
12
Securing Microservices with Bearer Tokens
Security is one of the most important and tedious aspects of any application. We need to ensure that our application is built using secure code and always pursue the most effective ways to reduce intrusions and loopholes in our systems. Despite this, however, security also comes at the cost of usability, and we should always seek to find a balance between the two.
Basic application security begins with a login system. We should be able to allow a user to register themselves in a system and store some identifying information accordingly. When the user returns and wishes to access certain parts of the application, we will query the database and verify the identity of the user through their identifying information and decide to grant or restrict access accordingly.
In modern applications, we find it increasingly difficult to maintain a data store as an authority on all our users, while accounting for all the possible channels through which they may access our application. We have been exploring using microservices architecture, which takes our security considerations to a new level, where we now have multiple parts of an application that we need to secure for different users who are accessing from several devices.
In this chapter, we will explore the major considerations to be made in securing our microservices application and the best configurations and technologies to use.
After reading this chapter, we will have done the following:
- Understand bearer token security
- Learn how to implement bearer token security in an ASP.NET Core API
- Learn how to use an identity provider to secure our microservices
Technical requirements
The code references used in this chapter can be found in the project repository that is hosted on GitHub here: https://github.com/PacktPublishing/Microservices-Design-Patterns-in-.NET/tree/master/Ch12.
Bearer tokens for securing communications
Bearer tokens are a fairly recent solution to a number of security, authentication, and authorization challenges that we have faced when developing modern applications. We have gone from working with standard desktop and web applications to catering to various internet-capable devices that have similar security needs. Before we start exploring what these modern security needs are, let us review some of the challenges that we have faced with web applications over the years.
When securing web applications, we face several challenges:
- We need a way to collect user information.
- We need a way to store user information.
- We need a way to validate user information. This is called authentication.
- We need a way to track the user’s authenticated state in between requests.
- We need a way to track what the user is allowed to do in our system. This is called authorization.
- We need to cater to various channels or device types through which a user might access the web application.
In a typical web application, most of these factors can be implemented through form authentication, where we ask for uniquely identifying information and check our database for a match.
When a match is found, we instantiate a temporary storage mechanism that will identify the user as authenticated in our system. This temporary storage construct can come in the form of the following:
- Sessions: A way to store information in a variable that can be used across a website. Unlike typical variables that lose their value with each request, a session retains its value for a certain period until it either expires or is destroyed. Session variables are typically stored on the server, and one or many session variables are created each time a user authenticates successfully. Session variables can store information such as a username, role, and so on. With too many users logging in simultaneously, using session variables can lead to memory issues on a less powerful server.
- Cookies: An alternative to sessions, where a small file is created and stored on the user’s device. It serves a similar purpose for storing information between requests, as well as tracking a user’s authenticated state. Each time a request is sent from the user’s device, this cookie is sent, and the server web application uses this information to be informed of whether actions can be taken and if so, which ones. Cookies are sometimes preferred to sessions given that they reduce the load on the server and place more responsibility on the user’s device.
Both options work fantastically when we are sure that we will be dealing with a web application that maintains a state. A state means that we retain user information in between requests and remember who is logged in and their basic information for the period that they are using the website – but what happens when you need to authenticate against APIs? An API, by nature, does not maintain a state. It does not attempt to retain the knowledge of the users accessing it since APIs are designed for sporadic access from any channel at any point. For this reason, we implement bearer tokens.
A bearer token is an encoded string that contains information about a user who is attempting to communicate with our API. It helps us facilitate stateless communication and facilitate general user authentication and authorization scenarios.
Understanding bearer tokens
A bearer token or JSON Web Token (JWT) is a construct that is widely used in authentication and authorization scenarios for stateless APIs. Bearer tokens are based on an open industry standard of authentication that has made it easy for us to share authenticated user information between a server and a client. When an API is accessed, a temporary state is created for the duration of the request-response cycle. This means that when the request is received, we can determine the originating source of the request and can decode additional header information as needed. Once a response is returned, we no longer have a record of the request, where it came from, or who made it.
Bearer tokens are issued after a successful authentication request. We receive a request to our authentication API endpoint and use the information to check our databases, as previously described. Once a user is verified, we compile several data points, such as the following:
- Subject: Usually a unique identifier for the user, such as the user ID from the originating database.
- Issuer: Usually a name that is associated with the service that has generated the token for issuance.
- Audience: Usually a name that is associated with the client application that will be consuming the token.
- Username: The user’s unique system name, usually used for login.
- Email address: The user’s email address.
- Role: The user’s system role that determines what they are authorized to do.
- Claims: Various bits of information about the user that can be used to aid in authorization or information display in the client application. This can include the user’s name, gender, and even the path to their profile picture.
- Expiry Date: Tokens should always have a moderate expiry date relative to their generation. When this expires, the user will need to reauthenticate, so we don’t want it to only be valid for a short period, but it should also not last forever.
Ultimately, a login flow between a client application and an API is as follows:
- A user will use a client application to log in
- The client application forwards the information collected from the login form to the login API endpoint for verification
- The API returns an encoded string, or token, that contains the most relevant bits of information about the user
- The client application stores this encoded string and uses it for subsequent API communications
Based on this kind of flow, the client application will use information from the token to display information about the user on the UI, such as the username or other information that may have been included such as the first name and last name. While there are recommended bits of information that you should include in a token, there is no set standard on what should be included. We do, however, avoid including sensitive information, such as a password.
Bearer tokens are encoded but not encrypted. This means that they are self-contained blocks of information that contain all the information that we have mentioned earlier but are not human-readable at first sight. The encoding compresses the strings, usually as a base64 representation, and this is the format used for transportation between the client and the server, as well as for storage. Token strings are not meant to be secure since it is easy to decode the string and see the information therein, and once again, that is why we do not include sensitive and incriminating data in the token. This token string comprises three sections. Each section is separated by a full stop (.) and the general format is aaaa.bbbb.cccc. Each section represents the following:
- Header: The a section of the token, which contains information about the type of token and the signing algorithm that was used for the encoding, such as HMAC SHA-256 and RSA.
- Payload: The b section of the token string, which contains user information in the form of claims. We will discuss claims in a bit more detail later in this chapter.
- Signature: The c section of the token, which contains a string representation of the encoded header, the encoded payload, and the secret key that was used for the encoding. This signature is used to verify that the token has not been tampered with since its generation.
Most development frameworks include tools and libraries that can decrypt bearer tokens during the runtime of the application. Since bearer tokens are based on an open standard, support for decoding tokens is widely available. This allows us to write generic and consistent code to handle tokens being issued by an API. Each API implementation can include different tokens relative to the exact needs of the application, but there are certain standards that we can always count on.
During development, however, we might want to test a token to see the contents that we can expect to be present in a more human-readable form. For this reason, we turn to third-party tools that decode and show us the contents of a token and allow us to reference different bits of information as needed.
Tools such as jwt.io provide us with the ability to simply paste in a token and view the information in a more human-readable format. As stated, there are three sections in each token string and we can view each of the sections in plaintext using this website or a similar tool. The payload section of the token, when decoded, will yield the information displayed in Figure 12.1. It shows a sample bearer token and its contents on www.jwt.io.
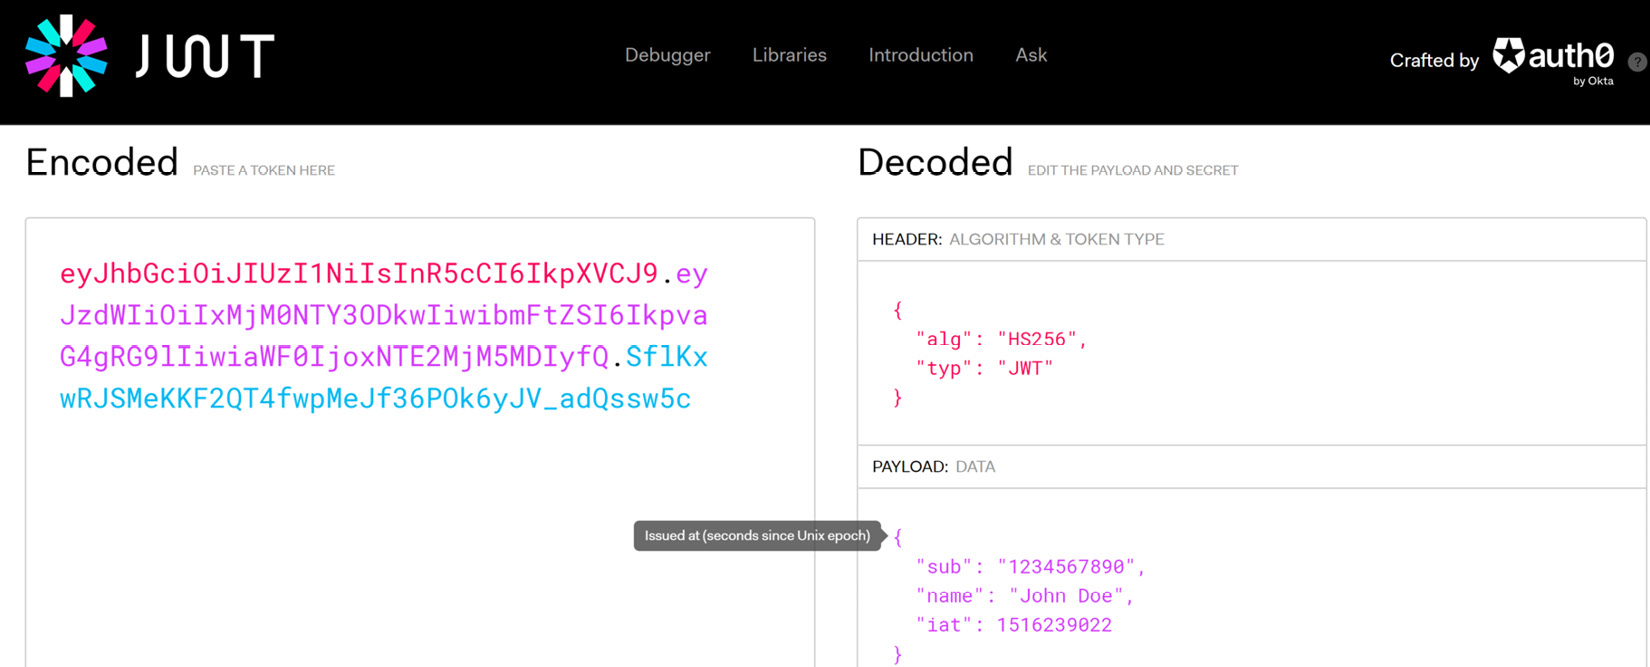
Figure 12.1 – We see the encoded string and the plaintext translation of its contents to the right
All the information that is placed into a bearer token represents a key-value pair. Each key-value pair represents a unit of information about the user or the token itself, and the keys are really short names for the previously mentioned claims that are usually present in a token:
- iss: Represents the issuer value.
- sub: Represents the subject value.
- aud: Represents the audience value.
- nonce: Represents a unique value that should always change with each token to prevent replay attacks. This value is always new, and this ensures that no two tokens that are issued to the same user are the same. This can sometimes be called a jti claim.
- exp: Represents the expiration date of the token. The value is in the form of a UNIX epoch, which is a numerical representation of a moment in time.
- iat: Represents the date and time of issuance.
Now that we have explored why we need bearer tokens and how they are used, let us review how we can implement token security in our ASP.NET Core API application.
Implementing bearer token security
ASP.NET Core offers native authentication and authorization support through its Identity Core library. This library has direct integration with Entity Framework and allows us to create standard user management tables in the target database. We can also further specify the authentication methods that we prefer and define policies that define authorization rules throughout that application.
This robust library has built-in support for the following:
- User registration: The user manager library has functions that make user creation and management easy. It has functions that cover most of the common user management operations.
- Login, session, and cookie management: The sign-in manager library has functions that can manage user authentication and session management scenarios.
- Two-factor authentication: Identity Core allows us to implement multi-factor authentication natively with email or SMS. This can be easily extended.
- Third-party identity providers: Social logins are important for any modern web application and Identity Core makes it easy to integrate this feature into your application.
Securing an API using bearer tokens ensures that each API call is required to have a valid token in the header section of the request. An HTTP header allows for additional information to be provided with an HTTP request or response.
In our case of securing an API, we enforce that each request must have an authorization header that contains the bearer token. Our API will assess the incoming request headers, retrieve the token, and validate it against the predefined configurations. If the token doesn’t meet the standards or is expired, an HTTP 401 Unauthorized response will be returned. If the token meets the requirements, then the request will be fulfilled. This built-in mechanism makes it easy and maintainable to support wide-scale and robust authentication and authorization rules in our application.
Now that we have an idea of the Identity Core library and how it is natively supported in ASP.NET Core applications, we can explore the necessary package and configurations needed to secure an API using bearer tokens.
Securing API with bearer tokens
We can begin by installing the following packages using the NuGet package manager:
Install-Package Microsoft.AspNetCore.Authentication
  .JwtBearer
The first package supports direct integration between Entity Framework and Identity Core. The second package contains extended methods that allow us to implement token generation and validation rules in our API configuration.
Next, we need to define constant values that will inform the token generation and validation activities in the API. We can place these constants in appsettings.json and they will look as follows:
  "Jwt": {
    "Issuer": "HealthCare.Appointments.API",
    "Audience": " HealthCare.Appointments.Client",
    "DurationInHours": 8
    "Key": "ASecretEncodedStringHere-Minimum16Charatcters"
  }
We have already discussed what the issuer and audience values help to enforce. We can also state a value for the proposed lifetime of the token that is generated. This value should always be relative to the API’s capabilities and operations, as well as your risk tolerance. The longer a token remains valid, the longer we provide a potential attacker with a window into our system. At the same time, if the period is too short, then the client will need to reauthenticate too often. We should always seek to strike a balance.
Our key value here is demonstrative in its value, but we use this signing key as an encryption key when generating the token. The key should always be kept secret, so we may use application secrets or a more secure key store to store this value.
Now that we have the application constants, we can proceed to specify the global authentication settings in our Program.cs file:
builder.Services.AddAuthentication(options =>
{
    options.DefaultAuthenticateScheme =
        JwtBearerDefaults.AuthenticationScheme;
    options.DefaultChallengeScheme =
        JwtBearerDefaults.AuthenticationScheme;
}).AddJwtBearer(o =>
{
    o.TokenValidationParameters = new
        TokenValidationParameters
    {
        ValidateIssuer = true,
        ValidateAudience = true,
        ValidateLifetime = true,
        ValidateIssuerSigningKey = true,
        ValidIssuer = builder.Configuration["Jwt:Issuer"],
        ValidAudience = builder.Configuration
            ["Jwt:Audience"],
        IssuerSigningKey = new SymmetricSecurityKey
        (Encoding.UTF8.GetBytes(builder.Configuration["Jwt:
            Key"]))
    };
});
Here, we are adding configurations to the application that will declare to the API application that it should enforce a particular type of authentication scheme. Given that Identity Core has support for several authentication schemes, we need to specify the ones that we intend to enforce and by extension, the type of challenge scheme that we require. The challenge scheme refers to the authentication requirements that the application will need. Here, we specify JwtBearerDefaults.AuthenticationScheme for both the challenge and authentication schemes. This JwtBearerDefaults class contains generally available and used JWT constants. In this case, AuthenticationScheme will render the value bearer, which is a keyword.
After we are done defining the authentication scheme, we go on to set configurations that will enforce certain rules that will govern how a bearer token is validated. By using true for ValidateIssuer, ValidateAdience, and ValidateLifetime, we are enforcing that the matching values in an incoming token must match the values that we set in the appsettings.json configuration constants. You can be flexible with the validation rules based on how strictly you want to check the bearer token contents against your system. The fewer validations in place, the higher the chances of someone using fake tokens to gain access to the system.
We will also need to ensure that our API knows that we intend to support authorization, so we need to add this line as well:
builder.Services.AddAuthorization();
Then, we also need to include our middleware with the following two lines, in this order:
app.UseAuthentication();
app.UseAuthorization();
Now that we have taken care of the preliminary configurations, we need to include our default identity user tables in our database. We first change the inheritance of our database context from DbContext to IdentityDbContext:
public class AppointmentsDbContext : IdentityDbContext
We will also add code to generate a sample user in the database context. When we perform the next migration, then this user will be added to the table and we can use it to test authentication:
protected override void OnModelCreating(ModelBuilder
    builder)
        {
            base.OnModelCreating(builder);
            var hasher = new PasswordHasher<ApiUser>();
            builder.Entity<ApiUser>().HasData(new ApiUser
            {
                Id = "408aa945-3d84-4421-8342-
                    7269ec64d949",
                Email = "[email protected]",
                NormalizedEmail = "[email protected]",
                NormalizedUserName = "[email protected]",
                UserName = "[email protected]",
                PasswordHash = hasher.HashPassword(null,
                    "P@ssword1"),
                EmailConfirmed = true
            });
        }
After these changes, the next migration that we perform will generate user tables that will be created when the update-database command is executed. These new tables will, by default, be prefixed with AspNet.
We also need to register the Identity Core services in our application and connect it to the database context as follows:
builder.Services.AddIdentityCore<IdentityUser>()
    .AddRoles<IdentityRole>()
    .AddEntityFrameworkStores<AppointmentsDbContext>();
Here, we register our identity-related services in our applications, specify that we are using the default user type called IdentityUser, the default role type called IdentityRole, and the data store associated with AppointmentsDbContext.
Now that we have specified what is required for the integration of Identity Core and JWT authentication, we can look to implement a login endpoint that will verify the user’s credentials and generate a token with the minimum identifying information accordingly. We will investigate this in the next section.
Generating and issuing bearer tokens
ASP.NET Core has support for generating, issuing, and validating bearer tokens. To do this, we need to implement logic in our authentication flow that will generate a token with the authenticated user’s information, and then return it to the requesting client in the body of the response. Let us first define a data transfer object (DTO), that will store the user’s Id value and the token and wrap them both in their own AuthResponseDto:
public class AuthResponseDto
{
   public string UserId { get; set; }
   public string Token { get; set; }
}
We will also have a DTO that will accept login information. We can call this LoginDto:
public class LoginDto
    {
        [Required]
        [EmailAddress]
        public string Email { get; set; }
        [Required]
        [StringLength(15, ErrorMessage = "Your Password is
            limited to {2} to {1} characters",
                MinimumLength = 6)]
        public string Password { get; set; }
    }
Our DTO will enforce validation rules on the data being submitted. Here, our users can authenticate using their email address and a password, and invalid attempts that violate the validation rules will be rejected with a 400BadRequest HTTP code.
Our authentication controller will implement a login action that will accept this DTO as a parameter:
[Route("api/[controller]")]
[ApiController]
public class AccountController : ControllerBase
{
    private readonly IAuthManager _authManager;
    public AccountController(IAuthManager authManager)
    {
        _authManager = authManager;
    }
    // Other Actions here
    [HttpPost]
    [Route("login")]
    public async Task<IActionResult> Login([FromBody]
        LoginDTO loginDto)
    {
        var authResponse = _authManager.Login(loginDto);
        if (authResponse == null)
        {
            return Unauthorized();
        }
        return Ok(authResponse);
    }
}
We inject an IAuthmanager service into the controller, where we have abstracted the bulk of the user validation and token generation logic. This service contract is as follows:
public interface IAuthManager
{
   // Other methods
   Task<AuthResponseDto> Login(LoginDto loginDto);
}
In the implementation of AuthManager, we use the UserManager service, which is provided by Identity Core, to verify the username and password combination that is submitted. Upon verification, we will generate and return an AuthResponseDto object containing the token and user’s ID. Our implementations will look like the following code block:
public class AuthManager : IAuthManager
{
    private readonly UserManager<IdentityUser>
        _userManager;
    private readonly IConfiguration _configuration;
    private IdentityUser _user;
    public AuthManager(UserManager<IdentityUser>
        userManager, IConfiguration configuration)
    {
        this._userManager = userManager;
        this._configuration = configuration;
    }
    // Other Methods
    public async Task<AuthResponseDto> Login(LoginDto
        loginDto)
    {
        var user = await _userManager.FindByEmailAsync
            (loginDto.Email);
        var isValidUser = await _userManager
            .CheckPasswordAsync(_user, loginDto.Password);
        if(user == null || isValidUser == false)
        {
            return null;
        }
        var token = await GenerateToken();
        return new AuthResponseDto
        {
            Token = token,
            UserId = _user.Id
        };
    }
We inject both UserManager and IConfiguration into our AuthManager. In our login method, we attempt to retrieve the user based on the email address that was provided in LoginDto. If we then attempt to validate that the correct password was provided. If there is no user, or the password was incorrect, we return a null value, which the login action will use to indicate that no user was found and will return a 401 Unauthorized HTTP response.
If we can validate the user, then we generate a token and then return our AuthResponseDto object with the token and the user’s Id value. The method to generate the token is also in AuthManager and it looks like this:
private async Task<string> GenerateToken()
{
        var securitykey = new SymmetricSecurityKey
            (Encoding.UTF8.GetBytes(_configuration["
               Jwt:Key"]));
        var credentials = new SigningCredentials
            (securitykey, SecurityAlgorithms.HmacSha256);
        var roles = await _userManager.GetRolesAsync
            (_user);
        var roleClaims = roles.Select(x => new
            Claim(ClaimTypes.Role, x)).ToList();
        var userClaims = await _userManager.GetClaimsAsync
           (_user);
        var claims = new List<Claim>
        {
            new Claim(JwtRegisteredClaimNames.Sub,
                _user.Email),
            new Claim(JwtRegisteredClaimNames.Jti,
                Guid.NewGuid().ToString()),
            new Claim(JwtRegisteredClaimNames.Email,
                _user.Email),
            new Claim("uid", _user.Id),
        }
        .Union(userClaims).Union(roleClaims);
        var token = new JwtSecurityToken(
            issuer: _configuration[" Jwt:Issuer"],
            audience: _configuration[" Jwt:Audience"],
            claims: claims,
            expires: DateTime.Now.AddMinutes
                (Convert.ToInt32(_configuration["
                    Jwt:DurationInMinutes"])),
            signingCredentials: credentials
            );
        return new JwtSecurityTokenHandler()
            .WriteToken(token);
    }
}
In this method, we start by retrieving our security key from appsettings.json through the IConfiguration service. We then encode and encrypt this key. We also compile the standard claims that should generally be included in a token, and we can include other claim values, whether from the user’s claims in the database or custom claims that we deem necessary.
We finally compile all the claims and other key values such as these:
- SigningCredentials with the value of the encrypted key
- Issuer and Audience as defined in appsettings.json
- The jti claim, which is a unique identifier, or nonce for the token.
- The expiration date and time of the token, relative to the time limit from the configuration
The result is a string full of encoded characters that is returned to our Login method, and this is then returned to the controller with AuthResponseDto.
In order for our AuthManager to be useable in our controller, we need to register the interface and implementation in our Program.cs file using this line:
builder.Services.AddScoped<IAuthManager, AuthManager>();
With these configurations in place, we can protect our controllers and actions with a simple [Authorize] attribute. This attribute will be placed directly above the implementation of our class or the action method. Our API will automatically assess each incoming request for an authorization header value and automatically reject requests that have no token or violate the rules that were stipulated in TokenValidationParameters.
Now, when we use a tool such as Swagger UI or Postman, to test our login endpoint using the test user that we seeded, we will receive a token response that looks like this:
{
  "userId": "408aa945-3d84-4421-8342-7269ec64d949",
  "token": "eyJhbGciOiJIUzI1NiIsInR5cCI6IkpXVCJ9.eyJz
  dWIiOiJhZG1pbkBsb2NhbGhvc3QuY29tIiwianRpIjoiZWU5ZjI4OD
  ItMWFkZC00ZTZkLThlZjktY2Q1ZjFlOWM3ZjMzIiwiZW1haWwiOiJhZ
  G1pbkBsb2NhbGhvc3QuY29tIiwidWlkIjoiNDA4YWE5NDUtM2Q4NC00
  NDIxLTgzNDItNzI2OWVjNjRkOTQ5IiwiZXhwIjoxNjY5ODI4MzMwLCJ
  pc3MiOiJIb3RlbExpc3RpbmdBUEkiLCJhdWQiOiJIb3RlbExpc3Rpbm
  dBUElDbGllbnQifQ.yuYUIFKPTyKKUpsVQhbS4NinGLSF5_XXPEBtAEf
  jO5E"
}
Implementing token authentication in an API is easy enough, but we are not only accounting for one API in our application. We have several APIs that need to be secured and preferably, one token should be accepted across all the services. If we continue down this path, we may end up making these configurations per service and then needing extra code to have all the other services acknowledge a token that might be issued by any other service.
We need a more global solution and more suitably, a central authority of security and token generation and management for all the services in our microservices application. This is where we begin to explore separating the token management responsibilities from each API and placing them in one that implements IdentityServer, which is OpenID Connect and the OAuth 2.0 framework for ASP.NET Core. We will investigate implementing IdentityServer in the next section.
Using IdentityServer4 to secure microservices
A key feature in any modern application or suite of applications is the concept of single-sign-on (SSO). This feature allows us to provide our credentials once and retain an authenticated user state across several applications within the suite. This is a feature that can be observed in Google or Microsoft Online products, to name a few.
This concept will come in handy when securing a microservices application. As we can see, it is not feasible to implement token-issuing logic in many APIs across an application and then attempt to coordinate access to all the APIs when it was granted to one. We also run the risk of requiring a user to reauthenticate each time they attempt to access a feature that requires another API to complete, and this will not make for a good user experience.
With these considerations in mind, we need to use a central authority that can allow us to implement more global token issuing and validation rules given all the security considerations of our services. In ASP.NET Core, the best candidate for such services is IdentityServer.
IdentityServer is an open source framework built on top of ASP.NET Core that extends the capabilities of Identity Core and allows developers to support OpenID Connect and OAuth2.0 standards in their web application security implementation. It is compliant with industry standards and contains out-of-the-box support for token-based authentication, SSO, and API access control in your applications. While it is a commercial product, a community edition is available for use by small organizations or personal projects.
The recommended implementation style of IdentityServer would have us do the following:
- Create a new microservice for authentication
- Create a new database just for our authentication-related tables (optional)
- Configure scopes to be included in the token information
- Configure our services to know which scopes are allowed to access them
Figure 12.2 shows the IdentityServer authentication flow:
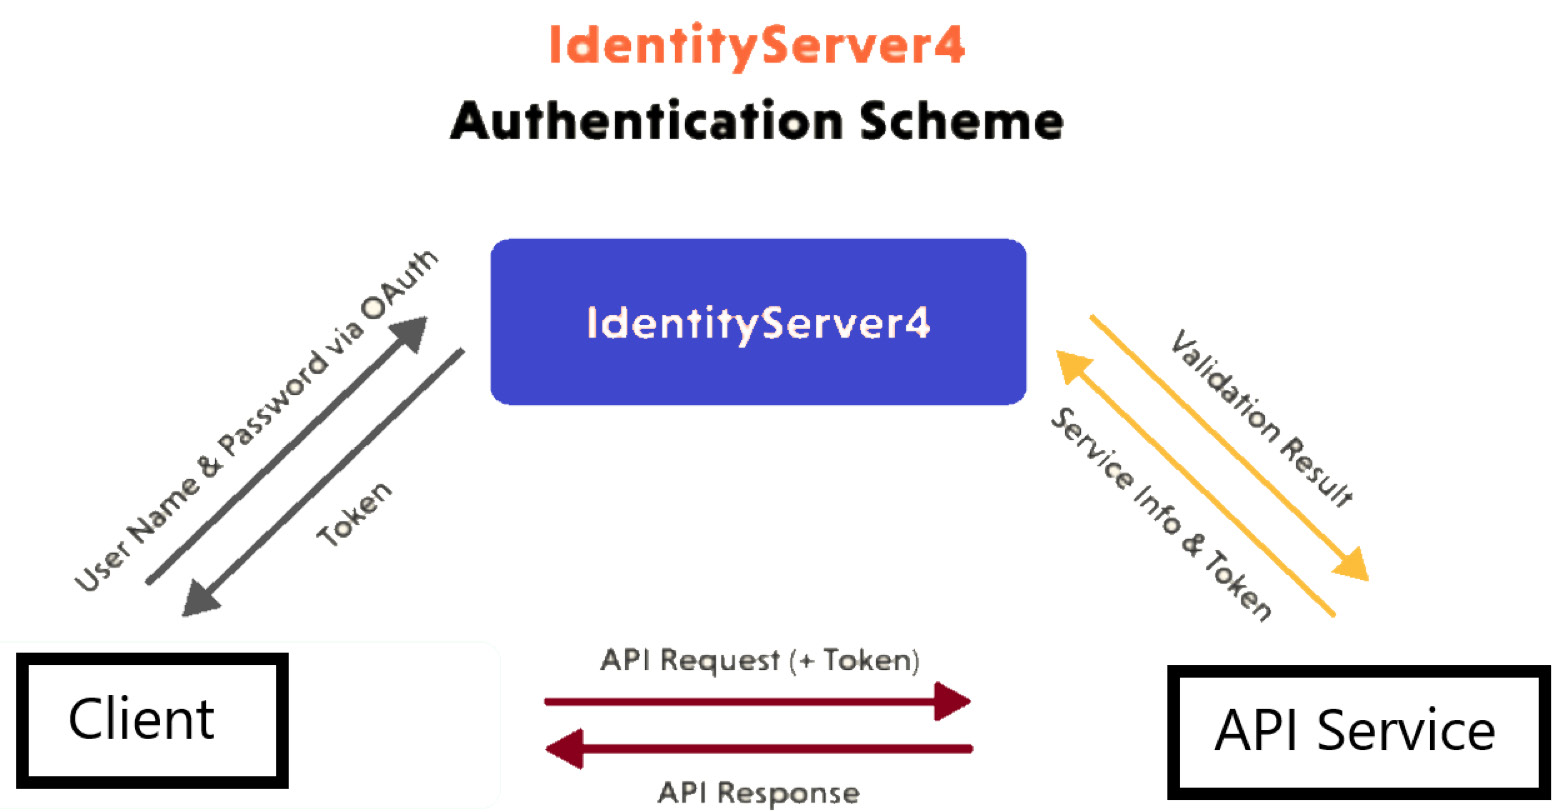
Figure 12.2 – This depicts how IdentityServer sits between a client and service and handles the flow of authentication and token exchange
Now, let us explore creating a new service and configuring it to be our central authority for authentication and authorization in our microservices application.
Configuring IdentityServer
Duende offers us some quick-start ASP.NET Core project templates that are easy to create in our solution. These quick-start templates bootstrap the minimum requirements needed to bootstrap IdentityServer functionality in an ASP.NET Core project. The general steps involved in setting up an IdentityServer service are as follows:
- Add Duende IdentityServer support to a standard ASP.ENT Core project
- Add data storage support, preferably using Entity Framework configurations
- Add support for ASP.NET Identity Core
- Configure token issuing for client applications
- Secure client applications with IdentityServer
To get started, we need to use the .NET CLI and run the following command:
dotnet new --install Duende.IdentityServer.Templates
That command will now give us access to new project templates prefixed with Duende.IdentityServer. Figure 12.3 depicts what we can expect to see in Visual Studio once these templates are installed.
Figure 12.3 shows the Duende IdentityServer project templates:
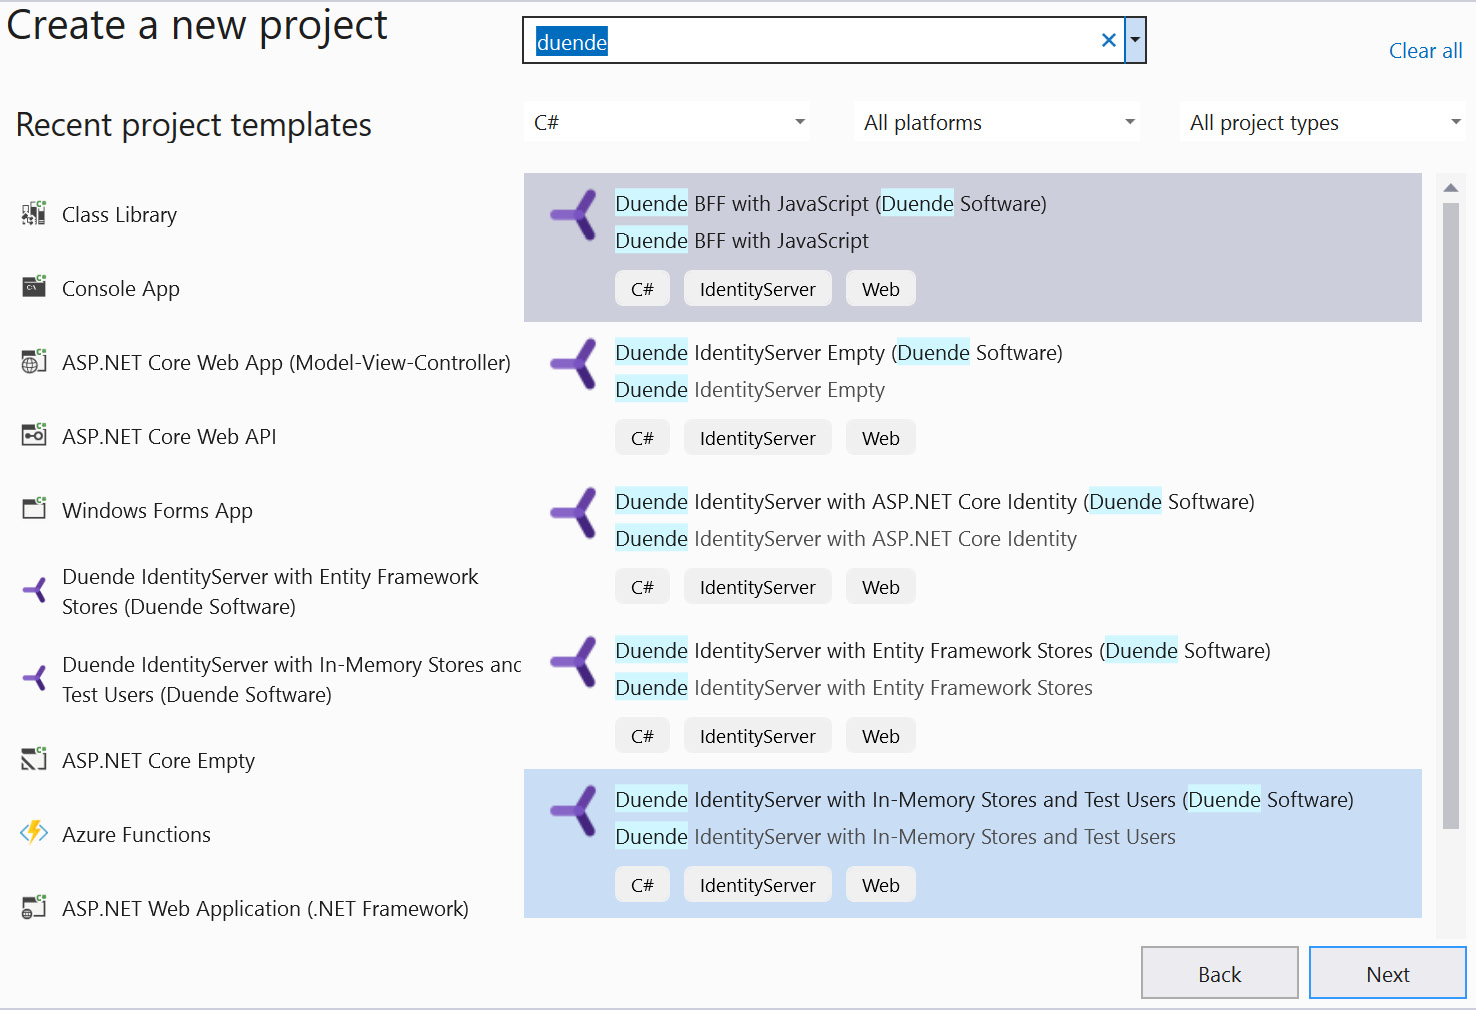
Figure 12.3 – We get a variety of project templates that help us to speed up the IdentityServer implementation process
Using our healthcare microservices application, let us start by adding a new Duende IdentityServer with Entity Framework Stores project to handle our authentication. We will call it HealthCare.Auth. Now, we have a preconfigured IdentityServer project with several moving parts. We need to understand what the major components are and have an appreciation of how we can manipulate them for our needs. Let us conduct a high-level review of the file and folder structure that we get out of the box:
- Wwwroot: A standard folder that is shipped with ASP.NET Core web application templates. It stores static assets such as JavaScript and CSS files that are used in the website.
- Migrations: Stores preset migrations that will be used to populate the data store with supporting tables. This is handy, as it removes the need for us to create the databases.
- Pages: Stores default Razor pages that are used to support the UI requirements of user authentication operations. Out of the box, we get login, register, grant, and user data management pages.
- appsettings.json: The standard file that contains logging and database connection configurations. We can change this connection string to reflect our requirements better.
- buildschema.bat: Contains Entity Framework commands using .NET command-line commands (dotnet ef) that will run migration scripts that have been included in the Migrations folder. We will use these commands to create our databases.
- Config.cs: This static class serves as a configuration authority. It is used to outline IdentityResources, Scopes, and Clients:
- IdentityResources: Map to scopes that grant access to identity-related information. The OpenId method supports the expected subject (or sub-claim) value and the Profile method supports additional claim information such as given_name and family_name. We can also extend the default offerings and include additional details such as the user’s roles.
- Scopes: Can be used to outline permissions that can be included in the token when it is issued.
- Clients: Third-party clients that we expect to use IdentityServer as a token-issuing authority.
- HostingExtension.cs: Contains service and middleware registration extension methods. These methods are then called in the Program.cs file during startup.
- Program.cs: Primary program execution file in an ASP.NET Core application.
- SeedData.cs: Contains default methods that will ensure that data migrations and seeding operations are carried out at application startup.
IdentityServer uses two database contexts, a configuration store context and an operational store context. As a result, two database contexts are created in the HostingExtension.cs file. The IdentityServer libraries are registered using the following code:
var isBuilder = builder.Services
                .AddIdentityServer(options =>
                {
                    options.Events.RaiseErrorEvents = true;
                    options.Events.RaiseInformationEvents =
                        true;
                    options.Events.RaiseFailureEvents =
                        true;
                    options.Events.RaiseSuccessEvents =
                        true;
                     options.EmitStaticAudienceClaim =
                        true;
                })
                .AddTestUsers(TestUsers.Users)
                .AddConfigurationStore(options =>
                {
                    options.ConfigureDbContext = b =>
                        b.UseSqlite(connectionString,
                        dbOpts => dbOpts.MigrationsAssembly
                        (typeof(Program).Assembly
                         .FullName));
                })       .AddOperationalStore(options =>
                {
                    options.ConfigureDbContext = b =>
                        b.UseSqlite(connectionString,
                        dbOpts => dbOpts.MigrationsAssembly
                        (typeof(Program).Assembly.FullName
                        ));
                     options.EnableTokenCleanup = true;
                    options.RemoveConsumedTokens = true;
                });
We are adding TestUsers to the configuration and then adding ConfigurationStoreDbContext and OperationalStoreDbContext. Other settings also govern how alerts and tokens are handled. The defaults are generally solid, but you may modify them based on your specific needs.
The default connection string and Entity Framework Core libraries give us support for an SQLite database. This can be changed to whatever the desired data store may be, but we will continue with SQLite for the purpose of this exercise. Let us proceed to generate the database and the tables, and we need the following commands:
Update-Database -context PersistedGrantDbContext
Update-Database -context ConfigurationDbContext
With these two commands, we will see our database scaffolded with all the supporting tables. At this point, they are all empty and we may want to populate them with some default values based on our application. Let us start by configuring the IdentityResources that we intend to support in our tokens. We can modify the IdentityResources method as follows:
public static IEnumerable<IdentityResource>
    IdentityResources =>
            new IdentityResource[]
            {
            new IdentityResources.OpenId(),
            new IdentityResources.Profile(),
            new IdentityResource("roles", "User role(s)",
                new List<string> { "role" })
            };
We have added the list of roles to the resources list. Based on the claims that are being accounted for, we need to ensure that our users will contain all their expected data, as well as the list of claims that they are expected to have. Bear in mind that claims are the information that a client application will have via the token since it is the only way a client can track which user is online and what they can do.
Now, we can refine the list of scopes that are supported by modifying the ApiScopes method as follows:
public static Ienumerable<ApiScope> ApiScopes =>
            new ApiScope[]
            {
                new ApiScope("healthcareApiUser",
                    "HealthCare API User"),
                new ApiScope("healthcareApiClient",
                    "HealthCare API Client "),
            };
Here, we are supporting two types of authentication scopes. These scopes will be used to support authentication for two different scenarios: client and user. Client authentication represents an unsupervised attempt to gain access to a resource, usually by another program or API. Client authentication means that a user will authenticate using credentials.
This brings us to the next configuration, which is for the clients. The term client is used a bit loosely since any entity that attempts to gain authorization from IdentityServer is seen as a client. The word client can also refer to a program that is attempting to gain authorization, such as a daemon or background service. Another scenario is when a user attempts to carry out an operation that requires them to authenticate against IdentityServer. We add support for our clients as follows:
public static IEnumerable<Client> Clients =>
            new Client[]
            {
            // m2m client credentials flow client
            new Client
            {
                ClientId = "m2m.client",
                ClientName = "Client Credentials Client",
                AllowedGrantTypes = GrantTypes
                    .ClientCredentials,
                ClientSecrets = { new Secret("511536EF-
                   F270-4058-80CA-1C89C192F69A ".Sha256())
                       },
                AllowedScopes = { "healthcareApiClient" }
            },
            // interactive client using code flow + pkce
            new Client
            {
                ClientId = "interactive",
                ClientSecrets = { new Secret("49C1A7E1-
                  0C79-4A89-A3D6-A37998FB86B0".Sha256()) },
                AllowedGrantTypes = GrantTypes.Code,
                RedirectUris = {
                    "https://localhost:5001/signin-oidc" },
                FrontChannelLogoutUri =
                    "https://localhost:5001/signout-oidc",
                PostLogoutRedirectUris = {
                   "https://localhost:5001/signout-
                      callback-oidc" },
                AllowOfflineAccess = true,
                AllowedScopes = { "openid", "profile",
                    "healthcareApiUser", "roles" }
            },
            };
Now, we have defined the ClientId and ClientSecret values for our clients. By defining several clients, we can support the applications that we expect to support at a more granular level, and we can define specific AllowedScopes and AllowedGrantTypes values. In this example, we have defined a client for an API, which can represent a microservice in our application that might need to authenticate with the authentication service. This type of authentication generally occurs without user interaction. We also define a web client, which could be a user-facing application. This presents the unique challenge where we configure sign-in and sign-out URLs to redirect our users during the authentication or logout flow. We also go on to state which scopes will be accessible via the generated token. We have added the roles value to the list of AllowedScopes since we want that information to be included when a user authenticates.
Now that we have our configuration values outlined, let us add a command-line argument for seeding to the launchSettings.json file in the Properties folder. The file’s contents will now look as follows:
"profiles": {
    "SelfHost": {
      "commandName": "Project",
      "launchBrowser": true,
      "environmentVariables": {
        "ASPNETCORE_ENVIRONMENT": "Development"
      },
      "applicationUrl": "https://localhost:5001",
      "commandLineArgs": "/seed"
    }
If we run this application after making this adjustment, the if (args.Contains("/seed")) statement will evaluate to true in Program.cs and this will trigger the database seeding activity as outlined in the SeedData.cs file. After the first run, you may remove the "commandLineArgs": "/seed" section from the launchSettings.json file. Running it again will launch a browser application with a page similar to what is depicted in Figure 12.4. This is the home landing page and shows that our IdentityServer is up and running.
Figure 12.4 shows the Duende IdentityServer landing page:
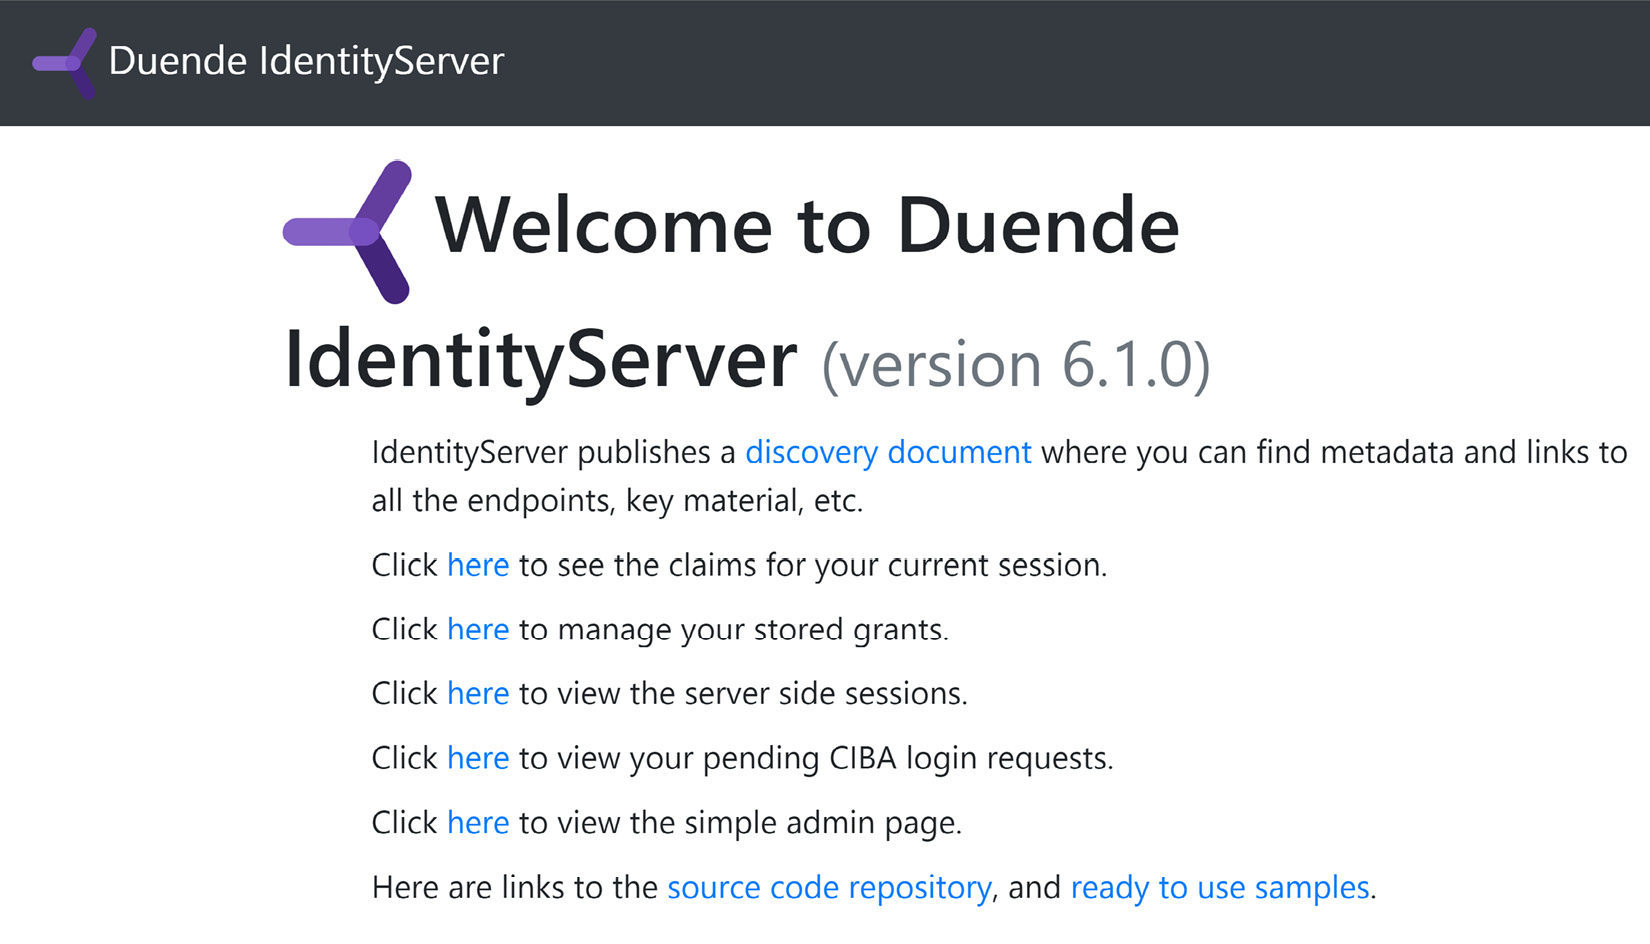
Figure 12.4 – This landing page shows us that our IdentityServer application is in a running state
You can find the TestUsers.cs file in the Pages folder. We will use alice as both the username and password for a quick test. You may proceed to use the credentials that have been provided in your instance of that file. We can then proceed to test a login operation using one of the test users that was added to the context by default, and we will be required to authenticate when attempting to access most of these links.
The most important link to discuss is the one that leads to the discovery document. Most OAuth2.0 and OpenID Connect service providers have a concept of a discovery document, which outlines the built-in routes in the API, supported claims and token types, and other key bits of information that make it easier for us to know and access these intricate bits of information from IdentityServer. Some of the key information available is as follows:
{
    "issuer": "https://localhost:5001",
    "jwks_uri": "
        https://localhost:5001/.well-known/openid-
        configuration/jwks",
    "authorization_endpoint": "
        https://localhost:5001/
        connect/authorize",
    "token_endpoint": "
        https://localhost:5001/connect/
        token",
    "userinfo_endpoint": "
        https://localhost:5001/connect/
        userinfo",
    "end_session_endpoint": "
        https://localhost:5001/connect
        /endsession",
    "check_session_iframe": "
        https://localhost:5001/connect
        /checksession",
    "revocation_endpoint": "
        https://localhost:5001/connect
       /revocation",
    "introspection_endpoint": "
        https://localhost:5001/
        connect/introspect",
    "device_authorization_endpoint": "
        https://localhost:5001/connect/deviceauthorization",
    "backchannel_authentication_endpoint":
        "https://localhost:5001/connect/ciba",
   ...
    "scopes_supported": [
        "openid",
        "profile",
        "roles",
        "healthcareApiUser",
        "healthcareApiClient",
        "offline_access"
    ],
...
}
We have a clear outline of the various endpoints that are now available to us for the different commonly access operations.
Next, we can test our HealthCare.Auth application and validate that we can retrieve a valid token. Let us attempt to retrieve a token using our machine client credentials. We will use an API testing tool called Postman to send the request. Figure 12.5 shows the user interface in Postman and the information that needs to be added accordingly.
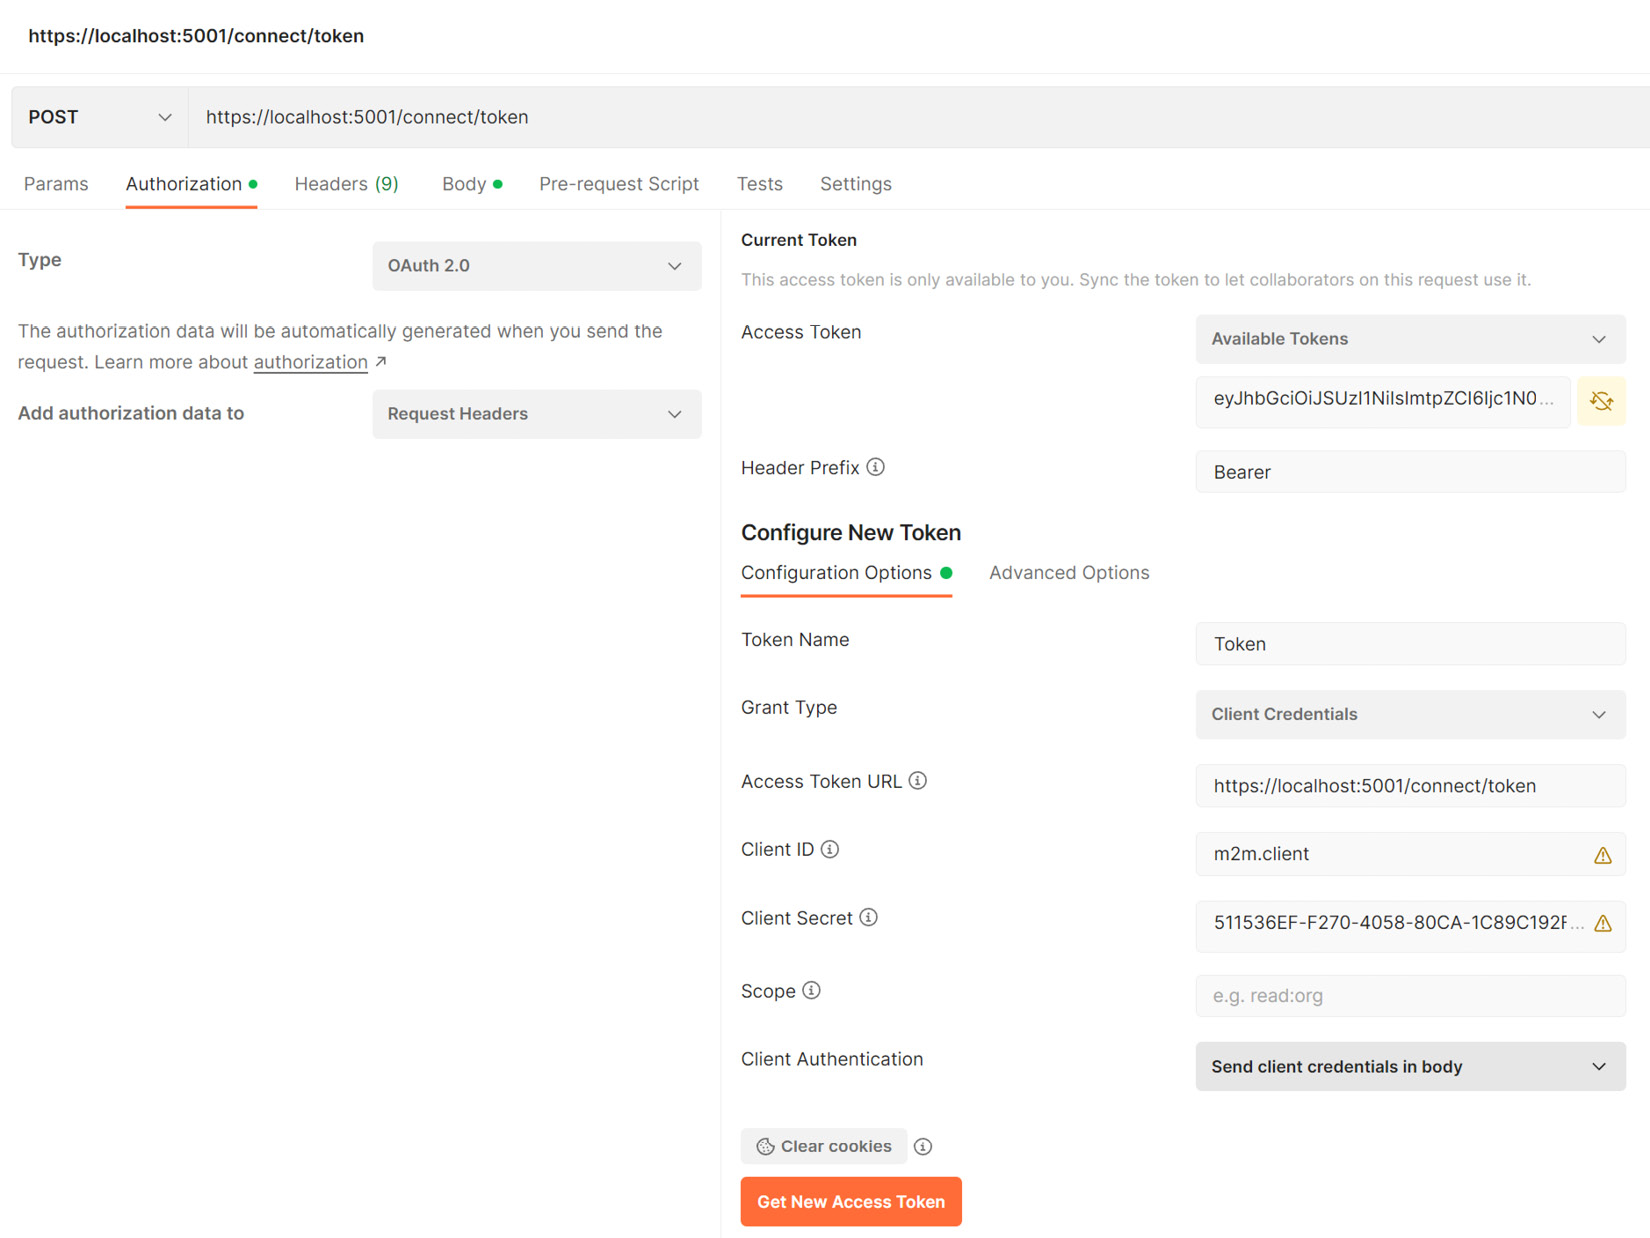
Figure 12.5 – Here, we add the client ID, client secret, and token URL values in Postman in order to retrieve a bearer token
Once we have added the required values, we proceed to click on the Get New Access Token button. This will send a request to our IdentityServer, which will validate the request and return a token if the information is found in the database.
Our token response automatically includes some additional information such as the type of token, the expiry timestamp, and the scope that is included. Our token is generated with several data points by default. Since IdentityServer follows the OAuth and OpenID Connect standards, we can be sure that we do not need to include basic claims such as sub, exp, jti, and iss, to name a few.
The values that get included are the scope and client ID. These are determined by the configurations that we have per client and the information that is presented by the authenticating user. In this example, we are accommodating APIs that only authenticated users should be able to access.
Figure 12.6 shows the payload of the token:
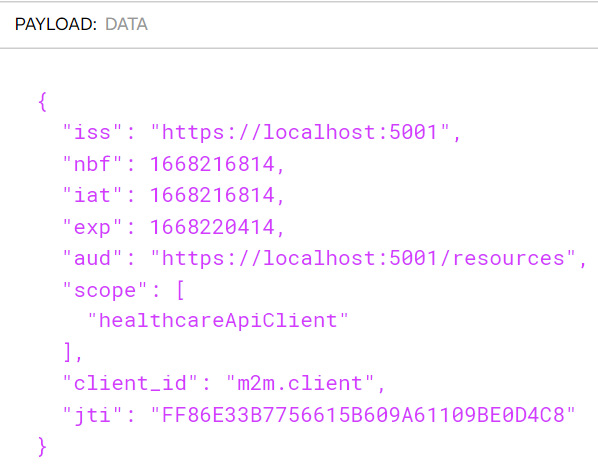
Figure 12.6 – Our token automatically contains some claims that we would have entered manually if it was generated without IdentityServer
Let us save our bearer token value that was returned, as we will use it in our next section. Now let us review the changes that are necessary to protect an API using IdentityServer.
Securing an API using IdentityServer
We now have the peculiar challenge of implementing the best possible security solution across our microservices application. We have several services that need to be secured and based on the architecture pattern you have implemented, you might also have a gateway that is routing traffic:
- Securing each service: Securing each service seems simple enough, but we must bear in mind that each service has different requirements and might need to be seen as a different client for each request. This can lead to a maintenance nightmare when trying to maintain all the scopes and clients, relative to each service. We then need to navigate how services will communicate as well since a token will be needed for service-to-service calls. One service’s claims and scopes might not be sufficient for this communication. This might lead to a user having to authenticate several times when accessing different features that rely on different services.
- Secured API gateway: Securing our API gateway makes the most sense. If we implement a gateway that all apps will communicate with, we allow the gateway to orchestrate the authentication flow for the client and then manage the token to be shared between service calls. This support can be implemented in a custom-written API gateway and is supported by most if not all third-party gateway service providers. This is especially useful when combined with the Backend For Frontend pattern.
We have already seen how we can add JWT bearer protection to our API using functionality from the Identity Core library. We can leverage some of these configurations and override the native functionality with support for IdentityServer. Let us explore how we can secure our Patients API using IdentityServer. We start by adding the Microsoft.AspNetCore.Authentication.JwtBearer library using the NuGet package manager:
Install-Package Microsoft.AspNetCore.Authentication
  .JwtBearer
We then modify the Program.cs file and add the following configuration:
builder.Services.AddAuthentication(JwtBearerDefaults
     .AuthenticationScheme)
            .AddJwtBearer(options =>
            {
                // base-address of your identityserver
                options.Authority =
                    "https://localhost:5001/";
                // audience is optional, make sure you read
                   the following paragraphs
                // to understand your options
                options.TokenValidationParameters
                    .ValidateAudience = false;
                // it's recommended to check the type
                header to avoid "JWT confusion" attacks
                options.TokenValidationParameters
                    .ValidTypes = new[] { "at+jwt" };
            });
We will also need to register the authentication middleware in our application with the following line. We should ensure that we place this registration above the authorization middleware:
app.UseAuthentication();
app.UseAuthorization();
This configuration will dictate to our service that we are now to refer them to the URL in the Authority option, for authentication instructions. We can now protect our API by implementing a global authorization policy. This will ensure that no endpoint can be accessed without a valid bearer token that has been issued by our IdentityServer:
builder.Services.AddAuthorization(options =>
{
    options.AddPolicy("RequireAuth", policy =>
    {
        policy.RequireAuthenticatedUser();
    });
});
We modify the controller’s middleware as follows:
app.MapControllers().RequireAuthorization("RequireAuth");Now, any attempt to interact with our Patients API endpoint will return a 401Unauthorized HTTP response. The API is now expecting us to provide the bearer token in the authorization header value. In Figure 12.7, we see how we can make authorized API calls to our Patients API endpoints using the bearer token that was retrieved in the previous section from our machine client credentials authentication.
Figure 12.7 shows the authorized API request:
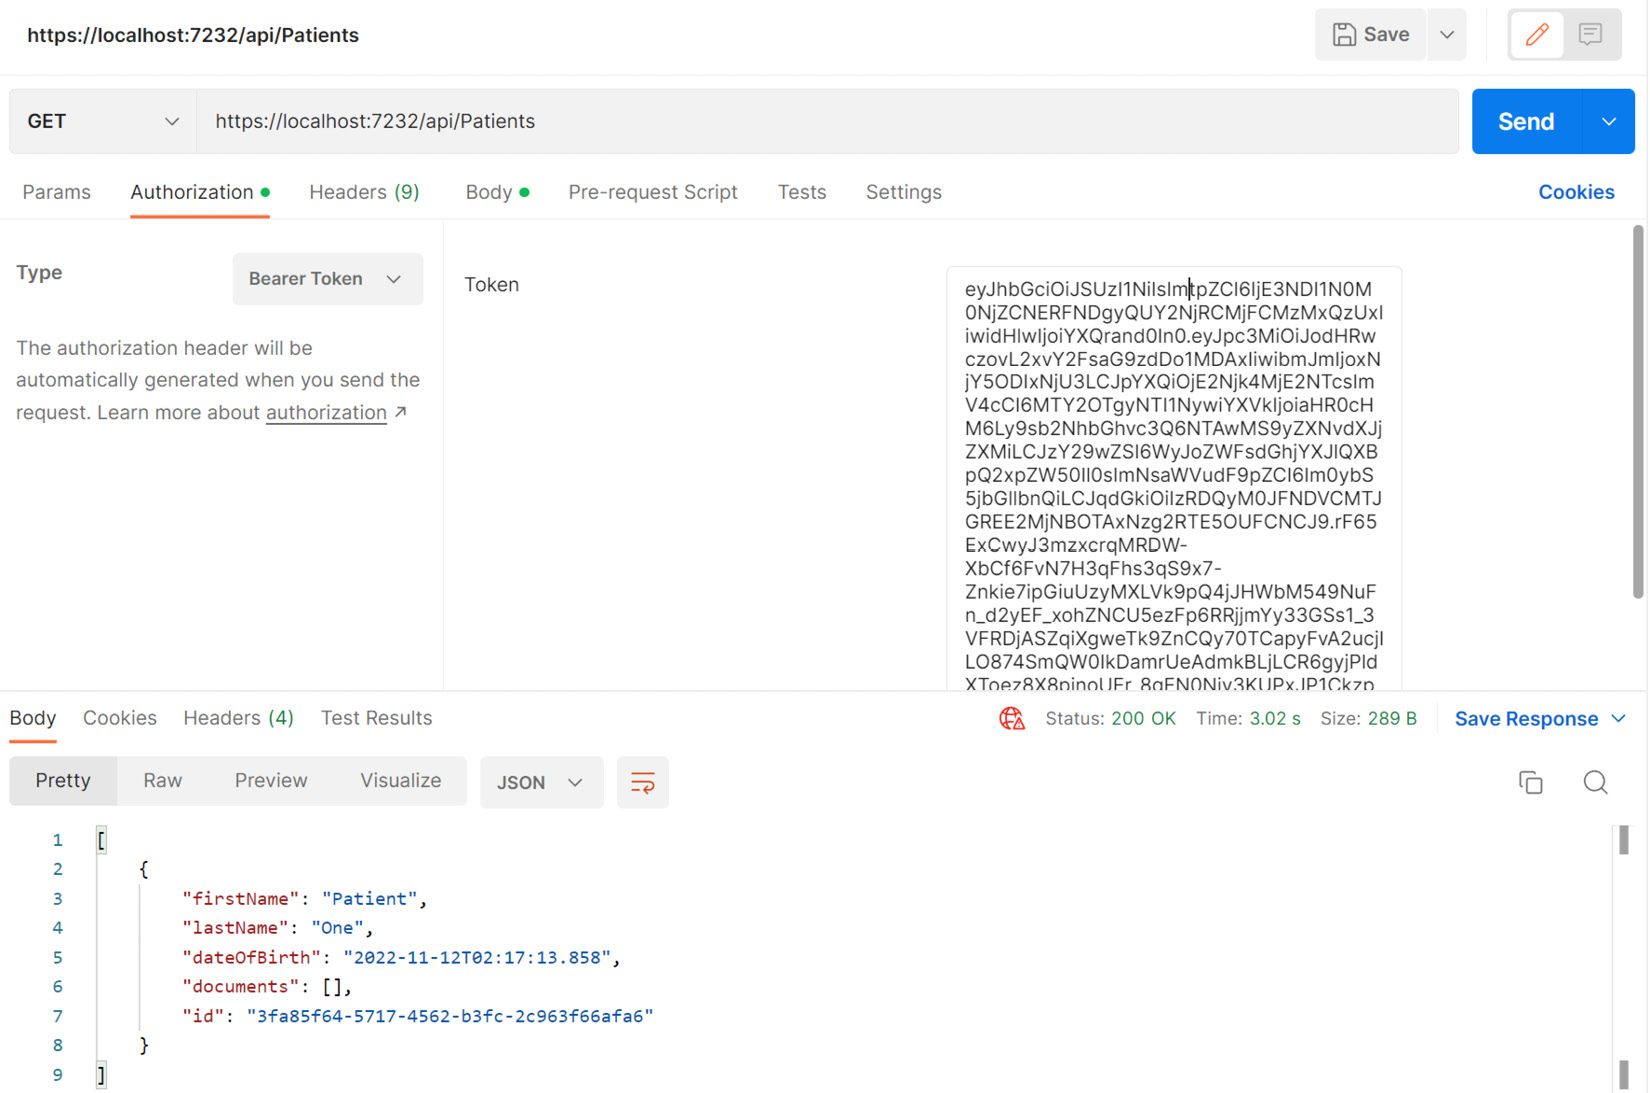
Figure 12.7 – Our bearer token is included in the request to our protected service and we can comfortably access endpoints
Now, we need to configure our API to force authentication and rely on the HealthCare.Auth service accordingly. If we reuse our appointments API, we can make a few modifications to the Program.cs file and introduce reliance on our authentication service.
We begin by modifying the builder.Services.AddAuthenctication() registration as follows:
builder.Services.AddAuthentication(JwtBearerDefaults
    .AuthenticationScheme)
   .AddJwtBearer("Bearer", opt =>
   {
       opt.RequireHttpsMetadata = false;
Now that we have secured our API directly, we can explore how we can manage this new security requirement in our API gateway. Recall that we have implemented aggregation methods and we will expect client applications to access the endpoints through the gateway.
Securing the Ocelot API gateway with IdentityServer
Now, when we access an API endpoint that is protected via IdentityServer, we need to retrofit our gateway service to support authentication and forwarding of the credentials to the target API. We start by adding the Microsoft.AspNetCore.Authentication.JwtBearer library using the NuGet package manager:
Install-Package Microsoft.AspNetCore.Authentication
  .JwtBearer
We then modify the ocelot.json file with an AuthenticationOptions section. Now, our GET method for the Patients API is as follows:
{
  "DownstreamPathTemplate": "/api/Patients",
  ...
  "AuthenticationOptions": {
        "AuthenticationProviderKey":
            "IdentityServerApiKey",
        "AllowedScopes": []
      },
…
},
Now, we modify our Program.cs file and register our authentication service to use JWT bearer authentication, similar to what we did on the service itself:
builder.Services
    .AddAuthentication()
    .AddJwtBearer(authenticationProviderKey, x =>
    {
        x.Authority = "https://localhost:5001";
        x.TokenValidationParameters = new
            TokenValidationParameters
        {
            ValidateAudience = false
        };
    });
Now, we have secured our gateway using IdentityServer. This, once again, might be a better security solution for our suite of microservices that will be accessed through the gateway, and it can help us to centralize access to our services.
Now that we have explored API security at length, let us summarize the concepts that we have explored.
With this simple change, we no longer need to concern our appointments API with the inclusion of authentication tables in its database, or complex JWT bearer compilation logic. We simply point the service to our Authority, which is the authentication service, and include the Audience value so that it can identify itself to the authentication service.
With this configuration, a user will need to provide a token such as the one we retrieved to make any calls to our API. Any other token or lack thereof will be met with a 401 Unauthorized HTTP response.
Configuring IdentityServer is not the most difficult task, but it can become complex when attempting to account for several scenarios, configurations, and clients. Several considerations can be made along the way, and we will discuss them next.
Additional API security considerations
We have configured an authentication service to secure our microservices application. Several scenarios can govern how each service is protected by this central authority and they all have their pros and cons.
What we also need to consider is that we want the entire responsibility of hosting and maintaining our own OAuth service. There are third-party services such as Auth0, Azure Active Directory, and Okta, to name a few. They all provide a hosted service that will abstract our need to stage and maintain our services, and we can simply subscribe to their services and secure our application with a few configurations.
This option takes advantage of Software-as-a-Service (SaaS) offerings that greatly reduce our infrastructure needs and increase the reliability, stability, and future-proofing of our application’s security.
Summary
In this chapter, we have reviewed the current industry standard for API security. Using bearer tokens, we can support authorized API access attempts without maintaining state or sessions.
In a service-oriented architecture, a client app can come in several forms, whether a web application, a mobile application, or even a smart television. We cannot account for the type of device in use and our API does not keep track of the applications connecting to it. For this reason, when a user logs in and is verified against our user information data stores, we select the most important bit of information and compile them into a token.
This token is called a bearer token and is an encoded string that should contain enough information about a user that our API can determine the user with whom the token is associated and their privileges in our system.
Ultimately, attempting to secure each API using this method can lead to a lot of disconnection and complexity, so we introduce a centralized authentication management platform such as IdentityServer. This central authority will secure all the APIs using common configurations, and issue tokens based on those global configurations. Now, we can use these tokens once and access several services without needing to re-authenticate.
Security should never be neglected in any application and when it is well implemented, we can strike a balance between security and usability in our application.
Now that we have explored security for our microservices application, we will review how we can leverage containers to deploy our microservices application in the next chapter.