
13
Microservice Container Hosting
Once we have completed a fair amount of development, our next major concern is hosting. Hosting comes with its own set of problems because there are many options, and the pros and cons of these options are relative to the application’s architecture and overall needs.
Typical hosting options for a web application would be a simple server and a singular point of entry to that server via an IP address or domain name. Now, we are building a microservices application where we pride ourselves on the fact that we can promote loose coupling and have all the parts of our application act autonomously and without direct dependency on each other. The challenge now becomes how we cater to a potentially heterogeneous application. Each service is autonomous and might have varied hosting and database requirements. We would then need to consider creating specific hosting environments for each technology, which can lead to massive cost implications.
This is where we can take advantage of container hosting technologies and minimize the cost overheads of having several server machines. We can use containers as scaled-down imitations of the minimum hosting requirements for each technology and database that is being used in the microservices architecture, and we can configure endpoints by which each container can be accessed.
In this chapter, we will review how containers work, how they can benefit us, and why they are an essential tool for efficiently hosting a microservices application.
We will cover the following topics:
- Understand the use of Docker and containers
- Learn how to use Dockerfiles and commands
- Learn how to use docker-compose and orchestrate Docker images
- Learn how to deploy a microservices application in containers and to a container registry
Technical requirements
Code references used in this chapter can be found in the project repository, which is hosted on GitHub at this URL: https://github.com/PacktPublishing/Microservices-Design-Patterns-in-.NET/tree/master/Ch13.
Using containers in microservices development
Containers are all the rage in the development space. They present us with a lightweight application hosting option that allows us to deploy our applications in a clean and repeatable manner. They are not new, but their use in more commercial and accessible spaces has been made far more popular in recent years. What, however, is a container, and why should we care about how it works? Let us review that next.
What can containers do for me?
Traditionally speaking, whenever we have applications that have specific requirements for environments and software, we would resort to using servers to facilitate the requirements. The problem with servers and servers per application is that they come with costs. A server machine is generally not cheap, and then we must also factor in licensing and energy costs when new machines are introduced. Also, consider that if a machine goes down, we will need to reconfigure that machine to the original environmental specifications and reprovision several aspects of the original deployment.
At this point, we begin to think about virtualization. This means that we now use virtual machines (VMs) for new servers and reuse the old infrastructure. This will go a long way in reducing the physical infrastructure requirements and costs and allow us to scale a bot more easily. We can also use snapshots of the machines to keep a quick recovery plan up our sleeves in times of failure. There are several virtualization solutions on the market, including popular ones such as VMware, VirtualBox, and Microsoft Hyper-V.
Figure 13.1 shows a server with several VMs:
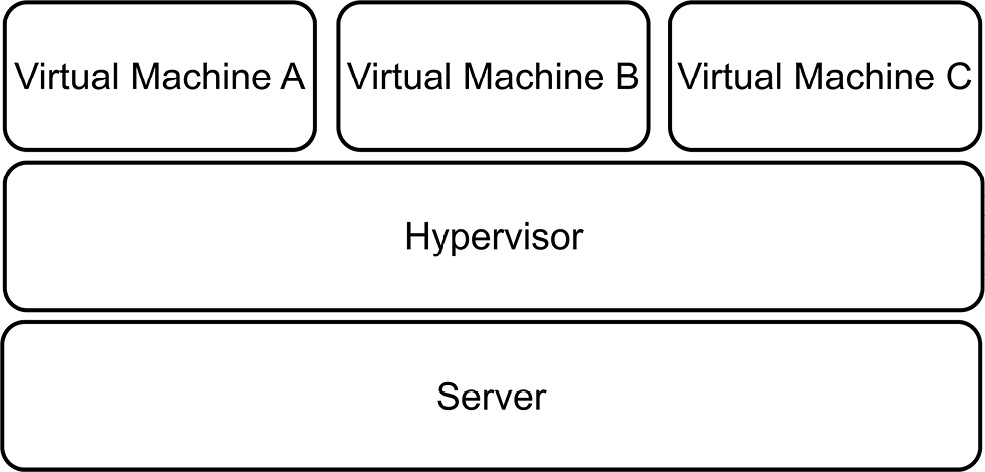
Figure 13.1 – One machine is required to support multiple VMs on top of a hypervisor
This visualization approach seems like the silver bullet we need, except we have found more problems with this solution, which are as follows:
- We will still need to factor in that we need very powerful machines to be able to handle multiple VMs
- We will still have the manual maintenance tasks required to keep our environments and operating systems up to date and secure
- We must remember that there are several situations where we attempt to provision the same environment on different installations and encounter unforeseen differences each time
- We cannot always rely on the machine environment to remain consistent with each instance
Now, this brings us to the most recent solution to this problem, which is containers. Containers build on the concept given to us VMs and allow us to downsize the overall space and resource requirements that an application might need. The use of containers to host our applications is called containerization—this is an approach in modern software development that allows us to package an application and all its dependencies and create a repeatable, testable, and reliable package called an image. This image can then be deployed directly to several places in a consistent way.
This consistency is very important in how we distinguish the benefits of containers from VMs. We just reviewed that we cannot always be sure that each operating system (OS) instance of a server or VM will be the same. Containers strip away many of the variables that we contend with during deployments and provide an environment that is specifically tuned for the application that needs to be deployed.
Figure 13.2 shows a server with several containers and apps:
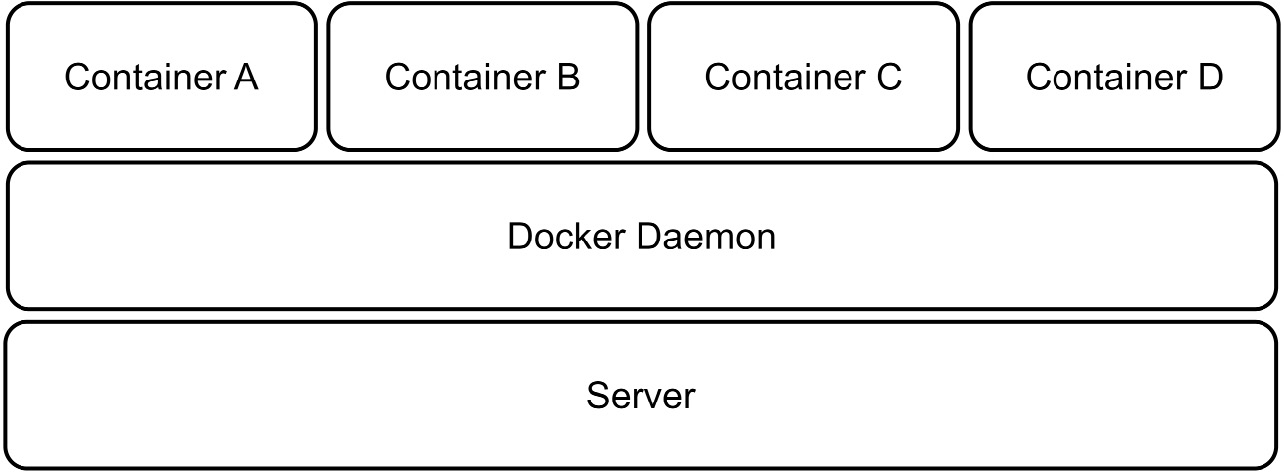
Figure 13.2 – One machine can host several container apps and make better use of its resources
Another benefit, as seen in Figure 13.2, is that we can now maximize the resource usage of a physical server since we no longer need to provide a set amount of RAM, CPU, and storage for entire instances of operating systems.
Containers also provide isolation from each other on a shared operating system, so we do not need to worry about heterogenous requirements across containers. In simpler terms, it will be acceptable to run one container in a Linux environment alongside one that needs a Windows-based environment. Using containers will make our applications more scalable and reliable. We can easily provision new instances of containers as needed and run multiple identical instances.
There is a major security risk in using VMs that need to communicate with each other. They generate metadata files that contain very sensitive information about the data being exchanged and how it is exchanged. With this information, an attacker could seek to replay operations and insert malicious information into the mix. Containers do not transfer this risk and will support inter-container communication in a far more secure manner.
Containers are not new, but they are becoming more and more popular for hosting isolated operations in consumer applications and improving efficiency for applications deployed to less powerful machines. To use containers, we need a container hosting solution such as Docker. We will review how we can get started with Docker and containers next.
Understanding Docker
Before we dive into Docker and how it works, it is noteworthy that Docker is not the only application that handles containerization. There are several alternatives that follow the same Open Container Initiative (OCI) standards and allow us to containerize our applications. Docker, however, revolutionized and propelled containerization into mainstream access and exposure. It is a free (for development and open source) application that is available cross-platform and allows us to version control our containers and generally manage several container instances through either a user interface (UI) or a command-line interface (CLI).
Docker’s engine has a client-server implementation style, where both client and server run on the same hardware. The client is a CLI, and it interacts with the server via a REST API to send instructions and execute functions. The Docker server is a background job, or daemon, called dockerd. It is responsible for tracking the life cycle of our containers. We also have objects that need to be created and configured to support deployments. These objects can be networks, storage volumes, and plugins, to name a few. We create these objects on a case-by-case basis and deploy them as needed.
So, let’s recap a bit. A container is a self-contained space that is prepared to host one application at a time. The definition of a container’s environment and dependencies is called an image. This image is a consistent blueprint for what the environment needs to look like. Images exist for several third-party applications as well, and this makes it easy for us to spin up an instance. It is good to have a central repository for images, and Docker provides Docker Hub for this reason.
Docker Hub is a container registry that stores and distributes container images. We can use it to host our own images, and there is a public space for generally available and shared images for industry-leading applications. Note—Docker Hub is not the only registry. There are alternatives such as Microsoft Azure Container Registry (ACR), which allows us to integrate with other Azure services more seamlessly.
We have mentioned container images a few times now. Let us discuss them a bit more in the next section.
Understanding container images
A container image, as mentioned before, is a blueprint for the contents of a container. It is a portable package that materializes as an in-memory instance of a container. A key feature is that images are immutable. Once we have defined the image, it cannot be changed. Each container that is based on the image, or a specific version of that image, will be the same. This helps us to guarantee that the environment that worked in development and staging will be present in production. No longer will we need the it worked on my machine excuse during deployments.
A base image is an image that acts as a foundation for other images. It starts off using Docker’s scratch image, which is an empty container image that does not create a filesystem layer. This means that the image assumes that the application we will be running will run directly from the operating system’s kernel.
A parent image is a container image that is a foundational image for other images. It is usually based on an operating system and will host an application that is designed to run on that operating system. For instance, we might need a Redis cache instance on our machine. This Redis cache image will be based on Linux. That is the parent image.
In both cases, the images are reusable, but base images allow us to have more control over the final image. We can always add to the image, but we cannot subtract, since images are immutable.
Docker Hub is a reliable and secure registry of popular and in-demand container images that can easily be pulled onto your machine. The Docker CLI provides a direct connection to Docker Hub, and with a few commands, we can pull images to the host machine from which it was executed.
If we were to set up a Redis cache container, we could do so with a few simple steps. First, we should install Docker on our device, which you can get from www.docker.com. Once it is installed, we can proceed to run the following command in our CLI:
docker pull redis
This will pull the latest Redis cache application image from the Docker Hub registry and create a container on your machine. Now that we have the image, we can create a container based on the image with a docker run command:
docker run --name my-redis-container -d redis
Now, we have an instance of Redis cache running on the host machine, and we can connect using any Redis cache management tool. When we no longer need this container to be running, we can simply use the docker stop command, like this:
docker stop my-redis-container
Now, this is an example of how we can quickly create an optimized environment for a third-party application, but a major part of why we use Docker is the fact that we can provide containers for our own applications. Before we explore how this is done, we should seek to appreciate the pros and cons of using containers. We will look at these next.
Pros and cons of containers
The benefits of using containerization in our applications are clear. We can take advantage of managing our hosting environments, consistency in how we deliver software, more efficient use of system resources, and software portability.
Recall that containers will only require the exact resources needed for the hosted application to run. This means that we can rest assured that we are not overextending or over-provisioning resources to accommodate a container. We can also benefit from how easy it is to spin up new containers as needed. If we were using VMs, then each application might require an entire machine instance. Containers have a much smaller footprint and require far less to host a new application.
Amidst all these advantages, we need to be aware of the possible drawbacks of using this hosting and deployment method. Containers will share a single operating system and this shared reliance means that we now have a single point of failure or attack. This can be concerning for security teams. Monitoring our applications also becomes a bit more difficult since we have less to work with. Containers generally provide log information to give us insight into the health of the application, but we are not always aware of the additional resources and plugins that are at work, and this makes a total monitoring operation a bit more difficult.
Should we proceed to use containerization in our applications, we need to be familiar with how we author images for the sole purpose of hosting our application. In this case, we need to know and understand how to use a base image and deploy our own application to a new container. For this, we need a Dockerfile, and we will review how we can create one next.
Authoring a Dockerfile
A Dockerfile is a text file that outlines how a Docker image should be built. The language used is Yet Another Markup Language (YAML), which is a popular markup language used for configuration files. This file usually contains the following elements:
- A base or parent image to base the new image on
- Commands to update the operating system and additional software and plugins as needed
- Compiled application assets to be included in the image
- Additional container image assets for storage and networking needs
- A command to run the application when the container launches
In our case, we are building a microservices-based application with several web services. This means that we need to author Dockerfiles per web service. Since all our services are ASP.NET Core based, we can use the following example of a Dockerfile as a base example for our appointment web service and others.
To add a Dockerfile to our project, we can use Visual Studio and simply right-click our project in Solution Explorer, go to Add, and then click Docker Support….
Figure 13.3 shows the Docker Support… option:
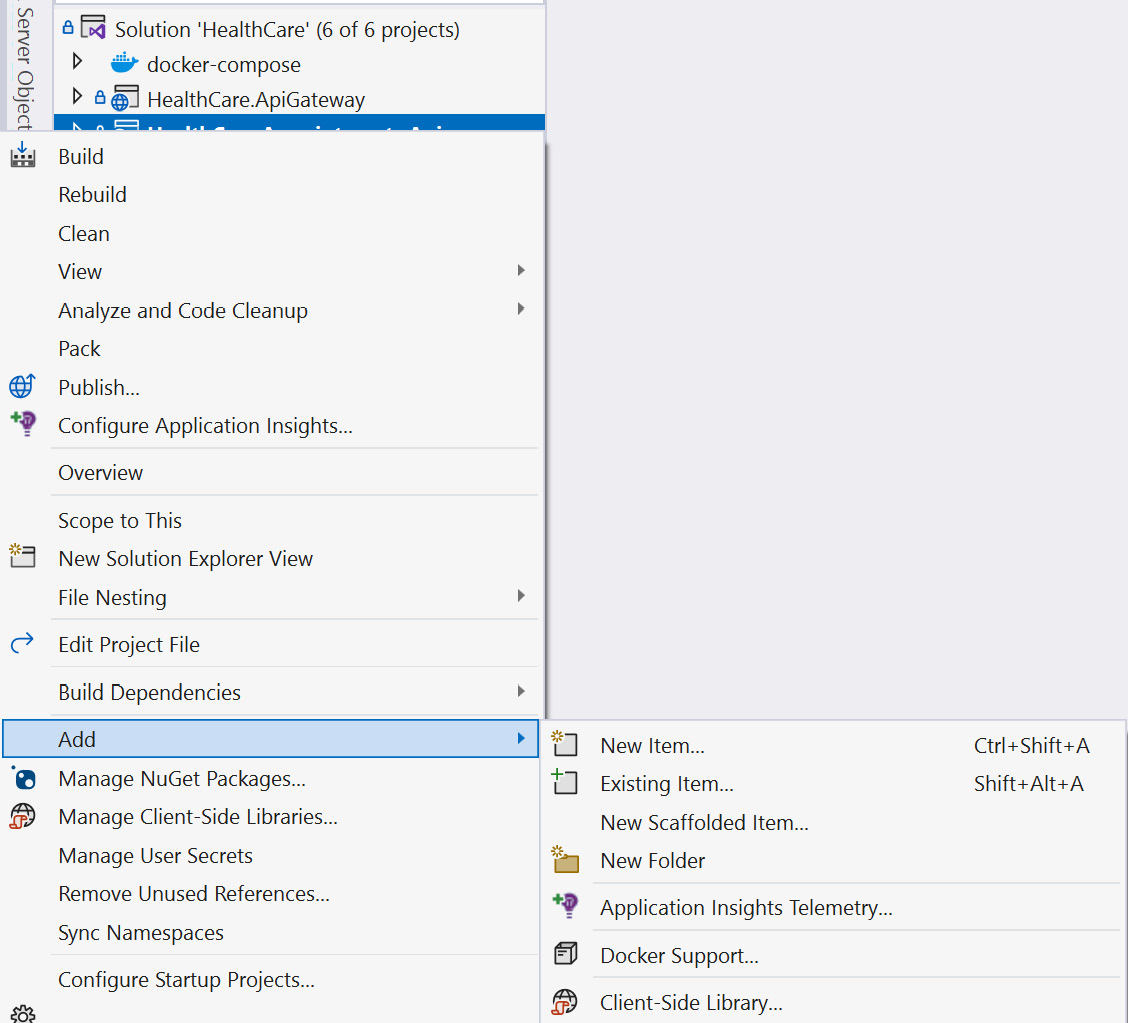
Figure 13.3 – Adding Docker Support in Visual Studio 2022
In Visual Studio Code, you can install the official Docker extension provided by Microsoft. Once this extension is installed, you can then add Dockerfiles to your workspace by selecting the Docker: Add Docker Files to Workspace command from the command palette. It will then seek to confirm the type of application runtime that we wish to support with our container and confirm if we need docker-compose support. Once we complete selecting our options, it will proceed to generate our files.
Both paths will produce two new files in the target project. We get a Dockerfile and a .dockerignore file. In the case of the appointments booking service project, if we complete the preceding steps, we end up with a Dockerfile that looks like this:
FROM mcr.microsoft.com/dotnet/aspnet:6.0 AS base
WORKDIR /app
EXPOSE 80
EXPOSE 443
FROM mcr.microsoft.com/dotnet/sdk:6.0 AS build
WORKDIR /src
COPY ["HealthCare.Appointments.Api/HealthCare.Appointments.Api.c
  sproj", "HealthCare.Appointments.Api/"]
COPY ["HealthCare.SharedAssets/HealthCare.SharedAssets.csproj",
  "HealthCare.SharedAssets/"]
RUN dotnet restore "HealthCare.Appointments.Api
  /HealthCare.Appointments.Api.csproj"
COPY . .
WORKDIR "/src/HealthCare.Appointments.Api"
RUN dotnet build "HealthCare.Appointments.Api.csproj" -c
  Release -o /app/build
FROM build AS publish
RUN dotnet publish "HealthCare.Appointments.Api.csproj" -c
  Release -o /app/publish /p:UseAppHost=false
FROM base AS final
WORKDIR /app
COPY --from=publish /app/publish .
ENTRYPOINT ["dotnet", "HealthCare.Appointments.Api.dll"]
This Dockerfile has instructions that will create an image for the target service and build the container. The instructions execute the following actions:
- Use the mcr.microsoft.com/dotnet/aspnet:6.0 image as the base from which we will derive the rest of our new image.
- Define which ports we wish to expose from our container, which are the standard web traffic ports for HTTP (80) and HTTPS (443).
- Define our own content in the image by copying the contents of key files and directories that we need for the app.
- Perform build, restore, and publish operations to generate binaries, and after the publish operation, run and copy the files from the publish directory to the container space.
- Define ENTRYPOINT as the executing binary for the project that will launch our application.
We also get a .dockerignore file that outlines files and directories that should not be included in the container when it is created. Its contents look like this:
**/.classpath
**/.dockerignore
**/.env
**/.git
**/.gitignore
**/.project
**/.settings
**/.toolstarget
**/.vs
**/.vscode
**/*.*proj.user
**/*.dbmdl
**/*.jfm
**/azds.yaml
**/bin
**/charts
**/docker-compose*
**/Dockerfile*
**/node_modules
**/npm-debug.log
**/obj
**/secrets.dev.yaml
**/values.dev.yaml
LICENSE
README.md
This file is simple to understand, and modifying it is not generally required. It is simply outlining the different areas of the project file composition that it doesn’t deem necessary to transport to the container once the application is built and deployed.
Our Dockerfile is a starting point for our own container that will house the target web service. Just to recap on how containers are built, we start off with a registry, and this registry contains images. In this set of images, we have base images, which are a starting point for all subsequent images. In this case, our first line refers to a base image from which we wish to derive our web service container. Note that the origin and base images of the base image that we ended up using are not visible through this process. The truth is, we don’t know the hierarchy behind the mcr.microsoft.com/dotnet/aspnet:6.0 base image, nor the hierarchy of those images. This approach helps us to make use of the various images that have contributed to our current base image, without needing to make direct references to them or bloat our file with references. We are simply making our own derivative henceforth. This ties in with the goal of keeping our container images small.
Now, let us explore how we can use this Dockerfile going forward.
Launching a containerized application
Now that we have done this process for one of our services, we can easily repeat it for the others. By doing this, we will have completely and successfully containerized each of our web services and, by extension, our microservices application. It is noteworthy as well that Visual Studio and Visual Studio Code will always generate the best Dockerfile to suit the project type that you are working with. We can now also enjoy the new launch feature that gets introduced where we can launch our new containerized web service in a Docker container and still retain real-time analytics and debugging features as if it were running in a normal debugging setting.
In Solution Explorer, we can look under the project folder, inspect the folder called Properties, and open the file called launchSettings.json. This is a JSON configuration file that comes as standard in every ASP.NET Core project, and unless you have a specific reason to, you wouldn’t normally open or modify this file. It was, however, modified and given a new launch profile, which informs Visual Studio that there is a new way to launch this application for debugging. The file now looks like this:
  "profiles": {
    "HealthCare.Appointments.Api": {
    // Unchanged Content
    },
    "IIS Express": {
     // Unchanged Content
      }
    },
    "Docker": {
      "commandName": "Docker",
      "launchBrowser": true,
      "launchUrl": "{Scheme}://{ServiceHost}:{ServicePort}
         /swagger",
      "publishAllPorts": true,
      "useSSL": true
    }
  },
This new Docker section was created during our introduction of the Dockerfile, and it now allows us to select Docker as a launch option from Visual Studio. This will proceed to execute the instructions outlined in the Dockerfile where it will create a new image based on the base Microsoft image, build, restore, and publish our web project, and then move the files to a freshly created container and execute the application.
The only major difference that we will see in this experience is that the UIs in Visual Studio or Visual Studio Code will show more information regarding the containers, such as their health, version, ports, environment variables, logs, and even the filesystem that the container is using.
Figure 13.4 shows the Visual Studio UI while using Docker for debugging:

Figure 13.4 – We see Visual Studio in debug mode while containers are in use; it shows us information about the container during runtime
While we are debugging with our Docker containers, you may notice the containers in Docker’s graphical UI (GUI), and they show which ports are available for HTTP traffic. We will use these ports to handle the configured port mapping accordingly. If you want to see the running containers using the CLI, you can run this command:
docker ps -a
This will produce a list of containers, showing their names, ports, and status. Docker has several commands that help us to automate our container operations, such as the following:
- docker run starts or creates a container. It takes a -d parameter, which is the name of the container to be started.
- docker pause will pause a running container and suspend all services and activities.
- docker unpause does the opposite of docker pause.
- docker restart encapsulates the stop and start commands and will reboot a container.
- docker stop sends a termination signal to a container and the processes running in the container.
- docker rm removes a container and all data associated with the container.
The amazing thing to note here is that using containers has made our application extremely portable and deployable. Now, we do not need to make special configurations on a server and risk one server behaving differently from the other. We can more easily deploy the same environment through the container on any machine, and we can always expect the same outcome.
As of .NET 7, we can containerize our applications without needing a Dockerfile. We will review the steps that can be completed next.
Using native .NET container support
With .NET 7, we have native support for containerization. This means that we can use .NET packages to add container support to our application and then publish our app directly to a container, all without needing Docker.
Container support is made available through the Microsoft.NET.Build.Containers package. We can add this package using the following command:
Install-package Microsoft.NET.Build.Containers
Now that we have our package added, we can publish our application to a container and then use Docker to run the published application. Using the CLI, we can run the following commands:
dotnet publish --os linux --arch x64 -c Release -
  p:PublishProfile=DefaultContainer
docker run -it --rm -p 5010:80 healthcare-patients-
  api:1.0.0
Now, our self-hosted container will run and listen for traffic on the configured 5010 port.
Now we see that we have several ways that can lead to us containerizing our applications, we do this for all our other services. This, however, brings a new challenge where we might need to launch our containerized web services in a specific order, or with default values and settings. For this, we need an orchestrator. We have mentioned orchestrators before in the form of Kubernetes, which is an industry-leading metaphorical glove for Docker images (the metaphorical hand) to fit in.
Before we get to Kubernetes, though, Docker provides an orchestration engine that is defined by instructions outlined in a docker-compose file. We will explore how this works in the next section.
Understanding docker-compose and images
Before we explore docker-compose and how it compiles our images, we need to understand the concept of orchestration and why we need it. Container orchestration is an automated approach to launching containers and related services. In context, when we have a containerized application, we might end up with several containers between our application that has been containerized and third-party applications that we are using as containers.
In the context of our microservices application where we have several individual services, each one is containerized. We might also end up using a containerized cache server, and other supporting services such as email and logging applications. We now need a way to organize our list of containers and launch them in a particular order, such that the supporting applications are available before the dependent service containers are launched.
This requirement introduces a considerable amount of complexity and can make a manual effort very difficult. Using container orchestration, we can make this operation manageable for development and operations. We now have a declarative way of defining the work that needs to be done and the order in which our containers should be launched and with which dependencies. We will now have the following:
- Simplified operations: To reiterate, container orchestration vastly simplifies the recurring effort of launching containers in a specific order and with specific configurations.
- Resiliency: Can be used to carry out our specific operations based on container health, system load, or scaling needs. Orchestration will manage our instances as needed and automate actions that should be taken in the best interest of the application’s stability.
- Security: This automated approach helps us to reduce the chance of human error and ensure security in our application.
docker-compose is the simplest form of orchestration that we can employ. Alternatives include Kubernetes and Docker Swarm, which are industry-leading options in the container orchestration space.
docker-compose is a tool that helps us to define multi-container applications. We can define a YAML file and define the containers that need to be launched, and their dependencies, and then we can launch the application with a single command. The major advantage of docker-compose is that we can define everything about our application’s stack in a file and have this defined at the root of our application’s folder.
Another advantage here is that if our project is version controlled, we can easily allow for the evolution of this file through outside contributions, or we can share our containers and the launch steps for our application easily with others.
Now, let us review the steps to add docker-compose support to our microservices application.
Adding docker-compose to a project
Adding docker-compose support to our ASP.NET Core microservices application is easy. In Visual Studio, we can simply right-click one of our service projects, go to Add, and select Container Orchestrator Support…. This launches a window where we can confirm that we prefer Docker Compose and select OK. We can select either Windows or Linux as the target OS. Either OS option works since ASP.NET Core is cross-platform.
Figure 13.5 shows the Container Orchestrator Support… option:
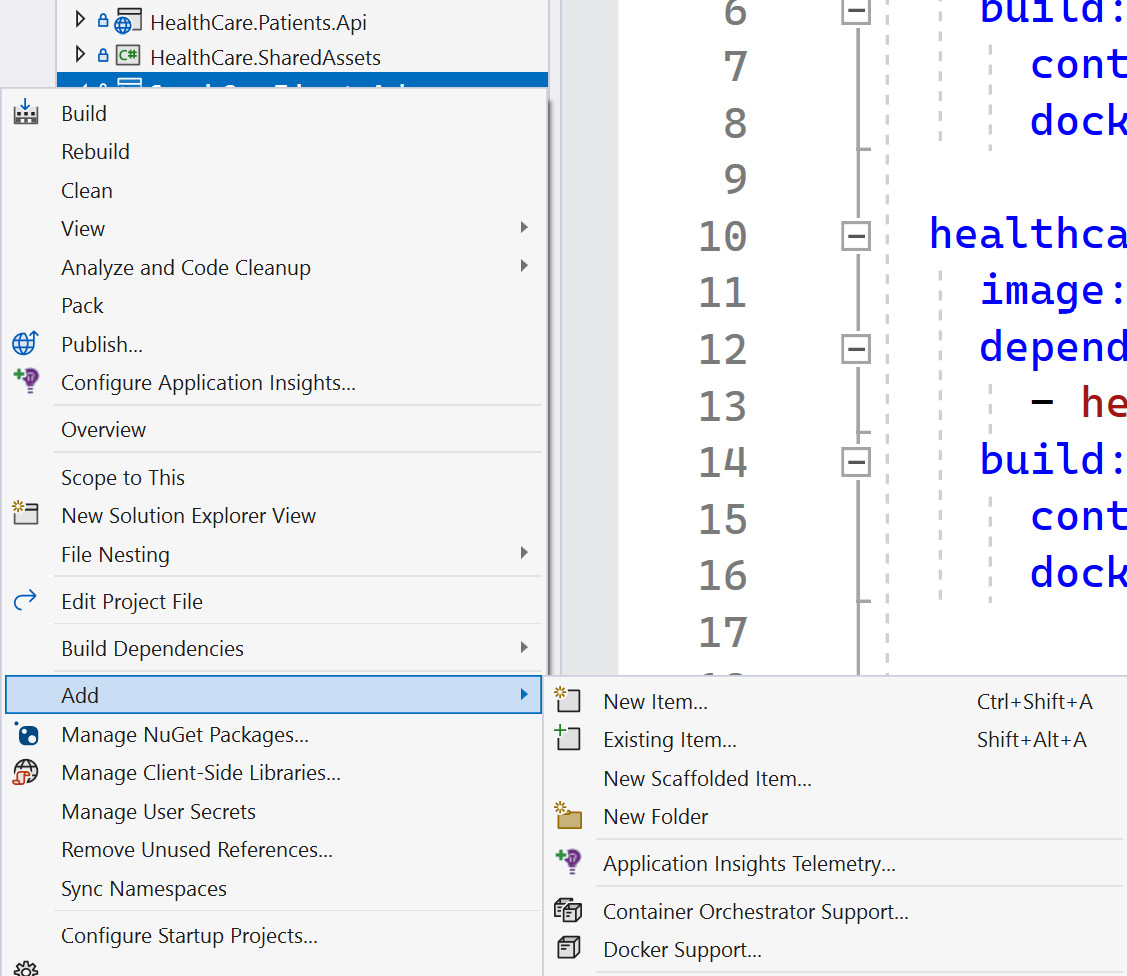
Figure 13.5 – Adding container orchestrator support using Visual Studio 2022
This introduces a new project to our solution where we have a .dockerignore file and a docker-compose.yml file. If we inspect the docker-compose.yml file, we will see that we have a version number and at least one service defined:
version: '3.4'
services:
  healthcare.patients.api:
    image: ${DOCKER_REGISTRY-}healthcarepatientsapi
    build:
      context: .
      dockerfile: HealthCare.Patients.Api/Dockerfile
Under the definition of our service, we define the containers that we wish to launch and state the name of the image and the Dockerfile that will be a reference point for the image definition. Following similar steps for the other services, Visual Studio will automatically append additional services to the file accordingly. If we proceed to do this with the additional services, we will end up with a docker-compose file like this:
version: '3.4'
services:
  healthcare.patients.api:
    image: ${DOCKER_REGISTRY-}healthcarepatientsapi
    build:
      context: .
      dockerfile: HealthCare.Patients.Api/Dockerfile
  healthcare.auth:
    image: ${DOCKER_REGISTRY-}healthcareauth
    build:
      context: .
      dockerfile: HealthCare.Auth/Dockerfile
  healthcare.appointments.api:
    image: ${DOCKER_REGISTRY-}healthcareappointmentsapi
    build:
      context: .
      dockerfile: HealthCare.Appointments.Api/Dockerfile
  healthcare.apigateway:
    image: ${DOCKER_REGISTRY-}healthcareapigateway
    build:
      context: .
      dockerfile: HealthCare.ApiGateway/Dockerfile
Now, we have a docker-compose file that has a record of each container that needs to be launched in our microservices application. This file can now be extended to include additional containers as required by the entire application. If we need a Redis cache instance, we can add a command to this docker-compose file to launch a container for Redis. This is what it would look like:
services:
  redis:
    image: "redis:alpine"
… Other services …
This addition to the file will simply spin up a Redis cache container using the defined base image. Note that the Redis cache image composition can be extended to use storage volumes, and we can pass specific configuration files to our image and indicate that we wish to persist the container’s information in a data volume. When we restart this image, the data from the last run will still be available.
We might also want to indicate that some containers should be available before others are started. This could come in handy if a container has a dependency on the Redis cache container or even on another service. For this, we can add another node called depends_on, which will allow us to indicate the name of the container that should be launched before we attempt to launch the other. For example, our appointments service communicates with our patients service from time to time. It would be prudent of us to make sure that the patients service is launched before we attempt to launch the appointments service. We can modify the appointment container orchestration to look like this:
healthcare.appointments.api:
    image: ${DOCKER_REGISTRY-}healthcareappointmentsapi
    depends_on:
      - healthcare.patients.api
    build:
      context: .
      dockerfile: HealthCare.Appointments.Api/Dockerfile
It is possible for us to provide more specific configurations for each image and even provide more specific configurations for our image, without needing to directly repeat the Dockerfile execution. This is where the docker-compose.override.yml file comes into play. It is a nested child item that can be found under the docker-compose.yml file, and its contents look like this:
version: '3.4'
services:
  healthcare.patients.api:
    environment:
      - ASPNETCORE_ENVIRONMENT=Development
      - ASPNETCORE_URLS=https://+:443;http://+:80
    ports:
      - "80"
      - "443"
    volumes:
      - ${APPDATA}/Microsoft/UserSecrets:/root/.microsoft/
      usersecrets:ro
      - ${APPDATA}/ASP.NET/Https:/root/.aspnet/https:ro
... Other overrides...
Here, we see that our API’s container will be launched with specific environment variables and will have preset ports and volumes. This file can be removed if you prefer to have more explicit control over your containers, but you need to make sure that the relevant values are configured in the Dockerfile.
To revisit our Backend for Frontend pattern from a previous chapter, we outlined that we could provision multiple gateway projects and provide specific configurations for each instance. Now that we have containerization, we can remove the need for additional code projects and reuse the same project while using different configurations for each one. Let us add the following lines to the docker-compose.yml file and create two separate containers based on the same gateway image:
  mobileshoppingapigw:
    image: ${DOCKER_REGISTRY-}healthcareapigateway
    build:
      context: .
      dockerfile: HealthCare.ApiGateway/Dockerfile
  webshoppingapigw:
    image: ${DOCKER_REGISTRY-}healthcareapigateway
    build:
      context: .
      dockerfile: HealthCare.ApiGateway/Dockerfile
Now that we have defined two new containers based on the same ApiGateway image definition, we can add to the docker-override.yml file and specify the sources of the specific configuration files that should be used in either case:
  mobilegatewaygw:
    environment:
      - ASPNETCORE_ENVIRONMENT=Development
      - IdentityUrl=IDENTITY_URL
    volumes:
      - ./HealthCare.ApiGateway/mobile:/app/configuration
  webhealthcaregw:
    environment:
      - ASPNETCORE_ENVIRONMENT=Development
      - IdentityUrl=IDENTITY_URL
    volumes:
      - ./HealthCare.ApiGateway/web:/app/configuration
We can specify the volume sources as the paths to the configuration files, but we also took the opportunity to define environment variable values relative to configurations that may vary or need to be set when the container is being created.
In general, we will also want to consider the need for other dependencies such as a database server, message bus provider (such as RabbitMQ), supporting web services and utilities, and so on. All the components of your microservices application can be containerized, and the containers can make direct reference to each other as needed. The docker-compose.yml file allows us to outline all these containers and their variables as needed, and we can easily plug in the values accordingly. With a few lines, we can get started, but there are many more avenues to explore and master.
Now, we can comfortably launch our entire microservices application and all the components with one click or command. If using Visual Studio, the button to start with debugging would traditionally have cited the name of one service at a time, or we would need to enable multiple projects to be run at debugging. Now, the presence of the docker-compose.yml file overrides the need to be that specific and gives us the ability to run the compose command and initialize all our containers in one go. Using the CLI, we can simply run docker-compose up.
Now, we have a fully containerized application, and we can simply adjust the parameters used to launch our containers and remain agile and scalable in how we handle our application hosting and deployments. It also makes it easier to share our applications with our development team and have the members run our applications with only Docker installed as a dependency.
We have also seen that there are base images that allow us to extend and create our own images. There will come a time when we have a particular application or our own version of an application that we wish to preserve and reshare beyond just our project. We can publish our container images to a central repository. We will review this concept next.
Publishing containers to a container registry
A container registry is a centralized repository that stores several containers. It allows for remote access to these containers and comes in handy for general development and deployment needs when we need a consistent source for a container image for some applications. Container registries are generally connected directly to platforms such as Docker and Kubernetes.
Registries can save developers time and effort in creating and delivering cloud-native solutions. Recall that a container image contains files and components that make up an application. By maintaining a registry, we can maximize our agile development efforts and deliver incremental image updates efficiently, and with the registry, we can store them in a central area for the team.
A container registry can be private or public. We will discuss our options next.
Public versus private container registries
A registry can be public or private. Public repositories are generally used by developers or teams of developers who either want to provision a registry as quickly as possible or want to publicly share containers that they have developed. These images are then used as base images by others and are sometimes tweaked. This is a great way to contribute to the open source collection of container images. Docker Hub is the largest public repository and community for containers and is the default source of our container images when we do a docker pull command.
Private repositories provide a more secure and private way to host and maintain enterprise containers. These types of registries can be remote through established registries such as Google Container Registry (GCR), Microsoft ACR, or Amazon Elastic Container Registry (ECR).
When using a private container registry, we have more control over security and configuration, but we also take on more management responsibilities for access control and compliance within your organization. We need to maintain the following:
- Support for several authentication options within our organization
- Role-based access control (RBAC) for images
- Image versioning and maintenance against vulnerabilities
- User activity auditing and logging
We can properly control who is able to upload images through more strict controls and measures and prevent unauthorized access and contributions to the registry.
Recall that a container registry can be hosted locally. This means that we can stage a local instance of Docker Hub on a server and add configurations that are specific to our organization’s needs and policies. We can also leverage cloud-hosted container registry services. The advantage of using cloud-hosted solutions is that we can reduce the infrastructural consideration that comes with setting up a local server as well as taking advantage of a fully managed and geo-replicated solution.
Let us review how we can create a customized version of an image and upload it to a registry.
Creating and uploading custom images
We have already created several images to support our application. There are times when we might need a particular application to be deployed in a consistent and repeatable manner, and we don’t want to risk recreating the Dockerfile or docker-compose.yml file.
In this case, we can pull a copy of the base image, add our own configurations and variables to it, and then push the image back to the registry with a new and unique name. Now, other team members—or even you in a future project—can pull this new image at will and leverage the preset environment as needed. For this exercise, we need to have an account on Docker Hub.
Let us use an example of a SQL Server image. If we needed to create an image that has a default database as a starting point, then we could do this in a few steps. First, we pull the base image from Docker Hub with this command:
docker pull mcr.microsoft.com/mssql/server
SQL Server images tend to be large, so this may take a while to download. Once downloaded, however, we can execute this command to run the container:
docker run -e "ACCEPT_EULA=Y" -e
  "MSSQL_SA_PASSWORD=AStrongP@ssword1" -p 1434:1433 -d
    mcr.microsoft.com/mssql/server
The first command is like what we have seen before, where we pull the image to our local machine. We then run the image and create an instance of SQL Server based on the latest image version and make it available through port 1434. 1433 is the default port for SQL Server, so we can use a different port to avoid conflicts with other SQL instances that might be present. We also set default sa user credentials and accept the terms of use agreements.
Now that we have the instance of SQL Server up and running from our image, we can connect using SQL Server Management Studio (SSMS) or Microsoft Azure Studio and then run a script. We will keep it simple and create a database and a table:
CREATE DATABASE PatientsDb
GO
USE PatientsDb
CREATE TABLE Patients(
    Id int primary key identity,
    FirstName varchar(50),
    LastName varchar(50),
    DateofBirth datetime
)
Now that we have the updated database, let us commit the updated image to a registry. We can use the Docker UI to see the name of the running container for SQL Server or use the docker ps command, which will list all the running containers. We then run this docker commit command using the name of the running SQL Server container:
docker commit -m "Added Patients Database" -a "Your Name"
  adoring_boyd Username/NewImageName:latest
This creates a local copy of the image based on the current state of the container. We add a commit message so that we can keep track of the change that was made and also add an author tag, state the name of the container on which we need to base the image, and then add our Docker Hub username and the new image’s name. Now, we can use the Docker UI and click the Images option and see our new image created and ready for usage for future projects. We can also use the docker images command to list all the images that are currently on the system. You will now see the original SQL Server image as well as our recently committed image.
Now, we have successfully published our own image to our own local registry. If we want to make this image accessible on Docker Hub, we need to use the Push to Hub option that is available to us in the Docker UI. Alternatively, we can run the following command:
docker push Username/NewImageName
Going forward, if we needed to add this database image to our orchestration, we could modify our docker-compose.yml file like this:
  patients_sql_db:
    image: Username/NewImageName
    restart: always
    ports:
      1434:1433
Now, we will always launch a SQL Server instance with this base database.
We have not only containerized our application, but we have configured orchestration and created our very own custom image. Let us review all that we have learned in this chapter.
Summary
In this chapter, we have reviewed the pros and cons of containerization. We saw where containers help us to downsize some of the resource requirements that our applications have and created a portable version of these applications for development and deployment use.
Docker is an industry-leading containerization software that has a growing community of contributors. Docker can be installed on a machine and then used to manage images and containers as needed. We will also have access to Docker Hub, which is a popular repository for publicly accessible images.
When we integrate Docker into our ASP.NET Core application, we open a new dimension to what it means to build and host our own applications. We can now guarantee that our services will behave in a more consistent manner regardless of the machine they are deployed on. This is because we will have created containers to host our services, and these containers will be optimized to the needs of the service and will never change unless we adjust their definitions.
We also looked at container orchestration, which is where we can outline the containers that we need in one setting and launch them at once, or in a particular order according to the dependencies. This is perfect for our microservices application, which comprises several services and dependencies and would be tedious to launch individually.
Finally, we reviewed how to create our own image and host it on a local container registry. We could then publish the custom image to a public registry, Docker Hub, and have it accessible to all. Now, we can create specific containers with versions of our applications that we need to share with our teams, and we can better control the container versions that are distributed and used.
In the next chapter, we will review a major cross-cutting concern in application development, which is log aggregation in microservices.