Determining the validity of user activity and information in the system is critical to ensuring authenticity. In order to achieve these goals, we must ensure that information entered is genuine and that users performing the actions associated with this information have been properly identified. This includes all information and communications into and out of the system, including both process and user identification.
User authentication meets the fundamentally critical requirement of authenticity by determining the identity of the user making a request. SharePoint Server 2007 supports a variety of authentication options, including Anonymous-, Integrated-, and Forms-based authentication, as well as newly added support for pluggable authentication providers. Because authentication options are configured at the Web application level, it’s important to consider goals for providing access prior to creating new site collections within a Web application. This is especially true when configuring anonymous access. Although it is not uncommon for a single farm to serve data for both internal and external users, it is a best practice to use separate Web applications. In the next section, we will review a few of the best practices regarding the configuration of authentication. Windows authentication is the default authentication mechanism for the default zone of each Web application upon creation. Windows authentication is provided using the following authentication protocols: Kerberos, Integrated, and Basic.
Kerberos is the recommended protocol for intranet users because it is more secure than traditional NTLM/Challenge. In addition, it reduces the load on the domain controllers because each session does not require checking with the directory service. It is widely accepted that in order for NTLM/Challenge authentication to be considered secure, a minimum password length of 14 characters is required.
Integrated authentication allows the use of the current user context, which is based on workstation login, to authenticate. It is considered a best practice to leverage Integrated authentication for the authentication of intranet users who access sites from a shared or trusted activity directory domain.
Basic authentication should only be used in cases in which Integrated authentication is not possible, such as extranet access scenarios.
Code Access Security (CAS) deals with the permissions provided to the code executing in a partially trusted domain. SharePoint Server 2007 provides a partially trusted application environment where extended functionality of SharePoint CAS provides only the level of security required for a code to perform its operations. This ensures that the code is not being misused by other applications.
SharePoint Server 2007, by default, operates on a minimum trust level of ensuring that no malicious code is executed. This is important because SharePoint Server 2007 is an information management system and would contain sensitive information. But if the assembly is placed in Global Assembly Cache (GAC), the assembly is considered to be a Full Trust assembly and gets all privileges. Also note that only signed assemblies can be placed in the GAC.
Signing an assembly ensures that the assembly is coming from a trusted source and is not tampered with once the assembly has been signed. There are two ways to sign an assembly: strong name signing and authenticode signing.
Strong name signing is based on the strong name keys generated using .NET tool SN.exe. Strong name consists of the public key portion of a key pair used for signing the assembly and the friendly name, version, and culture of the assembly. It is also possible to delay sign assemblies using strong name. In an enterprise development scenario, the strong name key will be protected from the developers, but for the developers to test the assembly, .NET allows delay signing. In this scenario, the .NET assembly will be signed using a temporary key during development and will be signed using a proper strong name key just before deployment.
Authenticode signing uses a digital certificate issued by a certificate authority, such as VeriSign. Also, it is possible to sign the assembly with both authenticode and strong name. In this scenario, the assembly must be signed using strong name first, then the authenticode. As strong name signing excludes the signature slot generated by the authenticode, a sequence of authenticode followed by strong name will not work. Hence, the assembly must be signed with strong name, then by authenticode.
Both authenticode and strong name are cryptographically powerful ways to identify the publisher of the assembly. This ensures that the assembly has not been tampered with. Authenticode provides a way to verify the publisher of code as the certificate is issued by third-party certificate authorities. The certificates associated with authenticode signing can be revoked, thus making the assembly invalid; this option is not available in strong name signing.
Shared dynamic-link libraries (DLLs) should be strong named. Regardless of whether a DLL will be deployed to the GAC, a strong name is recommended when the DLL is not a private implementation detail of the application, but a general service that can be used by more than one application.
You must strong name the following:
DLLs, if you wish to deploy them to the GAC.
ClickOnce application and deployment manifests. The Microsoft Visual Studio project system enables this by default for ClickOnce-deployed applications.
Primary interop assemblies, which are used for component object model (COM) interoperability. The TLBIMP utility enforces strong naming when you create a primary interop assembly from a COM type library.
In general, you should avoid strong naming application EXE assemblies. A strongly named application or component cannot reference a weak-named component, so strong-naming an EXE prevents the EXE from referencing weak-named DLLs that are deployed with the application.
For this reason, the Visual Studio project system does not strong name application EXEs. Instead, it strong names the application manifest, which internally points to the weak named application EXE.
In addition, you may want to avoid strong naming components that are private to your application. In this case, strong naming can make it harder to manage dependencies and add unnecessary overhead for private components.
An organization can have a closely guarded key pair that developers do not have access to on a daily basis. The public key is often available, but access to the private key is restricted to only a few individuals. When you develop assemblies with strong names, each assembly that references the strong-named target assembly contains the token of the public key used to give the target assembly a strong name. This requires that the public key be available during the development process.
You can use delayed or partial signing at build time to reserve space in the portable executable (PE) file for the strong name signature, but defer the actual signing until some later stage (typically just before shipping the assembly).
The following procedure outlines the process of using delay signing for an assembly:
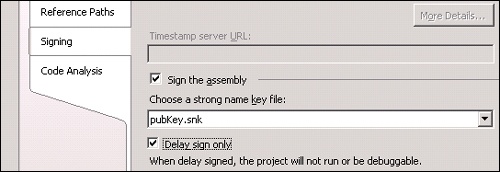
Obtain the public key part of the key pair that will be used for delay signing. The public key is in the form of a .snk file.
In the Visual Studio, use the .snk file to sign the assembly. Select the Delay Sign Only check box in the Signing tab of Project Properties, as shown in Figure 17-8.
As the assembly does not have a valid strong name signature, the verification of the signature must be turned off. Do this by using the –Vr option with the Strong Name tool.
sn –Vr DelaySignedAssembly.dll
Just before shipping the assembly, sign it using the actual key pair using the Strong Name tool with –R option.
sn –R DelaySignedAssembly.dll actualKey.snk
Safe controls are a way to specify that a class or a Web control in the assembly can be executed within the SharePoint partially trusted environment. The safe control definitions are made in the Web.config of each SharePoint Web application. The following is the syntax for declaring safe controls:
<SafeControl Assembly="AssemblyName, Version=1.0.0.0,
Culture=neutral, PublicKeyToken=222111222111aaab"
Namespace="Fully.Qualified.Assembly.Namespace"
TypeName="* | ClassName" Safe="True" />
The assembly that contains the safe control classes can be placed either in the GAC or in the bin folder of the Web application. If the assembly is placed in the GAC, it is executed with the Full Trust mode; if the assembly is placed in the bin folder, a partially trusted location, it is executed with the security trust level set in the Web.config.
The safe control definition can be manually set in Web.config of the Web application. The issues with defining safe control entries manually are the following:
Each Web application’s Web.config needs to be updated individually.
Any inadvertent change to Web.config can crash the Web application.
Alternatively, safe control definitions can be made part of the WSP (SharePoint Solution) deployment for the associated custom component. In this method, the safe control entries are added into the Web.config automatically when the WSP package is deployed onto Web applications in the SharePoint 2007 Server. The deployment of the WSP can be done using the STSADM tool or using the Central Administration Web site of the SharePoint 2007 Server. This method is the preferred approach for deploying the Web parts and the safe control entries into the SharePoint server.
More Info
For additional information regarding the development and packaging of custom components, refer to Chapter 12,
The manifest.xml of the WSP should contain the safe control entries as follows:
<Assembly DeploymentTarget="GlobalAssemblyCache"
Location="WebPartAssembly.dll">
   <SafeControls>
         <SafeControl
               Assembly=" WebPartAssembly, Version=1.0.0.0,
 Culture=neutral, PublicKeyToken=5a5a5a5b5b5b6c6c"
               Namespace="WebPart.Assembly"
               TypeName="*" Safe="True" />
   </SafeControls>
</Assembly>SharePoint Server 2007 defines two trust levels: WSS_Minimal and WSS_Medium. The default trust level for the Web application is WSS_Minimal. The default trust level can be raised to WSS_Medium, which will provide more permission for the code to execute. There is no guarantee that either of these trust levels will give the necessary permissions to your code. An alternative is to create a custom trust level, add it to the SharePoint server, and then set the default trust level in Web.config to the new trust level.
Windows SharePoint Services defines two security permissions, by default, as part of the Microsoft.SharePoint.Security namespace that is located in the Microsoft.SharePoint.Security.dll. Each permission contains one or more attributes, as follows:
SharePointPermission. Controls rights to access resources used by Windows SharePoint Services (see Table 17-2).
WebPartPermission. Controls rights to access Web part resources (see Table 17-3).
As explained earlier, SharePoint defines two trust levels: WSS_Minimal and WSS_Medium.
Table 17-4 lists various permissions associated with these two trust levels.
Table 17-4. Default Trust Level Permissions
Permission | WSS_Medium trust level | WSS_Minimal trust level |
|---|---|---|
AspNetHostingPermission | Medium | Minimal |
Environment | Read: TEMP, TMP, OS, USERNAME, COMPUTERNAME | |
FileIO | Read, Write, Append, PathDiscovery:Application Directory | |
IsolatedStorage | AssemblyIsolationByUser, Unrestricted UserQuota | |
Reflection | ||
Registry | ||
Security | Execution, Assertion, ControlPrincipal, ControlThread, RemotingConfiguration | Execution |
Socket | ||
WebPermission | Connect to origin host (if configured) | |
DNS | Unrestricted | |
Printing | Default printing | |
OleDBPermission | ||
SqlClientPermission | AllowBlankPassword=false | |
EventLog | ||
Message Queue | ||
Service Controller | ||
Performance Counters | ||
Directory Service | ||
SharePointPermission | ObjectModel = true | |
WebPartPermission | Connections = true | Connections = true |
You can determine the trust level for a Web application by the value of the level attribute of the <trust> tag in the Web.config file. By default, Windows SharePoint Services sets the trust level to WSS_Minimal. In the Web.config file of a Web application extended with Windows SharePoint Services, you can find the following <trust>:
<trust level="WSS_Minimal" originUrl="" />
The following are the possible trust levels that can be applied to the Web application. These are either defined by ASP.NET (first five) or by SharePoint 2007 server (last two). You can also specify custom trust level configurations and then specify them as the trust level, as explained in the next section.
Full
High
Medium
Low
Minimal
WSS_Minimal (default setting)
WSS_Medium
After specifying the trust level, Internet Information Services (IIS) must be recycled for the new trust level to take effect. Specifying a trust level in the Web.config file results in the following:
The trust level specified in the Web.config file applies to all assemblies used by the specified Web application.
All SharePoint sites associated with the specified Web application apply the same trust level.
The following steps outline the process of adding a custom trust level configuration to the SharePoint server and setting it up as the default trust level.
Go to the following location on the SharePoint 2007 Server LocalDrive:Program FilesCommon FilesMicrosoft SharedWeb server Extensions12Config.
Make a copy of wss_minimaltrust.config to wss_customtrust.config.
Open the wss_customtrust.config in any text editor.
Add a reference to SharePointPermissions reference under <SecurityClasses> as follows:
<SecurityClass Name="SharePointPermission"
Description="Microsoft.SharePoint.Security.SharePointPermission,
Microsoft.SharePoint.Security, Version=12.0.0.0, Culture=neutral,
PublicKeyToken=71e9bce111e9429c." />
Search for the <PermissionSet> tags for an element with the name SPRestricted.
Copy the tag and all of its children, and paste it at the end of this tag definition.
Change the name property of the pasted PermissionSet tag from SPRestricted to CustomTrust. The changed tag will look like this:
<PermissionSet class="NamedPermissionSet" version="1" Name="CustomTrust">
Add the following <IPermission> node to the <PermissionSet> element where the name attribute equals CustomTrust:
<IPermission class="SharePointPermission" version="1" ObjectModel="True" />
Once you define the customized element, you must create a code group to specify when the common language runtime (CLR) should apply the permission set.
Locate the <CodeGroup> tag where the class attribute equals FirstMatchCodeGroup, and copy the following CodeGroup immediately below it. The membership condition for this code group is based on URL and the URL points bin directory. The permission is applicable to all assemblies in the bin directory. It is also possible to use the strong name membership condition, but this will restrict the permission to be applied only to one assembly.
<CodeGroup class="UnionCodeGroup" version="1"
PermissionSetName="CustomTrust">
   <IMembershipCondition class="UrlMembershipCondition" version="1"
   Url="$AppDirUrl$/bin/*" />
</CodeGroup>
Save and close the file.
This file now needs to be referenced in the Web.config of the Web application. To manually update the Web.config, follow these steps:
Open the Web.config for the Web application, and add the following trustlevel tag under the SecurityPolicy element:
<trustLevel name="WSS_Custom" policyFile="LocalDrive:Program FilesCommon
FilesMicrosoft SharedWeb Server
Extensions12configwss_customtrust.config" />
Change the trust tag as follows to point to the new custom policy file:
<trust level="WSS_Custom" originUrl="" />
Save and close the Web.config.
Recycle the IIS.
The new policy setting is now applied to all .dll files in the bin directory.
Note that the changes to the Web.config should be made using WSP. The changes to the Web.config can be added to an XML file and deployed to the 12Config folder. The changes will automatically be added to the Web.config file when a new Web application is created.
This option is the recommended approach for specifying the security permissions applicable to an assembly. In this approach, you specify the security permissions applicable to each assembly individually as part of the manifest.xml of WSP. The CAS specified in the manifest.xml is appended to the currently used trust level of the Web application. The following is an example of the CodeAccessSecurity element in the manifest.xml file.
<CodeAccessSecurity>
 <PolicyItem>
  <PermissionSet class="NamedPermissionSet" version="1"
Description="Permission set for custom assembly">
         <IPermission class="AspNetHostingPermission" version="1"
Level="Minimal" />
          <IPermission class="SecurityPermission" version="1"
Flags="Execution" />
          <IPermission
class="Microsoft.SharePoint.Security.SharePointPermission, Microsoft.SharePoint.Security,
version=12.0.0.0, Culture=neutral,
PublicKeyToken=71e9bce111e9429c" version="1" ObjectModel="True" />
   </PermissionSet>
   <Assemblies>
         <Assembly Name="CustomAssembly"/>
   </Assemblies>
 </PolicyItem>
</CodeAccessSecurity>
You must determine the exact set of permissions that are applicable to your custom assembly. You can use Permcalc.exe, provided as part of the .NET 2.0 framework, to determine the necessary permissions required for an assembly. Permcalc can be used as follows to determine the permission sets applicable to an assembly:
permcalc AnyAssembly.dll
This will generate an XML file of name AnyAssembly.dll.PermCalc.xml, which contains the detailed set of permissions applicable to each method. Using this, you can calculate the necessary permission set applicable to the assembly.
Web parts are user-facing components and must be executed with the least possible permission. As a Web part developer, if you install assemblies into the bin directory of the Web application, you must ensure that your code provides error handling in the event that required permissions are not available. Otherwise, unhandled security exceptions may cause your Web part to fail and may affect page rendering on the page where the Web part appears.
As stated previously, the WSS_Minimal trust level does not grant permission to the SharePointPermission.ObjectModel to assemblies in the bin directory for an application. Therefore, if your code attempts to use the Microsoft SharePoint object model, the common language runtime throws an exception.
Because the minimal permission set provides the smallest set of permissions required for code to execute, the likelihood of additional security exceptions increases.
Table 17-5 shows various options available to raise the trust level of the assemblies installed in the bin directory.
Table 17-5. Options for Granting Trust
Option | Pros | Cons |
|---|---|---|
Increase the trust level for the entire Web application. For more information, see the "Setting the Trust Level for a Web Application" section earlier in the chapter. Raising the trust level can also be achieved by adding a custom trust level configuration file to the SharePoint 2007 Server. For more information, see the "Adding a Custom Trust Level Configuration" section earlier in the chapter. |
|
|
Install your assemblies in the GAC. |
|
|
Create custom policy definitions for the Web part assembly, and add them to the current trust configuration file during deployment. See the "Adding Policy Definitions During Deployment" section earlier in the chapter. |
|
|