Microsoft Office SharePoint Server 2007 has blurred the lines between legacy file sharing and Web sites. No longer must content exist in one or the other. In fact, we believe this is a natural progression of Web technologies. Web technologies started out as simple content that was published in static .html pages. Likewise, file shares were simple file storage. Office SharePoint Server 2007 brings us the ability to store all of this in one place and aggregate via search that which is not stored in SharePoint Products and Technologies. SharePoint Server 2007 provides these capabilities through Web applications, and therefore Web applications are foundational to the design of any intranet, extranet, or Internet Web site. We divide and define three types of SharePoint Server 2007 Web application solutions as follows:
Internet. In 1985, Merriam-Webster Dictionary defined the Internet as "an electronic communications network that connects computer networks and organizational computer facilities around the world." Wow. We can see how far technology has come since 1985! Originally, the Internet was consumed only by government agencies, universities, and large businesses. It has matured to the point that it now connects almost any device imaginable, from your refrigerator to the largest business servers in the world. In fact, many multibillion-dollar companies exist solely because of the Internet. When information technology security professionals hear the word Internet, however, fear and panic often consume them. Seriously, we all know how dangerous the Internet can be; our financial data can be lost, our personal data can be stolen, and our children can be exposed to unsavory content. But the Internet also allows us to easily transmit data to cell phones and coffee shop Wi-Fi networks, enabling employees to work more and more efficiently. Lastly, we assume Internet users are an unknown identity.
Intranet. An intranet is essentially the Internet behind closed doors that provides services to known entities. The same protocols and basic technologies are leveraged, but the content is available only behind the corporate firewall. This allows companies to more stringently control the access to content that could be damaging if compromised. Until recently, the intranet was thought of as only a Web technology. However, advances in technology have allowed intranets to store almost any type of content and effectively give users a one-stop shop for information. Many companies refer to their intranet Web sites as portals because that’s what they are—a gateway to find anything in a company. Others view intranets as the entire corporate network behind the firewall. However, we do not refer to an intranet as such in this chapter. An intranet is one or more Web applications used to aggregate, organize, present, and collaborate within an organization’s internal network.
Extranet. A network that lives in a company’s perimeter network, also called a screened subnet, is usually referred to as an extranet. What generally differentiates an extranet from an intranet is access from third parties, such as partners and vendors. The two differentiating characteristics of an extranet over the Internet are (1) the extranet user is a known identity and (2) there are usually better security controls in place. Otherwise, extranets and the Internet are much alike. Be aware that when sharing your intranet with external partners, you should probably treat it as an extranet because your data security risk will increase.
We realize you may define these differently, and that’s okay. We just need to define them here as a reference for conceptual designs. You may call these Web applications something different in your organization, but the best practices in this chapter will easily map to whatever naming convention you choose. Be aware that the following assumption was made throughout this chapter: Intranet users are trusted users only, extranets include trusted users and semi-trusted users (dedicated/unique authentication source for semi-trusted users), and Internet consumers are primarily untrusted (anonymous) users.
Because Web applications are foundational to any SharePoint Server 2007 implementation, this chapter begins the best practices for implementing Web applications and then continues into possible scenarios for your intranet, extranet, or Internet solutions.
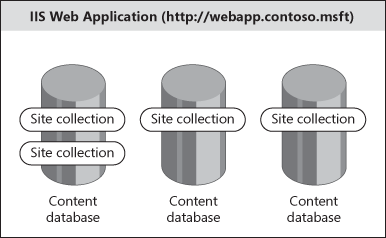
A SharePoint Server 2007 Web application is an Internet Information Services (IIS) Web site associated with at least one content database to store information for that site. We say SharePoint Web application because other Web applications may not require a database for content storage. Classically, Web applications were fairly simple servers where files on the hard drive of the physical server were consumed by clients via the HTTP protocol. SharePoint Server 2007 stores only the minimum set of files necessary to participate in a SharePoint Server 2007 server farm and render content to users from databases, hence the name content database. These Web applications are addressed by a URL, such as http://portal.contoso.msft or http://www.contoso.msft. Figure 20-1 shows the anatomy of a SharePoint Web application.
So why store content in a database? First, it allows you to scale farms to multiple servers without the need to replicate content on the back-end. Multiple Web front-end (WFE) servers can connect to a single content database and serve content from within the database. Second, it allows for real-time collaboration via lists, libraries, workflows, and policies, and it provides robust backup, restore, and database mirroring and log shipping capabilities.
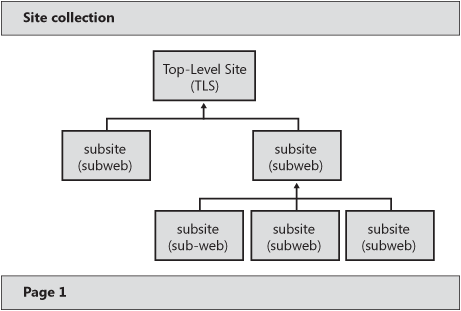
A Web application by itself is essentially useless, however. If you built a SharePoint Server 2007 Web application and stopped there, you would receive a 404 page not found error message because a Web application is essentially an empty shell with an associated URL. Think about this URL as an entry point to the database content. You must create site collections in the Web application before it becomes functional. A site collection is just that—a collection of sites. But the sites are not randomly organized; a site collection is a group of structured sites with a top-level site (TLS) and a hierarchal subsite structure underneath. When you design and implement SharePoint Products and Technologies, a best practice is to use either the terms site collections and subsites or top-level sites and subsites. Note that developers often refer to these as the root web and subwebs. Avoiding the generic term site reduces the amount of confusion within your organization about what type of site is being referenced. Figure 20-2 is an overview of a site collection.
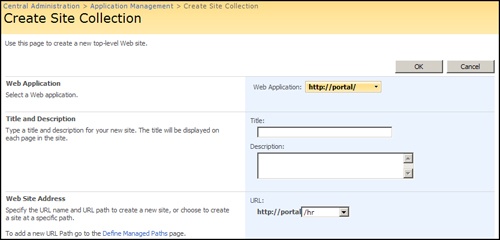
Site collections aren’t randomly created in a Web application; they must be created in a managed path. There are two types of managed paths: explicit and wildcard. What’s the difference between an explicit managed path and a wildcard managed path? By default, the root ‘/’ managed path is explicit, meaning only one site collection can be in it and the site collection assumes the identity of the managed path. That’s how you browse to http://portal.contoso.msft and get a Web page. A Web application without a site collection in the root managed path will return a 404 error when a user browses to the root. Therefore, a SharePoint Server 2007 best practice is to always create a site collection in the root managed path, even if it is a simple information or redirect page. You could always create another explicit managed path for multiple portal support in a Web application, such as http://portal.contoso.msft/HR. HR is a peer to ‘/’. But when doing so, you can no longer have an HR subsite in the root site collection. You will get a security validation error because the URL space is already taken by the explicit managed path HR.
More Info
Managed paths are also discussed in Chapter 15.
A wildcard managed path is basically 180 degrees in the opposite direction. A wildcard managed path can support hundreds or thousands of site collections, but the site collections are appended to the managed path, as in http://portal.contoso.msft/sites/team, with sites being the wildcard managed path. This path will always return a 404 error when a user browses directly to a wildcard managed path. Figure 20-3 shows an example of an explicit managed path during site collection creation, and Figure 20-4 shows an example of a wildcard managed path during site collection creation.
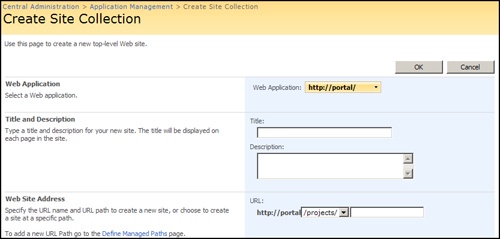
You can create many wildcard managed paths, such as teams or projects, as shown in Figure 20-4. Wildcard managed paths are like a categorizing mechanism for site collections. It is a best practice to not get fancy and change the browsability of wildcard managed paths. Many have tried manipulating the native behavior via the file system or by writing ISAPI filters. It is best to use the product as designed and keep it simple.
When to use a particular type of managed path depends mainly on your information architecture decisions. As a general rule, team sites and project sites are created in wildcard managed paths. In fact, self-service site management exclusively uses wildcard managed paths and cannot leverage explicit managed paths. Organization-wide processes, such as information technology and human resources, are often created as explicit managed paths in the root of a portal. Explicit managed paths can also allow you to create multiple site collections in your WWW Web application without the need for a wildcard managed path, such as sites.
Web applications require dedicated memory space on the WFE servers to function. These memory spaces are called application pools in IIS and are simply dedicated memory for one or more Web applications. Application pools also require a username and password as an identity because there is no unauthenticated access in IIS. This application pool username is how Web applications authenticate and connect to the associated content databases. While it is possible through a great deal of effort to change an application pool identity after installation, it is not advisable to do so. In fact, it is a best practice to decide on the username for a given Web application and never change it.
How many application pools do you need? This question could be argued amongst SharePoint Server 2007 professionals, but here are what we think are the best practices. If you are running 32-bit hardware, the answer is fairly simple. Because a 32-bit SharePoint Server 2007 system is essentially limited to 1024 MB of usable memory for .NET, you should use as few application pools as possible. Why? A 32-bit system cannot directly address more than 4 GB of memory, and 2 GB is reserved for the system. A common workaround once was to use the /3GB switch to enable 3 GB for applications, leaving 1 GB for the operating system. However, the /3GB switch is not supported in Microsoft Windows SharePoint Services 3.0 or SharePoint Server 2007. Therefore, only 2 GB is available to applications, and the .NET CLR reserves at least 50 percent of that memory for other services. With a 64-bit system, you have much greater flexibility in that up to 500 GB are available for .NET applications. Whether you are using a 32-bit or 64-bit system, you will need at least three application pools:
Central Administration. This application pool provides the memory space for the Central Administration Web application and root site collection. Because it has full control access in the configuration database, you should never share this application pool with another Web application. Additionally, you should never use the application pool identity for Central Administration for another application pool identity. The Central Administration Web application pool identity is the "farm account" and effectively has full control in the entire SharePoint farm.
Shared Services. Your Shared Services Provider (SSP) Web application should have a dedicated application pool. A dedicated application pool assists with security and manageability of Shared Services. It also serves as isolation from other Web applications should a corrupt piece of code crash the application pool.
Community. You should have at least one application pool to be used by collaborative Web applications. If security and process isolation aren’t paramount in your organization, you can probably design with a single application pool.
The driving factor for creating a fourth application pool is process isolation. This isolation can be used for reliability or security. First, let’s look at an example in which two Web applications share the Community application pool. Let’s use http://portal.contoso.msft and http://intranetapp.contoso.msft for this scenario. An error in http://intranetapp.contoso.msft would also crash http://portal.contoso.msft. Creating a single application pool for each Web application would most likely prevent the demise of the other should one fail. The second reason for another application pool is security. We believe that using multiple application pools for security generally creates a false sense of security. It does provide some isolation from the average user in gaining access to another Web application, but a talented hacker can easily gain access to an entire server farm once a single Web application in the farm is compromised.
We previously learned that the size of your content database is mostly limited to your ability to restore in a reasonable time frame, which solely depends on your SQL server implementation and backup/restore capabilities. What we present here are the best practices for creating and managing content databases.
Note
While we generally design databases based on availability and recovery, there are software limitations, such as five million items in a site collection, which could be a limiting factor. Browse to http://technet.microsoft.com/en-us/library/cc262787.aspx for more information on SharePoint Server 2007 software boundaries.
First, you should always use database names that correlate to the Web application and function of the database. If the database will be simply one of many in a round-robin style of site collection creation, then using 1, 2, 3, and so on makes perfect sense. But if the database will host a specific site collection, then name it accordingly. Some organizations will create a one-to-one site collection to content database association for critical sites. Be aware that doing so will not scale well and is not supported on a large-scale basis. Reserve dedicated content databases for very important site collections. Table 20-1 shows a naming example for a Web application named http://portal.contoso.msft.
Table 20-1. Example Database Naming Convention
Site collection URL | Purpose | Database name | # of site collections |
|---|---|---|---|
http://portal/ | Root site collection, hosting the primary Web application portal | WSS_Portal_Root | 1 |
http://portal/sites/team1 | General team sites database | WSS_Portal_1 | Many |
http://portal/sites/team2 | General team sites | WSS_Portal_2 | Many |
http://portal/sites/CEO | Dedicated to critical site collection | WSS_Portal_CEO | 1 |
The naming convention needs to be easily identifiable within Microsoft SQL Server Management Studio as to its purpose.
Another best practice is to create multiple content databases to support multiple site collections. A very common mistake we see is when customers create all site collections in a single content database. This usually results from a lack of understanding about how the product should be architected and partially from the process of rapid deployments. All is not lost, however, if you have implemented in this way. Before we present the methodologies to fix this erroneous database design, we need to explain an almost-always misunderstood Central Administration interface. Figure 20-5 shows a screen in Central Administration, Application Management, Content Databases to take a database offline. Figure 20-6 shows the status of the database as stopped after it has been taken offline.
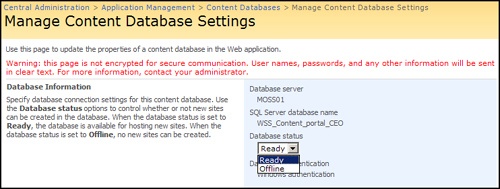
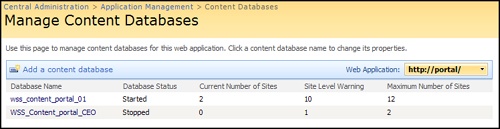
Figure 20-5 and Figure 20-6 do not mean what they appear to mean. Taking a database offline merely blocks any new site collections from being created in it. It does not take the database offline as one might think. Users can still upload and download content, view Web pages, and process workflows. The content database status will also show as stopped. Once again, this means only that new site collections cannot be created in this database. If you want a one-to-one site collection to content database association, taking the hosting database offline is the best method to accomplish this end.
Note
If multiple content databases for a given Web application are online, new site collections will be created in the database with the greatest remaining capacity, not the fewest current number of sites. If the capacity is the same, it will "round-robin" the creation of site collections among the content databases.
Now that you understand what offline and stopped really mean, it is fairly easy to move site collections between content databases. There are basically two ways to do this:
Back up the site collection using <stsadm.exe –o backup –url>, delete the site collection, create a new content database, take all online databases offline except the target database, and restore the site collection. It must go into the only online database.
Use the mergecontentdbs stsadm.exe operation to move site collections between content databases.
Rrequently it is necessary to move a site collection from one content database to another. In the past, this process was very painful and very manual. Why would you need to move a site collection to a different content database? This comes up for a variety of reasons. For instance, because of restore times, you should keep databases under a certain size. While you try to work with site collection owners to plan accordingly, sometimes the content databases grow larger than you had imagined. When this happens, you need to shuffle site collections around to keep databases in harmony. There are other times when you would shuffle site collections if it were more convenient. For example, if site collections are not growing as expected, you might want to consolidate several into smaller databases. You might also want to move less active site collections to databases on slower discs or move site collections to databases that reflect geographic regions. Whatever the reason, in the past, you had to go through the following time-consuming steps to move a site collection:
Lock the site collection.
Back up the site collection.
Delete the site collection.
Set all the content databases’ maximum allowed sites to the number of current sites.
Set the content database you want the site collection to go into to allow one more site collection.
Restore the site collection.
Unlock the site collection.
Adjust the content database maximums to allow new sites to be created.
Today, however, all of these steps can be done with stsadm.exe, so you can build scripts and move through the process quickly. In one of the security updates (KB934525) for Windows SharePoint Services 3.0 and SharePoint Server 2007, Microsoft slipped in a new stsadm.exe operation, mergecontentdbs. We assume this operation was added with the intention of merging content databases, but it can also be used to split them. This section will walk you through both uses. Let’s start with the following configuration:
<Sites Count="3">
  <Site Url=http://portal Owner="BARCELONAadministrator"
ContentDatabase="WSS_Content" StorageUserMB="2.1" StoreWarningMB="0"
StorageMaxMB="0" />
  <Site Url=http://portal/MySite Owner="NT AUTHORITY
etwork service"
 SecondaryOwner=""BARCELONAadministrator" ContentDatabase="WSS_Content2"
 StorageUserMB="0.2" StoreWarningMB="0" StorageMaxMB="0" />
  <Site Url=http://portal/sites/stsadm Owner="BARCELONAadministrator"
 ContentDatabase="WSS_Content" StorageUserMB="0.8" StoreWarningMB="0"
 StorageMaxMB="0" />
</Sites>
You can see that we have three site collections in two content databases: WSSContent and WSSContent2. We want to move http://portal/sites/stsadm from WSS_Content to WSS_Content2. You can prefix –h for any stsadm.exe and get help, as shown below:
C:>stsadm -help mergecontentdbs

stsadm.exe -o mergecontentdbs
           -url <url>
           -sourcedatabasename <source database name>
           -destinationdatabasename <destination database name>
           [-operation <1-3>
                1 - Analyze (default)
                2 - Full Database Merge
                3 - Read from file]
           [-filename <file generated from stsadm -o enumsites>]
See also:
     stsadm -o enumcontentdbs -url <url>
     stsadm -o enumsites -url <url> -databasename <database>
For this example, we use operation 3, Read from file. stsadm.exe provides a clue about the file needed; it is generated from stsadm –o enumsites. Let’s run that and pipe it to a file as follows:
stsadm –o enumsites –url http://portal > mysites.xml
This operation will produce a file, mysites.xml, which contains my site collections. To move http://portal/sites/stsadm, We will remove all of the other site collections except for that one from mysites.xml and save it. There is no need to worry about changing the site count at the top or any of the other site collection information in the file. stsadm.exe retrieves only the URLs. WE have only two content databases, so determining the target database for the site collection is easy. But what if we had many content databases? In that case, we could use the first operation, Analyze, to get an idea of how the content databases are laid out. Let’s see how that looks:
Stsadm –o mergecontentdbs –url http://portal –sourcedatabasename
 WSS_Content –destinationdatabasename WSS_Content2 –operation 1
WSS_Content:
  Disk Size: 43 MB.
  Sites: 2.
  Maximum sites: 15000.
  Maximum number of sites that can be added : 14998.
WSS_Content2:
  Disk Size: 20 MB.
  Sites: 1.
  Maximum sites: 15000.
  Maximum number of sites that can be added : 14999.
The source database WSS_Content is larger than then the destination database WSS_Content2. It may be more performant to move from WSS_Content2 to WSS_Content. Here are the steps:
Retrieve all the site collections from the source.
   Stsadm –o enumsites –url http://portal/ -databasename
WSS_Content > mysites.xml
Remove unneeded site collections by editing mysites.xml in notepad.exe.
Merge the databases:
   Stsadm –o mergecontentdbs –url http://portal/ -sourcedatabasename
WSS_Content –destinationdatabasename WSS_Content2 –operation 3 –filename mysites.xml
You can see here where we got the idea to use the filename mysites.xml. The great thing about this screen is that you can just cut and paste the final command into the command prompt. Microsoft did a great job with the usage on this command, other than a couple of typos. One thing to note is that the –url parameter is not the URL of the site collection you want to move—it’s the URL of the Web application that the site collection is in. Since we’ve already created the file and edited it, we now can run the command:
Stsadm –o mergecontentdbs –url http://portal/ -sourcedatabasename
 WSS_Content –destinatindatabasename WSS_Content2 –operation 3
 –filename mysites.xml
http://portal/sites/stsadm
That’s all there is to it. After an iisreset, the site collection http://portal/sites/stsadm appears in WSS_Content2. You can confirm a database move by looking in Central Administration, Applications, Content Databases before and after you run the command or by using stsadm.exe –o enumsites.
We also want to show you the intended usage of mergecontentdbs, which merges two content databases. When you use the second operation, stsadm.exe will simply move all the site collections from the source database to the destination database. To move all of the sites in WSS_Content2 back into WSS_Content use this command:
Stsadm –o mergecontentdbs –url http://portal/ -sourcedatabasename
 WSS_Content –destinatindatabasename WSS_Content2 –operation 2
Again, you can confirm the move by looking in Central Administration > Applications > Content Databases before and after you run the command, or by using stsadm.exe–o enumsites:
<Sites Count="3">
  <Site Url=http://portal Owner="BARCELONAadministrator"
 ContentDatabase="WSS_Content" StorageUserMB="2.1" StoreWarningMB="0"
 StorageMaxMB="0" />
  <Site Url=http://portal/MySite Owner="NT AUTHORITY
etwork service"
 SecondaryOwner="BARCELONAadministrator"  ContentDatabase="WSS_Content"
 StorageUserMB="0.2" StoreWarningMB="0" StorageMaxMB="0" />
  <Site Url=http://portal/sites/stsadm Owner="BARCELONAadministrator"
 ContentDatabase="WSS_Content" StorageUserMB="0.8" StoreWarningMB="0" StorageMaxMB="0" />
</Sites>
At this point, all of the site collections in the http://portal Web application are in the WSS_Content database, right where we want them. We think you’ll enjoy this addition to stsadm.exe.
Use common sense when creating and managing content databases. SharePoint Server 2007 is very flexible and will allow more functionality than you probably need. A good example is hosting content databases on multiple SQL server instances. While this is most certainly supported, it is rarely needed. You could host a very large and very busy site collection in its own content database and associated SQL server instance to reduce the impact to other site collections in the farm. Generally, you will need only a single SQL server instance to host all farm databases.
Note
Site collections cannot span content databases. A site collection can exist only in a single content database, but a content database can host many site collections. For critical site collections, a best practice is to create a single site collection in an associated content database for the purposes of speedy content recovery. Be sure to take this advice with caution—creating a content database for every site collection simply will not scale. Use this architecture sparingly, and reserve its use for those site collections that require extra care.
Before we move into applying the technology to real-world scenarios, let’s discuss the best practices for SharePoint Server 2007 zones. A zone is simply a policy-naming convention for SharePoint Server 2007 IIS Web sites. A zone does not infer a Web application. While a new Web application is always defined as the default zone, an extended zone of the default Web application is not another Web application. Think of them this way: SharePoint Server 2007 wants to associate any incoming traffic on a URL with a known farm Web application. Extending and mapping a Web application to another zone does not create another Web application. Instead, it creates another entry point for an existing Web application. This correlation is important to understand or zones become confusing. For example, if you extended http://portal to https://portal-ext for external access using Secured Sockets Layer (SSL), you still have one Web application, http://portal. The URL https://portal-ext is an extended zone, but it is associated with http://portal’s content database. Remember that a Web application, by definition, must have its own content database. A zone does not have its own content database.
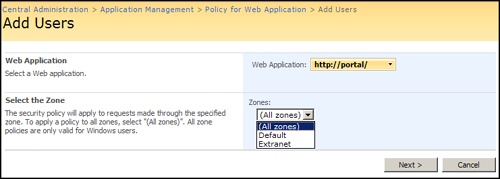
There are several things you must know about zones to adhere to best practices. First, SharePoint Server 2007 zones have nothing to do with the zones defined in the client’s Internet Explorer. While they have the same basic naming convention, they are not the same thing. The five zones included with SharePoint Server 2007 are Default, Intranet, Internet, Custom, and Extranet. While you can associate any URL in your farm with any zone name, the best practice is to align zones with their desired usage. For example, if your intranet portal is http://portal.contoso.msft and you want to extend its usage to Internet users via another URL (https://extranet.contoso.msft, for example), you would put it on the extranet zone. Defining it as another zone type would just be confusing. Second, you cannot create your own zone names; you must use one of the five included with SharePoint Server 2007. Third, you should always document the URL for every zone because you are not often given the full URL when policies are applied. An example of this can be seen in Figure 20-7, which shows the Zones options. The Web application URL is visible, but the actual URL of ‘Extranet’ is http://extranet, and is not shown in the interface. If you need to find the URL to Zone association, these are viewable in Central Administration, Operations, Alternate Access Mappings.
Fourth, zones are the hosting mechanism for applying security policies to a group of users using the Policy For Web Applications feature in Central Administration. When correctly configured, you can tightly define which group of users can enjoy which list, site, and personal permissions. In addition, you can give Site collection owners explicit full control in their site collections and give site collection auditors full read access without having to manually grant them access to each site within the collection individually.
Because these policies allow for explicit grant and deny permission levels, you can effectively control the exact permissions that each user or group has to the same content and ensure that different groups are either explicitly granted or denied certain permissions.
A common example of how to use this feature is when you’re allowing contractors to work in your production environment. Let’s assume your design is such that all non-employees must connect to SharePoint Server using SSL and must use a unique URL for which you have created an Alternate Access Mapping (AAM) in Central Administration. In addition, you place those contractors in a separate Active Directory directory service Global Group (GG) and then assign a unique permissions policy to that group in Central Administration.
That unique permission policy may grant users all kinds of collaborative permissions but deny them the ability to create subsites or personal sites. You might also want to ensure that they cannot delete information, so you deny that permission level too. Finally, to ensure that contractors always use the URL, zone, and permission levels you’ve assigned to them, you deny all permissions to the contractors group for the default zone for that Web application, thereby ensuring that all contractors must come through the URL you’ve specified in order to access content within that Web application.
Several best practices immediately present themselves as part of this discussion. First, to create highly secure and controlled extranet access to your content, use the combination of the AAMs, extending Web applications, zones, policy for Web applications, and authentication providers. These five features, when combined properly, will enable you to highly secure and control extranet access to your content.
Second, it is a best practice to use the explicit Deny feature in the Policy for Web Applications configuration if you’re under compliance laws and regulations that require you to explicitly deny permissions to certain groups of users in certain conditions.
More Info
AAMs are discussed more fully in Chapter 15.
Last, notifications from workflows and site confirmation and deletion are always sent with the default zone URL in e-mails. Carefully think this last point through before creating the first Web application in your server farm. If you created http://portal.contoso.msft on the default zone and then extended it to https://portal.constoso.msft on the extranet zone, workflows and site confirmation and deletion notifications would be sent with the http://scheme. If your firewall is denying HTTP requests, your users would not be able to browse to alerts embedded in e-mails externally. Therefore, the best practice is to always have the most secure zone as the default. In this example, https://portal.contoso.msft would be the default zone, and http://portal.contoso.msft could be on the intranet zone.
Note
With the release of the Microsoft SharePoint Administration Toolkit, you can change the URL used for alerts. Because it was in Beta at the time of this writing, we cannot provide a download URL. Instead, browse to http://technet.microsoft.com/sharepointserver and search for the toolkit by name.