
In this section
Networking—once a requirement only in large corporations—is now almost a necessity in a multi-computer household, a home office, or a small business. With two or more computers connected, you can access files and folders on other computers that have been set up for sharing, and you can share the files and folders on your computer with other people. (And if there are items to which you want to limit other people’s access—your private files, for example—you can do so.) But that’s not all—a network also enables you to share printers, to share an Internet connection, and to communicate over the network using Windows Messenger (see "Sending Instant Messages") or, alternatively, NetMeeting, which we’ll discuss in this section. One of the nice things about NetMeeting is that you don’t have to be connected to the Internet to have a conversation or a quick meeting with a friend or coworker.
Windows XP also makes it easy for you to telecommute—the Remote Desktop Connection allows you to sit at your home computer and actually work on the Desktop of your office computer, provided your office computer is running Windows XP Professional or Windows XP Server. It’s a great way to get some of your work done from the comfort of your home. If you need to gain access to your office network from your home computer, you can do so via a remote connection: by dialing up a network server, for example, or using the Internet to create a VPN (Virtual Private Network), which ensures a secure connection to another computer. We’ll also show you how simple it is to connect to a wireless network, whether you’re in a small coffee shop or a big conference center.
Windows XP automatically searches for the shared folders, printers, and whatever other items are shared on your network’s computers. You can also open a window to all the shared folders on a specific computer, or you can connect to a computer that’s in a different workgroup.
Tip
If you’ve set up your network but you don’t see My Network Places on the Start menu, choose My Computer from the Start menu, and click My Network Places in the Other Places list. Close the window. My Network Places should now be listed on the Start menu.
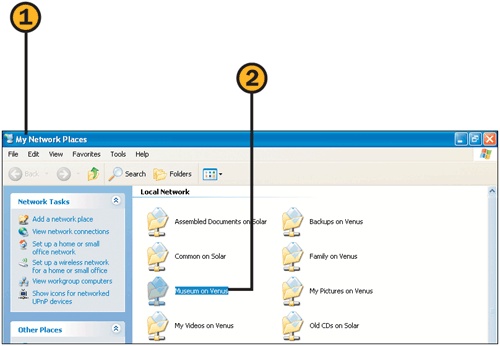
![]() Choose My Network Places from the Start menu to open the My Network Places window.
Choose My Network Places from the Start menu to open the My Network Places window.
![]() Double-click a shared folder to access its contents.
Double-click a shared folder to access its contents.
New Feature
The Show Icons For Networked UPnP Devices item in the Network Tasks area is a security enhancement installed with Service Pack 2. It’s designed to avoid security vulnerabilities in Universal Plug and Play software. Click this task to install support software and allow access to any UPnP devices on your network.
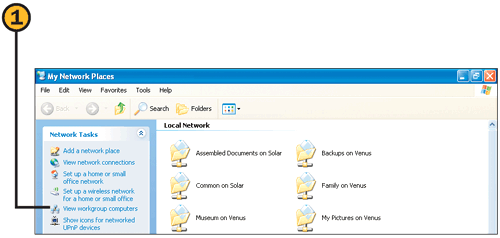
![]() In the My Network Places window, click View Workgroup Computers.
In the My Network Places window, click View Workgroup Computers.

![]() Double-click the computer whose shared folders and resources you want to view or access.
Double-click the computer whose shared folders and resources you want to view or access.
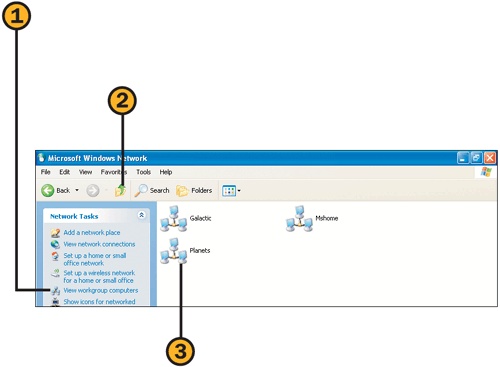
![]() In the My Network Places window, click View Workgroup Computers if your workgroup computers aren’t already displayed.
In the My Network Places window, click View Workgroup Computers if your workgroup computers aren’t already displayed.
![]() Click the Up button on the Standard toolbar to view all the workgroups on your network.
Click the Up button on the Standard toolbar to view all the workgroups on your network.
![]() Double-click the workgroup you want to access.
Double-click the workgroup you want to access.

![]() Double-click the computer you want to access, and locate the shared folder you want to use.
Double-click the computer you want to access, and locate the shared folder you want to use.
Tip
To see the folders and other resources that are being shared by your computer over the network, look at the list of workgroup computers, and then double-click your own computer’s name in the list. Review the shared folders and their contents. Only shared items are displayed.
Tip
If a Connect To dialog box appears when you try to access a computer or folder, enter the valid user name and password required to access the computer.
See Also
For information about setting up your network, see "Setting Up a Network".
For more information about working with restricted access to network features, see "Creating Custom Access Across the Firewall".
For information about how and why these security features are implemented, see "Maintaining High Security with Service Pack 2".
Once you’ve set up your network, you can share all the documents that are stored in the Shared Documents folder. If this folder contains any subfolders, you can share their contents too. You can also designate which folders and printers on your computer you want to share with other network users.
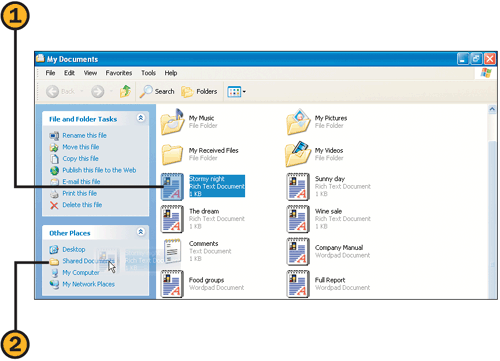
![]() Use My Computer to locate the file you want to share.
Use My Computer to locate the file you want to share.
![]() Drag the file onto the Shared Documents item in the Other Places list.
Drag the file onto the Shared Documents item in the Other Places list.
Tip
File sharing and print sharing are usually enabled when the networking is set up on your computer. If the Sharing check box isn’t present on the Sharing tab of the Properties dialog box, or if you receive an error when you’re trying to share a folder, rerun the Network Setup Wizard, and enable file sharing and print sharing.
![]() Use My Computer to open the drive or folder containing the folder you want to share.
Use My Computer to open the drive or folder containing the folder you want to share.
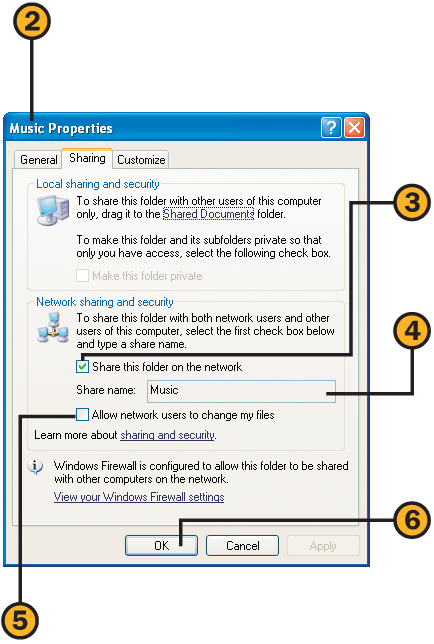
![]() Right-click the folder you want to share, and choose Sharing And Security from the shortcut menu to display the folder’s Properties dialog box.
Right-click the folder you want to share, and choose Sharing And Security from the shortcut menu to display the folder’s Properties dialog box.
![]() On the Sharing tab, select this check box.
On the Sharing tab, select this check box.
![]() Either accept the proposed name or type a new name for the shared folder.
Either accept the proposed name or type a new name for the shared folder.
![]() If you’re going to allow others to have full control of the folder—that is, to be able to add, delete, modify, and rename files in the folder—select this check box. To allow read-only access—that is, users of the network can see and open the files in the folders, but they can’t save or modify any files—clear this check box.
If you’re going to allow others to have full control of the folder—that is, to be able to add, delete, modify, and rename files in the folder—select this check box. To allow read-only access—that is, users of the network can see and open the files in the folders, but they can’t save or modify any files—clear this check box.
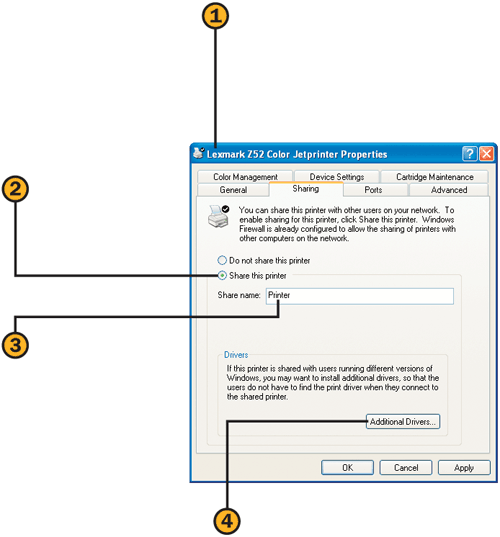
![]() Choose Control Panel from the Start menu, click the Printers And Other Hardware category, and click the View Installed Printers Or Fax Printers task. Right-click the printer to be shared, and choose Sharing from the shortcut menu to display the printer’s Properties dialog box.
Choose Control Panel from the Start menu, click the Printers And Other Hardware category, and click the View Installed Printers Or Fax Printers task. Right-click the printer to be shared, and choose Sharing from the shortcut menu to display the printer’s Properties dialog box.
![]() On the Sharing tab, click the Share This Printer option.
On the Sharing tab, click the Share This Printer option.
![]() Either accept the proposed name or type a new name for the shared printer.
Either accept the proposed name or type a new name for the shared printer.
![]() If there are computers on your network that use an operating system other than Windows XP or Windows 2000, and if those computers will be using your printer, click Additional Drivers.
If there are computers on your network that use an operating system other than Windows XP or Windows 2000, and if those computers will be using your printer, click Additional Drivers.
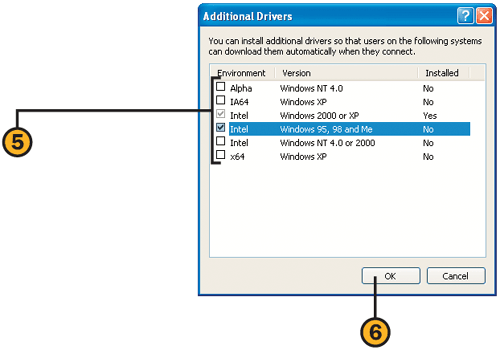
![]() Select the check boxes for the relevant operating systems.
Select the check boxes for the relevant operating systems.
![]() If prompted, insert the Windows XP CD into your computer’s CD drive, and click OK. Wait for the drivers to be installed. Click OK in the Additional Drivers dialog box, and click OK in the printer’s Properties dialog box.
If prompted, insert the Windows XP CD into your computer’s CD drive, and click OK. Wait for the drivers to be installed. Click OK in the Additional Drivers dialog box, and click OK in the printer’s Properties dialog box.
If you frequently use one particular folder on the network, you can access that folder quickly by assigning a drive letter to it. By doing so, you will not only gain quick access to the folder from My Computer but will also be able to access the folder in programs that don’t let you browse My Network Places to find a file.
Try This
Create a network drive. Open My Computer, and verify that the drive is listed in that window. Start a program, use the drive to open or save a file, and then close the program. Right-click My Computer, and choose Disconnect from the shortcut menu to delete the drive assignment.

![]() Choose My Network Places from the Start menu.
Choose My Network Places from the Start menu.
![]() Click View Workgroup Computers in the Network Tasks list.
Click View Workgroup Computers in the Network Tasks list.
![]() Double-click the computer that contains the shared folder.
Double-click the computer that contains the shared folder.
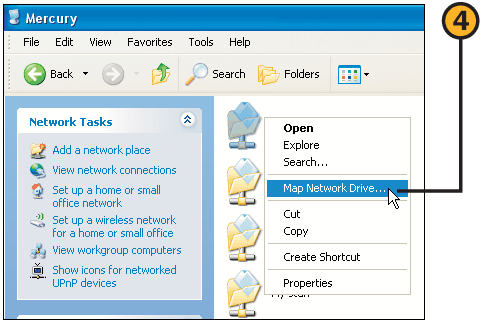
![]() Right-click the folder, and choose Map Network Drive from the shortcut menu.
Right-click the folder, and choose Map Network Drive from the shortcut menu.

![]() In the Map Network Drive dialog box, click a drive letter for this folder.
In the Map Network Drive dialog box, click a drive letter for this folder.
![]() Clear this check box if you want to use the drive assignment during this session only, or keep the check box selected if you want to reestablish this drive assignment each time the computer is started.
Clear this check box if you want to use the drive assignment during this session only, or keep the check box selected if you want to reestablish this drive assignment each time the computer is started.
When a network is set up to share a dial-up connection to the Internet, the connection can be left open even when no one is using it. However, if you’re concerned about tying up the phone line or if you want to economize on the phone or ISP connection charges, you can have the connection end automatically when no one is using it. Alternatively, you can manually end the connection from your computer even if the phone line isn’t connected to your computer.
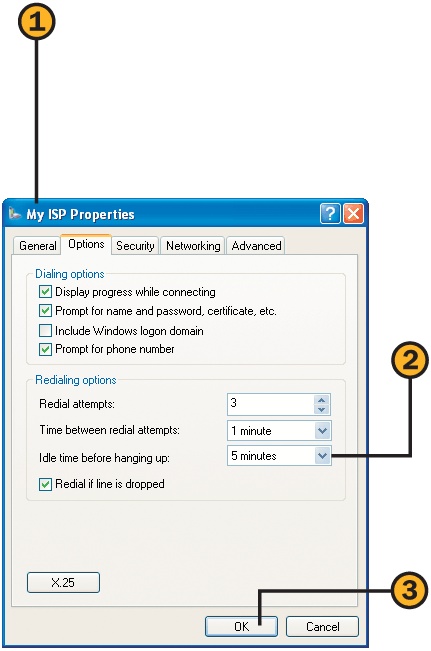
![]() On the computer that’s hosting the Internet connection, choose My Network Places from the Start menu, and click View Network Connections in the Network Tasks list. Click the Internet connection you use, and click Change Setting Of This Connection in the Network Tasks list to display the connection’s Properties dialog box.
On the computer that’s hosting the Internet connection, choose My Network Places from the Start menu, and click View Network Connections in the Network Tasks list. Click the Internet connection you use, and click Change Setting Of This Connection in the Network Tasks list to display the connection’s Properties dialog box.
![]() On the Options tab, set a short time for the computer to be idle before it hangs up the connection.
On the Options tab, set a short time for the computer to be idle before it hangs up the connection.
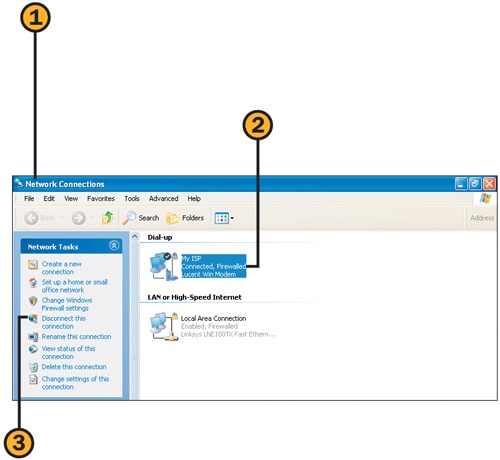
![]() On the computer that’s using the Internet connection over the network, choose My Network Places from the Start menu, and click View Network Connections in the Network Tasks list to display the Network Connections dialog box.
On the computer that’s using the Internet connection over the network, choose My Network Places from the Start menu, and click View Network Connections in the Network Tasks list to display the Network Connections dialog box.
![]() Click the Internet connection you’re using to select it.
Click the Internet connection you’re using to select it.
![]() Click Disconnect This Connection.
Click Disconnect This Connection.
Try This
To set up your computer to quickly hang up the connection over the network, right-click the connection in the Network Connections window, and choose Properties from the shortcut menu. Select the Show Icon In Notification Area When Connected check box to show an icon in the notification area of the taskbar, and click OK. To disconnect, click the icon, and then click Disconnect in the Status dialog box that appears.
Windows Messenger is a great way to communicate over the Internet, but you can use it over your network only if you’re connected to the Internet or to a network that’s running Microsoft Office Live Communications Server 2003 or Microsoft Exchange 2000 Server. Fortunately, there’s a Windows XP feature called NetMeeting that provides similar functionality over your network without tying up—or being slowed down by—your connection to the Internet.
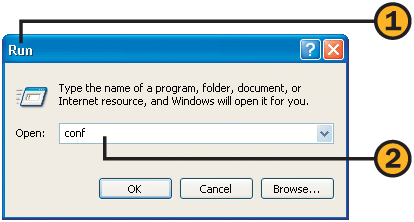
![]() Choose Run from the Start menu to display the Run dialog box.
Choose Run from the Start menu to display the Run dialog box.
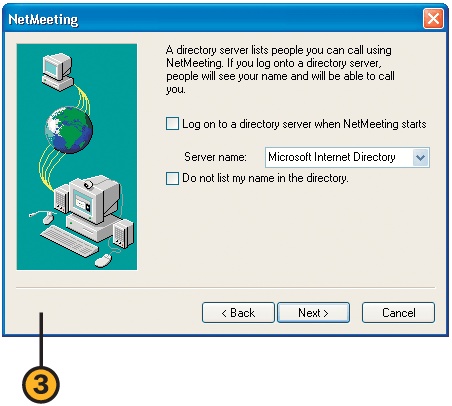
![]() If you haven’t used NetMeeting before, step though the NetMeeting Setup Wizard. Make sure that you choose not to connect to the Internet directory unless you’re planning to use NetMeeting over the Internet as well as on your network.
If you haven’t used NetMeeting before, step though the NetMeeting Setup Wizard. Make sure that you choose not to connect to the Internet directory unless you’re planning to use NetMeeting over the Internet as well as on your network.
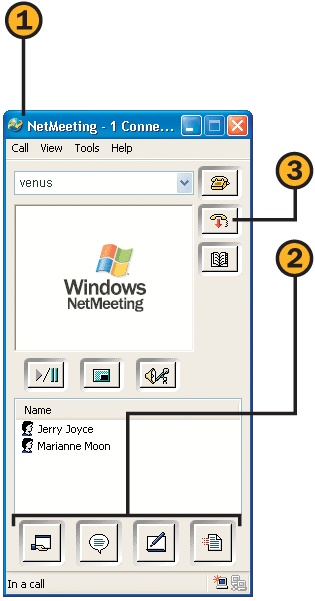
![]() With NetMeeting running on both computers, type the name of the computer you’re calling, and press Enter. Wait for the other person to answer your call.
With NetMeeting running on both computers, type the name of the computer you’re calling, and press Enter. Wait for the other person to answer your call.
![]() Use the tools to conduct your conversation or meeting, as follows:
Use the tools to conduct your conversation or meeting, as follows:
Share Program to display and share a running program with other people
Chat to exchange text messages
Whiteboard to share illustrations
Transfer Files to exchange files
![]() Click the End Call button when you’ve finished.
Click the End Call button when you’ve finished.
Tip
NetMeeting has been replaced by Windows Messenger for most uses, but the tools in the two features are very similar. However, you can’t use Windows Messenger without being connected to the Internet, and, because NetMeeting allows video from only one computer, you can’t have a two-way video session in NetMeeting as you can in Windows Messenger.
Do you want to gain full access to one computer from another over your network? By sharing a computer’s Desktop using NetMeeting, you can access and run programs, reorganize files, and so on—all from the other computer’s Desktop.
See Also
For information about using Desktop Sharing with a computer that’s running Windows XP Professional, see "Controlling a Computer at Your Workplace".
For information about opening ports, see "Creating Custom Access Across the Firewall".
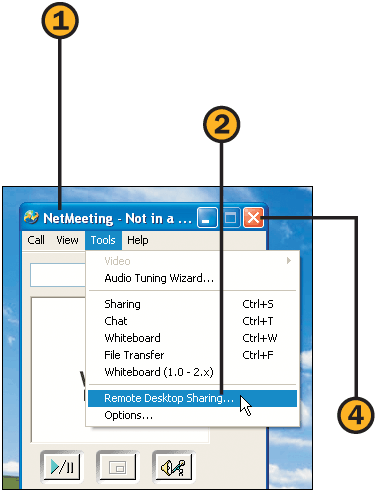
![]() On the other computer on the network (the one you want to control), choose Run from the Start menu, type conf and press Enter to start NetMeeting.
On the other computer on the network (the one you want to control), choose Run from the Start menu, type conf and press Enter to start NetMeeting.
![]() From the Tools menu, choose Remote Desktop Sharing.
From the Tools menu, choose Remote Desktop Sharing.
![]() Close NetMeeting when you’ve finished.
Close NetMeeting when you’ve finished.

![]() Step through the Remote Desktop Sharing Wizard. Be sure to set up a password-protected screen saver when you’re prompted to do so.
Step through the Remote Desktop Sharing Wizard. Be sure to set up a password-protected screen saver when you’re prompted to do so.
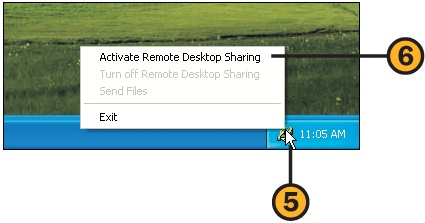
![]() Right-click the NetMeeting Remote Desktop Sharing icon in the notification area of the taskbar.
Right-click the NetMeeting Remote Desktop Sharing icon in the notification area of the taskbar.
![]() Choose Activate Remote Desktop Sharing from the shortcut menu.
Choose Activate Remote Desktop Sharing from the shortcut menu.
Tip
Desktop Sharing is automatically blocked by the Windows Firewall. For access through the firewall, you must manually open ports 522, 389, 1503, 1720, and 1731 on both computers. When you’ve finished, make sure that you close these ports by clearing their check boxes on the Exceptions tab of the Windows Firewall dialog box. A less secure method is to disable the Windows Firewall on both computers.
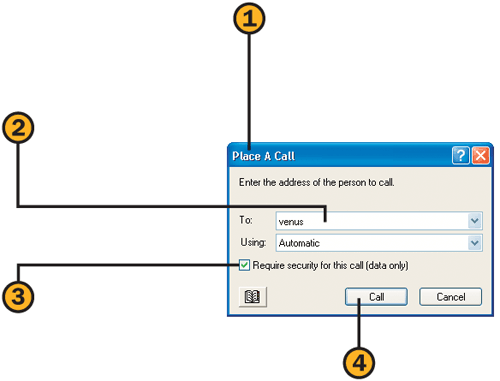
![]() On the computer that you’ll be using to remotely control another computer, start NetMeeting, and click the Place Call button to display the Place A Call dialog box.
On the computer that you’ll be using to remotely control another computer, start NetMeeting, and click the Place Call button to display the Place A Call dialog box.
![]() Enter the name of the computer you’re calling.
Enter the name of the computer you’re calling.

![]() Enter your password when prompted, and click OK.
Enter your password when prompted, and click OK.
![]() Work from the Desktop of the computer you’re controlling remotely.
Work from the Desktop of the computer you’re controlling remotely.
![]() Click the End Call button in NetMeeting when you’ve finished.
Click the End Call button in NetMeeting when you’ve finished.
Tip
Using a password-protected screen saver prevents other people from using your computer when it’s unattended.
Tip
To temporarily deactivate Remote Desktop Sharing on your computer, right-click the NetMeeting Remote Desktop Sharing icon on the taskbar, and choose Turn Off Remote Sharing from the shortcut menu. To permanently remove Remote Desktop Sharing, start NetMeeting, choose Remote Desktop Sharing from the Tools menu, and clear the Enable Remote Desktop Sharing On This Computer check box.
Wouldn’t it be great to sit at your home computer—wearing your pajamas and slippers if you want—and actually be able to use your computer at work? If your work computer is running Windows XP Professional or Windows XP Server, you can use the Remote Desktop Connection to take control of your work computer and get your work done just as if you were sitting in your office. However, you can’t use Remote Desktop Connection to remotely control a computer running Windows XP Home.
Tip
The computer you’re connecting to must be configured to allow the Remote Desktop Connection, and the user name with which you log on must be authorized to create the Remote Desktop Connection. If you’re the authorized user, you can’t connect with a blank password—you must have a valid password.
![]() Use your usual method to connect to your office network.
Use your usual method to connect to your office network.
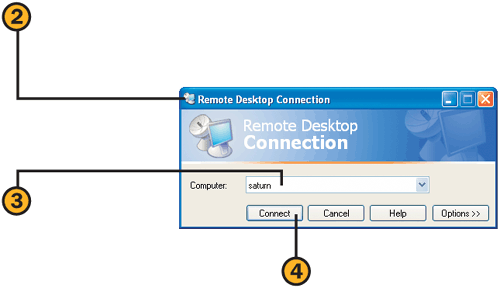
![]() Choose Remote Desktop Connection from the Communications submenu of the Start menu to display the Remote Desktop Connection dialog box.
Choose Remote Desktop Connection from the Communications submenu of the Start menu to display the Remote Desktop Connection dialog box.
![]() Type the name or IP address of your work computer.
Type the name or IP address of your work computer.
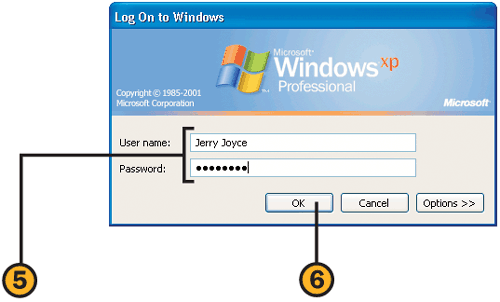
![]() Type the user name and password that you use at the office and, if the computer is part of a domain, the domain name.
Type the user name and password that you use at the office and, if the computer is part of a domain, the domain name.
Tip
If you’re running Windows XP Professional, you can enable the Remote Desktop Connection by choosing the Performance And Maintenance category in the Control Panel, clicking the System Control Panel icon, and, on the Remote tab of the System Properties dialog box, selecting the check box to enable remote access to the computer.
Tip
Windows Firewall might block the Remote Desktop Connection unless you specify Remote Desktop as an exception to the firewall.
See Also
For information about configuring Windows Firewall, see "Creating Custom Access Across the Firewall".
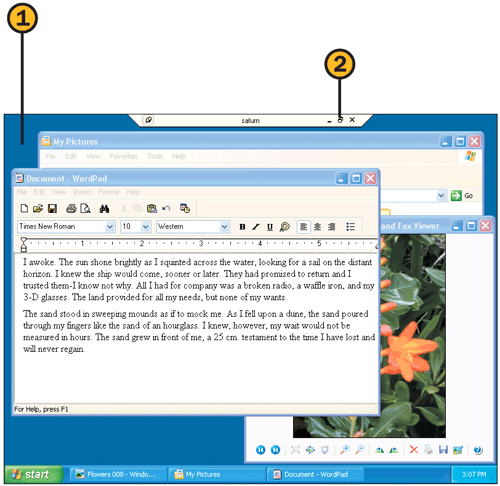
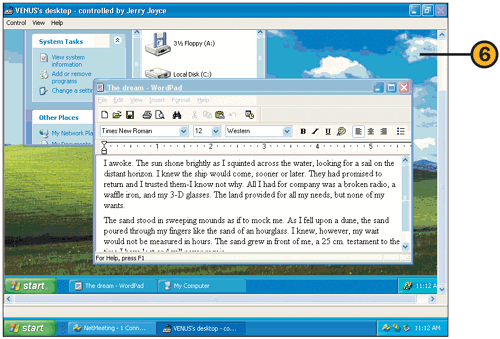
![]() Use the remote Desktop of your work computer just as if you were sitting at your desk in the office.
Use the remote Desktop of your work computer just as if you were sitting at your desk in the office.
![]() Click to resize the remote Desktop.
Click to resize the remote Desktop.
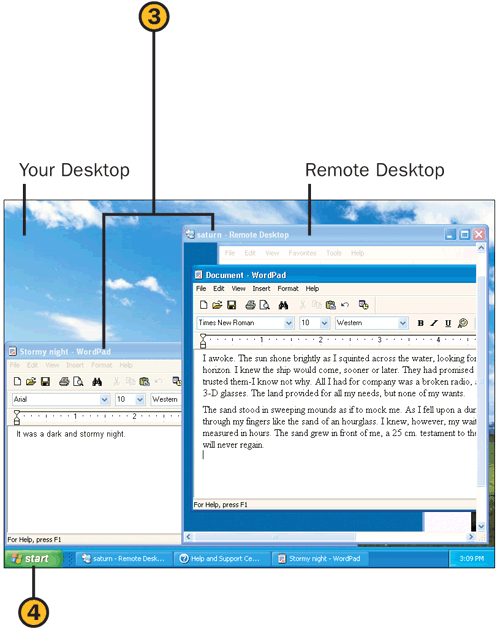
![]() Switch between programs on your home computer and your work computer. You can copy and paste items, such as text or graphics, between programs, regardless of which computer each program is on.
Switch between programs on your home computer and your work computer. You can copy and paste items, such as text or graphics, between programs, regardless of which computer each program is on.
![]() When you’ve finished, open the Start menu, and choose to log off or disconnect.
When you’ve finished, open the Start menu, and choose to log off or disconnect.
If you want to connect to a business network over a phone line, you can use Dial-Up Networking to make the connection and to log on to the company’s network. You’ll be required to establish an account that lets you access resources on the network, and you’ll need the proper permissions to connect. Be sure to get all the information you need from the company’s network administrator before you connect. Every company has its own security settings and policies, so you’ll need those details for the proper configuration.
Caution
If you choose to save your user name and password so that anyone can use them, you’re leaving the network vulnerable to unauthorized access and possible damage, all in your name. To protect access, save the name only for yourself, and use a password when you first log on to your computer. Also make sure that your computer is free of viruses. When you connect directly to a large network, your computer is probably the weakest link in the network’s security.
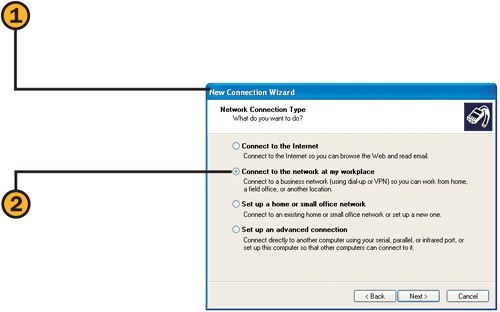
![]() Choose New Connection Wizard from the Communications submenu of the Start menu, and click Next to start the wizard.
Choose New Connection Wizard from the Communications submenu of the Start menu, and click Next to start the wizard.
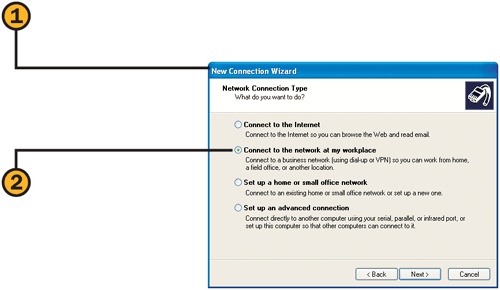
![]() Click the Connect To The Network At My Workplace option, and click Next.
Click the Connect To The Network At My Workplace option, and click Next.
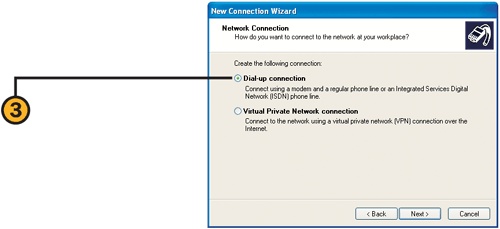
![]() Click the Dial-Up Connection option, and click Next.
Click the Dial-Up Connection option, and click Next.
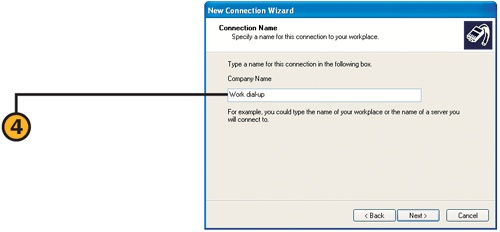
![]() Type a name for the connection, and click Next.
Type a name for the connection, and click Next.
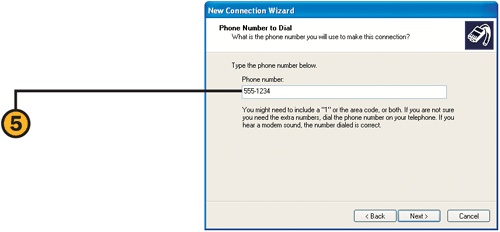
![]() Type the phone number for calling the network, and click Next. Click Finish to create the connection.
Type the phone number for calling the network, and click Next. Click Finish to create the connection.

![]() Point to Connect To on the Start menu, and choose the connection to your work computer from the submenu to display the Connect dialog box.
Point to Connect To on the Start menu, and choose the connection to your work computer from the submenu to display the Connect dialog box.
![]() Enter your assigned user name and password to connect to the remote network.
Enter your assigned user name and password to connect to the remote network.
![]() If you don’t want to enter your user name and password each time you connect, select this check box, and then click the Me Only option. To save the information so that anyone who uses the computer can use your name and password, click the Anyone Who Uses This Computer option.
If you don’t want to enter your user name and password each time you connect, select this check box, and then click the Me Only option. To save the information so that anyone who uses the computer can use your name and password, click the Anyone Who Uses This Computer option.
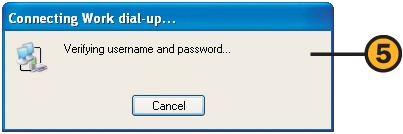
![]() Wait to be connected, and then use the connection just as you use any network connection.
Wait to be connected, and then use the connection just as you use any network connection.
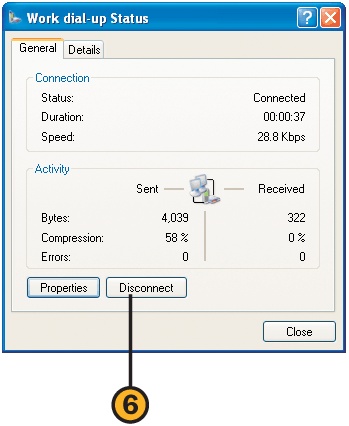
![]() When you’ve finished, click the connection icon in the notification area of the task bar to display the Status dialog box. Click Disconnect.
When you’ve finished, click the connection icon in the notification area of the task bar to display the Status dialog box. Click Disconnect.
To connect to your network over the Internet, you can use a VPN (Virtual Private Network), which provides a secure connection between your computer and the network. The computer you connect to must be configured as a VPN server and must be connected to the Internet. Before you connect, verify that you have the correct name of the host computer and the correct user name and password that have been assigned to you.
![]() Choose New Connection Wizard from the Communications submenu of the Start menu, and click Next to start the wizard.
Choose New Connection Wizard from the Communications submenu of the Start menu, and click Next to start the wizard.
![]() Click the Connect To The Network At My Workplace option, and click Next.
Click the Connect To The Network At My Workplace option, and click Next.

![]() Click the Virtual Private Network Connection option, and click Next.
Click the Virtual Private Network Connection option, and click Next.
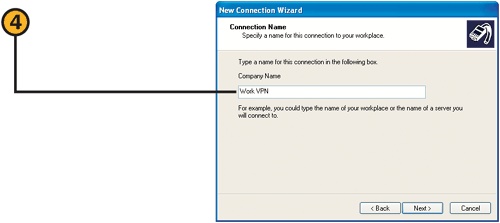
![]() Type a name for the connection, and click Next.
Type a name for the connection, and click Next.
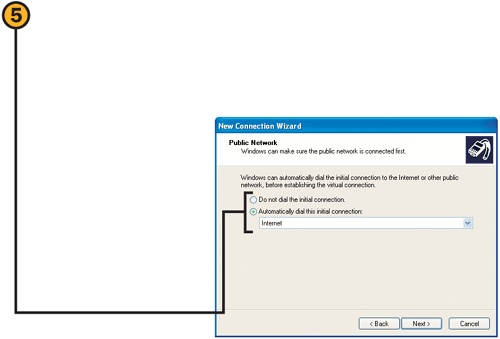
![]() Specify whether or not you want Windows XP to dial the Internet connection whenever you want to connect to the VPN. If you want Windows XP to do the dialing, click the connection to the Internet in the list, and click Next.
Specify whether or not you want Windows XP to dial the Internet connection whenever you want to connect to the VPN. If you want Windows XP to do the dialing, click the connection to the Internet in the list, and click Next.
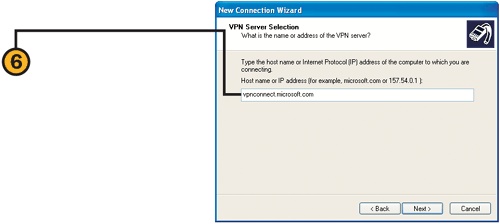
![]() Type the host name or the IP address that you were provided with by the person who administers the host computer, and click Next. Click Finish to create the connection.
Type the host name or the IP address that you were provided with by the person who administers the host computer, and click Next. Click Finish to create the connection.
![]() If you chose not to have your Internet connection made automatically when the VPN connection is made, and if you’re not currently connected, connect to the Internet. Point to Connect To on the Start menu, and choose the connection to your work computer from the submenu to display the Connect dialog box.
If you chose not to have your Internet connection made automatically when the VPN connection is made, and if you’re not currently connected, connect to the Internet. Point to Connect To on the Start menu, and choose the connection to your work computer from the submenu to display the Connect dialog box.
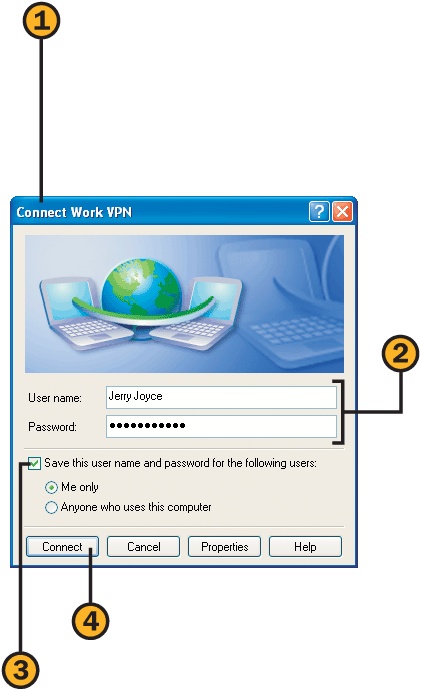
![]() Enter your assigned user name and password to connect to the remote network.
Enter your assigned user name and password to connect to the remote network.
![]() If you don’t want to enter your user name and password each time you connect, select this check box, and then click the Me Only option. To save the information so that anyone who uses the computer can use your name and password, click the Anyone Who Uses This Computer option.
If you don’t want to enter your user name and password each time you connect, select this check box, and then click the Me Only option. To save the information so that anyone who uses the computer can use your name and password, click the Anyone Who Uses This Computer option.

![]() Wait for the connection to be established, and then use it just as you use any other network connection.
Wait for the connection to be established, and then use it just as you use any other network connection.
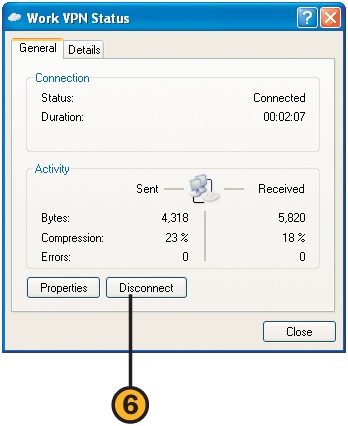
![]() When you’ve finished, click the connection icon for the VPN in the notification area of the taskbar to display the Status dialog box. Click Disconnect.
When you’ve finished, click the connection icon for the VPN in the notification area of the taskbar to display the Status dialog box. Click Disconnect.
Tip
Sometimes the configuration used by an ISP (Internet Service Provider) can interfere when you’re creating a VPN connection. If you encounter any problems, check with your ISP to determine whether you need to change any of your settings.
Tip
Although a VPN connection provides a direct and secure connection to the network, you’re still subject to all the slowdowns that you might experience whenever you use the Internet, including a slow connection to your service provider, slow performance by your service provider, a general slowdown of the Internet, and poor performance from the VPN server. If you’re planning to transfer large files, be prepared to wait!
The world is bristling with wireless networks, many of which are available to you—provided, of course, that you have a portable computer with a wireless network adapter, and that you know how to connect. You’ll find that many of these "Wi-Fi hotspots," whether they’re in small coffee shops or large conference centers, provide free access to the Internet and/or the ability to communicate with other computers on the same network. However, in airports and in some of the big coffee chains, you’ll often have to pay a fee to access a wireless network. Then all you need to do is turn on your computer and connect to the network you want.
See Also
For information about setting up a password for your computer, see "Setting Your Password".
For information about increasing firewall security for use with public wireless networks, see "Configuring the Windows Firewall".
For information about setting up a secure wireless network, see "Securing Your Wireless Network".
![]() In an area where you expect a wireless network to be present, turn on your computer with the wireless network adapter installed.
In an area where you expect a wireless network to be present, turn on your computer with the wireless network adapter installed.
![]() Click the Wireless Network Connection icon in the notification area of the taskbar.
Click the Wireless Network Connection icon in the notification area of the taskbar.
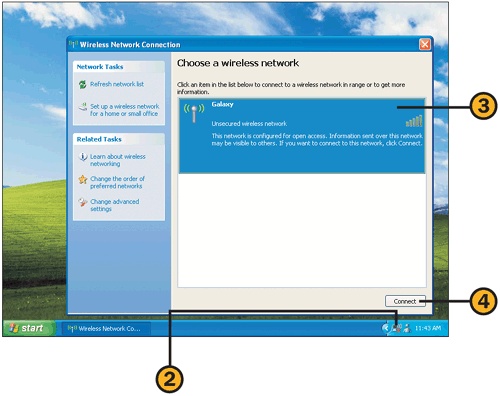
![]() In the Wireless Network Connection dialog box that appears, select the network that you want to use.
In the Wireless Network Connection dialog box that appears, select the network that you want to use.

![]() Click Connect Anyway to connect to the network.
Click Connect Anyway to connect to the network.
![]() Use the computer as you normally would to access the Internet or to make connections to other networks over the Internet.
Use the computer as you normally would to access the Internet or to make connections to other networks over the Internet.
![]() When you’ve finished, select the network connection, and click Disconnect.
When you’ve finished, select the network connection, and click Disconnect.
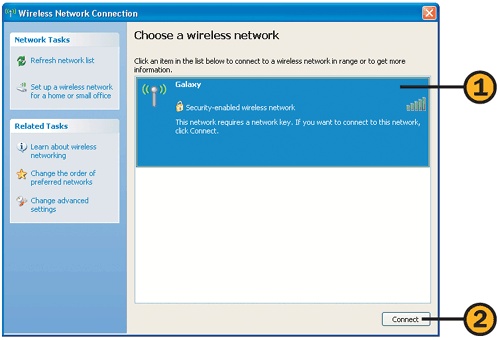
![]() Select the secure network you want to connect to. If the Wireless Network Connection dialog box isn’t displayed, click the Wireless Network Connection icon in the notification area of the taskbar to display the dialog box.
Select the secure network you want to connect to. If the Wireless Network Connection dialog box isn’t displayed, click the Wireless Network Connection icon in the notification area of the taskbar to display the dialog box.
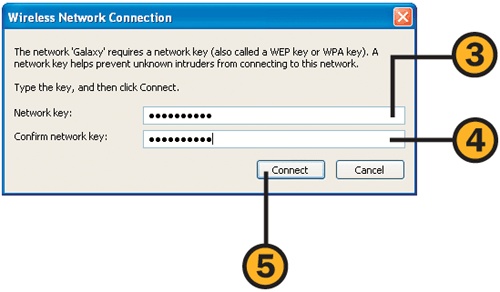
![]() In the Wireless Network Connection dialog box, enter the network key that you were provided with.
In the Wireless Network Connection dialog box, enter the network key that you were provided with.
![]() Enter the same network key to confirm your typing.
Enter the same network key to confirm your typing.
![]() Click Connect. Use the network to access the information you want.
Click Connect. Use the network to access the information you want.
![]() If the Wireless Network Connection dialog box isn’t open when you’ve finished, double-click the Wireless Network Connection icon in the notification area of the taskbar. In the Wireless Network Connection dialog box, click Disconnect (the Connect button changes to the Disconnect button when you’re connected to the network).
If the Wireless Network Connection dialog box isn’t open when you’ve finished, double-click the Wireless Network Connection icon in the notification area of the taskbar. In the Wireless Network Connection dialog box, click Disconnect (the Connect button changes to the Disconnect button when you’re connected to the network).
If you want to connect to your own computer from another computer and establish a network connection so that you can transfer or use files, you can turn your computer into a small version of a dial-up network server. To do so, you create an incoming connection and allow only authorized users to connect to your computer.
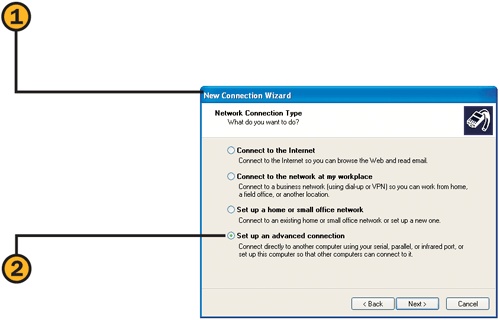
![]() Choose New Connection Wizard from the Communications submenu of the Start menu, and click Next to start the wizard.
Choose New Connection Wizard from the Communications submenu of the Start menu, and click Next to start the wizard.
![]() Click the Set Up An Advanced Connection option, and click Next.
Click the Set Up An Advanced Connection option, and click Next.
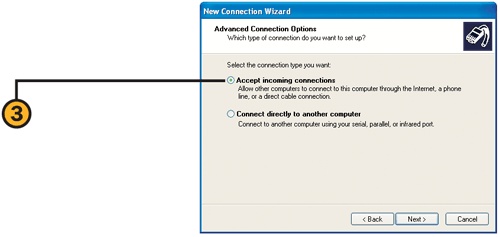
![]() Click the Accept Incoming Connections option, and click Next.
Click the Accept Incoming Connections option, and click Next.
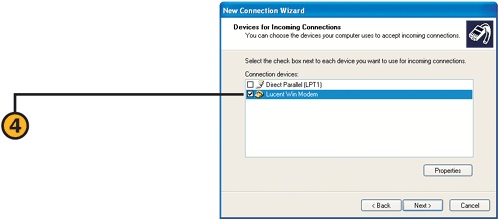
![]() Specify the device (usually your modem) that you’ll be using, and click Next.
Specify the device (usually your modem) that you’ll be using, and click Next.
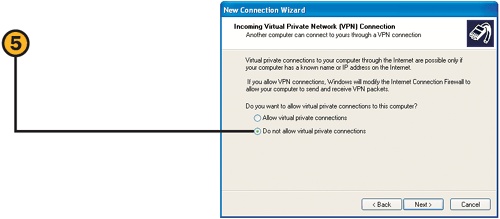
![]() Click the Do Not Allow Virtual Private Connections option, and then click Next.
Click the Do Not Allow Virtual Private Connections option, and then click Next.

![]() Select the check boxes for the users who are allowed access to your computer. (Only authorized users of the computer can connect.)
Select the check boxes for the users who are allowed access to your computer. (Only authorized users of the computer can connect.)
![]() Click Next, click Next again in the Network Software page of the wizard, and click Finish to create the incoming connection.
Click Next, click Next again in the Network Software page of the wizard, and click Finish to create the incoming connection.