
In this section
One of the things that usually takes all the fun out of buying a new computer is having to set up all over again the files and settings that took such a long time to get exactly right on your old computer. Well, we have good news for you! You can transfer your files and settings easily and quickly with the help of a wizard that walks you through the process. If you choose to transfer the information over your network, you provide a few pieces of information and type a password, and the transfer happens automatically. If you use disks to transfer the information, just follow the instructions on the screen until the transfer is complete.
True to this section’s title, you’ll also find information about setting up dial-up Internet access so that you can explore the far reaches of the Web’s vastness; setting up Outlook Express for sending and receiving e-mail messages, as well as for subscribing to newsgroups; setting up Fax Service so that you can send and receive faxes directly through your computer; setting up a printer that’s attached to your computer; and setting up a network.
In addition, in this section we’ll talk about adding or removing Microsoft Windows XP components or parts thereof, installing software programs, and adding hardware devices to your computer.
If these all sound like daunting tasks, rest assured that they’re not. With the instructions on the pages that follow, and with help from the wonderful wizards of Microsoft, you’ll sail right through them.
If you said "bye-bye" to your old computer and went out and bought a new super-duper computer loaded with Windows XP, you’ll be glad to know that you can transfer your files and all sorts of settings from the old computer to the new one. You don’t have to set everything up again! You can transfer your settings, including those for Outlook Express, Internet Explorer, and your dial-up connections, by running the Files And Settings Transfer Wizard on both your old and new computers.
![]() On the new computer, choose the Files And Settings Transfer Wizard from the System Tools submenu of the Start menu.
On the new computer, choose the Files And Settings Transfer Wizard from the System Tools submenu of the Start menu.
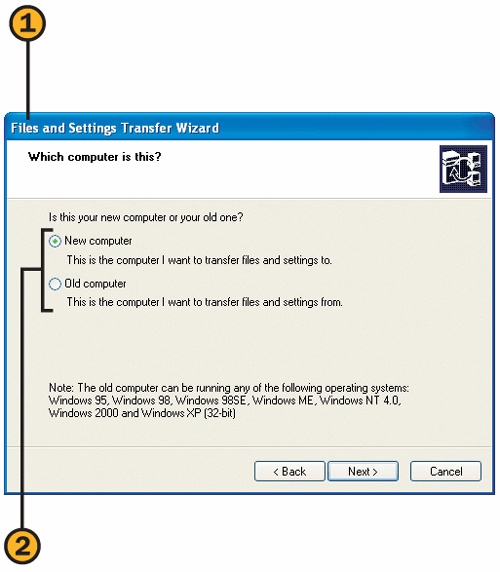
![]() On the new computer, step through the beginning part of the wizard, completing the information below, and then stopping when the wizard tells you to stop. Specify that
On the new computer, step through the beginning part of the wizard, completing the information below, and then stopping when the wizard tells you to stop. Specify that
This is the new computer.
You’re going to use the Windows XP CD on the old computer. If you don’t have the CD, use the option to create a copy of the wizard on a floppy disk.
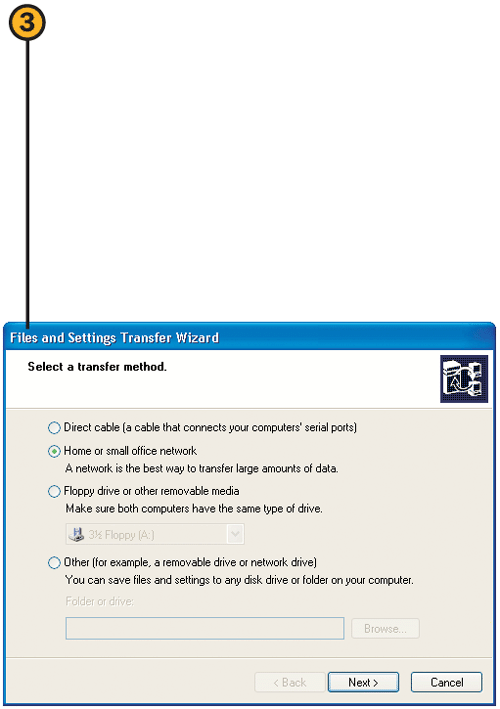
![]() On the old computer, insert the Windows XP CD, and, when it starts, choose Perform Additional Tasks from the menu that appears. On the next menu, choose Transfer Files And Settings to start the Files And Settings Transfer Wizard. Step through the wizard, specifying
On the old computer, insert the Windows XP CD, and, when it starts, choose Perform Additional Tasks from the menu that appears. On the next menu, choose Transfer Files And Settings to start the Files And Settings Transfer Wizard. Step through the wizard, specifying
That this is the old computer.
Whether you’re going to transfer the file using a serial transfer cable, your network (which is the easiest way), a multitude of floppy disks, or a removable drive or network drive.
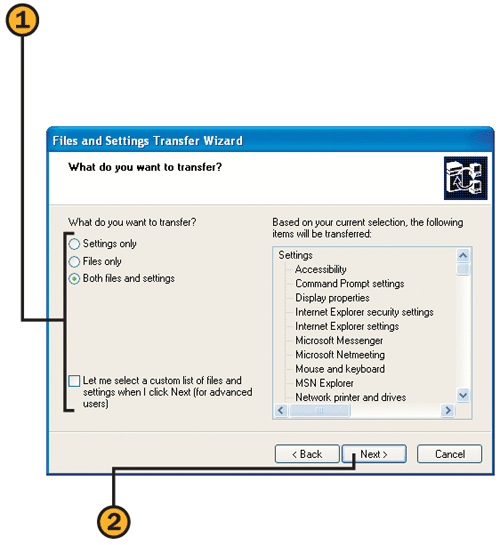
![]() On the old computer, specify whether you want to copy files, settings, or both, and whether you want to select which files and settings are to be copied.
On the old computer, specify whether you want to copy files, settings, or both, and whether you want to select which files and settings are to be copied.
![]() Click Next. If you’re using disks, follow the instructions on the screen, and switch disks when prompted to do so.
Click Next. If you’re using disks, follow the instructions on the screen, and switch disks when prompted to do so.

![]() If you’re transferring the information over your network, write down the password that’s displayed on the new computer, type it in the Password dialog box on the old computer, and click OK. The transfer will take place automatically.
If you’re transferring the information over your network, write down the password that’s displayed on the new computer, type it in the Password dialog box on the old computer, and click OK. The transfer will take place automatically.
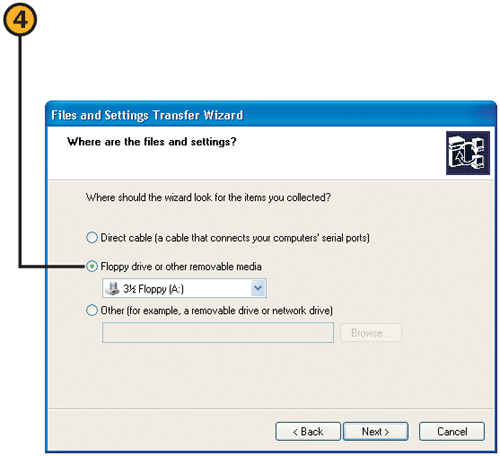
![]() If you’re using disks, on the new computer, click Next. Click the Floppy Drive Or Other Removable Media option, and click Next. Follow the instructions on the screen to switch disks.
If you’re using disks, on the new computer, click Next. Click the Floppy Drive Or Other Removable Media option, and click Next. Follow the instructions on the screen to switch disks.
When Windows XP is installed on your computer, some—but not all—of its components are included in the installation. If any components you need haven’t been installed, you can add them, and, by the same token, if there are components you never use, you can remove them from your system to save disk space.
Tip
A shaded check box indicates that only some of the items in the group will be installed. Use the Details button to modify which items are to be installed.
![]() Save any documents you’re working on, and close all your running programs.
Save any documents you’re working on, and close all your running programs.
![]() Choose Control Panel from the Start menu, and click the Add Or Remove Programs category to display the Add Or Remove Programs dialog box.
Choose Control Panel from the Start menu, and click the Add Or Remove Programs category to display the Add Or Remove Programs dialog box.
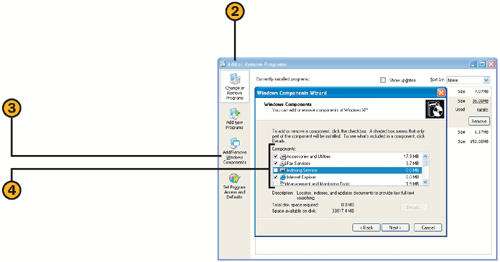
![]() Click Add/Remove Windows Components to start the Windows Components Wizard.
Click Add/Remove Windows Components to start the Windows Components Wizard.
![]() On the windows Components page of the wizard, clear a check box to remove an entire component, or select a check box to add all the items in a component group.
On the windows Components page of the wizard, clear a check box to remove an entire component, or select a check box to add all the items in a component group.
See Also
For information about updating existing Windows components or adding components that have recently been released, see "Updating Your System".
Tip
You can install additional components and utilities from other sources. On the Windows XP CD, in the Valueadd folder, you’ll find the Setup program for Windows Backup—a program for backing up and safeguarding your files. If you buy Microsoft Plus! For Windows XP, you’ll find that it contains numerous additional components and utilities. And you can find many other items at the Windows Update Web site.
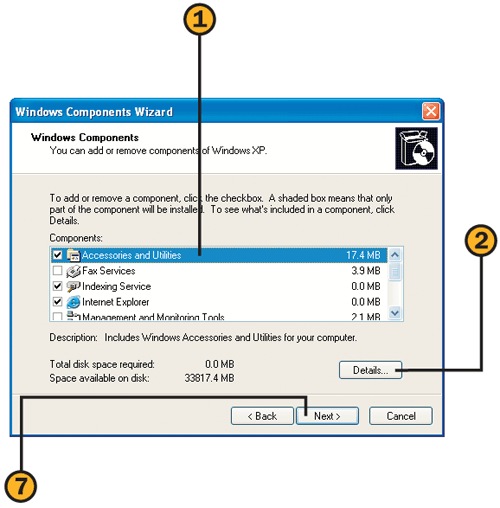
![]() Click the component group that contains the item you want to add or remove.
Click the component group that contains the item you want to add or remove.
![]() Click Details. If the button is grayed (unavailable), there are no individual items to be managed, so you must either add or remove the entire component.
Click Details. If the button is grayed (unavailable), there are no individual items to be managed, so you must either add or remove the entire component.
![]() Click Next. If prompted, insert the Windows XP CD into its drive, or specify the location of the installation folder. Click Finish to close the Windows Components Wizard, and click OK if prompted to restart the computer to complete the installation.
Click Next. If prompted, insert the Windows XP CD into its drive, or specify the location of the installation folder. Click Finish to close the Windows Components Wizard, and click OK if prompted to restart the computer to complete the installation.
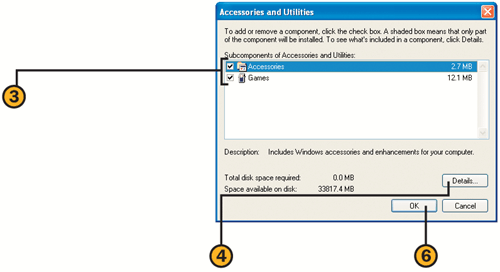
![]() Clear a selected check box to remove that item, or select a cleared check box to add that item.
Clear a selected check box to remove that item, or select a cleared check box to add that item.
![]() If the Details button is available when you select an item, click the button.
If the Details button is available when you select an item, click the button.
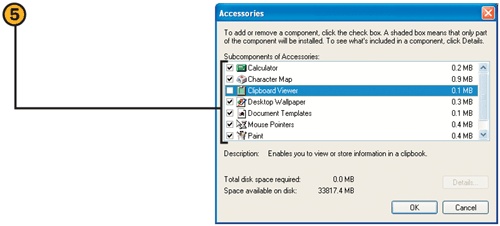
![]() Select or clear the check boxes for the individual items you want to add or remove. Click OK when you’ve finished.
Select or clear the check boxes for the individual items you want to add or remove. Click OK when you’ve finished.
When you set up Windows XP, certain programs are designated as the default programs for specific tasks: Outlook Express for your e-mail, for example; Internet Explorer for Web browsing; Windows Media Player for playing videos and digital music; and Windows Messenger for instant messaging. However, if there are other programs you want to use instead, you can set them as your default programs.
Tip
Programs that have previously been used or associated with the type of file selected are shown on the Open With submenu. Choosing a program from that submenu will open a file in that program but won’t make the program the default program for that type of file.
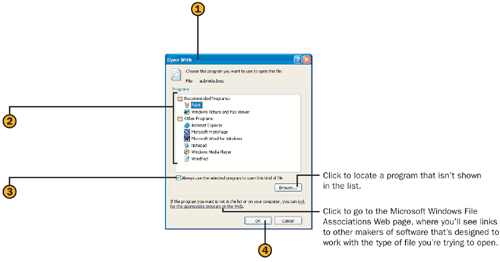
![]() Right-click the file that you want to be associated with a specific program, point to Open With on the shortcut menu, and choose Choose Program from the submenu to display the Open With dialog box.
Right-click the file that you want to be associated with a specific program, point to Open With on the shortcut menu, and choose Choose Program from the submenu to display the Open With dialog box.
![]() Click the program you want to use.
Click the program you want to use.
![]() Select this check box to make the program the default program for all files of this type.
Select this check box to make the program the default program for all files of this type.
![]() Choose Control Panel from the Start menu, and click the Add Or Remove Programs category to display the Add Or Remove Programs dialog box.
Choose Control Panel from the Start menu, and click the Add Or Remove Programs category to display the Add Or Remove Programs dialog box.
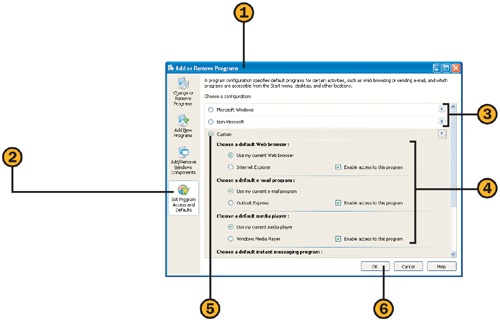
![]() Click Set Program Access And Defaults.
Click Set Program Access And Defaults.
![]() Click the down arrows for any configuration you might want to use.
Click the down arrows for any configuration you might want to use.
![]() Select the type of configuration you want to use. If you chose the Custom configuration, make any changes you want to the configuration.
Select the type of configuration you want to use. If you chose the Custom configuration, make any changes you want to the configuration.
New Feature
The Set Program Access And Defaults tool makes it easy to use whatever program you want. By setting a program as the default, you ensure that the program will automatically open whenever you need it—when you double-click a music file, your default music player opens, when you choose to send a file via e-mail, your default e-mail program opens.
Tip
When you initially install certain programs, they’ll automatically set themselves as the default programs for some files. If there’s a program you want to use but it isn’t set as your default program, use the procedure on the facing page to designate it as the default program before you use the Set Program Access And Defaults settings.
Almost every software program contains its own installation program, which copies the required files to the computer’s hard disk and tells Windows XP which files are installed, where they are, and what they do.
Tip
You can also install a program by double-clicking its setup.exe or install.exe program in a folder window.
Tip
Some programs are only partially installed until you use them for the first time. When you first choose one of these programs from the Start menu, you’ll be asked whether you want to install it. You’ll see this request if you chose Install On First Use when you installed the program.
![]() Close all your running programs. If you’re installing from a CD, insert the CD into its drive, follow the instructions that appear on the screen, and skip steps 2 through 5.
Close all your running programs. If you’re installing from a CD, insert the CD into its drive, follow the instructions that appear on the screen, and skip steps 2 through 5.
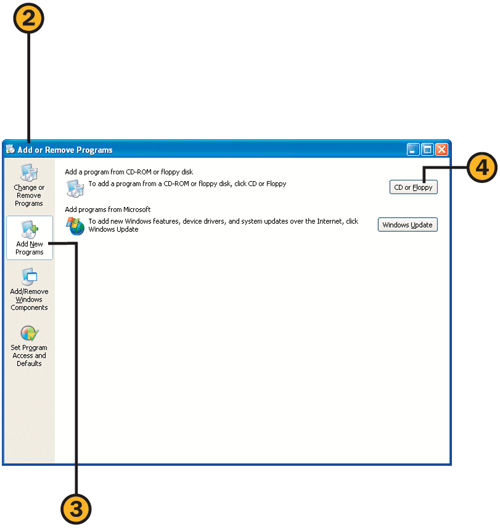
![]() If the CD didn’t start, or if you’re installing from a different drive or from a network location, choose Control Panel from the Start menu, and click the Add Or Remove Programs category to display the Add Or Remove Programs dialog box.
If the CD didn’t start, or if you’re installing from a different drive or from a network location, choose Control Panel from the Start menu, and click the Add Or Remove Programs category to display the Add Or Remove Programs dialog box.
![]() Click CD Or Floppy. If you are installing from a CD or disk, place it in to its drive. Click Next.
Click CD Or Floppy. If you are installing from a CD or disk, place it in to its drive. Click Next.
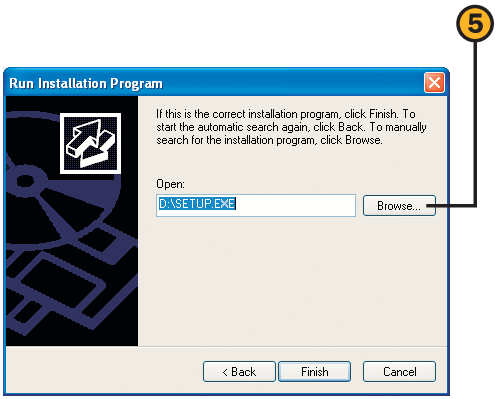
![]() If the Setup or installation program is found, click Finish. If not, click Browse, locate the Setup or installation program on a different drive or in a network folder, and click Finish.
If the Setup or installation program is found, click Finish. If not, click Browse, locate the Setup or installation program on a different drive or in a network folder, and click Finish.
![]() Follow the Setup or installation program’s instructions, and close the Add Or Remove Programs dialog box when the installation is complete.
Follow the Setup or installation program’s instructions, and close the Add Or Remove Programs dialog box when the installation is complete.
Many ISPs (Internet Service Providers) supply installation CDs or other setup disks, and all you have to do is insert the CD or the disks into the appropriate drive and follow the instructions on the screen. However, if you don’t have the installation materials, you can easily set up your connection manually.
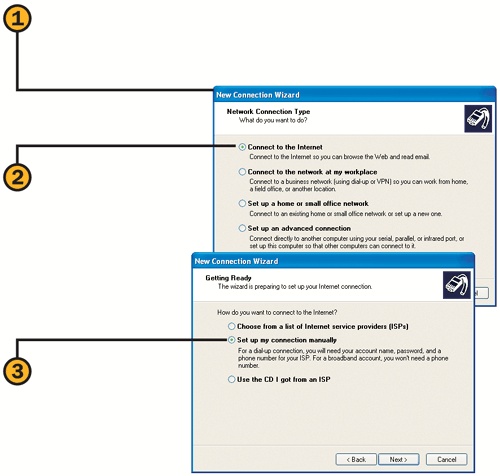
![]() Choose New Connection Wizard from the Communications submenu of the Start menu, and click Next to start the wizard.
Choose New Connection Wizard from the Communications submenu of the Start menu, and click Next to start the wizard.
![]() Click the Connect To The Internet option, and click Next.
Click the Connect To The Internet option, and click Next.
![]() Click the Set Up My Connection Manually option, and click Next.
Click the Set Up My Connection Manually option, and click Next.
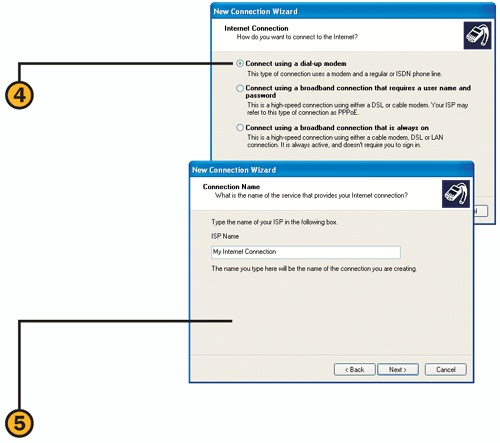
![]() Click the Connect Using A Dial-Up Modem option, and click Next.
Click the Connect Using A Dial-Up Modem option, and click Next.
![]() Continue through the wizard, specifying the following:
Continue through the wizard, specifying the following:
A descriptive name for the connection
The access phone number
Your user name for connecting to the ISP
Your password for connecting to the ISP
Whether this account may be used by everyone who uses the computer
Whether this is your default connection
See Also
For information about using a firewall to protect your Internet access, see "Configuring the Windows Firewall".
When you first set up Windows XP, you probably set up your e-mail account at the same time. However, if you didn’t set up the account, or if you want to add newsgroups or another e-mail account, you can easily make changes to the Outlook Express setup.
Tip
In case you’re wondering, POP3 is Post Office Protocol 3, IMAP is Internet Message Access Protocol, HTTP is Hypertext Transfer Protocol, and NNTP is Network News Transfer Protocol.
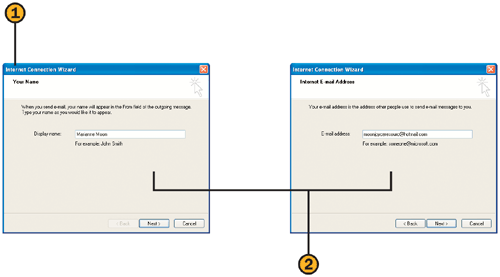
![]() Choose Outlook Express from the Start menu. If this is the first time you’ve started Outlook Express, the Internet Connection Wizard will start.
Choose Outlook Express from the Start menu. If this is the first time you’ve started Outlook Express, the Internet Connection Wizard will start.
![]() Step through the wizard, specifying the following:
Step through the wizard, specifying the following:
Your name as you want it displayed in your e-mail
Your e-mail address
The type of incoming mail server (HTTP, POP3, or IMAP)
The addresses of the incoming and outgoing e-mail servers, if they haven’t already been supplied
Your e-mail account name (usually the same as your e-mail address) and your password
Whether your e-mail provider requires you to log on using Secure Password Authentication
See Also
For information about transferring your Outlook Express settings and messages from another computer, see "Transferring Files and Settings".
For information about creating an Internet connection to your ISP (Internet Service Provider), see "Setting Up Dial-Up Internet Access".

![]() In Outlook Express, choose Accounts from the Tools menu to display the Internet Accounts dialog box.
In Outlook Express, choose Accounts from the Tools menu to display the Internet Accounts dialog box.
![]() Click Add, and choose Mail from the submenu that appears. Step through the Internet Connection Wizard to add the e-mail account.
Click Add, and choose Mail from the submenu that appears. Step through the Internet Connection Wizard to add the e-mail account.
![]() Click Add again, and choose News from the submenu to start the Internet Connection Wizard. Step through the wizard, specifying the following:
Click Add again, and choose News from the submenu to start the Internet Connection Wizard. Step through the wizard, specifying the following:
Your name as you want it to appear in the newsgroups
Your e-mail address
The address of the news server
Whether you need to log on to use the server, and, if so, your logon name and password
See Also
For information about using Outlook Express, see "Sending E-Mail" and "Subscribing to Newsgroups".
If your computer has a fax modem, you can use Fax Service, which allows you to send and receive faxes through your computer. Before you can use Fax Service, you’ll need to provide some personal information that can be used on the fax cover page. You’ll also need to enter your identification number for Fax Service and set options for the way you want your faxes to be sent and received.
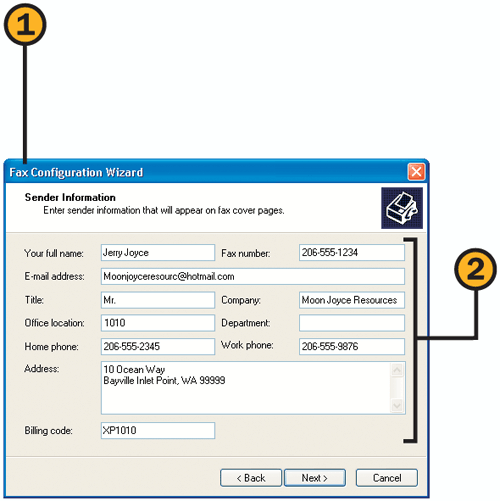
![]() Choose Fax Console from the Fax submenu of the Start menu, and choose Configure Fax from the Tools menu to display the Fax Configuration Wizard. Click Next to start the wizard.
Choose Fax Console from the Fax submenu of the Start menu, and choose Configure Fax from the Tools menu to display the Fax Configuration Wizard. Click Next to start the wizard.
![]() Enter your personal information, and click Next.
Enter your personal information, and click Next.
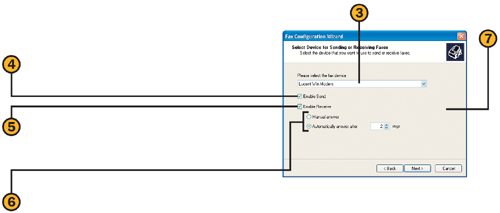
![]() Make sure the correct fax device is specified.
Make sure the correct fax device is specified.
![]() Select this check box if you want to send faxes from your computer.
Select this check box if you want to send faxes from your computer.
![]() Select this check box if you want to receive faxes on your computer.
Select this check box if you want to receive faxes on your computer.
![]() If you want to receive faxes, click an option to specify whether the faxes are to be received manually or automatically. If you specify automatic receiving, designate the number of rings before the modem answers the call.
If you want to receive faxes, click an option to specify whether the faxes are to be received manually or automatically. If you specify automatic receiving, designate the number of rings before the modem answers the call.
![]() Complete the wizard, specifying the following:
Complete the wizard, specifying the following:
The TSID
The CSID
Whether every received fax should be printed by a specific printer
Whether a copy of the fax is to be stored in a specific folder
Tip
The TSID is the Transmitting Station Identifier and is usually sent along with the fax so that the recipient can identify the source of the fax. In many locations, a TSID is required by law. The CSID is the Called Subscriber Identifier. This identification is sent back to the sending fax device to confirm your identity, and it’s also used in a log that records received faxes.
Tip
The Fax printer is used exclusively to send faxes, and it can’t be shared, so you can’t share your fax modem with other computers on your network. A fax modem can, however, be shared through a Windows XP Professional computer.
See Also
For information about installing Fax Service if it isn’t already installed, see "Adding or Removing Windows Components".
Windows XP might or might not detect your printer, depending on how and to what the printer is attached. Windows should detect and install any printer that’s attached to your computer’s USB (Universal Serial Bus) or infrared port. If the printer is attached to a parallel or serial port, however, Windows might not have detected the printer when it was installed, so you’ll need tell Windows about it yourself.
![]() If the printer came with an installation disk that’s designed to work with Windows XP, follow the directions that came with the printer to run the installation program. The printer should then be installed correctly.
If the printer came with an installation disk that’s designed to work with Windows XP, follow the directions that came with the printer to run the installation program. The printer should then be installed correctly.
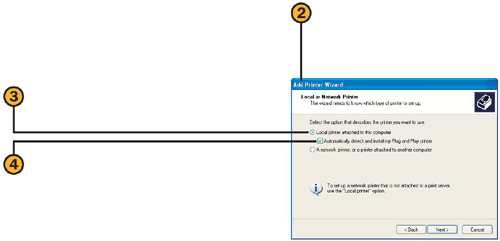
![]() If you don’t have an installation disk, with the printer connected and turned on, choose Control Panel from the Start menu, click the Printers And Other Hardware category, and click the Add A Printer task. Click Next to start the Add Printer Wizard.
If you don’t have an installation disk, with the printer connected and turned on, choose Control Panel from the Start menu, click the Printers And Other Hardware category, and click the Add A Printer task. Click Next to start the Add Printer Wizard.
![]() Click the Local Printer Attached To This Computer option.
Click the Local Printer Attached To This Computer option.
![]() Select this check box to have Windows XP look for the printer, and then click Next. If Windows doesn’t detect the printer, click Next.
Select this check box to have Windows XP look for the printer, and then click Next. If Windows doesn’t detect the printer, click Next.
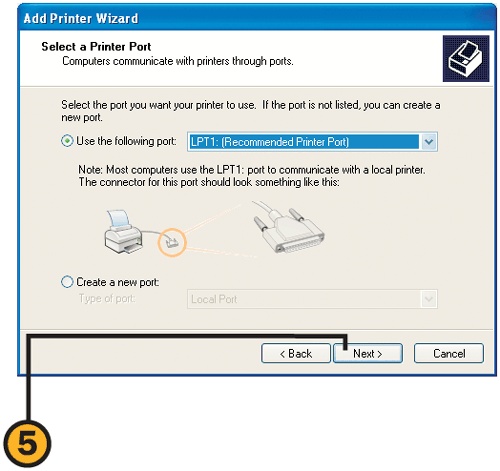
![]() In the list, click the port to which the printer is connected, and click Next.
In the list, click the port to which the printer is connected, and click Next.
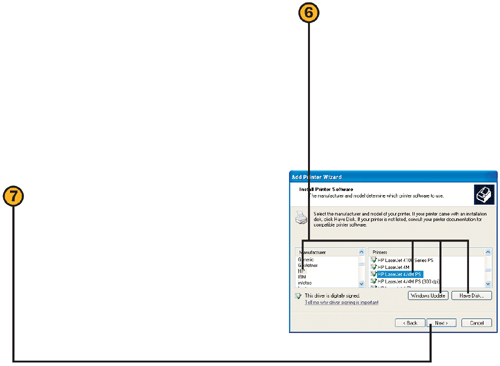
Select the manufacturer and model of the printer.
Click Have Disk if you have a disk or a download of the required files.
Click Windows Update to download new printer installation files.
![]() Click Next, and complete the wizard, specifying the following:
Click Next, and complete the wizard, specifying the following:
A name for the printer
Whether this is your default printer
Whether the printer is to be shared on your network, and, if so, the name it will display to the other computers
Whether you want to print a test page to verify the setup
If your network hasn’t already been set up, you can configure it easily. To do so, you first have to set up one of the computers as the network host. Then you configure the other computers on your network to be clients of the host. There are two different types of network configurations: one in which you use one of your computers to host the network and connect to the Internet, and the other in which you use a router that hosts the network and connects to the Internet. When you use a computer as the host, you first set up the host computer and then add the other computers as network clients. In a network with a router, all the computers are network clients.
Tip
Be sure to set up your Internet connection on the host computer before you set up the network. Verify that all the computers that will be on the network have the proper network cards and cables and are turned on and operating correctly.
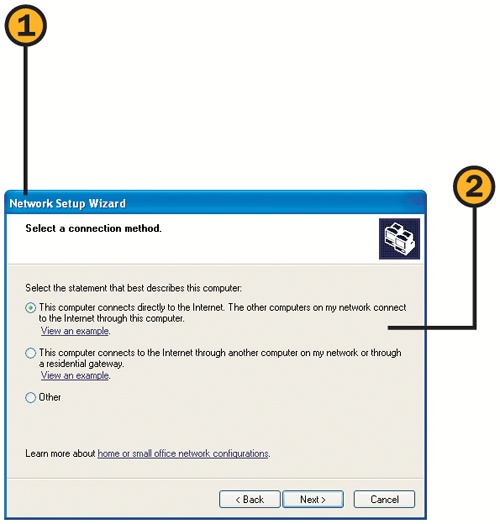
![]() With all your network connections in place and all the computers turned on, on the computer that will host your network, choose Network Setup Wizard from the Communications submenu of the Start menu, and click Next to start the wizard.
With all your network connections in place and all the computers turned on, on the computer that will host your network, choose Network Setup Wizard from the Communications submenu of the Start menu, and click Next to start the wizard.
![]() Step through the wizard, specifying the following:
Step through the wizard, specifying the following:
That this computer connects directly to the Internet
The connection you’ll use to connect to the Internet
A friendly description of the computer and a name for the computer
A name for your workgroup
Whether you want to allow sharing of files and printers on your computer over the network
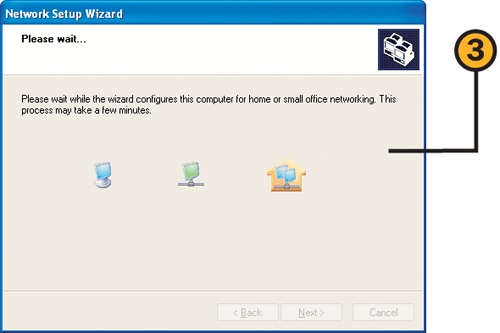
![]() After confirming the configuration and clicking Next, wait for the computer to do a preliminary search of the network to identify the computers and shared items that are available.
After confirming the configuration and clicking Next, wait for the computer to do a preliminary search of the network to identify the computers and shared items that are available.
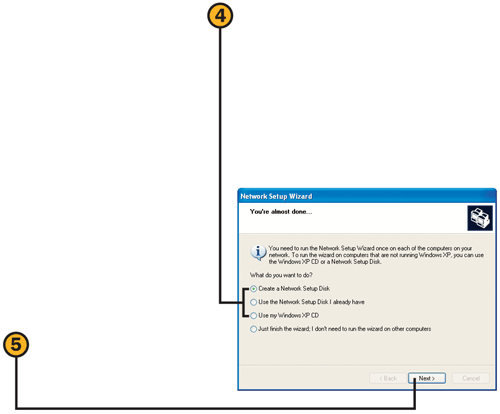
![]() If a computer that will be part of the network isn’t running Windows XP, do either of the following:
If a computer that will be part of the network isn’t running Windows XP, do either of the following:
Click the Create A Network Setup Disk option if you don’t have a Windows XP CD.
Click the Use My Windows XP CD option.
![]() Click Next, and follow the instructions to complete the wizard.
Click Next, and follow the instructions to complete the wizard.
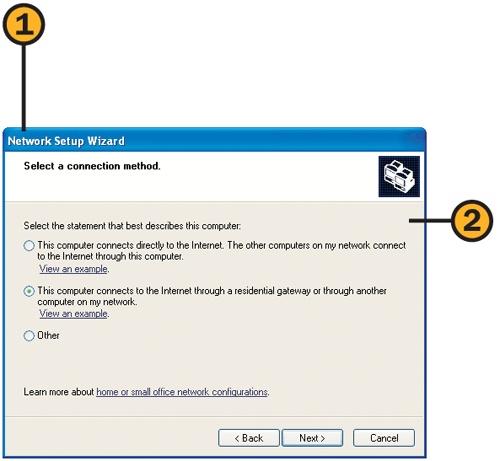
![]() Choose Network Setup Wizard from the Communications submenu of the Start menu, and click Next to start the wizard.
Choose Network Setup Wizard from the Communications submenu of the Start menu, and click Next to start the wizard.
![]() If the computer isn’t running Windows XP, insert the Windows XP CD and, when the CD starts, choose Perform Additional Tasks from the menu that appears. From the next menu, choose Set Up A Home Or Small Office Network.
If the computer isn’t running Windows XP, insert the Windows XP CD and, when the CD starts, choose Perform Additional Tasks from the menu that appears. From the next menu, choose Set Up A Home Or Small Office Network.
![]() Step through the wizard, specifying the following:
Step through the wizard, specifying the following:
That this computer connects to the Internet through another computer or through a residential gateway
A friendly description of the computer and a name for the computer
A name for your workgroup
Whether you want to allow sharing of files and printers on your computer over the network

![]() After confirming the configuration and clicking Next, wait for the computer to search your network, and then complete the wizard.
After confirming the configuration and clicking Next, wait for the computer to search your network, and then complete the wizard.
Caution
A network can have only one host. If you’re adding a computer that’s running Windows XP, and you want that computer to host an existing network that uses ICS (Internet Connection Sharing), you must disable ICS before you can set up your Windows XP computer as the host.
Tip
If you aren’t using the Windows XP CD, and if you created a setup disk, place the disk in the client computer’s disk drive, choose Run from the Start menu, type a:netsetup and press Enter.
See Also
For information about setting up a wireless network that uses high security to prevent outside intrusion, see "Securing Your Wireless Network".
In most cases, when you install a piece of hardware, Windows XP detects it, configures it, and installs the necessary software drivers. Sometimes, however, Windows doesn’t detect the hardware device, which means that you’ll have to install it manually. When a device isn’t detected, it’s usually because Windows doesn’t have the necessary software drivers, so you’ll need to obtain that software from the manufacturer before you can install the device. If the hardware came with an installation CD, use it to install the hardware. If you don’t have an installation CD, use the Add Hardware Wizard to install the hardware.
![]() If the hardware has been properly installed on the computer but Windows XP doesn’t recognize it, shut down Windows and then restart it to see whether Windows has detected the hardware now.
If the hardware has been properly installed on the computer but Windows XP doesn’t recognize it, shut down Windows and then restart it to see whether Windows has detected the hardware now.
![]() If Windows still hasn’t detected the hardware, open the Control Panel, and click Printers And Other Hardware. Click Add Hardware in the See Also list to display the Add Hardware Wizard. Click Next to start the wizard.
If Windows still hasn’t detected the hardware, open the Control Panel, and click Printers And Other Hardware. Click Add Hardware in the See Also list to display the Add Hardware Wizard. Click Next to start the wizard.
![]() Click the Yes, I Have Already Connected The Hardware option, and click Next.
Click the Yes, I Have Already Connected The Hardware option, and click Next.
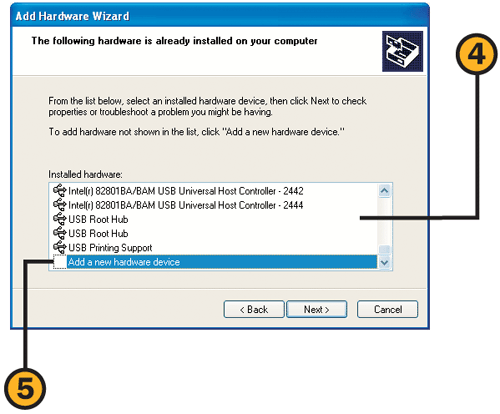
![]() Review the list of installed items. If your hardware is listed, it has already been installed, but there might be a problem. Double-click the item to see whether there’s any troubleshooting information about it and to complete the wizard.
Review the list of installed items. If your hardware is listed, it has already been installed, but there might be a problem. Double-click the item to see whether there’s any troubleshooting information about it and to complete the wizard.
![]() If your hardware isn’t listed, double-click Add A New Hardware Device. Click the Search For And Install The Hardware Automatically option, and click Next. If the hardware is detected, Windows should install it for you.
If your hardware isn’t listed, double-click Add A New Hardware Device. Click the Search For And Install The Hardware Automatically option, and click Next. If the hardware is detected, Windows should install it for you.
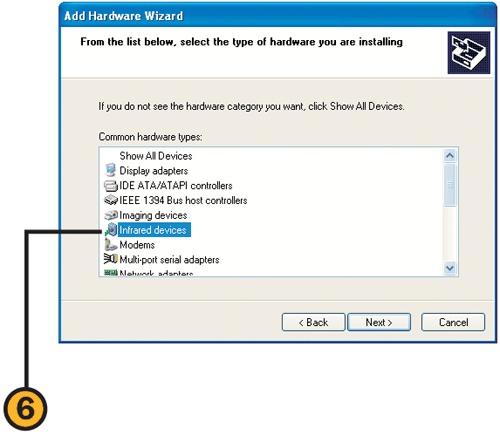
![]() If Windows doesn’t detect the hardware, click Next, and double-click the type of device.
If Windows doesn’t detect the hardware, click Next, and double-click the type of device.
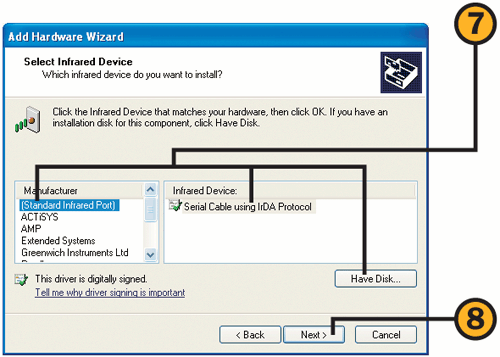
Click the manufacturer and model.
Click Have Disk if you have a disk or a download of the required files. Use the Browse button to locate the files, and click OK.