
In this section
Changing the Date or Time, Changing the Display, or Changing the Disk Format
Troubleshooting
The beauty of Microsoft Windows XP is the flexibility it gives you to make changes, fix problems, and generally make your computer work better. If your Desktop is a cluttered mess, you can run a wizard that automatically removes Desktop shortcuts you haven’t used for the previous 60 days and puts them in a special folder. If you want to squeeze more items onto your Desktop, you can increase its "virtual" size by changing the screen resolution. If the date or time on your computer is inaccurate, it’s easy to change it. If your hard disk is NTFS–formatted, you can compress files, folders, or even the entire drive so that you can store more information in the same location. If your disk isn’t NTFS–formatted, you can probably convert it to the NTFS format.
Windows XP also provides disk-maintenance tools that help make your computer run better. You can schedule these tools to run periodically—they’ll find and re-order bits of files that have become scattered or lost, delete unused files, and so on. Because computers, programs, and peripheral devices are continually changing, we’ll show you how to use the Windows Update Web page to update your computer. You’ll learn how to avoid common hardware problems and how to remove software programs. If Windows XP won’t start properly, you’ll find several solutions that will either get it started or help diagnose what’s wrong. If you have made changes to your computer and now wish you hadn’t, the System Restore tool will restore your previous settings. And we’ll show you how to document your system so that if you do encounter serious problems, you can provide a technician with detailed information about your system.
If you’re a member of the Administrators group—that is, one who has full access to the computer—you can grant other people access to the computer. You grant access by creating a new user account and specifying whether the account grants full or limited access. To keep things tidy, you can also delete accounts that are no longer used.
See Also
For information about the access each type of account allows, see "Know Your Rights, Know Your Format".
For information about using the Guest account and about changing the type of account for an existing user, see "Restricting User Rights".
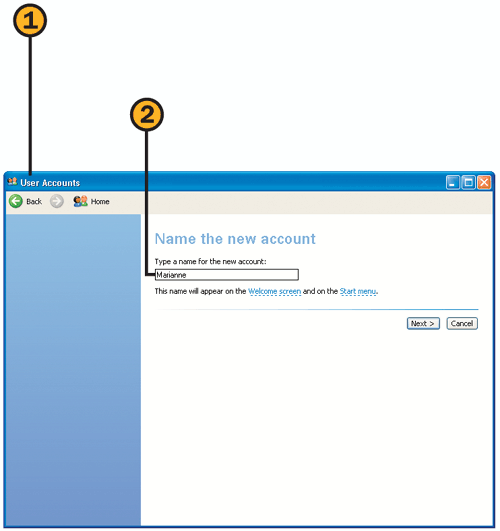
![]() Choose Control Panel from the Start menu, click the User Accounts category, and click the Create A New Account task to display the User Accounts window.
Choose Control Panel from the Start menu, click the User Accounts category, and click the Create A New Account task to display the User Accounts window.
![]() Type a name for the account, and click Next.
Type a name for the account, and click Next.
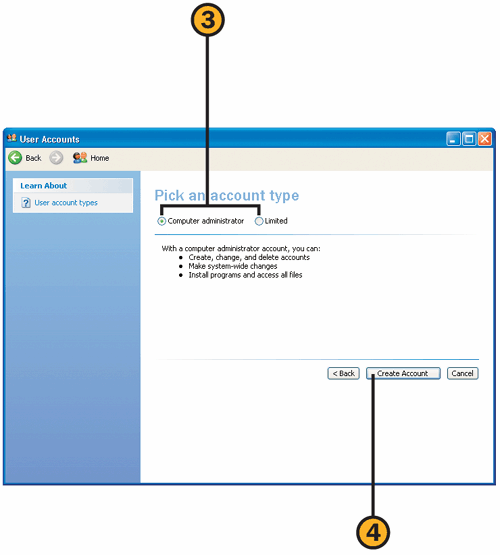
![]() Click the Computer Administrator option to grant complete access to the computer; click the Limited option to grant limited access.
Click the Computer Administrator option to grant complete access to the computer; click the Limited option to grant limited access.
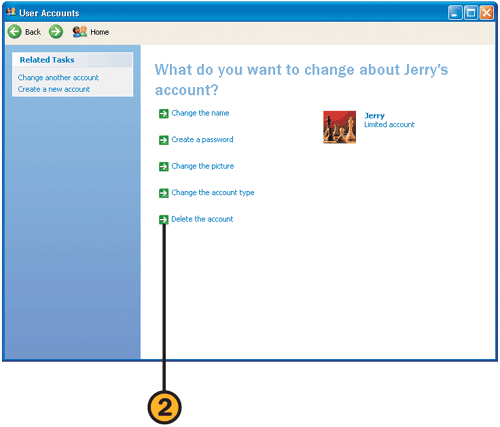
![]() If the User Accounts window isn’t already open, choose Control Panel from the Start menu, and click the User Accounts category. In the User Accounts window, click the account you want to delete.
If the User Accounts window isn’t already open, choose Control Panel from the Start menu, and click the User Accounts category. In the User Accounts window, click the account you want to delete.
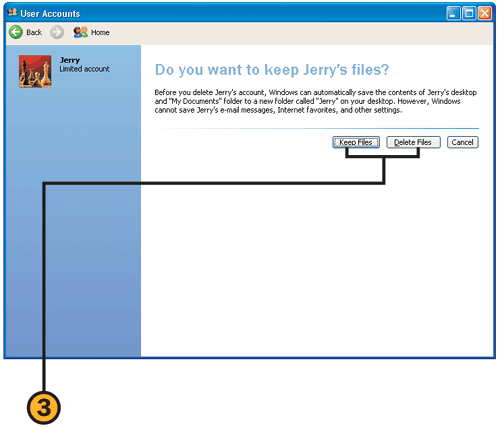
![]() Click Keep Files if you want all the files in the account’s My Documents folder saved to a Desktop folder, or click Delete Files to delete all the files.
Click Keep Files if you want all the files in the account’s My Documents folder saved to a Desktop folder, or click Delete Files to delete all the files.
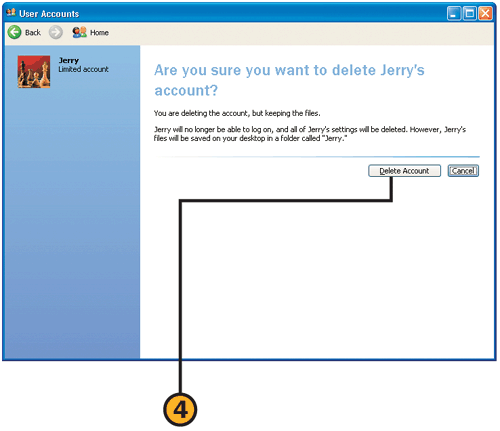
![]() Click Delete Account to permanently delete the account.
Click Delete Account to permanently delete the account.
Caution
When you delete an account, its settings, favorites, certificates, and many other items will be lost, even if the items had been saved in the My Documents folder on the Desktop. If you want to preserve those files and settings, use the Files And Settings Transfer Wizard.
See Also
For information about using the Files And Settings Transfer Wizard, see "Transferring Files and Settings".
Although the Desktop is a great place to store shortcuts to files, folders, programs, and Web pages, it can become hopelessly cluttered with items that were probably vital at some point but whose importance is now a vague memory. Do you remember why you placed all those items on the Desktop? Windows XP will take the problem off your hands by removing all the shortcuts that you haven’t used for the past 60 days and storing them in a single Unused Desktop Shortcuts folder on your Desktop. You can have Windows run this handy service every 60 days, or you can run the Desktop Cleanup Wizard any time you want.
![]() Right-click a blank spot on the Desktop, and choose Properties from the shortcut menu.
Right-click a blank spot on the Desktop, and choose Properties from the shortcut menu.
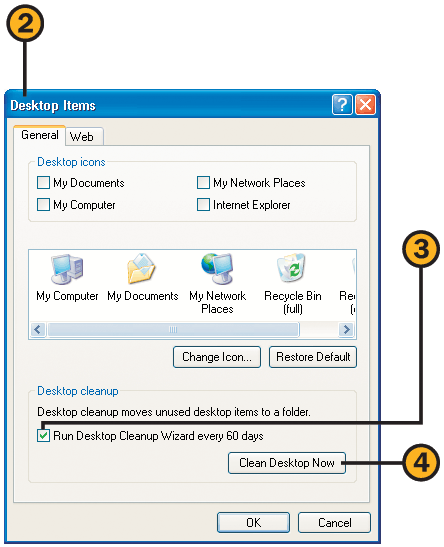
![]() On the Desktop tab of the Display Properties dialog box, click Customize Desktop to display the Desktop Items dialog box.
On the Desktop tab of the Display Properties dialog box, click Customize Desktop to display the Desktop Items dialog box.
![]() Select this check box, if it isn’t already selected, to have Windows XP run the wizard every 60 days.
Select this check box, if it isn’t already selected, to have Windows XP run the wizard every 60 days.
![]() Click the Clean Desktop Now button to display the Desktop Cleanup Wizard dialog box.
Click the Clean Desktop Now button to display the Desktop Cleanup Wizard dialog box.
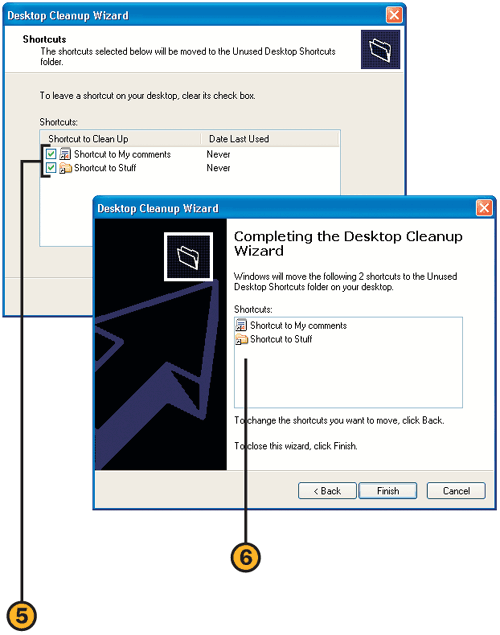
![]() Click Next to start the wizard. Clear the check boxes for any shortcuts that you don’t want removed from the Desktop and placed in the Unused Desktop Shortcuts folder, and click Next.
Click Next to start the wizard. Clear the check boxes for any shortcuts that you don’t want removed from the Desktop and placed in the Unused Desktop Shortcuts folder, and click Next.
![]() Review the shortcuts that will be deleted, and click Finish.
Review the shortcuts that will be deleted, and click Finish.
![]() Click OK to close the Desktop Items dialog box, and then click OK to close the Display Properties dialog box.
Click OK to close the Desktop Items dialog box, and then click OK to close the Display Properties dialog box.
Windows XP and your computer keep track of the date and time, using commonly accepted formats to display them. If the date or time on your computer is inaccurate, or if you travel with your computer into different time zones, you can quickly adjust and correct the settings.
Tip
Windows XP can link to a time server on the Internet so that the time on your computer is always accurate. If your computer is always connected to the Internet, its time will be adjusted automatically once a week. (If you connect to the Internet manually, you can update the time yourself.)
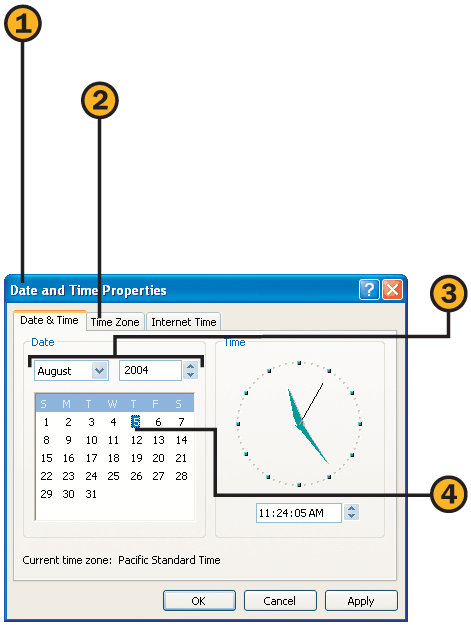
![]() Double-click the time on the taskbar to display the Date And Time Properties dialog box.
Double-click the time on the taskbar to display the Date And Time Properties dialog box.
![]() If necessary, on the Time Zone tab, select a different time zone, and make sure the Automatically Adjust Clock For Daylight Saving Changes check box is selected or cleared, depending on whether or not the region you’re in uses Daylight Saving Time.
If necessary, on the Time Zone tab, select a different time zone, and make sure the Automatically Adjust Clock For Daylight Saving Changes check box is selected or cleared, depending on whether or not the region you’re in uses Daylight Saving Time.
![]() Click the Date & Time tab, and click the correct month or year in the list if necessary.
Click the Date & Time tab, and click the correct month or year in the list if necessary.
![]() Click the correct date if necessary.
Click the correct date if necessary.
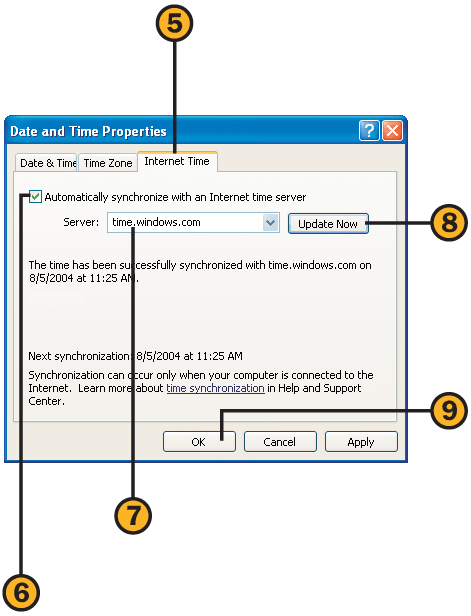
![]() Click the Internet Time tab. If you aren’t already connected to the Internet, connect now.
Click the Internet Time tab. If you aren’t already connected to the Internet, connect now.
![]() Select this check box if it isn’t already selected.
Select this check box if it isn’t already selected.
![]() In the list, click the time server you want to use.
In the list, click the time server you want to use.
If you want to squeeze more items onto your Desktop, you can change its size...sort of. This is one of those "virtual" realities. You "enlarge" the available space by changing the screen resolution, and thereby the scaling, which lets you fit more items onto the Desktop even though its area on your screen doesn’t get any larger. Your gain in virtual area comes at a cost, though—everything will be smaller and harder to read. Also, the combination of screen resolution and color quality displayed affects how much video memory (the memory on your computer that’s dedicated to producing the video image on your monitor) is used. Therefore, you might need to adjust both the screen resolution and the color quality until you’re happy with the result.
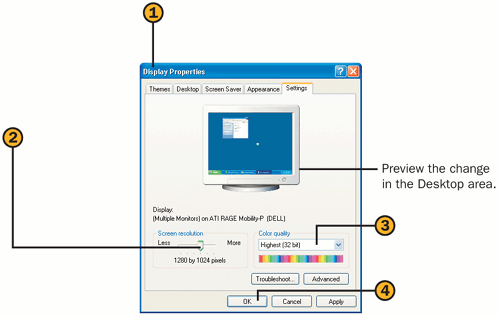
![]() Right-click a blank spot on the Desktop, and choose Properties from the shortcut menu to display the Display Properties dialog box.
Right-click a blank spot on the Desktop, and choose Properties from the shortcut menu to display the Display Properties dialog box.
![]() On the Settings tab, drag the slider to specify a screen area (the degree of screen resolution).
On the Settings tab, drag the slider to specify a screen area (the degree of screen resolution).
![]() Specify the color quality you want to use.
Specify the color quality you want to use.
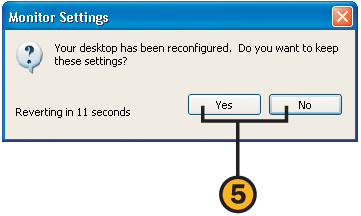
![]() If the Monitor Settings dialog box appears after you’ve changed the Desktop, click Yes to accept the new settings or No to revert to the original settings. If you don’t click Yes within 15 seconds, Windows restores the original settings.
If the Monitor Settings dialog box appears after you’ve changed the Desktop, click Yes to accept the new settings or No to revert to the original settings. If you don’t click Yes within 15 seconds, Windows restores the original settings.
Tip
If text is too large or too small after you adjust the screen area, click the Advanced button on the Settings tab, and change the font size.
Try This
Click the Advanced button on the Settings tab, and, on the Adapter tab, click the List All Modes button. Review the many modes in the list, and select one that has the resolution, color quality, and refresh rate you want. A different refresh rate might reduce or eliminate any flicker on your screen. Click OK, and confirm that you want to use the current settings.
Windows XP supports three disk formats—FAT, FAT32, and NTFS (NT file system). The NTFS format provides the speed, resources, security, and ability to handle large disks—capabilities that aren’t available with the FAT or FAT32 formats. The FAT and FAT32 formats provide compatibility with other operating systems (dual-boot or multi-boot configuration, or the backup of a previous operating system) running on your computer. If your hard disk uses FAT or FAT32, and if you’re certain that compatibility won’t be an issue, you can convert the disk to the NTFS format.
![]() Back up your work, and then close all the files and folders on the disk you’re going to convert.
Back up your work, and then close all the files and folders on the disk you’re going to convert.
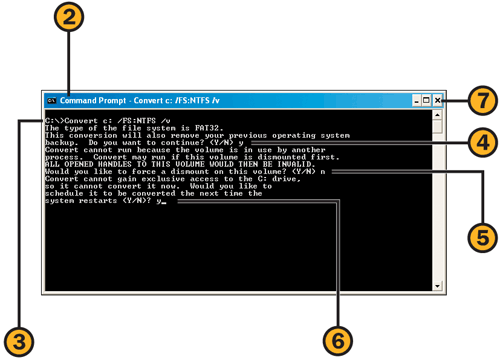
![]() Click the Start button, point to Programs and then Accessories, and choose Command Prompt from the submenu to display the Command Prompt window.
Click the Start button, point to Programs and then Accessories, and choose Command Prompt from the submenu to display the Command Prompt window.
![]() At the command prompt, type Convert drive: /FS:NTFS /v (where drive is the drive letter of the hard disk or drive to be converted), and press Enter.
At the command prompt, type Convert drive: /FS:NTFS /v (where drive is the drive letter of the hard disk or drive to be converted), and press Enter.
![]() If you upgraded your computer from a previous version of Windows, type Y and press Enter to confirm that you want the backup deleted, or type N and press Enter to cancel the procedure.
If you upgraded your computer from a previous version of Windows, type Y and press Enter to confirm that you want the backup deleted, or type N and press Enter to cancel the procedure.
![]() If you’re notified that the system can’t gain access to the drive and are asked whether you want to force a dismount of the drive, type N and press Enter.
If you’re notified that the system can’t gain access to the drive and are asked whether you want to force a dismount of the drive, type N and press Enter.
![]() If you’re told that the system can’t gain exclusive control (as is the case when the drive is the primary drive), type Y and press Enter to convert the drive when the system restarts.
If you’re told that the system can’t gain exclusive control (as is the case when the drive is the primary drive), type Y and press Enter to convert the drive when the system restarts.
![]() Close the Command Prompt window.
Close the Command Prompt window.
![]() Choose Turn Off Computer from the Start menu, click Restart in the Turn Off Computer dialog box, and wait for the computer to restart and convert the drive.
Choose Turn Off Computer from the Start menu, click Restart in the Turn Off Computer dialog box, and wait for the computer to restart and convert the drive.
See Also
For information about checking the format of the drives on your computer, see "Know Your Rights, Know Your Format".
When a disk is formatted for NTFS (NT file system), you can compress its files and folders—and even the entire drive—so that you can store even more information in the same location. The cost of compression can be a slightly longer time to access files, which must be decompressed before you can use them. This delay is usually so minor, however, that you won’t even notice it on most systems.
Tip
NTFS compression is not the same thing as the Compressed Folders feature that uses ZIP-type compression. NTFS compression is intended for use on your computer only, whereas a compressed folder can be sent to others as a ZIP file.
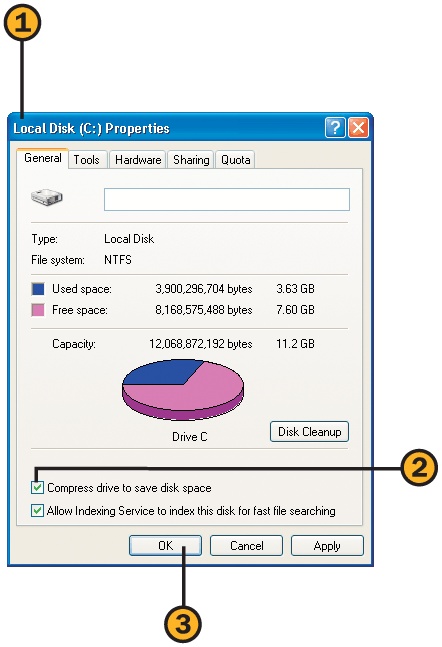
![]() Open the My Computer window, right-click the drive you want to compress, and choose Properties from the shortcut menu to display the drive’s Properties dialog box.
Open the My Computer window, right-click the drive you want to compress, and choose Properties from the shortcut menu to display the drive’s Properties dialog box.
![]() On the General tab, select this check box to compress the drive.
On the General tab, select this check box to compress the drive.
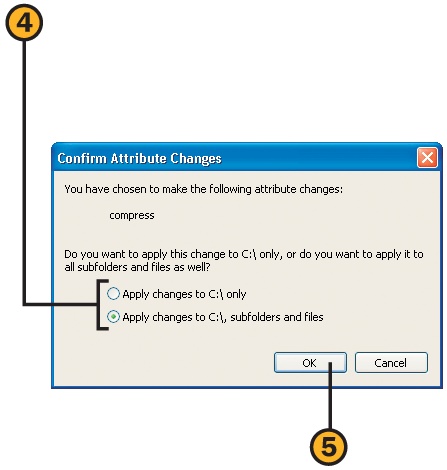
![]() Click the first option if you want to compress only the root directory of the drive (that is, no folders will be compressed); click the second option if you want to compress all the folders and files on the drive.
Click the first option if you want to compress only the root directory of the drive (that is, no folders will be compressed); click the second option if you want to compress all the folders and files on the drive.
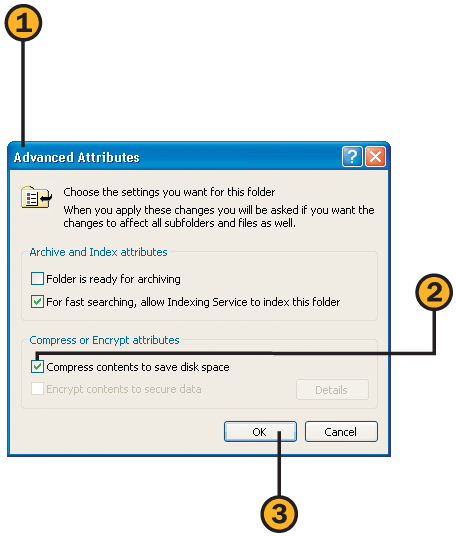
![]() Right-click the file or folder, and choose Properties from the shortcut menu. On the General tab of the Properties dialog box, click the Advanced button to display the Advanced Attributes dialog box.
Right-click the file or folder, and choose Properties from the shortcut menu. On the General tab of the Properties dialog box, click the Advanced button to display the Advanced Attributes dialog box.
![]() Select this check box to compress the file or folder.
Select this check box to compress the file or folder.
![]() Click OK, and then click OK again to close the Properties dialog box.
Click OK, and then click OK again to close the Properties dialog box.

![]() Click the first option if you want to compress the folder only; click the second option if you want to compress all the subfolders and files in the folder.
Click the first option if you want to compress the folder only; click the second option if you want to compress all the subfolders and files in the folder.
![]() Click OK. Wait for the files and folders to be compressed.
Click OK. Wait for the files and folders to be compressed.
Tip
In the Advanced Attributes dialog box, the Folder Is Ready For Archiving check box tags the folder for archiving. This setting is used by certain programs, such as file backup programs, to determine how to handle the folder. The check box for Indexing Service determines whether the content of the folder is indexed to speed up file searching. The Encrypt Contents To Secure Data check box is grayed in Windows XP Home Edition because the required Encrypting File System is available only in Windows XP Professional Edition.
With time and use, your computer can become a bit disorganized. As the information stored in the computer gets used, moved, copied, added to, or deleted, the computer’s hard disk, or drive, can become cluttered with useless or inefficiently organized files. Windows XP provides a group of maintenance tools whose occasional use can make your computer run more smoothly, more efficiently, and (usually) faster. The table at the right describes what each of these tools does.
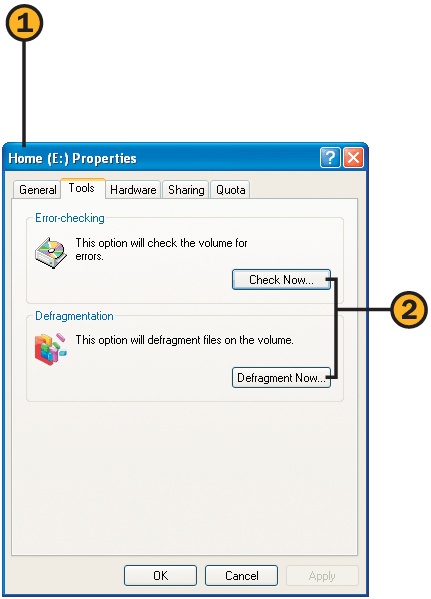
![]() Choose My Computer from the Start menu, right-click the drive that needs attention, and choose Properties from the shortcut menu to display the drive’s Properties dialog box.
Choose My Computer from the Start menu, right-click the drive that needs attention, and choose Properties from the shortcut menu to display the drive’s Properties dialog box.
![]() Click the appropriate button to use the tool you need, and follow the instructions provided by the program:
Click the appropriate button to use the tool you need, and follow the instructions provided by the program:
On the General tab, click Disk Cleanup.
On the Tools tab, under Error-Checking, click Check Now.
On the Tools tab, under Defragmentation, click Defragment Now.
Disk-Maintenance Tools | |
|---|---|
Tool | What it does |
Disk Cleanup | Checks the disk for unused files that can be deleted. |
Error-Checking | Scans the disk to see whether there are disk errors in any files or folders. Optionally, fixes file-system errors and attempts to recover bad sectors on the hard disk. If the disk is in use, error-checking will be scheduled for the next time you log on. For NTFS–formatted disks, records all file-transaction information. |
Defragmentation | Analyzes the disk to see whether defragmentation is necessary. Re-orders the items on your disk so that files aren’t separated into several noncontiguous parts. Can take a long time to run but speeds up disk performance. |
See Also
For information about managing unused shortcuts on your Desktop, see "Tidying Up the Desktop".
For information about backing up your files to another location, see "Backing Up Your Files".
Diagnosing hardware problems can be a time-consuming and expensive activity. Instead of checking and modifying settings, uninstalling and reinstalling drivers, and replacing hardware devices that might or might not be incompatible with Windows XP and/or with your computer system, you can avoid most problems by being cautious about any hardware you install, and by using it properly.
![]() When buying hardware, make sure that it’s certified to work with Windows XP. Many older items and some discounted items aren’t designed to be used with Windows XP. To search through a list of devices that have been tested for full compatibility with Windows XP, choose Windows Catalog from the All Programs submenu of the Start menu.
When buying hardware, make sure that it’s certified to work with Windows XP. Many older items and some discounted items aren’t designed to be used with Windows XP. To search through a list of devices that have been tested for full compatibility with Windows XP, choose Windows Catalog from the All Programs submenu of the Start menu.
![]() Install only hardware drivers for hardware devices that are designed for Windows XP and that are digitally signed (indicating that they’re authentic). When you’re manually installing a hardware device, you’ll be notified if the driver isn’t digitally signed.
Install only hardware drivers for hardware devices that are designed for Windows XP and that are digitally signed (indicating that they’re authentic). When you’re manually installing a hardware device, you’ll be notified if the driver isn’t digitally signed.
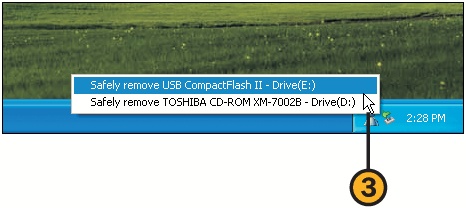
![]() When you’re using certain devices, such as some USB (Universal Serial Bus) and SCSI (Small Computer System Interface) devices, you must stop the device before it can be safely removed. To stop a device, click the Safely Remove Hardware icon in the notification area of the taskbar, and then click the device to be stopped and removed.
When you’re using certain devices, such as some USB (Universal Serial Bus) and SCSI (Small Computer System Interface) devices, you must stop the device before it can be safely removed. To stop a device, click the Safely Remove Hardware icon in the notification area of the taskbar, and then click the device to be stopped and removed.
See Also
For information about identifying hardware problems, see "Documenting Your System" and "Managing Everything".
Tip
If a device driver isn’t digitally signed, check with the manufacturer for an updated driver. Many drivers that were designed for use with Windows 2000 might work correctly with Windows XP. However, you can’t be certain that a device is fully compatible unless it is certified for Windows XP and is digitally signed.
Caution
One of the most frequent causes of a sudden hardware problem is something called "surprise removal." This happens when you remove or disable a hardware component when it’s in use or when your system thinks it should be available. If you want to undock a portable computer from its docking station, for example, you should either use the Undock Computer command on the Start menu, or shut down the computer and turn it off before you undock it. If you’re using a USB hub, don’t disconnect its power supply, don’t turn off the hub’s power, and don’t remove any components from the hub while Windows XP is still running.
Different computers sometimes have different power-management requirements and abilities. You might want the monitor on your main desktop computer to shut down after a few minutes of idleness, but you might also want the hard disk to "stay awake" constantly. On your portable computer, you might want everything to shut down after a few minutes of idleness. Depending on the features and abilities of your computer, you can set these power schemes, as well as some other features.

![]() Choose Control Panel from the Start menu, click the Performance And Maintenance category, and click the Power Options Control Panel icon to display the Power Options Properties dialog box.
Choose Control Panel from the Start menu, click the Performance And Maintenance category, and click the Power Options Control Panel icon to display the Power Options Properties dialog box.
![]() Click a power scheme in the list.
Click a power scheme in the list.
![]() If the preset power schemes don’t meet your specific needs, modify the settings. Click Save As, and save your settings as a new scheme.
If the preset power schemes don’t meet your specific needs, modify the settings. Click Save As, and save your settings as a new scheme.
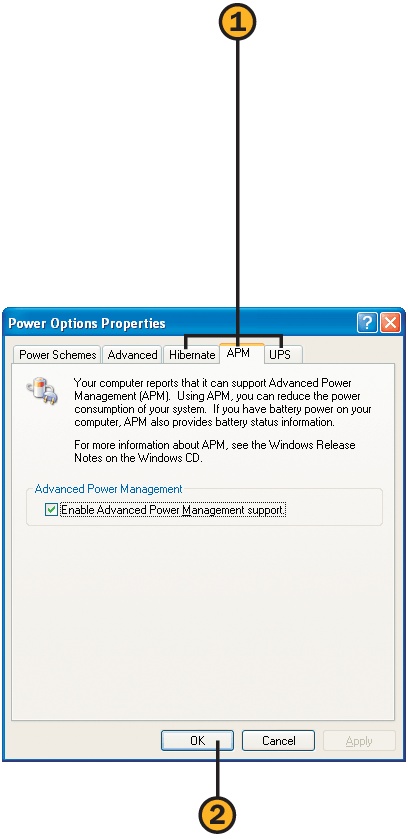
Tip
Power settings are primarily controlled by the ACPI (Advanced Configuration And Power Interface) features of your computer. Windows XP has very strict standards for supporting ACPI. If, even though your computer is designed to support ACPI, Windows doesn’t enable the ACPI features, contact the computer manufacturer for updates that might make your computer’s ACPI system work with Windows XP.
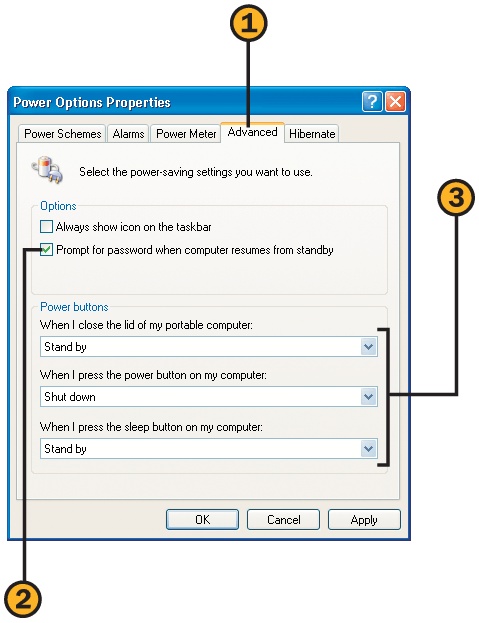
![]() Click the Advanced tab of the Power Options Properties dialog box.
Click the Advanced tab of the Power Options Properties dialog box.
![]() Select this check box if you use a password to log on and you want the security of requiring the password to be entered whenever the computer is revived from Standby or Hibernate mode.
Select this check box if you use a password to log on and you want the security of requiring the password to be entered whenever the computer is revived from Standby or Hibernate mode.
![]() Specify the actions you want to occur when you press the various power buttons. The options displayed depend on whether the computer is a portable or a desktop computer.
Specify the actions you want to occur when you press the various power buttons. The options displayed depend on whether the computer is a portable or a desktop computer.
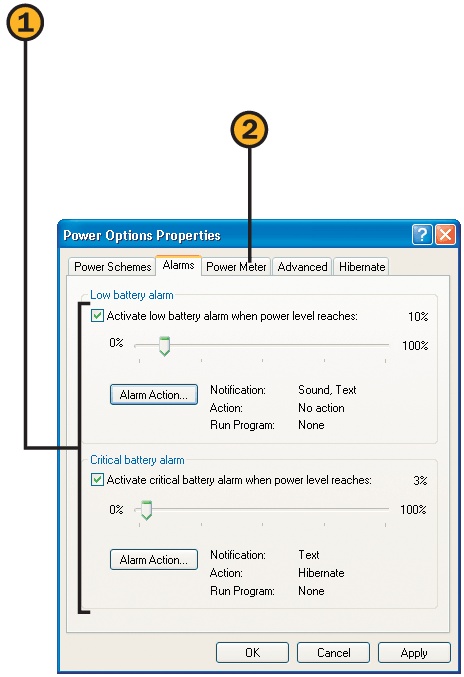
![]() Click the Alarms tab, and set the battery level at which the computer will take action. Click Alarm Action for each alarm to specify what happens when the battery reaches the specified level.
Click the Alarms tab, and set the battery level at which the computer will take action. Click Alarm Action for each alarm to specify what happens when the battery reaches the specified level.
![]() Click the Power Meter tab, and check the current power level of the battery or batteries.
Click the Power Meter tab, and check the current power level of the battery or batteries.
As time marches on, Microsoft continues to make improvements, fix problems, and offer new features in Windows. You can easily take care of the critical updates that are necessary to keep your computer running safely and efficiently, as well as those updates that aren’t considered critical. At Windows Update, all you need to do is let the system see which updates are available and which you currently have, and then you can install them.
See Also
For information about using the Automatic Updates feature to install critical updates, see "Installing Critical Fixes".
For information about downloading more programs from Microsoft, see "Getting Free Software" and "Tweaking Your System".
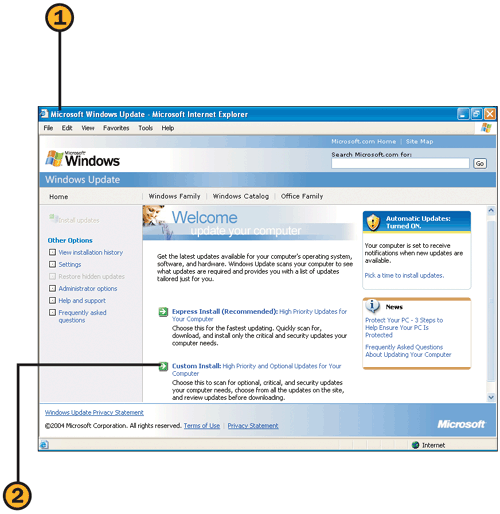
![]() Choose Windows Update from the All Programs submenu of the Start menu. Connect to the Internet if you aren’t already connected. Wait for a scan of your computer to catalog your Windows status and contents and to check for any items available from Windows Update.
Choose Windows Update from the All Programs submenu of the Start menu. Connect to the Internet if you aren’t already connected. Wait for a scan of your computer to catalog your Windows status and contents and to check for any items available from Windows Update.
![]() Click Custom Install to see a list of optional updates, and wait for Windows Update to search for available updates.
Click Custom Install to see a list of optional updates, and wait for Windows Update to search for available updates.
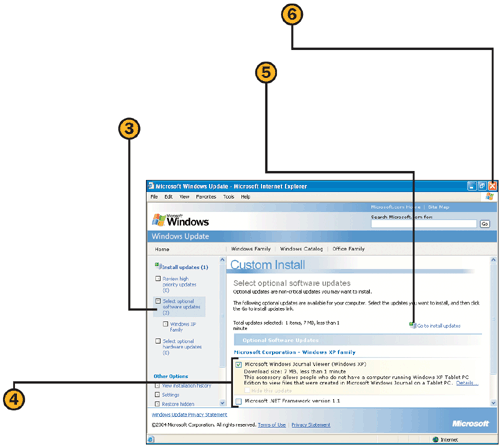
![]() Click to select the optional updates.
Click to select the optional updates.
![]() Select the check boxes for the items you want to download.
Select the check boxes for the items you want to download.
![]() Click Go To Install Updates, and, on the Install Updates page, review the items you selected. If they’re correct, click Install, and wait for the items to be downloaded and installed.
Click Go To Install Updates, and, on the Install Updates page, review the items you selected. If they’re correct, click Install, and wait for the items to be downloaded and installed.
Throughout this book we’ve talked about the increased security provided by Service Pack 2 and the importance of installing critical updates. Although your use of the Automatic Updates feature will keep your computer properly updated, you should also look around to see which service packs and updates are installed on your computer. This information is particularly useful when you need to seek help from another person.
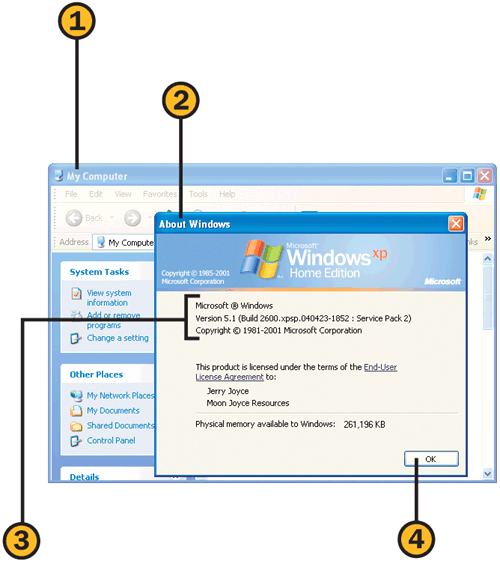
![]() Choose My Computer from the Start menu to display the My Computer window.
Choose My Computer from the Start menu to display the My Computer window.
![]() Choose About Windows from the Help menu to display the About Windows dialog box.
Choose About Windows from the Help menu to display the About Windows dialog box.
![]() In the dialog box, look for the Windows build number and the most recent service pack that’s been installed.
In the dialog box, look for the Windows build number and the most recent service pack that’s been installed.
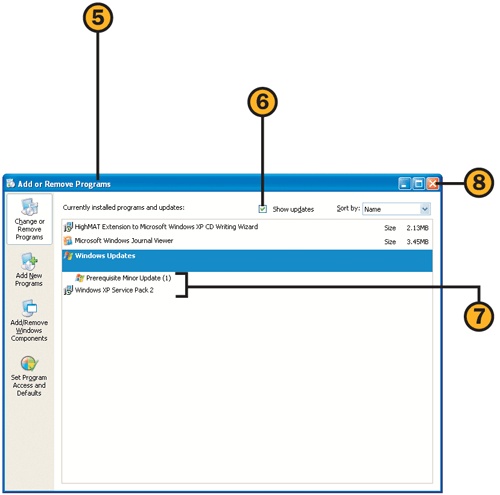
![]() Choose Control Panel from the Start menu, and click the Add Or Remove Programs category to display the Add Or Remove Programs dialog box.
Choose Control Panel from the Start menu, and click the Add Or Remove Programs category to display the Add Or Remove Programs dialog box.
![]() With Change Or Remove Programs selected, select the Show Updates check box if it isn’t already selected.
With Change Or Remove Programs selected, select the Show Updates check box if it isn’t already selected.
![]() Note the updates that are installed.
Note the updates that are installed.
![]() Close the Add Or Remove Programs dialog box when you’ve finished.
Close the Add Or Remove Programs dialog box when you’ve finished.
Microsoft and its partners are continually developing tools, utilities, and other items that make it possible for your computer to work better, run more effectively, and just do more things. Many such items are available as free downloads from the Microsoft Web site. True, you’ll need to wade through listings of many technical downloads, but it’s worth it—your search can yield some pretty interesting items related to just about any Microsoft product, including trial versions of many of Microsoft’s games.
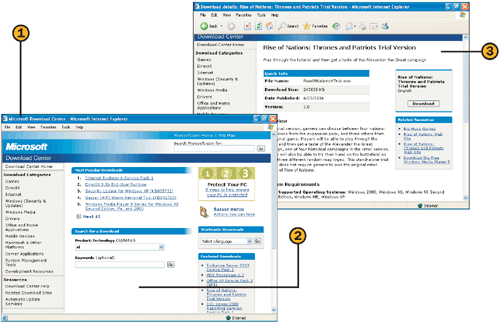
![]() Use your Web browser to go the main Microsoft Web page (www.microsoft.com), and, in the Resources section, click Downloads to display the Download Center Web page.
Use your Web browser to go the main Microsoft Web page (www.microsoft.com), and, in the Resources section, click Downloads to display the Download Center Web page.
Click a download in the Most Popular Downloads list.
Click a category in the Download Categories list, and then click a download in the Most Popular Downloads list.
Click a download in the Featured Downloads list.
Select an item in the Product/Technology list and/or type a Keyword in the keywords text box, and press Enter. Click the download you want in the Search Results listing that appears.
Click Related Download Sites in the Resources section, select a relevant download site, and click the download you want.
![]() Review the information about the download and the instructions for downloading and installing it, and then click Download. If you receive a security warning, click the appropriate button as instructed, wait for the item to be downloaded, and follow the instructions on the Web page for installing the item.
Review the information about the download and the instructions for downloading and installing it, and then click Download. If you receive a security warning, click the appropriate button as instructed, wait for the item to be downloaded, and follow the instructions on the Web page for installing the item.
Most programs are registered with Windows XP when you install them. You can—and should—use Windows tools when you want to remove a program. If you simply delete the files, you might leave accessory files you don’t need, or delete files you need for other programs. When you uninstall a program using Windows tools, Windows keeps track of the files, and only when a file is no longer needed by any of your programs does Windows delete the file.
Tip
Various programs provide different ways to remove or modify an installed program. For example, in some programs you might see a Change/Remove button that starts a setup program so that you can either install only the parts of the program you want or completely remove the program. In other programs you might see a Change button that lets you modify the installation, or a Remove button that simply lets you remove the program.
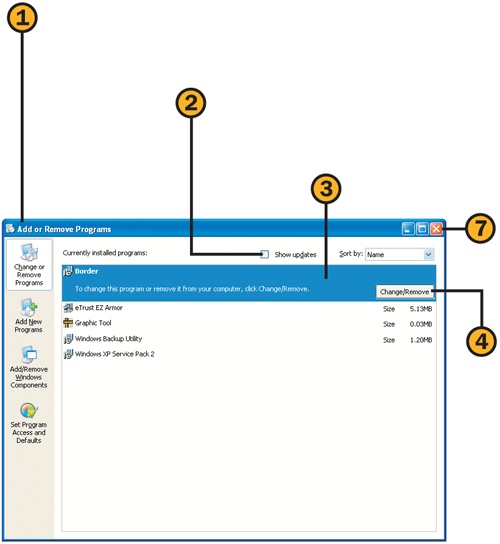
![]() Close all your running programs. Choose Control Panel from the Start menu, and click the Add Or Remove Programs category to display the Add Or Remove Programs dialog box.
Close all your running programs. Choose Control Panel from the Start menu, and click the Add Or Remove Programs category to display the Add Or Remove Programs dialog box.
![]() With the Change Or Remove Programs category selected, clear the Show Updates check box if it’s selected.
With the Change Or Remove Programs category selected, clear the Show Updates check box if it’s selected.
![]() Select the program you want to remove.
Select the program you want to remove.
![]() Click the Change/Remove or the Remove button, depending on which appears.
Click the Change/Remove or the Remove button, depending on which appears.
![]() Close the Add Or Remove Programs dialog box when you’ve finished.
Close the Add Or Remove Programs dialog box when you’ve finished.
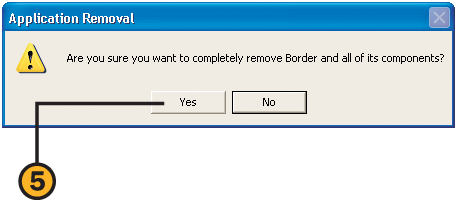
![]() If you’re asked, confirm that you want to remove the selected program. If another program starts and offers you a choice of actions, use it to remove the selected program.
If you’re asked, confirm that you want to remove the selected program. If another program starts and offers you a choice of actions, use it to remove the selected program.
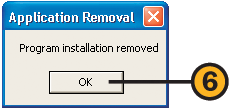
![]() Wait for the program to be removed, and then click OK.
Wait for the program to be removed, and then click OK.
See Also
For information about removing programs that came with Windows, see "Adding or Removing Windows Components".
Internet Explorer add-ons are programs that provide enhancements to your Internet browser. Unfortunately, some add-ons can cause problems not only with the running of your browser but with Windows itself, and can sometimes even cause serious security problems. You can use the Internet Explorer Manage Add-Ons tool to disable any add-ons that you decide you don’t want on your computer.
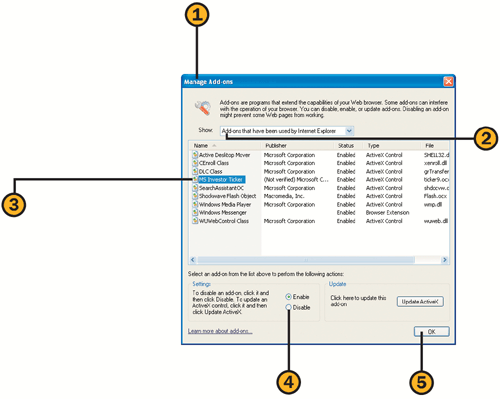
![]() In Internet Explorer, choose Manage Add-Ons from the Tools menu to display the Manage Add-Ons dialog box.
In Internet Explorer, choose Manage Add-Ons from the Tools menu to display the Manage Add-Ons dialog box.
![]() In the Show list box, choose either of the following:
In the Show list box, choose either of the following:
Add-Ons Currently Loaded In Internet Explorer to see a list of the add-ons that are currently being used by Internet Explorer
Add-Ons That Have Been Used By Internet Explorer to see a list of the add-ons that are currently being, or have previously been, used by Internet Explorer
![]() Select the add-on you want to modify.
Select the add-on you want to modify.
![]() If you believe the add-on is causing problems, select Disable.
If you believe the add-on is causing problems, select Disable.
![]() Start Internet Explorer, and explore the Web sites where you encountered problems. Note whether you continue to encounter problems.
Start Internet Explorer, and explore the Web sites where you encountered problems. Note whether you continue to encounter problems.
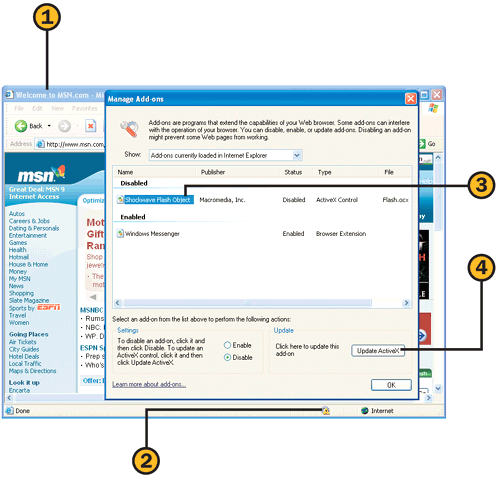
![]() If you see a message that an add-on has been disabled, double-click the Manage Add-Ons icon on Internet Explorer’s status bar.
If you see a message that an add-on has been disabled, double-click the Manage Add-Ons icon on Internet Explorer’s status bar.
![]() In the Manage Add-Ons dialog box that appears, select the add-on that was disabled.
In the Manage Add-Ons dialog box that appears, select the add-on that was disabled.
![]() If you trust the publisher of the add-on, and if the Update ActiveX button is active, click it to try to update the add-on. If there is an update, install it. After you’ve updated the add-on, enable it, close the Manage Add-Ons dialog box, and see whether you have any problems viewing the Web sites where you previously encountered problems.
If you trust the publisher of the add-on, and if the Update ActiveX button is active, click it to try to update the add-on. If there is an update, install it. After you’ve updated the add-on, enable it, close the Manage Add-Ons dialog box, and see whether you have any problems viewing the Web sites where you previously encountered problems.
![]() If you continue to experience the same problems, in the Manage Add-Ons dialog box, deactivate all the other add-ons, and click OK.
If you continue to experience the same problems, in the Manage Add-Ons dialog box, deactivate all the other add-ons, and click OK.
![]() Close Internet Explorer, and then restart it, exploring the same Web sites and assessing the results as follows:
Close Internet Explorer, and then restart it, exploring the same Web sites and assessing the results as follows:
If you have serious problems other than content being blocked because of the deactivated add-ons, your problems are probably not being caused by the add-ons, and you’ll need to do other troubleshooting. Use the Manage Add-Ons dialog box to enable the add-ons you disabled.
If you’re no longer having any problems, open the Manage Add-Ons dialog box, enable one add-on, close the dialog box, and see whether any problems appear. Continue enabling the add-ons one at a time. If or when a problem occurs, deactivate the add-on that caused the problem, and enable all the others.
If you have a problem starting up Windows XP correctly, you can use one of several startup procedures either to determine what’s wrong or to start Windows with minimal features so that you can adjust or restore settings. After you’ve started Windows, you can use a variety of techniques to fix whatever is wrong with the system.
 After the computer system loads, and as Windows XP starts, hold down the F8 key. (If your computer displays a list of operating systems, press F8 when that list appears.) The Windows Advanced Options menu appears.
 Shut down your computer, and then restart it to see whether it starts correctly now.
 If the computer doesn’t start correctly, repeat steps 1 and 2, and choose a different startup mode to help diagnose the problem.
See Also
For information about fixing problems by resetting your computer to the previous settings, see "Fixing System Problems".
Caution
If Windows XP came preinstalled on your computer, read the computer manufacturer’s documentation about fixing problems before you execute any actions.
Startup Options | |
|---|---|
Option | What it does |
Safe Mode | Starts with no network connections and without most of its drivers. |
Safe Mode With Networking | Starts with network connections but without most of its drivers. |
Safe Mode With Command Prompt | Starts without network connections, without most of its drivers, and with the command prompt only. |
Enable Boot Logging | Starts normally; records startup information to the ntbtlog.txt file (in the Windows folder). |
Enable VGA Mode | Starts normally but uses only the basic VGA video driver. |
Last Known Good Configuration | Starts normally, using the settings stored in the Registry when the computer was last shut down properly. |
Directory Services Restore Mode | (Not available for Windows XP Home Edition.) |
Debugging Mode | Starts normally but sends the debugging information to another computer over a serial cable. |
Disable Automatic Restart on System Failure | Prevents the computer from restarting repetitively if a system failure occurs each time the computer restarts. |
Start Windows Normally | Starts Windows as if you hadn’t pressed the F8 key. |
Reboot | Restarts the computer. |
Return To OS Choices Menu | Goes to the menu to select the operating system to start. |
A fabulous feature of Windows XP is the System Restore tool, which makes it possible for you to undo whatever changes you or programs have made to your system. Periodically, and whenever you make changes to the system, Windows records all the system information. If you’ve made changes to the system but the effect isn’t what you wanted, you can tell Windows to revert to the previous settings.

![]() Close all your running programs, and make sure that no one else is logged on to the computer.
Close all your running programs, and make sure that no one else is logged on to the computer.
![]() Choose System Restore from the System Tools submenu of the Start menu to display the System Restore window.
Choose System Restore from the System Tools submenu of the Start menu to display the System Restore window.
![]() Click the Restore My Computer To An Earlier Time option.
Click the Restore My Computer To An Earlier Time option.
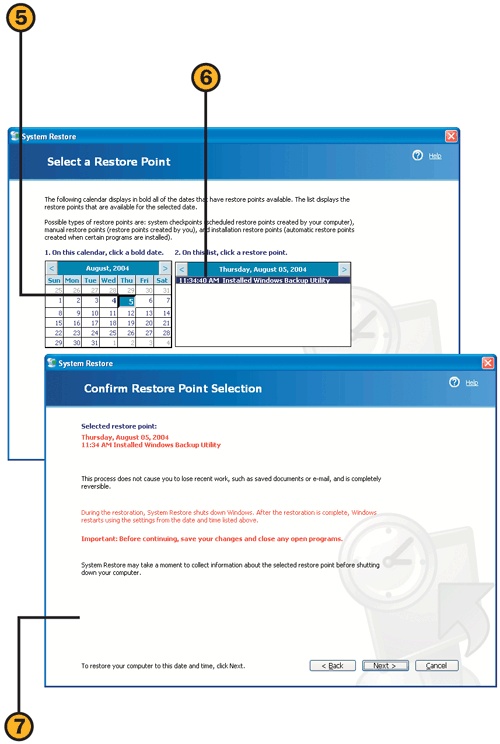
![]() Select a date that contains a restore point. (Only the dates in bold type contain restore points.)
Select a date that contains a restore point. (Only the dates in bold type contain restore points.)
![]() Click the restore point you want to use, and click Next.
Click the restore point you want to use, and click Next.
![]() Review the item that’s being restored, and then click Next to start the restoration process. Wait for the settings and any files to be restored, and log back on when prompted. Click OK when you’re notified that the restoration has been completed.
Review the item that’s being restored, and then click Next to start the restoration process. Wait for the settings and any files to be restored, and log back on when prompted. Click OK when you’re notified that the restoration has been completed.
Be prepared! Even if your system is working perfectly now, the day might come when you’ll encounter a problem that you can’t fix yourself. When you need professional assistance, you’re going to have to supply a helpful technician with as much information about your system as possible. Windows XP can provide you with a vast amount of information about the system, and you can document some or all of it. Much of the information is indecipherable to the average computer user, but it’s invaluable for the support person. Some of the system documentation can be useful to you, though—you might need to refer to it when you’re planning to add items to or remove them from the system.
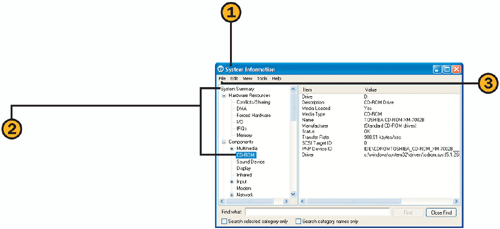
![]() Choose System Information from the System Tools submenu of the Start menu to display the System Information dialog box.
Choose System Information from the System Tools submenu of the Start menu to display the System Information dialog box.
![]() To record all the information about your system, click System Summary. To limit the information to a specific component, click that component in the list.
To record all the information about your system, click System Summary. To limit the information to a specific component, click that component in the list.
![]() Choose Export from the File menu, and save the information as a text file.
Choose Export from the File menu, and save the information as a text file.
![]() Use the text file as your external source of information about your system. You can e-mail the file to a technician, save it on another computer or on a floppy disk, or use Notepad or WordPad to edit, format, and print relevant portions of the report.
Use the text file as your external source of information about your system. You can e-mail the file to a technician, save it on another computer or on a floppy disk, or use Notepad or WordPad to edit, format, and print relevant portions of the report.
Windows XP provides a powerful administrative tool called the Computer Management Console that gives you access to almost everything on your computer system. You can use this tool to explore your computer and learn about the adjustments you can make, and—armed with a little knowledge—you can then use the tool to maintain and improve your system.
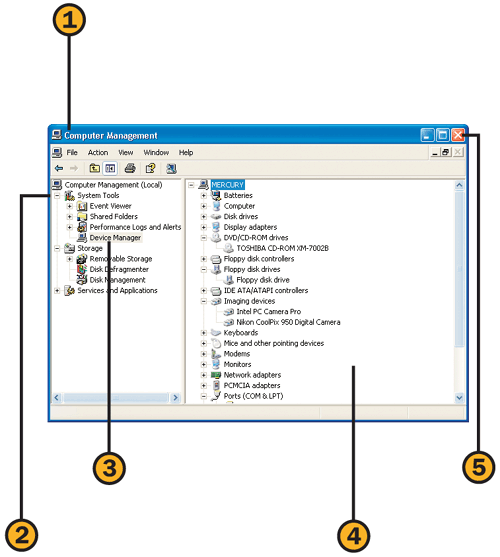
![]() Right-click My Computer on the Start menu, and choose Manage from the shortcut menu to display the Computer Management Console.
Right-click My Computer on the Start menu, and choose Manage from the shortcut menu to display the Computer Management Console.
![]() Click a plus sign to see a subtopic or category.
Click a plus sign to see a subtopic or category.
![]() Click an item to see the details.
Click an item to see the details.
![]() Use the items in the right pane to gather information or adjust settings.
Use the items in the right pane to gather information or adjust settings.
![]() Close the console when you’ve finished.
Close the console when you’ve finished.
Computer Management Console Items | |
|---|---|
Item | What it does |
Event Viewer | Allows you to view logs of events (including errors and warnings) for your applications, security, and the operating system. |
Shared Folders | Monitors which items on your computer are shared on the network, who’s currently connected to your computer, and which files are being used. |
Performance Logs And Alerts | Provides technical data about the running of the computer. |
Device Manager | Lists all hardware devices on the system. You can adjust settings, including installing or uninstalling new device drivers. |
Storage | Provides information about removable and fixed disks, and allows some management of those disks. |
Services And Applications | Lists all the services available on your computer; allows you to manually start or stop services; and provides access to the Indexing Service, where you can manage the service and directly query the index of files on your computer. |
Here’s a little secret that some computer experts don’t want to be widely known: Microsoft has made available a set of free tools that you can use to tweak your Windows system well beyond what you can do using conventional settings. All you need to do is download the correct tool and use it to gain spectacular control of the system. This free tool set is called PowerToys, and the one with the most outstanding power to manage and modify your system is TweakUI.
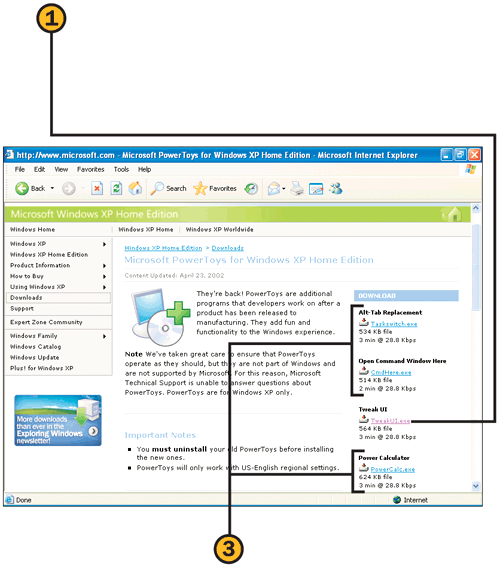
![]() Go to the Microsoft PowerToys For Windows XP Home Edition Web page at www.microsoft.com/windowsxp/home/downloads/powertoys, click TweakUI.exe, and follow the directions on the screen to download and install the program.
Go to the Microsoft PowerToys For Windows XP Home Edition Web page at www.microsoft.com/windowsxp/home/downloads/powertoys, click TweakUI.exe, and follow the directions on the screen to download and install the program.
![]() Return to the PowerToys download Web page, and download and install any other PowerToys you want to use.
Return to the PowerToys download Web page, and download and install any other PowerToys you want to use.

![]() From the PowerToys For Windows XP submenu of the Start menu, choose Readme to display the PowerToysReadme Web page. Review the information about the PowerToys, and decide which additional PowerToys you want to use.
From the PowerToys For Windows XP submenu of the Start menu, choose Readme to display the PowerToysReadme Web page. Review the information about the PowerToys, and decide which additional PowerToys you want to use.
Caution
These tools are powerful, so it’s possible to make a real mess of things if you use them without really knowing what you’re doing. Microsoft doesn’t provide any support for these tools, so be aware that you’ll be using them at your own risk!
Tip
If you’re using Windows XP Professional instead of the Home edition, you can download the tools from www.microsoft.com/windowsxp/pro/downloads/powertoys.
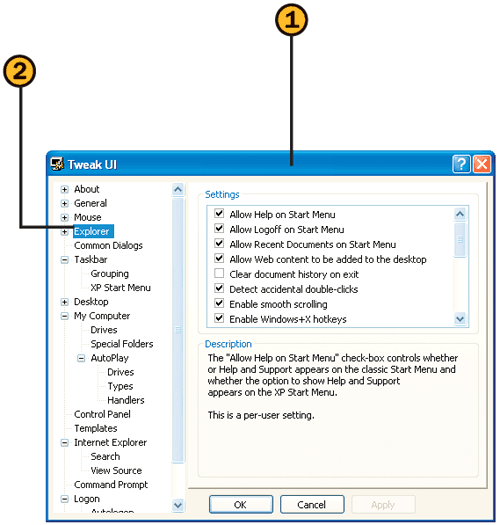
![]() From the PowerToys For Windows XP submenu of the Start menu, choose Tweak UI to display the Tweak UI dialog box.
From the PowerToys For Windows XP submenu of the Start menu, choose Tweak UI to display the Tweak UI dialog box.
![]() Click a category to make any adjustments or settings for that category.
Click a category to make any adjustments or settings for that category.
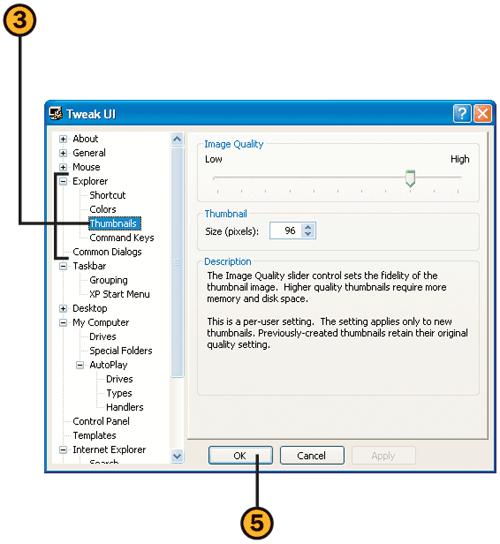
![]() If a category has a plus sign next to it, click the plus sign to see the subcategories. Click a subcategory to make changes.
If a category has a plus sign next to it, click the plus sign to see the subcategories. Click a subcategory to make changes.
![]() Repeat steps 2 and 3 for any other categories you want.
Repeat steps 2 and 3 for any other categories you want.
![]() Click OK when you’ve finished.
Click OK when you’ve finished.
Try This
In TweakUI, click the plus sign next to the About category, and then click the Tips subcategory. Use the Next Tip and the Previous Tip buttons to read tips for using Windows XP. Then, if you find the tips useful, click the Save Tips button, and save the tips to a text file in your My Documents folder. When you review the tips in a Notepad window, be sure to turn on the Word Wrap option from the Format menu.
Tip
Keep checking the PowerToys Web pages, where new programs are posted occasionally. There’s also a PowerToys Fun Pack, which contains two programs: one that lets you use Windows Media video files as your screen saver, and the other that lets you automatically change the wallpaper on your Desktop at whatever interval you set.
How many times have you screamed "Help!" (or worse) when your computer was being an uncooperative brat, only to be met by silence? Now your pleas for help won’t disappear into the void. Using the Remote Assistance feature, you can contact someone over the Internet for help. Your friend or coworker can view your computer Desktop, review your system information, and even chat with you to help you figure out what’s wrong. Likewise, if a friend or colleague has a problem that you know how to solve, you can be the expert who provides the oh-so-welcome assistance.

![]() Start Windows Messenger if it isn’t already running, log on, and open the Windows Messenger window. Choose Ask For Remote Assistance from the Actions menu, and, in the Ask For Remote Assistance dialog box that appears, double-click the name of the contact from whom you want help. Wait for that person to accept the invitation, and then confirm that you want him or her to view your screen and chat with you.
Start Windows Messenger if it isn’t already running, log on, and open the Windows Messenger window. Choose Ask For Remote Assistance from the Actions menu, and, in the Ask For Remote Assistance dialog box that appears, double-click the name of the contact from whom you want help. Wait for that person to accept the invitation, and then confirm that you want him or her to view your screen and chat with you.
![]() When you’re connected, type a message to explain your problem, and press Enter.
When you’re connected, type a message to explain your problem, and press Enter.
![]() If you want to discuss the problem using audio, click Start Talking.
If you want to discuss the problem using audio, click Start Talking.
![]() If you’ve allowed the other person to take control of the computer, click Stop Control (ESC) or press the Esc key when you want to terminate that control.
If you’ve allowed the other person to take control of the computer, click Stop Control (ESC) or press the Esc key when you want to terminate that control.
![]() When you’ve finished (and solved the problem, we hope!), click Disconnect to end the remote assistance.
When you’ve finished (and solved the problem, we hope!), click Disconnect to end the remote assistance.
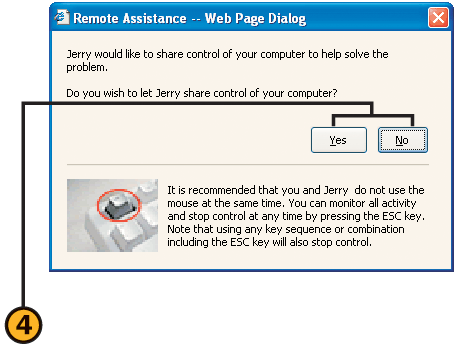
![]() If the person asks to take control of your computer, click Yes to allow him or her full access to the computer and permission to make changes to the system. Click No if you want to retain control and make changes or act on suggestions yourself.
If the person asks to take control of your computer, click Yes to allow him or her full access to the computer and permission to make changes to the system. Click No if you want to retain control and make changes or act on suggestions yourself.
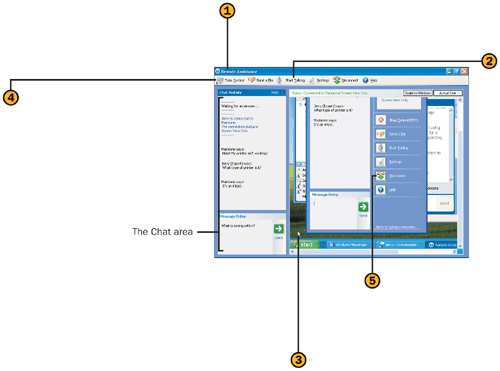
![]() With Windows Messenger running, log on, and wait for the invitation to provide help. When you receive it, accept the invitation, and wait for the Remote Assistance window to appear.
With Windows Messenger running, log on, and wait for the invitation to provide help. When you receive it, accept the invitation, and wait for the Remote Assistance window to appear.
![]() If you want to discuss the problem using audio, click Start Talking. Otherwise, use the Chat area to send and read messages.
If you want to discuss the problem using audio, click Start Talking. Otherwise, use the Chat area to send and read messages.
![]() Review the Desktop of the person you’re helping. All the actions he or she takes will be displayed, including using programs or changing settings.
Review the Desktop of the person you’re helping. All the actions he or she takes will be displayed, including using programs or changing settings.
![]() If you want to take control of the other computer, click Take Control. Wait for the other person to confirm that you can take control. Click OK to confirm that you have control, and use your mouse to explore the other computer, open menus and programs, and do whatever troubleshooting and problem-solving you need to do.
If you want to take control of the other computer, click Take Control. Wait for the other person to confirm that you can take control. Click OK to confirm that you have control, and use your mouse to explore the other computer, open menus and programs, and do whatever troubleshooting and problem-solving you need to do.
![]() When you no longer need control, click the Release Control button (the Take Control button changes to the Release Control button after it’s clicked), and click Disconnect when the session has been completed.
When you no longer need control, click the Release Control button (the Take Control button changes to the Release Control button after it’s clicked), and click Disconnect when the session has been completed.
With all the security features built into Windows, you’d think you wouldn’t need to do anything more. Wrong! What if you have a severe hardware failure—your hard disk just stops, for example—or someone accidentally erases all your files? What if your computer gets hit by lightning? All your work will be gone forever if you haven’t backed up your important files. And, with all the right tools readily available, there really is no excuse for not backing up those files periodically.
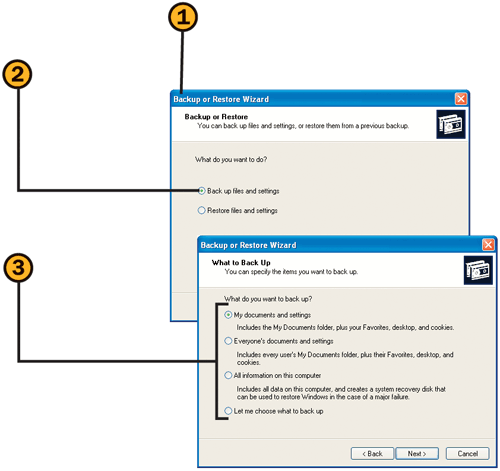
![]() Start Backup from the Systems submenu of the Start menu, and click Next to start the Backup Or Restore Wizard.
Start Backup from the Systems submenu of the Start menu, and click Next to start the Backup Or Restore Wizard.
![]() Select the Backup Files And Settings option, and click Next.
Select the Backup Files And Settings option, and click Next.
![]() Specify what you want to back up, and click Next.
Specify what you want to back up, and click Next.

![]() If you chose to back up selected items, select those items, and click Next.
If you chose to back up selected items, select those items, and click Next.
![]() Specify where the files are to be saved. If you’re backing up to a network share or a removable disk, click the Browse button to specify the location, and either select an existing backup file or enter a new file name to create a new backup file.
Specify where the files are to be saved. If you’re backing up to a network share or a removable disk, click the Browse button to specify the location, and either select an existing backup file or enter a new file name to create a new backup file.
Tip
You can run Windows Backup using the Backup Or Restore Wizard, or you can run Backup in Advanced Mode. Although Advanced Mode provides more direct access to your backup options, it can be confusing. If, when Windows Backup starts, it displays the Backup Utility window, choose Switch To Wizard Mode from the Tools menu to simplify your backups by using the wizard.
Tip
Windows Backup isn’t installed automatically in Windows XP Home Edition. To install it, in the VALUEADD folder on your Windows XP CD, open the MSFT folder and then the NTBACKUP folder. Double-click the NTBACKUP file to start the Windows Backup Utility Installation Wizard, and follow the steps to install the program.
![]() On the Completing The Backup Or Restore Wizard page of the wizard, click the Advanced button.
On the Completing The Backup Or Restore Wizard page of the wizard, click the Advanced button.
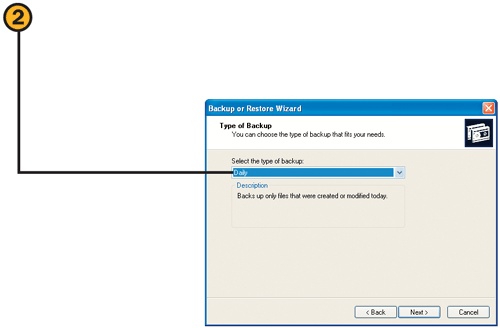
![]() Specify the type of backup you want, and click Next. Step through the wizard, setting your preferences for verification and compression, appending or replacing the data, and labeling the backup.
Specify the type of backup you want, and click Next. Step through the wizard, setting your preferences for verification and compression, appending or replacing the data, and labeling the backup.
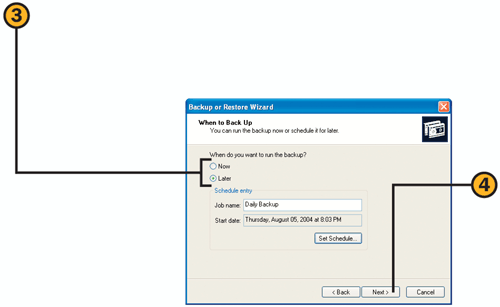
![]() Specify when you want the backup to be run. If you choose Later, click the Set Schedule button, and specify whether you want the backup to be run once at a specific time or routinely at specified time increments.
Specify when you want the backup to be run. If you choose Later, click the Set Schedule button, and specify whether you want the backup to be run once at a specific time or routinely at specified time increments.
![]() Click Next, and complete the wizard.
Click Next, and complete the wizard.
![]() If the backup is set to run immediately, wait for the data to be backed up, and then close both the Backup Progress dialog box and the Backup program when the backup has been completed. If the backup is scheduled to run later, close the Backup program.
If the backup is set to run immediately, wait for the data to be backed up, and then close both the Backup Progress dialog box and the Backup program when the backup has been completed. If the backup is scheduled to run later, close the Backup program.
Tip
Windows Backup is a useful tool (and it’s free!), but if you want more power, including the ability to write the backup files directly to removable media such as CDs or DVDs, you might want to purchase a more sophisticated backup program.
Types of Backup | |
|---|---|
Type | Files copied |
Copy | All files. The files are not marked as backed up. |
Daily | Files created or modified on the current day only. The files are not marked as backed up. |
Differential | Any files created or modified since the last Normal or Incremental backup. The files are not marked as backed up. |
Incremental | Any files created or modified since the last Normal or Incremental backup. The files are marked as backed up. |
Normal | All files. The files are marked as backed up. |
Have you deleted or otherwise lost files that you now need? If those files were routinely backed up from your computer, you can restore them from the backup to your computer.
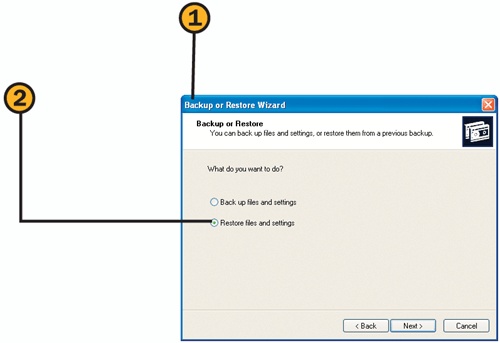
![]() Start the Backup program from the Systems submenu of the Start menu, and click Next to start the Backup Or Restore Wizard.
Start the Backup program from the Systems submenu of the Start menu, and click Next to start the Backup Or Restore Wizard.
![]() Select the Restore Files And Settings option, and click Next.
Select the Restore Files And Settings option, and click Next.
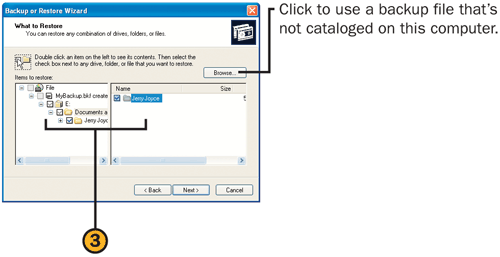
![]() Select the data set and the files to be restored. Click Next.
Select the data set and the files to be restored. Click Next.
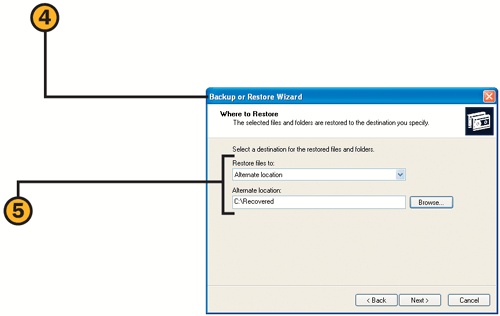
![]() On the Completing The Backup Or Restore Wizard page of the wizard, click the Advanced button to display the Where To Restore page of the wizard.
On the Completing The Backup Or Restore Wizard page of the wizard, click the Advanced button to display the Where To Restore page of the wizard.
![]() Specify where you want the files to be copied to.
Specify where you want the files to be copied to.
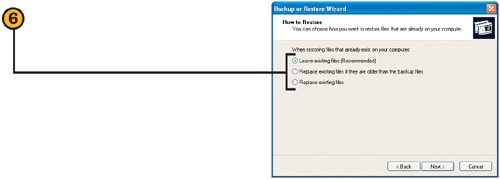
![]() Specify whether you want the restored files to replace any existing files of the same name.
Specify whether you want the restored files to replace any existing files of the same name.
![]() Complete the wizard, and wait for the files to be restored. Click Close in the Restore Progress dialog box when all the files have been copied, and then close the Backup program.
Complete the wizard, and wait for the files to be restored. Click Close in the Restore Progress dialog box when all the files have been copied, and then close the Backup program.
Tip
When a backup is executed, information about the items that were backed up and the storage location of the backup is saved in a "catalog" on your computer. If you’re restoring a backup that wasn’t created by you on your own computer, or if the original catalog was deleted or damaged, the Backup program will read the backup file you specify and will add its contents to the catalog.
Windows XP uses a database called the Registry to keep track of all its settings, including most of the programs that are installed on the system. Occasionally—if there’s a problem with your system or with a program, or if you simply want to customize the system—you’ll need to modify the contents of the Registry.
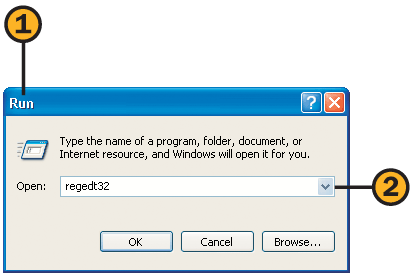
![]() Choose Run from the Start menu to open the Run dialog box.
Choose Run from the Start menu to open the Run dialog box.
![]() Type regedt32 in the Open box, and click OK.
Type regedt32 in the Open box, and click OK.
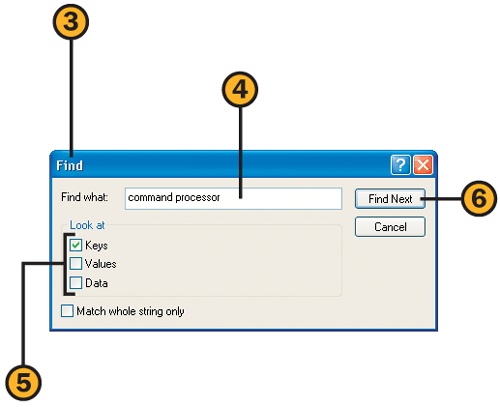
![]() Choose Find from the Edit menu to display the Find dialog box.
Choose Find from the Edit menu to display the Find dialog box.
![]() Type the name of the key you’re looking for.
Type the name of the key you’re looking for.
![]() Select the Keys check box if it isn’t already selected. Clear the check boxes for Values and Data if they’re selected.
Select the Keys check box if it isn’t already selected. Clear the check boxes for Values and Data if they’re selected.
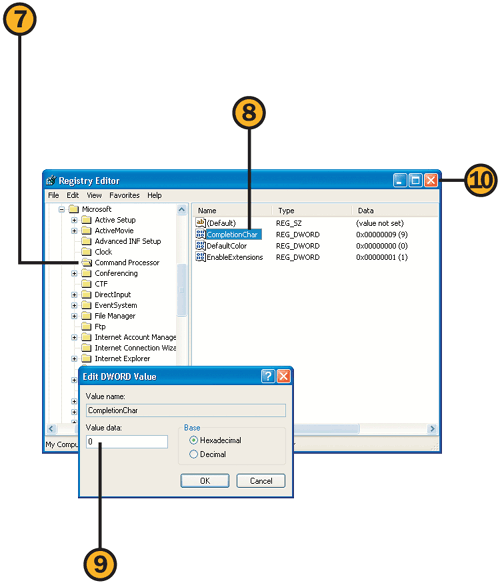
![]() Check the directory structure to verify that you have the correct key. If it’s not the correct key, choose Find Next from the Edit menu until you’ve located the correct key.
Check the directory structure to verify that you have the correct key. If it’s not the correct key, choose Find Next from the Edit menu until you’ve located the correct key.
![]() Double-click the item you want to change.
Double-click the item you want to change.
![]() Make your changes, and click OK.
Make your changes, and click OK.
![]() Close the Registry Editor, and see whether the change works as expected.
Close the Registry Editor, and see whether the change works as expected.