
In this section
The ability to communicate electronically is one of a computer’s most used and most valued features. In this section, we’ll discuss the tools that Microsoft Windows XP provides to enable you to reach out and connect with other people.
Microsoft Outlook Express helps you organize and customize your e-mail and does double duty as a news reader. It can complete an address from your Contacts list when you type only the first couple of letters of your contact’s name, and it can automatically add a signature to your messages. You can format your e-mail messages with fonts and colors, and you can choose or create your own e-mail stationery. If you often send one message to the same group of people, you can combine all their addresses into a group so that you don’t have to enter each individual’s address. You can enclose files, or attachments, with your e-mail, and if an attached file exceeds the size that your mail system can handle, you can compress the file to make it smaller. If you’re using a public computer, you can send and receive your e-mail using Microsoft Internet Explorer. There’s also a great new security feature in Outlook Express that helps you limit e-mail snooping by spammers and mass mailers.
You can use Windows Messenger to exchange instant text messages or to conduct working sessions with up to five of your contacts whenever they’re on line. If text messages aren’t personal enough, you can have voice and video chats, provided your contacts are running Windows XP. In a Windows Messenger session, you can share programs, discuss documents on line, and transfer large files without compressing them.
You don’t have to address an envelope or trek to the mailbox on a cold, rainy day. All you do is select a name, create a message, and click a Send button. Outlook Express and your mail server do the rest. What could be more convenient?

![]() Open Outlook Express from the Start menu. Click Create Mail. If you want to send a formatted message with a background and coordinated fonts and bullets, click the down arrow next to the button, and click the stationery you want to use.
Open Outlook Express from the Start menu. Click Create Mail. If you want to send a formatted message with a background and coordinated fonts and bullets, click the down arrow next to the button, and click the stationery you want to use.
![]() Start typing the recipient’s name. Press Enter when Outlook Express completes the name based on the names in your Contacts list, or continue typing if the proposed name is incorrect. To add more names, type a semicolon (;), and then start typing another recipient’s name.
Start typing the recipient’s name. Press Enter when Outlook Express completes the name based on the names in your Contacts list, or continue typing if the proposed name is incorrect. To add more names, type a semicolon (;), and then start typing another recipient’s name.
![]() Press the Tab key to move to the CC field, and type the names of the people who are to receive a copy of the message.
Press the Tab key to move to the CC field, and type the names of the people who are to receive a copy of the message.
![]() Press the Tab key to move to the Subject line, type a subject, and press Tab again to move into the message area.
Press the Tab key to move to the Subject line, type a subject, and press Tab again to move into the message area.
![]() Type your message. Use any of the formatting tools to format your message.
Type your message. Use any of the formatting tools to format your message.
![]() Click Send to send the message to your Outbox.
Click Send to send the message to your Outbox.
![]() When you’ve composed all the messages you want to send, click Send/Recv to send the messages in the Outbox to your mail server.
When you’ve composed all the messages you want to send, click Send/Recv to send the messages in the Outbox to your mail server.
See Also
For information about adding formatting, pictures, or your signature, see "Designing Your Default Message".
For information about setting up e-mail accounts in Outlook Express, see "Setting Up Outlook Express".
Caution
A formatted message uses HTML formatting. Use Plain Text formatting if you’re not sure whether the recipient has a mail reader that supports HTML formatting. Messages using Plain Text formatting are smaller and will download faster over a slow Internet connection than will messages using HTML formatting, especially those that contain pictures.
You can’t always complete an e-mail message without being interrupted by someone or something. Or perhaps you want to mull over what you’ve said for a while and make a few changes to the wording before you send the message. Fortunately, you can save your message in its incomplete form and then return to it when you’re ready, finish it, and send it on its way.

![]() In Outlook Express, create a new message, address it, add a subject, and write your content.
In Outlook Express, create a new message, address it, add a subject, and write your content.
![]() Choose Save from the File menu.
Choose Save from the File menu.
![]() If a message box appears, click OK.
If a message box appears, click OK.
![]() Continue working on the message, choosing Save from the File menu occasionally. When you need to stop, click the Close button.
Continue working on the message, choosing Save from the File menu occasionally. When you need to stop, click the Close button.

Outlook Express lets you specify how frequently you want it to check for incoming e-mail, and it notifies you when you receive new mail. You can check your Inbox and see at a glance which messages have and haven’t been read, or you can set the view to list unread messages only.
Tip
When you start Outlook Express, it checks for your mail, and it checks periodically thereafter while it’s running. To receive mail immediately when you don’t want to wait for the system to check your mailbox for you, click the Send/Recv button. To change the frequency with which Outlook Express checks for mail, choose Options from the Tools menu, and change the settings on the General tab.

![]() Click the Inbox for the mail service you want to view if it isn’t the currently active folder.
Click the Inbox for the mail service you want to view if it isn’t the currently active folder.
![]() On the View menu, specify how you want to view your messages:
On the View menu, specify how you want to view your messages:
Point to Current View, and choose the type of messages you want displayed.
Point to Sort By, and choose the way you want the messages to be ordered.
Choose Layout, specify whether and where you want the preview pane displayed, and click OK.
![]() Click a message header, and read the message in the preview pane.
Click a message header, and read the message in the preview pane.

![]() Double-click a message header to view the message in a separate window.
Double-click a message header to view the message in a separate window.
When you’re away from your home computer—staying in a hotel, visiting a cybercafé, attending a conference, and so on—you can often use a public computer to access your e-mail. In order to do this, you must be able to access your e-mail account via the Web—using Internet Explorer instead of a dedicated mail program, for example. E-mail accounts such as Hotmail are designed for Web access, and many other types of accounts also support Web access together with their normal e-mail access.
Tip
If you sign in and accidentally tell Internet Explorer to remember your password, choose Internet Options from the Tools menu, and, on the Content tab, click the AutoComplete button. In the AutoComplete Settings dialog box, click the Clear Passwords button, confirm that you want to delete the password, and then click OK twice. By doing this, you prevent someone else from signing on to the computer using your stored password.

![]() In Internet Explorer, type the name of the Web page of your e-mail server in the Address toolbar, and press Enter.
In Internet Explorer, type the name of the Web page of your e-mail server in the Address toolbar, and press Enter.

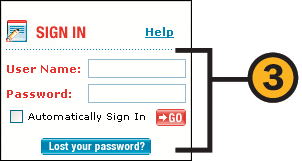
![]() If you need to sign in using a .NET Passport, do the following:
If you need to sign in using a .NET Passport, do the following:
Type your e-mail address.
Type your password.
If the check box for automatic sign-in is checked, clear it.
Select the check box that directs the system not to remember your e-mail address.
Click Sign In.
![]() If you don’t use a .NET passport to sign in, follow the directions to sign in. Make sure that you clear any check boxes so that your password and/or e-mail address won’t be remembered.
If you don’t use a .NET passport to sign in, follow the directions to sign in. Make sure that you clear any check boxes so that your password and/or e-mail address won’t be remembered.
![]() Use your e-mail service as usual. When you’ve finished, sign out, and close Internet Explorer so that all items are deleted.
Use your e-mail service as usual. When you’ve finished, sign out, and close Internet Explorer so that all items are deleted.
See Also
For information about connecting to a public wireless network, see "Connecting to a Wireless Network".
For information about increasing security when you use your own computer on a public network, see "Configuring the Windows Firewall".
Why not let your computer do some of your work for you? When you design a default mail message, every new message that you start will look exactly the way you want, with all the elements in place—a specific background picture, your signature automatically inserted at the end of the message, a font that makes the message a little more "you," and so on.
Tip
If you know that a certain contact can receive only plain-text–formatted messages, right-click his or her name in your Contacts list, choose Properties from the shortcut menu, and, on the Name tab, select the Send E-Mail Using Plain Text Only check box. Click OK. To send a message in plain text only once, choose Plain Text from the Format menu when you compose the message.

![]() In Outlook Express, choose Options from the Tools menu, and click the Signatures tab of the Options dialog box.
In Outlook Express, choose Options from the Tools menu, and click the Signatures tab of the Options dialog box.
![]() Type the signature you want to use as your default signature, or specify the text or HTML document that contains the signature.
Type the signature you want to use as your default signature, or specify the text or HTML document that contains the signature.
![]() Specify whether you want the signature added automatically to all outgoing messages and whether or not you want it included in replies and forwarded messages.
Specify whether you want the signature added automatically to all outgoing messages and whether or not you want it included in replies and forwarded messages.
![]() If you have more than one mail or news account, click Advanced.
If you have more than one mail or news account, click Advanced.

![]() Select the check boxes for the accounts that will use this signature, and then click OK.
Select the check boxes for the accounts that will use this signature, and then click OK.

![]() Click the Compose tab of the Options dialog box, and turn on this check box to use stationery.
Click the Compose tab of the Options dialog box, and turn on this check box to use stationery.

![]() In the list, click the stationery you want to use.
In the list, click the stationery you want to use.

![]() Click the Send tab, and click the HTML option for your mail format if it isn’t already selected.
Click the Send tab, and click the HTML option for your mail format if it isn’t already selected.
A great way to share a file—a Microsoft Word document, a picture, or even an entire program—is to include it as part of an e-mail message. The file is kept as a separate part of the message—an attachment—that the recipient can save and open at any time.
Tip
Some mail systems can’t accommodate attachments larger than about 1 MB, and some types of files can be corrupted when they’re sent as attachments. In those cases, you can compress the file before you send it. To do so, send the file to a compressed folder, and then e-mail the compressed folder. You can also use other file-transfer methods such as those available through FTP services or Windows Messenger.

![]() Open the folder window that contains the file, right-click the file, point to Send To on the shortcut menu, and choose Mail Recipient from the submenu.
Open the folder window that contains the file, right-click the file, point to Send To on the shortcut menu, and choose Mail Recipient from the submenu.
![]() Address the message, and type your message text.
Address the message, and type your message text.
![]() Click Send to send the message just as you’d send any other message.
Click Send to send the message just as you’d send any other message.

![]() If you receive a message about modifying the file you’re sending, click the option you want.
If you receive a message about modifying the file you’re sending, click the option you want.
See Also
For information about other ways to transfer files, see "Transferring Files".
For information about using compressed folders, see "Compressing Files".

![]() Select a message you’ve received that contains an attachment.
Select a message you’ve received that contains an attachment.
![]() Click the Attachment icon, and, from the menu that appears, choose
Click the Attachment icon, and, from the menu that appears, choose
The name of the file to open the file.
Save Attachments to save the file to disk without opening it.
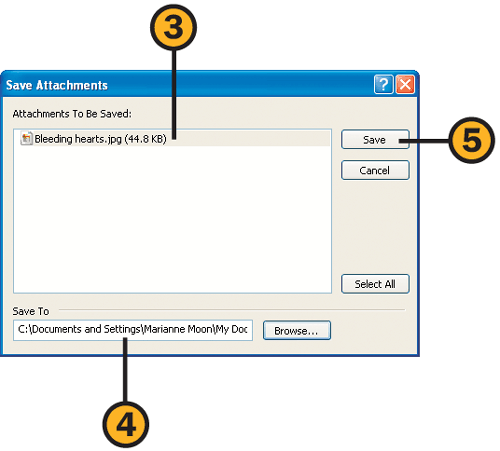
![]() If you chose to save the file, select it.
If you chose to save the file, select it.
![]() Specify where you want to save the file.
Specify where you want to save the file.
Caution
Viruses are often distributed in attached files. Never open an attachment you aren’t expecting without first saving the attachment to disk and then using a virus-scanning program to inspect the file.
Try This
Open a folder window, and select two or more files. Right-click one of the files, point to Send To on the shortcut menu, and choose Mail Recipient from the submenu. In your message, click the Attach button, and use the Insert Attachment dialog box to locate an additional file in a different folder. Select the file, and click Attach. You now have multiple files enclosed in a single message.
See Also
For information about protecting yourself and others from e-mail viruses, see "Foiling E-Mail Viruses".
When you receive an e-mail message that needs a reply or that you want to forward to someone else, all it takes is a click of a button to create a new message. But be careful when you use the Reply All button—your message could be received by a lot of people for whom it wasn’t intended!
Tip
When you reply to a message that has an attached file, the attachment isn’t included with your reply. When you forward a message, though, the attachment is included so that the recipient can open or save it.

Reply to send your reply to the writer of the message only
Reply All to send your reply to the writer of the message and to everyone listed in the original message’s To and CC lines
Forward to send a copy of the message to another recipient

![]() Add names to or delete names from the To and CC lines.
Add names to or delete names from the To and CC lines.
![]() Type your reply message or any note associated with the forwarded message.
Type your reply message or any note associated with the forwarded message.
With so many newsgroups available, you’ll probably want to be selective about the ones you review. You can do so in Outlook Express by subscribing to the newsgroups you like. Those newsgroups will appear in the message pane when you select the news server and will also appear on the Folders Bar, if it’s displayed, when you expand the listing for a news server.

![]() With Outlook Express open and connected to the Internet, click the news server you want to access.
With Outlook Express open and connected to the Internet, click the news server you want to access.
![]() If no dialog box appears, click Newsgroups.
If no dialog box appears, click Newsgroups.

![]() If you receive a notification that you’re not subscribed to any newsgroups, click Yes.
If you receive a notification that you’re not subscribed to any newsgroups, click Yes.

![]() If you have more than one news server, specify the one you want to use.
If you have more than one news server, specify the one you want to use.
![]() Type a keyword to search for the newsgroups you want to access.
Type a keyword to search for the newsgroups you want to access.
![]() Double-click a newsgroup to subscribe to it. Repeat to subscribe to all the newsgroups you want to access.
Double-click a newsgroup to subscribe to it. Repeat to subscribe to all the newsgroups you want to access.
Reading and adding to the news—or the gossip, tirades, and misinformation that often pass for news in Internet newsgroups—is as simple as reading or sending your e-mail. All you need to do is specify a newsgroup and select a message, and then either read the message or click a button to respond to it.
Tip
A "thread" is a series of messages in which one person posts a message and other readers reply to the message and/or to the replies.

![]() In the Folders list, expand the list under the news server if necessary, and click the newsgroup.
In the Folders list, expand the list under the news server if necessary, and click the newsgroup.
![]() On the View menu, point to Current View, and choose the view you want:
On the View menu, point to Current View, and choose the view you want:
Show All Messages to see everything
Hide Read Messages to display only the messages you haven’t read
Show Downloaded Messages to see the messages you’ve downloaded
Hide Read Or Ignored Messages to display only the messages you haven’t read or that haven’t been marked to be ignored
Show Replies To My Messages to see responses to your messages
![]() Click a message to display it.
Click a message to display it.
![]() Click New Post if you want to create a new message under its own topic (to start a new thread).
Click New Post if you want to create a new message under its own topic (to start a new thread).
![]() Click Reply Group to respond to the selected message and have your message added under that message (to add it to the thread).
Click Reply Group to respond to the selected message and have your message added under that message (to add it to the thread).
![]() Click Reply to send an e-mail message to the author of the message only but not to add your message to the newsgroup.
Click Reply to send an e-mail message to the author of the message only but not to add your message to the newsgroup.
If you aren’t always connected to the mail and news servers, or if you want to economize on connection charges, you can download your e-mail and newsgroup messages, disconnect from the Internet, and then read the messages at your leisure. Any replies or new messages you compose will be stored in your Outbox until you reconnect.

![]() Click the mail or news service whose content you want to read off line.
Click the mail or news service whose content you want to read off line.
![]() Click Settings, and specify what you want to be downloaded.
Click Settings, and specify what you want to be downloaded.
![]() Select the check boxes for the folders or groups you want to download. Clear the check boxes for those you don’t want to download.
Select the check boxes for the folders or groups you want to download. Clear the check boxes for those you don’t want to download.
![]() Click Synchronize Account. Connect to the Internet if you aren’t already connected.
Click Synchronize Account. Connect to the Internet if you aren’t already connected.

![]() Wait for the messages to download, and then disconnect from the Internet.
Wait for the messages to download, and then disconnect from the Internet.
![]() Click a message to read it. If Outlook Express tries to reconnect, choose Work Offline from the File menu, and then click the message to read it.
Click a message to read it. If Outlook Express tries to reconnect, choose Work Offline from the File menu, and then click the message to read it.
Tip
Unless you’ve changed some settings, all your messages are automatically downloaded from a POP3 e-mail service. However, messages aren’t routinely downloaded from an HTTP service (a Hotmail account, for example) or an IMAP service. Use the method described in the procedure on this page to download any messages from those mail services that you want to review off line.
One of the most insidious ways mass mailers and spammers verify that your e-mail address is valid is to include a picture that they hope you’ll download from a Web server. When your computer accesses the site that contains the picture, your e-mail address is automatically verified. You can guard against this invasion of your privacy by having Outlook Express prevent automatic downloading of pictures in all your mail.


Why not let Outlook Express do some of the work of organizing your e-mail messages? By creating rules, you can tell Outlook Express how you want your messages to be treated, based on subject, content, e-mail addresses, or various other factors.
Tip
If a rule already exists, the Message Rules dialog box appears when you choose Message Rules from the Tools menu. Click New to display the New Mail Rules dialog box.
![]() Point to Message Rules on the Tools menu, and choose Mail from the submenu to display the New Mail Rule dialog box.
Point to Message Rules on the Tools menu, and choose Mail from the submenu to display the New Mail Rule dialog box.
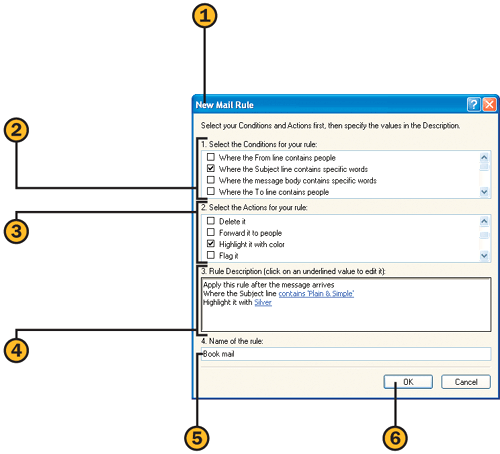
![]() Select the check box for each identifying condition.
Select the check box for each identifying condition.
![]() Select the check box for each action to be executed when the identifying conditions are met.
Select the check box for each action to be executed when the identifying conditions are met.
![]() Click a link to provide the specific information required to execute the rule.
Click a link to provide the specific information required to execute the rule.

![]() Click New, and repeat steps 2 through 6 to create additional rules.
Click New, and repeat steps 2 through 6 to create additional rules.
![]() Use the Move Up and Move Down buttons to change the order in which the rules are executed.
Use the Move Up and Move Down buttons to change the order in which the rules are executed.
When you’re using e-mail, you don’t need to type an address every time you send a message; you can retrieve addresses from your Contacts list. All the names shown in the Contacts list are actually stored in your Address Book, a separate program that works with Outlook Express and other programs. If you frequently send one message to the same group of people, you can gather all their addresses into a group, and then all you need to find and use is that one address item. It’s a real time-saver.

![]() In Outlook Express, point to New on the File menu, and choose Contact from the submenu to display the Properties dialog box.
In Outlook Express, point to New on the File menu, and choose Contact from the submenu to display the Properties dialog box.
![]() On the various tabs of the Properties dialog box, enter the information you want to record.
On the various tabs of the Properties dialog box, enter the information you want to record.

![]() In the Inbox, right-click the message.
In the Inbox, right-click the message.
![]() Choose Add Sender To Address Book from the shortcut menu. If the command is grayed (unavailable), connect to the Internet or to your mail server, click the message to download it, and then right-click it and choose the command again.
Choose Add Sender To Address Book from the shortcut menu. If the command is grayed (unavailable), connect to the Internet or to your mail server, click the message to download it, and then right-click it and choose the command again.
Try This
Create a group. Start a new e-mail message, and use the group name as the address in the To line. Send the message, and then look at that message in your Sent Items folder. Note that the address of each member of the group is listed.

![]() Click Addresses on the toolbar.
Click Addresses on the toolbar.
![]() On the Address Book toolbar, click New, and choose New Group from the menu.
On the Address Book toolbar, click New, and choose New Group from the menu.
![]() On the Group tab of the Properties dialog box, type a descriptive name, or alias, for the group.
On the Group tab of the Properties dialog box, type a descriptive name, or alias, for the group.
![]() Add any further information to the Group Details tab, and click OK. Close the Address Book when you’ve finished.
Add any further information to the Group Details tab, and click OK. Close the Address Book when you’ve finished.

![]() Click the name of someone you want to include in the group.
Click the name of someone you want to include in the group.
![]() Click Select. Continue selecting members and clicking the Select button until the Members list is complete.
Click Select. Continue selecting members and clicking the Select button until the Members list is complete.
![]() Use the New Contact button or the Name and Members boxes to add to the group any new members who aren’t listed in your Address Book.
Use the New Contact button or the Name and Members boxes to add to the group any new members who aren’t listed in your Address Book.
Tip
You can collect addresses from address books from other computers, other programs, or other users by using the Import command on the File menu, by clicking the Find button on the address book’s toolbar to use a directory service, or by opening and importing an electronic business card (vCard) that someone sent you. (A vCard, or virtual card, is a file that contains a single Address Book entry with contact information for an individual.)
Using Windows Messenger and a Passport, you can exchange instant messages with your designated contacts whenever they’re on line. For you to be able to contact others, they must be in your Contacts list. You can add a person who has a Passport to your list, or you can send e-mail to someone who doesn’t have a Passport to provide that person with information about obtaining a Passport and using the proper Windows Messenger software.
Tip
In most cases, when you set up Windows XP, you also set up your e-mail account and your Passport. If you didn’t, however, or if you want to change your Passport, choose Control Panel from the Start menu, click User Accounts, and then click your user name.

![]() Connect to the Internet if you aren’t already connected.
Connect to the Internet if you aren’t already connected.
![]() Double-click the Windows Messenger icon in the notification area of the taskbar. If you don’t see the icon, click the Start button, point to All Programs, and choose Windows Messenger from the submenu to open the Windows Messenger dialog box.
Double-click the Windows Messenger icon in the notification area of the taskbar. If you don’t see the icon, click the Start button, point to All Programs, and choose Windows Messenger from the submenu to open the Windows Messenger dialog box.
![]() After you’ve logged on, click Add A Contact.
After you’ve logged on, click Add A Contact.

![]() Step through the Add A Contact Wizard to add a contact. If the person you’re adding doesn’t have a Passport, or if you’re not sure whether he or she has Windows Messenger installed, click the option to send an e-mail message explaining what’s needed.
Step through the Add A Contact Wizard to add a contact. If the person you’re adding doesn’t have a Passport, or if you’re not sure whether he or she has Windows Messenger installed, click the option to send an e-mail message explaining what’s needed.
![]() Wait for each person to accept your invitation to be an online contact.
Wait for each person to accept your invitation to be an online contact.
Try This
In Outlook Express, click the down arrow next to Contacts, choose New Online Contact from the menu, and add a new contact. Click an existing e-mail contact, open the Contacts menu again, and choose Set As Online Contact. Point to a contact’s name and see whether that person is on line. If so, right-click the contact’s name, and then choose Send Instant Message from the shortcut menu.
Are you and your contacts ready for an online conversation? Each of your contacts must have a Passport and must have the Windows Messenger software installed. You can have as many as 75 different contacts and can include up to five people in a text conversation. Each message can contain up to 400 characters.
Tip
Instant messaging procedures and protocols change frequently. You’ll probably need to upgrade the software periodically to maintain complete functionality.

![]() Connect to the Internet if you aren’t already connected.
Connect to the Internet if you aren’t already connected.
![]() Click the Windows Messenger icon in the notification area of the taskbar. On the menu that appears, point to Send An Instant Message, and choose the person you want to connect to.
Click the Windows Messenger icon in the notification area of the taskbar. On the menu that appears, point to Send An Instant Message, and choose the person you want to connect to.
![]() Click the Windows Messenger icon in the notification area, point to My Status on the menu, and choose the status you want.
Click the Windows Messenger icon in the notification area, point to My Status on the menu, and choose the status you want.
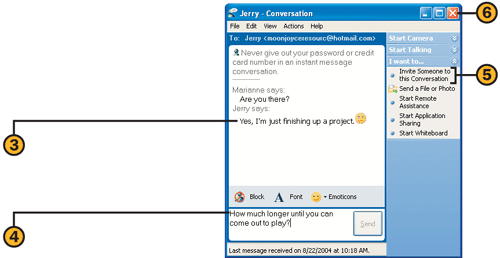
![]() Read the message from the other person.
Read the message from the other person.
![]() Type your text message, and press Enter to send it.
Type your text message, and press Enter to send it.
![]() If you want another person to join the conversation, click Invite Someone To This Conversation, and choose that person’s name from the submenu.
If you want another person to join the conversation, click Invite Someone To This Conversation, and choose that person’s name from the submenu.
![]() When the conversation is over, close the Conversation window.
When the conversation is over, close the Conversation window.
If a text conversation is too antiquated or too impersonal for your taste, you can use both voice and video in your instant messages. If you and your contact are both using Windows Messenger on computers running Windows XP, and you both have the necessary sound systems and video cameras, having a voice and video chat is as simple as clicking a button.

![]() Connect to the Internet if you aren’t already connected.
Connect to the Internet if you aren’t already connected.
![]() Click the Windows Messenger icon in the notification area of the taskbar. On the menu that appears, point to Send An Instant Message, and choose the person with whom you want to chat to open the Conversation dialog box.
Click the Windows Messenger icon in the notification area of the taskbar. On the menu that appears, point to Send An Instant Message, and choose the person with whom you want to chat to open the Conversation dialog box.
To have a video and voice conversation, click Start Camera, and wait for the other person to accept the invitation.
To have a voice-only conversation, click Start Talking, and wait for the other person to accept the invitation.
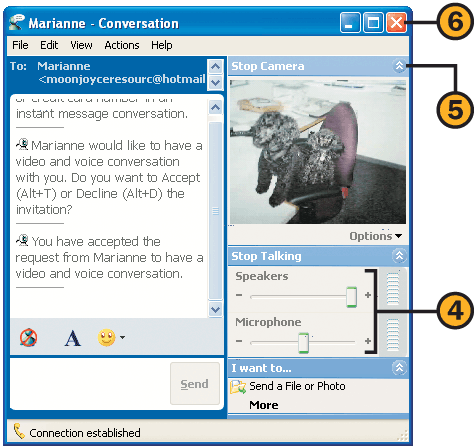
![]() Use the controls to change the volume of the speakers or of the microphone.
Use the controls to change the volume of the speakers or of the microphone.
![]() To end the voice or video conversation, click Stop Talking or Stop Camera.
To end the voice or video conversation, click Stop Talking or Stop Camera.
![]() Close the Conversation window when you’ve finished.
Close the Conversation window when you’ve finished.
Tip
The first time you ran Windows Messenger, you should have stepped through the Audio And Tuning Wizard. If you find that your sound system needs some adjustment, close your conversation, double-click the Windows Messenger icon in the notification area of the taskbar, and, in the Windows Messenger window, choose Audio And Tuning Wizard from the Tools menu to retune your system.
If you need to display a program to one of your contacts, or if you want to allow the other person to use the program or to gain access to a folder on your computer, all you need to do is start a conversation, and then you can share the program or folder.
Caution
If you share the Desktop and then allow the other person to control the Desktop or your shared programs, he or she will have full control of your computer and will be able to access anything from the Start menu. Even if you share only one program, the other person can make considerable modifications to your settings and files. Therefore, you should never leave your computer unattended when you’re sharing items and you’ve given someone else control.

![]() On your computer, open the program, folder, or document you want to share.
On your computer, open the program, folder, or document you want to share.
![]() Start a Windows Messenger conversation with the person with whom you want to share the item. Invite others into the conversation if you want.
Start a Windows Messenger conversation with the person with whom you want to share the item. Invite others into the conversation if you want.
![]() In the I Want To section, click Start Application Sharing. Wait for the other person to accept the invitation. If you’re connected to more than one contact, you’ll need to select the contact who is going to share the application. You can then share the application with other contacts.
In the I Want To section, click Start Application Sharing. Wait for the other person to accept the invitation. If you’re connected to more than one contact, you’ll need to select the contact who is going to share the application. You can then share the application with other contacts.

![]() Select the item that’s going to be shared.
Select the item that’s going to be shared.
![]() Click Share. Share additional items if you want.
Click Share. Share additional items if you want.
![]() Click Allow Control if you want someone else to be able to control the shared item. Only one person at a time can have control.
Click Allow Control if you want someone else to be able to control the shared item. Only one person at a time can have control.
![]() Select the check boxes for the type of control you want to allow.
Select the check boxes for the type of control you want to allow.
See Also
For information about asking someone for help using remote assistance, see "Helping Each Other".

![]() Click in the item to be displayed on both computers, and make sure there’s nothing on your Desktop that might obscure the other person’s view of the item. Make any changes you want.
Click in the item to be displayed on both computers, and make sure there’s nothing on your Desktop that might obscure the other person’s view of the item. Make any changes you want.
![]() If you’re allowing control by others, a person who wants to take control should choose Request Control from the Control menu. If a dialog box appears asking whether you want to let that person take control, click Accept or Reject.
If you’re allowing control by others, a person who wants to take control should choose Request Control from the Control menu. If a dialog box appears asking whether you want to let that person take control, click Accept or Reject.
![]() Let the other person make the desired changes.
Let the other person make the desired changes.
![]() To regain control, click your mouse.
To regain control, click your mouse.
![]() To make changes to what is shared, click Start Application Sharing, and make your changes in the Sharing dialog box that appears.
To make changes to what is shared, click Start Application Sharing, and make your changes in the Sharing dialog box that appears.
![]() When you’ve finished, click Stop Collaborating to end the sharing session.
When you’ve finished, click Stop Collaborating to end the sharing session.
You can receive updated information in Windows Messenger about a wide range of topics. When you customize your alerts, all you need to do is switch to the Alerts tab to receive your updated content.
Tip
If you haven’t signed up for any alerts, you can click the Alerts tab to sign up for the alerts you want.

![]() In the Windows Messenger window, click the Alerts tab. If it isn’t visible, point to Show Tabs on the Tools menu, and, from the submenu, choose the tab you want to display. If you see a dialog box about automatically signing in to a Web site, click OK.
In the Windows Messenger window, click the Alerts tab. If it isn’t visible, point to Show Tabs on the Tools menu, and, from the submenu, choose the tab you want to display. If you see a dialog box about automatically signing in to a Web site, click OK.
![]() Specify whether you want to see the alerts listed consecutively by date and time received or as categorized by the provider.
Specify whether you want to see the alerts listed consecutively by date and time received or as categorized by the provider.
![]() To see the entire text of the alert, or other content related to the alert, click the alert text.
To see the entire text of the alert, or other content related to the alert, click the alert text.
![]() If you want to see the alerts for a truncated list, click the list title to expand the list.
If you want to see the alerts for a truncated list, click the list title to expand the list.
![]() To change the settings for your alert, click the Change The Delivery Settings icon.
To change the settings for your alert, click the Change The Delivery Settings icon.
![]() If you don’t want to receive any alerts for a while, choose the option to turn off your alerts.
If you don’t want to receive any alerts for a while, choose the option to turn off your alerts.
![]() Click to add to, delete, or modify the delivery of your alerts.
Click to add to, delete, or modify the delivery of your alerts.
Tip
You might have more than one tab in your Windows Messenger window, depending on whatever additional software you’ve installed. If you don’t see any tabs and if the Show Tabs command isn’t listed on the Tools menu, choose Options from the Tools menu, and, on the Privacy tab, clear the check box that prevents you from downloading tabs. Then, after you sign out and sign back in, you should be able to access the tabs.
One of the easiest ways to transfer a file from one computer to another over the Internet is to use Windows Messenger, especially if you’re sending a large file. When you send a file as an e-mail attachment you’re often limited as to its size (usually it can be no larger than 1 MB), but when you use Windows Messenger there’s no limitation on file size.

![]() Use Windows Messenger to connect to the person to whom you’ll be sending the file.
Use Windows Messenger to connect to the person to whom you’ll be sending the file.
![]() Click Send A File Or Photo. If you’re connected to more than one person, select the recipient’s name in the Send A File dialog box, and then click OK. (You can send a file to only one person at a time.)
Click Send A File Or Photo. If you’re connected to more than one person, select the recipient’s name in the Send A File dialog box, and then click OK. (You can send a file to only one person at a time.)
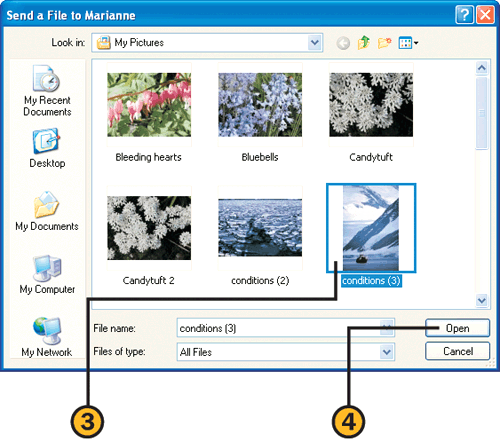
![]() Locate and select the file to be sent.
Locate and select the file to be sent.
![]() Click Open, and wait for the recipient to accept the file.
Click Open, and wait for the recipient to accept the file.
Caution
If you receive a file but feel uncertain about its safety or its origin, don’t click the link to the file in the Conversation window—that will open or run the file. Instead, choose Open Received Files from the File menu, and, when the folder opens, run a virus-scanning program to check the file.
Try This
There’s more than one way to send a file, and you don’t need to start a conversation first. In the Windows Messenger window, right-click an online contact, choose Send A File Or Photo from the shortcut menu, and use the Select A File dialog box to select and send the file. Now choose Send A File Or Photo from the File menu, specify the address of the recipient on the Other tab of the Send A File dialog box, click OK, and send the file using the Select A File dialog box.
When you use Windows Messenger to communicate with others, you can format your messages with the fonts and colors of your choice. You can also use emoticons—those little symbols that some people love and others just can’t stand—instead of words.

![]() In your Conversation window, click Font to display the Change My Message Font dialog box.
In your Conversation window, click Font to display the Change My Message Font dialog box.
![]() Specify the formatting you want, and then view the result in the Sample box.
Specify the formatting you want, and then view the result in the Sample box.
