In the earlier sections, we were concerned with setting up the environment. Now, with our environment scanned and the bin placed, we are ready to allow the user to throw paper into, hopefully, the bin. As we did earlier, let's quickly outline our general approach before writing any code.
One motivation for MR devices is the desire to eliminate the abstraction between computers and the real world, including how we interact with them. We want to borrow as much from the real world as possible to help deliver an intuitive and natural experience. In basketball, the ball's velocity is determined by the angle and force of the player's throw; this is ideally what we want to mimic.
HoloLens recognizes gesture input by tracking the position of both hands that are visible to the device; hands are detected when they are either in the ready state (the back of the hand with index finger up) or the pressed state (the back of the hand).
The field of view for gestures differs from the other cameras on the device in that it focuses on the lower left and right regions in front of the device, known as the gesture frame. We can access the states of the hands by registering for the relevant events of the InteractionManager class; we will take advantage of this to implement our throw mechanic. In this section, we will implement a class responsible for tracking the hands, allowing the user to throw paper when we detect a finger being pressed and then released. Velocity and direction will be derived from the change in distance of the tracked hands, from when we detect a press to when we detect a release.
Let's start by creating the component responsible for tracking the user's hands and managing the throwing of the paper.
Select the Controllers GameObject in the Hierarchy pane, click on the Add Component button in the Inspector panel, select New Script, and name it PlayerInputController. Double-click on the PlayerInputController script to open it within Visual Studio.
With PlayerInputController open, start by adding the UnityEngine.VR.WSA.Input namespace.
Like the other controllers, make the PlayerInputController a singleton by adding the following code:
    private static PlayerInputController _sharedInstance;

    public static PlayerInputController SharedInstance
    {
        get
        {
            if (_sharedInstance == null)
            {
                _sharedInstance =
                GameObject.FindObjectOfType<PlayerInputController>();
            }

            if (_sharedInstance == null)
            {
                GameObject instanceGameObject = new
                GameObject(typeof(PlayerInputController).Name);
                _sharedInstance =
                instanceGameObject.AddComponent<PlayerInputController>();
            }

            return _sharedInstance;
        }
    }
Next, we want to register (and unregister) to the interaction events to allow us to track the hands' positions and state. Add the following code to your PlayerInputController:
    void OnEnable()
    {
        InteractionManager.SourceDetected +=
        InteractionManager_SourceDetected;
        InteractionManager.SourcePressed +=
        InteractionManager_SourcePressed;
        InteractionManager.SourceReleased +=
        InteractionManager_SourceReleased;
        InteractionManager.SourceUpdated +=
        InteractionManager_SourceUpdated;
        InteractionManager.SourceLost += InteractionManager_SourceLost;
    }

    void OnDisable()
    {
        InteractionManager.SourceDetected -=
        InteractionManager_SourceDetected;
        InteractionManager.SourcePressed -=
        InteractionManager_SourcePressed;
        InteractionManager.SourceReleased -=
        InteractionManager_SourceReleased;
        InteractionManager.SourceUpdated -=
        InteractionManager_SourceUpdated;
        InteractionManager.SourceLost -= InteractionManager_SourceLost;
    }
As discussed in the preceding code snippet, we want to be able to track the hands to calculate the force to apply to the paper. To track the state, we will implement a new class and a data structure to keep track of them. Add the following at the top, but within our PlayerInputController class:
    public class HandState
    {
        public uint id;
        public bool isPressed;
        public float pressedTimestamp;
        public Vector3 pressedPosition;
        public Vector3 currentPosition;
    }

    Dictionary<uint, HandState> trackedHands = new Dictionary<uint,
    HandState>();
This allows us to track the state of the user's hands; all we need to do now is to populate and update these objects from the events fired from InterfactionManager. To make our life easier, we will create two utility methods that will be responsible for adding and removing states from our trackedHands dictionary. Add the following methods to your PlayerInputController script:
    HandState GetHandState(InteractionSourceState state)
    {
        if(state.source.kind != InteractionSourceKind.Hand)
        {
            return null;
        }

        if (!trackedHands.ContainsKey(state.source.id))
        {
            trackedHands.Add(state.source.id, new HandState
            {
                id = state.source.id
            });
        }

        Vector3 handPosition;
        if (!state.properties.location.TryGetPosition(out
        handPosition))
        {
            RemoveHandState(state);
            return null;
        }

        HandState handState = trackedHands[state.source.id];
        handState.currentPosition = handPosition;

        return handState;
    }

    void RemoveHandState(InteractionSourceState state)
    {
        if (trackedHands.ContainsKey(state.source.id))
        {
            trackedHands.Remove(state.source.id);
        }
    }
The GetHandState is the most interesting of the two methods, it's responsible for creating a new state, if one doesn't already exist, and for updating the associate currentPosition of HandState. If it fails to obtain the hand's state, it will remove it from the trackedHands dictionary and return null, signifying an invalid state.
With our utility methods implemented, the InteractionManager event's methods are just used to update the hand's state:
    void InteractionManager_SourceDetected(InteractionSourceState
    state)
    {
        GetHandState(state);
    }

    void InteractionManager_SourcePressed(InteractionSourceState state)
    {
        HandState handState = GetHandState(state);

        if (handState == null)
        {
            return;
        }

        handState.pressedPosition = handState.currentPosition;
        handState.pressedTimestamp = Time.time;
        handState.isPressed = true;
    }

   void InteractionManager_SourceUpdated(InteractionSourceState state)
    {
        GetHandState(state);
    }

   void InteractionManager_SourceReleased(InteractionSourceState state)
    {
        HandState handState = GetHandState(state);

        if (handState == null || !handState.isPressed)
        {
            return;
        }

        handState.isPressed = false;
    }

    void InteractionManager_SourceLost(InteractionSourceState state)
    {
        RemoveHandState(state);
    }
Of interest are the InteractionManager_SourcePressed and InteractionManager_SourceReleased methods. Within the InteractionManager_SourcePressed method, we obtain the current state and update its pressedTimestamp and pressedPosition, and set pressed to true. These will be used in the InteractionManager_SourceReleased method to calculate the force used to throw our paper, which we will do now.
Head to the top of your PlayerInputController and add the following variables:
    public GameObject PaperPrefab;

    public float ThrowForceMultiplier = 2.0f;
Our GameObject PaperPrefab will hold reference to the Paper prefab we want to throw, which we will assign shortly. The ThrowForceMultiplier is a multiplier we will apply to the user's force, saving the user from having to do a workout when using our app. Within the InteractionManager_SourceReleased method of your PlayerInputController script, add the following code:
        Vector3 distance = handState.currentPosition -
        handState.pressedPosition;
        float elapsedTime = Time.time - handState.pressedTimestamp;

        Vector3 force = distance / elapsedTime;
        force += Camera.main.transform.forward;
        force *= ThrowForceMultiplier;

        GameObject paper = GameObject.Instantiate(PaperPrefab);
        paper.transform.position = handState.currentPosition;

        paper.GetComponent<Rigidbody>().AddForce(force,
        ForceMode.Force);
We initially determine the velocity (remember your physics class: velocity = distance/time) based on the change in the distance of the user's hand between when they performed the press and release gestures. We supplement this with the forward direction the user is facing and then apply our multiplier.
With our force now calculated, we are ready to project our holographic paper into MR. The next lines instantiate a new instance of our Paper prefab, set its position to the position of the throwing hand, and then add the force to the attached Rigidbody.
Our final task is to assign the Paper prefab to our PlayerInputController component and align this functionality with our app state.
Head back into the editor, select SceneController from the Hierarchy panel,locate the CrumbledPaper prefab from the Project panel, and drag it onto the SceneController Paper prefab variable.
As we only want this functionality available in the playing state, let's go ahead and disable it. Do this by clicking on the checkbox shown at the top of the PlayerInputController component attached to the SceneController GameObject.
We are almost there; our final task is to enable PlayerInputController when we transition into the playing state. Jump back into your SceneController (Script) and make the following amendments to the OnStateChanged method:
void OnStateChanged()
{
     StopAllCoroutines();

     switch (_currentState)
     {
          case State.Scanning:
              StartCoroutine(ScanningStateRoutine());
              break;
          case State.Placing:
              StartCoroutine(PlacingStateRoutine());
              break;
          case State.Playing:

PlayerInputController.SharedInstance.gameObject.SetActive(true);
                break;
      }

}
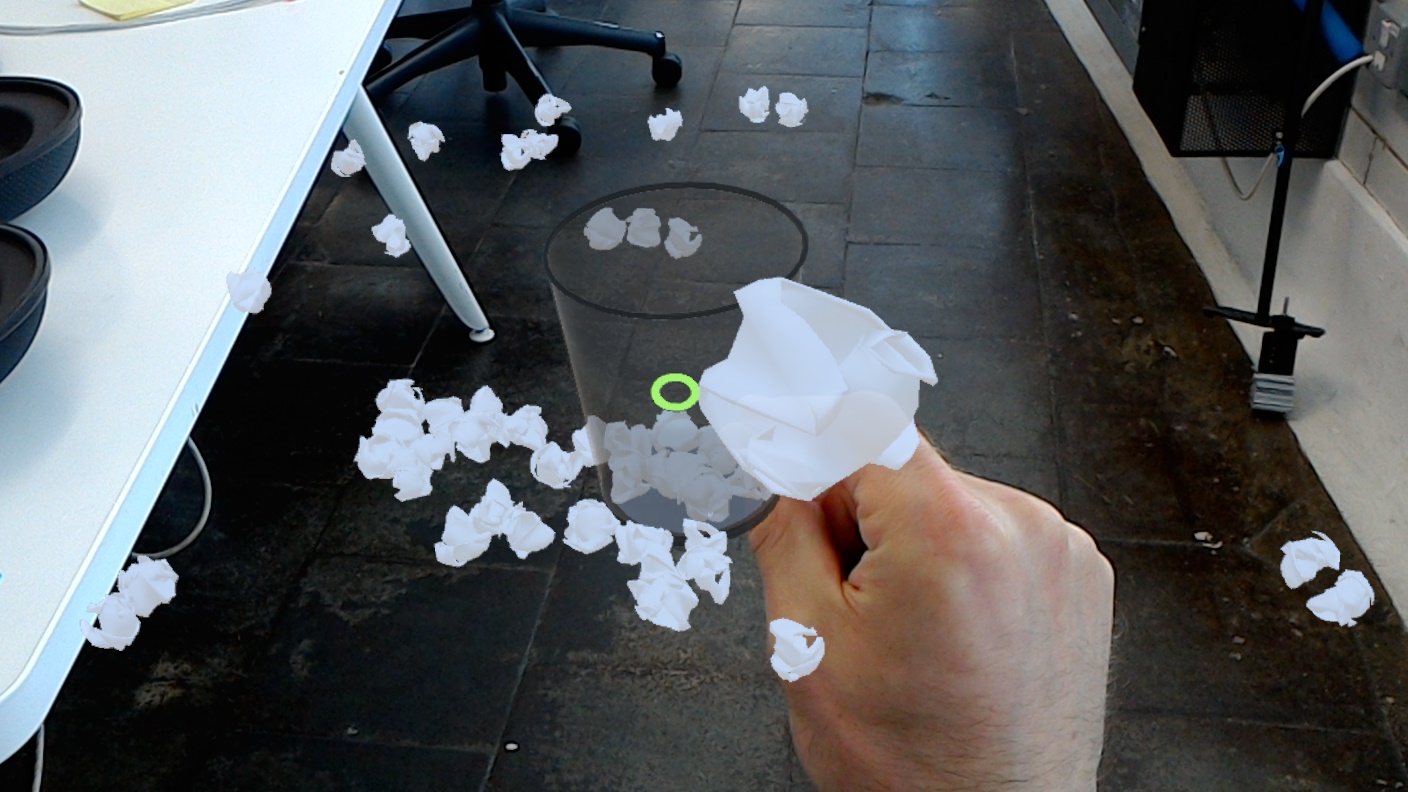
Here, we are simply activating PlayerInputController when the state transitions into playing. Now that it's complete, build and deploy to your device or emulator to see your hard work in action--time to shoot some hoops!