CHAPTER |
|
5 |
Data Definition Language |
In This Chapter
This chapter describes all the Transact-SQL statements concerning data definition language (DDL). The DDL statements are divided into three groups, which are discussed in turn. The first group includes statements that create objects, the second group includes statements that modify the structure of objects, and the third group includes statements that remove objects.
Creating Database Objects
The organization of a database involves many different objects. All objects of a database are either physical or logical. The physical objects are related to the organization of the data on the physical device (disk). The Database Engine’s physical objects are files and filegroups. Logical objects represent a user’s view of a database. Databases, tables, columns, and views (virtual tables) are examples of logical objects.
The first database object that has to be created is a database itself. The Database Engine manages both system and user databases. An authorized user can create user databases, while system databases are generated during the installation of the database system.
This chapter describes the creation, alteration, and removal of user databases, while Chapter 15 covers all system databases in detail.
Creation of a Database
Two basic methods are used to create a database. The first method involves using Object Explorer in SQL Server Management Studio (see Chapter 3). The second method involves using the Transact-SQL statement CREATE DATABASE. This statement has the following general form, the details of which are discussed next:
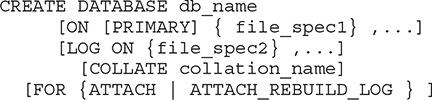
NOTE For the syntax of the Transact-SQL statements, the conventions used are those described in the section “Syntax Conventions” in Chapter 1. According to the conventions, optional items appear in brackets, [ ]. Items written in braces, { }, and followed by “...” are items that can be repeated any number of times.
db_name is the name of the database. The maximum size of a database name is 128 characters. (The rules for identifiers described in Chapter 4 apply to database names.) The maximum number of databases managed by a single system is 32,767.
All databases are stored in files. These files can be explicitly specified by the system administrator or implicitly provided by the system. If the ON option exists in the CREATE DATABASE statement, all files containing the data of a database are explicitly specified.
NOTE The Database Engine uses disk files to store data. Each disk file contains data of a single database. Files themselves can be organized into filegroups. Filegroups provide the ability to distribute data over different disk drives and to back up and restore subsets of the database (useful for very large databases).
file_spec1 represents a file specification, which includes further options such as the logical name of the file, the physical name, and the size. The PRIMARY option specifies the first (and most important) file that contains system tables and other important internal information concerning the database. If the PRIMARY option is omitted, the first file listed in the specification is used as the primary file.
A login account of the Database Engine that is used to create a database is called a database owner. A database can have one owner, who always corresponds to a login account name. The login account, which is the database owner, has the special name dbo. This name is always used in relation to a database it owns.
dbo uses the LOG ON option to define one or more files as the physical destination of the transaction log of the database. If the LOG ON option is not specified, the transaction log of the database will still be created because every database must have at least one transaction log file. (The Database Engine keeps a record of each change it makes to the database. The system keeps all those records, in particular before and after values, in one or more files called the transaction log. Each database of the system has its own transaction log. Transaction logs are discussed in detail in Chapter 13.)
With the COLLATE option, you can specify the default collation for the database. If the COLLATE option is not specified, the database is assigned the default collation of the model database, which is the same as the default collation of the database system.
The FOR ATTACH option specifies that the database is created by attaching an existing set of files. If this option is used, you have to explicitly specify the first primary file. The FOR ATTACH_REBUILD_LOG option specifies that the database is created by attaching an existing set of operating system files. (Attaching and detaching a database is described later in this chapter.)
During the creation of a new database, the Database Engine uses the model database as a template. The properties of the model database can be changed to suit the personal conception of the system administrator.
NOTE If you have a database object that should exist in each user database, you should create that object in the model database first.
Example 5.1 creates a simple database without any further specifications. To execute this statement, type it in the Query Editor window of SQL Server Management Studio and press F5.
Example 5.1
![]()
Example 5.1 creates a database named sample. This concise form of the CREATE DATABASE statement is possible because almost all options of that statement have default values. The system creates, by default, two files. The logical name of the data file is sample and its original size is 8MB. Similarly, the logical name of the transaction log is sample_log and its original size is 8MB. (Both size values, as well as other properties of the new database, depend on corresponding specifications in the model database.)
Example 5.2 creates a database with explicit specifications for database and transaction log files. (You must create the C: emp directory before you start the following example.)
Example 5.2
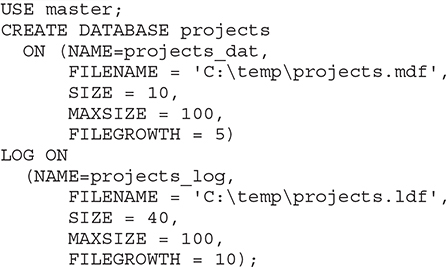
Example 5.2 creates a database called projects. Because the PRIMARY option is omitted, the first file is assumed to be the primary file. This file has the logical name projects_dat and is stored in the file projects.mdf. The original size of this file is 10MB. Additional portions of 5MB of disk storage are allocated by the system, if needed. If the MAXSIZE option is not specified or is set to UNLIMITED, the file will grow until the disk is full. (The KB and MB suffixes can be used to specify kilobytes or megabytes, respectively—the default is MB.)
There is also a single transaction log file with the logical name projects_log and the physical name projects.ldf. All options of the file specification for the transaction log have the same name and meaning as the corresponding options of the file specification for the data file.
Using the Transact-SQL language, you can apply the USE statement to change the database context to the specified database. (The alternative way is to select the database name in the Database drop-down menu in the toolbar of SQL Server Management Studio.)
The system administrator can assign a default database to a user by using the CREATE LOGIN statement or the ALTER LOGIN statement (see also Chapter 12). In this case, the users do not need to execute the USE statement if they want to use their default database.
Creation of a Database Snapshot
The CREATE DATABASE statement can also be used to create a database snapshot of an existing database (source database). A database snapshot is transactionally consistent with the source database as it existed at the time of the snapshot’s creation.
The syntax for the creation of a snapshot is

As you can see, if you want to create a database snapshot, you have to add the AS SNAPSHOT OF clause in the CREATE DATABASE statement. Example 5.3 creates a snapshot of the AdventureWorks database and stores it in the C: emp data directory. (You have to download and create the AdventureWorks database, if this database does not exist on your system.) The AdventureWorks database is a sample database of SQL Server and can be downloaded from Microsoft Docs (https://docs.microsoft.com).
Example 5.3

An existing database snapshot is a read-only copy of the corresponding database that reflects the point in time when the database is copied. (For this reason, you can have multiple snapshots for an existing database.) The snapshot file (in Example 5.3, 'C: empsnapshot_DB.mdf') contains only the modified data that has changed from the source database. Therefore, the process of creating a database snapshot must include the logical name of each data file from the source database as well as new corresponding physical names.
While the snapshot contains only modified data, the disk space needed for each snapshot is just a small part of the overall space required for the corresponding source database.
NOTE To create snapshots of a database, you need NTFS disk volumes, because only such volumes support the sparse file technology that is used for storing snapshots.
Database snapshots are usually used as a mechanism to protect data against user errors.
Attaching and Detaching Databases
All data of a database can be detached and then attached to the same or another database server. Detaching and attaching a database should be done if you want to move the database.
You can detach a database from a database server by using the sp_detach_db system procedure. (The detached database must be in the single-user mode.)
To attach a database, use the CREATE DATABASE statement with the FOR ATTACH clause. When you attach a database, all data files must be available. If any data file has a different path from when the database was first created, you must specify the file’s current path.
CREATE TABLE: A Basic Form
NOTE Besides traditional tables, the Database Engine supports memory-optimized tables, too. The content of these tables is always stored in memory. Hence, the performance of read and write operations on such tables can be significantly improved. Chapter 21 describes in detail how you can use the CREATE TABLE statement to create memory-optimized tables.
The CREATE TABLE statement creates a new base table with all corresponding columns and their data types. The basic form of the CREATE TABLE statement is

NOTE Besides base tables, there are also some special kinds of tables, such as temporary tables and views (see Chapters 6 and 11, respectively).
table_name is the name of the created base table. The maximum number of tables per database is limited by the number of objects in the database (there can be more than 2 billion objects in a database, including tables, views, stored procedures, triggers, and constraints). col_name1, col_name2,... are the names of the table columns. type1, type2,... are data types of corresponding columns (see Chapter 4).
NOTE The name of a database object can generally contain four parts, in the form:[server_name.[db_name.[schema_name.]]]object_name
object_name is the name of the database object. schema_name is the name of the schema to which the object belongs. server_name and db_name are the names of the server and database to which the database object belongs. Table names, combined with the schema name, must be unique within the database. Similarly, column names must be unique within the table.
The first constraint that will be discussed in this book is the existence and nonexistence of NULL values within a column. If NOT NULL is specified, the assignment of NULL values for the column is not allowed. In that case, the column may not contain NULLs, and if there is a NULL value to be inserted, the system returns an error message. (NULL values are explained in detail at the end of Chapter 4.)
As already stated, a database object (in this case, a table) is always created within a schema of a database. A user can create a table only in a schema for which she has ALTER permissions. Any user in the sysadmin, db_ddladmin, or db_owner role can create a table in any schema. (The ALTER permissions, as well as database and server roles, are discussed in detail in Chapter 12.)
The creator of a table must not be its owner. This means that you can create a table that belongs to someone else. Similarly, a table created with the CREATE TABLE statement must not belong to the current database if some other (existing) database name, together with the schema name, is specified as the prefix of the table name.
The schema to which a table belongs has two possible default names. If a table is specified without the explicit schema name, the system checks for a table name in the corresponding default schema. If the object name cannot be found in the default schema, the system searches in the dbo schema.
NOTE You should always specify the table name together with the corresponding schema name. That way you can eliminate possible ambiguities.
Temporary tables are a special kind of base table. They are stored in the tempdb database and are automatically dropped at the end of the session. The properties of temporary tables and examples concerning them are given in Chapter 6.
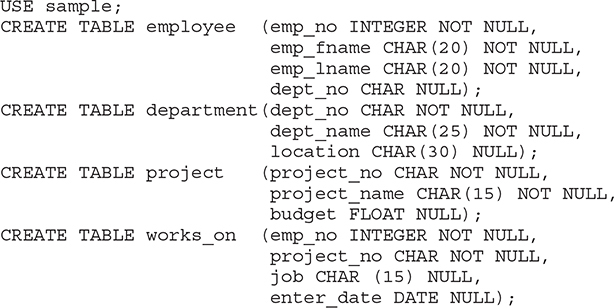
Example 5.4 shows the creation of all tables of the sample database.
Example 5.4
Besides the data type and the nullability, the column specification can contain the following options:
• DEFAULT clause
• IDENTITY property
The DEFAULT clause in the column definition specifies the default value of the column—that is, whenever a new row is inserted into the table, the default value for the particular column will be used if there is no value specified for it. A constant value, such as the system functions USER, CURRENT_USER, SESSION_USER, SYSTEM_USER, CURRENT_TIMESTAMP, and NULL, among others, can be used as the default values.
A column with the IDENTITY property allows only integer values, which are usually implicitly assigned by the system. Each value, which should be inserted in the column, is calculated by incrementing the last inserted value of the column. Therefore, the definition of a column with the IDENTITY property contains (implicitly or explicitly) an initial value and an increment. This property will be discussed in detail in the next chapter (see Example 6.38).
To close this section, Example 5.5 shows the creation of a table with a column of the SQL_VARIANT type.
Example 5.5
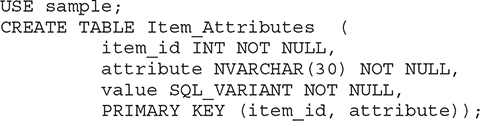
In Example 5.5, the table contains the value column, which is of type SQL_VARIANT. As you already know from Chapter 4, the SQL_VARIANT data type can be used to store values of various data types at the same time, such as numeric values, strings, and date values. Note that in Example 5.5 the SQL_VARIANT data type is used for the column values, because different attribute values may be of different data types. For example, the size attribute stores an integer attribute value, and the name attribute stores a character string attribute value.
CREATE TABLE and Declarative Integrity Constraints
One of the most important features that a DBMS must provide is a way of maintaining the integrity of data. The constraints, which are used to check the modification or insertion of data, are called integrity constraints. The task of maintaining integrity constraints can be handled by the user in application programs or by the DBMS. The most important benefits of handling integrity constraints by the DBMS are the following:
• Increased reliability of data
• Reduced programming time
• Simple maintenance
Using the DBMS to define integrity constraints increases the reliability of data because there is no possibility that the integrity constraints can be forgotten by a programmer. If an integrity constraint is handled by application programs, all programs concerning the constraint must include the corresponding code. If the code is omitted in one application program, the consistency of data is compromised.
An integrity constraint not handled by the DBMS must be defined in every application program that uses the data involved in the constraint. In contrast, the same integrity constraint must be defined only once if it is to be handled by the DBMS. Additionally, application-enforced constraints are usually more complex to code than are database-enforced constraints.
If an integrity constraint is handled by the DBMS, the modification of the structure of the constraint must be handled only once, in the DBMS. The modification of a structure in application programs requires the modification of every program that involves the corresponding code.
There are two groups of integrity constraints handled by a DBMS:
• Declarative integrity constraints
• Procedural integrity constraints that are handled by triggers (these constraints will be discussed in Chapter 14)
The declarative constraints are defined using the DDL statements CREATE TABLE and ALTER TABLE. They can be column-level constraints or table-level constraints. Column-level constraints, together with the data type and other column properties, are placed within the declaration of the column, while table-level constraints are always defined at the end of the CREATE TABLE or ALTER TABLE statement, after the definition of all columns.
NOTE There is only one difference between column-level constraints and table-level constraints: a column-level constraint can be applied only upon one column, while a table-level constraint can cover one or more columns of a table.
Each declarative constraint has a name. The name of the constraint can be explicitly assigned using the CONSTRAINT option in the CREATE TABLE statement or the ALTER TABLE statement. If the CONSTRAINT option is omitted, the Database Engine assigns an implicit name for the constraint.
NOTE Using explicit constraint names is strongly recommended. The search for an integrity constraint can be enhanced if an explicit name for a constraint is used.
All declarative constraints can be categorized into several groups:
• DEFAULT clause
• UNIQUE clause
• PRIMARY KEY clause
• CHECK clause
• FOREIGN KEY clause and referential integrity
The definition of the default value using the DEFAULT clause was shown earlier in this chapter (see also Example 5.6). All other constraints are described in the following sections.
The UNIQUE Clause
Sometimes more than one column or group of columns of the table have unique values and therefore can be used as the primary key. All columns or groups of columns that qualify to be primary keys are called candidate keys. Each candidate key is defined using the UNIQUE clause in the CREATE TABLE or the ALTER TABLE statement.
The UNIQUE clause has the following form:
![]()
The CONSTRAINT option in the UNIQUE clause assigns an explicit name to the candidate key. The option CLUSTERED or NONCLUSTERED relates to the fact that the Database Engine always generates an index for each candidate key of a table. The index can be clustered—that is, the physical order of rows is specified using the indexed order of the column values. If the order is not specified, the index is nonclustered (see also Chapter 10). The default value is NONCLUSTERED. col_name1 is a column name that builds the candidate key. (The maximum number of columns per candidate key is 16.)
Example 5.6 shows the use of the UNIQUE clause. (You have to drop the projects table, via DROP TABLE projects, before you execute the following example.)
Example 5.6

Each value of the project_no column of the projects table is unique, including the NULL value. (Just as with any other value with a UNIQUE constraint, if NULL values are allowed on a corresponding column, there can be at most one row with the NULL value for that particular column.) If an existing value should be inserted into the column project_no, the system rejects it. The explicit name of the constraint that is defined in Example 5.6 is unique_no.
The PRIMARY KEY Clause
The primary key of a table is a column or group of columns whose value is different in every row. Each primary key is defined using the PRIMARY KEY clause in the CREATE TABLE or the ALTER TABLE statement.
The PRIMARY KEY clause has the following form:
![]()
All options of the PRIMARY KEY clause have the same meaning as the corresponding options with the same name in the UNIQUE clause. In contrast to UNIQUE, the PRIMARY KEY column must be NOT NULL, and its default value is CLUSTERED.
Example 5.7 shows the specification of the primary key for the employee table of the sample database.
NOTE You have to drop the employee table (DROP TABLE employee) before you execute the following example.
Example 5.7

The employee table is re-created and its primary key is defined in Example 5.7. The primary key of the table is specified using the declarative integrity constraint named prim_empl. This integrity constraint is a table-level constraint, because it is specified after the definition of all columns of the employee table.
Example 5.8 is equivalent to Example 5.7, except for the specification of the primary key of the employee table as a column-level constraint.
NOTE Again, you have to drop the employee table (DROP TABLE employee) before you execute the following example.
Example 5.8

In Example 5.8, the PRIMARY KEY clause belongs to the declaration of the corresponding column, together with its data type and nullability. For this reason, it is called a column-level constraint.
The CHECK Clause
The check constraint specifies conditions for the data inserted into a column. Each row inserted into a table or each value updating the value of the column must meet these conditions. The CHECK clause is used to specify check constraints. This clause can be defined in the CREATE TABLE or ALTER TABLE statement. The syntax of the CHECK clause is
![]()
expression must evaluate to a Boolean value (true or false) and can reference any columns in the current table (or just the current column if specified as a column-level constraint), but no other tables. Example 5.9 shows how the CHECK clause can be used.
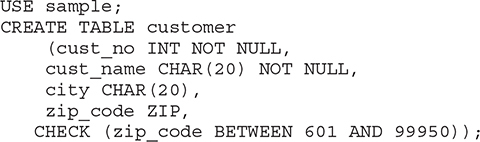
Example 5.9

The customer table that is created in Example 5.9 contains the cust_group column with the corresponding check constraint. The database system returns an error if the cust_group column, after a modification of its existing values or after the insertion of a new row, would contain a value different from the values in the set ('c1', 'c2', 'c10').
The FOREIGN KEY Clause
A foreign key is a column or group of columns in one table that contains values that match the primary key values in the same or another table. Each foreign key is defined using the FOREIGN KEY clause combined with the REFERENCES clause.
The FOREIGN KEY clause has the following form:

The FOREIGN KEY clause defines all columns explicitly that belong to the foreign key. The REFERENCES clause specifies the table name with all columns that build the corresponding primary key. The number and the data types of the columns in the FOREIGN KEY clause must match the number and the corresponding data types of columns in the REFERENCES clause (and, of course, both of these must match the number and data types of the columns in the primary key of the referenced table).
The table that contains the foreign key is called the referencing table, and the table that contains the corresponding primary key is called the parent table or referenced table. Example 5.10 shows the specification of the foreign key in the works_on table of the sample database.
NOTE You have to drop the works_on table before you execute the following example.
Example 5.10
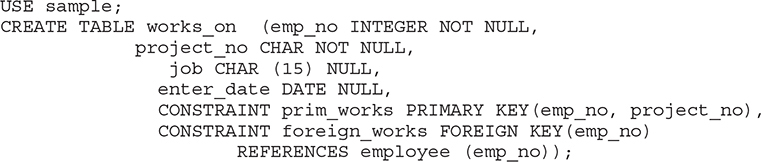
The works_on table in Example 5.10 is specified with two declarative integrity constraints: prim_works and foreign_works. Both constraints are table-level constraints, where the former specifies the primary key and the latter the foreign key of the works_on table. Further, the constraint foreign_works specifies the employee table as the parent table and its emp_no column as the corresponding primary key of the column with the same name in the works_on table.
The FOREIGN KEY clause can be omitted if the foreign key is defined as a column-level constraint, because the column being constrained is the implicit column “list” of the foreign key, and the keyword REFERENCES is sufficient to indicate what kind of constraint this is.
A definition of the foreign keys in tables of a database imposes the specification of another important integrity constraint: the referential integrity, described next.
Referential Integrity
A referential integrity enforces insert and update rules for the tables with the foreign key and the corresponding primary key constraint. Examples 5.7 and 5.10 specify two such constraints: prim_empl and foreign_works. The REFERENCES clause in Example 5.10 determines the employee table as the parent table.
If the referential integrity for two tables is specified, the modification of values in the primary key and the corresponding foreign key is not always possible. The following subsection discusses when modification is possible and when it is not.
Possible Problems with Referential Integrity
There are four cases in which the modification of the values in the foreign key or in the primary key can cause problems. All of these cases will be shown using the sample database. The first two cases affect modifications of the referencing table, while the last two concern modifications of the parent table.
Case 1 Insert a new row into the works_on table with the employee number 11111.
The insertion of the new row in the referencing table works_on introduces a new employee number for which there is no matching employee in the parent table (employee). If the referential integrity for both tables is specified as is done in Examples 5.7 and 5.10, the Database Engine rejects the insertion of a new row. For readers who are familiar with the SQL language, the corresponding Transact-SQL statement is

Case 2 Modify the employee number 10102 in all rows of the works_on table. The new number is 11111.
In Case 2, the existing value of the foreign key in the works_on table should be replaced using the new value, for which there is no matching value in the parent table employee. If the referential integrity for both tables is specified as is done in Examples 5.7 and 5.10, the database system rejects the modification of the rows in the works_on table. The corresponding Transact-SQL statement is

Case 3 Modify the employee number 10102 in the corresponding row of the employee table. The new number is 22222.
In Case 3, the existing value of the primary key in the parent table and the foreign key of the referencing table is modified only in the parent table. The values in the referencing table are unchanged. Therefore, the system rejects the modification of the row with the employee number 10102 in the employee table. Referential integrity requires that no rows in the referencing table (the one with the FOREIGN KEY clause) can exist unless a corresponding row in the parent table (the one with the PRIMARY KEY clause) also exists. Otherwise, the rows in the referencing table would be “orphaned.” If the modification described were permitted, then rows in the works_on table having the employee number 10102 would be orphaned, and the system would reject it. The corresponding Transact-SQL statement is

Case 4 Delete the row of the employee table with the employee number 10102.
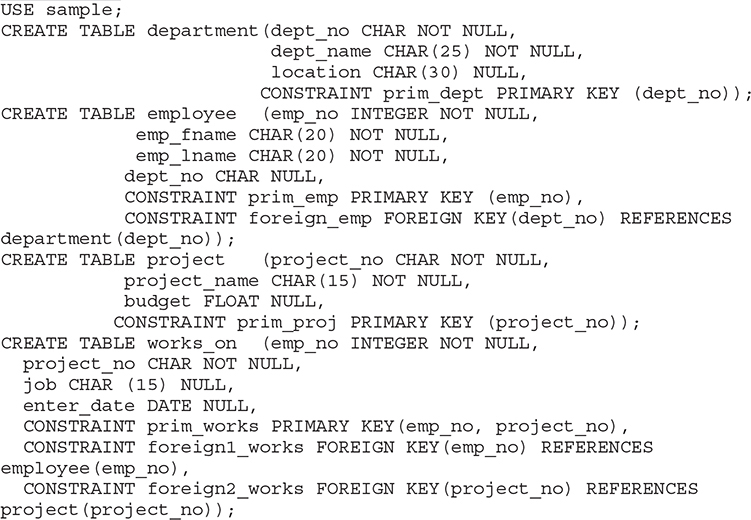
Case 4 is similar to Case 3. The deletion would remove the employee for which matching rows exist in the referencing table. Example 5.11 shows the definition of tables of the sample database with all existing primary key and foreign key constraints. (If the employee, department, project, and works_on tables already exist, drop them first using the DROP TABLE table_name statement.)
Example 5.11
The ON DELETE and ON UPDATE Options
The Database Engine can react differently if the values of the primary key of a table should be modified or deleted. If you try to update values of a foreign key, and those modifications result in inconsistencies in the corresponding primary key (see Case 1 and Case 2 in the previous section), the database system will always reject the modification and will display a message similar to the following:
Server: Msg 547, Level 16, State 1, Line 1 UPDATE statement conflicted with COLUMN FOREIGN KEY constraint 'FKemployee'. The conflict occurred in database 'sample', table 'employee', column 'dept_no'. The statement has been terminated.
But if you try to modify the values of a primary key, and these modifications result in inconsistencies in the corresponding foreign key (see Case 3 and Case 4 in the previous section), a database system could react very flexibly. Generally, there are four options for how a database system can react:
• NO ACTION Allows you to modify (update or delete) only those values of the parent table that do not have any corresponding values in the foreign key of the referencing table.
• CASCADE Allows you to modify (update or delete) all values of the parent table. If this option is specified, a row in the referencing table is modified if the corresponding value in the primary key of the parent table has been updated. The same is true for deletion; that is, if a row in the parent table is deleted, the corresponding row in the child table is deleted, too.
• SET NULL Allows you to modify (update or delete) all values of the parent table. If you want to update a value of the parent table and this modification would lead to data inconsistencies in the referencing table, the database system sets all corresponding values in the foreign key of the referencing table to NULL. Similarly, if you want to delete the row in the parent table and the deletion of the value in the primary key would lead to data inconsistencies, the database system sets all corresponding values in the foreign key to NULL. That way, all data inconsistencies are omitted.
• SET DEFAULT Analogous to the SET NULL option, with one exception: all corresponding values in the foreign key are set to a default value. (Obviously, the default value must still exist in the primary key of the parent table after modification.)
NOTE The Transact-SQL language supports all four directives.
Example 5.12 shows the use of the ON DELETE and ON UPDATE options.
Example 5.12
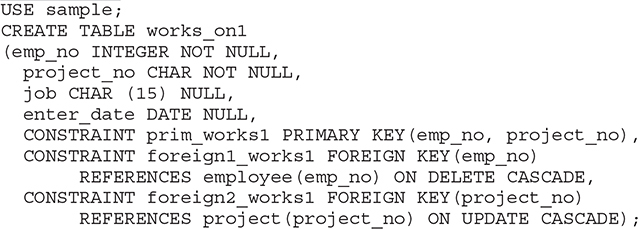
Example 5.12 creates the works_on1 table that uses the ON DELETE CASCADE and ON UPDATE CASCADE options. If you load the works_on1 table with the content shown in Table 1-4 (see Chapter 1), each deletion of a row in the employee table will cause the additional deletion of all rows in the works_on1 table that have the corresponding value in the emp_no column. Similarly, each update of a value in the project_no column of the project table will cause the same modification on all corresponding values in the project_no column of the works_on1 table.
Creating Other Database Objects
A relational database contains not only base tables that exist in their own right but also views, which are virtual tables. The data of a base table exists physically—that is, it is stored on a disk—while a view is derived from one or more base tables. The CREATE VIEW statement creates a new view from one or more existing tables (or views) using a SELECT statement, which is an inseparable part of the CREATE VIEW statement. Since the creation of a view always contains a query, the CREATE VIEW statement belongs to the data manipulation language (DML) rather than to the data definition language (DDL). For this reason, the creation and removal of views is discussed in Chapter 11, after the presentation of all Transact-SQL statements for data modification.
The CREATE INDEX statement creates a new index on a specified table. The indices are primarily used to allow efficient access to the data stored on a disk. The existence of an index can greatly improve the access to data. Indices, together with the CREATE INDEX statement, are discussed in detail in Chapter 10.
A stored procedure is an additional database object that can be created using the corresponding CREATE PROCEDURE statement. (A stored procedure is a special kind of sequence of statements written in Transact-SQL, using the SQL language and procedural extensions. Chapter 8 describes stored procedures in detail.)
A trigger is a database object that specifies an action as a result of an operation. This means that when a particular data-modifying action (modification, insertion, or deletion) occurs on a particular table, the Database Engine automatically invokes one or more additional actions. The CREATE TRIGGER statement creates a new trigger. Triggers are described in detail in Chapter 14.
A synonym is a local database object that provides a link between itself and another object managed by the same or a linked database server. Using the CREATE SYNONYM statement, you can create a new synonym for the given object. Example 5.13 shows the use of this statement.
Example 5.13

Example 5.13 creates a synonym for the Product table in the Production schema of the AdventureWorks database. This synonym can be used in DML statements, such as SELECT, INSERT, UPDATE, and DELETE.
NOTE The main reason to use synonyms is to omit the use of lengthy names in DML statements. As you already know, the name of a database object can generally contain four parts. Introducing a (single-part) synonym for an object that has three or four parts can save you time when typing its name.
A schema is a database object that includes statements for creation of tables, views, and user privileges. (You can think of a schema as a construct that collects together several tables, corresponding views, and user privileges.)
NOTE The Database Engine treats the notion of schema the same way it is treated in the ANSI SQL standard. In the SQL standard, a schema is defined as a collection of database objects that is owned by a single principal and forms a single namespace. A namespace is a set of objects that cannot have duplicate names. For example, two tables can have the same name only if they are in separate schemas. (Schema is a very important concept in the security model of the Database Engine. For this reason, you can find a detailed description of schema in Chapter 12.)
Integrity Constraints and Domains
A domain is the set of all possible legitimate values that columns of a table may contain. Almost all DBMSs use base data types such as INTEGER, CHARACTER, and DATE to define the set of possible values for a column. This method of enforcing “domain integrity” is incomplete, as can be seen from the following example.
The person table has a column, zip, that specifies the ZIP code of the city in which the person lives. This column can be defined using the SMALLINT or CHAR data type. The definition with the SMALLINT data type is inaccurate, because the SMALLINT data type contains all positive and negative values between –215 – 1 and 215. The definition using CHAR is even more inaccurate, because all characters and special signs can also be used in such a case. Therefore, an accurate definition of ZIP codes requires defining an interval of positive integers between 00601 and 99950 and assigning it to the zip column.
CHECK clauses (specified in the CREATE TABLE or ALTER TABLE statement) can enforce more precise domain integrity because their expressions are flexible, and they are always enforced when the column is inserted or modified.
The Transact-SQL language provides support for domains by creating alias data types using the CREATE TYPE statement. The following two sections describe alias and Common Language Runtime (CLR) data types.
Alias Data Types
An alias data type is a special kind of data type that is defined by users using the existing base data types. Such a data type can be used with the CREATE TABLE statement to define one or more columns in a database.
The CREATE TYPE statement is generally used to create an alias data type. The syntax of this statement to specify an alias data type is as follows:

Example 5.14 shows the creation of an alias data type using the CREATE TYPE statement.
Example 5.14

Example 5.14 creates an alias type, zip, based on the standard data type SMALLINT. This user-defined data type can now be used as a data type of a table column, as shown in Example 5.15.
NOTE You have to drop the customer table (DROP TABLE customer) before you execute the following example.
Example 5.15
Example 5.15 uses the new zip data type to specify a column of the customer table. The values of this column have to be constrained to the region between 601 and 99950. As can be seen from Example 5.15, this can be done using the CHECK clause.
NOTE Generally, the Database Engine implicitly converts between compatible columns of different data types. This is valid for the alias data types, too.
The Database Engine supports the creation of user-defined table types. Example 5.16 shows how you can use the CREATE TYPE statement to create such a table type.
Example 5.16

The user-defined table type called person_table_t has two columns: name and salary. The main syntactical difference in relation to alias data types is the existence of the AS TABLE clause, as can be seen in Example 5.16. User-defined table types are usually used in relation to table-valued parameters (see Chapter 8).
CLR Data Types
The CREATE TYPE statement can also be applied to create a user-defined data type using .NET. In this case, the implementation of a user-defined data type is defined in a class of an assembly in the Common Language Runtime (CLR). This means that you can use one of the .NET languages like C# or Visual Basic to implement the new data type. Further description of the user-defined data types is outside the scope of this book.
Modifying Database Objects
The Transact-SQL language supports changing the structure of the following database objects, among others:
• Database
• Table
• Stored procedure
• View
• Schema
• Trigger
The following two sections describe, in turn, how you can alter a database and a table. The modification of the structure of each of the last four database objects is described in Chapters 8, 11, 12, and 14, respectively.
Altering a Database
The ALTER DATABASE statement changes the physical structure of a database. The Transact-SQL language allows you to change the following properties of a database:
• Add or remove one or more database files, log files, or filegroups
• Modify file or filegroup properties
• Set database options
• Change the name of the database using the sp_rename stored procedure (discussed a bit later, in the section “Altering a Table”)
The following subsections describe these different types of database alterations. In this section, we will also use the ALTER DATABASE statement to show how FILESTREAM data can be stored in files and filegroups and to explain the notion of contained databases.
Adding or Removing Database Files, Log Files, or Filegroups
The ALTER DATABASE statement allows the addition and removal of database files. The clauses ADD FILE and REMOVE FILE specify the addition of a new file and the deletion of an existing file, respectively. (Additionally, a new file can be assigned to an existing filegroup using the TO FILEGROUP option.)
Example 5.17 shows how a new database file can be added to the projects database.
Example 5.17

The ALTER DATABASE statement in Example 5.17 adds a new file with the logical name projects_dat1. Its initial size is 10MB, and this file will grow using units of 5MB until it reaches the upper limit of 100MB. (Log files are added in the same way as database files. The only difference is that you use the ADD LOG FILE clause instead of ADD FILE.)
The REMOVE FILE clause removes one or more files that belong to an existing database. The file can be a data file or a log file. The file cannot be removed unless it is empty.
The CREATE FILEGROUP clause creates a new filegroup, while DELETE FILEGROUP removes an existing filegroup from the system. Again, you cannot remove a filegroup unless it is empty.
Modifying File or Filegroup Properties
You can use the MODIFY FILE clause to change the following file properties:
• Change the logical name of a file using the NEWNAME option of the MODIFY FILE clause
• Increase the value of the SIZE property
• Change the FILENAME, MAXSIZE, or FILEGROWTH property
• Mark the file as OFFLINE
Similarly, you can use the MODIFY FILEGROUP clause to change the following filegroup properties:
• Change the name of a filegroup using the NAME option of the MODIFY FILEGROUP clause
• Mark the filegroup as the default filegroup using the DEFAULT option
• Mark the filegroup as read-only or read-write using the READ_ONLY or READ_WRITE option, respectively
Setting Database Options
The SET clause of the ALTER DATABASE statement is used to set different database options. Some options must be set to ON or OFF, but most of them have a list of possible values. Each database option has a default value, which is set in the model database. Therefore, you can alter the model database to change the default values of specific options.
All options that you can set are divided into several groups. The most important groups are
• State options
• Auto options
• SQL options
The state options control the following:
• User access to the database (options are SINGLE_USER, RESTRICTED_USER, and MULTI_USER)
• The status of the database (options are ONLINE, OFFLINE, and EMERGENCY)
• The read/write modus (options are READ_ONLY and READ_WRITE)
The auto options control, among other things, the type of the database shutdown (the option AUTO_CLOSE) and how index statistics are built (the options AUTO_CREATE_STATISTICS and AUTO_UPDATE_STATISTICS).
The SQL options control the ANSI compliance of the database and its objects. All SQL options can be edited using the DATABASEPROPERTYEX function and modified using the ALTER DATABASE statement.
Storing FILESTREAM Data
Chapter 4 explained what FILESTREAM data is and the reason for using it. This section discusses how FILESTREAM data can be stored as a part of a database. Before you can store FILESTREAM data, you have to enable the system for this task. The following subsection explains how to enable the operating system and the instance of your database system.
Enabling FILESTREAM Storage FILESTREAM storage has to be enabled at two levels:
• For the Windows operating system
• For the particular database server instance
You use SQL Server Configuration Manager to enable FILESTREAM storage at the OS level. To open SQL Server Configuration Manager, type SQLServerManager15.msc in the Search field for SQL Server 2019 or type SQLServerManager14.msc for SQL Server 2017. In the list of services, right-click SQL Server Services, and then click Open. In the SQL Server Configuration Manager snap-in, choose your instance of the Database Engine, right-click the instance, and then click Properties. In the SQL Server Properties dialog box, click the FILESTREAM tab. Check the Enable FILESTREAM for Transact-SQL Access check box. If you want to read and write FILESTREAM data from Windows, check the Enable FILESTREAM for File I/O Access check box. Enter the name of the Windows share in the Windows Share Name box and click Apply to apply the changes. SQL Server Configuration Manager creates a new share with the specified name for the instance.
NOTE You need to be Windows Administrator on a local system and have administrator (sysadmin) rights to enable FILESTREAM storage. You also need to restart the instance for the changes to take effect.
The next step is to enable FILESTREAM storage for a particular database server instance. SQL Server Management Studio will be used to show this task. Right-click the instance in Object Explorer, click Properties, select Advanced in the left pane, and set Filestream Access Level to one of the following levels:
• Disabled FILESTREAM storage is not allowed.
• Transact-SQL Access Enabled FILESTREAM data can be accessed using T-SQL statements.
• Full Access Enabled FILESTREAM data can be accessed using T-SQL as well as from the OS.
The alternative way is to use the sp_configure system procedure with the filestream access level option:
![]()
The last parameter has three different values, which correspond to the three levels mentioned previously. Therefore, the value 2 in this code means “Full Access Enabled.”
Adding a File to the Filegroup After you enable FILESTREAM storage for your instance, you can use the ALTER DATABASE statement first to create a filegroup for FILESTREAM data and then to add a file to that filegroup, as shown in Example 5.18. (Of course, you can also use the CREATE DATABASE statement to accomplish this task.)
NOTE Before you execute the statement in Example 5.18, change the name of the file in the FILENAME clause.
Example 5.18
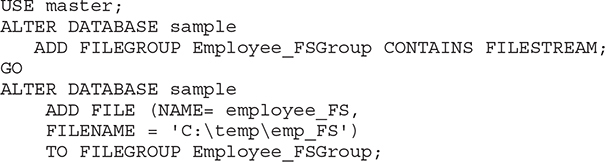
The first ALTER DATABASE statement in Example 5.18 adds a new filegroup called Employee_FSGroup to the sample database. The CONTAINS FILESTREAM option tells the system that this filegroup will contain only FILESTREAM data. The second ALTER DATABASE statement adds a new file to the existing filegroup.
Now you can create a table with one or more FILESTREAM columns. Example 5.19 shows the creation of a table with a FILESTREAM column.
Example 5.19

The employee_info table in Example 5.19 contains the filestream_data columns, which must be of the VARBINARY(max) data type. Such a column includes the FILESTREAM attribute, indicating that a column should store data in the FILESTREAM filegroup. All tables that store FILESTREAM data require the existence of a UNIQUE ROWGUILDCOL. For this reason, the employee_info table has the id column, defined using these two attributes.
To insert data into a FILESTREAM column, you use the standard INSERT statement, which is described in Chapter 7. Also, to read data from a FILESTREAM column, you can use the standard SELECT statement, which is described in Chapter 6. The detailed description of read and write operations on FILESTREAM data is outside the scope of this book.
Contained Databases
One of the significant problems with SQL Server databases is that they cannot be exported (or imported) easily. As you already know from this chapter, you can attach and detach a database, but many important parts and properties of the attached database will be missing. (The main problem in such a case is database security in general and existing logins in particular, which are usually incomplete or wrong after the move.)
Microsoft solved such problems by introducing contained databases. A contained database comprises all database settings and data required to specify the database and is isolated from the instance of the Database Engine on which it is installed. In other words, this form of databases has no configuration dependencies on the instance and can easily be moved from one instance of SQL Server to another.
Generally, there are three forms of databases in relation to containment:
• Fully contained databases
• Partially contained databases
• Noncontained databases
Fully contained databases are those where database objects cannot cross the application boundary. (An application boundary defines the scope of an application. For instance, user-defined functions are within the application boundary, while functions related to server instances are outside it.)
Partially contained databases allow database objects to cross the application boundary, while noncontained databases do not support the notion of an application boundary at all.
Let’s take a look at how you can create a partially contained database. If a database called my_sample already exists, and it is created as a noncontained database (using the CREATE DATABASE statement, for instance), you can use the ALTER DATABASE statement to alter it to partial containment, as shown in Example 5.20.
Example 5.20

The ALTER DATABASE statement modifies the containment of the my_sample database from noncontained to partially contained. This means that the database system allows you to create both contained and noncontained database objects for the my_sample database. (All other statements in Example 5.20 just set the scene for the ALTER DATABASE statement.)
NOTE sp_configure is a system procedure that can be used to, among other things, change advanced configuration options, such as 'contained database authentication'. To make changes to advanced configuration options, you first have to set the value of 'show advanced options' to 1 and reconfigure the system. At the end of Example 5.20, this option has been set again to its default value (0). The sp_configure system procedure is discussed in detail in the section “System Procedures” in Chapter 9.
For the my_sample database, you can now create a user that is not tied to a login. This will be described in detail in the “Managing Authorization and Authentication of Contained Databases” section of Chapter 12.
Altering a Table
The ALTER TABLE statement modifies the schema of a table. The Transact-SQL language allows the following types of alteration:
• Add or drop one or more new columns
• Modify column properties
• Add or remove integrity constraints
• Enable or disable constraints
• Rename tables and other database objects
The following sections describe these types of changes.
Adding or Dropping a Column
You can use the ADD clause of the ALTER TABLE statement to add a new column to the existing table. Only one column can be added for each ALTER TABLE statement. Example 5.21 shows the use of the ADD clause.
Example 5.21

The ALTER TABLE statement in Example 5.21 adds the column telephone_no to the employee table. The Database Engine populates the new column either with NULL or IDENTITY values or with the specified default. For this reason, the new column must either be nullable or have a default constraint.
NOTE There is no way to insert a new column in a particular position in the table. The column, which is added using the ADD clause, is always inserted at the end of the table.
The DROP COLUMN clause provides the ability to drop an existing column of the table, as shown in Example 5.22.
Example 5.22

The ALTER TABLE statement in Example 5.22 removes the telephone_no column, which was added to the employee table with the ALTER TABLE statement in Example 5.21.
Modifying Column Properties
The Transact-SQL language supports the ALTER COLUMN clause of ALTER TABLE to modify properties of an existing column. The following column properties can be modified:
• Data type
• Nullability
Example 5.23 shows the use of the ALTER COLUMN clause.
Example 5.23

The ALTER TABLE statement in Example 5.23 changes the previous properties (CHAR(30), nullable) of the location column of the department table to new properties (CHAR(25), not nullable).
Adding or Removing Integrity Constraints
A new integrity constraint can be added to a table using the ALTER TABLE statement and its option called ADD CONSTRAINT. Example 5.24 shows how you can use the ADD CONSTRAINT clause in relation to a check constraint.
Example 5.24
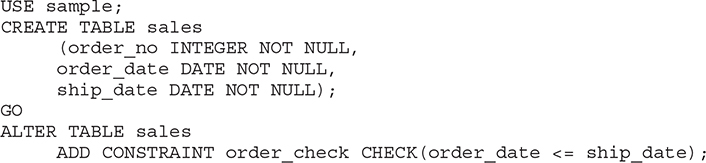
The CREATE TABLE statement in Example 5.24 creates the sales table with two columns of the DATE data type: order_date and ship_date. The subsequent ALTER TABLE statement defines an integrity constraint named order_check, which compares both of the values and prevents the INSERT statement from successfully completing if the shipping date is earlier than the order date.
Example 5.25 shows how you can use the ALTER TABLE statement to additionally define the primary key of a table.
Example 5.25

The ALTER TABLE statement in Example 5.25 declares the primary key for the sales table.
Each integrity constraint can be removed using the DROP CONSTRAINT clause of the ALTER TABLE statement, as shown in Example 5.26.
Example 5.26

The ALTER TABLE statement in Example 5.26 removes the CHECK clause called order_check, specified in Example 5.24.
NOTE You cannot use the ALTER TABLE statement to modify a definition of an integrity constraint. In this case, the constraint must be re-created—that is, dropped and then added with the new definition.
Enabling or Disabling Constraints
As previously stated, an integrity constraint always has a name that can be explicitly declared using the CONSTRAINT option or implicitly declared by the system. The name of all (implicitly or explicitly) declared constraints for a table can be viewed using the system procedure sp_helpconstraint.
A constraint is enforced by default during future insert and update operations. Additionally, the existing values in the column(s) are checked against the constraint. Otherwise, a constraint that is created with the WITH NOCHECK option is disabled in the second case. In other words, if you use the WITH NOCHECK option, the constraint will be applied only to future insert and update operations. (Both options, WITH CHECK and WITH NOCHECK, can be applied only with the CHECK and FOREIGN KEY clauses.)
Example 5.27 shows how you can disable all existing constraints for a table.
Example 5.27

In Example 5.27, the keyword ALL is used to disable all the constraints on the sales table.
NOTE Use of the NOCHECK option is not recommended. Any constraint violations that are suppressed may cause future updates to fail.
Renaming Tables and Other Database Objects
The sp_rename system procedure modifies the name of an existing table (and any other existing database objects, such as databases, views, or stored procedures). Examples 5.28 and 5.29 show the use of this system procedure.
Example 5.28
![]()
Example 5.28 renames the department table to subdivision.
Example 5.29
![]()
Example 5.29 renames the order_no column in the sales table. If the object to be renamed is a column in a table, the specification must be in the form table_name.column_name.
NOTE Do not use the sp_rename system procedure, because changing object names can influence other database objects that reference them. Drop the object and re-create it with the new name.
Removing Database Objects
All Transact-SQL statements that are used to remove a database object have the following general form:
![]()
Each CREATE object statement has the corresponding DROP object statement. The statement
![]()
removes one or more databases. This means that all traces of the database are removed from your database system.
One or more tables can be removed from a database with the following statement:
![]()
All data, indices, and triggers belonging to the removed table are also dropped. (In contrast, all views that are defined using the dropped table are not removed.) Only the user with the corresponding privileges can remove a table.
In addition to DATABASE and TABLE, objects in the DROP statement can be, among others, the following:
• TYPE
• SYNONYM
• PROCEDURE
• INDEX
• VIEW
• TRIGGER
• SCHEMA
The statements DROP TYPE and DROP SYNONYM drop a type and a synonym, respectively. (Dropping the synonym does not have any influence on the underlying object.) The rest of the statements are described in different chapters: DROP PROCEDURE in Chapter 8, DROP INDEX in Chapter 10, DROP VIEW in Chapter 11, DROP SCHEMA in Chapter 12, and DROP TRIGGER in Chapter 14.
Summary
The Transact-SQL language supports many data definition statements that create, alter, and remove database objects. The following database objects, among others, can be created and removed using the CREATE object and the DROP object statement, respectively:
• Database
• Table
• Schema
• View
• Trigger
• Stored procedure
• Index
A structure of all database objects in the preceding list can be altered using the ALTER object statement. Note that the ALTER TABLE statement is the only standardized statement from this list. All other ALTER object statements are Transact-SQL extensions to the SQL standard.
The next chapter addresses the data manipulation statement called SELECT.
Exercises
E.5.1 Using the CREATE DATABASE statement, create a new database named test_db with explicit specifications for database and transaction log files. The database file with the logical name test_db_dat is stored in the file C: mp est_db.mdf and the initial size is 5MB, the maximum size is unlimited, and the file growth is 8 percent. The log file called test_db_log is stored in the file C: mp est_db_log.ldf and the initial size is 2MB, the maximum size is 10MB, and the file growth is 500KB.
E.5.2 Using the ALTER DATABASE statement, add a new log file to the test_db database. The log file is stored in the file C: mpemp_log.ldf and the initial size of the file is 2MB, with growth of 2MB and an unlimited maximum size.
E.5.3 Using the ALTER DATABASE statement, change the file size of the test_db database to 10MB.
E.5.4 In Example 5.4, there are some columns of the four created tables defined with the NOT NULL specification. For which column is this specification required and for which is it not required?
E.5.5 Why are the columns dept_no and project_no in Example 5.4 defined as CHAR values (and not as numerical values)?
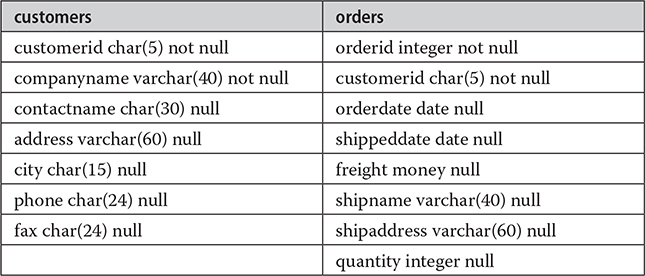
E.5.6 Create the tables customers and orders with the following columns. (Do not declare the corresponding primary and foreign keys.)
E.5.7 Using the ALTER TABLE statement, add a new column named shipregion to the orders table. The fields should be nullable and contain integers.
E.5.8 Using the ALTER TABLE statement, change the data type of the column shipregion from INTEGER to CHARACTER with length 8. The fields may contain NULL values.
E.5.9 Delete the formerly created column shipregion.
E.5.10 Describe exactly what happens if a table is deleted with the DROP TABLE statement.
E.5.11 Re-create the tables customers and orders, enhancing their definition with all primary and foreign keys constraints.
E.5.12 Using SQL Server Management Studio, try to insert a new row into the orders table with the following values:
(10, 'ord01', getdate(), getdate(), 100.0, 'Windstar', 'Ocean', 1)
Why isn’t that working?
E.5.13 Using the ALTER TABLE statement, add the current system date and time as the default value to the orderdate column of the orders table.
E.5.14 Using the ALTER TABLE statement, create an integrity constraint that limits the possible values of the quantity column in the orders table to values between 1 and 30.
E.5.15 Display all integrity constraints for the orders table.
E.5.16 Delete the primary key of the customers table. Why isn’t that working?
E.5.17 Delete the integrity constraint called prim_empl defined in Example 5.7.
E.5.18 Rename the city column of the customers table. The new name is town.