CHAPTER |
|
15 |
System Environment of the Database Engine |
In This Chapter
This chapter describes several features of the Database Engine that belong to the system environment. First, the chapter provides a detailed description of the system databases that are created during the installation process. It then discusses data storage by examining several types of data pages and describing how different data types are stored on the disk. Next, the chapter presents the bcp, sqlcmd, mssql-cli, and sqlservr system utilities and the DBCC system commands. The final major section of the chapter introduces Policy-Based Management, a component for managing an instance of the Database Engine.
System Databases
During the installation of the Database Engine, the following system databases are generated:
• master
• model
• tempdb
• msdb
NOTE There is another, “hidden” system database, called the resource database, which is used to store system objects, such as system stored procedures and functions. The content of this database is generally used for system upgrades.
The following sections describe each of the system databases in turn.
master Database
The master database is the most important system database of the Database Engine. It comprises all system tables that are necessary for your work. For example, the master database contains information about all other databases managed by the Database Engine, system connections to clients, and user authorizations.
Because of the importance of this system database, you should always keep a current backup copy of it. Also, the master database is modified each time you perform an operation such as creating user databases or user tables. For this reason, you should back it up after the execution of such operations. (The section “Backing Up the master Database” in Chapter 16 explains when it is necessary to back up the master database.)
model Database
The model database is used as a template when user-defined databases are created. It contains the subset of all system tables of the master database, which every user-defined database needs. The system administrator can change the properties of the model database to adapt it to the specific needs of their system.
NOTE Because the model database is used as a model each time you create a new database, you can extend it with certain database objects and/or permissions. After that, all new databases will inherit the new properties. Use the ALTER DATABASE statement to extend or modify the model database, the same way as you modify user databases.
tempdb Database
The tempdb system database is a shared database for all users of the Database Engine instance. It provides, among other things, the storage space for temporary tables and other temporary objects that are needed. Its content is destroyed every time the system is restarted.
NOTE I will describe the tempdb system database in more detail than the other system databases because it can be a significant factor in relation both to performance and to the management of the whole Database Engine instance to which it belongs.
This section covers the following topics in relation to the tempdb database:
• The use of tempdb
• Differences between tempdb and other databases
• Specification of size and number of files for tempdb
• Editing information concerning tempdb
The following subsections describe these features.
Use of the tempdb Database
Three types of objects are stored in the tempdb system database:
• Temporary user objects, such as temporary tables and stored procedures
• Internal objects
• Version store (see the “Row Versioning” section in Chapter 13)
Local and global temporary tables as well as temporary stored procedures, all of which are created by users, are stored in the tempdb database. The other objects stored in this system database are table variables and table-valued functions. All user objects stored in tempdb are treated by the system in the same way as any other database object. This means that entries concerning a temporary object are stored in the system catalog and you can retrieve information about the object using the sys.objects catalog view.
Internal objects are similar to user objects, except that they are not visible using catalog views or other tools to retrieve metadata. There are three types of internal objects:
• Work files Created when the system retrieves information using particular operators
• Work tables Created by the system when certain operations, such as spooling and recovering databases and tables by using the DBCC commands, are executed
• Sort units Created when a sort operation is executed
The third use of the tempdb system database is for storing row versions when using the READ COMMITTED SNAPSHOT level or SNAPSHOT ISOLATION level with user tables. (For the detailed description of these isolation levels, see Chapter 13.) Both forms of isolation level mentioned use the feature called optimistic concurrency to save older versions of rows as updates are made, so you can see the prior committed values. During this process, the tempdb database grows each time the system performs the following operations, among others:
• An INSERT, UPDATE, or DELETE statement is executed in a snapshot transaction.
• A trigger is executed.
NOTE Because of optimistic concurrency, the system makes heavy use of the tempdb database. For this reason, make sure that tempdb is large enough and monitor its space regularly. (Monitoring the space of tempdb is described at the end of this section.)
Differences Between tempdb and Other Databases
The most important difference between tempdb and other databases is that tempdb is re-created every time the corresponding Database Engine instance starts up. (You can use this fact to quickly determine the last time a Database Engine instance was restarted, checking the create_date column of the tempdb system database.)
Another difference is a caching behavior. To reduce the impact on structures of the tempdb database, the system can cache temporary objects in the same way as caching is done for persistent database objects. Instead of dropping a temporary object, the system keeps the system metadata and truncates the table data. The process of truncation reduces the storage requirement to a single data page and reduces the allocation information to a single Index Allocation Map (IAM) page. (An IAM page tracks the pages/extents allocation for a specific allocation unit of a table.) The main benefit of caching is that it avoids almost all of the allocation and metadata costs of re-creating the temporary object.
There is also a difference in the logging process that is done for tempdb. The tempdb system database works in simple recovery mode, but only the minimal amount of information concerning modification operations is stored in the transaction log. (Simple recovery mode will be described in the Chapter 16 section “Recovery Models.”)
Specification of Size and Number of Files for tempdb
Two important issues concerning tempdb are its total size and the number of files used to store data in it. There is no simple way to specify the size of tempdb. The best way is an empirical one: Use your system for a couple of days or weeks and monitor how large the tempdb database is. Generally, you should allow tempdb to auto-grow. For monitoring the size of your tempdb database, use the sys.dm_db_file_space_usage dynamic management view (see the upcoming Example 15.2).
During the installation process, on the Database Engine Configuration page of the installation wizard (see Chapter 2), you can specify the number of tempdb files on the TempDB tab. The default value is 4. There are several important recommendations for specifying the number of files. First, you should create a data file per logical processor for your tempdb, with a maximum of eight data files. Second, each of the multiple data files should have the same size so the Database Engine can apply the proportional fill optimization procedure. Third, according to Microsoft, you should set the Autogrowth property for tempdb.
Editing Information Concerning tempdb
You can edit information of temporary objects (tables and stored procedures) in the tempdb database the same way you would do for any other such objects. Example 15.1 shows this.
Example 15.1

The result for my instance at present is

If you want to see how much space is being used for the tempdb database of your Database Engine instance, you can use the sys.dm_db_file_space_usage dynamic management view. Example 15.2 shows the use of this DMV.
Example 15.2

Example 15.2 displays the information concerning three types of objects in the tempdb system database. The user_object_reserved_page_count column displays the number of pages allocated for user objects. The internal_object_reserved_page_count column displays the number of pages allocated for internal objects. The version_store_reserved_page_count column specifies the number of pages allocated for the version store.
msdb Database
The msdb database is used by the component called SQL Server Agent to schedule alerts and jobs. This system database contains task scheduling, exception handling, alert management, and system operator information; for example, the msdb database holds information for all the operators, such as e-mail addresses and pager numbers, and history information about all the backups and restore operations. For more information regarding how this system database can be restored, see Chapter 16.
Disk Storage
The storage architecture of the Database Engine contains several units for storing database objects:
• Page
• Extent
• File
• Filegroup
NOTE Files and filegroups will not be discussed in this chapter. They are described in Chapter 5.
The main unit of data storage is the page. The size of a page is always 8KB. Each page has a 96-byte header used to store the system information. Data rows are placed on the page immediately after the header.
The Database Engine supports different page types. The most important are
• Data pages
• Index pages
NOTE Data and index pages are actually physical parts of a database where the corresponding tables and indices are stored. The content of a database is stored in one or more files, and each file is divided into page units. Therefore, each table or index page (as a database physical unit) can be uniquely identified using a database ID, database file ID, and a page number.
When you create a table or index, the system allocates a fixed amount of space to contain the data belonging to the table or index. When the space fills, the space for additional storage must be allocated. The physical unit of storage in which space is allocated to a table (index) is called an extent. An extent comprises eight contiguous pages, or 64KB. There are two types of extents:
• Uniform extents Owned by a single table or index
• Mixed extents Shared by up to eight tables or indices
The system always allocates pages from mixed extents first. After that, if the size of the table (index) is greater than eight pages, it switches to uniform extents.
Properties of Data Pages
All types of data pages have a fixed size (8KB) and consist of the following three parts:
• Page header
• Space reserved for data
• Row offset table
NOTE This chapter does not include a separate discussion of the properties of index pages because index pages are almost identical to data pages.
The following sections describe these parts.
Page Header
Each page has a 96-byte page header used to store the system information, such as page ID, the ID of the database object to which the page belongs, and the previous page and next page in a page chain. As you may have already guessed, the page header is stored at the beginning of each page. Table 15-1 shows the information stored in the page header.

Table 15-1 Information Contained in the Page Header
Space Reserved for Data
The part of the page reserved for data has a variable length that depends on the number and length of rows stored on the page. For each row stored on the page, there is an entry in the space reserved for data and an entry in the row offset table at the end of the page. [A data row cannot span two or more pages, except for values of VARCHAR(MAX) and VARBINARY(MAX) data that are stored in their own specific pages.] Each row is stored subsequently after already-stored rows, until the page is filled. If there is not enough space for a new row of the same table, it is stored on the next page in the chain of pages.
For all tables that have only fixed-length columns, the same number of rows is stored at each page. If a table has at least one variable-length column (a VARCHAR column, for instance), the number of rows per page may differ and the system then stores as many rows per page as will fit on it.
Row Offset Table
The last part of a page is tightly connected to a space reserved for data, because each row stored on a page has a corresponding entry in the row offset table (see Figure 15-1). The row offset table contains 2-byte entries consisting of the row number and the offset byte address of the row on the page. (The entries in the row offset table are in reverse order from the sequence of the rows on the page.) Suppose that each row of a table is fixed-length, 36 bytes in length. The first table row is stored at byte offset 96 of a page (because of the page header). The corresponding entry in the row offset table is written in the last 2 bytes of a page, indicating the row number (in the first byte) and the row offset (in the second byte). The next row is stored subsequently in the next 36 bytes of the page. Therefore, the corresponding entry in the row offset table is stored in the third- and fourth-to-last bytes of the page, indicating again the row number (1) and the row offset (132).

Figure 15-1 The structure of a data page
Types of Data Pages
Data pages are used to store data of a table. There are two types of data pages, each of which is used to store data in a different format:
• In-row data pages
• Row-overflow data pages
In-Row Data Pages
There is nothing special to say about in-row data pages: they are pages in which it is convenient to store data and index information. All data that doesn’t belong to large objects is always stored in-row. Also, VARCHAR(MAX), NVARCHAR(MAX), VARBINARY(MAX), and XML values can be stored in-row, if the large value types out of row option of the sp_tableoption system procedure is set to 0. In this case, all such values are stored directly in the data row, up to a limit of 8000 bytes and as long as the value can fit in the record. If the value does not fit in the record, a pointer is stored in-row and the rest is stored out of row in the storage space for large objects.
Row-Overflow Data Pages
Values of the VARCHAR(MAX), NVARCHAR(MAX), and VARBINARY(MAX) columns can be stored outside of the actual data page. As you already know, 8KB is the maximum size of a row on a data page, but you can exceed this size limit if you use columns of such large data types. In this case, the system stores the values of these columns in extra pages, which are called row-overflow pages.
The storage in row-overflow pages is done only under certain circumstances. The primary factor is the length of the row: if the row needs more than 8060 bytes, some of the column’s values will be stored on overflow pages. (A value of a column cannot be split between the actual data page and a row-overflow page.)
As an example of how content of a table with large values is stored, Example 15.3 creates such a table and inserts a row into it.
Example 15.3

The CREATE TABLE statement in Example 15.3 creates the mytable table. The subsequent INSERT statement inserts a new row in the table. The length of the inserted row is 10,000 bytes. For this reason, the row doesn’t fit in a page.
The query in Example 15.4 uses several catalog views to display information concerning page type description.
Example 15.4

The result is

As you can see from Example 15.4, the two columns in the SELECT list (type_desc and total_pages) are from the sys.allocation_units catalog view. (This view contains a row for each allocation unit in the database.) Different allocation units can be displayed using the type_desc column of the sys.allocation_units catalog view. (A set of pages of one particular data page type is called an allocation unit.)
The only reason use of the sys.partition view is required is to specify mytable as the corresponding table using the object_id column of the view. The sys.partition view contains one row for each partition of each table or index. (Nonpartitioned tables, such as mytable, have only one partition unit.)
The result of Example 15.4 shows that for the single row of the mytable table, nine data pages plus nine row-overflow pages are allocated by the system.
NOTE The performance of a system can significantly degrade if your queries access many row-overflow data pages.
Editing Information Concerning Disk Storage
In earlier versions of SQL Server, the only way to inspect data or index pages of a table has been to use two DBCC commands: DBCC PAGE and DBCC IND. The main problem with these commands is that they were (and still are) undocumented, meaning that the functionality has been added to the system but there is no official support for it.
In SQL Server 2012, Microsoft released a new dynamic management function (DMF), called sys.dm_db_database_page_allocations. The purpose of this DMF is to replace DBCC PAGE and DBCC IND. We will use an example to introduce this DMF.
In Example 15.5, we inspect data and index pages of the employee table.
Example 15.5

The result is

As you can see from Example 15.5, the sys.dm_db_database_page_allocations function has five parameters. The first four parameters—@databaseid, @tableid, @indexid, and @partitionid—detail the object whose pages you are interested in. Therefore, in Example 15.5, we analyze the employee table (@tableid) of the sample database (@databaseid) in relation to all indexes (@indexid = NULL) and all partitions (@partitionid = NULL).
@tableid, @indexid, and @partitionid can be NULL, but @databaseid has to be specified. If, for example, you specify the @tableid and @indexid parameters of a particular index but you pass in NULL for the @partitionid parameter, the function will return all pages in all partitions for that particular index. If only the @databaseid parameter is valued, all (table-related) pages in that database are returned.
The last parameter of this DMF, @mode, specifies the amount of information that is displayed and can be either 'LIMITED' or 'DETAILED'. 'LIMITED' returns less information. On the other hand, 'DETAILED' uses significantly more resources. Therefore, the value 'DETAILED' should be used only on small sets of pages.
The is_allocated column of the DMF in the WHERE clause of the SELECT statement restricts the result set only to the pages that are allocated.
NOTE Before the execution of the DMF in Example 15.5, I created an index for the emp_no column of the employee table to display the information of index pages, too.
There are two problems with the sys.dm_db_database_page_allocations DMF. First, it is undocumented. The other problem is more significant and concerns performance. The function reads the information of all the pages for the entire table or index, even when the filter in the WHERE clause is restricted to a single page. For this reason, the bigger the table (index), the worse the performance of this DMF.
Therefore, Microsoft introduced in SQL Server 2019 a new and improved dynamic management function called sys.dm_db_page_info. This function takes a similar set of arguments as sys.dm_db_database_page_allocations, still allowing you to identify an object by its page, but performs more efficiently. Example 15.6 shows the use of this DMF.
Example 15.6

The result is

The sys.dm_db_page_info DMF has four parameters: @DatabaseId, @FileId, @PageId, and @Mode. The first and the last parameter have the same meaning as the parameters with the same name for the sys.dm_db_database_page_allocations DMF. @FileId is the ID of the file, while @PageId is the ID of the corresponding page. (The page_ID = 21320, which we use as the fourth parameter of the sys.dm_db_page_info view, has been determined in Example 15.5.)
Parallel Processing of Tasks
The Database Engine can execute different database tasks in parallel. The following tasks can be parallelized:
• Bulk load
• Backup
• Query execution
• Indices
The Database Engine allows data to be loaded in parallel using the bcp utility. (For the description of the bcp utility, see the next section.) The table into which the data is loaded must not have any indices, and the load operation must not be logged. (Only applications using the ODBC or OLE DB–based APIs can perform parallel data loads into a single table.)
The Database Engine can back up databases or transaction logs to multiple devices using parallel striped backup. In this case, database pages are read by multiple threads one extent at a time (see also Chapter 16).
The Database Engine provides parallel queries to enhance the query execution. With this feature, the independent parts of a SELECT statement can be executed using several native threads on a computer. Each query that is planned for the parallel execution contains an exchange operator in its query execution plan. (An exchange operator is an operator in a query execution plan that provides process management, data redistribution, and flow control.) For such a query, the Database Engine generates a parallel query execution plan. Parallel queries significantly improve the performance of the SELECT statements that process very large amounts of data.
On computers with multiple processors, the Database Engine automatically uses more processors to perform index operations, such as creation and rebuilding of an index. The number of processors employed to execute a single index statement is determined by the configuration option max degree of parallelism as well as the current workload. If the Database Engine detects that the system is busy, the degree of parallelism is automatically reduced before the statement is executed.
Utilities
Utilities are components that provide different features such as data reliability, data definition, and statistics maintenance functions. The following utilities are described next:
• bcp
• sqlcmd
• mssql-cli
• sqlservr
NOTE The first three utilities—bcp, sqlcmd, and mssql-cli—are cross-platform utilities, meaning that you can use them with Windows as well as with macOS and Linux operating systems. The Windows installation of bcp and sqlcmd is performed when you install the corresponding instance of the Database Engine. The Linux installation of bcp and sqlcmd is similar to the installation of mssql-cli, which is described in detail later in this chapter using the Ubuntu operating system.
bcp Utility
bcp (Bulk Copy Program) is a useful utility that copies database data to or from a data file. Therefore, bcp is often used to transfer a large amount of data into a Database Engine database from another relational DBMS using a text file, or vice versa.
The syntax of the bcp utility is
![]()
db_name is the name of the database to which the table (table_name) belongs. IN or OUT specifies the direction of data transfer. The IN option copies data from the file_name file into the table_name table, and the OUT option copies rows from the table_name table into the file_name file. The FORMAT option creates a format file based on the options specified. If this option is used, the option –f must also be used.
NOTE The IN option appends the content of the file to the content of the database table, whereas the OUT option overwrites the content of the file.
Data can be copied as either specific text or standardized (ASCII) text. Copying data as specific text is referred to as working in native mode, whereas copying data as ASCII text is referred to as working in character mode. The parameter –n specifies native mode, and the parameter –c specifies character mode. Native mode is used to export and import data from one system managed by the Database Engine to another system managed by the Database Engine, and character mode is commonly used to transfer data between a Database Engine instance and other database systems.
Example 15.7 shows the use of the bcp utility. (You have to execute this statement from a command line of your Windows operating system.)
Example 15.7
![]()
The bcp command in Example 15.7 exports the data from the address table of the AdventureWorks database in the output file address.txt. The option –T specifies that the trusted connection is used. (Trusted connection means that the system uses integrated security instead of the SQL Server authentication.) The option –c specifies character mode; thus, the data is stored in the ASCII file.
NOTE Be aware that the BULK INSERT statement is an alternative to bcp. It supports all of the bcp options (although the syntax is a bit different) and offers much greater performance.
To import data from a file to a database table, you must have INSERT and SELECT permissions on the table. To export data from a table to a file, you must have SELECT permission on the table.
sqlcmd Utility
sqlcmd allows you to enter Transact-SQL statements, system procedures, and script files at the command prompt. The general form of this utility is
![]()
where option is the specific option of the utility, and parameter specifies the value of the defined option. The sqlcmd utility has many options, the most important of which are described in Table 15-2.

Table 15-2 Most Important Options of the sqlcmd Utility
Example 15.8 shows the use of sqlcmd. (You have to execute this statement from a command line of your Windows operating system.)
NOTE Before you execute Example 15.8, you have to change the server name and make sure the input file is available.
Example 15.8
![]()
In Example 15.8, a user of the database system named NTB11900 executes the batch stored in the file ms0510.sql and stores the result in the output file ms0510.rpt. Depending on the authentication mode, the system prompts for the username and password (SQL Server authentication) or just executes the statement (Windows authentication).
One of the most important options of the sqlcmd utility is the –A option. As you already know from Table 15-2, this option allows you to start a dedicated administrator connection (DAC) to an instance of the Database Engine. Usually, you make the connection to an instance of the Database Engine with SQL Server Management Studio. But, there are certain extraordinary situations in which users cannot connect to the instance. In that case, the use of the DAC can help.
The DAC is a special connection that can be used by DBAs in case of extreme server resource depletion. Even when there are not enough resources for other users to connect, the Database Engine will attempt to free resources for the DAC. That way, administrators can troubleshoot problems on an instance without having to take down that instance.
The sqlcmd utility supports several specific commands that can be used within the utility, in addition to Transact-SQL statements. Table 15-3 describes the most important commands of the sqlcmd utility. Example 15.9 shows how a query in relation to the sample database can be executed using this utility. (To execute Example 15.9, start sqlcmd, and at the command prompt type each line separately.)

Table 15-3 Most Important Commands of the sqlcmd Utility
Example 15.9

This example displays the number of rows of the project table (e.g., the number 3 if project contains three rows).
mssql-cli Utility
mssql-cli is an open source, cross-platform, interactive command-line query tool for the Database Engine. This tool can be used as an alternative to the sqlcmd utility.
This section demonstrates the Windows installation and the Ubuntu installation of the tool, as well as how you can use it. The final subsection compares the properties of mssql-cli to those of the sqlcmd utility.
Windows Installation of mssql-cli
The mssql-cli utility is implemented in Python. Python is not installed by default on Windows. Therefore, before you install mssql-cli, you have to install Python.
You can download the latest Python installation package from https://www.python.org/downloads/. When installing, check the Add Python to PATH option, which you can find as the last line in the installation screen. That way, the necessary information concerning Python directories and files can be found by the system in the PATH environment variable.
Once Python is installed and the PATH environment variable is set, open a command prompt and install mssql-cli using the following command:
![]()
Figure 15-2 shows the installation process of the mssql-cli utility under Windows.

Figure 15-2 Installation of mssql-cli on Windows
Ubuntu Installation of mssql-cli
As you already know, mssql-cli is a tool based on the Python programming language. You can find the source code for this tool on GitHub. To install the tool, go to https://github.com/dbcli/mssql-cli. Click Installation Guide under the Ubuntu platform. The page that appears contains different forms of installations. Scroll down to “Installation for latest preview version via Direct Downloads.” Download the Debian package and save the .deb file under the desired location.
Go to the download folder and double-click the file to launch it. It opens the screen shown in Figure 15-3. Click Install. After that, you will be prompted to enter the credentials for the authentication.
Figure 15-3 Installation screen for mssql-cli on Ubuntu
NOTE As you can see from the description, the mssql-cli installation process is similar to the installation process of Azure Data Studio (see Chapter 3). Analogously, you do not get any message when the installation of mssql-cli is finished.
Using mssql-cli
The mssql-cli utility allows you to write T-SQL statements, system procedures, and script files at the command prompt. The general form of this utility is
![]()
where option is the specific option of the utility, and parameter specifies the value of the particular option. The utility has many options, the most important of which are described in Table 15-4.

Table 15-4 Most Important Options of the mssql-cli utility
NOTE The functionality of mssql-cli is identical for all platforms.
Example 15.10 shows the use of the mssql-cli tool. (You have to execute this statement from a command line of your Windows operating system.)
NOTE Before you execute Example 15.10, you have to change the server name.
Example 15.10
![]()
In Example 15.10, a connection to the Database Engine instance LAPTOP-TVUM0CNL will be established for the sa user. (You will be prompted by the system to type the corresponding password.)
Figure 15-4 shows how you can establish a connection (with Windows Authentication) and execute T-SQL statements.

Figure 15-4 Connecting to the instance and executing statements with mssql-cli
As you can see from Figure 15-4, the connection to the server instance is established using a trusted (integrated) connection. The system establishes the connection and shows you the name of the default database (“master>”). The USE statement changes the default database to sample. After that, you can write any T-SQL statement in relation to that database.
mssql-cli vs. sqlcmd
The following list describes the most important properties of mssql-cli and compares them to the corresponding properties of sqlcmd:
• mssql-cli is an open source contribution from Microsoft, with its source code available at GitHub, whereas sqlcmd is Microsoft proprietary software.
• mssql-cli has user-friendly interactive features like T-SQL IntelliSense, multiline editing, syntax highlighting, and formatting of results. (You can see most of these features by looking at the output of the SELECT statement in Figure 15-4.) sqlcmd is a simple command-line tool with none of these interactive features.
• mssql-cli and sqlcmd are both cross-platform utilities, meaning that you can use them with Windows as well as with macOS and Linux derivatives. mssql-cli is a new tool and does not have all the command arguments available in sqlcmd. For example, at the time of writing, the tool does not have an option to specify the output file.
• Generally, the mssql-cli tool can be used as an enhanced alternative to sqlcmd. On the other hand, sqlcmd is a mature tool and has more options.
sqlservr Utility
The most convenient way to start an instance of the Database Engine is automatically with the boot process of the computer. However, certain circumstances might require different handling of the system. Therefore, the Database Engine offers, among others, the sqlservr utility for starting an instance.
NOTE You can also use Management Studio or the net command to start or stop an instance of the Database Engine.
The sqlservr utility is invoked using the following command:
![]()
option_list contains all options that can be invoked using the application. Table 15-5 describes the most important options.
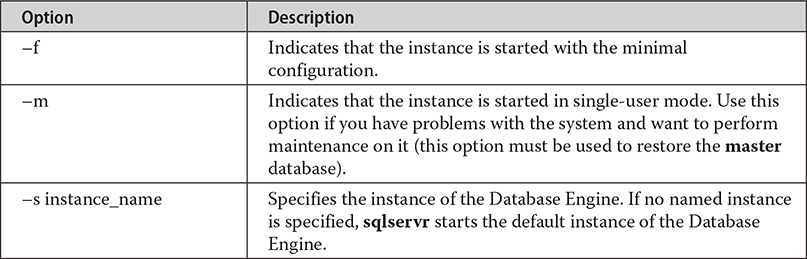
Table 15-5 Most Important Options of the sqlservr Utility
DBCC Commands
The Transact-SQL language supports the DBCC (Database Console Commands) statements, which are commands for the Database Engine. Depending on the options used with DBCC, the DBCC commands can be divided into the following groups:
• Maintenance
• Informational
• Validation
• Performance
In contrast to utilities of the Database Engine, which have to be installed separately for all Linux derivatives, the DBCC commands are already installed during the installation process.
NOTE This section discusses only the validation commands and a command in relation to performance. Other commands will be discussed in relation to their application. For instance, DBCC FREEPROCCACHE is discussed in detail in Chapter 19, while the description of DBCC USEROPTIONS can be found in Chapter 13.
Validation Commands
The validation commands do consistency checking of the database. The following commands belong to this group:
• DBCC CHECKALLOC
• DBCC CHECKTABLE
• DBCC CHECKCATALOG
• DBCC CHECKDB
The DBCC CHECKALLOC command validates whether every extent indicated by the system has been allocated, as well as that there are no allocated extents that are not indicated by the system. Therefore, this command performs cross-referencing checks for extents.
The DBCC CHECKTABLE command checks the integrity of all the pages and structures that make up the table or indexed view. All performed checks are both physical and logical. The physical checks control the integrity of the physical structure of the page. The logical checks control, among other things, whether every row in the base table has a matching row in each nonclustered index, and vice versa, and whether indices are in their correct sort order. Using the PHYSICAL_ONLY option, you can validate only the physical structure of the page. This option causes a much shorter execution time of the command and is therefore recommended for frequent use on production systems.
The DBCC CHECKCATALOG command checks for catalog consistency within the specified database. It performs many cross-referencing checks between tables in the system catalog. After the DBCC CATALOG command finishes, a message is written to the error log. If the DBCC command successfully executes, the message indicates a successful completion and the amount of time that the command ran. If the DBCC command stops because of an error, the message indicates the command was terminated, a state value, and the amount of time the command ran.
If you want to check the allocation and the structural and logical integrity of all the objects in the specified database, use DBCC CHECKDB. (As a matter of fact, this command performs all checks previously described, in the given order.)
NOTE All DBCC commands that validate the system use snapshot transactions (see Chapter 13) to provide transactional consistency. In other words, the validation operations do not interfere with the other, ongoing database operations, because they use versions of current rows for validation.
Performance Command
The DBCC MEMORYSTATUS command provides a snapshot of the current memory status of the Database Engine. The command’s output is useful in troubleshooting issues that relate to the memory consumption of the Database Engine or to specific out-of-memory errors (many of which automatically print this output in the error log).
The output of this command has several parts, including the “Process/System Counts” part, which delivers important information concerning the total amount of memory (the Working Set parameter) and the actual memory used by the Database Engine (the Available Physical Memory parameter).
Policy-Based Management
The Database Engine supports Policy-Based Management, a framework for managing one or more server instances, databases, or other database objects. Before you learn how this framework works, though, you need to understand some key terms and concepts of it.
Key Terms and Concepts
The following is a list of the key terms regarding Policy-Based Management, which is followed by a description of the concepts related to these terms:
• Managed target
• Target set
• Facet
• Condition
• Policy
• Category
The system manages entities called managed targets, which may be server instances, databases, tables, or indices. All managed targets that belong to an instance form a hierarchy. A target set is the set of managed targets that results from applying filters to the target hierarchy. For instance, if your managed target is a table, a target set could comprise all indices that belong to that table.
A facet is a set of logical properties that models the behavior or characteristics for certain types of managed targets. The number and characteristics of the properties are built into the facet and can be added or removed only by the maker of the facet. Some facets can be applied only to certain types of managed targets.
A condition is a Boolean expression that specifies a set of allowed states of a managed target with regard to a facet. Again, some conditions can be applied only to certain types of managed targets.
A policy is a condition and its corresponding behavior. A policy can contain only one condition. Policies can be enabled or disabled. They are managed by users through the use of categories.
A policy belongs to one and only one category. A category is a group of policies that is introduced to give a user more flexibility in cases where third-party software is hosted. Database owners can subscribe a database to a set of categories. Only policies from the database’s subscribed categories can govern that database. All databases implicitly subscribe to the default policy category.
Using Policy-Based Management
This section presents an example that shows how you can use Policy-Based Management. This example will create a policy whose condition is that the index fill factor will be 60 percent for all databases of the instance. (For a description of the FILLFACTOR option, see Chapter 10.)
The following are the three main steps to implement Policy-Based Management:
1. Create a condition based on a facet.
2. Create a policy.
3. Categorize the policy.
Generally, to create a policy, open SQL Server Management Studio, expand the server, and then expand Management | Policy Management.
The first step is to create a condition. Right-click Conditions and choose New Condition. In the Create New Condition dialog box (see Figure 15-5), type the condition name in the Name field (SetFillFactor in this example), and choose Server Configuration in the Facet drop-down list. (Setting a fill factor for all databases of an instance is server-bound and thus belongs to the server configuration.) In the Field column of the Expression area, choose @FillFactor from the drop-down menu and choose = as the operator. Finally, enter 60 in the Value field. Click OK.

Figure 15-5 The Create New Condition dialog box
The next step is to create a policy based on the condition. In the Policy Management folder, right-click Policies and choose New Policy. In the Name field of the Create New Policy dialog box, type the name for the new policy (PolicyFillFactor60 in this example). In the Check Condition drop-down list, choose the condition that you have created (SetFillFactor). (This condition can be found under the node called Server Configurations.) Choose On Demand from the Evaluation Mode drop-down list.
NOTE Policy administrators can run policies on demand, or enable automated policy execution by using one of the existing execution modes.
After you create a policy, you should categorize it. To categorize a policy, click the Description page in the Create New Policy dialog box. You can place policies in the Default category or in a more specific category. (You can also create your own category by clicking the New button.)
The process described in this section can be applied in the same way to dozens of different policies in relation to servers, databases, and database objects.
Summary
This chapter described several features of the system environment of the Database Engine:
• System databases
• Disk storage
• Utilities
• DBCC commands
• Policy-Based Management
The system databases contain system information and high-level information about the whole database system. The most important of them is the master database.
The main unit of disk storage is the page. The size of pages is 8KB. The most important page type is the data page. (The form of an index page is almost identical to that of a data page.)
The Database Engine supports many utilities and commands. This chapter discussed four utilities (sqlcmd, sqlservr, mssql-cli, and bcp) and the DBCC validation commands.
Policy-Based Management is a framework for DBAs to configure and manage objects at the system level. It allows you to define and enforce policies for configuring and managing databases and database objects across the enterprise.
The next chapter discusses how you can prevent the loss of data, using backup and recovery.
Exercises
E.15.1 If you create a temporary table, where will it be stored? Also, how you can display information concerning such a table?
E.15.2 Change the properties of the model database so that its size is 4MB.
E.15.3 Name all key terms of Policy-Based Management and discuss their roles and how they relate to one another.
E.15.4 Name all groups for which you can specify a condition.
E.15.5 Generate a policy that disables the use of the Common Language Runtime (CLR).