
CHAPTER |
|
7 |
Modification of a Table’s Contents |
In This Chapter
• Other T-SQL Modification Statements and Clauses
In addition to the SELECT statement, which was introduced in Chapter 6, there are three other DML statements: INSERT, UPDATE, and DELETE. Like the SELECT statement, these three modification statements operate either on tables or on views. This chapter discusses these statements in relation to tables and gives examples of their use. Additionally, it explains two other statements: TRUNCATE TABLE and MERGE. Whereas the TRUNCATE TABLE statement is a Transact-SQL extension to the SQL standard, MERGE is a standardized feature. The chapter wraps up with coverage of the OUTPUT clause, which allows you to display explicitly the inserted (or updated) rows.
INSERT Statement
The INSERT statement inserts rows (or parts of them) into a table. It has two different forms:

Using the first form, exactly one row (or part of it) is inserted into the corresponding table. The second form of the INSERT statement inserts the result set from the SELECT statement or from the stored procedure, which is executed using the EXECUTE statement. (The stored procedure must return data, which is then inserted into the table. The SELECT statement can select values from a different table or from the same table as the target of the INSERT statement, as long as the types of the columns are compatible.)
With both forms, every inserted value must have a data type that is compatible with the data type of the corresponding column of the table. To ensure compatibility, all character-based values and data and time data must be enclosed in apostrophes, while all numeric values need no such enclosing.
Inserting a Single Row
In both forms of the INSERT statement, the explicit specification of the column list is optional. This means that omitting the list of columns is equivalent to specifying a list of all columns in the table.
The option DEFAULT VALUES inserts default values for all the columns. If a column is of the data type TIMESTAMP or has the IDENTITY property, the value, which is automatically created by the system, will be inserted. For other data types, the column is set to the appropriate non-null default value if a default exists, or NULL if it doesn’t. If the column is not nullable and has no DEFAULT value, then the INSERT statement fails and an error will be indicated.
Examples 7.1 through 7.4 insert rows into the four tables of the sample database. This action shows the use of the INSERT statement to load a small amount of data into a database.
Example 7.1
Load data into the employee table:
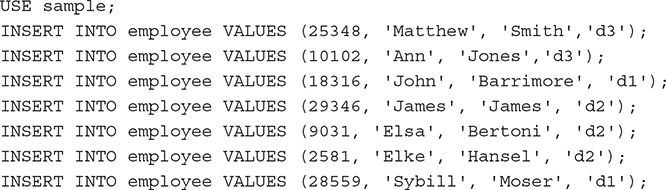
Example 7.2
Load data into the department table:

Example 7.3
Load data into the project table:

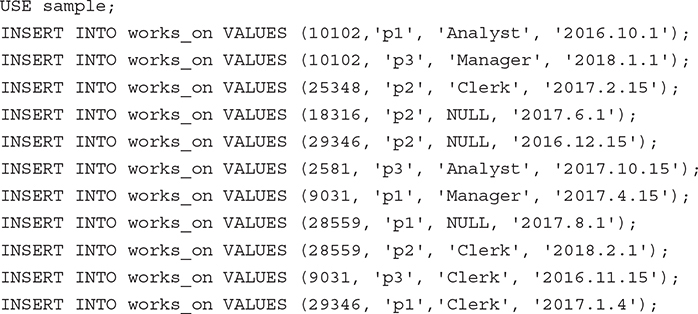
Example 7.4
Load data into the works_on table:
There are a few different ways to insert values into a new row. Examples 7.5 through 7.7 show these possibilities.
Example 7.5
![]()
The INSERT statement in Example 7.5 corresponds to the INSERT statements in Examples 7.1 through 7.4. The explicit use of the keyword NULL inserts the null value into the corresponding column.
The insertion of values into some (but not all) of a table’s columns usually requires the explicit specification of the corresponding columns. The omitted columns must either be nullable or have a DEFAULT value.
Example 7.6

Examples 7.5 and 7.6 are equivalent. The dept_no column is the only nullable column in the employee table because all other columns in the employee table were declared with the NOT NULL clause in the CREATE TABLE statement.
The order of column names in the VALUE clause of the INSERT statement can be different from the original order of those columns, which is determined in the CREATE TABLE statement. In this case, it is absolutely necessary to list the columns in the new order.
Example 7.7

Inserting Multiple Rows
The second form of the INSERT statement inserts one or more rows selected with a subquery. Example 7.8 shows how a set of rows can be inserted using the second form of the INSERT statement.
Example 7.8
Get all the numbers and names for departments located in Dallas, and load the selected data into a new table:
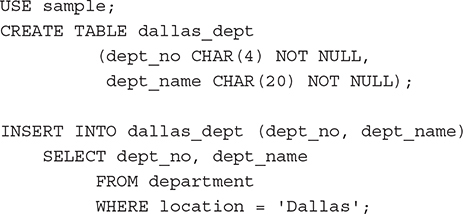
The new table created in Example 7.8, dallas_dept, has the same columns as the department table except for the location column. The subquery in the INSERT statement selects all rows with the value 'Dallas' in the location column. The selected rows will be subsequently inserted in the new table.
The content of the dallas_dept table can be selected with the following SELECT statement:
![]()
The result is

Example 7.9 is another example that shows how multiple rows can be inserted using the second form of the INSERT statement.
Example 7.9
Get all employee numbers, project numbers, and project enter dates for all clerks who work in project p2, and load the selected data into a new table:

The new table, clerk_t, contains the following rows:

The tables dallas_dept and clerk_t (Examples 7.8 and 7.9) were empty before the INSERT statement inserted the rows. If, however, the table already exists and there are rows in it, the new rows will be appended.
NOTE You can replace both statements (CREATE TABLE and INSERT) in Example 7.9 with the SELECT statement with the INTO clause (see Example 6.44 in Chapter 6).
Table Value Constructors and INSERT
A table (or row) value constructor allows you to assign several tuples (rows) with a DML statement such as INSERT or UPDATE. Example 7.10 shows how you can assign several rows using such a constructor with an INSERT statement.
Example 7.10
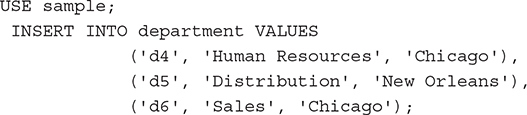
The INSERT statement in Example 7.10 inserts three rows at the same time in the department table using the table value constructor. As you can see from the example, the syntax of the constructor is rather simple. To use a table value constructor, list the values of each row inside the pair of parentheses and separate each list from the others by using a comma.
UPDATE Statement
The UPDATE statement modifies values of table rows. This statement has the following general form:

Rows in the tab_name table are modified in accordance with the WHERE clause. For each row to be modified, the UPDATE statement changes the values of the columns in the SET clause, assigning a constant (or generally an expression) to the associated column. If the WHERE clause is omitted, the UPDATE statement modifies all rows of the table. This means that if you have a table with 1 million rows, all rows will be updated if the WHERE clause is missing. (The FROM clause will be discussed later in this section.)
NOTE An UPDATE statement can modify data of a single table only.
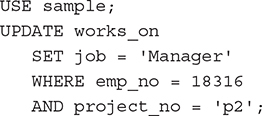
The UPDATE statement in Example 7.11 modifies exactly one row of the works_on table, because the combination of the columns emp_no and project_no builds the primary key of that table and is therefore unique. This example modifies the task of the employee, which was previously unknown or set to NULL.
Example 7.11
Set the task of employee number 18316, who works on project p2, to be 'Manager':
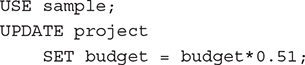
Example 7.12 modifies rows of a table with an expression.
Example 7.12
Change the budgets of all projects to be represented in English pounds. The current rate of exchange is 0.51£ for $1.
In the example, all rows of the project table will be modified because of the omitted WHERE clause. The modified rows of the project table can be displayed with the following Transact-SQL statement:
![]()
The result is

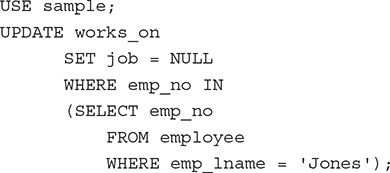
Example 7.13 uses an inner query in the WHERE clause of the UPDATE statement. Because of the use of the IN operator, more than one row can result from this query.
Example 7.13
Due to her illness, set all tasks on all projects for Mrs. Jones to NULL:
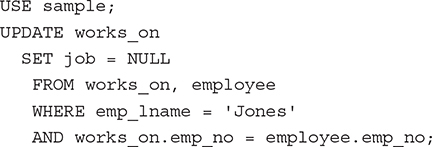
Example 7.13 can also be solved using the FROM clause of the UPDATE statement. The FROM clause contains the names of tables that are involved in the UPDATE statement. All these tables must be subsequently joined. Example 7.14 shows the use of the FROM clause. This example is identical to the previous one.
NOTE The FROM clause is a Transact-SQL extension to the ANSI SQL standard.
Example 7.14
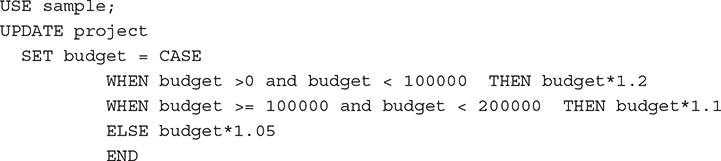
Example 7.15 illustrates the use of the CASE expression in the UPDATE statement. (For a detailed discussion of this expression, refer to Chapter 6 and Example 6.50.)
Example 7.15
The budget of each project should be increased by a percentage (20, 10, or 5) depending on its previous amount of money. Those projects with a lower budget will be increased by the higher percentages.
DELETE Statement
The DELETE statement deletes rows from a table. This statement has two different forms:
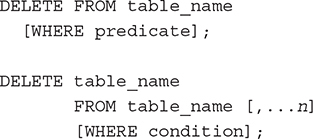
All rows that satisfy the condition in the WHERE clause will be deleted. Explicitly naming columns within the DELETE statement is not necessary (or allowed), because the DELETE statement operates on rows and not on columns.
NOTE The TRUNCATE TABLE statement, which is semantically equivalent to UPDATE, will be explained in the next section.
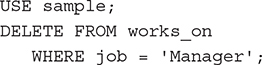
Example 7.16 shows an example of the first form of the DELETE statement.
Example 7.16
Delete all managers in the works_on table:
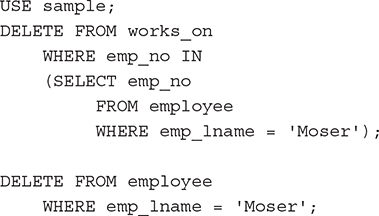
The WHERE clause in the DELETE statement can contain an inner query, as shown in Example 7.17.
Example 7.17
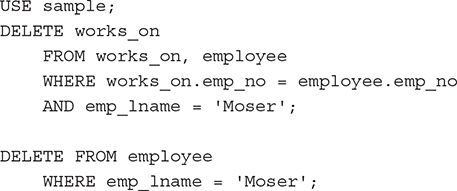
Mrs. Moser is on leave. Delete all rows in the database concerning her:
Example 7.17 can also be performed using the FROM clause, as Example 7.18 shows. This clause has the same semantics as the FROM clause in the UPDATE statement.
Example 7.18
The use of the WHERE clause in the DELETE statement is optional. If the WHERE clause is omitted, all rows of a table will be deleted, as shown in Example 7.19.
Example 7.19
![]()
NOTE There is a significant difference between the DELETE and the DROP TABLE statements. The DELETE statement deletes (partially or totally) the contents of a table, whereas the DROP TABLE statement deletes both the contents and the schema of a table. Thus, after a DELETE statement, the table still exists in the database (although possibly with zero rows), but after a DROP TABLE statement, the table no longer exists.
Other T-SQL Modification Statements and Clauses
The Database Engine supports two additional modification statements:
• TRUNCATE TABLE
• MERGE
and the OUTPUT clause.
Both statements, together with the OUTPUT clause, will be explained in turn in the following subsections.
TRUNCATE TABLE Statement
The Transact-SQL language also supports the TRUNCATE TABLE statement. This statement normally provides a “faster executing” version of the DELETE statement without the WHERE clause. The TRUNCATE TABLE statement deletes all rows from a table more quickly than does the DELETE statement because it drops the contents of the table page by page, while DELETE drops the contents row by row.
NOTE The TRUNCATE TABLE statement is a Transact-SQL extension to the SQL standard.
The TRUNCATE TABLE statement has the following form:
![]()
TIP If you want to delete all rows from a table, use the TRUNCATE TABLE statement. This statement is significantly faster than DELETE because it is minimally logged and there are just a few entries in the log during its execution. (Logging is discussed in detail in Chapter 13.)
MERGE Statement
The MERGE statement combines the sequence of conditional INSERT, UPDATE, and DELETE statements in a single atomic statement, depending on the existence of a record. In other words, you can sync two different tables so that the content of the target table is modified based on differences found in the source table.
The main application area for MERGE is a data warehouse environment (see Chapter 24), where tables need to be refreshed periodically with new data arriving from online transaction processing (OLTP) systems. This new data may contain changes to existing rows in tables and/or new rows that need to be inserted. If a row in the new data corresponds to an item that already exists in the table, an UPDATE or a DELETE statement is performed. Otherwise, an INSERT statement is performed.
The alternative way, which you can use instead of applying the MERGE statement, is to write a sequence of INSERT, UPDATE, and DELETE statements, where, for each row, the decision is made whether to insert, delete, or update the data. This old approach has significant performance disadvantages: it requires multiple data scans and operates on a record-by-record basis.
Examples 7.20 and 7.21 show the use of the MERGE statement.
Example 7.20
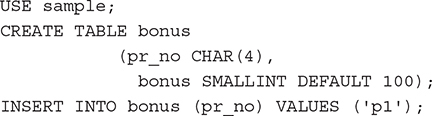
Example 7.20 creates the bonus table, which contains one row, (p1, 100). This table will be used for merging.
Example 7.21

The MERGE statement in Example 7.21 modifies the data in the bonus table depending on the existing values in the pr_no column. If a value from the project_no column of the project table appears in the pr_no column of the bonus table, the MATCHED branch will be executed and the existing value will be updated. Otherwise, the NOT MATCHED branch will be executed and the corresponding INSERT statement will insert new rows in the bonus table.
The content of the bonus table after the execution of the MERGE statement is as follows:
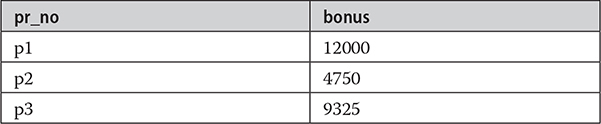
From the result set, you can see that a value of the bonus column represents 10 percent of the original value in the case of the first row, which is updated, and 5 percent in the case of the second and third rows, which are inserted.
The OUTPUT Clause
The result of the execution of an INSERT, UPDATE, or DELETE statement contains by default only the text concerning the number of modified rows (“3 rows deleted,” for instance). If the content of such a result doesn’t fit your needs, you can use the OUTPUT clause, which displays explicitly the rows that are inserted or updated in the table or deleted from it.
NOTE The OUTPUT clause is also part of the MERGE statement. It returns an output for each modified row in the target table (as will be demonstrated in Examples 7.25 and 7.26).
The OUTPUT clause uses the inserted and deleted tables (explained in Chapter 14) to display the corresponding result. Also, the OUTPUT clause must be used with an INTO expression to fill a table. For this reason, you use a table variable to store the result.
Example 7.22 shows how the OUTPUT statement works with a DELETE statement.
Example 7.22
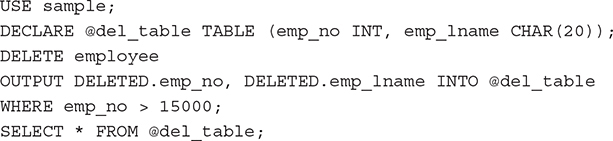
If the content of the employee table is in the initial state, the execution of the statements in Example 7.22 produces the following result:

First, Example 7.22 declares the table variable @del_table with two columns: emp_no and emp_lname. (Variables are explained in detail in Chapter 8.) This table will be used to store the deleted rows. The syntax of the DELETE statement is enhanced with the OUTPUT option:
![]()
Using this option, the system stores the deleted rows in the deleted table, which is then copied in the @del table variable.
Example 7.23 shows the use of the OUTPUT option in an UPDATE statement.
Example 7.23
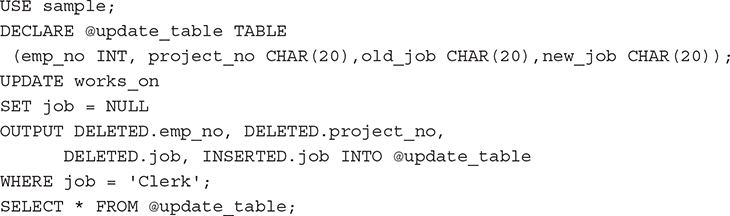
The result is

The following examples show the use of the OUTPUT clause within the MERGE statement.
NOTE The use of the OUTPUT clause within the MERGE statement is complex. Therefore, you might want to skip the rest of this section on the first reading of the book and make a note to return to it later.
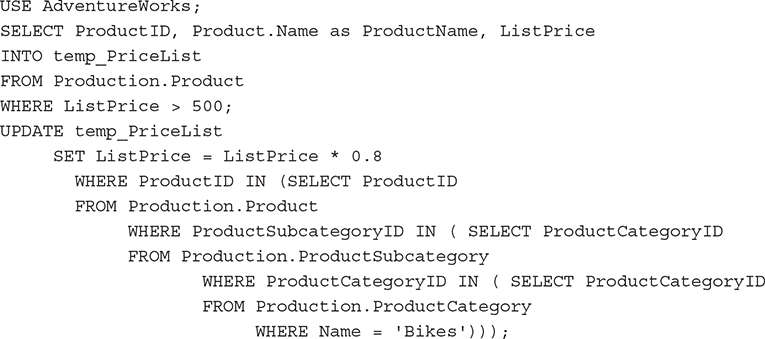
Suppose that your marketing department decides to give customers a price reduction of 20 percent for all bikes that cost more than $500. The SELECT statement in Example 7.24 selects all products that cost more than $500 and inserts them in the temp_PriceList temporary table. The consecutive UPDATE statement searches for all bikes and reduces their price. (The UPDATE statement uses three subqueries to get the necessary information from three tables: Production.Product, Production.ProductSubcategory, and Production.ProductCategory.)
Example 7.24
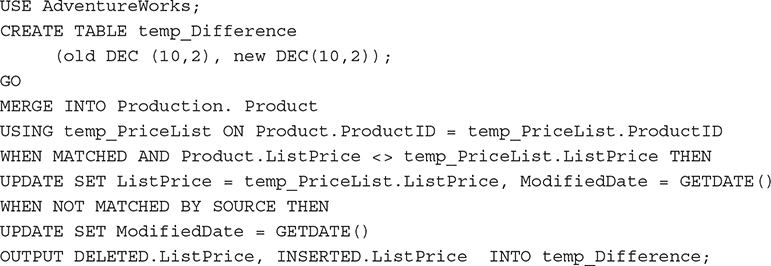
The CREATE TABLE statement in Example 7.25 creates a new table, temp_Difference, that will be used to store the result set of the MERGE statement. After that, the MERGE statement compares the complete list of the products with the new list (given in the temp_priceList table) and inserts the modified prices for all bicycles by using the UPDATE SET clause. (Besides the insertion of the new prices for all bicycles, the statement also changes the ModifiedDate column for all products and sets it to the current date.) The OUTPUT clause in Example 7.25 writes the old and new prices in the temporary table called temp_Difference. That way, you can later calculate the aggregate differences, if needed.
Example 7.25
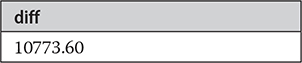
Example 7.26 shows the computation of the overall difference, the result of the preceding modifications.
Example 7.26

The result is
Summary
Generally, only three SQL statements can be used to modify a table: INSERT, UPDATE, and DELETE. These statements are generic insofar as for all types of row insertion, you use only INSERT; for all types of column modification, you use only UPDATE; and for all types of row deletion, you use only DELETE.
The nonstandard statement TRUNCATE TABLE is just another form of the DELETE statement, but the deletion of rows is executed faster with TRUNCATE TABLE than with DELETE. The MERGE statement is basically an “UPSERT” statement: it combines the UPDATE and the INSERT statements in one statement.
Chapters 5 through 7 have introduced all SQL statements that belong to DDL and DML. Most of these statements can be grouped together to build a sequence of Transact-SQL statements. Such a sequence is the basis for stored procedures, which will be covered in the next chapter.
Exercises
E.7.1 Insert the data of a new employee called Julia Long, whose employee number is 11111. Her department number is not known yet.
E.7.2 Create a new table called emp_d1_d2 with all employees who work for department d1 or d2, and load the corresponding rows from the employee table. Find two different, but equivalent, solutions.
E.7.3 Create a new table of all employees who entered their projects in 2017 and load it with the corresponding rows from the employee table.
E.7.4 Modify the job of all employees in project p1 who are managers. They have to work as clerks from now on.
E.7.5 The budgets of all projects are no longer determined. Assign all budgets the NULL value.
E.7.6 Modify the jobs of the employee with the employee number 28559. From now on she will be the manager for all her projects.
E.7.7 Increase the budget of the project where the manager has the employee number 10102. The increase is 10 percent.
E.7.8 Change the name of the department for which the employee named James works. The new department name is Sales.
E.7.9 Change the enter date for the projects for those employees who work in project p1 and belong to department Sales. The new date is 12.12.2017.
E.7.10 Delete all departments that are located in Seattle.
E.7.11 The project p3 has been finished. Delete all information concerning this project in the sample database.
E.7.12 Delete the information in the works_on table for all employees who work for the departments located in Dallas.