Chapter 4
Staying Connected to Others with Channels and Chat
IN THIS CHAPTER
![]() Getting to know channels and using chat
Getting to know channels and using chat
![]() Understanding how to configure channels
Understanding how to configure channels
![]() Attaching files to your messages
Attaching files to your messages
![]() Portraying meaning with emojis, GIFs, and stickers
Portraying meaning with emojis, GIFs, and stickers
Sending instant communication over chat has been around since the dawn of the Internet. If you are as old as me, you may remember the days of AOL Instant Messenger and Internet Relay Chat (IRC) — which was invented in 1988, by the way. The Internet has come a long way since then, but one thing hasn’t changed. Using the Internet to send communications back and forth in real time is still used by most people on a daily basis, and that capability is more valuable than ever. Have you heard of Slack? It relies on instant messaging. Have you used Skype to send chat messages? That is instant messaging, too. Microsoft Teams just wouldn’t be valuable if it didn’t include instant messaging.
In this chapter, you discover how to send chat messages to others on your team via channels. You learn how to create new channels and configure them. You also discover some of the cool features of channels beyond sending simple chat messages such as tagging others and using emojis. You also learn the difference between chatting within a channel and private chats, and you take a look at how assigning a team moderator can help keep your channel organized.
Instant Messaging in Teams
Before we started using Teams to chat, my team and I had been using a different chat application for which we paid a monthly fee to use. However, we also had an Office 365 subscription (which included Teams). Teams was still brand new back then, but we realized we could stop paying for the other chat program and use Teams instead. It already came with Office 365, and unless it was terrible, it would work just fine for sending instant communications.
My story happened a few years ago when Teams had just been released. However, based on my work with many clients, their stories (and perhaps your story) are very similar to mine. Teams might have already been included with your organization’s Microsoft 365 subscription, even though you hadn’t used it before. You might need to use Teams now because the coronavirus pandemic in 2020 forced everyone in your office to start working from home and you need a way to communicate virtually with your coworkers. Regardless of how you start using Teams, you will likely spend your initial interactions sending messages to other people on your team.
Instant messages in Teams happen in channels. A channel is a place where people can type messages, add files, and share links. I like to think of a channel like a virtual water cooler. You go there to communicate with colleagues, learn and share gossip, and generally stay in touch with your social circle.
A channel lives inside of a team, and a team can contain multiple channels. You can name a channel anything you want. I recommend using a name that describes the purpose of the channel. For example, you could name your channels channel01, channel02, channel03, and so on, but these titles aren’t descriptive. Are you creating a channel that people in your team will use to discuss carpooling to and from work? Name the channel Carpooling. Or do you want to create a channel for accounting and another for human resources? Name them Accounting and Human Resources, respectively. Or perhaps a group of people want to discuss the new policy of allowing pets in the office. Create a channel called Pets. You get the point.
A channel can contain multiple conversations happening at the same time. To try to make these conversations easier to follow, Teams groups them together in what are known as threads. A thread is simply a topic of conversation. When someone types a brand-new message, it appears in the channel, and any replies to that original message are placed underneath. If someone else types a different message for a different topic, it will become its own thread and any responses to that message will be grouped under the original message.
In Figure 4-1, you can see that I am creating a brand-new topic of conversation in the General channel (“Hello”). If I want to reply to the existing topic, I will click the Reply link at the bottom of the “Hello” thread. If I want to start another new topic, I will click the New Conversation button at the bottom of the message window to open the primary text box to begin a new conversation.
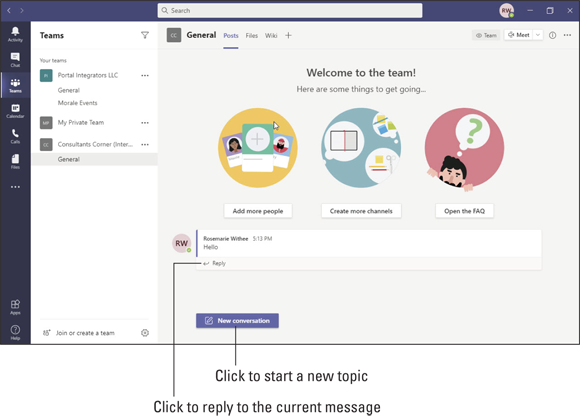
FIGURE 4-1: Starting a new topic of conversation.
Sending Messages in Channels
Whenever you create a new team, a channel is created for that team automatically. Called “General,” this channel is perfectly acceptable to use to start chatting with others on the team. (See Chapter 3 for a reminder on how to create your first team.)
To send a message in the General channel, follow these steps:
Select the Teams icon in the left navigation pane to view all your teams.
Under each team, you will see a list of channels that are available to you. If this is a new team, you will only see the General channel until more channels are created.
 In addition to the channels available to you, there may be private channels in the team that you don’t have access to. There could also be channels that are public but that you have not joined. The list of channels you see under a team might not be inclusive of every channel that team contains.
Select the General channel, as shown in Figure 4-2.
When you click a channel, it opens in the main part of the screen.

FIGURE 4-2: Selecting the General channel that was automatically created when the Team was created.
- Click the New Conversation button that appears at the bottom of the screen.
Type a message in the text box that appears and click the Send icon, which looks like a paper airplane (or press the Enter key).
Your message appears in the General channel screen.
Congratulations! You are sending messages!
Notice above your message that Microsoft Teams is giving you some hints about adding more people, creating more channels, and opening the Frequently Asked Questions (FAQ). These buttons that appear in new channels are shortcuts for you. You can achieve these same tasks without using these shortcuts, and you will find out how later in this chapter.
Creating a New Channel
As you use Teams more, you will want to create chat channels for other topics so that everything does not happen in one “general” channel. For example, you might want to create a channel for your team to discuss finances, another for carpooling, and another for team morale events. Team conversations can be organized in endless ways. The only thing that matters is what works for your team.
To create a new channel in your team, follow these steps:
- Select the Teams icon in the left navigation pane to view all your teams.
Click the ellipsis to the right of the team to which you wish to add a channel.
The More Options drop-down menu appears.
Choose Add Channel, as shown in Figure 4-3.
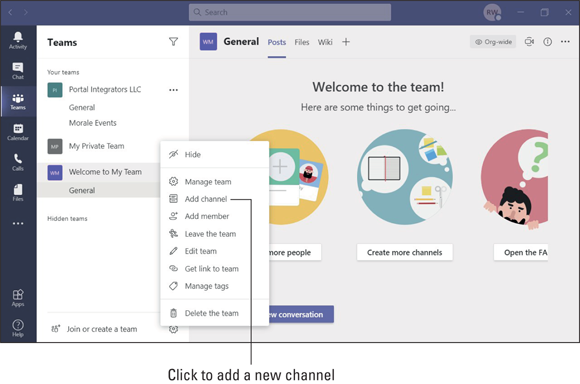
FIGURE 4-3: Choosing Add Channel from the settings menu for a team.
 If this option isn’t shown in the drop-down menu, you don’t have permission to create a new channel. If you are a guest to a team, your ability to create teams and channels can be limited. I discuss setting team member permissions in Chapter 13.
Enter a name and description for the channel in the dialog box that appears and then click Add, as shown in Figure 4-4.
The new channel appears under the team as shown in Figure 4-5.
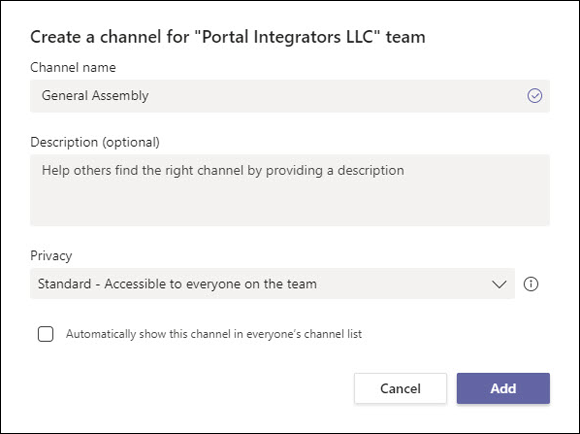
FIGURE 4-4: Filling in the dialog box to create a new channel.
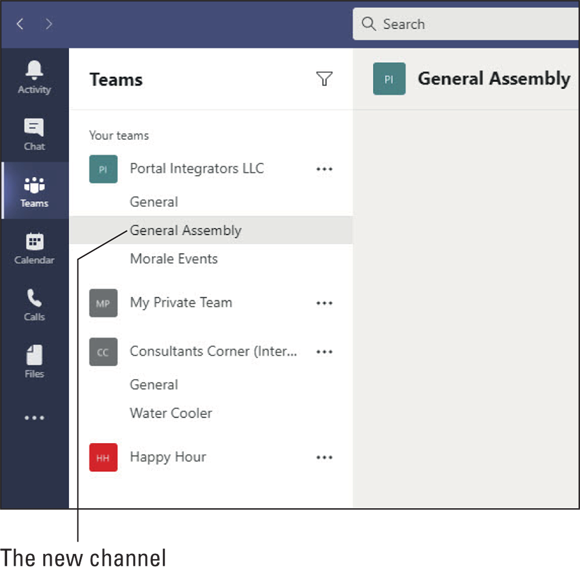
FIGURE 4-5: A new channel in a team.
Note that when you create a new channel, you can set a few options. First, you can set the privacy settings as shown in Figure 4-4. The options include Standard and Private. A standard channel is accessible to everyone on the team by default. A private channel is only accessible to a specific group of people. When you select Private you then have the option on the next screen to add members to the channel. You can always add additional people to a private channel at any point in the future.
Second, you can also select the box to have this channel automatically show up for every person in the team. If you don’t select this box, the channel will show up as hidden, and people will need to click a button to see it in the list of channels in the team. I cover hiding and unhiding channels in Chapter 8.
 A channel is part of a team. A team can contain multiple channels, and each channel can contain its own threads of conversation. You can create chat channels for any topic you want. I have seen teams have a lot of success breaking out work-related channels from non-work-related channels, such as morale events in one channel and budget discussions in a different channel.
Some things to keep in mind with channels are:
- Each team can have a maximum 200 standard channels.
- Each team can have a maximum of 30 private channels with a maximum of 250 members each.
- Making a copy of a private channel doesn’t copy over the channel’s members.
- You can search using keywords in standard or private channels.
- Guest users cannot create private channels.
Configuring a Channel
You can configure many different settings for a channel via the More Options drop-down menu. As shown earlier in Figure 4-3, you access these additional options by clicking the ellipsis next to the channel name you wish to manage. Figure 4-6 shows the More Options drop-down menu that appears next to the new channel we created in the previous section. The options that appear for a channel you add include the following:
- Channel notifications: You can configure the notifications you receive for this channel. This is important as your organization’s use of Teams increases. Teams can quickly become noisy with everyone chatting about all manner of topics. You can use this setting to turn down the noise for channels that are less important to you and turn up the volume for topics you need to pay close attention to. The channel notifications submenu is shown in Figure 4-7.
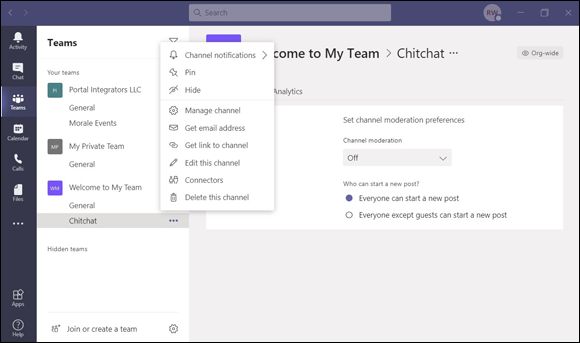
FIGURE 4-6: The More Options menu for a team’s channel.
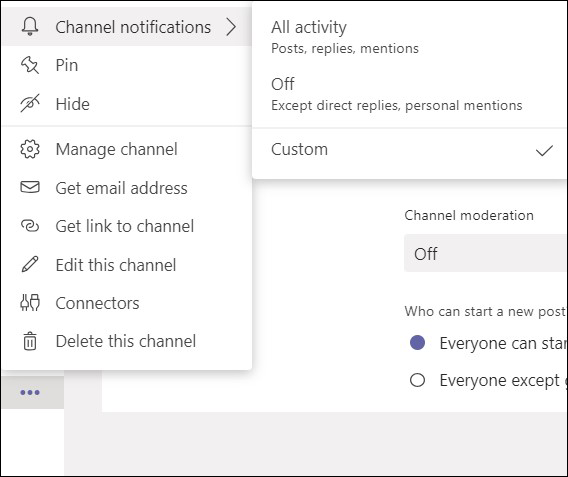
FIGURE 4-7: Setting channel notifications.
- Pin: Select this option to keep a channel at the top of your list of channels. You can pin multiple channels and arrange them in any order you want.
- Hide: Select this option to hide the channel from the list of channels you have in the team. You can always unhide the channel at any time. You will see a little message that lets you know how many channels you have hidden, and you can click it to see those hidden channels. I cover this behavior in more detail in Chapter 8 as it is something you will need to become familiar with as the number of teams and channels grows and start to become overwhelming.
- Manage channel: This option allows owners of the channel to manage the permissions for the channel, as shown in Figure 4-8. You can allow others to moderate the channel and control who can post new messages to the channel. See “Adding Moderators” later in this chapter for more on adding moderation to a channel.
- Get email address: A cool feature I use all the time is the ability to send an email message directly to a channel. You can configure the channel so that if you send an email, the message appears in the channel. (I send a copy of my email messages to my channels all the time!) Figure 4-9 shows the email address for the private channel I created in Chapter 3. Whenever I send an email message to this address, it appears in the channel, as shown in Figure 4-10.
- Get link to channel: You can quickly get overwhelmed with the number of teams and channels in your organization. When you want to tell people about a channel, you can send them a direct link to the channel. You can get the link by using this option.
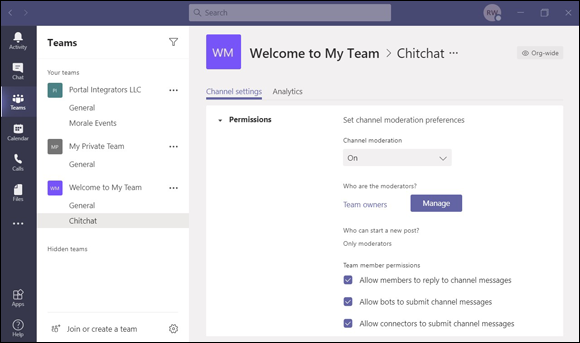
FIGURE 4-8: Managing the moderators and permissions for a channel.
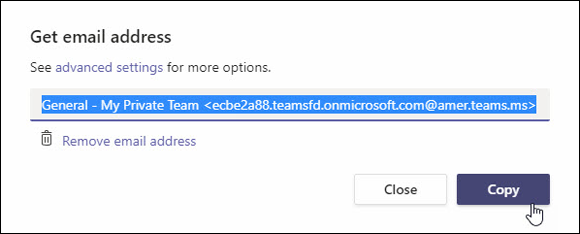
FIGURE 4-9: Obtaining the dedicated email address to send email directly to the channel.
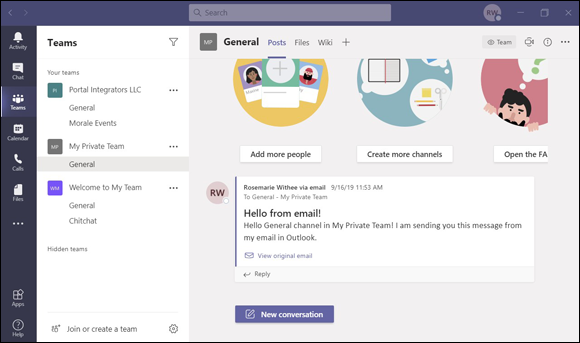
FIGURE 4-10: Viewing an email sent to the channel.
- Edit this channel: When you first created the channel, you set the title and description. You can change those settings with this option.
- Connectors: Connectors are add-on apps. Think of them as custom extensions to Teams that you can add to a channel in order to connect with other software services. They allow you to connect other apps to your channel. There are many types of connectors, as shown in Figure 4-11. For example, you can connect your channel to GitHub or Zendesk or seemingly any other app out on the Internet. Check out Chapter 5 for more detail on adding apps and using connectors in Teams.
- Delete this channel: When you are ready to remove a channel, you can choose this option to delete it.

FIGURE 4-11: Viewing some of the connectors that are available for a channel.
Be careful of the ellipsis you click to open the More Options drop-down menu. Figure 4-3 illustrates opening the menu for a team, while Figure 4-6 illustrates opening the menu for a channel. Channels appear underneath the team name, but it is easy to select the wrong ellipsis because they appear very close to each other.
Adding Moderators
One way to keep the team channel organized is to assign moderators. Moderators may only be assigned by team owners. With moderation, only an assigned moderator is able to start new posts and decides whether members are able to reply to posts or not. Using moderation allows you to leverage subject matter experts for a channel and ensure that their voices are heard. Think of a moderator as an air traffic controller. They can help things keep moving and avoid collisions.
The General channel and private channels do not have moderators by default. To turn on moderation for a standard channel, follow these steps:
- Click the ellipsis next to the channel name to which you want to add a moderator and choose Manage channel.
- On the Channel settings tab, select On for Channel moderation as shown earlier in Figure 4-8.
Click the Manage button to select who can be a moderator and then select which options require moderation.
You can allow or disallow members to reply in the channel and bots or connectors to submit messages.
Your changes are saved as you make them so there is no need to click a save button.
A team moderator can do the following:
- Start new posts. Note that only moderators can start new posts when moderation is turned on.
- Add and remove team members as moderators to a channel. Moderators, however, cannot remove a team owner as a moderator.
- Control whether team members can post replies to existing channel messages. The moderator can also control whether bots and connectors can make changes as well.
Moving from a Channel to a Chat
The various ways you can communicate within Teams can quickly become confusing. As a quick recap, a team is a group of people, and a channel is an ongoing conversation within the team. You can be in multiple teams and each team can have multiple channels.
The nice thing about this system of communication is that it has structure. You can always select a team from the left navigation pane and see the channels in that team. However, you might also need to just chat with someone or with groups of people, and you don’t want to go through the process of setting up a new team or channel. Teams has you covered with a concept called chat. You find the Chat icon in the left navigation pane just above the Teams icon, as shown in Figure 4-12.
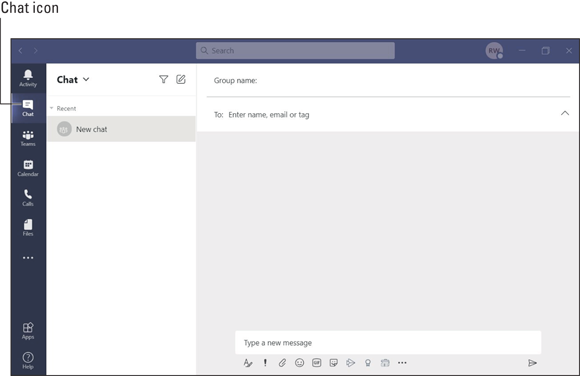
FIGURE 4-12: The Chat feature of Teams.
A chat is an ad hoc conversation between two or more people.
Click the Chat icon to see a list of all your open chats. If you remember using AOL Instant Messenger, Skype, or most any other chat application, you may recognize that each chat item is like a window. However, instead of a new window for each chat, each chat appears as an item in the list. Click a chat and you see the main window refresh to show that conversation.
Starting a private chat
You can start a private chat by selecting the New Chat icon, which is located to the right of the Filter icon at the top of the chat list. The New Chat icon looks like a piece of paper with a pencil on it (see Figure 4-13). When you select the icon, a new chat appears in the main pane of the Teams workspace. You type in the name of the person you want to send a chat message to in the To: field, and then click that person’s name to add that person to the chat. Once you have added the person to the chat, you can send a message just like you do in a channel. You type your message in the text box at the bottom of the chat area and press the Enter key on your keyboard or select the Send icon, which looks like a paper airplane.
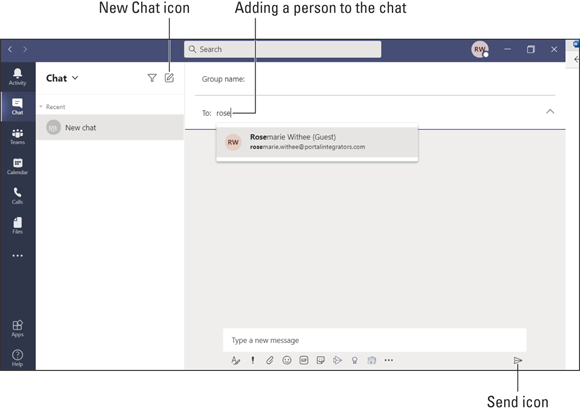
FIGURE 4-13: Starting a new chat in Teams.
Adding multiple people to a chat
The previous section covers how to start a new chat. You can chat with multiple people by adding them in the To: line when you start the chat. However, you may find that you want to add more people to an existing chat.
To add more people to a chat that has already started, select the Add People icon that appears in the top-right corner of the chat window (see Figure 4-14). Then, type in the names of the people you want to add in the Add dialog box. If you are chatting with only one person and you add another person, a new chat will appear with the three people in the chat. If you already have three people in a chat and you add a fourth person (or more), you will be presented with the option of including the chat history for the new people you are adding.
 If you are chatting with one person, you cannot add another person to the same chat and share the history of the personal chat with the new third party. The feature of adding people and keeping the history of the chat only appears when there are at least three people already in the chat. Microsoft has said that this is done for privacy reasons and the expectation that if there is a one-on-one chat happening, Teams should not allow one person to share that confidential chat with other people.
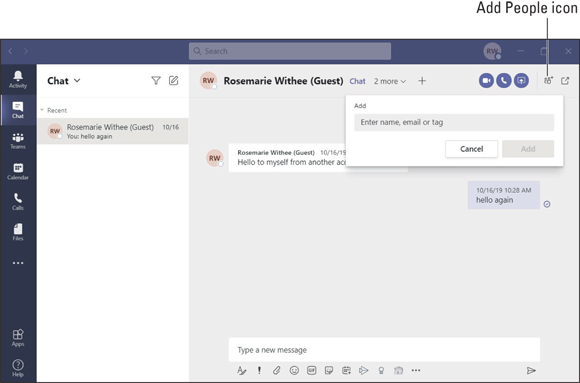
FIGURE 4-14: Adding additional people to a chat.
Giving a chat a title
By default, a chat is listed in your chat list with the names of the people in the chat. Often a chat will take on a life of its own as more and more people are added, and the chat becomes the central point of communication for a topic. When this happens, I find it helpful to give the chat a title so that when I am looking through my list of chats, I can quickly remember the topic of that chat.
To add a title to a chat, click the pencil icon at the top of the chat and type in a name, as shown in Figure 4-15.
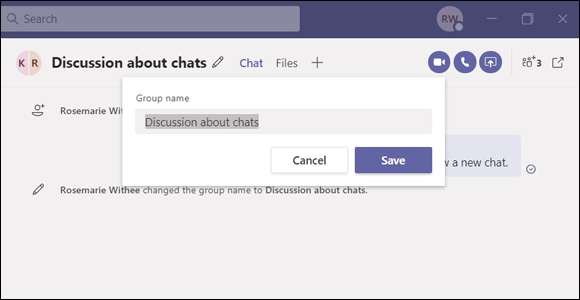
FIGURE 4-15: Adding a title to a chat.
Pinning a chat to the top of the list
In addition to giving a title to a chat, you can also pin a chat so that it always appears at the top of the list. By default, chats are listed in order with the most recently used chat at the top. What I will do is pin a chat to the top of the list so that I can quickly get to that chat even if it has been a few days since anyone has added a message to it.
To pin a chat, select the ellipsis next to the chat in the left navigation pane and choose Pin from the More Options drop-down menu, as shown in Figure 4-16.
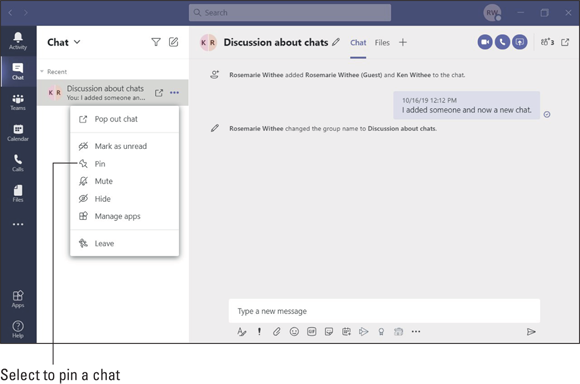
FIGURE 4-16: Pinning a chat to the top of the list for quick access.
Sending More than Text When Chatting
Entering text into a channel or chat is the most common way of sending your message to others on the team. However, you can send more than just text. You can send emojis, GIFs, stickers, and even attach files. These options appear at the bottom of the text box where you type in your message, as shown in Figure 4-17.
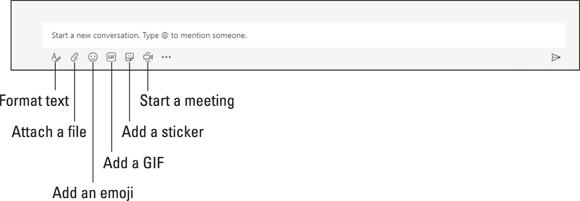
FIGURE 4-17: Additional chat options.
Adding emojis, GIFs, and stickers
Emojis are little icons that display an emotion. For example, a smiley face shows happiness and a sad face shows sadness. You will find emoji icons of all shapes and sizes and meanings. You can send an emoji by clicking the emoji icon and then selecting the emoji you want to use (see Figure 4-18).

FIGURE 4-18: Adding an emoji to your message.
Teams includes text shortcuts you can type so that you don’t have to select an emoji with your mouse from the list of options shown in Figure 4-18. For example, to send a happy face, you can type a colon (:) followed by a closing parenthesis ( ) ). When you type this sequence of characters, the happy face emoji will automatically be added to your chat. You can also type a keyword inside of parenthesis in order to create an emoji icon. Some of the common emojis and their shortcut words are shown in Figure 4-19. The entire list can be found at https://365trainingportal.com.
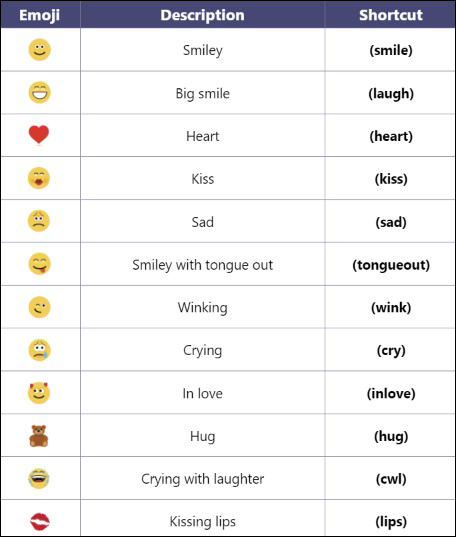
FIGURE 4-19: Microsoft Teams emoji shortcuts.
A GIF is an animated picture. Microsoft Teams includes several GIFs that are popular. For example, there might be a cat yawning or a reaction of a character from a popular television show. You can include these short video clips in your chat message as GIFs by clicking the GIF icon at the bottom of the text box.
Stickers are short little comic strip–type images. For example, a drawing with a speech balloon over the person. If you have ever read the Dilbert comic strip, then you can picture what these stickers look like. Microsoft Teams includes a lot of popular stickers, and you can add your own as well. Adding a sticker to your message is shown in Figure 4-20.
Adding a file
In addition to fun emojis, GIFs, and stickers, you can also add a file to the chat message. For example, you might be working on an Excel spreadsheet and you want to include it in the chat. You can add the file to your chat message using the paperclip icon, as shown in Figure 4-21. You can choose a recent file you have been working on, browse the files already uploaded to Teams, choose a file from OneDrive, or upload a file from your local computer.
When you attach a file to a channel, the file appears in the Files tab at the top of the channel. The Files tab is a SharePoint site behind the scenes. You can spot the Files tab at the top of Figure 4-21 in between the Posts tab and the Wiki tab.
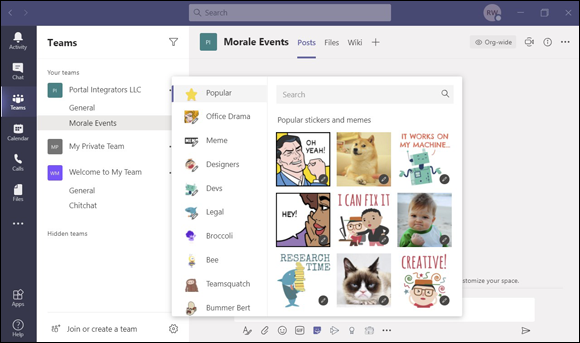
FIGURE 4-20: Adding a sticker to your message.
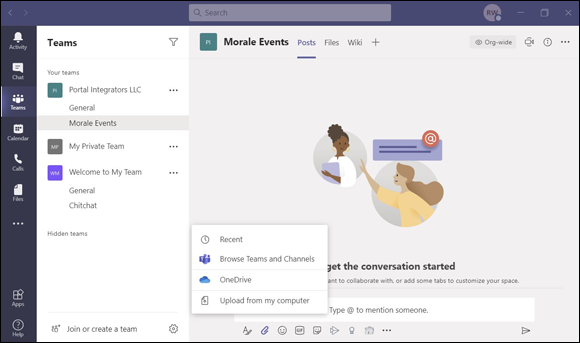
FIGURE 4-21: Attaching a file to a message to send to a channel.
Reacting to chat messages
When someone types a message, you can react to it instead of or in addition to responding to it. To react to a message means to acknowledge you’ve seen the chat. For example, you can react with an emoji such as a thumbs up, a surprise emoji, or many others. To react to a message, you either hover your mouse over the message or select the ellipsis if you are using a mobile device and touchscreen, and then select the reaction. In Figure 4-22 I am reacting to a message with a thumbs up emoji to indicate that I like the message and acknowledge it.

FIGURE 4-22: Reacting to a message with a thumbs up.
If someone else has already given a reaction, such as a thumbs up, then your reaction will increase the number that appears next to the same reaction. For example, if your coworker gave a thumbs up, and you reacted with the same thumbs up, then a small number 2 will appear next to the thumbs up emoji. Reactions can be important to acknowledge a message without having to type out a response.