
Chapter 12
Letting Teams Be Your Personal Operator
IN THIS CHAPTER
![]() Customizing incoming calls
Customizing incoming calls
![]() Limiting Teams with permissions
Limiting Teams with permissions
![]() Using modern voicemail
Using modern voicemail
![]() Setting up devices, auto attendants, and call queues
Setting up devices, auto attendants, and call queues
In the past, only the most senior executives had administrative assistants who would answer their calls and route them appropriately. With Microsoft Teams, everyone can set up rules to route their incoming calls and handle voicemail. Teams will even transcribe voicemail for you so you can read the message and determine if it is worth getting to right away, or if it is something that can wait.
Also in the past, advanced voice-system features such as phone trees and call queues were the realm of only the largest organizations. Teams provides these capabilities to organizations of any size.
In this chapter, you learn how to tell Teams when and where to ring your incoming calls. You discover how to create rules to automatically forward calls and limit how and when you receive calls so you can maintain focus without getting interrupted. You also find out how voicemail works in Teams and how to get it set up. In addition, you learn how to assign delegates who can work with Teams on your behalf, how to configure permissions, and how to set up notifications and privacy, auto attendants, and call queues for your organization.
Setting Up Audio Devices in Teams
A traditional telephone is pretty straightforward. It usually includes a cradle and a handset that contains both the speaker and the microphone so that you can hear the call and speak to the person on the other end of the call. Using Teams for calls introduces many additional dimensions to this old way of using a telephone.
When using Teams to make and receive calls, you can set up multiple audio devices and configure them in several different ways. For example, you might have a speakerphone and a headset plugged into your computer. You might prefer the speakerphone to ring when you get a call so that you can hear it ring without wearing your headset. You might also prefer to answer the call and communicate with the other person only using your headset. Or, if there are others around you who need to hear the call, you might want to switch the call to use the speakerphone. You can configure all of this using Teams.
To set up the audio devices you use with Teams to make and receive calls, follow these steps:
Log in to Teams and select Settings from your profile drop-down menu, as shown in Figure 12-1.
The Settings screen appears.
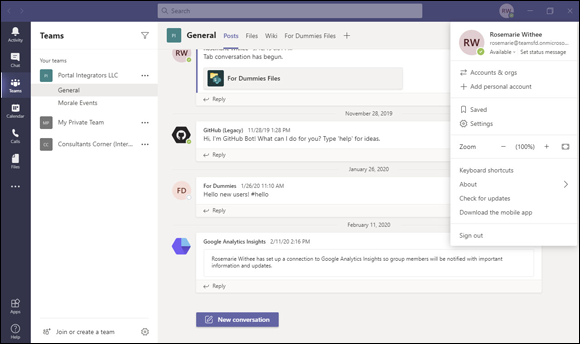
FIGURE 12-1: Opening Teams settings from your profile drop-down menu.
On the Settings screen, select Devices in the left navigation pane.
The speakers, microphones, and cameras that are attached to your computer are displayed, as shown in Figure 12-2. You can select which device to use for your microphone, your speaker, and your camera. You can also choose a secondary ringer, which allows you to direct the ring to a speaker or speakerphone and still answer the call using your headset.
To make a test call to test your settings, click the Make a Test Call button (see Figure 12-2).
You will hear a recording that guides you to say a few words to test your microphone and speaker. After the recording, a results page will be displayed, as shown in Figure 12-3. If any device is not working properly, you will see a red triangle next to that device. In this example, I didn’t have a camera configured, but the microphone, speaker, and network were working fine.
 Since Teams uses the Internet, it is important you have a fast Internet connection. I use this test frequently to see if there are any network problems that might cause problems with my phone calls.
FIGURE 12-2: The devices section on the Teams Settings screen.
After you have configured the settings, close the window by selecting the X in the top-right corner of the screen.
You don’t need to save the settings; they are saved automatically as you adjust them.

FIGURE 12-3: Making a test call in Teams.
If you are already in a Teams meeting, you can change your device settings by selecting the ellipsis from the meeting information toolbar and then selecting Show device settings, as shown in Figure 12-4.

FIGURE 12-4: Opening device settings while in a Teams meeting.
Customizing How You Receive Calls
You can customize Teams to receive calls in a way that makes the most sense to your circumstances. You can set rules that tell Teams what to do with incoming calls. You can have Teams ring you on the device you are currently using, or you can forward your calls to voicemail, to another phone number, or even to a group of people. You can even set Teams to do these things only after you don’t answer.
One of the nice things about Teams is that it is a software app that you can install on many devices. I recommend installing it on multiple devices, such as your laptop or desktop computer, mobile phone, and tablet. When you set Teams to ring you, Teams will ring you on whatever device you are using when you are currently logged into Teams. So, to get your calls in Teams, all you need to do is log in to the app. Teams doesn’t care which app you are using — you can even use the web app without installing Teams!
One rule I like to set up is to have my mobile phone number ring if someone calls my office number, which is in Teams.
To have another phone number ring if someone calls your Teams number, follow these steps:
- Log in to Teams and select Settings from your profile drop-down menu.
- On the Settings screen, select Calls in the left navigation pane.
Make sure the Calls Ring Me radio button is selected, and then in the Also Ring drop-down menu, select New Number or Contact, as shown in Figure 12-5.
You can also forward your calls in this screen by selecting the Forward My Calls radio button.
Enter the phone number you want to ring at the same time someone calls your Teams number.
You can also enter a Teams contact here instead of using a phone number.
After you have configured the settings, close the window by selecting the X in the top-right corner of the screen.
You don’t need to save the settings; they are saved automatically as you adjust them.
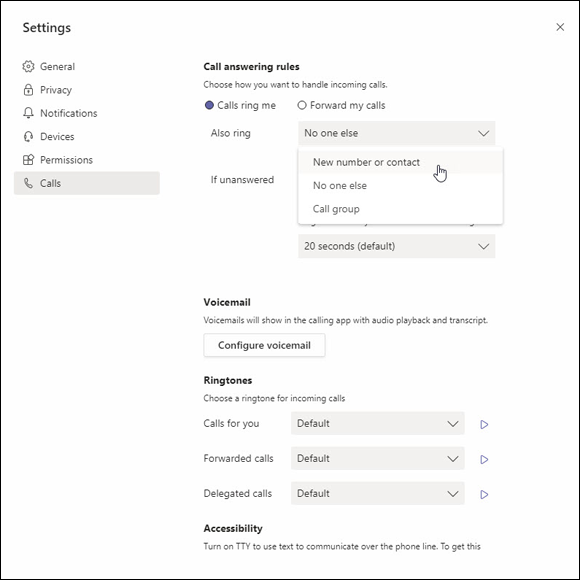
FIGURE 12-5: Entering another phone number or contact to ring when your Teams number is called.
Restricting Calls with Do Not Disturb
When you set your status as Available, Busy, Do Not Disturb, Be Right Back, or Appear Away in Teams, it also affects how you receive phone calls. (See Chapter 3 for more details about setting your status.) There are times when I like to set my status to Do Not Disturb so that I don’t receive phone calls. However, if there is an emergency, I want family members to be able to reach me.
To set your status to Do Not Disturb, click your profile image in the top-right corner of the Teams window. From the drop-down menu that appears, hover over your current status and select Do Not Disturb from the status options.
To allow someone to call even when you have Do Not Disturb set, follow these steps:
- Click your profile icon in the upper-right corner of the Teams app.
Select Settings from the available options in the drop-down menu.
The Settings dialog box appears.
- Select Privacy.
- Under the Do Not Disturb section, click the Manage Priority Access button.
Add the person you want to be able to send you chats, messages, and calls while your status is set to Do Not Disturb.
Once the person is added to the list, you can close the dialog box. Your settings are saved automatically.
Delegating Access to Others
If you have an administrative assistant, or would otherwise like to delegate access to your Teams account to someone else, you can allow that person to access your Teams features on your behalf without sharing your password. This is handy when an admin needs full control over your calendar and communications system, for example. When you delegate access to your Teams account to someone else, that person can make and receive calls from your Teams phone number, and work with meetings on your behalf.
 When you add a delegate to your account, that person has full control of your Teams features and acts on your behalf in Teams.
To add a delegate to your Teams account, follow these steps:
- Log in to Teams and select Settings from your profile drop-down menu.
- On the Settings screen, select General in the left navigation pane.
Select Manage Delegates, as shown in Figure 12-6.
The Delegate Settings screen appears where you will see the People You Support tab, which lists who you have delegate access for, as well as the Your Delegates tab, which shows the people you have designated as your delegates.
- Select Your Delegates and then type in the name of the Teams user you want to add as a delegate, as shown in Figure 12-7.
Set the permissions for the delegate.
You can choose to allow the delegate to make and receive calls on your behalf as well as change your call and delegate settings, as shown in Figure 12-8.
- Select Add to add the new delegate.
Close the window by selecting the X in the top-right corner of the screen.
You don’t need to save the settings; they are saved automatically as you adjust them.
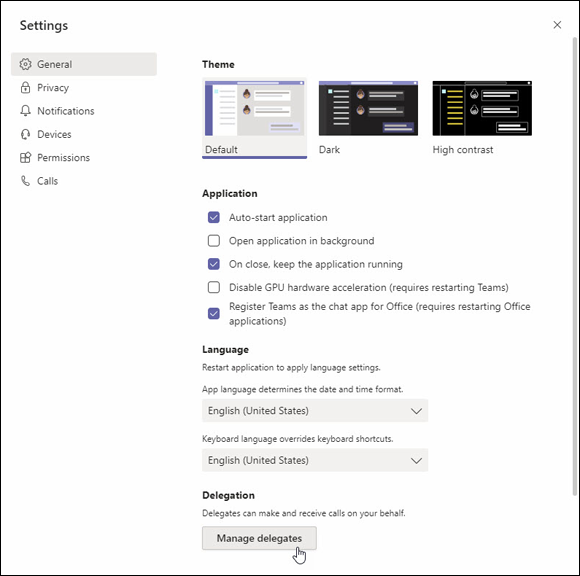
FIGURE 12-6: Accessing the delegate management screen in Teams.
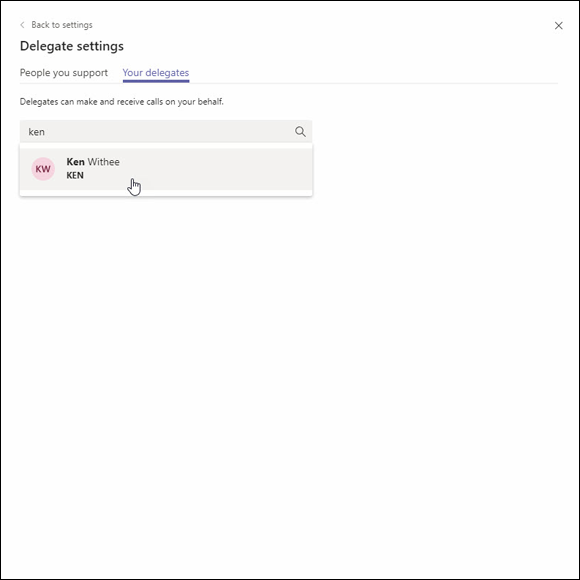
FIGURE 12-7: Adding another Teams user as a delegate.
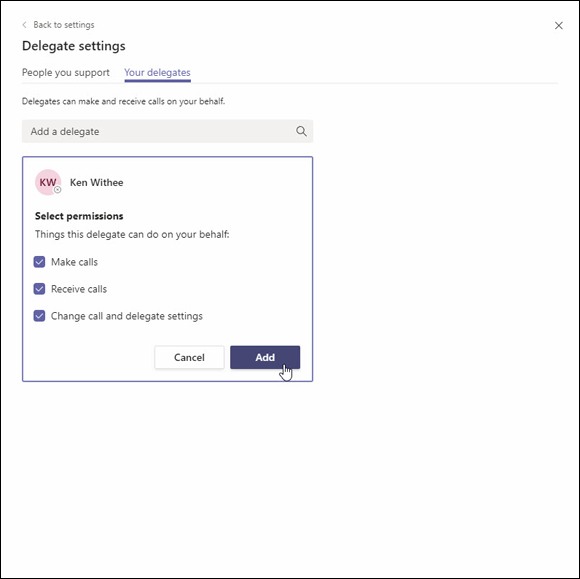
FIGURE 12-8: Setting permissions for a new delegate.
You can change the permissions for a delegate or remove them by navigating back to the same screen you used in the above procedure and then selecting the ellipsis next to their name in the list.
Digging into Modern Voicemail
If you are like me, you might find it a rare occurrence when someone calls you when you are not busy with something else and can answer the call. Voicemail provides a mechanism for people to leave a message when they call, and for you to retrieve the message when you have the time. Teams offers voicemail, but you must set it up before people can leave messages for you.
To set up voicemail in Teams, follow these steps:
- Log in to Teams and select Settings from your profile drop-down menu.
- On the Settings screen, select Calls in the left navigation pane.
Select the Configure Voicemail button, which is shown in Figure 12-5 earlier in this chapter.
The setup screen for voicemail appears, as shown in Figure 12-9. You can record a greeting, set rules for when voicemail should be used, select the language of a default greeting, and set a custom out-of-office greeting. You can even trigger the out-of-office greeting to play based on events in Outlook, such as when you have an out-of-office message set for email or when you have a calendar event where you are listed as “out of office” on your status.
When someone calls your phone and you don’t answer, you can send the call to voicemail, send the call to another person automatically, or give the caller the option. I find that giving the incoming caller the option of leaving a voicemail message or being transferred to someone covering for me while I am out of the office is particularly valuable. You can see the options in Figure 12-10.- Click OK to save your settings.

FIGURE 12-9: The Voicemail screen in Teams.
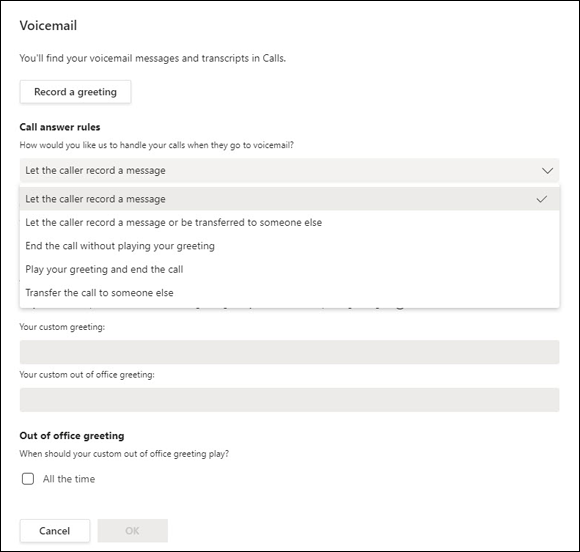
FIGURE 12-10: Call answering rules for voicemail.
Understanding Phone Number Types
In Chapter 11, you discover how to obtain and assign a phone number in Teams. A phone number can be assigned for different uses. Teams offers four types of phone numbers for different uses: subscriber numbers, conference bridges, call queue numbers, and auto attendant numbers, each of which are described here:
- Subscriber: This is the basic phone number you assign to a person. You can think of it as a regular phone number you would use to make and receive calls in Teams. (Chapter 11 walks you through assigning a subscriber number to a Teams user.)
- Conference bridge: A conference bridge is a phone number you can use for large meetings. Multiple people can call into the same number and all talk together. When I signed up for the Microsoft 365 E5 plan, a conference bridge was automatically assigned for Teams use.
- Call queue: A queue is a line in which the first in the line is the first out. A call queue works similarly, but the “line” is made up of people who have called into a particular phone number. For example, if you have a phone number that people will call for support, you want to use a call queue. Your support agents answer the phone as calls come in, and if there is a backup, the new callers will be placed on hold in the queue. While on hold, the callers will listen to hold music until someone is available to take the call.
- Auto attendant: When you need to route calls to different people and different departments, you want an auto attendant. An auto attendant provides phone-tree functionality. For example, when you dial the number, you might hear a recording that directs you to “press 1 for sales, 2 for support, and 3 for billing.” The auto attendant feature is what makes this possible in Teams.
A conference bridge, call queue, and auto attendant phone number can be obtained as either a toll or toll-free number. (Refer back to Figure 11-5 in Chapter 11 to see these options.)
Taking calls in an orderly fashion with call queues
A call queue is a line of calls that you can answer in the order in which they were received. A call queue is a simple concept, but has always been considered a phone-system feature reserved for large organizations. Microsoft Teams brings call queues to organizations of any size. When a call comes into a call queue number, it is sent to a Teams user who can answer it. If everyone who can answer the line is already busy on another call, the person calling is placed on hold until someone is available.
To set up a call queue, you must have a resource account. You can think of a resource account as an Office 365 account that is for resources instead of the usual accounts that are for people. You manage your resource accounts in the Teams Admin Center by selecting Org-Wide Settings in the left navigation pane. (Refer to Chapters 13 and 14 for more details about the Teams Admin Center and setting up resource accounts.)
To set up a call queue, follow these steps:
Open your favorite web browser and log in to the Teams Admin Center at
https://admin.teams.microsoft.com.Refer to Chapter 13 for more details on logging into the Teams Admin Center.
In the left navigation pane, select Voice and then select Call Queues.
The Call Queues screen is displayed, and you can see a list of any existing call queues.
- Select +Add to create a new call queue, as shown in Figure 12-11.
Configure the new call queue and then select Save.
Figure 12-12 shows a portion of the call queue configuration screen. When you are finished configuring your call queue, your new call queue will show up in the list that was shown in Figure 12-11.

FIGURE 12-11: The Call Queues screen in the Teams Admin Center.
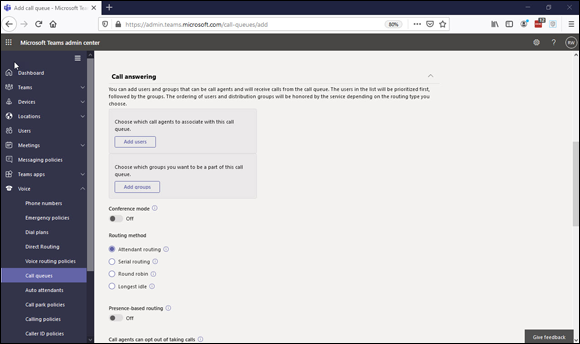
FIGURE 12-12: A portion of the Call Queues configuration screen.
Call queues can quickly become complicated, and the details of them are beyond the scope of this book. A good place to learn more is the Microsoft documentation site for administrators located at https://docs.microsoft.com. Navigate to the Teams content and search for call queues.
Routing callers with auto attendants
An auto attendant is a phone-system feature that routes incoming calls to the appropriate people or departments within an organization. When a call comes into an auto attendant, the caller hears a recording that lists several options, such as “press 1 for English or 2 for Spanish.” The auto attendant then routes the call to the correct person or group depending on how the caller navigates the tree of options.
To set up an auto attendant in Teams, follow these steps:
Open your favorite web browser and log in to the Teams Admin Center at
https://admin.teams.microsoft.com.Refer to Chapter 13 for more details on logging into the Teams Admin Center.
In the left navigation pane, select Voice and then select Auto Attendants.
The Auto Attendants screen is displayed, and you can see a list of any existing auto attendants.
- Select +Add to create a new auto attendant, as shown in Figure 12-13.
- Configure the new auto attendant by navigating through the wizard.
Select Next to navigate each screen and then select Submit when finished.
Your new auto attendant will show up in the list that was shown in Figure 12-13.
Auto attendants can quickly become complicated, and the details of them are beyond the scope of this book. A good place to learn more is the Microsoft documentation site for administrators located at https://docs.microsoft.com. Navigate to the Teams content and search for auto attendants.
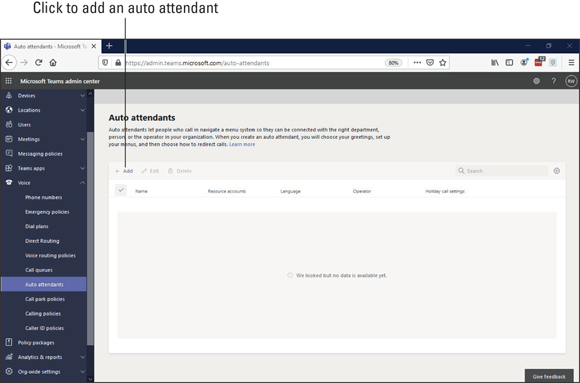
FIGURE 12-13: The Auto Attendants screen in the Teams Admin Center.