
Chapter 9
Working Remotely: Embracing Teams to Make Meetings Better
IN THIS CHAPTER
![]() Scheduling and joining meetings
Scheduling and joining meetings
![]() Using Outlook to organize meetings
Using Outlook to organize meetings
![]() Dividing into breakout rooms
Dividing into breakout rooms
![]() Creating a shared space with Together Mode
Creating a shared space with Together Mode
The year 2020 was the year of remote work. Companies and organizations that weren’t used to conducting business remotely suddenly had to adapt to working from home as the coronavirus pandemic caused many governments to issue stay-at-home orders. Although working from home provided the convenience of having no commute, it also meant that so many were now working by themselves. The lack of social interaction during a workday can be isolating.
In this chapter, you take a look at how two Teams features — breakout rooms and Together Mode — can help create an atmosphere of togetherness with your coworkers. You also take a peek at Teams Live Events, which are productions unto themselves.
But first things first. The chapter starts with an introduction to the different types of meetings Teams offers — scheduled meetings, ad hoc meetings, and private meetings — and you discover how to schedule each one of them. You also learn how to start a meeting and join an existing meeting, and you explore Teams’ built-in conference call and video call capabilities, which enable you to meet with people from all over the world.
Whew, that’s a lot about meetings! Let’s get started.
Getting Up to Speed with Teams Meetings
A meeting is a general term that encompasses everything from a one-on-one chat with a friend to a presentation to hundreds of colleagues. Teams accommodates a variety of meeting types, and the way you set up a meeting in Teams depends on the frequency of the meeting and how many people need to be involved in the meeting.
The three types of Teams meetings include:
- Regular or recurring meetings: Think of this type of meeting as a traditional meeting in an organization. For example, you might have a recurring team meeting that happens every Monday at 11:00 a.m. Or your colleagues might have a regular meeting to go over the latest financial reports with various people throughout the organization. These types of meetings are meetings that are scheduled on your calendar.
- Instant ad hoc meetings: This is a meeting that happens instantly. For example, you might be communicating with a group of people and someone decides that it would be better to call a quick meeting to decide on something.
- Private meetings: A private meeting involves a discussion with another person. I equate this meeting type to picking up the phone and calling someone.
As you work with Teams, keep in mind the type of meetings you can initiate. You can schedule a meeting, start an instant meeting with a group of people, or start a private meeting with another person.
 Use the types of meetings in order to build your mental model of becoming more efficient with Teams. For example, if you need to meet with five people right away, you don’t need to schedule a new meeting on everyone’s calendar. You can use the Meet Now functionality to start an ad hoc meeting, which I discuss how to do later in this chapter.
Viewing Your Calendar in Teams
If you are a veteran of Microsoft Office, you are surely familiar with Outlook. Microsoft Outlook is an app that is part of the Office suite of products that you can use to manage your email, calendar, and contacts. Microsoft Teams integrates with Outlook and shines when you use Outlook to manage and conduct your Teams meetings. If you are like me, you welcome any help you can get to make your calendar and meetings schedule more organized and streamlined.
Just as you can view your calendar in Microsoft Outlook, you can view your calendar in Microsoft Teams. Your calendar is where your meetings are scheduled and where you can view what meetings you need to attend. Click the Calendar icon in the left navigation pane, as shown in Figure 9-1, to open your Outlook calendar in Teams.
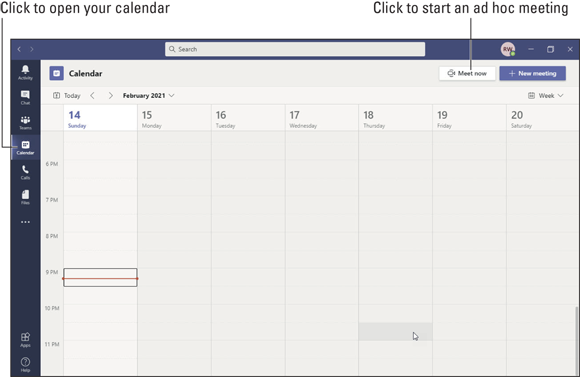
FIGURE 9-1: Viewing your Outlook calendar in Teams.
The Calendar navigational item only shows up as an option in Teams if you have Outlook installed on the same computer. If your Office 365 subscription includes the Office clients, you can install them by logging in at https://office.com. Once you log in, you should see a button that says Install Office on the main landing page. The process is covered in detail in Microsoft Office 365 For Dummies (Wiley).
You can view your calendar in Teams in several ways. You can view by the day, by the week, and by the workweek. You can change the view with the selector in the top-right corner of your calendar. By default, the view selector is set to Work Week.
Creating a New Meeting and Inviting People
With Teams, you can create an instant or ad hoc meeting to connect with someone right away, or you can schedule a meeting for the future that will appear as a meeting on the invitee’s Outlook calendar. To create an ad hoc meeting, click the Meet Now button in the top-right corner of your calendar (shown earlier in Figure 9-1). When you click the Meet Now button, a meeting will be created, and you are instantly able to join it, as shown in Figure 9-2.

FIGURE 9-2: Joining a meeting in Teams.
When you join a meeting in Teams, you have the option of turning on or off your video and microphone before you join.
When you first create a Meet Now meeting, you will be the only one in the meeting. You can invite others to join your meeting by selecting Meeting Participants from the icons that appear in the middle of the meeting window and then writing the name of the person you want to invite.
You can also start an ad hoc audio or video call directly from a chat by clicking the video camera or Phone icon. You will find these icons in the top-right corner of the screen when you are chatting with someone, or when you hover your mouse over the name of a person in a channel. The icons will appear, and you can start an audio or video call with them or even send them a chat or email. I cover chat functionality in Chapter 4.
Meeting instantly is a nice feature, and I use it often. However, many of my meetings are also scheduled in advance and booked on other people’s calendars. This is a task I used to do in Outlook but find myself using Teams for nowadays.
To schedule a new meeting in Teams, follow these steps:
- Click the Calendar icon in the left navigation pane to open your Outlook calendar.
Select the New Meeting button, which is just to the right of the Meet Now button.
Both buttons are shown in Figure 9-1. You are presented with a New Meeting dialog box to set up the meeting, as shown in Figure 9-3.
You can also browse your calendar and click on a day and time to open the New Meeting dialog box.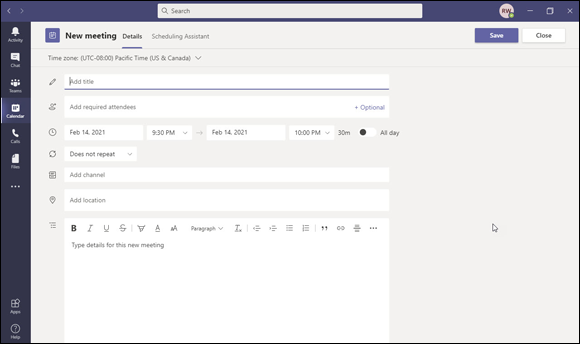
FIGURE 9-3: Scheduling a new meeting in Teams.
- Provide a title, location, date, time, and details for the meeting.
Invite people to your meeting by typing the name of a person into the Invite People textbox.
As you type, Teams offers suggestions of team members based on the name you start to type.
Select the person or people you want to invite from the list of team members.
You can also invite people who are external to your organization if you have that feature enabled. See Chapter 7 for more information about working with external users.
 (Optional) One nuance of a Teams meeting is that you can make the meeting available and open to anyone in an existing Teams channel. To do this, choose the channel you want to access from the Select a Channel to Meet In drop-down menu. When you do this, the meeting will appear in the channel. When the meeting starts, anyone in the channel can join it. In addition, all the chat conversations of the meeting and recording appear in that Teams channel.
I like to think of this option as a transparency feature. Even though I might only need to meet with three people, I can give everyone in the channel the option of joining the meeting. This also lets everyone in the channel view the recording, the chat logs, and any files that were shared. In other words, the meeting is transparent to everyone in the channel, even if only a few were invited. Because I am unable to meet in person with the people I am working with, this has become a lifesaver. We get to be on the same page without much effort.
Once you have added people to the invitation, Teams shows you their availability. The scheduling assistant will also kick into gear and you will see common times when people are available based on their Outlook calendars. To see more detail, you can click the Scheduling Assistant link to view the calendar availability for each attendee. This meeting functionality has been a part of Outlook for a long time, and it is now integrated with Teams.
Select the Schedule button to create the meeting.
A summary of the meeting is displayed, and you can edit it if you made any mistakes.
Once you are satisfied with the meeting, select the Close button to close the New Meeting dialog box.
The meeting is now scheduled on your calendar, as shown in Figure 9-4. In addition, if you selected a Teams channel for the meeting, it will appear in the channel as well (see Figure 9-5).
 The calendar in Teams is tied to Microsoft Outlook. If you open Outlook and look at your calendar, you will see the meeting you just created in Teams, as shown in Figure 9-6. You can also schedule a Teams meeting directly from Outlook. When you are in Outlook, and you want to schedule a Teams meeting, click the button that says New Event in the upper-left corner.
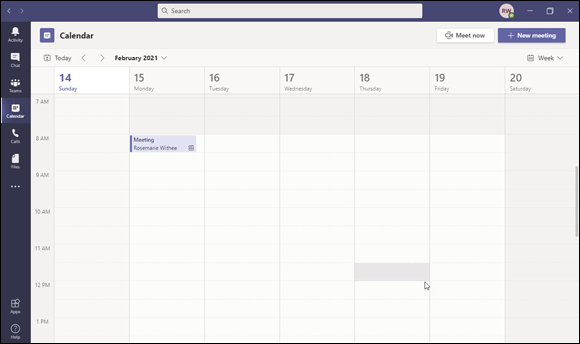
FIGURE 9-4: A meeting on your calendar in Teams.

FIGURE 9-5: A meeting that is shared with a Teams channel.
Outlook integrates with many different types of meeting software. Because Teams comes with many of the Office 365 subscriptions, I see most organizations quickly adopt Teams. However, if your organization uses other meeting software, such as GoToMeeting, you will have a similar experience in Outlook.
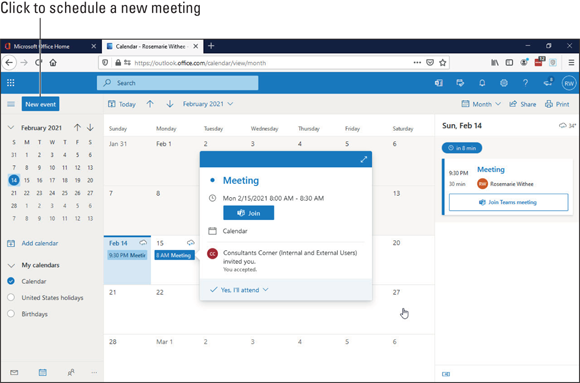
FIGURE 9-6: Viewing a scheduled Teams meeting in Outlook.
If you need to broadcast an event to many people, you can use a feature called Teams Live Events. This feature used to be called Skype Meeting Broadcast, and it is designed for presentations to a very large audience. If your Office 365 subscription includes Teams Live Events, you will see the option to create a regular meeting or create a live event when you click the Schedule Meeting button. (See “What Are Live Events?” later in this chapter for more about Teams Live Events.)
Joining an Existing Meeting
One of the features that has made Teams the fastest growing product in Microsoft’s history is its ease of use in joining meetings. Whether you are part of the organization or not, you can join a Teams meeting with a few clicks of your mouse.
The most straightforward way of joining a Teams meeting is when your organization already uses Microsoft Office. If you are familiar with the meeting reminders that pop up from Outlook, then you already know how to join a Teams meeting. Those Outlook meeting reminders include a Join Online button that connects you to the meeting. When you join a meeting this way, you have the option to turn on or off your web cam or mute your microphone.
You can also find the link to join the Teams meeting by opening the meeting from your Outlook calendar. Click the meeting in your calendar, and the link to join appears in the meeting description, as shown in Figure 9-7. If you are signed in to Teams, you will also get a notification when a Teams meeting starts. The notification lets you know that someone has started the Teams meeting and that you can join.
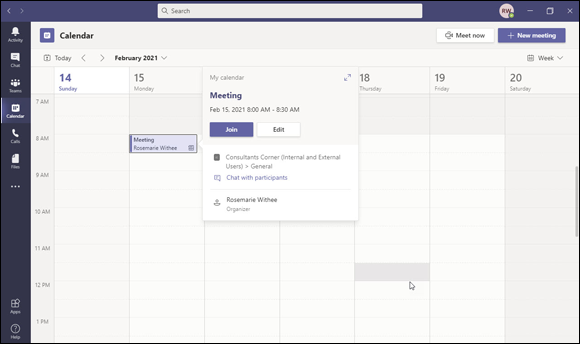
FIGURE 9-7: Joining a Teams meeting by opening an Outlook meeting in your calendar.
You can install Teams on Windows, Mac, and Linux. If you are using a temporary computer, you can use the web version of Teams. You can also install Teams on your mobile device running iOS or Android. However, I find attending meetings to be more productive when I am sitting at a desk using a full keyboard, video camera, and microphone on my laptop or desktop computer. Installing the Teams client is discussed in Chapter 3.
Using Teams for Conference Calls
If you expect people to call into the meeting using a traditional phone number, you can set up Audio Conferencing. Setting up Audio Conferencing requires you to obtain a phone plan, which I cover how to do in Chapter 12. When you set up the Audio Conferencing feature in Teams, a traditional phone number will be assigned to the meeting. Participants will then be able to dial into the audio portion of the meeting using a traditional phone. However, these attendees won’t get the full meeting experience of sharing files and video.
 The Audio Conferencing feature is not available in every country. You can check if it is available in your country by using your favorite search engine and searching for Audio Conferencing in Microsoft Teams. You can also search the official Microsoft site at
 https://docs.microsoft.com.
Connecting with Video
Meetings have evolved over the years. In the old days, everyone would crowd into a room and meet in person. For people who were not in the same location, they could call into a phone number so that everyone could share a line and hear each other. All of that changed when meetings went online with Lync and Skype. Teams is a continuation of these tried and true products, and Microsoft has evolved and consolidated its meeting technology with Teams. In 2020, we saw the explosion of everyone making video calls whether for work, school, or staying connected with family and friends.
Lync was a standard product used for chat and meetings for many years. Then the product name changed to Skype for Business and now Skype for Business has been gobbled up by Teams. If you have experience with any of these past products, you will feel right at home in Teams. The interface is different, but the concepts are still the same.
A Teams meeting can include many different features. At the most basic level, a Teams meeting provides an online chat group, a voice link, and a shared screen where people can present presentations, share their screens, and see each other through video.
A meeting is often more productive and inclusive when you can see the other participants and watch their reactions and facial expressions. Teams works especially well at making a meeting feel inclusive when the conference room also has video of the entire room. That way people offsite and the people in the room can see each other and the presentation at the same time. The people offsite see the presentation and the video of the room on their computer screens. The people in the room see the presentation and the video of those offsite projected on the wall. This functionality makes a meeting with a dispersed team feel very natural and efficient. When I am part of a meeting without video, I always feel like I am on the outside of the meeting and that everyone in the room is on the inside. When there is video, I feel very much connected to the rest of the people because I can see them and they can see me. In order to make this happen, you need to have special hardware designed for Teams, which I cover in Chapter 10.
To conduct a video call in a Teams chat, follow these steps:
Click the Chat icon in the left navigation pane and then select the chat message for the person you want to call.
If you don’t already have a chat going with the person you want to meet with, you can start one by clicking the New Chat icon (which looks like a pencil writing on a paper).
To start a video call, click the video icon in the top-right corner of the chat, as shown in Figure 9-8.
The video call will start ringing the other person and, you can click the video icon or the audio icon to either turn off your video camera or mute your audio button, as shown in Figure 9-9.
You can turn off your webcam and microphone at any time throughout the call as well. For example, maybe you have a child who runs into the room unexpectedly and you want to turn off your webcam for a moment, or your dog starts barking and you need to mute your microphone. Click the video icon or the audio icon and the webcam will be disabled, or the audio will be muted. To enable them again, simply click them again.- When you are finished with the call, click the red hang-up icon and the call will end.

FIGURE 9-8: Starting a video from a chat.

FIGURE 9-9: Calling another person with a video call.
You can start a video call from just about anywhere in Teams. Just hover your mouse over the name of the person you want to call and then select the video icon. You can find all your contacts by selecting the Calls icon in the left navigation pane and then selecting Contacts. I generally just hover over a person’s name in a channel or start a call from a chat as outlined in the previous steps.
During a Teams meeting, most of the Teams window is usually taken up by the presentation someone is discussing. If a presentation is not active, then the screen fills with the video of the person speaking.
You can customize the way these components appear on your computer. To customize these components, all you need to do is hover your mouse over the main display screen to reveal the meeting control icons (see Figure 9-10). In addition to using these icons to turn your webcam and microphone on or off, you can also make adjustments to how your screen appears. For example, clicking the icon of a little monitor with an arrow pointing up into it will pop-out the video or the presentation so that you can view different aspects of the meeting on different monitors or on different portions of a large monitor.

FIGURE 9-10: Use these icons to customize your meeting screen.
I generally find the defaults work well, and I don’t change things most of the time. But just be aware that you can if you want to. The best way to discover this functionality is to hover the mouse over the meeting and test out the icons that appear.
Breaking Out into Breakout Rooms
When a meeting involves a lot of people, it is useful to break into groups for small group discussions. This is common in seminars or workshops. Doing this in person is easy when people can just walk toward each other to gather into groups. When meetings are virtual, however, it’s a bit trickier. Teams’ breakout rooms are designed to enable virtual meeting attendees to form subgroups within a larger group to facilitate smaller discussions. Think of breakout rooms as smaller meetings within one main meeting, or “meetings within a meeting.”
Just like organizing an in-person seminar or training, advance preparation is recommended. This will help the organizer run the meeting smoothly. (It is possible to break out into breakout rooms after a meeting has begun, and I discuss how to do that later in this section.)
To create a meeting with planned breakout rooms, it’s important to map out just how many breakout rooms you will need before you create the meeting invite. Once you know how many subgroups you will need, follow these steps to set up breakout rooms for your meeting:
If there isn’t an existing team to use for your meeting, create one and add the participants to your channel.
Within this team, a General channel is created by default. This will be the main channel for your meeting.
Create separate channels for your breakout groups.
Each separate channel is a different breakout room, as shown in Figure 9-11. Make sure you label each channel clearly. (See “Creating a New Channel” in Chapter 4 if you need a refresher on creating new channels.)

FIGURE 9-11: Create a separate channel for each breakout room.
Select the General channel and create a meeting invite to your meeting, as shown in Figure 9-12.
The General channel will be your main meeting room.
Next, create a meeting invite for each of the channels you created (see Figure 9-13).
When you are done, the meeting, including all breakout rooms, appear on your calendar.
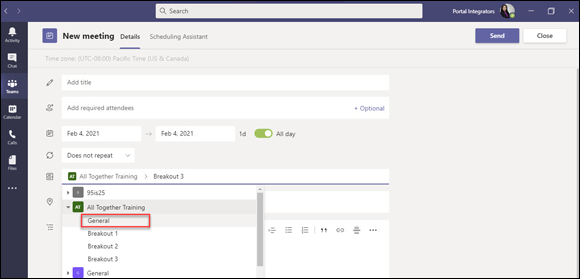
FIGURE 9-12: Create a meeting invite for the main meeting.
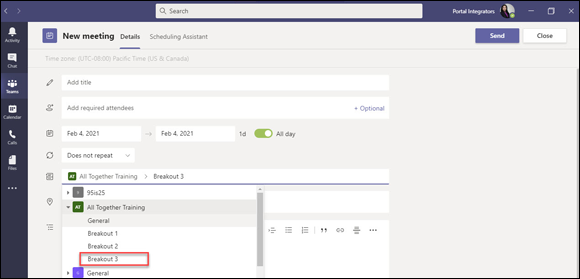
FIGURE 9-13: Create a meeting invite for each channel.
You can create as many as 50 breakout rooms in a meeting.
What if you decide you want breakout rooms after a meeting has already started? No problem. Breakout rooms can also be used in ad hoc meetings. Here’s how:
- Start the Teams meeting per usual.
Click the Breakout Room icon on your screen, as shown in Figure 9-14.
Only the meeting organizer can start breakout rooms, and the organizer must be present throughout the entire meeting to facilitate the breakout groups.Give a name for your breakout room meeting and select the audio options and then click Join Now.
The Create Breakout Rooms dialog box appears, as shown in Figure 9-15.

FIGURE 9-14: Click the Breakout Room icon to start a breakout room.
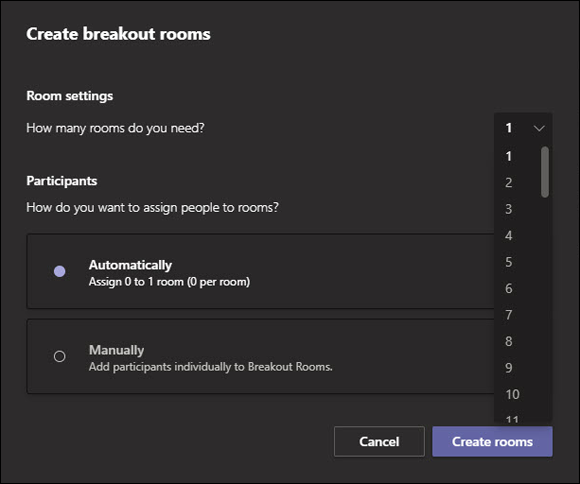
FIGURE 9-15: Select the number of breakout rooms you need.
In the Create Breakout Rooms dialog box, select the number of breakout rooms you need and how you want to assign people to rooms.
You have two options for assigning participants to rooms: automatically or manually. Selecting the automatic option tells Teams to create breakout assignments based on the number of participants and the number of rooms.
- Select Automatically to have Teams automatically assign the meeting participants into rooms.
Click the Create Rooms button to create your breakout rooms.
The rooms should all say Closed next to them. Participants are not available to join yet and won’t be until you open them.
- Open each breakout room by clicking on the Closed button next to each room (see Figure 9-16).
To close the breakout rooms, select Close Rooms.
The participants will rejoin the main meeting.

FIGURE 9-16: Open each breakout room individually.
If you choose to assign participants manually in the Create Breakout Rooms dialog box, you will see the breakout rooms you have created and the participants in your meeting on the right side of your screen.
To manually assign these participants to breakout rooms, follow these steps:
- Select the name or names of the participants from the right side of your screen you want to assign to a room.
- Select which room to assign your participant(s), as shown in Figure 9-17.

FIGURE 9-17: Assigning meeting participants into breakout rooms.
Once you are done assigning participants to breakout rooms, select the Start Rooms icon.
The participants will find themselves in the breakout room they have been assigned to.
Select Close Rooms to end the meetings in the breakout rooms.
The participants will rejoin the main meeting.
Getting Together with Together Mode
In mid-2020, after months of having no live sports, the National Basketball Association (NBA) was the first professional sports league in the United States to start playing live competitions. The NBA created a safe “bubble” of players who quarantined and lived together in order to stay virus-free and able to practice and play basketball together. However, in adherence to safety protocols, teams had to play without a live audience. The once packed arena seats were now empty of fans. To help both player morale and promote fan excitement when watching games on TV or the Internet, the NBA had virtual audiences fill the seats. To do this, it used Together Mode on Microsoft Teams. With it, fans are able to watch and experience the game with other fans.
Together Mode is a new meeting experience that uses artificial intelligence (AI) technology to create virtual “cutouts” of meeting participants and place them in a virtual conference room, lecture hall, or sports stadium. It gives the feeling of sitting in the same room with everyone else in the meeting. It’s another way to feel, well, together in virtual space.
Together Mode uses technology that knows where the participants are in the shared virtual meeting space. Instead of viewing each participant separately in a grid, you are interacting with each one in one space. Physical gestures are less awkward, since you are now sitting next to someone.
Together Mode requires at least four participants (including the host), and it will only be enabled if at least four participants have their video turned on.
Enabling Together Mode
To use Together Mode, you first need to ensure it is enabled in your version of Teams. Here’s how:
- From the desktop app, select your profile picture in the upper-right corner and select Settings.
- In the Settings screen, click in the box next to “Turn on new meeting experience” to turn it on.
- Restart Microsoft Teams.
Using Together Mode in your meetings
Once you are in a meeting, you can enable Together Mode in the meeting toolbar. Here’s how:
- Join your meeting.
- Select the three ellipses that appear in the meeting toolbar.
Select Together Mode from the drop-down menu.
Together Mode requires that there are at least four participants in the meeting, and that they have their video turned on. Together Mode uses Teams AI to create virtual “cutouts” of each participant, and does not work without video.
What Are Live Events?
By now you have attended your fair share of meetings online. You may have been in meetings with as few as two participants or as many as twenty or more. With a limited number of people in a typical meeting, most if not all attendees have an opportunity to have their say. But sometimes a meeting requires one person to many people at the same time. Examples include all-hands or town hall presentations, conferences, and seminars. Microsoft makes the distinction by calling such meetings live events.
Hosting a live event requires quite a bit of preparation, so much so that preparing for a live event is referred to as producing the event. The host does not just schedule a video call and talk in front of an audience. There is a literal producer to orchestrate the live event as it unfolds.
There are two types of Teams Live Events:
- Public event: Any event where anyone who has a link can attend. There is no need to sign in to Microsoft Teams to attend a public event.
- Private event: Any event where there is restricted access to join the event. Participants need to sign in to Microsoft Teams to attend the event. If the event is produced in Microsoft Teams, participants will need to download Microsoft Teams and sign in. If the event is produced externally, the participants would need to have a license for the Microsoft Stream video-sharing service.
To produce a Teams live event, you need an E1, E3, or E5 enterprise license to create a live event. As Microsoft often makes changes on what is allowed for the different tiers of licenses, always check with your administrator for any changes. For you to create events, your administrator should give you permission to do so. To be given permission you need to be a full member of the organization that is hosting the event. You cannot be a guest or a third party.
The various roles required to host a live event include the following:
Organizer: Much like a meeting organizer, a live event organizer creates the live event, sets attendees’ permissions, sets the agenda, and sends invites to attendees. The organizer selects the production method and configures event options such as whether there will be a Q&A session at the end. The organizer also selects event group members and does the after-event reporting.
Microsoft created an organizer checklist that you can find at https://support.microsoft.com/en-us/office/teams-live-event-organizer-checklist-44a80886-0fd9-42e5-8e7c-836c798096f8. This is a handy guide to help you remember all the bits and pieces needed to organize a successful event.- Producer: Think of an event producer as someone who will orchestrate or direct what happens during the event. The producer starts and stops the event, can share video (both his or her video or participant video), shares an active desktop or window, and selects even layouts. Whatever happens during a live event is the responsibility of the event producer. The producer and organizer work closely together.
- Presenter: A presenter or host is the face and voice of the event. This could be a keynote speaker at a conference, an instructor at a seminar, or a manager at an all-hands event.