
Chapter 3
Starting Your First Team and Managing Settings
IN THIS CHAPTER
![]() Creating new teams
Creating new teams
![]() Adding teammates to your team
Adding teammates to your team
![]() Managing your team
Managing your team
![]() Setting user preferences
Setting user preferences
One of the nice things about Microsoft Teams is that the name of it says it all. Teams is about communicating and collaborating with other people as part of a team. At the heart of the Teams app is a team of people. Whether you work in the same office building with your team or each team member works remotely from home, you are still the same team. A team in the context of Microsoft Teams, consists of a group of one or more people (though a team of one is boring). Within a team is where you create channels to chat, share files among teammates, use apps, and do all sorts of other nifty things.
In this chapter, you find out how to create new teams and invite others to them. You also discover how to manage teams you created and personalize each team’s settings.
Creating a New Team
When you first log in to Microsoft Teams, you will see that a default Team is created for you automatically using the account information you provide when you first sign up for Microsoft 365, Office 365, or the stand-alone Teams app. My default team is called Portal Integrators LLC, because that is the company name I provided when I signed up for the Office 365 trial in Chapter 2. (For a reminder on how to log in to Teams, see “Downloading, Installing, and Opening Teams” in Chapter 2.)
I suspect many people just use the default Team and don’t realize they can create more teams. (Perhaps they also didn’t make the wise decision to read this book like you did.) However, creating new teams involves only a few steps.
When you create a new team, you can customize it and build it out the way you want for your specific situation. For example, you might want the team to be private instead of the default org-wide team that is created that everyone is automatically a member of. You might also want to create a team for a focus area, such as carpooling or human resources or accounting. Once you have spent a little bit of time in Teams, you will find yourself creating new teams and trimming old teams as a regular habit.
To create a new Team, follow these steps:
- Open Microsoft Teams.
Click the Teams icon in the left navigation pane and then click the link to “Join or create a team” that appears in the bottom-left corner of the screen, as shown in Figure 3-1.
Join or create a team appears in the main Teams workspace.
 If you don’t see the “Join or create a team” link, as shown in Figure 3-1, two situations may be at play. The first, and most likely, is that you are a guest user to Teams, and thus have restricted access to the Office 365 — and Teams — products. If you are a licensed member of the organization but still don’t see the ability to create a new team, then your administrators may have locked down the Office 365 tenant your organization is using. If that is the case, you will need to contact your administrator in order to create a new team.
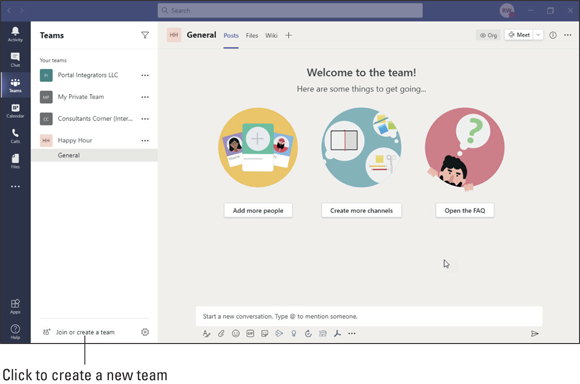
FIGURE 3-1: Clicking the link to join or create a new team.
Click the Create a Team tile, as shown in Figure 3-2.
The Create Your Team dialog box appears, as shown in Figure 3-3. You can choose to create a team based on an existing group of users in Microsoft 365, or create a team from scratch. For this example, let’s create a team from scratch.
Select the Build a Team From Scratch option.
Next, you need to decide what type of team you want to create. You have three options, as shown in Figure 3-4:
- Private: A private team requires members to have permission to join.
- Public: A public team is one that anyone can join.
- Org-wide: An organization-wide team is one that everyone in the organization belongs to automatically when they log in to Teams.
For this example, let’s create an org-wide team that everyone belongs to automatically so that we don’t have to worry about adding people. (I cover how to add members to your teams later in this chapter.)
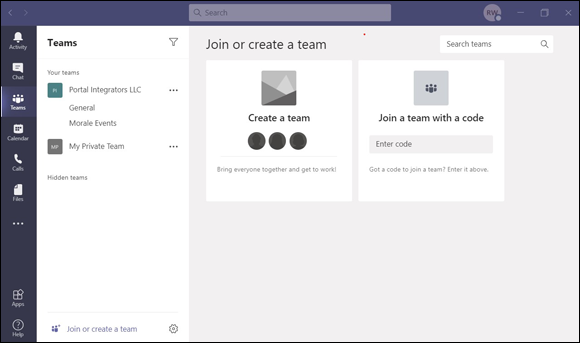
FIGURE 3-2: Clicking the Create a Team tile to start creating a new team.
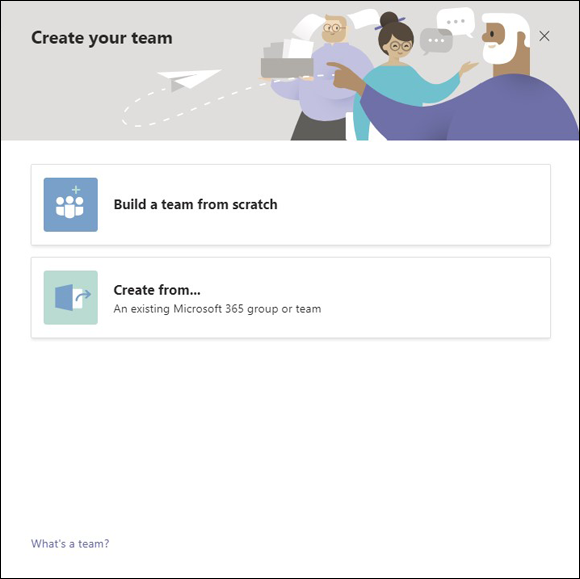
FIGURE 3-3: Choosing to build a team from scratch.
Select the Org-wide option.
As your organization becomes larger, you probably want to start using either private teams or public teams. This is because the number of teams within an organization can grow quickly, and if everyone in your organization is automatically joined to them, Teams can become very noisy and people may start to ignore it.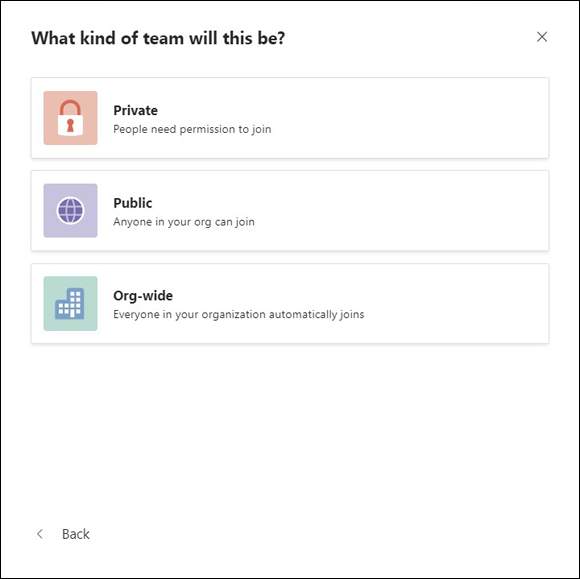
FIGURE 3-4: Choosing what type of team to create.
Enter a name and description for your new team and then click Create, as shown in Figure 3-5.
Teams will take a few moments and go about its work of creating a new team for you. When it is done, you will see the new team appear in your list of teams in the left navigation pane, as shown in Figure 3-6. Notice that when the new team was created, a channel called General was automatically created. In Chapter 4, I cover how to create additional channels for your team.
As a user of Teams, you can either be a team owner, a team member, or a guest user:
- Team owner: Team owners can manage the team, which includes the ability to add members, approve or deny requests to join the team, create channels, change the team settings, view analytics, and add apps. Note that a team owner is not limited to the person who created the team. A team can have up to 100 team owners.
- Team member: Team members make up a team. Team members interact and collaborate with other team members, team owners, and guest users. They can also view and make changes to documents (depending on the permissions set on the documents).
- Guest user: Guest users are non-licensed users that have limited access and who must be invited to each team explicitly.

FIGURE 3-5: Providing a team name and description when creating a new team.

FIGURE 3-6: Viewing your newly created team.
A user can join a team either by receiving an invite to join or request to join an existing team. If a team is set up as private, then new users will need to be invited as they won’t be able to see the team and ask to join.
Inviting People to Your Team
Once you have your team set up, you can add people to the team. In the last section, “Creating a New Team,” we created an org-wide team so that everyone within the organization is automatically added to the team. In this section, we go through the same process as before to create a new team, but this time we’ll create a public and a private team and add members first during the creation process and then after we’ve already set up the team.
To invite people to your team during the initial team creation process, follow these steps:
- Follow Steps 1–4 in the previous example to create a new team.
When asked, “What type of team will this be?”, instead of selecting the Org-wide option (shown earlier in Figure 3-4), choose Public or Private to create either a new public or private team.
When you create a public or private team, you are also presented with a dialog box to invite people to join it just after the team is created, as shown in Figure 3-7.
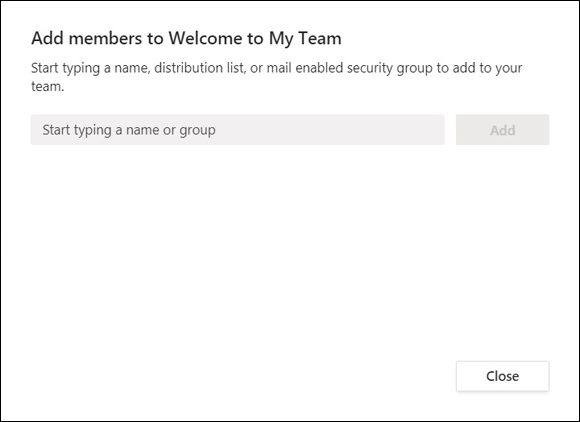
FIGURE 3-7: The dialog box to invite people to your team during the creation process.
Start typing the name of the person you want to invite to the team in the text box.
The search functionality automatically looks for and populates the text box based on the letters you are typing. This happens in real time so that you can see the results of your search as you are typing. This is helpful if, for example, you only know the first part of someone’s name, or if you only know that the name starts with a certain letter.- Once you find the correct person, click that person’s name and then click Add.
Continue adding people until you’ve invited all the team members you wish to add.
The users will be notified of their new team membership depending on how they have notifications set up. I cover notifications in detail in Chapter 8.
 You can invite people to your public or private team after it is created, too. Suppose a new person joins your organization and you want to add that person to your team. The only way people can join a private team is if you invite them, whereas anyone in the organization can join a public team. With an org-wide team, everyone in your organization is automatically included in the team.
To invite people to your public or private team after it has been created, follow these steps:
- Click the Teams icon in the left navigation pane to see a list of your teams.
Click the ellipsis next to the name of the team you want to invite someone to join.
This opens a menu with more options.
In the More Options drop-down menu that appears, select Add Member, as shown in Figure 3-8.
The Add Members dialog box that was shown earlier in Figure 3-7 appears. This is the same dialog box that appears when you first create a public or private team.
- Start typing the name of the person you want to invite to the team in the text box.
Once you find the correct person, click that person’s name and then click Add.
The users will be notified of their new team membership depending on how they have notifications set up. I cover notifications in detail in Chapter 8.
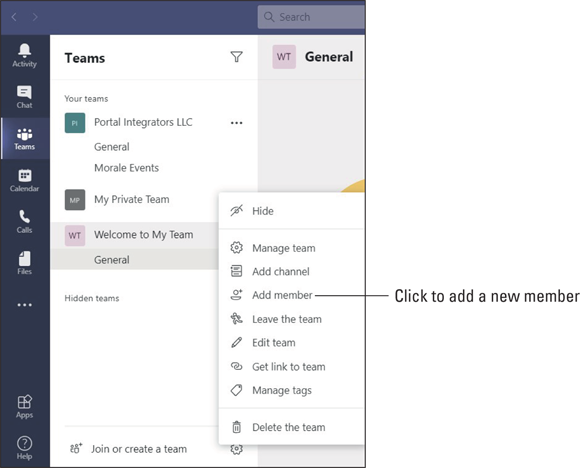
FIGURE 3-8: Adding members to a team already created.
Managing Your Team Settings
You can control many different settings in Teams, such as adding and configuring channels, users, and chat behavior, and you will discover how to change these settings in the next section. The settings you will likely use the most frequently are for your specific teams. These include adding and removing owners, members, and guests; adding and deleting channels; and working with apps.
To open the settings for a team, click the ellipsis next to the name of the team to open the More Options drop-down menu (shown earlier in Figure 3-8) and select Manage Team.
The Manage Team settings screen contains the following tabs at the top, as shown in Figure 3-9:
- Members: The Members screen is where you add new members to the team. You can add people as members of the team or as guests. A guest user is a user who has access to Teams and can chat with you, but does not have access to the rest of your Microsoft 365 ecosystem. I cover guest user access in detail in Chapter 7.
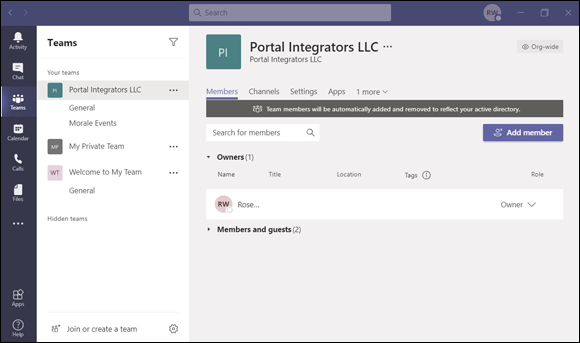
FIGURE 3-9: The management screen for a team with the Members tab open.
- Channels: The Channels screen is where you can add a channel. A channel is an area of a team where you can chat about a common topic. For example, you might have a channel for carpooling, a channel for accounting, and a channel for clients. I cover channels in Chapter 4.
Settings: The Settings screen is where you manage the settings for a team, as shown in Figure 3-10. On the Settings screen you can set the team picture, set the permissions of users including what permissions you want to give to guest users, set up how @mentions (pronounced “at mentions”) work, get a link to the team that you can share so others can join the team, and other fun stuff such as adding virtual stickers.
An @mention is when someone uses the @ (“at”) symbol followed by the name of a user in a message. It is essentially tagging the person so that Teams knows who the person is that is being mentioned. When your name is @mentioned, you will get a notification that someone has mentioned your name in a message. This will help you scroll through and find messages that are pertinent to you. I cover mentions and feeds in Chapter 8.- Apps: The Apps screen is where you can add apps to the team. You can see that some apps are installed by default. You can also add more by clicking the More Apps button. I cover apps in Chapter 5.
- Analytics: The Analytics tab, which appears when you select the Apps tab, is a dashboard of the activities and usage of a Teams channel. It includes information such as a summary of the number of users, apps, and data usage. It also shows metrics for engagement. Engagement is measured by the number of posts, replies, mentions, and reactions. It is a simple count on how busy the channel is based on the activity.
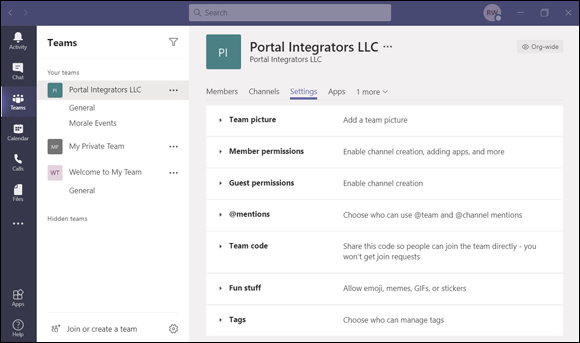
FIGURE 3-10: The Settings screen is where you can configure team settings.
You may also see the following additional tab if you have folks wishing to be part of your team:
- Pending Requests: The Pending Requests tab is where you will see people asking to join your team. To accept or deny a request, select your team from the team list and then select the three ellipses next to the team name. Select manage team from the menu that appears and then select pending requests.
Other settings that appear in the More Options drop-down menu are fairly straightforward. Like many Microsoft products, there are multiple ways to achieve the same result in Teams. For example, you can add a channel using this menu or you can add a channel via the Channels tab on the Manage Team settings screen.
I also like to think of the More Options drop-down menu as a shortcut to common tasks. For example, I often use it to hide a less important team from my list, get a link to share the team, and manage tags. (I discuss more about hiding chatting teams and channels in Chapter 8.)
The additional items you will find on the More Options drop-down menu for a team include:
- Hide
- Add channel
- Add member
- Leave the team
- Edit team
- Get link to team
- Manage tags
- Delete the team
Managing User Settings
Several settings are unique to each individual Teams user. I like to think of these as your user settings; you can also think of them as your profile settings. These settings are found in the drop-down menu that appears when you click your profile image in the top-right corner of the Teams window, as shown in Figure 3-11.
You can use this menu to:
- Set your current status such as Available, Do Not Disturb, and Away. I sometimes even set my status to Appear Away so that I can get work done without people knowing I am busy on my computer.
- Set your status message so that others see a message and know what you are up to or what you want people to know. For example, I sometimes set this to the music I am listening to or a quote that I find particularly captures my current mood.
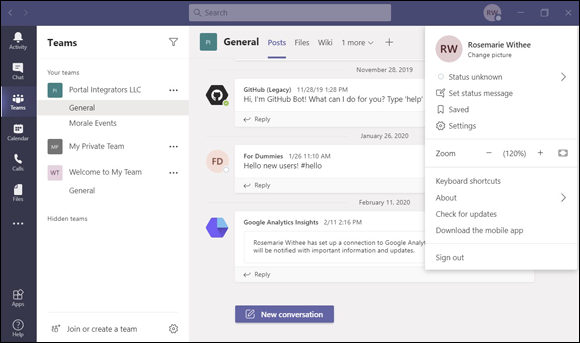
FIGURE 3-11: The profile drop-down menu.
- View chats and messages you have saved throughout Teams.
- Open your profile settings (more on this shortly).
- Adjust your zoom settings to zoom in and make items in your Teams window bigger or zoom out to make things smaller.
- Change your keyboard shortcuts so you can maneuver around Teams with a few taps of your keyboard.
- Learn more about Teams such as the version number you are currently using and legal notices.
- Check for any updates to Teams so that you can be sure you have the latest version.
- Download the mobile app so that you can have Teams on your smartphone and in your pocket so that you are never out of touch.
- Sign out of Teams. I rarely do this when using Teams normally, but have used it plenty of times while writing this book when I’ve needed to sign in and out of various accounts. You might use this if you are a member of multiple organizations and you need to sign into one account or the other.
When you select the Settings option from your profile menu, you can change several options that are specific to your account. The settings menu, shown in Figure 3-12, includes settings for six different categories: General, Privacy, Notifications, Devices, Permissions, and Calls. I provide a brief overview of these sections here, and cover these settings in more detail throughout the book. For example, in Chapter 8, I cover setting up your notifications.
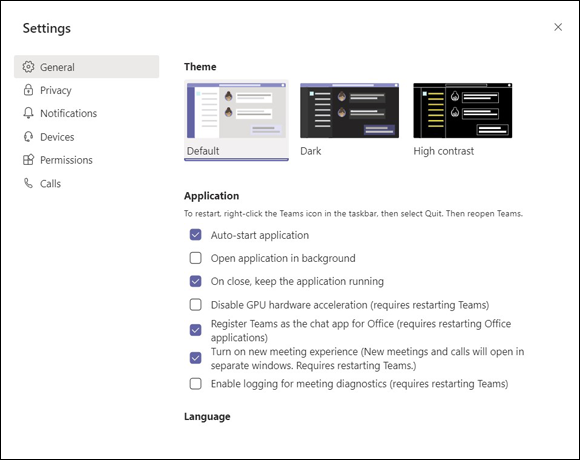
FIGURE 3-12: The settings menu for a Teams user.
General
The General section includes settings for the appearance of Teams and how the application behaves in general. For example, you can change the way Teams looks by changing the theme you are using. You can also change the language you want to use.
In the application section, you can decide how you want Teams to behave on your computer. The options include:
- Auto-start application: When selected, Microsoft Teams will open upon starting up your computer.
- Open application in background: When selected, Microsoft Teams will open when you start up your computer, but it will only run in the background and not as an open window.
- On close, keep the application running: When selected, Microsoft Teams will remain running even though you have closed the application.
- Disable GPU hardware acceleration: This is probably a setting that most people won’t need to bother with. GPU, or graphics processing unit, is a specialized processor designed to accelerate graphics processing. If your computer has performance issues (such as running too slowly), selecting this option may help with your computer’s performance.
- Register Teams as the chat app for Office: When selected, Teams becomes the default chat app for Office. This option is useful when you are part of an organization that is moving from Skype to Teams.
- Turn on new meeting experience: Selecting this feature means you will get to experience a new meeting experience before it becomes available to all users. You get to preview a recent change or addition to the calling feature.
- Enable logging for meeting diagnostics: Selecting this feature means Teams will log meeting diagnostics. The logs will be useful if there are any issues, as customer support usually looks at the diagnostic logs to help resolve any problems.
And one last general setting: You can change the language format and keyboard layout you are using.
Privacy
In the Privacy section, you will find settings to manage priority access, turn on or off read receipts, and turn on or off surveys.
Priority access defines who you will allow to interrupt you when your status is set to Do Not Disturb. For example, you might want your boss to be able to send you messages at any time, but everyone else must wait until you set your status to Available.
The Blocked Contacts option is where you can manage contacts you need to block or unblock. Think of it as your own “do not call” list. Select Block calls with no caller ID if you do not want to get calls from phone numbers with no caller ID. Click on Edit Blocked Contacts button to see the list of contacts you have blocked.
Read receipts is used to inform others when you read their messages. If you don’t want people to know that you have read a message, you can turn this off.
The Surveys option is a tool Microsoft uses to improve Teams. If you don’t mind giving feedback, you can leave this option on. If you don’t want to be bothered with it, then turn it off and Microsoft won’t survey you for your opinion on how to improve Teams.
Notifications
The Notifications area is where you set your preferences for how Teams should notify you about things. You can set various events to show up in your banner (a pop-up window that appears in the lower-right corner of your computer) and through email, only in your Activity feed, or turn them off completely. I cover notifications in detail in Chapter 8.
Devices
You configure the devices you are using with Teams in this settings section. A device includes things like your speaker, microphone, smartphone, headset, or camera. I cover devices in detail in Chapter 10.
Permissions
You can turn on or off permissions for Teams in this section. For example, do you want Teams to be able to use your location or be able to open external links in your web browser? You configure those permissions here.
Calls
Teams provides a full voice solution. What does this mean? It means that Teams can replace your regular telephone. In this section, you can configure how incoming calls are answered as well as setting up and configuring your voicemail and ringtones. You can also set accessibility options such as using a teletypewriter (TTY) device for people who are deaf or hearing impaired. I cover calling in detail in Chapters 11 and 12.
You can also access your Teams settings by clicking the Activity icon in the left navigation pane and clicking the gear icon. Did I mention that Microsoft is notorious for creating many different ways to achieve the same result? I guess the idea is that someone will stumble upon what they are trying to do just like stumbling around trying to find Easter eggs. Just remember that if you are in an argument with a coworker about how to do something in Teams, you might both be right!