17. Synchronizing Data

In this chapter, you learn how to synchronize calendar events, contacts, and other data on your phone with data stored elsewhere, such as web-based accounts, Exchange Server accounts, and other devices. Topics include the following:
![]() Developing a synchronization strategy
Developing a synchronization strategy
![]() Configuring the phone for automatic, scheduled syncs
Configuring the phone for automatic, scheduled syncs
When you got your phone, you probably already had important data such as contact records and calendar events stored somewhere else: in one or several computer applications, on websites, or in an Exchange Server account. Instead of keeping that information separate from the data in your phone’s apps, you might want to keep all your data sources synchronized. That is, no matter where you edit or create new data, you can automatically or manually synchronize the other data sources to match.
Developing a Sync Strategy
If you want to keep your phone’s important data (such as Calendar events and Contacts records) synchronized with data stored on your PC or Mac, on a Microsoft Exchange Server, or in web-based applications, there are currently only two seamless solutions. Seamless means that you can accomplish this automatically (or manually with a simple tap) over a cellular or wireless connection. You don’t have to hook up a USB cable or launch a separate application on your Mac or PC to perform a sync.
Although adding software and jumping through hoops are unnecessary, the seamless solutions do require that you accept either a Google/Gmail, Samsung, or Exchange Server account as the repository for your contact and calendar data.
Microsoft Exchange Server
If you work for a company or institution that employs Exchange Server to manage email, contacts, calendar, and other business data, your situation is the easiest. If you’ve added your Exchange email account to the phone, you have instant access on the phone to much of your important data—regardless of whether you create it on the phone or on one of several computers that you use. Each time you edit a contact or create a new calendar event, the server is responsible for synchronizing that data with every computer, phone, and tablet on which your Exchange account is registered. Unfortunately, most non-business users don’t have an Exchange Server account. Internet service providers (ISPs) don’t provide them.
Exceptions: Hotmail, Outlook.com, and Live Accounts
All email accounts with the web-based Microsoft Outlook.com, Hotmail.com, and Live.com are now handled as Microsoft Exchange ActiveSync accounts—not as POP3 accounts, as was the case in the past. If you have one or more of these accounts, you can sync their Calendar, Contacts, Email, and Tasks entries with data on your phone.
Google/Gmail
Because the Galaxy S5 is an Android-based phone, Android is Google software, and you’ve probably added a Google/Gmail account to the phone, you can use this account to keep your calendar and contact data in sync. Several approaches facilitate this, but all except the first require concessions:
• If you already use Google and Gmail to manage your contacts and calendar events, you’re all set.
• If you’re willing to switch to Google/Gmail for managing your contacts and calendar events, you probably can export your data from the applications you currently use and import the data into Google Calendar and Contacts.
• Even if you aren’t willing to switch to these Google web apps, you can perform the export/import as a one-time procedure. As long as you’re willing to manually maintain the Contacts list on your phone and record all new Calendar events on the phone, you can disable the sync process. Everything important to you will already be on your phone, so there’s no reason to sync.
• Finally, if you can live with the notion that chunks of your data will be out of sync much of the time and correct only on your computer, you can use Google/Gmail as an occasional data receptacle. Periodically delete your Gmail Contacts data on the Web, import your computer’s contact data into Gmail Contacts, and then perform a single sync to transfer the up-to-date contact roster to your phone. (For help with importing Microsoft Outlook, Apple contacts, or Address Book contacts into Gmail Contacts, see Chapter 5, “Managing Contacts.”)
Using a Samsung, Outlook, Hotmail, or Live Account
The Samsung account that you created during the phone’s setup (see “Creating a Samsung Account” in Chapter 1, “Galaxy S5 Essentials”) enables you to use certain Samsung apps, such as ChatON. Like a Gmail/Google account, you also can use it to sync your calendar and contact data. Similarly, if you’ve added an Outlook, Hotmail, or Live account to the phone, you can elect to use it to sync the same data.
Alternative Software
If you prefer to enter important data on your computer using programs such as Microsoft Outlook (PC or Mac), Contacts or Address Book (Mac), or iCal (Mac), another option is to search Google Play for an app solution that enables you to continue using those programs. An Android app and a companion application installed on your computer generally manage the sync process.

Test with Care
In reading about the Android/computer solutions, you might see a warning from the software company or in user comments concerning potential data loss. Before experimenting with any of these solutions, be sure to back up your data.
The Sneakernet (Manual) Approach
Before the wide acceptance of networking, if a co-worker needed a copy of a Word document, you’d use Sneakernet. That is, you’d copy the file to a floppy disk, walk down the hall, and hand it to whoever needed it. (A flash drive is the modern equivalent of a floppy disk.) Moral: Sometimes a manual approach is good enough.
This also applies to synchronizing data between your phone and computer. If you don’t live in Google/Gmail and don’t have an Exchange Server account, you might decide to ignore synchronizing. Create new events and contact records on the device you use most, create them on whatever device happens to be handy, or standardize on using your phone or a computer application for adding all the new data. If you decide that a particular record or event is crucial and needs to be in both places, re-create the data on the second device when you have time.
Setting Sync Options and Schedules
Data from each account can be synced manually or on a schedule (automatically in the background). Most accounts enable you to specify which data types to sync and which to ignore. Sync schedules, on the other hand, can only be set for email accounts. You can allow any account to sync automatically or disable automatic syncs, syncing manually on selected accounts as needed (whenever your data has significantly changed).
1. On the Home screen, tap Apps, Settings.
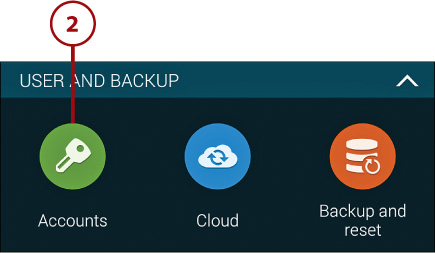
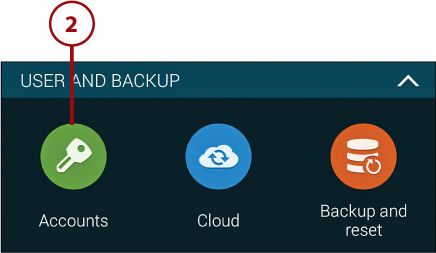
2. In the User and Backup section, tap Accounts.
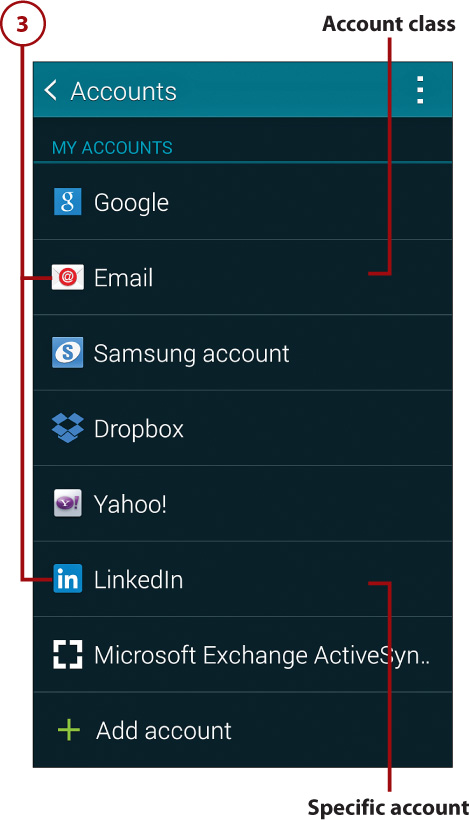
3. The Accounts screen lists your account classes (such as Email or Microsoft Exchange ActiveSync) and specific accounts (such as Facebook or LinkedIn) that can be synchronized. Tap the account class name or the specific account whose settings you want to examine or change.
4. Account classes only: If you select an account class (such as Email) in Step 3, all accounts of that type are shown. Tap the account whose schedule or settings you want to view or change. The Sync Settings screen appears.
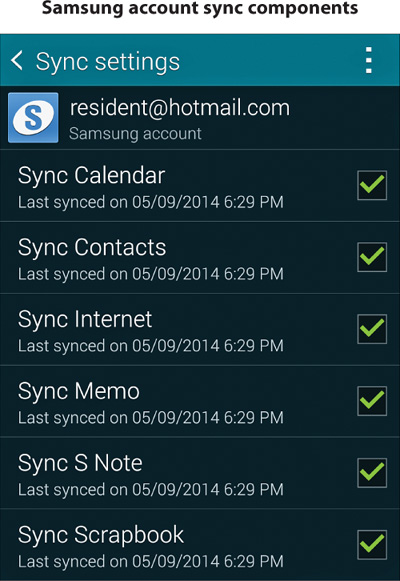
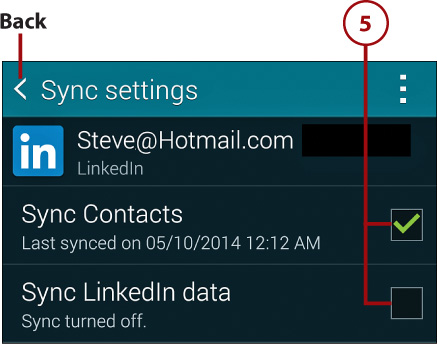
5. Synchronization will be performed only for those data elements that are checked. Make any desired changes by tapping check boxes. When you finish, press the Back key or tap the Back icon.
Stop Here
The remaining steps apply only to email accounts. If you are configuring a specific account (as explained in Step 3), you can stop here.
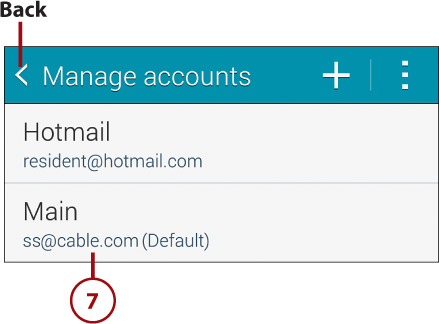
6. To set a schedule for an email or Microsoft Exchange ActiveSync account, tap Email or Microsoft Exchange ActiveSync in the My Accounts list (see Step 3), and then tap Settings in the Common Settings section of the screen.

7. Tap the name of the specific email account whose schedule you want to view or change.
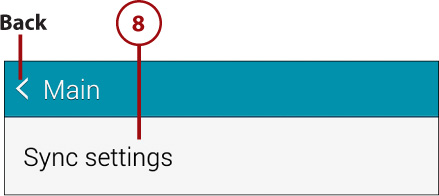
8. Tap Sync Settings.
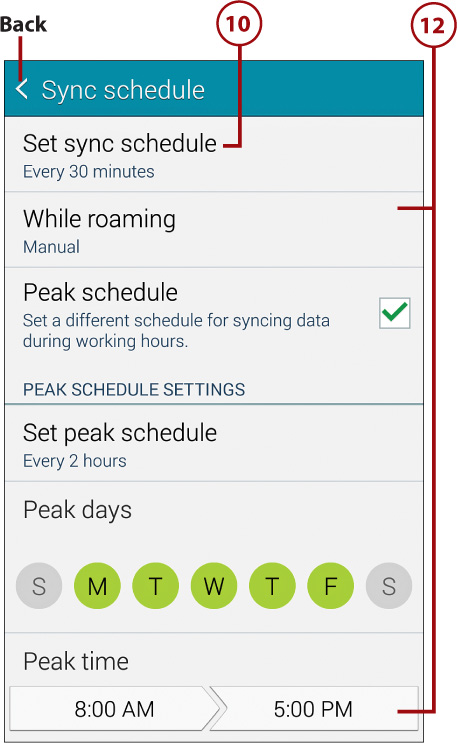
9. On the Sync Settings screen, ensure that Sync Email is checked and then tap Sync Schedule.

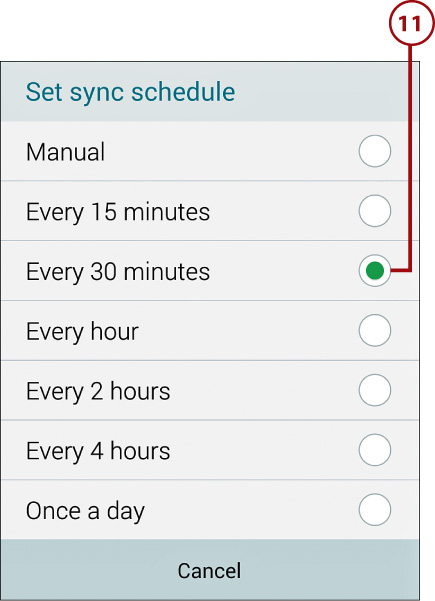
11. Select a sync interval.
The Manual Interval
Select Manual for accounts that you never want to update or sync with other devices, as well as for those accounts that you intend to sync manually.
12. Review the other scheduling settings on the Sync Schedule screen and then press the Back key or tap the Back icon until your email account list reappears. Repeat Steps 7–12 for each additional email account whose sync schedule you want to view or modify. See Chapter 8, “Sending and Receiving Email,” for additional information about scheduling checks for new email.
Performing Manual Syncs
You can perform manual syncs whenever you want—on an entire account or selected data elements within an account—regardless of whether an automatic schedule has been set.
1. On the Home screen, tap Apps, followed by Settings.

2. In the User and Backup section, tap Accounts.
3. Tap the account class (such as Email) or the specific account (such as LinkedIn) that you want to sync.
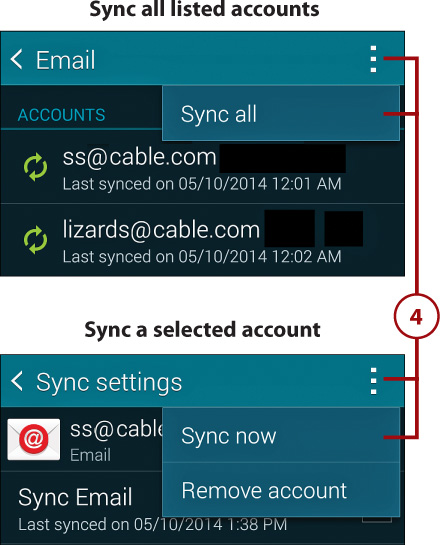
4. If multiple accounts are listed (as might be the case if you selected Email or Microsoft Exchange ActiveSync in Step 3), you can do the following:
• To simultaneously sync all currently checked components for all listed accounts, tap the menu icon and choose Sync All.
• To selectively sync the components of one account, tap the account name. On the Sync Settings screen, tap the menu icon and choose Sync Now to sync all checked components. To sync only a single component, double-tap the component. (It’s necessary to double-tap to retain the component’s original sync setting.)
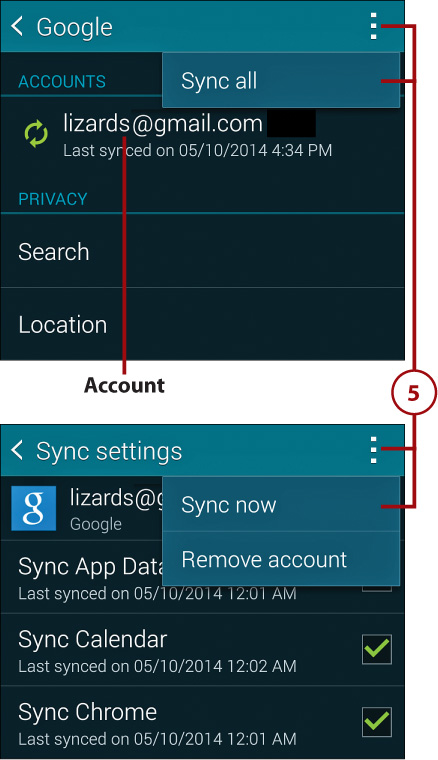
5. If a single account is listed and no components are displayed (such as a Google or Samsung Account), you can do the following:
• To simultaneously sync all currently checked components for the account, tap the menu icon and choose Sync All.
• Tap the account name. On the Sync Settings screen, tap the menu key and choose Sync Now to sync all checked components. To sync only a single component, double-tap the component. (It’s necessary to double-tap to retain the component’s original sync setting.)
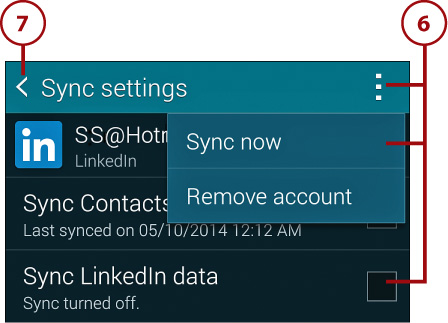
6. If a single account is listed and components are displayed (such as LinkedIn, Facebook, or Twitter), you can do the following:
• To simultaneously sync all checked components for the account, tap the menu icon and choose Sync Now.
• To sync only a single component, double-tap the component. (It’s necessary to double-tap to retain the component’s original sync setting.)
7. When you finish performing manual syncs, exit by pressing the Home key, repeatedly pressing the Back key, or repeatedly tapping the Back icon in the top-left corner of the screen.