1. Galaxy S5 Essentials
In this chapter, you become familiar with the basics of setting up and operating your new phone. Topics include the following:
![]() Familiarizing yourself with the phone hardware, operating system, interface, and customization options
Familiarizing yourself with the phone hardware, operating system, interface, and customization options
![]() Performing basic phone operations
Performing basic phone operations
![]() Adjusting the display and volume
Adjusting the display and volume
![]() Creating or registering Gmail, Samsung, and Dropbox accounts
Creating or registering Gmail, Samsung, and Dropbox accounts
![]() Using Wi-Fi networks and printers
Using Wi-Fi networks and printers
In this chapter and Chapter 2, “Understanding the Android/TouchWiz Interface,” you become familiar with the fundamentals of operating and interacting with your new Android-based phone. In Chapter 3, “Making the Phone Your Own,” you find out how to customize your phone to make it look and work the way that you prefer.
About the Galaxy S5
As the latest entrant in Samsung’s all-star lineup of Galaxy S-series phones, the Galaxy S5 is a fast, feature-laden smartphone. This section discusses the phone hardware, the Android operating system that powers the S5, the interface you use to interact with it, and available customization options.
• 2.5GHz quad-core processor, running the Android 4.4.2 (KitKat) operating system
• HD Super AMOLED, 1920 × 1080-pixel, 432 ppi, 5.1" touchscreen display
• 2.0-megapixel front-facing camera; 16-megapixel rear-facing camera with UHD (4K) and HD video recording
• 16 or 32GB internal memory; 2GB RAM; and support for up to 128GB of additional memory with a microSDHC card
• 4G/LTE network support
• Wi-Fi (802.11 a/b/g/n/ac) on 2.4 or 5 GHz, USB 3.0, Bluetooth 4.0, and NFC connectivity
• GPS (global positioning system)
• Accelerometer, gyro, proximity, compass, barometer, Hall sensor, RGB ambient light, gesture, fingerprint scanner, and heart rate sensor
• IR (infrared) remote; MHL 2.1; IP67 dust- and water-resistant
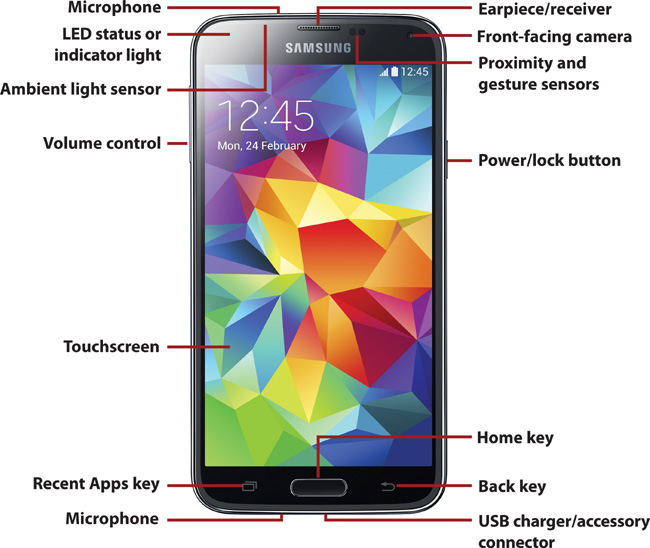

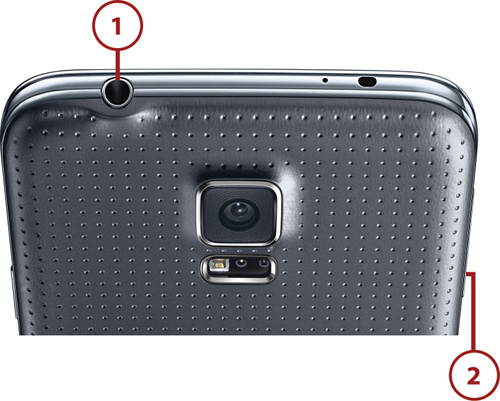
The following are the key hardware components of the Galaxy S5:
Power/Lock button. Press the Power button to turn the phone on or off and to manually darken (lock) or restore the screen.
Volume control. Press this context-sensitive hardware control to raise (top part) or lower (bottom part) the volume of the current activity, such as conducting a call or playing music.
Microphones. Speak into the bottom microphone when participating in a call, giving voice commands, or using the phone’s speech-to-text feature. The top microphone is used for noise cancellation and stereo recording.
Earpiece/receiver. When you’re not using a headset, call audio is transmitted through this front speaker. The external speaker on the back of the phone is used to play music, ringtones, and other audio.
Headset jack. Port for connecting a compatible 3.5mm wired headset or headphones; enables 5.1 channel sound when playing media.
Front-facing camera. Low-resolution (2-megapixel), front-facing camera for taking self-portraits and participating in video chats.
Rear-facing camera. High-resolution (16-megapixel), rear-facing camera for taking pictures and high-definition movies.
Flash. Illuminates photos shot with the rear-facing camera (unless you’ve disabled it for the shot).
Heart rate sensor. Used in conjunction with health apps (such as S Health) to measure your pulse.
Touchscreen. Touch-sensitive screen; displays information and enables you to interact with the phone.
Recent Apps, Home, and Back keys. Press these hardware keys to interact with the operating system and installed applications.
USB charger/accessory connector. Enables the phone to be connected with the supplied USB cable to a computer for file transfers or to the charger head and a wall outlet to charge the phone’s battery.
LED status or indicator light. Displays a flashing or steady light to indicate that the phone is performing its startup sequence, denoting notifications (such as newly received email or text messages), or showing the charging status.
Ambient light, proximity, and gesture sensors. The ambient light sensor enables the screen’s brightness to adjust to current lighting conditions. The proximity and gesture sensors detect how close an object is to the phone and whether particular gestures are occurring. During calls, the proximity sensor determines when your face is pressed to the screen and locks the keypad to prevent accidental key presses.
Infrared transmitter. With the appropriate apps, enables you to control infrared devices, such as flat-screen televisions, DVRs, and set-top boxes.
Adding a Memory Card
In addition to using the S5’s built-in memory for storing email, photos, music, apps, and other material, you can purchase a memory card (up to 128GB) to increase the phone’s available storage—much like adding a second hard disk to your computer. For information on installing, formatting, or removing a memory card, see “Viewing and Expanding Storage” in Chapter 20, “Optimizing and Troubleshooting.”
The Android Operating System and TouchWiz
Just like a computer, every smartphone has an operating system that controls virtually every important activity that the phone can perform, as well as the ways in which you interact with it. On the Galaxy S5, the operating system is Android 4.4.2 (KitKat).
Like many of the other major cell phone manufacturers, Samsung has customized the Android operating system to differentiate its phones from those of competitors. Samsung’s TouchWiz interface is that operating system customization. Although phones from other manufacturers run Android 4.4.x, TouchWiz ensures that Galaxy S5 phones operate in a similar—but never identical—fashion to those phones.
Note that operating system updates are periodically made available to phones through the carriers.
The Interface
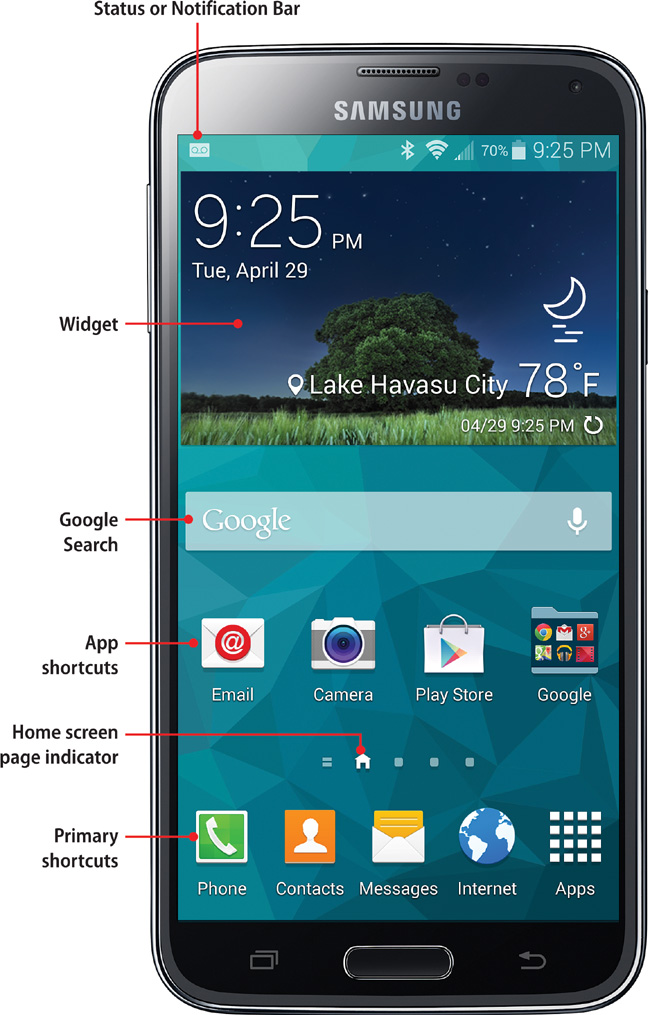
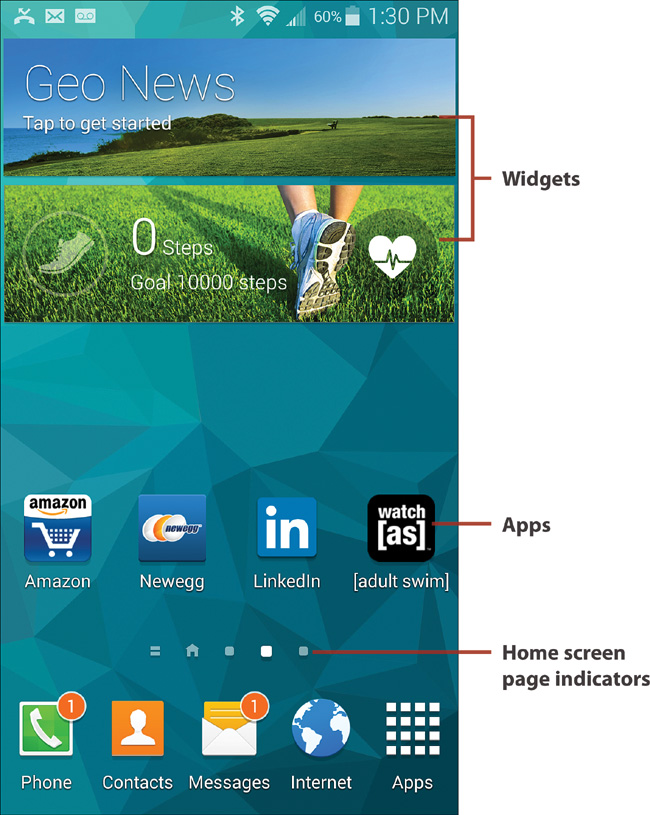
Much of what you do with the phone involves using its touchscreen. The Home screen consists of a series of customizable pages that you can optionally expand to seven. On these pages, you can place shortcuts to the applications (apps) that you use most often, as well as small applications called widgets that run directly on the Home screen. To interact with the touchscreen, you tap app icons to launch programs, flick up or down to scroll through lists, pinch and spread your fingers to change the current magnification, and so on. Chapter 2 explains in detail how to work with the touchscreen interface.
Easy or Standard Mode
If you’re new to cell phones (or just to Android phones), you can elect to use a Home screen variant called Easy mode. Although the material in this book is based on Standard mode, you may want to use Easy mode until you’re comfortable with the phone. See “Set the Home Screen Mode” in Chapter 2 for instructions and information about switching modes.
Customization
One of the main reasons for buying a smartphone such as the Galaxy S5 is that you can do considerably more with it than you can with an ordinary telephone or cell phone. Much as you can do with a computer, you can customize your phone by populating the Home screen with custom arrangements of widgets and app icons, change the Home and lock screens’ background (wallpaper), install additional useful apps, and set preferences (settings) for the system software and installed apps. When you’re comfortable with the phone’s basic operations and are ready to start customizing it, read Chapter 3.
>>>Go Further: Changing System Settings
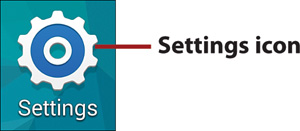
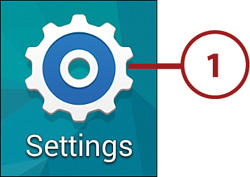
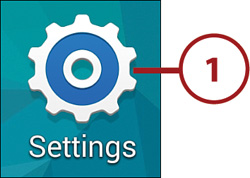
• On any Home screen page, tap the Apps icon, and then tap Settings.
• Open the Notification panel by dragging the status bar downward, and then tap the Settings icon.
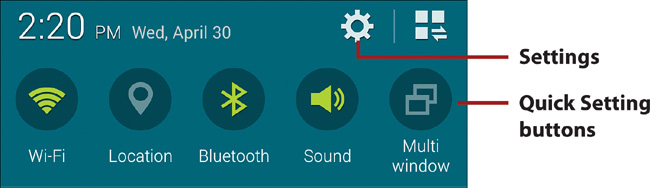
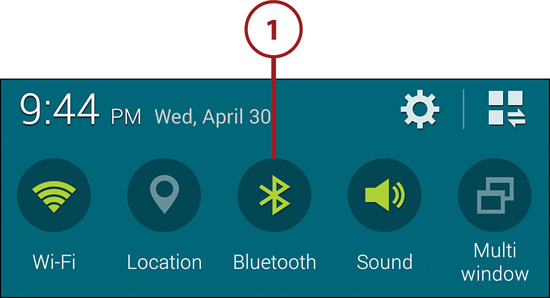
The top of the Notification panel also contains a row of scrolling icons called Quick Setting buttons. By tapping these icons, you can quickly enable or disable important features, such as Wi-Fi and Bluetooth. For information about using and customizing the Quick Setting buttons, see “The Notification Panel” in Chapter 2.
Charging the Battery
The Galaxy S5 includes a two-piece wall charger that consists of a special USB 3.0 cable and a charger head. You charge the phone’s battery by connecting the assembled wall charger to the phone and a standard wall outlet. It’s recommended that you fully charge the phone before its first use. Note that it isn’t necessary to wait until the battery is almost fully discharged before charging.
Connecting to a Computer
The battery also charges while the phone is connected to a computer by the USB cable. The included cable is compatible with computers with USB 3.0 or 2.0 ports. If you have an older computer with USB 2.0 ports, you don’t need a different cable to connect the phone to your computer—for any USB task, such as charging the battery or transferring data. See “Manually Transferring Files over USB” in Chapter 16, “Transferring and Sharing Files,” for instructions on making the phone-to-computer connection.
1. Gently flip open the USB cover on the bottom of the phone.
2. Plug the end of the USB cable with the single rectangular connector into the charger head.
3. Plug the other end of the cable (with the pair of connectors) into the bottom of the phone.
4. Plug the charger head into a wall outlet. The LED indicator light glows while the phone charges.
5. When the LED changes color, the phone is fully charged. Disconnect the USB cable from the wall outlet and phone. Replace the USB cover on the bottom of the phone.
Charging While the Phone Is On
If you need to complete a call or use apps when the battery is almost drained, you can continue to use the phone while it charges.
Powering On/Off
Although many people prefer to simply leave their phones on, you can turn yours off whenever you like—to conserve the battery, for example.
• To turn on the phone, press and hold the Power button until the phone vibrates and begins its normal startup sequence.
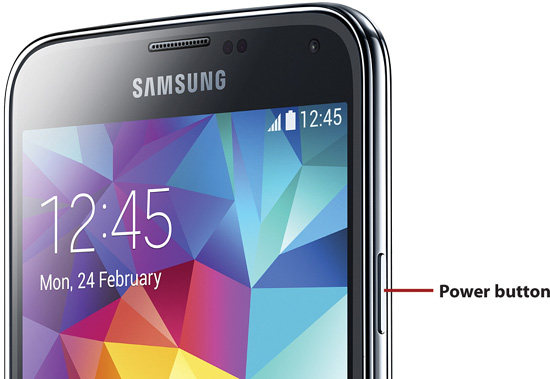
• To turn off the phone, press and hold the Power button for about 2 seconds. In the Device Options dialog box that appears, tap Power Off, and then tap OK to confirm that you want to shut down your phone.
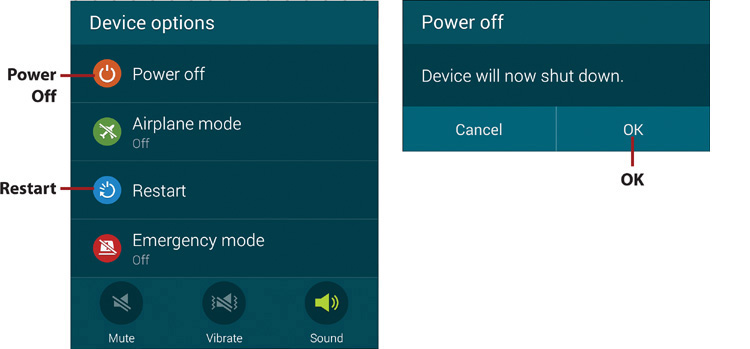
You can also restart the phone from the Device Options dialog box. If you’ve been running the phone continuously for several days, periodically restarting clears memory fragmentation—enabling you to start again with a clean slate.
Running the Setup Wizard
The first time the phone is turned on (and after a Factory Data Reset), the setup wizard automatically launches and displays its Welcome screen. You can respond to its prompts to set up some essential services, such as creating or signing in to a Google account and Samsung account, configuring your Wi-Fi settings, and adding an email account. The pages referenced in the following task explain how to establish these basic settings manually—without the wizard’s assistance.
Now or Later?
It doesn’t matter whether you use the setup wizard to immediately set up the phone or configure it manually when it’s more convenient. For instance, if a salesperson sells you the phone and runs the wizard, you won’t be able to select your particular Wi-Fi network until you go back home or to work. All important options in the wizard can be manually reconfigured whenever—and as often as—you like.
Run the Setup Wizard
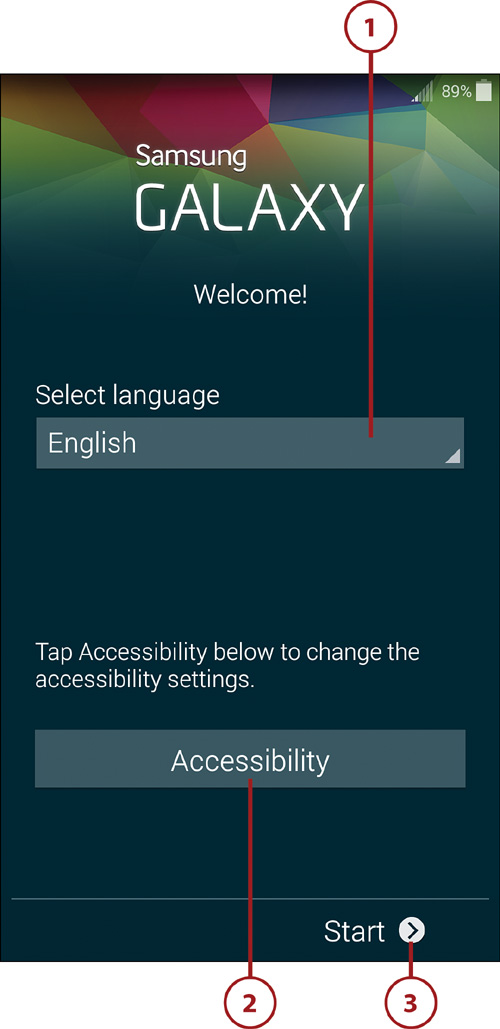
1. On the wizard’s opening screen, select a default language. (See “Changing the Default Language” on page 44 to manually choose a new default language.)
2. Optional: If you have hearing, vision, or dexterity issues, tap Accessibility to review or modify Accessibility settings, such as the size of the display font. To manually configure these settings, tap Settings, Accessibility.
3. Tap Start (on the opening screen) or Next (on the Accessibility screen) to continue.
4. If you have a Wi-Fi (wireless) home or business network, ensure that the Wi-Fi slider is On, select the network’s name, enter your network password (if any), and tap Connect. Tap Next to continue. (See “Connect to a New Wireless Network,” later in this chapter, for details.)
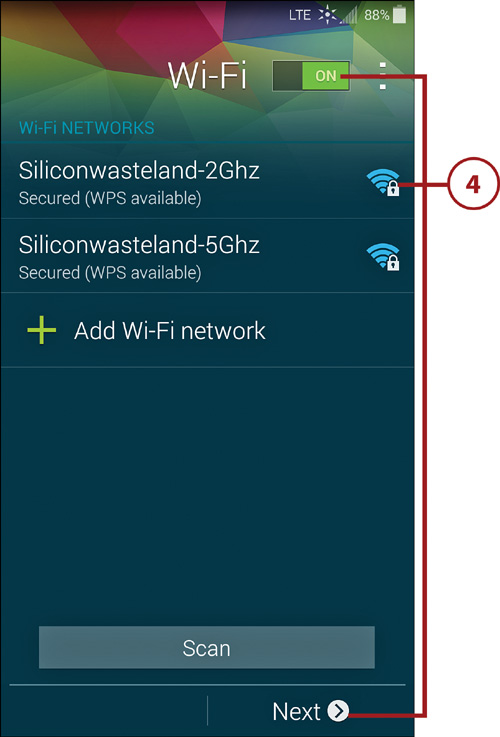
Where’s My Network?
If your wireless network doesn’t appear in the list, ensure that it’s active (by checking your router or modem’s lights) and that you’re reasonably close to it. Tap Scan to refresh the list of nearby networks.
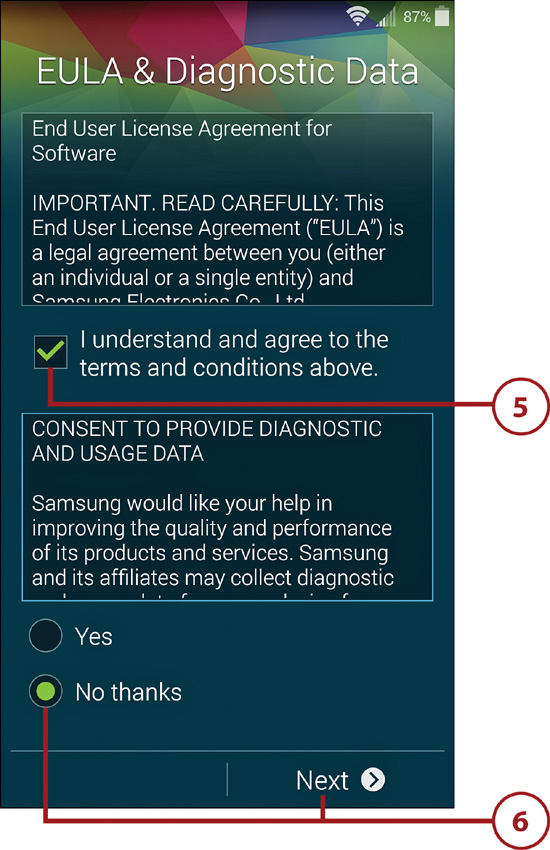
5. Read the End User License Agreement (EULA), and tap the I Understand... box.
6. Read the Consent to Provide Diagnostic and Usage Data information, select Yes or No Thanks, and tap Next.
7. A Google/Gmail account is essential for accessing a variety of Android services and apps with the S5. Do one of the following:
• If you already have a Google/Gmail account and you’d like to register now, tap Yes and enter your account information (see “Gmail and Your Phone,” later in this chapter, for instructions).
• If you’d like to create an account or would rather register an existing account later, tap No. Then tap Get an Account (see “Create a Gmail Account,” later in this chapter, for instructions) or Not Now, respectively.

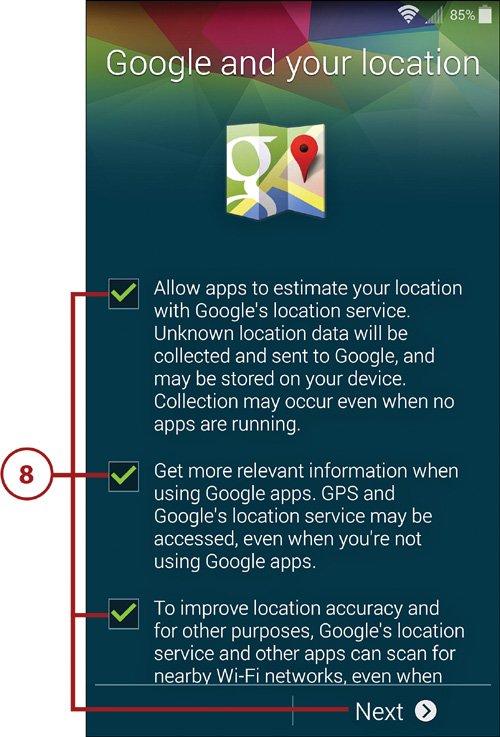
8. Set Google location preferences by tapping check boxes. Tap Next.
9. Personalize your phone by entering your name. Continue by tapping the right arrow icon at the bottom of the screen.

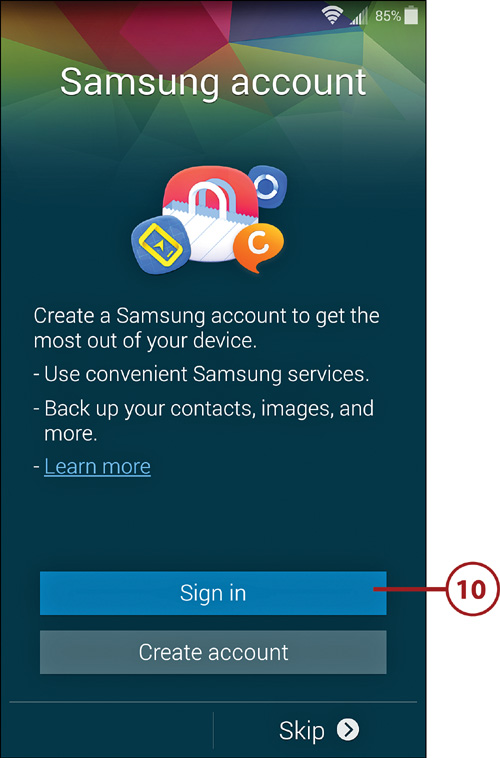
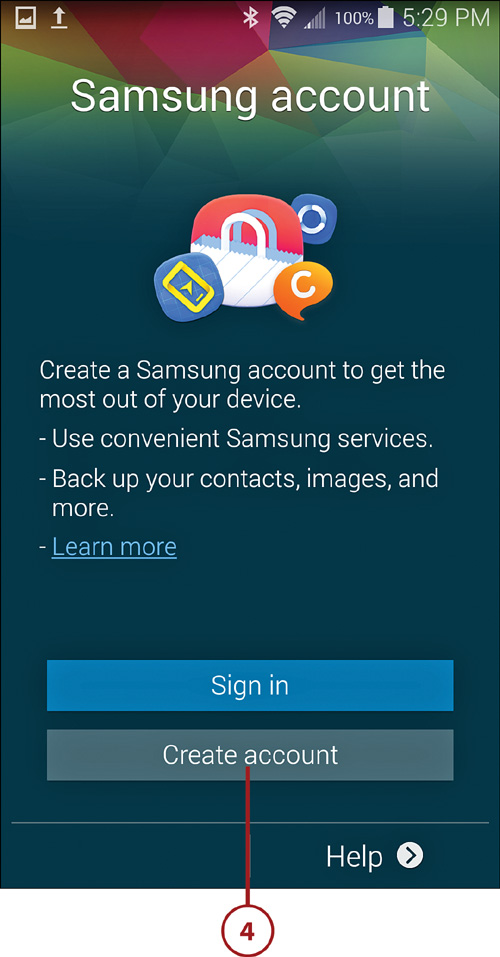
10. Certain Samsung apps require a free Samsung account. Do one of the following:
• Tap Sign In if you already have a Samsung account that you’d like to register now. Enter the email address that you associated with the account and your Samsung password.
• Tap Create Account if you’d like to create a Samsung account (see “Creating a Samsung Account,” later in this chapter, for additional details).
• Tap Skip to ignore this option.
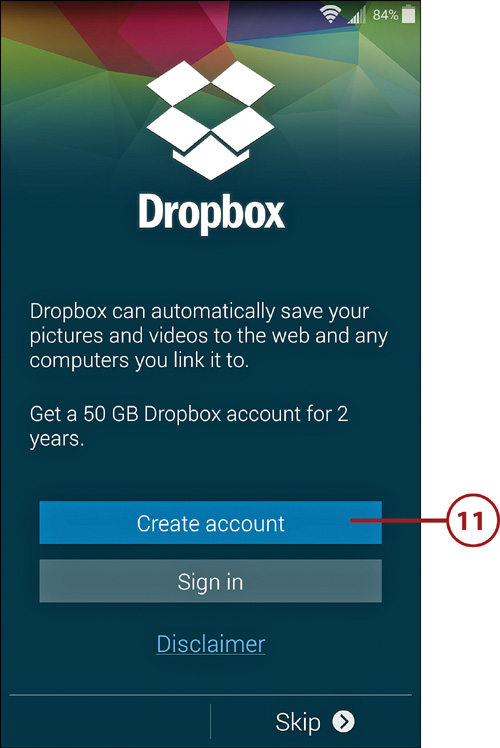
11. Some carriers offer a 50GB Dropbox account—free to Galaxy S5 users for the first two years. You can use the remote Dropbox servers to store your videos, photos, and other files, and access and share them among your devices and with others over the Internet. Do one of the following:
• Tap Sign In if you already have a Dropbox account. Enter the email address that you associated with the account and your Dropbox password, and tap Sign In.
• Tap Create Account to create a Dropbox account (see “Creating a Dropbox Account,” later in this chapter, for additional details).
• Tap Skip to ignore this option.
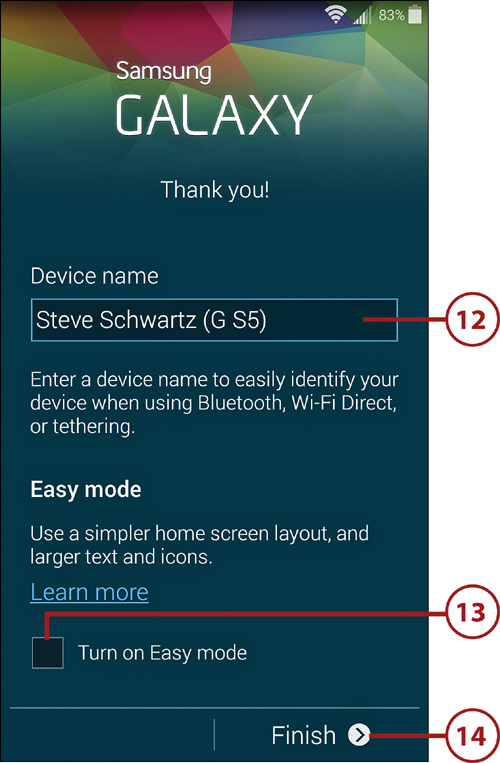
12. Optional: Edit the name that will be used to identify the phone.
13. Optional: If you’re new to Android phones, you might want to enable Easy mode to present a simpler interface for your S5 (see “Set the Home Screen Mode” in Chapter 2). Note, however, that instructions presented in this book assume that you’re using Standard mode rather than Easy mode.
Easy Versus Standard Mode
When you’re ready to experience the Android operating system and TouchWiz interface in its full glory, you can restore Standard mode by tapping Apps, Settings, Easy Mode.
14. Tap Finish to dismiss the wizard. Depending on your carrier, additional options and dialog boxes may appear as the wizard configures your phone for initial use.
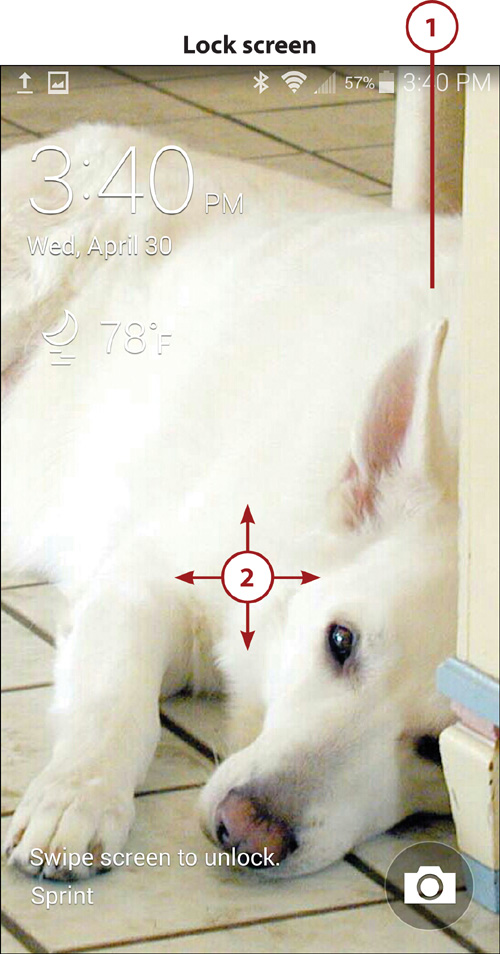
Darkening and Restoring the Display
Depending on your screen timeout setting, the display automatically turns off during periods of inactivity. In addition to waiting for this timeout to occur, you can manually darken the display to conserve the battery or maintain privacy by pressing the Power button on the right side of the phone.
Restore a Dark Display
1. Press the Power button on the right side of the phone to make the lock screen appear. (The lock screen also appears when you turn on the phone.)
Dimmed, Not Dark
The display momentarily dims for a brief period before it turns black. To restore a dimmed display, tap any blank spot on the touchscreen.
2. Swipe in any direction to dismiss the lock screen.
Working with a Locked Phone
You can secure the phone by other methods, such as assigning a password, to require more than a simple swipe to dismiss the lock screen. See “Securing the Lock Screen” in Chapter 18, “Securing the Phone,” for instructions.
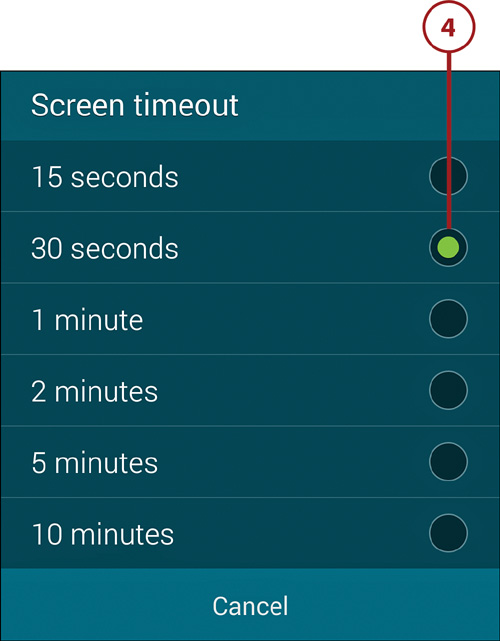
Set the Screen Timeout Interval
1. On the Home screen, tap Apps, followed by Settings.
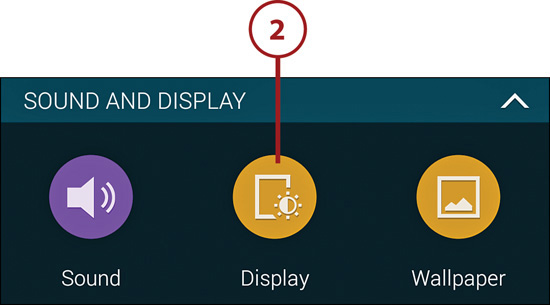
2. In the Sound and Display section of Settings, tap the Display icon.
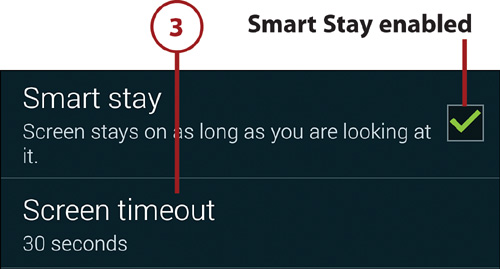
4. In the Screen Timeout dialog box, select a new timeout interval or tap the Cancel button to retain the current setting.
It’s All About Trade-Offs
Substantial juice is needed to power the phone’s gorgeous display, so the sooner it dims during idle periods, the longer the current charge will last. The key is to select a screen timeout that enables the phone to sit idle as long as possible before dimming and still have sufficient charge to meet your daily calling and app requirements.
To avoid timeouts when you’re reading or viewing material onscreen, enable the Smart Stay setting. (In Settings, tap Display and ensure that Smart Stay is checked.) If the front-facing camera detects that you’re looking at the screen, it prevents the normal timeout from occurring. Smart Stay works best when you hold the phone upright, the lighting is adequate, and you aren’t wearing glasses (which can make it more difficult for the camera to detect that you’re looking at the phone).
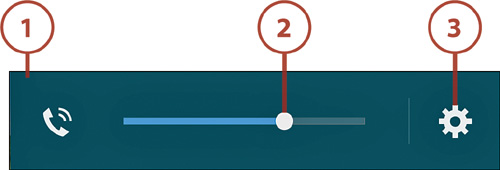
Adjusting the Volume
You can press the volume control on the left side of the phone to adjust voice volume during a call, media playback volume, or ringer volume (when you’re neither playing media nor participating in a call). The volume control is context-sensitive instead of being a general volume control; what is affected when you press the control depends on what you’re doing.
1. To change the volume, press the volume control on the left side of the phone. A context-sensitive control appears.
2. To raise or lower the volume, drag the slider. You can also press the top part of the hardware volume control to raise the volume or press the bottom part to lower the volume.
3. Optional: To adjust other common volume settings, tap the Settings icon and drag the sliders that appear.
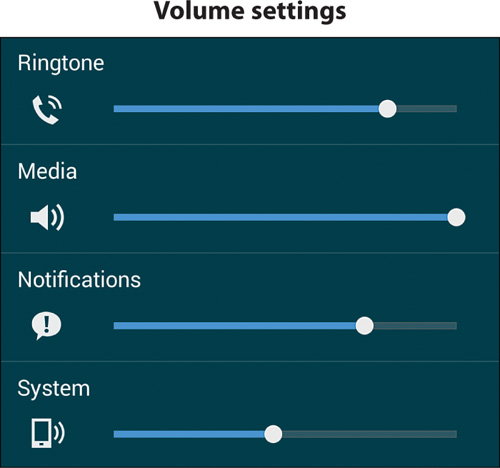
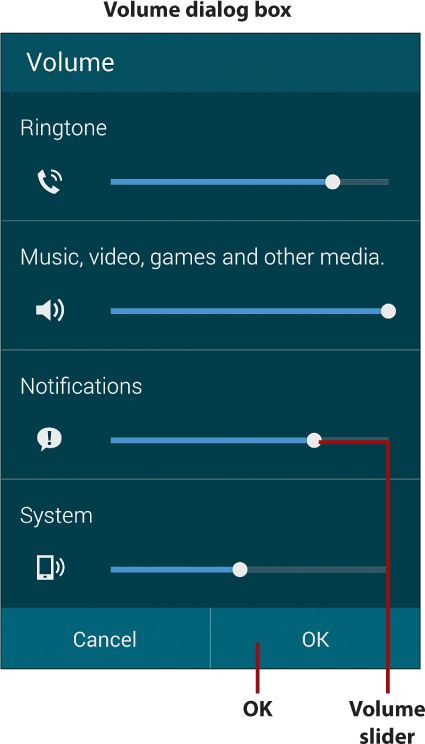
Same Settings, Different Presentation
You can also open Settings to adjust the various volumes. From the Home screen, tap Apps, Settings, Sound, and Volume. Adjust the volume sliders by dragging and tap OK.
Using a Headset or Headphones
By connecting the headset that’s included with the Galaxy S5 (or any other compatible 3.5mm wired headset or headphones), you can improve the phone’s audio quality. For example, the Music app supports 5.1 channel sound when a headset is connected. And a wired or a wireless (Bluetooth) headset is great for making hands-free calls.
Wired Headset or Headphones
1. Plug any compatible headset or headphones into the jack at the top of the phone.
2. Adjust the volume for whatever you’re currently doing (taking a call, playing media, and so on) using the phone’s or the headset’s volume control. For instructions on the former, see “Adjusting the Volume,” earlier in this chapter.
Bluetooth Headset
Although a few Bluetooth headsets support stereo (making them suitable for listening to music), most are mono devices intended primarily for hands-free phone calls. With a maximum range of 30 feet, using a Bluetooth headset enables you to place the phone nearby and conduct a conversation. Unlike using a speakerphone, the audio is routed directly to your ear and the headset’s microphone won’t pick up as much ambient noise.
Working with a Bluetooth headset involves two steps: pairing the headset and phone (a one-time procedure) and using the headset for calls. The procedures for pairing and answering calls are specific to your headset and are explained in the headset’s instructions. As an example, the following tasks illustrate how to use a Jabra EasyGo Bluetooth headset with the Galaxy S5.
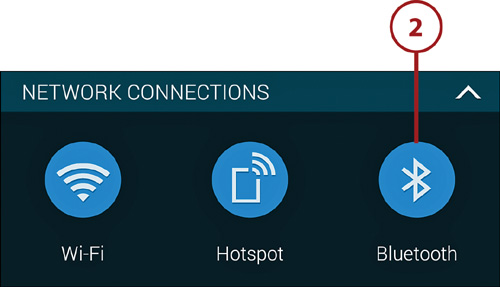
2. Tap Bluetooth in the Network Connections section of Settings.
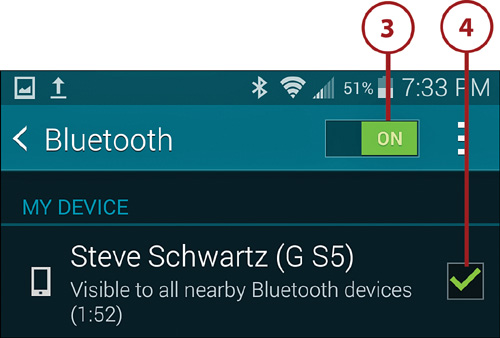
3. Enable Bluetooth by dragging the slider to the On position.
4. Make the phone visible to the headset by ensuring that the check box is selected. Turn the Bluetooth headset on.
Check Your Headset’s Manual
Your Bluetooth headset may require more than simply turning it on to enter pairing mode. The Jabra EasyGo, for example, can be paired with two devices. You must hold down the Answer button for 5 seconds to initiate the second pairing. Similarly, if your headset is already paired with one or more phones, it may be necessary to manually release the pairings to initiate this new pairing.
5. Optional: Tap the Scan button if the headset doesn’t appear in the Available Devices list.
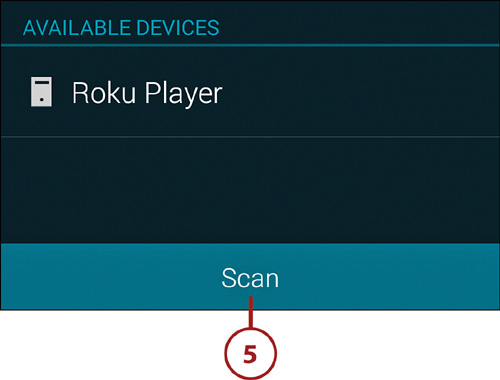
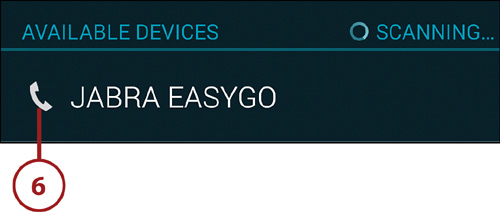
6. Tap the headset’s name in the Available Devices list to pair it with the phone.
7. A confirmation appears when pairing is successful.
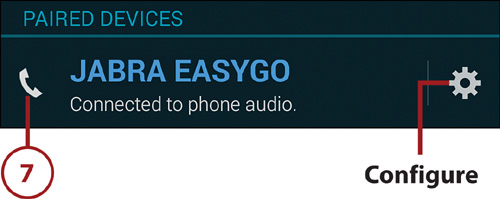
Future Headset Sessions
When you later use your headset for making and receiving calls, the Bluetooth Settings screen will list the headset as a paired device. You can tap the settings icon to the right of the headset’s name to configure or unpair it from your S5.
Use the Headset for Calls
1. Turn on the headset and place it in your ear. If Bluetooth isn’t currently enabled, open the Notification panel by dragging the status bar downward. In the Quick Setting buttons, tap the Bluetooth icon to enable it.
When the Headset Won’t Connect
If a previously paired Bluetooth headset refuses to connect to the phone, open the Notification panel, and then disable and re-enable Bluetooth.
2. To place a call, dial using any of the methods supported by the phone (see “Placing Calls” in Chapter 4, “Placing and Receiving Calls”).
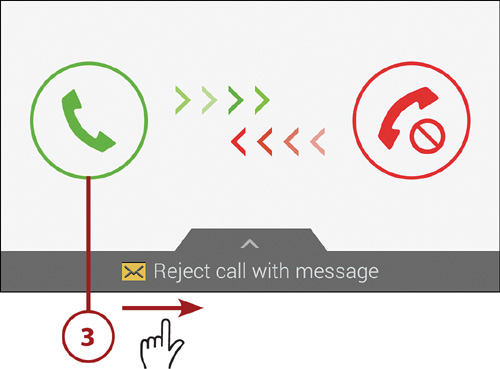
3. To receive an incoming call, tap the headset’s Answer/End button or drag the green Accept Call icon to the right.
Adjusting the Volume
While on a call, you can adjust the volume by pressing the volume control on the left side of the phone or on the headset.
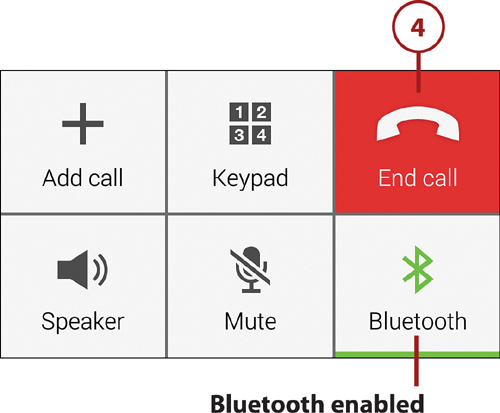
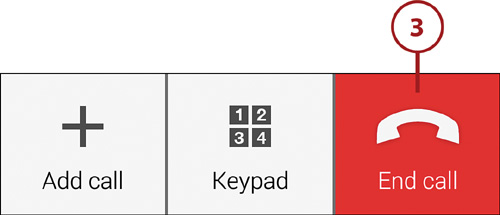
4. Tap the headset’s Answer/End button or tap the End Call icon on the phone when you’re done with the call.
Setting Up Voicemail
After your phone is activated, one of the first things you should do is set up voicemail. Doing so identifies the phone number as yours and ensures that callers have an opportunity to leave a message when you’re unavailable.
Carriers Differ
Note that the exact process of setting up and using voicemail is specific to each provider. They may even include their own app that you can use to review and manage your voicemail. See “Checking Voicemail” in Chapter 4 for instructions on accessing voicemail and changing your settings.
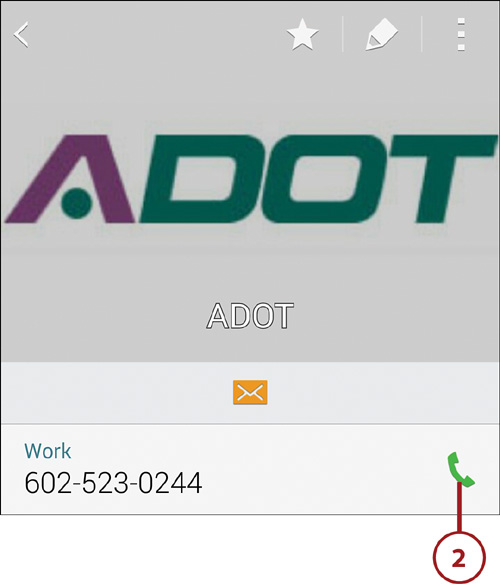
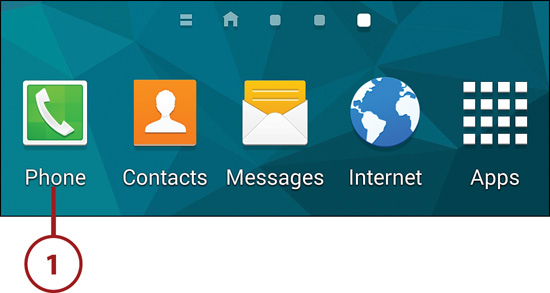
1. On any Home screen page, tap the Phone icon.
2. On the Phone keypad, press and hold 1 (the speed dial number reserved for voicemail) or tap the Voicemail icon.
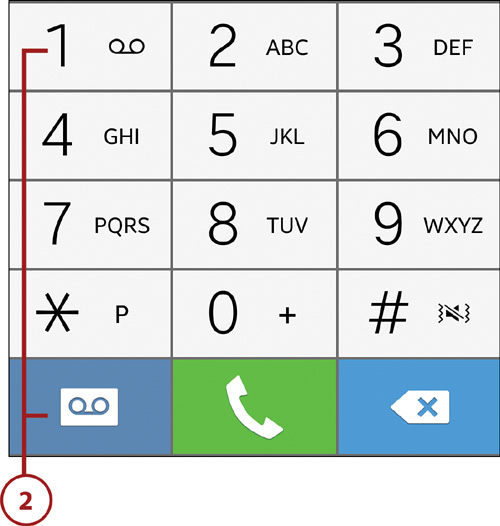
3. When prompted, record your name, enter a password, and select or record a greeting. When you finish reviewing voicemail options, tap the End Call icon.
Gmail and Your Phone
Your phone runs on Android, the Google operating system. To use and connect to any Google service (such as Google Play, a source for Android apps that run on your phone), you must have a Google (Gmail) account. Gmail is Google’s free email service. If you don’t have an account, you should create one now. The final step is letting your phone know your Gmail account username and password, enabling it to access Google services.
Do It the Easy Way
Although you can create a Gmail account using your phone, a lot of typing is required. It’s easier to use your computer’s web browser (as described next). On the other hand, if you don’t have access to a computer or would prefer to create the account using your phone, open Settings and tap Accounts, Add Account, Google, New. You can have more than one Google account, if you like.
Create a Gmail Account
1. On your PC or Mac, launch your web browser: Internet Explorer, Safari, Firefox, or Chrome, for example. Type www.gmail.com in the address box and press Enter/Return.

2. Click the Create an Account button in the page’s upper-right corner.

3. Enter the requested registration information on the Create a New Google Account page.

Register Your Gmail Account
If you just created a Gmail account using your computer’s browser, you need to add the account to your phone.
Once Will Suffice
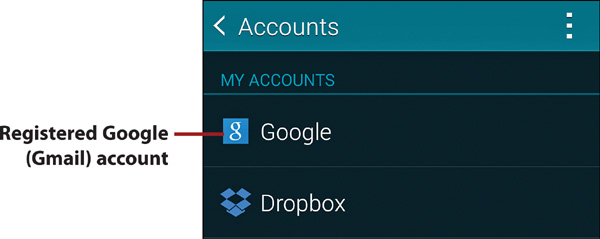
To see if the account is already registered, open Settings and tap Accounts. If Google is listed in the My Accounts section, the account is registered, and you can skip the following task.
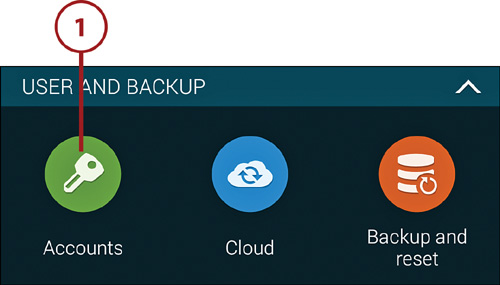
1. Open Settings, and then tap Accounts.

2. Tap Add Account at the bottom of the Accounts list.

3. Tap Google.
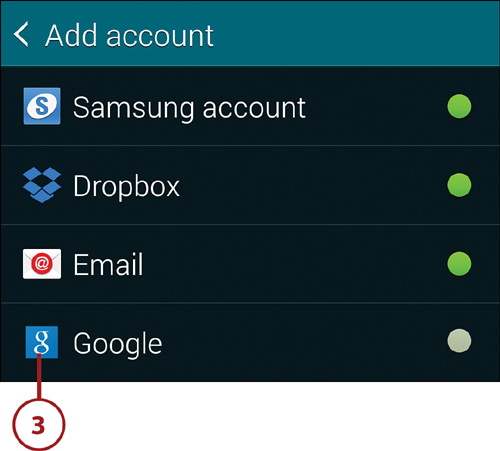
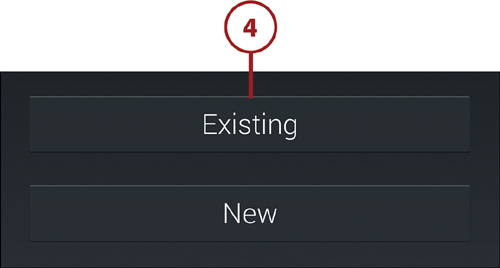
4. On the Add a Google Account screen, tap Existing. (If you don’t have a Google/Gmail account, tap New and follow the onscreen prompts, or perform the steps in the “Create a Gmail Account” task.)
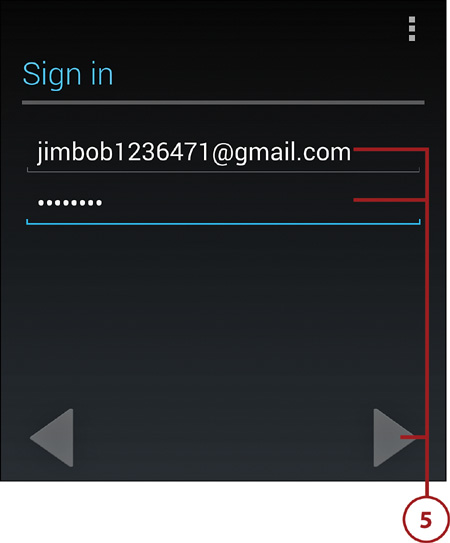
5. Enter your Gmail username and password. Tap the right-arrow icon to continue.
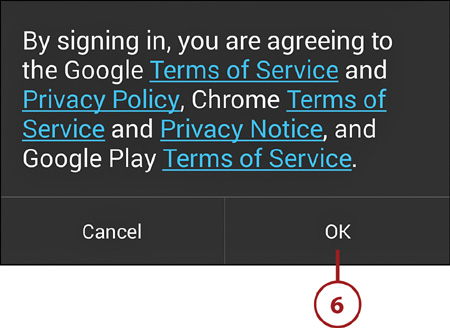
6. Tap OK to agree to the terms of service. An attempt is made to sign into the account.
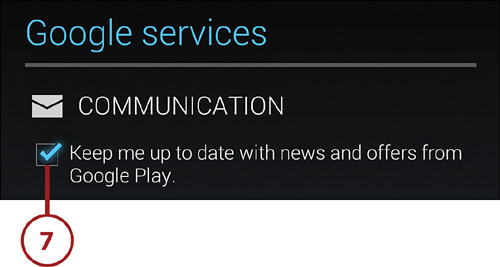
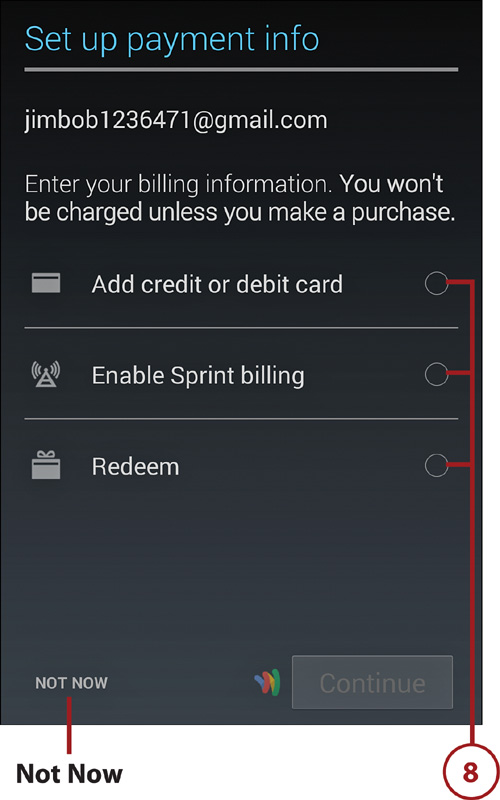
7. Decide whether you want to receive news and offers from Google Play. Tap the right-arrow icon to continue.
8. Enter payment information for purchases that you may later make in Goggle Play, or tap Not Now to skip this step. The phone attempts to sign into your new account.
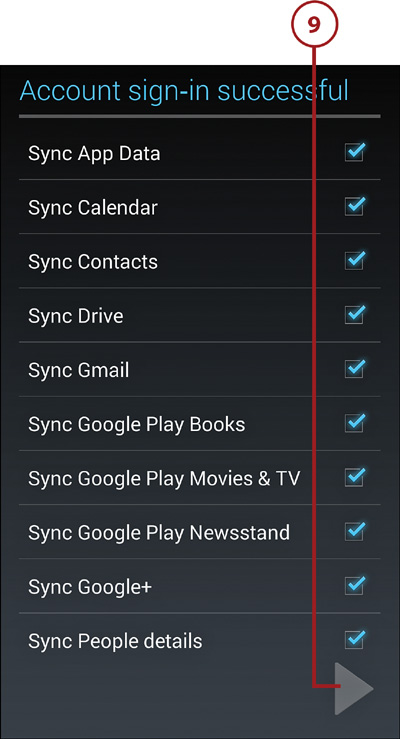
9. On the Account Sign-In Successful screen, the check boxes determine the types of important phone data that will be regularly synced with your Gmail account. Ensure that each box is checked or unchecked according to your preference, and then tap the right-arrow icon. An account sync is automatically attempted.
Creating a Samsung Account
Certain Samsung applications that are supported on the Galaxy S5 require you to sign up for a free Samsung account. Having a Samsung account also enables you to easily back up some types of data, such as your phone logs and messages. If you didn’t create the account or log into an existing one when you ran the setup wizard, you can create the account now—or the first time you use an application that requires an account.
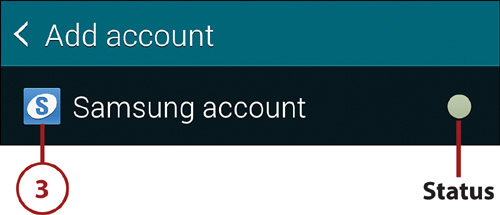
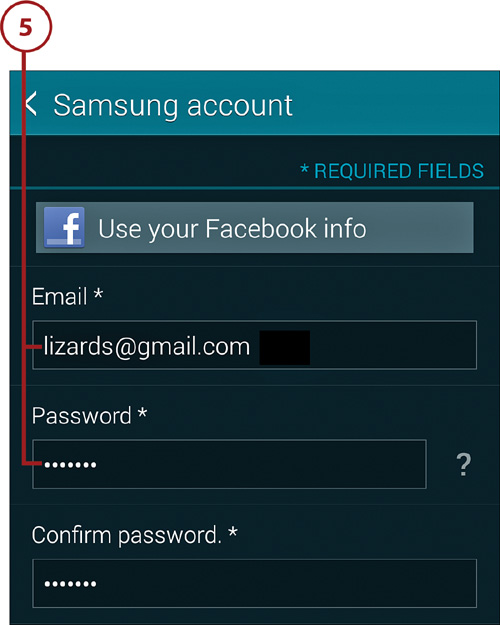
1. Open Settings, and then tap Accounts.
2. Tap Add Account at the bottom of the Accounts list.

3. Tap Samsung Account. (If the account’s status dot is green, you’ve already added a Samsung account to this phone and can skip the remaining steps.)
5. Create the account by entering an email address and password to use for the account, as well as the other requested information. Tap the Sign Up button.
6. Review the Terms and Conditions, Special Terms, Privacy Policy, and Data Combination information by tapping each entry. Tap the check boxes, and then tap the Agree button.

7. Open the account verification email message on your phone or computer and follow the account activation instructions. When you finish, the Samsung account is marked with a green dot on the Add Account screen, indicating that it’s recorded on your phone.

Creating a Dropbox Account
With Dropbox installed on your phone, tablet, and computers, you can use cloud storage to share your videos, photos, and other files among your devices and with other users. Normally, a free Dropbox account provides 2GB of online storage. If your carrier is one of those participating in the Galaxy S5 promotion, you’re eligible for an upgrade to 50GB—free for the first two years.
Getting the App and Desktop Versions
If the Dropbox app isn’t preinstalled on your S5, you can download it from Google Play. You can get versions for PCs, Macs, tablets, and other devices from the Dropbox website at www.dropbox.com. Instructions and tutorials for using Dropbox are there, too.
1. To create a free Dropbox account, do either of the following:
• From any Home screen, tap Apps and then Dropbox.
• Perform Steps 1 and 2 of “Creating a Samsung Account,” and then tap Dropbox.
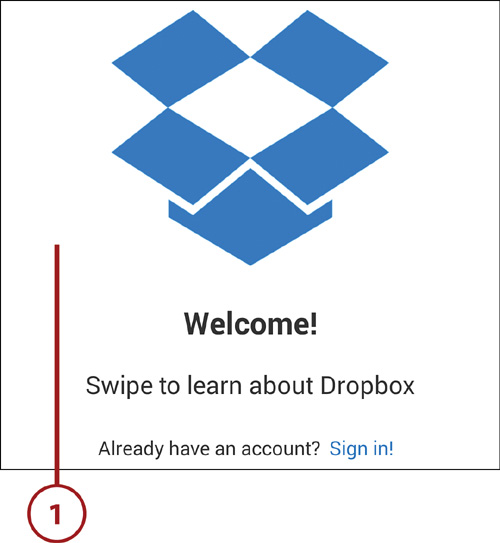
The Dropbox Welcome screen appears.
2. Swipe repeatedly until you reach the last page. Tap Sign Up. (If you already have an account, tap Sign In and provide your log-in information.)
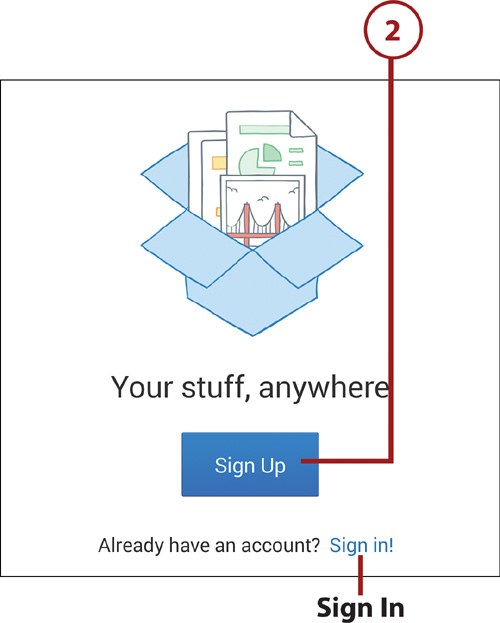
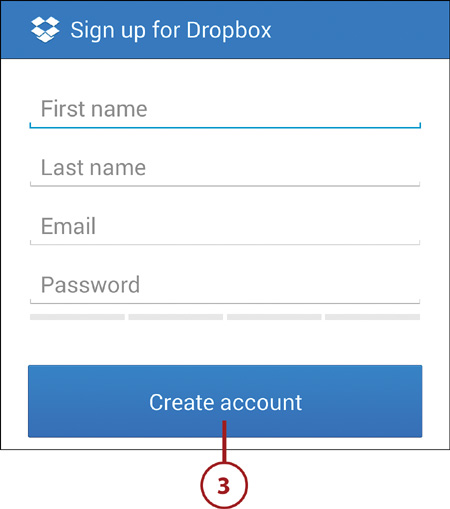
3. Enter your first and last name, an email address with which to associate the account, and a password for the Dropbox account. Tap Create Account.
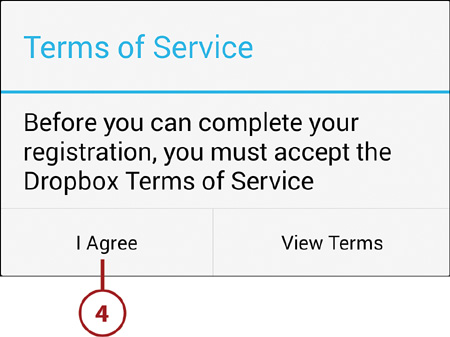
4. Review the Terms of Service, and tap I Agree.
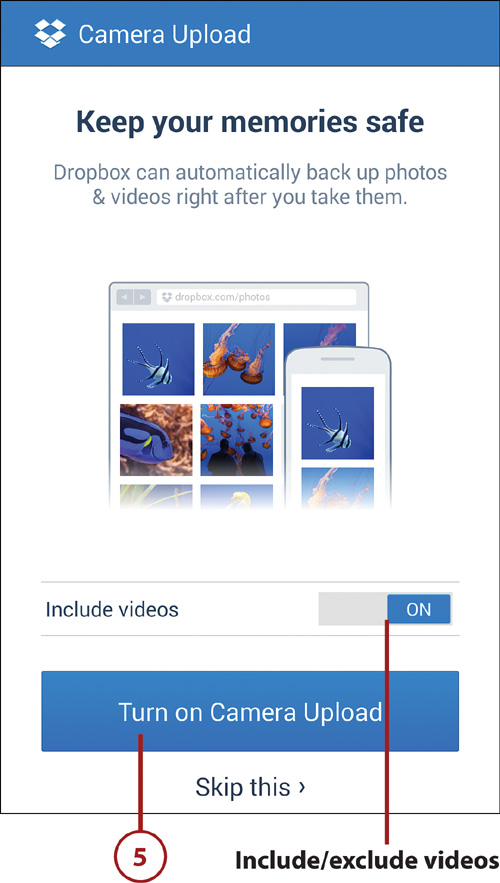
5. To instruct Dropbox to automatically back up photos and videos that you take with the phone, tap Turn On Camera Upload; otherwise, tap Skip This. (You can enable this feature within the Dropbox app whenever you like.)
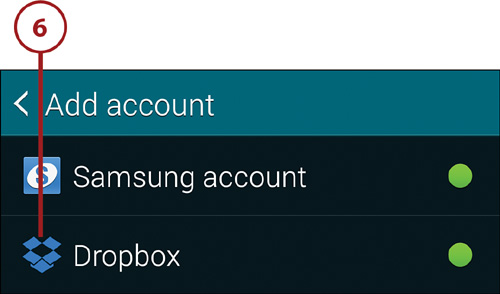
6. The Dropbox account is marked with a green dot on the Add Account screen, indicating that it’s recorded on your phone.
Working with Data
Any activity that transmits data to and from your phone over the cellular network counts toward your plan’s data limit. The same data transmitted over Wi-Fi, on the other hand, doesn’t count. By tapping icons in the Notification panel, you can manually control the method by which data transmissions occur, ensuring that the least expensive and fastest method is used. In this section, you learn how to enable and disable Wi-Fi, as well as how to connect your phone to a wireless (Wi-Fi) network.
At any given time, only Wi-Fi or 2G/3G/4G can be the active data connection method. When Wi-Fi is enabled and you’re connected to a network, 2G/3G/4G is automatically disabled. When Wi-Fi is disabled or unavailable and you perform a data-related activity, 2G, 3G, or 4G is automatically used, depending on what’s available at your current location. (Note that there’s an exception to the Wi-Fi or cellular connection rule. if your carrier is one of the few that supports the Download Booster feature, Wi-Fi and a cellular connection can be simultaneously active, enabling you to improve download speeds for files larger than 30 MB.)
You can also use Bluetooth to exchange data directly between the phone and any Bluetooth-capable computer or laptop. For instructions on using Bluetooth for data transfers, see Chapter 16.
Manually Set a Connection Method
1. Open the Notification panel by touching the status bar at the top of the screen and dragging downward.
2. The Wi-Fi icon toggles between a Wi-Fi and cellular (2G/3G/4G) data connection. Wi-Fi is enabled when the icon is green; a cellular connection is active when the Wi-Fi icon is dim. Tap the Wi-Fi icon to toggle its state.
3. Close the Notification panel by touching the bottom of the panel and dragging upward.

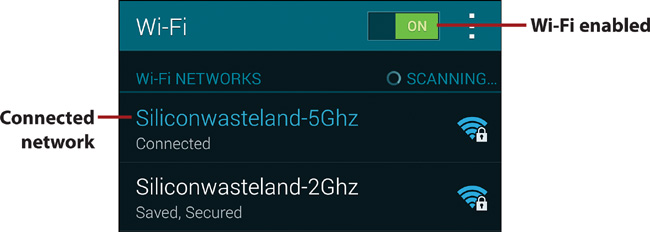
In Settings, Wi-Fi shows the Wi-Fi network to which you’re connected, as well as other available networks. Open Settings and tap Wi-Fi, or press and hold the Wi-Fi icon in the Quick Setting buttons. You can tap any network name to view its speed and signal strength.
Monitoring Data Usage
If your data plan isn’t unlimited, you can use the Data Usage setting to monitor your usage and warn when you’re close to the limit. See “Managing Talk Time and Data Usage” in Chapter 20 for details.
Connect to a New Wireless Network
Because it’s free and often a faster connection than using a 2G, 3G, or 4G cellular connection, it’s advantageous to use a Wi-Fi connection whenever it’s available. After you successfully connect to a given network (such as your home network or one at a local coffee shop), your phone can reconnect without requesting the password again.
1. To go directly to the Wi-Fi screen, open the Notification panel, and then press and hold the Wi-Fi icon in the Quick Setting buttons. (Alternatively, you can open Settings and tap the Wi-Fi icon.)
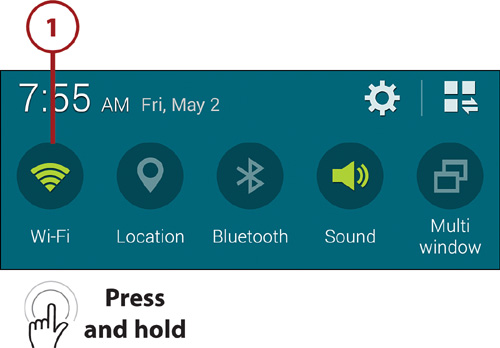
2. Ensure that Wi-Fi is enabled by dragging its slider to the On position.
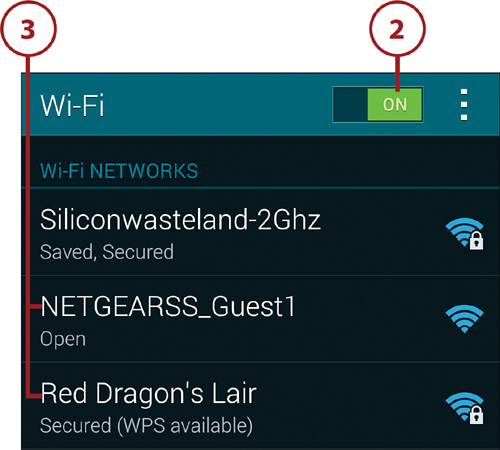
3. A list of nearby networks appears. If a network to which you’ve previously connected is found, the phone automatically connects to it. If no network is automatically chosen or you want to connect to a different network, tap the name of the network to which you want to connect and continue with Step 4.
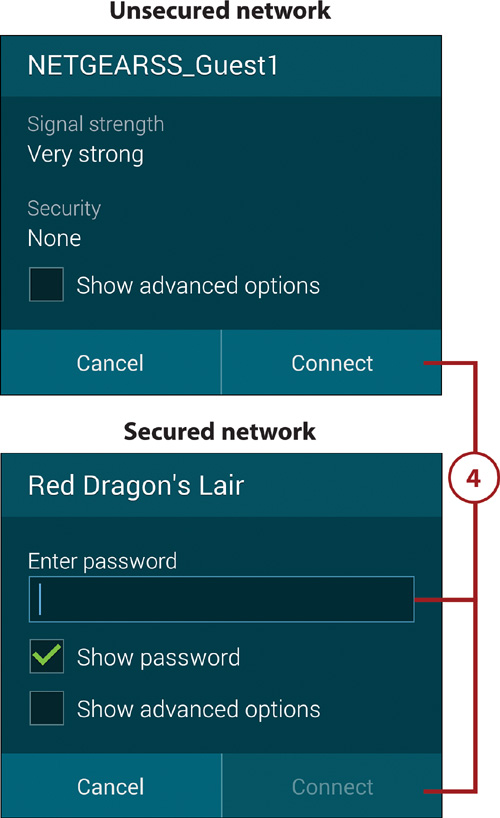
4. Do one of the following:
• If the network is unsecured (open), tap the Connect button. No password is required to connect.
• If the network is secured (password protected), enter the requested password, and then tap the Connect button.
Show Password
When entering a lengthy or complex password, you may find it helpful to tap the Show Password check box. Otherwise, each character in the password is only momentarily visible as you type it.
5. If successful, the Settings screen shows that you’re connected to the network.
>>>Go Further: Wi-Fi Network Tips
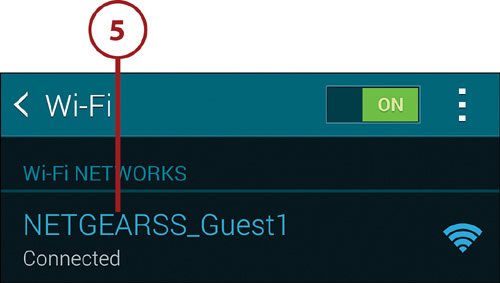
• To forget a network to which you’ve previously connected, press and hold the network name in the Wi-Fi Networks list, and then tap Forget Network.

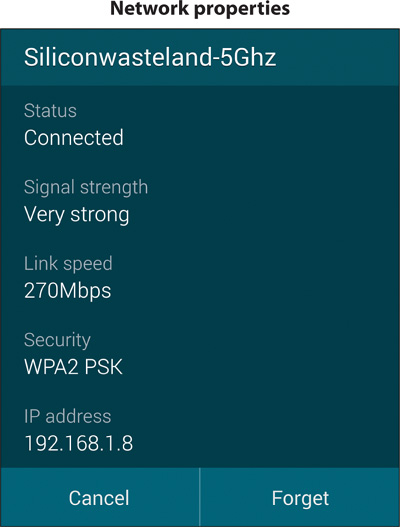
• To view information about the network to which you’re connected, tap its name in the Wi-Fi Networks list. If there are multiple unsecured networks within range, you can connect to each one and compare their signal strength and speed.
Changing the Default Language
If English isn’t your native language, you can change the phone’s default language to another supported language.
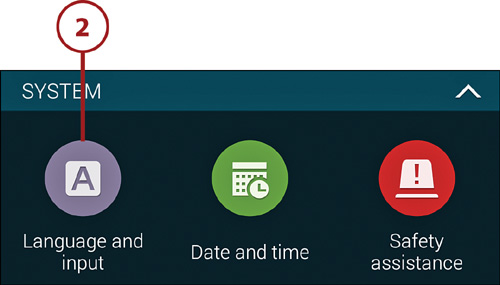
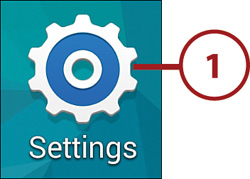
1. On the Home screen, tap Apps, followed by Settings.
2. In the System section, tap the Language and Input icon.
3. Tap Language.
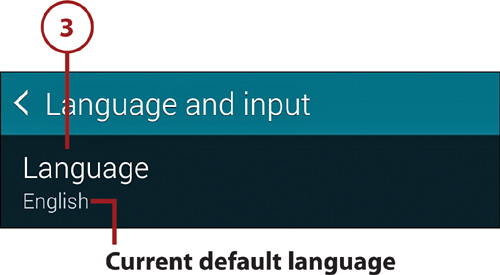
4. Tap the desired language. Icon names, display text, prompts, dialog boxes, and other text change to reflect the selected language.

Change the Input Language
Options for the default language are limited. Although it won’t affect system text, such as prompts and dialog boxes, you can still change the input language (text that you type or speak) to your native tongue. See the “Typing Tips” sidebar in Chapter 2 for more information.
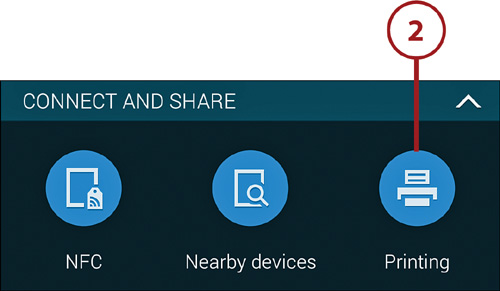
Wireless Printing
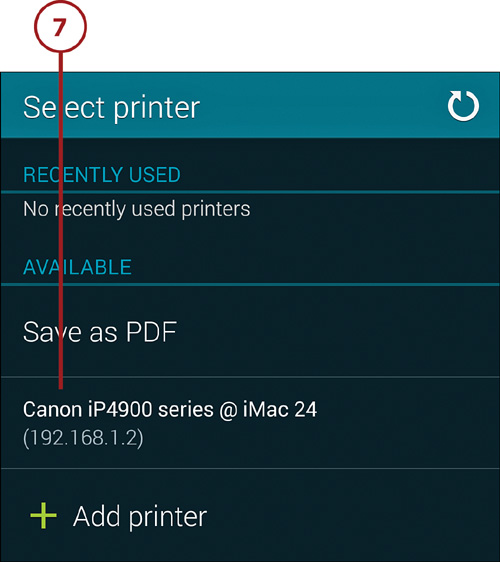
If you own or have access to a wireless printer, you can print from any app that provides a Print command, such as Gallery and Internet. Prior to printing, you must install print service software for your printer. You’ll also need to know the IP (Internet protocol) address of the printer on the wireless network. See the printer manual for this information. (If you know your router’s IP address, you can turn on the printer, enter the router’s IP address in your browser, and discern the printer’s IP address.)
Install the Print Services Software (First Time Only)
1. On the Home screen, tap Apps, followed by Settings.
2. In the Connect and Share section, tap Printing.
3. If a print service plug-in isn’t listed for your printer, tap the plus (+) button. Play Store launches.
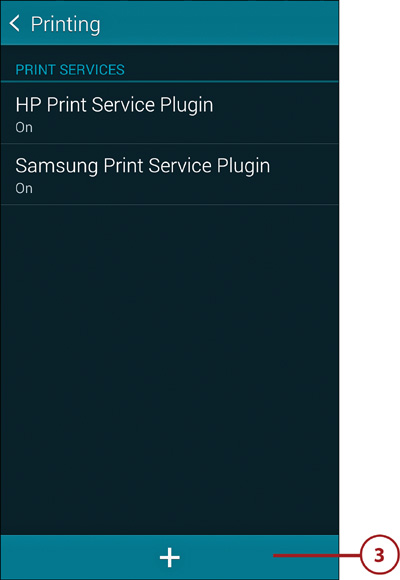
4. In the list that appears, locate a print service app from your printer’s manufacturer. Tap to select the software.
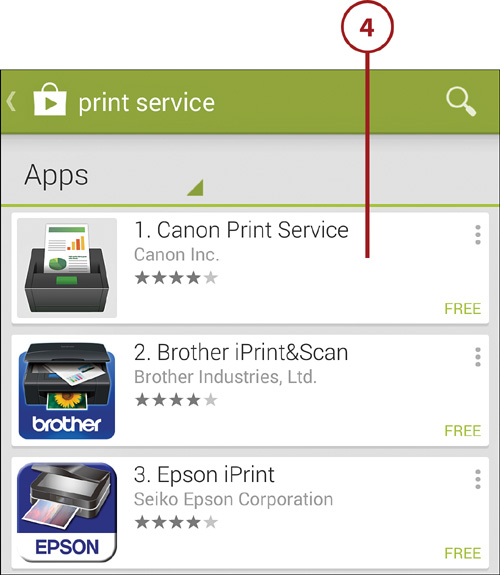
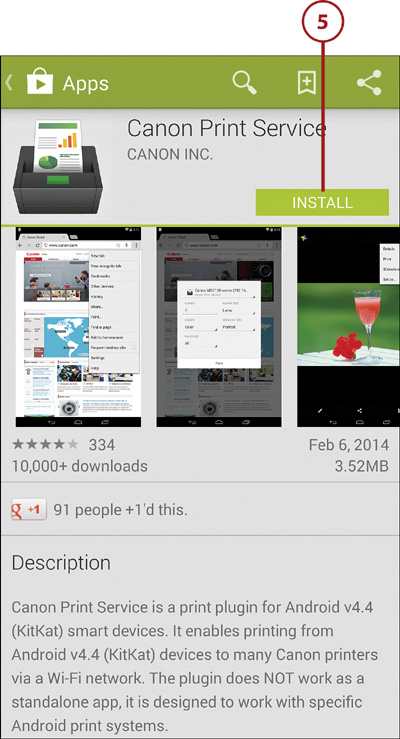
5. Review its description, ensure that your printer model is supported, and tap Install.
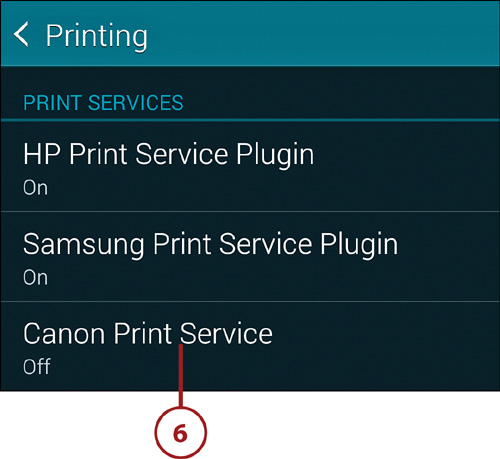
6. When installation finishes, press the Back key repeatedly until the Printing screen reappears. The new print service software is added to the list. Tap its name to enable and configure it.
7. When you print from an app, select your wireless printer from the Available list.