
4. Surf’s Up! Using the Internet
You’re going to be spending a lot of time online with your iPad. With it, browsing the Web is easy, fast, and fun—and touching websites to control them is way better than using a mouse. Here’s what you learn in this chapter:
• Using the iPad web browser
• Why some sites and videos don’t work
• Being safe on the Internet
One of the best things about the iPad is getting to use the Internet in all sorts of places—in bed, on the couch, in school, and out and about. But you can do that on a laptop with Wi-Fi, too, so what’s so special about the iPad? Three things: its shape, how you get online, and the way you control the iPad. Because it’s smaller than a laptop and much lighter, the iPad is easier to carry and use with just one hand. Some iPad models can get online almost anywhere, even if there’s no Wi-Fi network nearby. And finally, because of its touchscreen and lack of a keyboard, you can surf the Web on it by touch.
The Two Kinds of iPads
All iPads may look basically the same on the outside, but on the inside they can be different in two ways. The first way is the amount of storage they have (check out “Go Further: Your iPad’s Storage Space” in Chapter 2, “Getting Started: Set Up and Sync Your iPad,” for more on this). The second is how they connect to the Internet. When it comes to Internet connection, there are two kinds of iPads: Wi-Fi only or Wi-Fi + 4G. Both the standard iPad and iPad mini come in these two versions. Where and how you can surf the Web depends on what kind of iPad you have.
• Wi-Fi is the wireless Internet that you might have at home, school, or even your local McDonald’s or Barnes & Noble. It’s how you connect a computer and some video game systems to the Internet without any wires. Every iPad can get on the Internet this way.
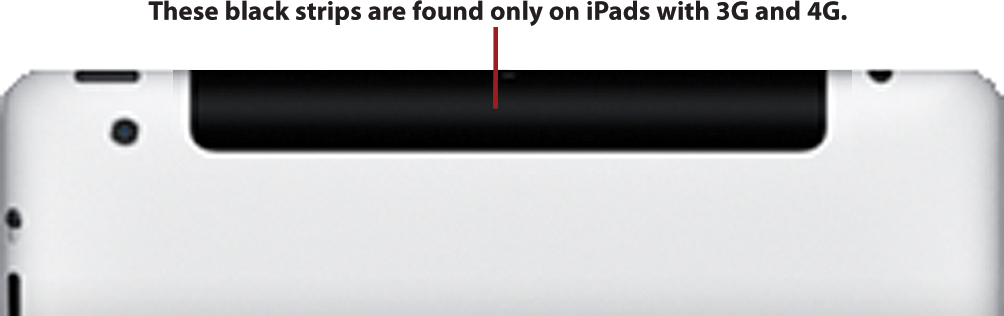
• Wi-Fi + 4G iPads are kind of like cell phones. They can get online using Wi-Fi, but they also have 4G, the same technology that lets cell phones make calls or browse the Web. Only some iPads have 4G. They have a black strip of plastic on the top of their back sides. If you have a Wi-Fi + 4G iPad, you can get online almost anywhere.
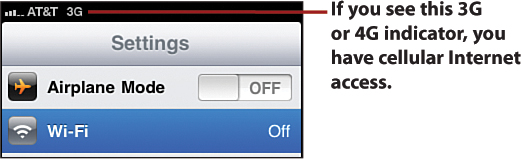
The iPad that came out in 2012 was the first one to use 4G networking. The previous models used 3G. There are two important differences between 4G LTE (the full name of 4G) and 3G. First, 4G is faster than 3G. Second, 4G is a newer technology, so it’s not available everywhere. When you’re in a place where 4G is available and you have cellular data turned on (more on that later in this chapter), your iPad automatically uses it. If there’s no 4G near you, but 3G is available, your iPad automatically connects to the 3G network. You don’t need to worry about choosing between 3G and 4G networks. Your iPad chooses the fastest one for you.
Wi-Fi iPads
If you’re like most people, you have a Wi-Fi iPad. This means that you can get online anytime there’s a Wi-Fi network near you—sort of.
Some people put passwords on their Wi-Fi networks to keep other people from using them. If you want to use one of those, you have to know the password. (If you have Wi-Fi at home and you don’t have a password, you should tell your parents to use one. It makes your network much safer.) If you don’t, though, there are lots of networks open.
Finding and Using Wi-Fi Networks
To see if there are any Wi-Fi networks near you, start by tapping the Settings app on the home screen and then follow these steps:
1. Tap Wi-Fi to access the Wi-Fi options.
2. In the Wi-Fi box, make sure the slider is On.
3. If there are any Wi-Fi networks nearby, they’re listed under Choose a Network. Networks with a lock next to them have passwords. If you know the password, tap that network’s name.

4. Type the password and tap Join. If you have the right password, you’ll be online in no time.

Networks that don’t have the lock icon are open to everyone. Tap one of those and your iPad connects. There are also some unlocked networks (often at places like restaurants and coffee shops) that you have to register to use. To use them, just tap them and, when the window pops up, agree to the network’s terms of use (with your parents’ permission). After you’ve done this, you’ll be free to use it.
5. When you’ve successfully connected to a Wi-Fi network, the Wi-Fi signal strength icon appears in the top-left corner of your screen. The number of bars tells you how strong and how fast your connection is. Now you’re on the Internet—happy surfing!
Wi-Fi + 4G iPads
If your iPad has both Wi-Fi and 4G, everything about using Wi-Fi to get on the Internet applies to you, but you’ve got something else too: You can get online with 4G.
To use 4G, you need to be in range of a 4G signal, which is kind of like a radio station signal. Just like with radio stations, sometimes it’s hard to get good reception. However, instead of static, your Internet connection gets slow. Unlike using Wi-Fi, you don’t have to connect to 4G; if you’re in range, you use it automatically. Look for the little 4G (or sometimes 3G) icon in the top-left corner of your screen. That means you’re connected.
If you can’t get good 4G reception, you can always try Wi-Fi, but you should be able to get online from more places using 4G.
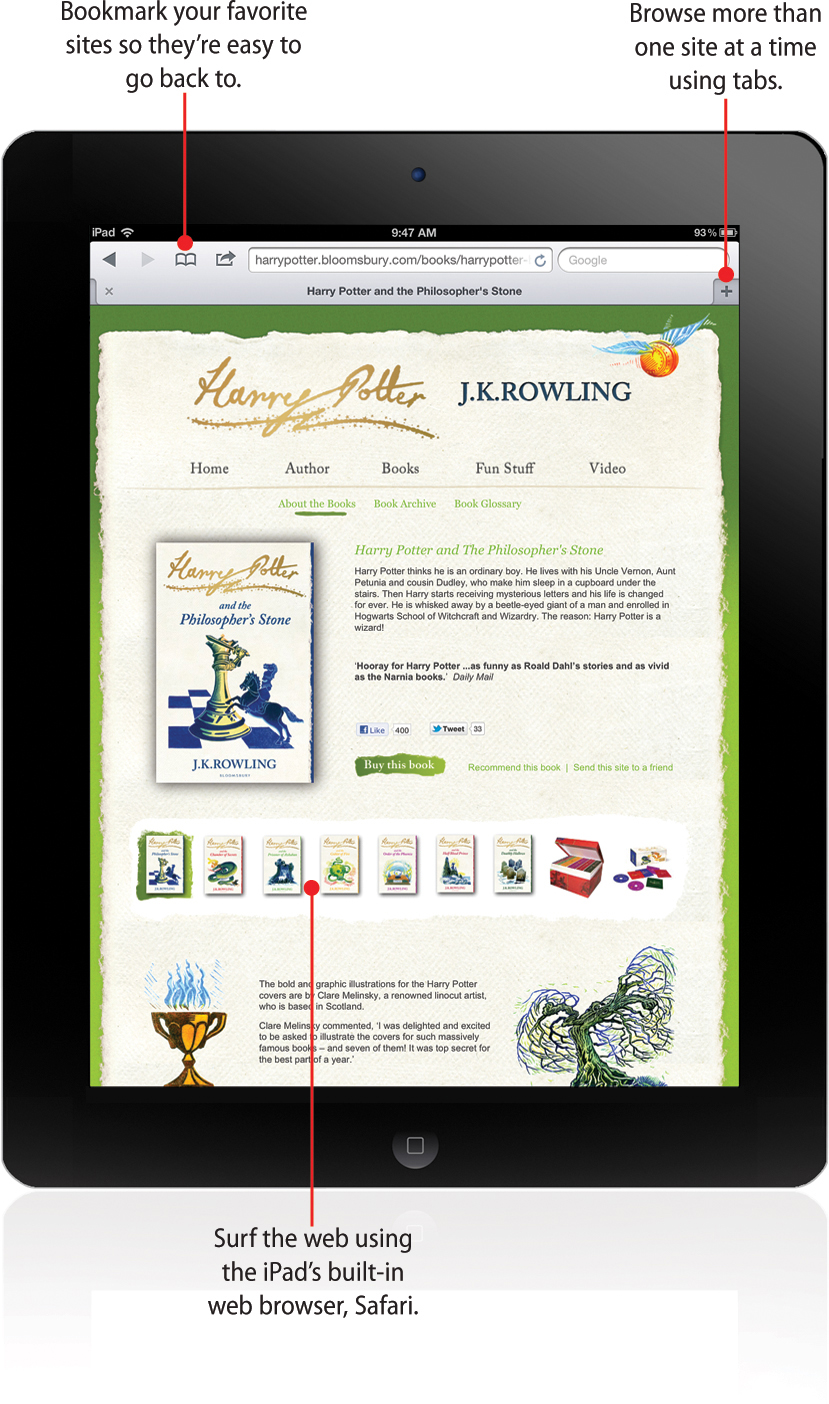
Let’s Go on Safari: Using the iPad Web Browser
The iPad comes with a web browser called Safari. It isn’t the only web browser you can use on your iPad (check out “Awesome Apps” later in this chapter for some suggestions), but it’s a really good one.
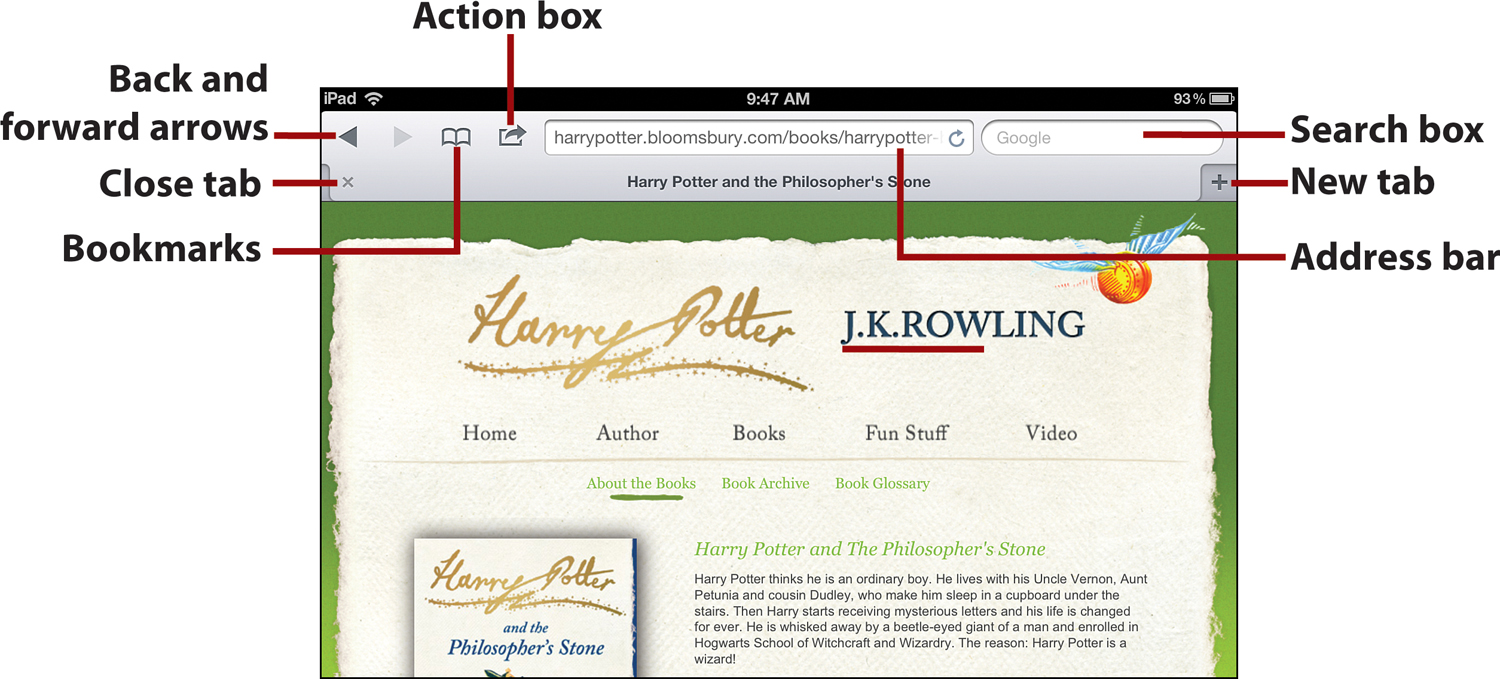
Safari is a lot like other web browsers you’ve probably used (in fact, if you’ve used a Mac, you’ve probably used Safari). Here’s what the buttons in Safari’s top bar do:
• Back/forward arrows—Tap the left arrow to go back to the last web page you were on. If you’ve already tapped that at least once, the right arrow goes to the next page.
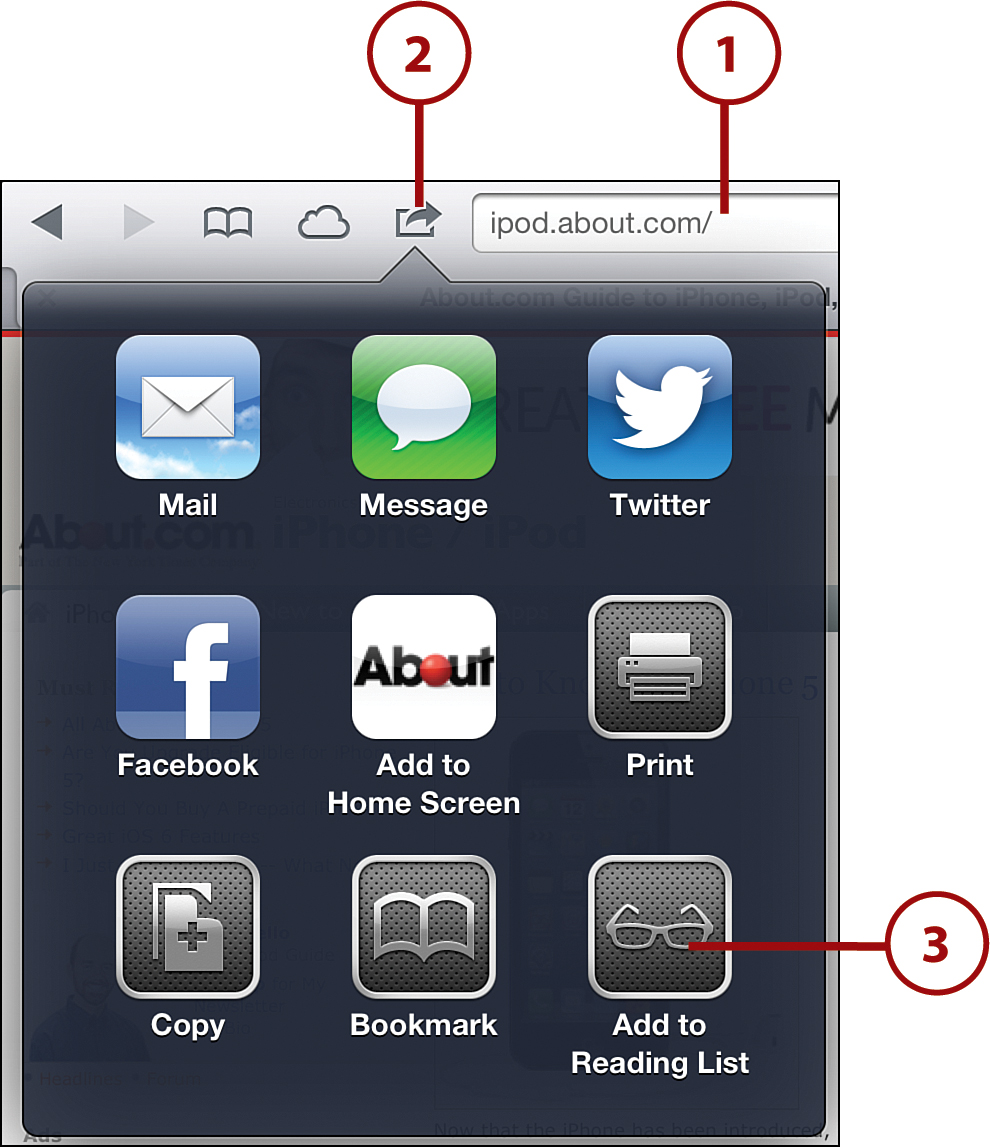
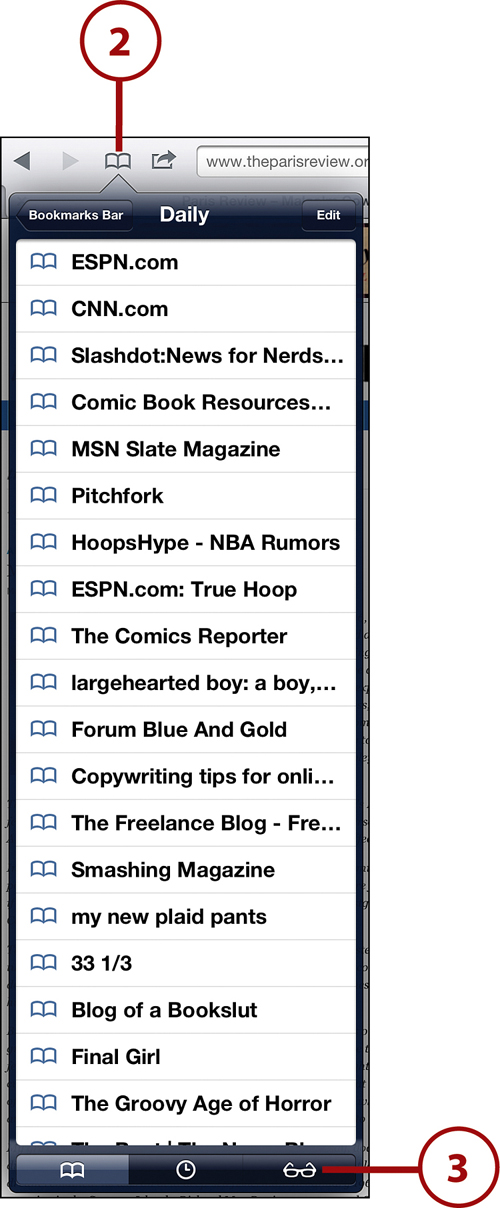
• Bookmarks—This menu stores your bookmarks (more on them in “Making Bookmarks,” later in this chapter). You can store bookmarks in folders, change their names, and delete them by tapping this button and then tapping Edit. If you’re using Reading List (read more about this feature later in this chapter), this icon turns into a pair of eyeglasses. If you sync bookmarks from your computer, they appear here.
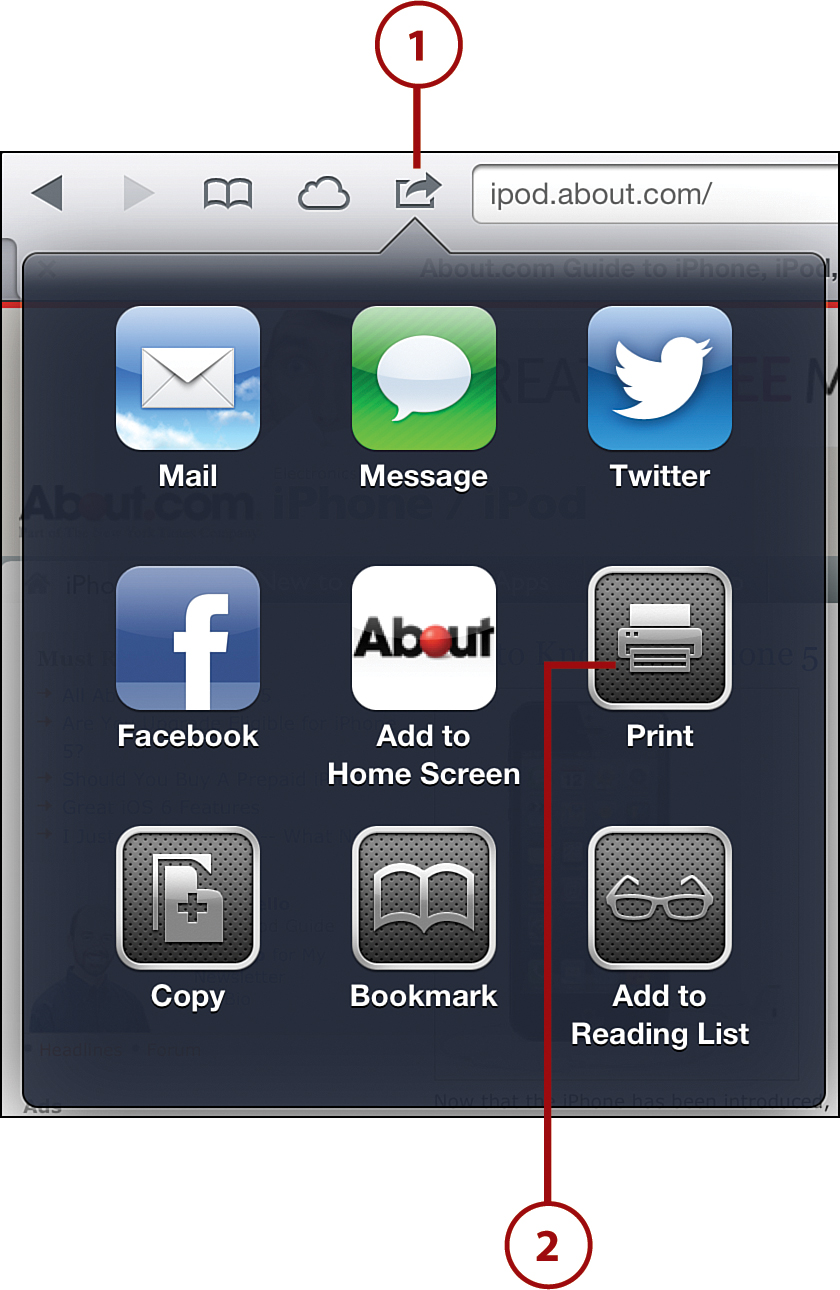
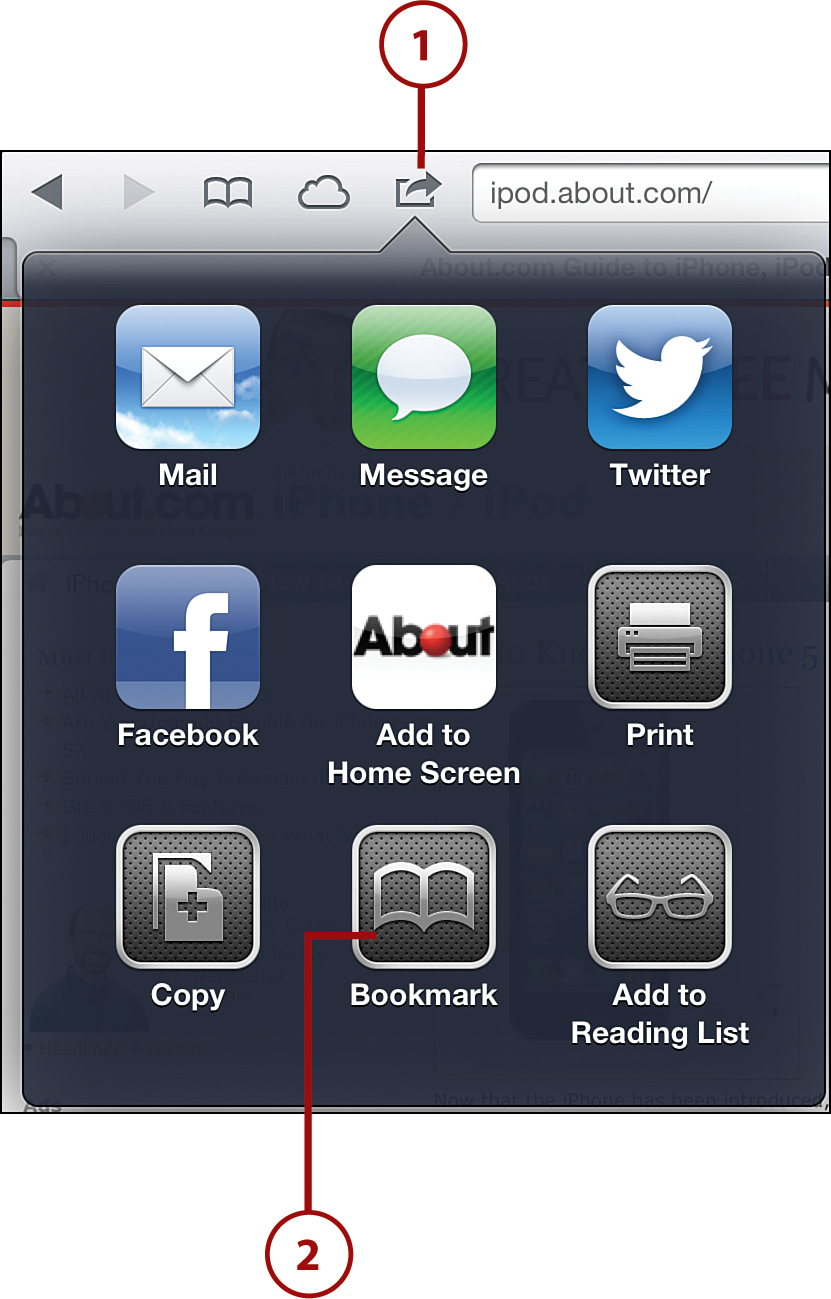
• Action box—This box contains all kinds of neat options—for making a bookmark, emailing or printing a page, adding it to your Reading List, and adding a shortcut to a page to your home screen (this is like a bookmark, except it lives on your home screen, not in Safari).
• Address bar—Shows the address of the page you’re on. Tap the address, tap the X at the end of the bar to delete the text all at once, and then type in the address of a new site you want to visit.
• Search box—If you want to search for something using Google or another search engine, tap this box, type in what you’re looking for, and then tap the Search button on the keyboard.
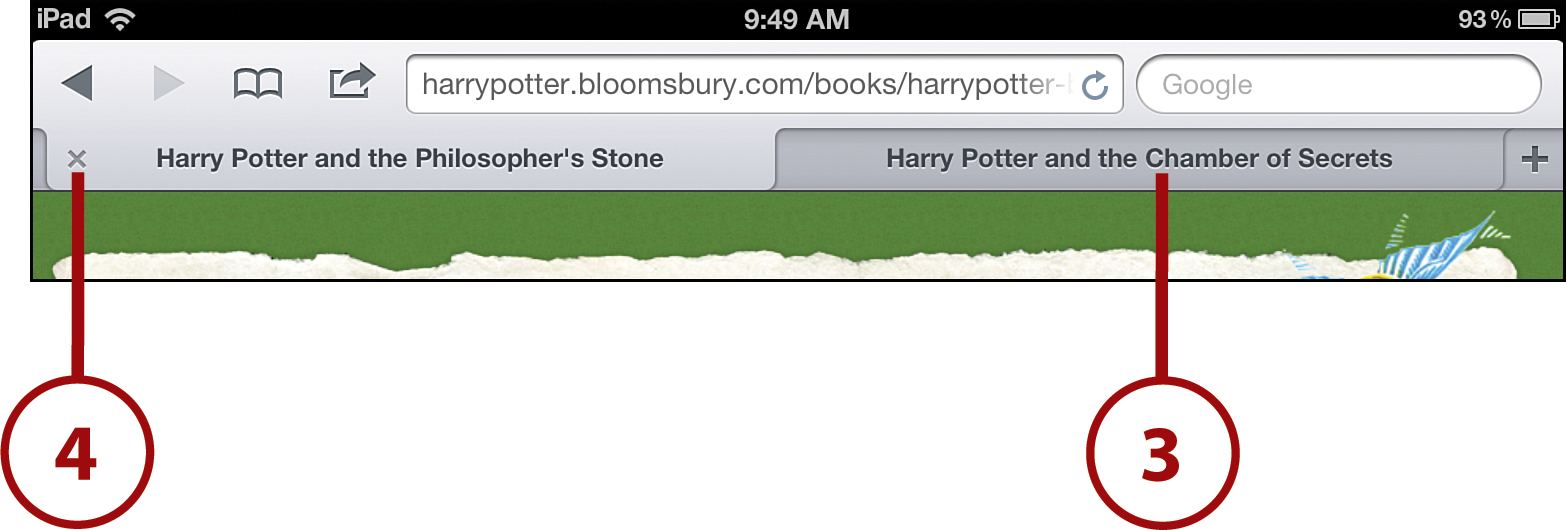
• New tab—If you want to go to a new website but still keep the one you’re looking at open, you need to open a new tab. Safari lets you open many websites at once, but because you can’t browse four or five at the same time, it hides the ones you’re not looking at. It lets you keep those hidden sites, and switch to them, by using tabs—little rectangles with the name of the hidden site on them. To open a new tab, tap the + sign. You can have up to nine tabs. Switch tabs by tapping the one you want to look at.
• Close tab—To close a tab and the site in it, tap the X on the one you want to close.
Those are far from the only things you can do with Safari, though. Read on for some tips on how to control Safari by touch and how to use some of its other features to get the most out of it.
Zooming In and Out
One of the really fun things about controlling the iPad by touch is that you can zoom in and out of websites using your fingers. There are two ways to do this:
• If you want to zoom in on a part of a web page, just double tap that section. That section of the page zooms to fill up more of the screen. To zoom out, just double tap it again.
• You can also pinch your iPad’s screen for greater control. To do this, put your thumb and index finger (the one you point with) together and then place them on your iPad’s screen. Without taking them off the screen, slide your fingers apart toward opposite sides of the screen. The page zooms in. To zoom out, put your thumb and index finger at opposite sides of the screen and then pinch together until they meet in the center.
Zooming in and out works in many iPad apps, not just Safari. Any time you want to zoom in or out in an app, try it. It usually works!
Opening a Link in a New Tab
By opening a web page in a new tab, you can see the new page without losing the one you’re already on. To do this, open a web page in Safari and follow these steps:
1. Find a link you want to open and then tap and hold it until a menu appears.
2. When the menu pops up, tap Open in New Tab. When you do that, the new tab opens, but you stay on the page you were on.

3. To see the page that you opened in the new tab, tap the new tab.
4. To close either tab, tap the X.
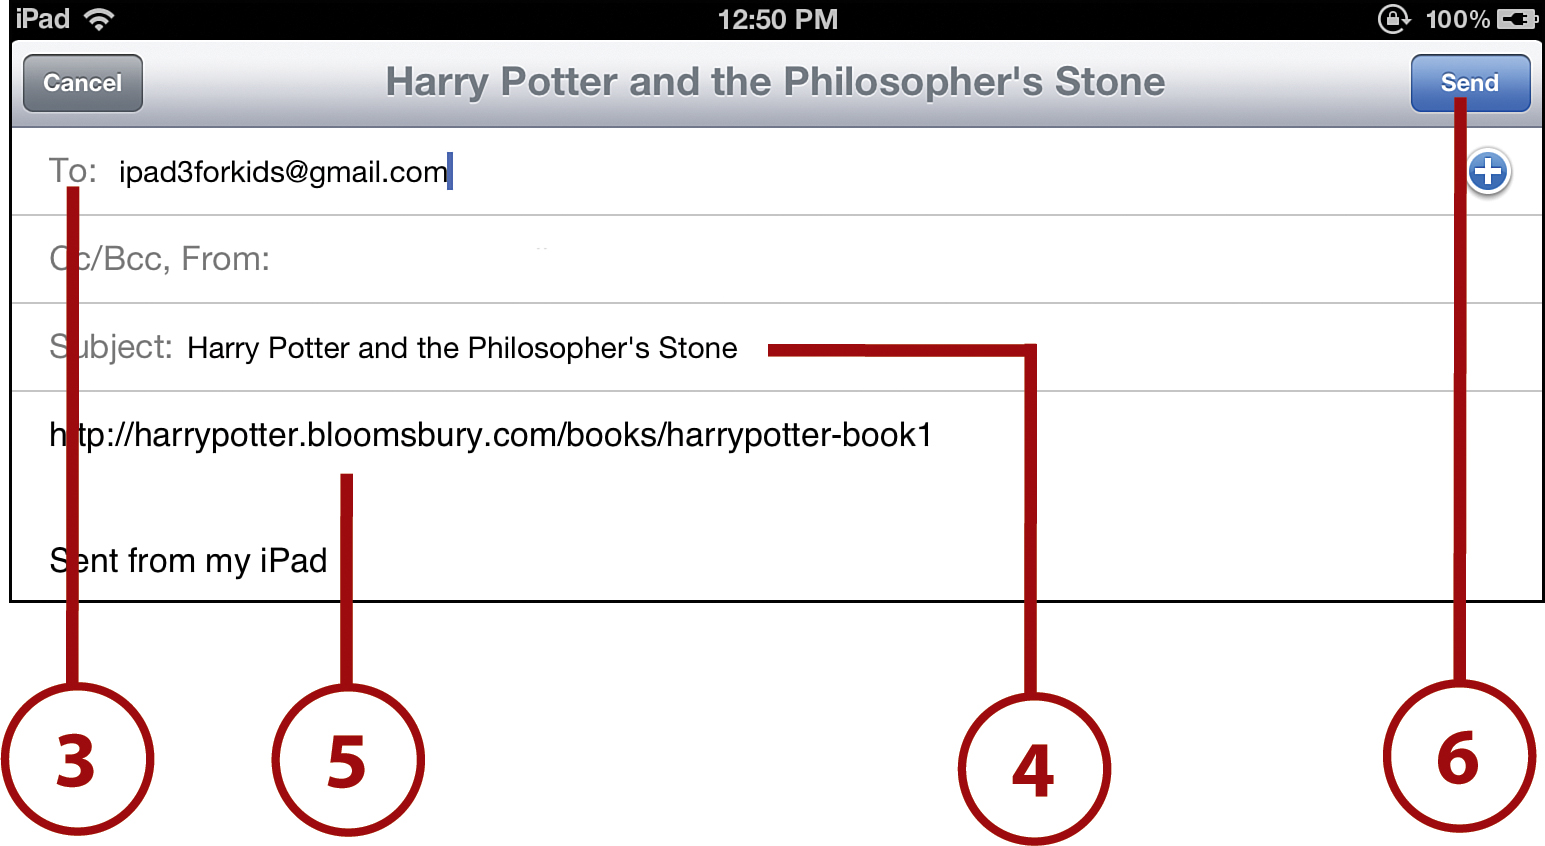
Emailing a Web Page
If there’s a web page you want to share with a friend, teacher, or family member, you can email them a link to it. A link is a shortcut that they can click to take them to their web browser and right to the page you’re sharing. To do that, go to the web page you want to send and then follow these steps:
1. Tap the Action box.
2. Tap Mail.

3. This opens the email app. Enter the email address of the person you want to send the link to.
4. The email subject is automatically filled in with the name of the page, but you can change it to whatever you want. Just tap the subject line and make your changes.
5. If you want to write a message to send with the link, tap the body of the email and write your message.
6. Tap the Send button. This doesn’t email the entire website, but it sends a link to the page so the person can easily check it out.
Following these steps, of course, means you have to have email set up on your iPad. If you don’t, you can learn how to set up and use email in Chapter 5, “Talk to Me: Texting, Chatting, and Email.”
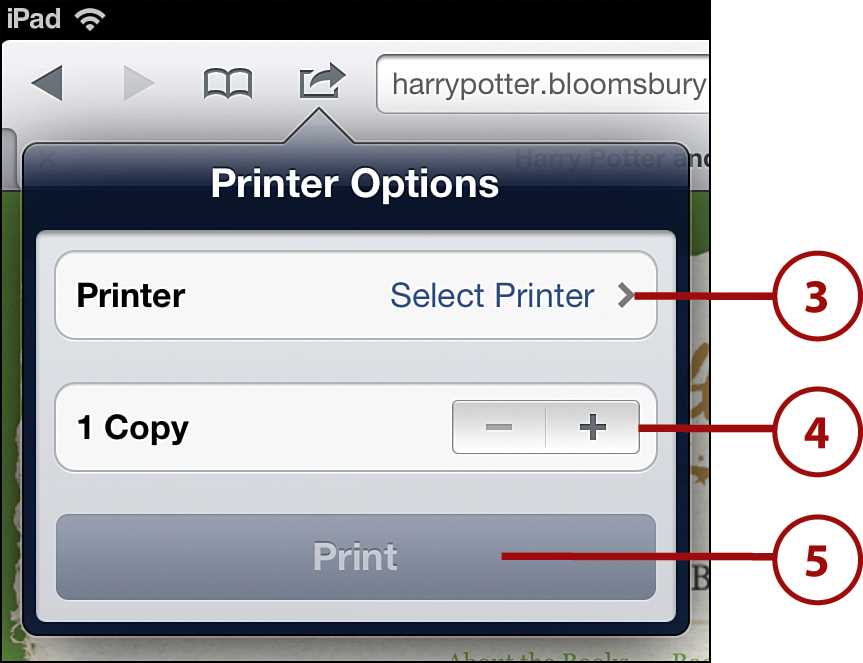
Printing a Web Page
Printing a page isn’t that different from sending someone a link. You have to have an iPad-compatible printer (more about this in “Writing and Printing on the iPad” in Chapter 7, “Using Your iPad for School”). If you do, go to the web page you want to print and follow these steps:
1. Tap the Action box so that a menu appears.
2. Tap Print to access the print options.
3. Tap Select Printer in the Printer menu to choose an available printer (if your printer isn’t already selected).
4. Tap the + and – buttons to change the number of copies of the page you’re printing.
5. Tap Print.
Making Bookmarks
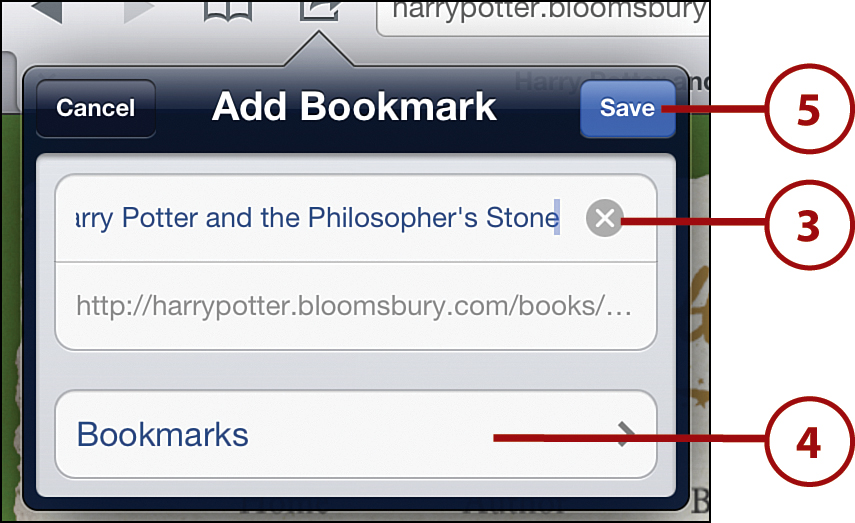
Bookmarks are shortcuts that make it easy for you to visit your favorite websites without typing the address each time. With a bookmark, you go right to your favorite site with just a couple taps. To create a new bookmark, begin by going to the website you want to bookmark and then follow these steps:
1. Tap the Action box to open it.
2. Tap Bookmark.
3. Each bookmark is named after the page you’re bookmarking, but you can change that (which is a good idea because sometimes page names are long). To do that, tap the X in the top section and enter something shorter.
4. If you want to put the bookmark in a different folder, tap Bookmarks and select one.
5. Tap Save.
Why Some Sites and Videos Don’t Work
Most websites look great on the iPad, but some sites look weird or don’t work at all. A lot of the ones that don’t work state that they need something called Flash. They might even say that you should download the Flash Player. Don’t listen to them: Flash doesn’t work on the iPad.
Flash is a technology that a lot of websites use for animations, audio and video, and sometimes games. YouTube uses Flash. So does the online video game site Kongregate.
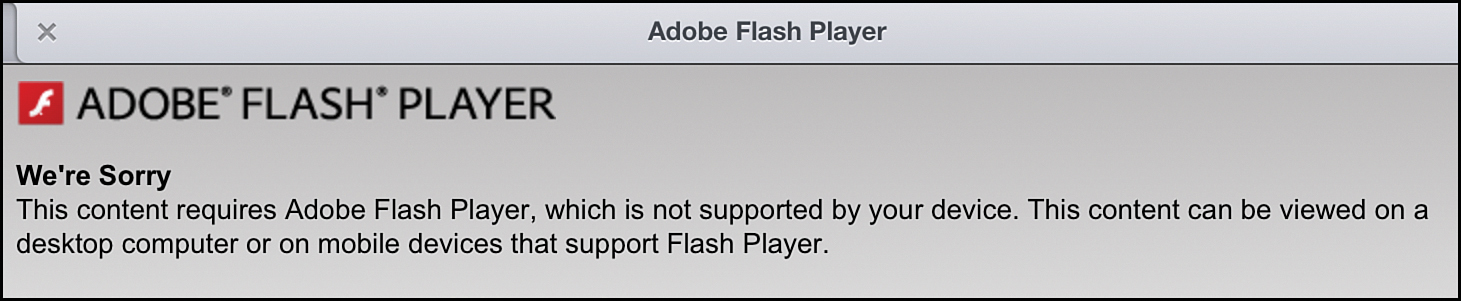
But Flash doesn’t work on the iPad because Apple controls what software works on the iPad, and Apple doesn’t like Flash. Apple says, correctly, that Flash makes browsers crash too often and that it drains batteries too quickly—and nobody wants that. Because of that, Apple doesn’t let Flash work on the iPad; you can’t install it even if you want to. Kind of lame, right?
But is that a big problem? Maybe, maybe not. Lots of websites that use Flash also have special versions that work on the iPad, too.
For instance, there are two ways to use YouTube on the iPad. There’s the YouTube app that comes with some versions of the iPad (check out “Watching Videos from YouTube or iTunes” in Chapter 15, “Lights, Camera, Action: Videos and Photos,” for more on that) or you can go right to YouTube.com. Both of those options play movies using technology that works on the iPad, so you can still have fun with YouTube without Flash.
Some sites, such as Kongregate, don’t have other versions; they require Flash and you can’t use them on the iPad. This is definitely a pain, but there are fewer and fewer sites that have Flash without also having an iPad version. Plus, the App Store has so many great games, you might not miss sites such as Kongregate.
Save Your Favorite Pages with Reading List
Ever come across an article or a page on the Web that you’re really interested in, and want to read, but don’t have time for right now? Then you’ll love Reading List. It’s a part of Safari that lets you save articles and pages to read later. It’s especially useful if you’re using your iPad to do research for school and want to collect articles on the topic you’re studying without having to read them all right away.
One especially cool feature of Reading List lets you read web pages even when your iPad isn’t connected to the Internet. This only works in iOS 6 and above, but if you’re running that version of the iPad’s operating system, whenever you add something to your Reading List, it’s saved to your iPad so you can read regardless of whether you have an Internet connection.
Adding Pages to Your Reading List
Adding pages or articles to your Reading List is simple; just follow these steps:
1. Use Safari to browse to a page you’re interested in.
2. When you find an article you want to save for later, tap the Action box.
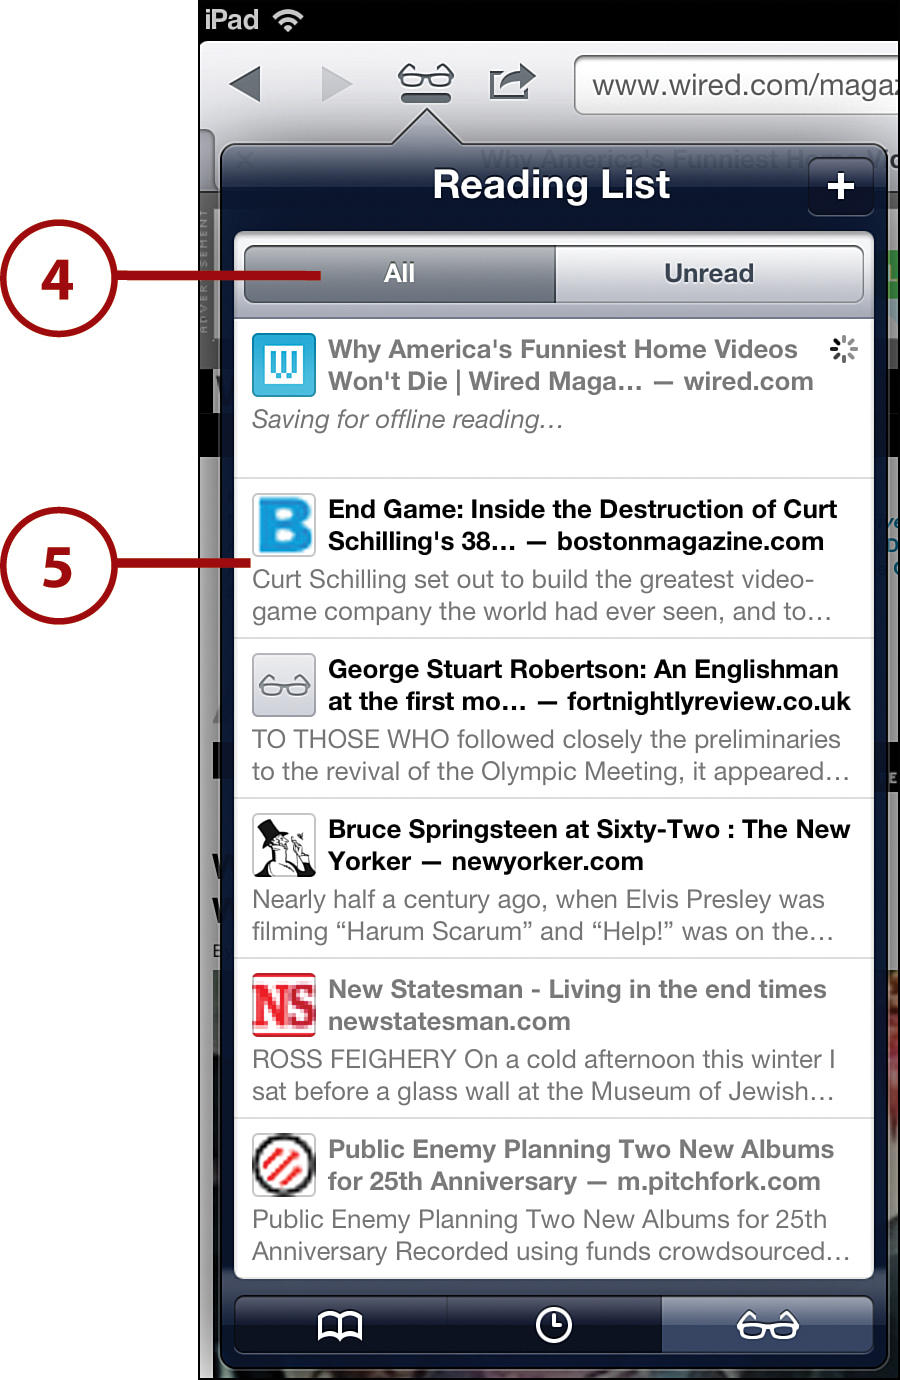
3. Tap Add to Reading List. The page is added to your list for you to read later.
Reading Your Saved Articles
After you’ve saved some articles to your Reading List, you can go back to them later to check them out.
1. Open Safari.
2. Tap the Bookmark icon. (This icon changes to Reading List’s eyeglasses icon when your Reading List is being synced to your other iOS devices or to the desktop version of Safari on your Mac.) This is where your Reading List is stored.
3. Tap on the eyeglass icon at the bottom to access your Reading List. You can also add articles to Reading List on a Mac and sync them to your iPad using iCloud.
4. To see all the pages in your list, tap All. To just see the articles you haven’t read yet, tap Unread.
5. When you find the one you want to read, tap it and it loads in Safari.
Be Safe: On the Internet
The playground is a fun place, but it can also be dangerous: You can fall off the jungle gym or get bullied. The Internet is the same way. It’s a pretty cool place, and it’s full of interesting, exciting, and fun websites. However, you have to make sure you’re safe when you use it. Follow these rules when you use the Internet to stay safe:
• Before you start using the Internet at all, talk to your parents. They’ll want to help you use it and might have rules or suggestions that will keep you safe.
• The most important rule is to always talk to your parents or teachers. If someone or something makes you feel weird or uncomfortable, tell your parents or teachers. Tell them if you feel scared or unsure about anything that happens online. They’re there to protect you, and they’ll be able to help you figure out what to do.
• Never give your personal information—such as your name, phone number, or where you live—to someone online. They might tell you that they know you or someone you know, or they might be a total stranger. Either way, don’t give them your information.
• Never give out passwords to your or your family’s computer or other accounts, no matter who’s asking for them.
• Don’t send pictures of yourself to strangers or people who say they know people you know, no matter who’s asking.
• If you only know someone online but not in real life, don’t ever make plans to meet them in person. If someone asks to meet you, tell your parents right away.
• Don’t sign up for things that ask for your personal information—such as a name or address—without getting your parents’ permission first.
Awesome Apps
Here are some great web browsing apps that you might want to use. Search for them at the App Store:
• Dolphin Browser HD—This browser is a little faster than Safari and lets you sign into social media without using other apps. The coolest thing about it, though, is the little designs you draw on the screen that make things happen (such as drawing an up arrow to jump to the top of the screen). Free
• Mercury Web Browser Pro—This is another alternative browser app that has features Safari doesn’t—such as different color themes and onscreen gestures to control the app. It also has an ad-blocking feature that lets you not have to see the ads on many websites. Mercury also usually loads web pages faster than Safari. $0.99
• Mobicip Safe Browser—Parents, you might find this app particularly interesting, since it filters websites for mature content and prevents your kids from visiting them. It offers multiple levels of filtering for kids of different ages and can be used together with a $10/year paid account to control what content your kids can browse with a high level of detail and specificity. $4.99
• Wi-Fi Finder—There’s nothing worse than wanting—or needing!—to get on the Internet, but not being able to find a nearby Wi-Fi hotspot (not a problem for you lucky iPad Wi-Fi + 4G owners, of course). You won’t have that problem again if you have this app, which features a directory of more than 650,000 Wi-Fi hotspots around the world. Just search based on your location, and it shows you where you can find nearby hotspots. Free