
4
Java EE Web Applications
CERTIFICATION OBJECTIVES
• Creating Web Applications from Existing Sources
• Adding and Using NetBeans-Available Web Frameworks
• Understanding the Visual Web JSF Framework
• Working with Server Instances
• Building and Deploying Web Applications
Q&A Self Test
NetBeans supports the development of web applications through various means including project import support, web framework support, application/web server integration, and build/deployment support. In essence, NetBeans provides support through the entire software development process, giving few reasons to ever leave the comfort of your IDE. The exam targets common tasks that are performed when developing web applications such as container/server setup, project importing, and web application creation. Objective 1.3, “Working with Server Instances,” covers registering and interfacing with application servers. Objective 4.2, “Understanding the Visual Web JSF Framework,” delves into the web application framework support in the IDE.
Objective 4.1, “Creating Web Applications from Existing Sources,” covers importing and configuring of existing non-NetBeans IDE projects.
Mastering these objectives will prepare you well for the exam and will assist you in web application development throughout your career.
Being familiar with the software development life cycle is important. Knowing about the NetBeans-related tools and resources at your disposal is equally beneficial. Objective 4.3, “Adding and Using NetBeans-Available Web Frameworks,” assists you in deciding on the best architecture to use. Objective 4.5, “Building and Deploying Web Applications,” assists you in the build and end-state deployment processes. Objective 4.4, “Using the HTTP Server-Side Monitor,” assists you in testing and tuning the application. Note that Objective 4.4 is covered in Chapter 8.
Working through this chapter will get you comfortable with all exam-related web development and support questions. Be prepared, as setting up application servers and learning web frameworks can be time-consuming. For the scope of the exam, having general knowledge of frameworks, application servers, and web-related processes should suffice. When learning (or refreshing your knowledge) about web-related technologies, for the scope of the exam, manage your time and focus.
CERTIFICATION OBJECTIVE: Creating Web Applications from Existing Sources
Exam Objective 4.1 Describe how to create a NetBeans project from the source code of an existing web application.
Creating a NetBeans project from the source code of an existing web application is similar to creating a NetBeans project from the source code of an existing Java application, as covered in Chapter 3. The main differences relate to the settings necessary for web applications, both in content and directory structures.
A four-step wizard drives the process for creating a new web application with existing sources. We will examine each step:
![]() Choose Project
Choose Project
![]() Name And Location
Name And Location
![]() Server And Settings
Server And Settings
![]() Existing Sources And Libraries
Existing Sources And Libraries
Step 1: Choose Project
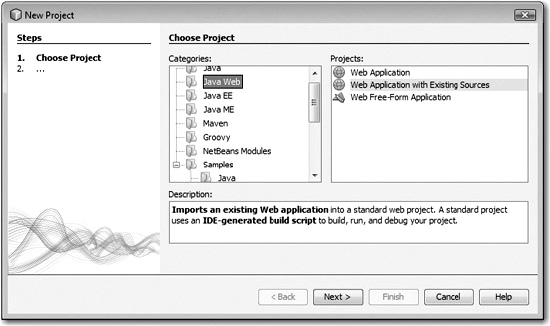
To create a new Web Application With Existing Sources, choose File | New Project (CTRL-SHIFT-N). This opens the first step in the wizard, shown in Figure 4-1. Under Categories select Java Web, and from the Projects list box on the right, choose Web Application With Existing Sources. Click Next to move to the next step in the wizard.
FIGURE 4-1 Step 1: Choose Project
Step 2: Name And Location
The next step in the New Project wizard asks for basic project setup information. It is shown in Figure 4-2 and configures the following:
FIGURE 4-2 Step 2: Name And Location
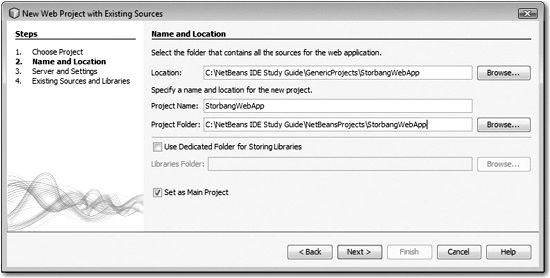
![]() Location Name of the folder that contains the source code for the web application.
Location Name of the folder that contains the source code for the web application.
![]() Project Name Name of the project that will appear in the Projects window.
Project Name Name of the project that will appear in the Projects window.
![]() Project Folder Location where the NetBeans project file information will be stored. This is where the nbproject directory is placed along with the build script.
Project Folder Location where the NetBeans project file information will be stored. This is where the nbproject directory is placed along with the build script.
![]() Use Dedicated Folder For Storing Libraries Enables the storing of libraries in a central location. Facilitates the sharing of projects between users.
Use Dedicated Folder For Storing Libraries Enables the storing of libraries in a central location. Facilitates the sharing of projects between users.
![]() Libraries Folder Location of the libraries—needed if the project is to be shared.
Libraries Folder Location of the libraries—needed if the project is to be shared.
![]() Set As Main Project Sets this project as the main project at the conclusion of the wizard.
Set As Main Project Sets this project as the main project at the conclusion of the wizard.
Step 3: Server And Settings
In this step, shown in Figure 4-3, you have the ability to set properties for server-related settings.
FIGURE 4-3 Step 3: Server And Settings
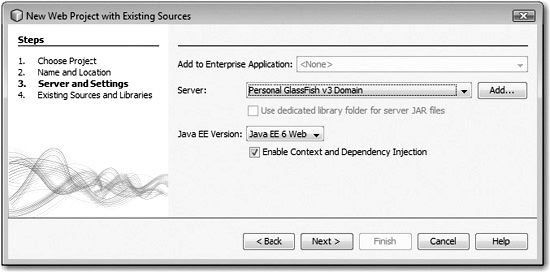
![]() Add To Enterprise Application Enables the web project to be added to an existing enterprise application.
Add To Enterprise Application Enables the web project to be added to an existing enterprise application.
![]() Server Specifies the target server to be used with the web project. Only registered servers may be selected. The Add button allows you to register a new server.
Server Specifies the target server to be used with the web project. Only registered servers may be selected. The Add button allows you to register a new server.
![]() Use Dedicated Library Folder For Server JAR Files Is only enabled if the same selection was made in the previous step.
Use Dedicated Library Folder For Server JAR Files Is only enabled if the same selection was made in the previous step.
![]() Java EE Version Specifies the Java EE level for your web application. Options are Java EE 6 Web, Java EE 5, and J2EE 1.4. The levels must match the compliancy of the application server.
Java EE Version Specifies the Java EE level for your web application. Options are Java EE 6 Web, Java EE 5, and J2EE 1.4. The levels must match the compliancy of the application server.

If you need to review settings in a previous step, select the Back button. Providing that you don’t change the project type in step 1, your settings are preserved for when you return to the step you were on.
Step 4: Existing Sources And Libraries
In this step, shown in Figure 4-4, web folders and the source and test package folders are selected for the project. Browse and Add Folder buttons display file browsers for choosing directories. Multiple directories can be configured for source and test package folders. Configuration of test sources is optional.
FIGURE 4-4 Step 4: Existing Sources And Libraries

![]() Web Pages Folder Specifies the location of the project’s web pages.
Web Pages Folder Specifies the location of the project’s web pages.
![]() WEB-INF Content Specifies the location of the project’s WEB-INF content.
WEB-INF Content Specifies the location of the project’s WEB-INF content.
![]() Libraries Folder Specifies the location of the project’s class library deficiencies.
Libraries Folder Specifies the location of the project’s class library deficiencies.
![]() Sources Package Folders Specifies the location of source directories.
Sources Package Folders Specifies the location of source directories.
![]() Test Package Folders Specifies the location of test directories.
Test Package Folders Specifies the location of test directories.
After you click the Finish button, the project is created on your computer and opened in NetBeans. The folder specified in Step 2’s Location property determines where the web pages, Java sources, and libraries are situated.
The Projects And Files windows display the logical and file structure of the project. Many of these settings can be modified in the Project Properties dialog box after the project has been created.
EXERCISE 4-1 Creating a Web Program with Existing Sources
In this exercise, you create a web application from existing sources.
1. Prepare a simple web application. If you do not have one available, consider using a sample web application for this exercise such as ServletExamples. Note that before it can be used to create a new project with existing sources, the IDE has to be restarted after the sample project is created. If you want to use the same folder as the project folder, you also have to delete build.xml and the build directory (if it exists).
2. Use the New Projects wizard to create a Web Application With Existing Sources from your base or modified sample application.
3. Run the application to ensure that it works.
CERTIFICATION OBJECTIVE: Adding and Using NetBeans-Available Web Frameworks
Exam Objective 4.3 Demonstrate knowledge of which web frameworks are available in the NetBeans IDE and how they are added to and used in a web application.
Web frameworks provide a well-defined structure for developers to build dynamic web applications, services, and websites. Web frameworks primarily consist of a class library and related configuration files. Popular frameworks are available in NetBeans as global libraries that can be added to your projects. When you’re creating a new web application, NetBeans prompts for the web application to be used and adds the required libraries and configuration files to the project automatically. Frameworks with wizard support include Spring (Spring Framework and Spring Web MVC (Model-View-Controller)), Struts, and JavaServer Faces, as shown in Table 4-1. NetBeans Visual Web JavaServer Faces is included in NetBeans 6.1 and is detailed in the next objective. There is no limit on frameworks that can be used in the IDE. Frameworks that are not available in the core installation can be added to the global libraries or directly to a project’s libraries folder. However, the downloaded frameworks will not have wizard support for the setting up of configuration files, special directory structures, or features. Some frameworks that are installed as plugins/modules may have additional tooling support such as the extended drag and drop features of NetBeans Visual Web JSF Framework.
TABLE 4-1 NetBeans-Available Web Frameworks and Web-Supporting Modules

Adding Web Frameworks
Web Frameworks can be added to a new project through the New Project wizard (File | New Project) or to an existing project from the Project Properties dialog box via the panel associated with the Frameworks node.
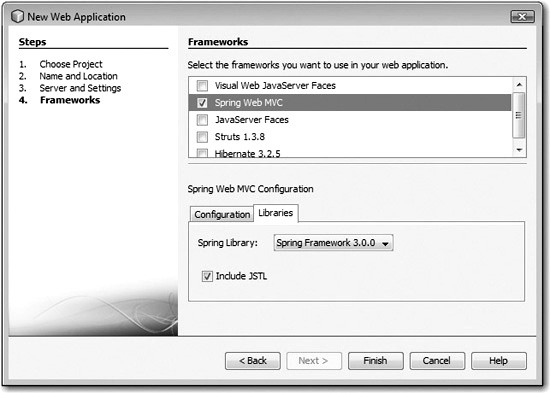
When you’re using the New Project wizard, a Web Application project needs to be selected after choosing to the Java Web category. The wizard is a four-step process. Step 1 defines the project as a Web Application, as shown in Figure 4-5. Step 2 defines the project’s name and location, as shown in Figure 4-6. In step 2, you may also define a dedicated library folder for storing your libraries. Step 3 is for establishing server-related settings, as represented in Figure 4-7. Step 4 is the step we are most concerned with, because it provides selection and configuration of the web frameworks we wish to have included in our application. Frameworks are available by selection of their checkbox in the Frameworks list box, as shown in Figure 4-8. When the desired framework is selected, tabbed panels with various configuration options show. Upon your selecting the Finish button, your project is set up with all of the necessary libraries, folders, wizards, and configuration files relative to your selected frameworks.
FIGURE 4-5 New Project: Choose Project step
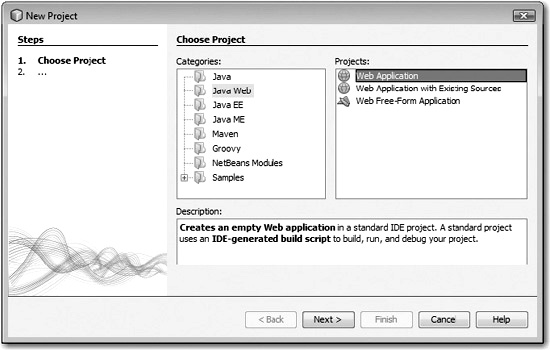
FIGURE 4-6 New Project: Name And Location step
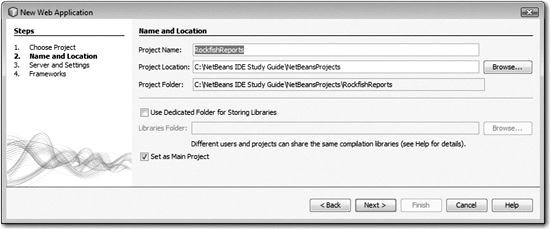
FIGURE 4-7 New Project: Server And Settings step
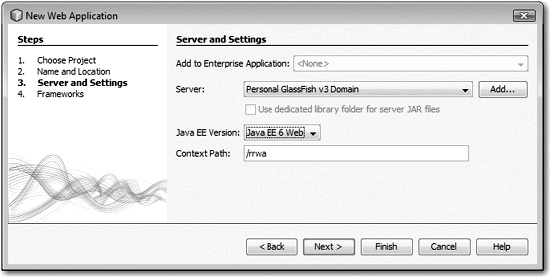
FIGURE 4-8 New Project: Frameworks step
Grails is an open-source web application framework based on the Groovy language. Grails is added to a project though the New Project wizard with Groovy as the Categories type and Grails Application as the Projects type. A Grails project is not necessary in order to use Groovy. You can create Groovy Classes and Scripts through the New File wizard.
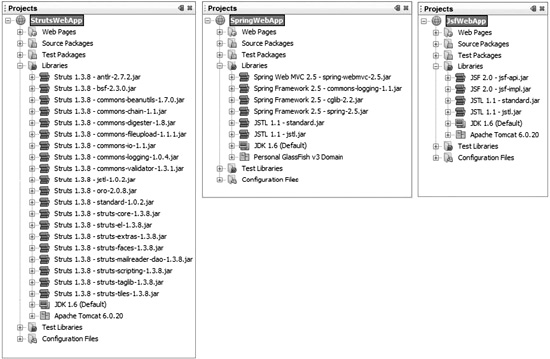
Let’s take a look at some of the files that are added to a web application when Spring, Struts, and JavaServer Faces projects are established. We show this analysis in Table 4-2 and Figure 4-9.
TABLE 4-2 Web Framework Additions to NetBeans Web Application Projects
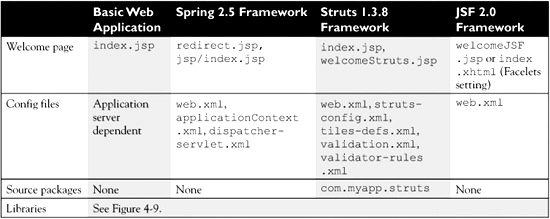
Figure 4-9 shows the libraries that are added when using the New Project wizard to add web frameworks. Note that the Tomcat libraries and JDK are not part of the web frameworks. Also note that the JSF libraries are included with GlassFish v3, so if that is your configured server, they do not appear separately. The left Libraries tree is within a Spring web application, the center one is within a Struts web application, and the one on the right is within a JavaServer Faces web application.
FIGURE 4-9 Web framework libraries
Understanding Web Frameworks
By now you should have a basic understanding of the available web frameworks in the NetBeans IDE and the files associated with them. However, if you haven’t used the frameworks in the past, you may want to have a general idea of what they are and what they do. The following subsections explore Struts, Spring, and JavaServer Faces from a high level in regard to the general knowledge that may be needed for the exam.
Struts
Struts is a web framework maintained by the Apache Software Foundation (struts.apache.org). It is a web-based Model-View-Controller (MVC) framework primarily focused on the presentation tier. In an MVC architecture, the model contains the business logic, the view is responsible for displaying the results back to the user, and the controller handles all of the requests from the user and selects the appropriate view to return.
In Struts, JSP implements the view layer, and the ActionServlet acts as the controller. Consider reviewing the “Introduction to the Struts Web Framework” tutorial at the following URL: http://netbeans.org/kb/docs/web/quickstart-webappsstruts.html.
The Forums at JavaRanch include Application Frameworks Forums (www.coderanch.com/forums/c/14/Application-Frameworks) for discussion on Struts, Spring, GWT, Flex, and other frameworks, as well as a forum on various implementations of the JSF specification (http://www.coderanch.com/forums/f-82/JSF).
Wizard-Generated Struts Files Struts-related file types can be generated by choosing File | New File. Upon selecting the Struts category in the wizard, relative to a context Struts application, the following File Type options are available:
![]() Struts Action Creates a new Struts action class that extends the Action. The default name is NewStrutsAction.
Struts Action Creates a new Struts action class that extends the Action. The default name is NewStrutsAction.
![]() Struts Action Form Bean Creates a new form bean that extends ActionForm. The default name is NewStructsActionForm. Completing the wizard generates the desired file type with the appropriate template and data.
Struts Action Form Bean Creates a new form bean that extends ActionForm. The default name is NewStructsActionForm. Completing the wizard generates the desired file type with the appropriate template and data.
Spring
Spring is a web framework maintained by Spring Source (www.springsource.com). Spring contains a web-based MVC framework as one of its components. A primary goal of the Spring Framework is encouraging the development of applications with Plain Old Java Objects (POJOs). Spring implements the Inversion of Control (IoC) principle. The IoC principle is an abstract principle where program flow is not centrally controlled, thus being considered inverted. The Spring IoC Container manages beans that form the backbone of the application. For specific details on the IoC Container, reference the following online documentation: http://static.springsource.org/spring/docs/2.0.x/reference/beans.html. Also, consider reviewing the “Introduction to the Spring Framework” tutorial at the following URL: http://netbeans.org/kb/docs/web/quickstart-webapps-spring.html.
Wizard-Generated Spring Files The most apparent and useful feature that comes along with setting up a project with the Spring Framework is the numerous Spring-related file types that can be generated with the New File wizard. Upon selecting the Spring Framework category in the wizard, relative to a context Spring application, the following File Type options are available:
![]() Spring XML Configuration File Creates a new Spring XML configuration file.
Spring XML Configuration File Creates a new Spring XML configuration file.
![]() Abstract Controller Creates a Spring Web MVC controller that extends AbstractController. The default name is NewAbstractController.
Abstract Controller Creates a Spring Web MVC controller that extends AbstractController. The default name is NewAbstractController.
![]() Simple Form Controller Creates a Spring Web MVC controller that extends SimpleFormController. The default name is NewSimpleFormController.
Simple Form Controller Creates a Spring Web MVC controller that extends SimpleFormController. The default name is NewSimpleFormController.
Completing the wizard generates the desired file type with the appropriate template and data.
If asked about supported (default) frameworks, don’t be thrown off on legacy frameworks that were once packaged with NetBeans such as Tapestry or plugins that can be obtained through the NetBeans Plugin Portal. Spring, Struts, JSF, and Visual Web JSF frameworks are the primary APIs you should be concerned with.
JavaServer Faces
JavaServer Faces is Java’s standard web framework. It was developed through the Java Community Process (http://jcp.org/). JSF’s main features include an API for representing user interface components and managing their state, event handling, server-side validation, data conversion, page navigation, internationalization, and accessibility. The framework is based on the specifications detailed in JSR-252 (JavaServer Faces 1.2) and JSR-314 (JavaServer Faces 2.0). NetBeans supports both of these versions. Consider reviewing the “JSF 2.0 Support in NetBeans IDE 6.8” tutorial at the following URL: http://netbeans.org/kb/docs/web/jsf20-support.html.
Wizard-Generated JSF Files JSF-related file types can be generated with the New File wizard. Upon selecting the JavaServer Faces category in the wizard, relative to a context JSF application, the following File Type options are available:
![]() JSF Page Creates a new Facelets file or JSP file (JSP fragment). The default name is newjsf.
JSF Page Creates a new Facelets file or JSP file (JSP fragment). The default name is newjsf.
![]() JSF Managed Bean Creates a new managed bean class. The default name is NewJSFManagedBean.
JSF Managed Bean Creates a new managed bean class. The default name is NewJSFManagedBean.
![]() JSF Faces Configuration Creates a new JSF configuration file. The default name is faces-config.xml.
JSF Faces Configuration Creates a new JSF configuration file. The default name is faces-config.xml.
![]() JSF Composite Component Creates Facelets composite components. The default name is out.html.
JSF Composite Component Creates Facelets composite components. The default name is out.html.
![]() JSF Pages From Entity Classes Creates a set of JSF pages, JSF controller and converter classes, JSF utility classes, a default style sheet and JavaScript file, and faces-config.xml entries. Also has the capability to create a set of JPA controller classes and related classes.
JSF Pages From Entity Classes Creates a set of JSF pages, JSF controller and converter classes, JSF utility classes, a default style sheet and JavaScript file, and faces-config.xml entries. Also has the capability to create a set of JPA controller classes and related classes.
![]() Facelets Template Creates a new Facelets template. The default name is newTemplate.xhtml.
Facelets Template Creates a new Facelets template. The default name is newTemplate.xhtml.
![]() Facelets Template Client Creates a new Facelets template client. The default name is newTemplate.xhtml.
Facelets Template Client Creates a new Facelets template client. The default name is newTemplate.xhtml.
Completing the wizard generates the desired file type with the appropriate template and data.
EXERCISE 4-2 Making Use of JavaServer Faces Libraries
The following exercise tests your critical thinking skills in regard to JSF libraries.
1. Validate that GlassFish was installed along with the NetBeans installation. You can perform this check in the Services window.
2. Create a new JSF JPA sample application.
3. The JSF libraries (jsf-api.jar and jsf-impl.jar) are not shown at the base of the libraries folder. Where are they and why are they there? Note that the files would be at the base when a project is set up with Tomcat as the target server.
CERTIFICATION OBJECTIVE: Understanding the Visual Web JSF Framework
Exam Objective 4.2 Distinguish between a visual web application and a web application.
Before you crack your knuckles and get ready to dive into the Visual Web JSF Framework and its supporting Woodstock component set, know this…they are end-of-life. This does not mean that they won’t be supported again, but in regard to NetBeans 6.8, they are off the map. Off the map because the JSF world has moved to Facelets so the Visual Web JSF framework represents an outdated way to create web applications. With Facelets, you can use a tool like Dreamweaver to create the pages. Thus, with Facelets, artists can create the user interface and the programmer is left to building the back end.
So when reviewing this chapter, do so only as read-only; that is, read the material in the chapter without exercising it in the IDE. If you do feel adventurous, though, make sure you are using NetBeans 6.1 when working with the Visual Web JSF Framework. Don’t bother using a different version of the IDE, because you may be dealing with missing or untested components. With all this being said, let’s begin.
A basic web application project may have the developer performing GUI-related scripting in source code editors and validating the expected functionality (for example, web pages) through web browsers and other resources at deployment time. However, visual web frameworks are supported by visual web editors, also known as WYSIWYG (What You See Is What You Get) editors. Supported visual web frameworks also have the ability to drag and drop components from palette windows into the WYSIWYG editor or source files (component is converted to text). Additional file wizards and other visually supporting features are also available with these frameworks.
For the scope of the exam, you will primarily need to be concerned with the visual web frameworks and how they relate to the JavaServer Faces technology. Let’s briefly talk about JSF again. JavaServer Faces is a Java-based web framework designed to ease the development of user interfaces. Its underlying architecture is a request-driven MVC web framework. JSF has a standard component API for user interface components, a decoupled rendering model, a request-processing life cycle, and tools for managing beans, page navigation, and value binding. Configuration files such as faces-config.xml are utilized by the framework. JSF’s latest specification is defined in JSR-314 (http://jcp.org/en/jsr/detail?id=314). Many implementations of the JSF specification meet and extend the framework. Popular implementations include Oracle ADF Faces and Apache MyFaces.
Available visual JSF-related frameworks include the RichFaces Palette, Visual Web ICEfaces Framework, and the NetBeans Visual Web JSF (VWJ) Framework. Note that the RichFaces Palette is currently not loaded with features, and Visual Web ICEfaces was not prevalent in the exam version of the IDE. We will briefly discuss the latter two frameworks so you understand the concept of a visual web application. We also take a look at Deployment Descriptor Visual Editors.
![]() Visual Web Frameworks
Visual Web Frameworks
![]() Deployment Descriptor Visual Editors
Deployment Descriptor Visual Editors
Visual Web Frameworks
NetBeans primary visual web frameworks include the Visual Web ICEfaces and Visual Web JSF frameworks. We’ll discuss both.
Visual Web ICEfaces
Visual Web ICEfaces is an IDE-integrated collection of visual aids and tools that makes working with the ICEfaces components easy and efficient. ICEfaces is an open source AJAX framework that extends the core functionality of the JSF API. ICEfaces both extends base components and implements new ones. The Visual Web ICEfaces toolset provides various features such as ICEfaces Facelet templates, code completion, and dragging of ICEfaces components from the Palette window into ICEfaces source files (where the component is automatically converted to text at the insertion point).
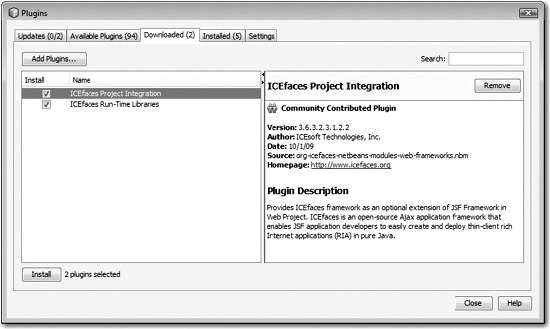
Installing Visual Web ICEfaces Visual Web ICEfaces has plugins available at the NetBeans Plugin Portal (http://plugins.netbeans.org/PluginPortal/). The downloaded ZIP file includes both an ICEfaces Project Integration plugin and an ICEfaces Run-Time Libraries plugin. Both are needed and different downloads are available for NetBeans 6.5.1 and 6.7. Selecting the downloaded plugins (.nbm files) for installation results in the screen shown in Figure 4-10.
FIGURE 4-10 Visual Web ICEfaces plugins installation
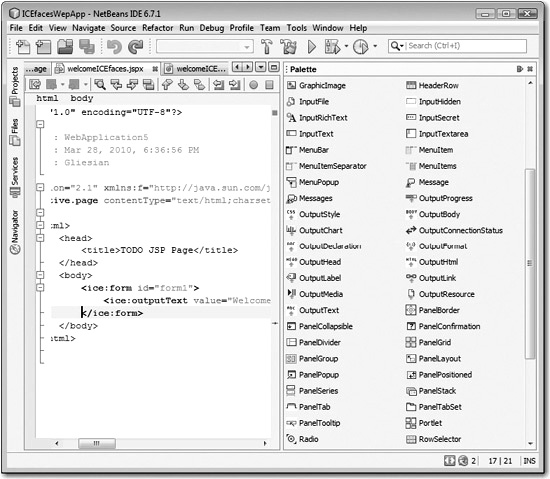
Using ICEfaces Components When creating a new project (CTRL-SHIFT-N), select support for ICEfaces in the last step. This enables the Visual Web ICEfaces features. One of the most visible features is ICEfaces support for drag and drop component functionality. ICEfaces components are shown in the Palette window, as represented in Figure 4-11.
FIGURE 4-11 ICEfaces components in the Palette window
![]()
The deeper the understanding you have of JavaServer Faces, the better you understand the visual frameworks supporting them. That is, learn JSF. Read an online tutorial on JSF or for more in-depth knowledge, consider picking up Core JavaServer Faces, Second Edition, by David Geary and Cay Horstmann (Prentice Hall PTR, 2007).
Visual Web JSF Applications
Visual Web JSF is an IDE-integrated collection of visual aids and tools that assist with working with Woodstock components, configuration files, and other JSF elements. Woodstock is an open source framework that makes use of AJAX. Woodstock extends the core functionality of the JSF API by both extending the base components and implementing new ones. Note that Woodstock components are end-of-life. As such, you can find migration matrixes online to move to different frameworks. The Woodstock to Oracle ADF Faces migration matrix can be found at this URL: www.oracle.com/technology/products/adf/adffaces/woodstock2adfMatix.html. The Woodstock to ICEfaces migration matrix can be found at this URL: www.icefaces.org/main/resources/woodstock-icefaces-mapping.iface.
The Visual Web JSF toolset provides various features that integrate with existing NetBeans functionality such as additional file templates, code completion, drag and drop functionality, and a properties editor as part of the Palette window.
Using NetBeans Visual Web JSF The Visual Web JSF Framework is available by default in NetBeans 6.1 and is available through the Plugin Manager in NetBeans 6.5 and 6.7. The framework is not readily available in NetBeans 6.8. However, NetBeans includes the Visual Web JSF plugins in NetBeans 6.9 Milestone 1 as part of their build process verification efforts. Be aware that these plugins are not currently being tested and are not planned for the final release of 6.9. Figure 4-12 shows the plugins available in NetBeans 6.9 Milestone 1. As mentioned earlier in the chapter, there is no need to actually use the NetBeans Visual Web JSF to prepare for the exam. But if you feel that you must, use the framework in the exam targeted at NetBeans 6.1.
FIGURE 4-12 Visual Web JSF Plugins for NetBeans 6.9 Milestone 1
NetBeans Visual Web JSF is well-liked, and users (on previous NetBeans versions) continue to ask for it to be supported. Unfortunately, the NetBeans team does not have an unlimited amount of resources, and they must prioritize their efforts based on current technology needs, important bug fixes, and tasks related to their core vision / “mission statement.” Keep in mind, though, that the NetBeans team is flexible and will adjust their focus if the demand is there.
Using Visual Web JSF Components When creating a new project, select support for Visual Web JavaServer Faces in the last step. This enables the Visual
Web JSF features in your new project. Visual Web JSF has support for drag and drop component functionality. The component library in the Visual Web JSF is Woodstock. Woodstock components are shown in the Palette window in Figure 4-13. Components can be dragged from the palette directly into the various editors mapped against the JSP/JSF files. When a JSP-based web page is opened for editing in a Visual Web JSF application, this palette is opened by default, along with the Visual Designer for the file. The file has three editing modes: Visual Designer (Design button), JSP Editor (JSP button), and the Java Source Code Editor (Java button), as shown in the top of the editor in Figure 4-13:
FIGURE 4-13 Visual Web JSF components
![]() Visual Designer Invoked via the Design button, allows for the visual editing of JSP/JSF components.
Visual Designer Invoked via the Design button, allows for the visual editing of JSP/JSF components.
![]() JSP Editor Invoked via the JSP button, switches to an editor so that the source code can be edited manually.
JSP Editor Invoked via the JSP button, switches to an editor so that the source code can be edited manually.
![]() Java Source Code Editor Invoked via the Java button, supports editing of the JSP/JSF backing bean through the basic Java source code editor.
Java Source Code Editor Invoked via the Java button, supports editing of the JSP/JSF backing bean through the basic Java source code editor.
The Properties window (CTRL-SHIFT-7) and the Inspector window also provide configuration and inspection support of the JSP/JSF files.
Component tags vary based on framework and user preference. Traditionally, basic JSF uses an h: for basic components, ICEfaces uses ice:, and Visual Web JSF uses webuijsf:. Respective examples are <h:outputText value="text"/>, <ice:outputText value="text"/>, and <webuijsf:staticText value="text"/>.
Wizard-Generated Visual Web JSF Files Visual JSF-related file types can be generated with the New File wizard. Upon selecting the JavaServer Faces category in the wizard, relative to a context Visual Web JSF application, the following File Type options are available:
![]() Visual Web JSF Page This template creates a new blank web page. Design the page by dragging components from the palette.
Visual Web JSF Page This template creates a new blank web page. Design the page by dragging components from the palette.
![]() Visual Web JSF Page Fragment This template creates a new blank web page. Design the page by dragging components from the palette.
Visual Web JSF Page Fragment This template creates a new blank web page. Design the page by dragging components from the palette.
![]() Visual Web JSF Request Bean With this template, you can create a new managed bean that is stored in request scope. The managed bean is added to the managed-beans.xml file and is visible in the application outline.
Visual Web JSF Request Bean With this template, you can create a new managed bean that is stored in request scope. The managed bean is added to the managed-beans.xml file and is visible in the application outline.
![]() Visual Web JSF Session Bean With this template, you can create a new managed bean that is stored in session scope. The managed bean is added to the managed-beans.xml file and is visible in the application outline.
Visual Web JSF Session Bean With this template, you can create a new managed bean that is stored in session scope. The managed bean is added to the managed-beans.xml file and is visible in the application outline.
![]() Visual Web JSF Application Bean With this template, you can create a new managed bean that is stored in application scope. The managed bean is added to the managed-beans.xml file and is visible in the application outline.
Visual Web JSF Application Bean With this template, you can create a new managed bean that is stored in application scope. The managed bean is added to the managed-beans.xml file and is visible in the application outline.
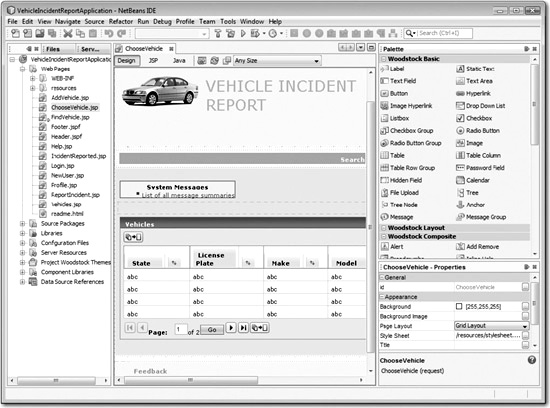
EXERCISE 4-3 Working with a Visual Web JSF Sample Application
In this exercise, you add a simple component to an existing JSF page using drag and drop features of the Visual Web JSF Framework.
1. Open the Vehicle Incident Report sample application.
2. Open the FindVehicles.jsp file in Design view.
3. Drag the Label component under the Find button, and change the text to TEST.
4. Run the application and validate that the web page is displayed with the new label, TEST.
5. Bonus: Add a component type (of your choice) to a page that needs business logic to be added or modified in the backing bean. Make all necessary middletier changes. Ensure that the component has all the necessary attributes in place. Run the application and verify the desired functionality.
Deployment Descriptor Visual Editors
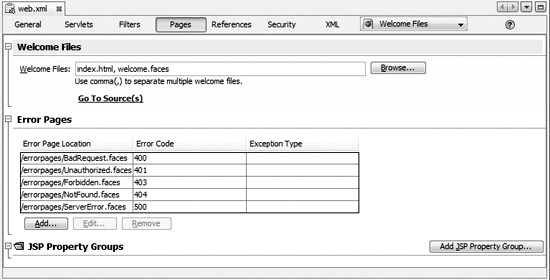
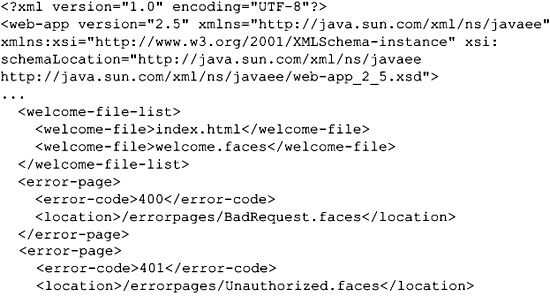
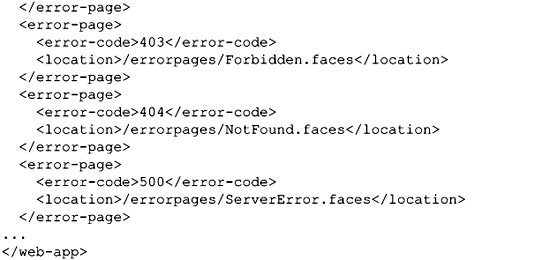
Visual editors exist for support of basic deployment descriptors. Deployment descriptors are XML-based files that provide configuration settings for components in web applications, such as Servlets and JavaServer Pages. The Deployment Descriptor Visual Editors are not a feature specific to the Visual Web JSF Framework. It is a core feature installed with the NetBeans Java Bundle. Deployment Descriptor Visual Editors provide form components that allow you to edit and view the content of the descriptors. Since deployment descriptors are XML-based files, the concept of tying in the visual editor to the files is rather simple. When content in the descriptor is modified, the associated elements in the XML file are updated accordingly. Web applications have three primary types of deployment descriptors: web.xml, sun-web.xml, and context.xml. The visual editor for web.xml is shown in Figure 4-14 and corresponds to the partial code listing that follows.
FIGURE 4-14 The web.xml Deployment Descriptor Visual Editor
![]() sun-web.xml Deployment descriptor for the GlassFish application server.
sun-web.xml Deployment descriptor for the GlassFish application server.
![]() context.xml Deployment descriptor for the Apache Tomcat web server.
context.xml Deployment descriptor for the Apache Tomcat web server.
![]() web.xml General deployment description for web applications.
web.xml General deployment description for web applications.
JSF’s faces-config.xml configuration file is supported with a specialized editor with two modes: PageFlow and XML. In PageFlow mode, the user can visually configure page navigation with assistance from the Properties window. In XML mode, the user accesses the XML editor with extended popup menu support. The right-click popup menu includes JavaServer Faces | Add Navigation Rule, Add Navigation Case, and Add Managed Bean.
CERTIFICATION OBJECTIVE: Working with Server Instances
Exam Objective 1.3 Demonstrate the ability to work with servers in the IDE, such as registering new server instances and stopping and starting servers.
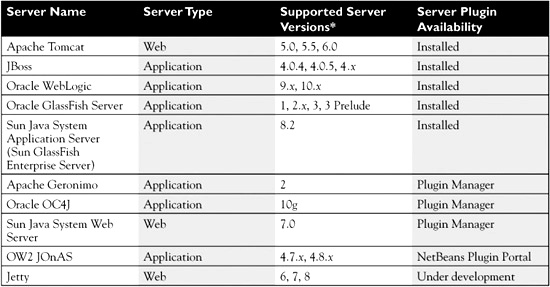
Web applications depend on application or web servers for development and deployment. Application servers implement all of the necessary Java Specification Request (JSR) specifications and thus provide a full Java EE compliant application stack. Web servers need to meet two primary specifications for compliancy, the Servlet specification and the JavaServer Pages specification. Table 4-3 lists current servers that work with the NetBeans 6.8 Milestone 1 IDE. An up-to-date list of supported servers can be found at http://wiki.netbeans.org/servers.
TABLE 4-3 Various NetBeans 6.8–Supported Application and Web Servers
After a plugin is installed, NetBeans provides interfaces that allow for many integration features with the server including general registration of the server instance and various server interfacing features such as menu item access to the admin console, debug mode, and server log. We’ll touch on these features:
![]() Registration
Registration
![]() IDE/Server Integration
IDE/Server Integration
Registration
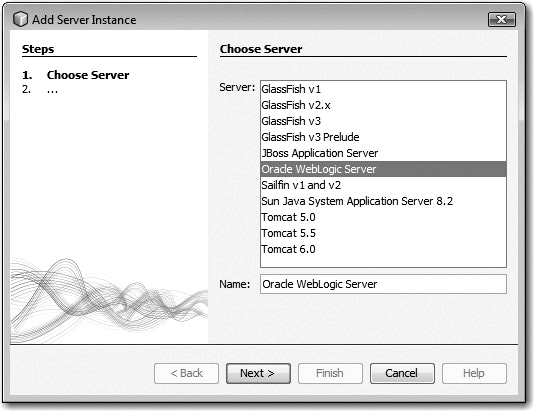
To make use of these features, the application server must be registered. NetBeans has server-support plugins installed by default for several servers. Other servers are supported by plugins that must be downloaded from the Plugin Portal or obtained first through the Plugin Manager. You can register server instances for servers that already have their modules/plugins installed. Registration is done by completing the Add Server Instance wizard. The Add Server Instance wizard can be invoked by selecting the Add Server menu item from a right-click of the Servers node in the Services window. The Add Server Instance wizard can also be invoked from the Add Server button in the Servers window, which is opened by selecting Tools | Server. The Add Server Instance wizard includes a three-step process, with the first step being selection of the desired server, as shown in Figure 4-15. Note that the server must be installed on your computer for registration to be successful.
FIGURE 4-15 Add Server Instance dialog box: Step 1, Choose Server
The second step in registering a server is specifying the location of the server. Figure 4-16 shows Step 2, where the edit box accepts the location of the server.
FIGURE 4-16 Add Server Instance dialog box: Step 2, Server Location

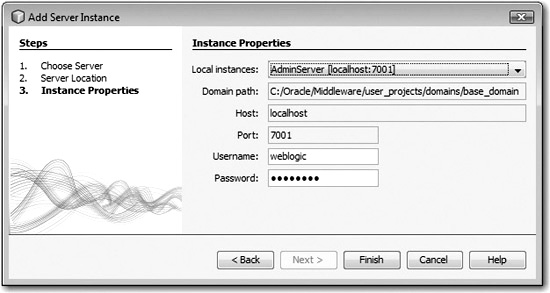
The last step in registering a server is providing the properties related to the server instance. Typical components are included in Step 3 for local instances, the domain path, the host ID, port number, username, and the password. Step 3 is shown in Figure 4-17.
FIGURE 4-17 Add Server Instance dialog box: Step 3, Instance Properties
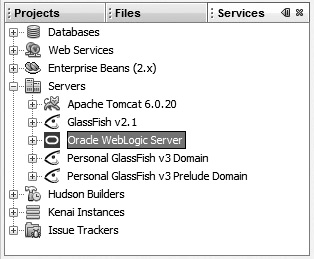
Selecting Finish adds a node for the server under the Servers node in the Services window, as shown in Figure 4-18. In addition, all related server functions would be added to the IDE.
FIGURE 4-18 Oracle WebLogic Server node
EXERCISE 4-4 Integrating an Application Server with a NetBeans Server Plugin
The following exercise tests your ability to download and install a server, retrieve and install its server-support plugin, and register the server.
1. Install an application server of your choice such as Oracle WebLogic Server from www.oracle.com/technology/products/weblogic.
2. If necessary, get the plugin from the NetBeans Plugin Manager and/or Plugin Portal.
3. Register the plugin with the Add Server Instance wizard.
IDE/Server Integration
Once a server instance is registered, you can use various means to control the application or web server. You can find features throughout the many dialog boxes of the IDE that provide reference or configuration related to the registered server instance. The most direct and apparent interface is the popup menu of the server node in the Services window, which provides for various means to interface with the server. The following items are present in the popup menu:
![]() Start Starts the server.
Start Starts the server.
![]() Start In Debug Mode Starts the server in debug mode.
Start In Debug Mode Starts the server in debug mode.
![]() Start In Profile Mode Starts the server in profile mode.
Start In Profile Mode Starts the server in profile mode.
![]() Restart Restarts the server.
Restart Restarts the server.
![]() Stop Stops the server.
Stop Stops the server.
![]() Refresh Refreshes the status of the server (started or stopped).
Refresh Refreshes the status of the server (started or stopped).
![]() Remove Removes the server instance from the IDE.
Remove Removes the server instance from the IDE.
![]() View Admin Console Opens the server’s administration console in the target web browser.
View Admin Console Opens the server’s administration console in the target web browser.
![]() View Server Log Opens the server’s log file in a window in the bottom right of the IDE.
View Server Log Opens the server’s log file in a window in the bottom right of the IDE.
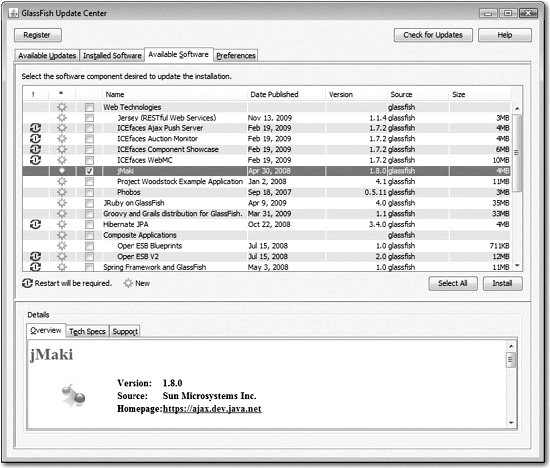
![]() View Update Center Opens the update center, if applicable. The update center for GlassFish is shown in Figure 4-19.
View Update Center Opens the update center, if applicable. The update center for GlassFish is shown in Figure 4-19.
FIGURE 4-19 GlassFish Update Center
![]() Properties Opens the Servers dialog box (Tools | Servers). This dialog box allows for viewing and/or modifying server properties.
Properties Opens the Servers dialog box (Tools | Servers). This dialog box allows for viewing and/or modifying server properties.
The GlassFish Update Center is very useful in keeping the GlassFish application server up to date with desired features. The Scenario & Solution explores usage of various configuration components in the GlassFish Update Center dialog box.
SCENARIO & SOLUTION
CERTIFICATION OBJECTIVE: Building and Deploying Web Applications
Exam Objective 5.5 Demonstrate a knowledge of basic tasks related to building and deploying web applications to a server, such as changing the target server and undeploying an application.
Monitoring the output log from an application build process is similar to watching your bowling ball approach the pins. You anticipate a successful build or “strike.” However, knocking down all ten pins or performing an error-free build isn’t always the case. In both scenarios, the sense of accomplishment or failure is often experienced with an utmost reserved expression. This section covers many of those tasks that bring on suspense, such as when you compile, begin the run process, or invoke your deployed application. For this objective, we examine common development tasks, build settings configurations, and the basic deployment processes. This coverage should prepare you adequately for the building and deploying web applications exam objective.
![]() Common Development Tasks
Common Development Tasks
![]() Configuring Build Settings
Configuring Build Settings
![]() Deployment Processes
Deployment Processes
Common Development Tasks
Common tasks related to web application development include cleaning, building, running, and deploying the application. Table 4-4 details many of the common approaches to invoke these tasks.
TABLE 4-4 Common Development Tasks

Each of these tasks is bound to XML targets (actions) defined in the build.xml file, more specifically, the build-impl.xml file that build.xml imports. Let’s take a look at some of the typical targets that are associated with the commands in Table 4-5. Note that project, build, and run configurations can affect the usage of these actions. You can see the Ant targets called by looking in the output window when running a command.
TABLE 4-5 Typical XML Targets Against Development Processes

You can expand the build.xml file node in the Files window to show all of the targets. You can run individual targets by right-clicking the build.xml file node and selecting Run Target | [target_name], as shown in Figure 4-20. Note that targets with a description property set appear in the main list; otherwise, they appear under Other Targets.
FIGURE 4-20 Runnable build.xml targets
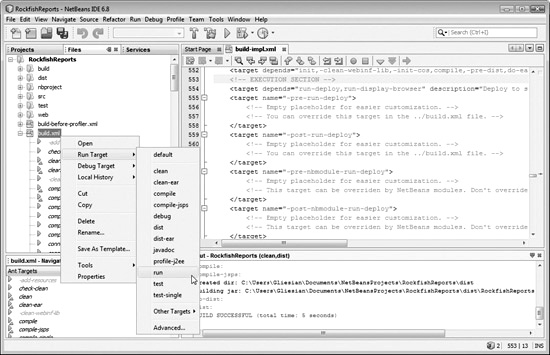
You can also run individual targets directly under the build.xml node by right-clicking the target and selecting Run Target. Targets that cannot be run from the Files window appear gray. Runnable targets have an orange triangle next to the blue triangle.
Configuring Build Settings
Build and Run properties are configurable in the Project Properties dialog box. You can get to this dialog box by right-clicking the project name in the Projects or Files window and selecting the Properties menu item.
Three panels provide configuration settings of the build process. These panels are associated with the Build node and are associated with subnodes labeled Compiling, Packaging, and Documenting. We’ll take a look at each panel.
Compiling Panel for Build Processes
The Compiling panel in the Project Properties dialog box, as shown in Figure 4-21, configures compilation settings. The panel is displayed after selecting the Compiling node under the Build node. The following items are configurable in the panel:
FIGURE 4-21 Project Properties: Build/Compiling
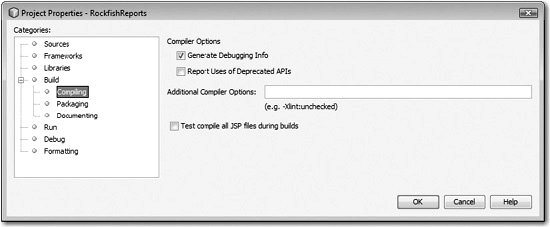
![]() Generate Debugging Info Generates debugging information during compilation. Reference the session establishment section in Chapter 9 for more details on this setting.
Generate Debugging Info Generates debugging information during compilation. Reference the session establishment section in Chapter 9 for more details on this setting.
![]() Report Uses Of Deprecated APIs Reports use of deprecated APIs during compilation.
Report Uses Of Deprecated APIs Reports use of deprecated APIs during compilation.
![]() Additional Compiler Options Additional compiler options to be specified in a space-separated list.
Additional Compiler Options Additional compiler options to be specified in a space-separated list.
![]() Test Compile All JSP Files During Builds Compiles JavaServer Pages files during the build process.
Test Compile All JSP Files During Builds Compiles JavaServer Pages files during the build process.
Packaging Panel for Build Processes
The Packaging panel in the Project Properties dialog box, as shown in Figure 4-22, configures settings related to packaging processes. The panel is displayed after selecting the Packaging node under the Build node. The following items are configurable in the panel:
FIGURE 4-22 Project Properties: Build/Packaging
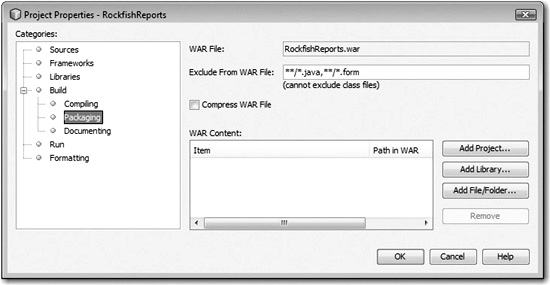
![]() WAR File The name of the WAR file. It should end with .war.
WAR File The name of the WAR file. It should end with .war.
![]() Exclude From WAR File Files to be excluded from the WAR file. Double asterisks filter the directories recursively (for example, **/*.java).
Exclude From WAR File Files to be excluded from the WAR file. Double asterisks filter the directories recursively (for example, **/*.java).
![]() Compress WAR File Compresses the WAR file.
Compress WAR File Compresses the WAR file.
![]() WAR Content Supports adding projects, libraries, and files/folders to the WAR file as well as their individual removal.
WAR Content Supports adding projects, libraries, and files/folders to the WAR file as well as their individual removal.
Documenting Panel for Build Processes
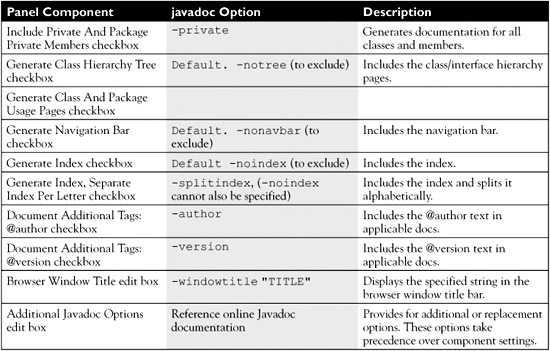
The Documenting panel in the Project Properties dialog box, as shown in Figure 4-23, configures settings related to Javadoc documentation. The panel is displayed after selecting the Documenting node under the Build node. The panel provides for the addition of Javadoc options through visual components as represented in Table 4-6. For clarity, Javadoc is a Java API documentation generator. It’s invoked via the javadoc command.
FIGURE 4-23 Project Properties: Build/Documenting
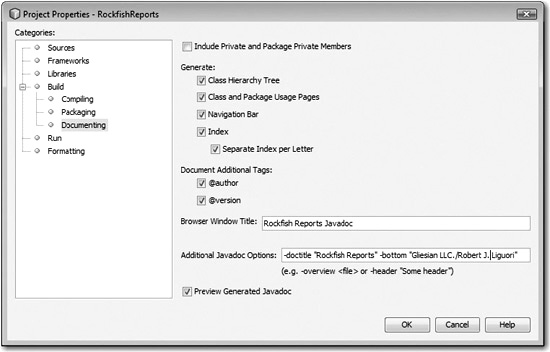
After the settings are applied via selection of the OK button, you can generate the Javadoc by either selecting Run | Generate Javadoc from the main menu or right-clicking the project and selecting Generate Javadoc. If the Preview Generated Javadoc checkbox was selected in the Project Properties window, the Javadoc opens in the browser after it has been generated, as shown in Figure 4-24. You may call the Javadoc Index Search with SHFIT-F1 or context search with ALT-F1.
FIGURE 4-24 Generated Javadoc documentation

You can read up on additional options (that is, flags) for the Javadoc command, at this URL: http://java.sun.com/javase/6/docs/technotes/tools/solaris/javadoc.html#options. Note that this documentation is specific to Solaris.
Run Panel for Run Processes
The Run panel in the Project Properties dialog box, as shown in Figure 4-25, configures settings related to Run processes. The following items are configurable in the panel:
FIGURE 4-25 Project Properties: Run
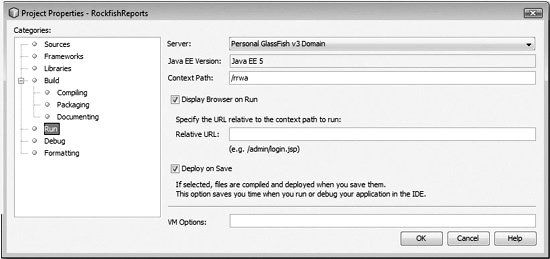
![]() Server The target server of the web application
Server The target server of the web application
![]() Java EE Version The Java Enterprise Edition version (for example, J2EE 1.4, Java EE 5, Java EE 6)
Java EE Version The Java Enterprise Edition version (for example, J2EE 1.4, Java EE 5, Java EE 6)
![]() Context Path The URL namespace of an application
Context Path The URL namespace of an application
![]() Display Browser On Run Determines if a browser is displayed at runtime
Display Browser On Run Determines if a browser is displayed at runtime
![]() Relative URL The URL relative to the context path
Relative URL The URL relative to the context path
![]() Deploy On Save Determines if the file changes are redeployed upon being saved
Deploy On Save Determines if the file changes are redeployed upon being saved
![]() VM Options Virtual machine options used for running main classes and unit tests
VM Options Virtual machine options used for running main classes and unit tests
Deployment Processes
The NetBeans IDE provides support for deploying and undeploying web applications. We’ll examine the processes for both.
Deploying Web Applications
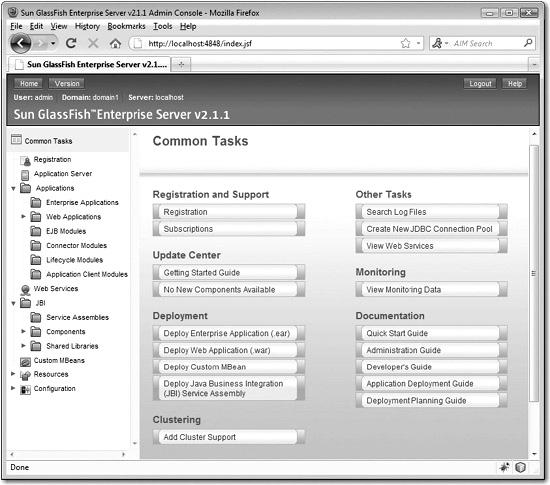
Deployment to Apache Tomcat and GlassFish application servers is automatic, as the context WAR file is placed in the appropriate autodeploy directly at deployment time (for example, right-click the project node and select Deploy). For other application servers that are hosted outside of the IDE or that lack the appropriate integration support, the WAR file needs to be manually deployed. Practically all application servers include a console management interface that is accessible through a web browser. The application consoles have the ability to deploy local or remote WAR files. Figure 4-26 shows the Application Server console for GlassFish. As you can see in the figure, there is support for deploying other types of applications in addition to WAR files, such as Enterprise Applications, Custom MBeans, and Java Business Integration (JBI) Service Assemblies.
FIGURE 4-26 GlassFish Application Server console
One of the first things you should do when working with an application server is to explore the web console and understand its deployment processes. You’ll also need to investigate application-specific configuration files, such as those used in JBoss and Glassfish.
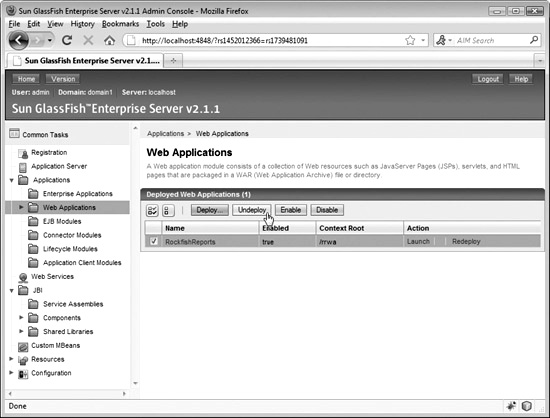
Undeploying Web Applications
Undeploying applications is easy. All application web consoles provide an easy means to undeploy applications, as shown in Figure 4-27. It’s often as simple as selecting the application you want undeployed and clicking an Undeploy button. Note that this process removes the WAR file from the autodeploy directory. A safer way to keep the application but make it unavailable is to disable it, which can also be done with a button in the web console.
FIGURE 4-27 Undeployment via GlassFish Application Server console
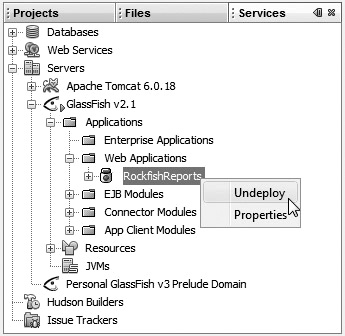
NetBeans’ goal is to make your life easy. If you can keep from leaving the IDE to perform a task, you’ll be able to save some time and a little bit of energy. So, for integrated/registered application servers such as GlassFish, there is undeployment support as well. And it’s really easy; you just need to know where to look. To undeploy a web application with the IDE, go to the Services window, open the node of your application server, find the web application in the subsequent subnodes, and right-click it. A popup menu opens with an Undeploy menu item, as shown in Figure 4-28. Click and the app is gone.
FIGURE 4-28 Undeployment via the Services window
CERTIFICATION SUMMARY
This chapter focused on objectives related to Java EE web applications. There are actually six related objectives, but the one on the HTTP server-side monitor is covered in a separate chapter. The remaining five objectives deal with creating web apps from existing sources, understanding NetBeans-available web frameworks, using the visual web frameworks, building/deploying web applications, and working with server instances.
From a high level, we learned the following:
![]() Creating a web application from existing sources is done through the New Project wizard. The wizard provides a four-step process that results in a new application with NetBeans-specific folders, properties, and build files.
Creating a web application from existing sources is done through the New Project wizard. The wizard provides a four-step process that results in a new application with NetBeans-specific folders, properties, and build files.
![]() NetBeans-available web frameworks are added to projects through the New Project wizard. Frameworks include JSF, Spring, and Struts as well as Visual Web JSF or Visual Web ICEfaces if their modules are installed. Hibernate also can be added for convenience.
NetBeans-available web frameworks are added to projects through the New Project wizard. Frameworks include JSF, Spring, and Struts as well as Visual Web JSF or Visual Web ICEfaces if their modules are installed. Hibernate also can be added for convenience.
![]() The Visual Web JSF Framework adds visual features such as a visual web editor, a visual page navigation editor, palette support of Woodstock components, and more. The Visual Web JSF Framework is not supported in recent versions of NetBeans. Woodstock is a set of JSF components that has reached end-of-life in favor of other framework components such as those of Oracle ADF and ICEfaces.
The Visual Web JSF Framework adds visual features such as a visual web editor, a visual page navigation editor, palette support of Woodstock components, and more. The Visual Web JSF Framework is not supported in recent versions of NetBeans. Woodstock is a set of JSF components that has reached end-of-life in favor of other framework components such as those of Oracle ADF and ICEfaces.
![]() Registering server instances for installed servers adds various features that support the target server, including console invocation and the binding of server commands to NetBeans menu items (that is, start and stop commands).
Registering server instances for installed servers adds various features that support the target server, including console invocation and the binding of server commands to NetBeans menu items (that is, start and stop commands).
After completing this chapter, you will be more familiar with web frameworks and will have gained the necessary experience to score well on web framework–related questions on the exam.
 TWO-MINUTE DRILL
Creating Web Applications from Existing Sources
![]() The New Project wizard (CTRL-SHIFT-N) and choosing Web Application with Existing Sources under the Java Web category creates new web applications from existing sources.
The New Project wizard (CTRL-SHIFT-N) and choosing Web Application with Existing Sources under the Java Web category creates new web applications from existing sources.
![]() Creating a web application from existing sources is a four-step process with settings made in the following dialog boxes: Choose Project, Name And Location, Server And Settings, Existing Sources And Libraries.
Creating a web application from existing sources is a four-step process with settings made in the following dialog boxes: Choose Project, Name And Location, Server And Settings, Existing Sources And Libraries.
![]() The Choose Project dialog/step allows for the selection of the project type (for example, Web Application With Existing Sources) from the Java Web category.
The Choose Project dialog/step allows for the selection of the project type (for example, Web Application With Existing Sources) from the Java Web category.
![]() The Name And Location dialog/step configures the project’s location, name, and folder location. Establishing dedicated folders and the main project setting is also done in this step.
The Name And Location dialog/step configures the project’s location, name, and folder location. Establishing dedicated folders and the main project setting is also done in this step.
![]() The Server And Settings dialog/step configures the target server, Java EE version, and context path. Adding the project to open enterprise projects and enabling dedicated folders is also done in this step.
The Server And Settings dialog/step configures the target server, Java EE version, and context path. Adding the project to open enterprise projects and enabling dedicated folders is also done in this step.
![]() The Existing Sources And Libraries dialog/step configures the location of the existing web page folders, WEB-INF content, libraries, source, and test packages.
The Existing Sources And Libraries dialog/step configures the location of the existing web page folders, WEB-INF content, libraries, source, and test packages.
Adding and Using NetBeans-Available Web Frameworks
![]() Readily available NetBeans IDE web frameworks include Spring, Struts, and JavaServer Faces.
Readily available NetBeans IDE web frameworks include Spring, Struts, and JavaServer Faces.
![]() Web framework libraries, directories, and configuration files are added to a new project when the desired framework is selected in the New Projects wizard.
Web framework libraries, directories, and configuration files are added to a new project when the desired framework is selected in the New Projects wizard.
![]() Spring is a web framework with a myriad of features supporting the middle tier. Spring contains a web-based MVC framework.
Spring is a web framework with a myriad of features supporting the middle tier. Spring contains a web-based MVC framework.
![]() Struts is a web-based MVC framework primarily supporting the presentation tier.
Struts is a web-based MVC framework primarily supporting the presentation tier.
![]() JavaServer Faces is a web framework with various features including an API for representing user interface components and managing their state.
JavaServer Faces is a web framework with various features including an API for representing user interface components and managing their state.
Understanding the Visual Web JSF Framework
![]() The visual web framework may provide file templates, code completion, and drag and drop support.
The visual web framework may provide file templates, code completion, and drag and drop support.
![]() The NetBeans Visual Web JSF Framework is available in NetBeans 6.1 directly and in 6.5 and 6.7 through the Plugin Manager.
The NetBeans Visual Web JSF Framework is available in NetBeans 6.1 directly and in 6.5 and 6.7 through the Plugin Manager.
![]() The Visual Web JSF Framework includes a PageFlow Editor for the faces-config.xml configuration file.
The Visual Web JSF Framework includes a PageFlow Editor for the faces-config.xml configuration file.
![]() The Visual Web JSF Framework includes a Visual Designer for visually editing web files.
The Visual Web JSF Framework includes a Visual Designer for visually editing web files.
![]() The Visual Web JSF Framework includes a JSP Editor for visually editing JavaServer Pages files.
The Visual Web JSF Framework includes a JSP Editor for visually editing JavaServer Pages files.
![]() The Visual Web JSF Framework includes a component properties editor as part of the Palette window.
The Visual Web JSF Framework includes a component properties editor as part of the Palette window.
![]() Woodstock is a JSF component library as part of the Visual Web JSF Framework. Woodstock is end-of-life. Users are encouraged to migrate to similar frameworks/component-sets such as Oracle ADF Faces or ICEfaces.
Woodstock is a JSF component library as part of the Visual Web JSF Framework. Woodstock is end-of-life. Users are encouraged to migrate to similar frameworks/component-sets such as Oracle ADF Faces or ICEfaces.
![]() Various frameworks implement the JSF specification, both meeting and extending the API (that is, Oracle ADF Faces, RichFaces, ICEfaces, and Apache MyFaces).
Various frameworks implement the JSF specification, both meeting and extending the API (that is, Oracle ADF Faces, RichFaces, ICEfaces, and Apache MyFaces).
![]() ICEfaces is an open source AJAX framework that extends the JSF API.
ICEfaces is an open source AJAX framework that extends the JSF API.
![]() ICEfaces is available through the online Plugin Portal for NetBeans 6.5.1 and 6.7. The module that includes visual web support can be considered the Visual Web ICEfaces framework.
ICEfaces is available through the online Plugin Portal for NetBeans 6.5.1 and 6.7. The module that includes visual web support can be considered the Visual Web ICEfaces framework.
![]() The RichFaces Palette is a visual tool that provides drag and drop assistance to RichFaces components.
The RichFaces Palette is a visual tool that provides drag and drop assistance to RichFaces components.
Working with Server Instances
![]() The Add Server Instance wizard registers servers that are installed locally on the computer. It is a three-step process: Choose Server, Server Location, and Instance Properties.
The Add Server Instance wizard registers servers that are installed locally on the computer. It is a three-step process: Choose Server, Server Location, and Instance Properties.
![]() Selecting Tools | Servers opens the Properties dialog box for all of the registered servers.
Selecting Tools | Servers opens the Properties dialog box for all of the registered servers.
![]() Selecting Tools | Servers followed by clicking the Add Server button opens the Add Server Instance wizard.
Selecting Tools | Servers followed by clicking the Add Server button opens the Add Server Instance wizard.
![]() Right-clicking the Servers node in the Services window and selecting Add Server opens the Add Server Instance wizard.
Right-clicking the Servers node in the Services window and selecting Add Server opens the Add Server Instance wizard.
![]() Right-clicking a registered server opens a dialog box with the following menu items: Start, Start In Debug Mode, Start In Profile Mode, Restart, Stop, Refresh, Remove, View Admin Console, View Server Log, View Update Center, and Properties.
Right-clicking a registered server opens a dialog box with the following menu items: Start, Start In Debug Mode, Start In Profile Mode, Restart, Stop, Refresh, Remove, View Admin Console, View Server Log, View Update Center, and Properties.
Building and Deploying Web Applications
![]() The NetBeans IDE provides support for cleaning, building, running, and deploying web applications.
The NetBeans IDE provides support for cleaning, building, running, and deploying web applications.
![]() The web application build processes are tied to Ant’s build.xml file.
The web application build processes are tied to Ant’s build.xml file.
![]() The build.xml file points to the build-impl.xml file.
The build.xml file points to the build-impl.xml file.
![]() The build.xml file can be opened and examined in the Files window.
The build.xml file can be opened and examined in the Files window.
![]() Individual targets of the build file can be executed.
Individual targets of the build file can be executed.
![]() The Project Properties dialog box provides configuration means for compiling, packaging, and documenting.
The Project Properties dialog box provides configuration means for compiling, packaging, and documenting.
![]() The Project Properties dialog box provides configuration means for a web application’s run processes.
The Project Properties dialog box provides configuration means for a web application’s run processes.
![]() Application servers have web consoles that can deploy and undeploy web applications.
Application servers have web consoles that can deploy and undeploy web applications.
![]() Web applications can be deployed in the Projects window relative to the popup menu Deploy commands of the project node.
Web applications can be deployed in the Projects window relative to the popup menu Deploy commands of the project node.
![]() Web applications can be undeployed in the Services window relative to the popup menu’s Undeploy command for each web application node.
Web applications can be undeployed in the Services window relative to the popup menu’s Undeploy command for each web application node.
SELF TEST
The following questions will help you measure your understanding of the material presented in this chapter. Read all the choices carefully because there might be more than one correct answer. Choose all correct answers for each question.
Creating Web Applications from Existing Sources
1. Within the New Web Project With Existing Sources wizard, which dialog page has the Set As Main Project checkbox?
A. 1. Choose Project
B. 2. Name And Location
C. 3. Server And Settings
D. 4. Existing Sources And Libraries
E. None of the above
2. True or False? The settings in Step 2 (Name And Location) of the New Web Project With Existing Sources wizard are the same as the settings in New Java Project With Existing Sources wizard.
A. True
B. False
Adding and Using NetBeans-Available Web Frameworks
3. In the last step of the New Project wizard for creating web applications, which framework is a persistence framework and hence not a web framework?
A. Java ServerFaces
B. Struts
C. Spring
D. Hibernate
4. Which web framework makes use of the following three files as part of its framework: tiles-defs.xml, validation.xml, validator-rules.xml?
A. Spring
B. Struts
C. Tapestry
D. JavaServer Faces
Understanding the Visual Web JSF Framework
5. Which item is not a Woodstock basic component? Note that these components were indirectly referenced by links to the ADF Faces and ICEfaces migration matrix URLs.
A. Text Area
B. Hyperlink
C. Dial
D. Tree
6. What tag pair corresponds to a table column in the Visual Web JSF Framework?
A. <webuijsf:tablecolumn></webuijsf:tablecolumn>
B. <webui:tablecolumn></webui:tablecolumn>
C. <ice:tablecolumn></ice:tablecolumn>
D. <ice:column></ice:column>
7. Considering the following Illustration, what JSF configuration file is being displayed in the PageFlow Editor?

A. sun-web.xml
B. faces-config.xml
C. web.xml
D. web-config.xml
Working with Server Instances
8. How is the GlassFish Update Center opened?
A. In the Services window, right-click the Servers node, and select the View Update Center menu item.
B. In the Services window, expand the Servers node, right-click the GlassFish node, and select the View Update Center menu item.
C. In the Servers window, expand the Services node, right-click the GlassFish node, and select the View Update Center menu item.
D. There is no GlassFish Update Center.
9. Server support plugins are available/installed for which application and/or web servers by default? That is, the plugin does not need to be obtained through the Plugin Manager or Plugin Portal.
A. Apache Tomcat
B. Sun GlassFish
C. Oracle OC4J
D. OW2 JOnAS
Building and Deploying Web Applications
10. What format is used in the Exclude From WAR File edit box found in the Build/Packaging node of the Project Properties dialog box to exclude all Java source files for the target WAR file?
A. *.java
B. */**.java
C. *all*.java
D. **/*.java
11. When running a web application, how can you ensure that the web browser is displayed when an application is deployed?
A. Select the Display Browser On Run checkbox associated with the Run node in the Project Properties dialog box.
B. Select the Display Browser On Run checkbox associated with the Build/Packaging node in the Project Properties dialog box.
C. Ensure the web browser is open on your desktop, because the application will only run in the browser if it’s already open.
D. Click the Display Browser On Run icon in the Run toolbar.
SELF TEST ANSWERS
Creating Web Applications from Existing Sources
1. Within the New Web Project With Existing Sources wizard, which dialog page has the Set As Main Project checkbox?
A. 1. Choose Project
B. 2. Name And Location
C. 3. Server And Settings
D. 4. Existing Sources And Libraries
E. None of the above
![]() B. The Name And Location dialog page (that is, the second step) has the Set As Main Project checkbox available.
B. The Name And Location dialog page (that is, the second step) has the Set As Main Project checkbox available.
![]() A, C, and D are incorrect. A is incorrect because the Set As Main Project checkbox is not on the Choose Project dialog page. C is incorrect because the Set As Main Project checkbox is not on the Server And Settings dialog page. D is incorrect because the Set As Main Project checkbox is not on the Existing Sources And Libraries dialog page. E is incorrect because “None of the above” is not correct.
A, C, and D are incorrect. A is incorrect because the Set As Main Project checkbox is not on the Choose Project dialog page. C is incorrect because the Set As Main Project checkbox is not on the Server And Settings dialog page. D is incorrect because the Set As Main Project checkbox is not on the Existing Sources And Libraries dialog page. E is incorrect because “None of the above” is not correct.
2. True or False? The settings in Step 2 (Name And Location) of the New Web Project With Existing Sources wizard are the same as the settings in New Java Project With Existing Sources wizard.
A. True
B. False
![]() False. The settings in Step 2 (Name And Location) of the New Web Project With Existing Sources and Step 2 (Name And Location) of the New Java Project With Existing Sources wizards are not the same. The New Java Project With Existing Sources wizard has a Build Script Name component that the New Java Project With Existing Sources wizard does not have.
False. The settings in Step 2 (Name And Location) of the New Web Project With Existing Sources and Step 2 (Name And Location) of the New Java Project With Existing Sources wizards are not the same. The New Java Project With Existing Sources wizard has a Build Script Name component that the New Java Project With Existing Sources wizard does not have.
Adding and Using NetBeans-Available Web Frameworks
3. In the last step of the New Project wizard for creating web applications, which framework is a persistence framework and hence not a web framework?
A. Java ServerFaces
B. Struts
D. Hibernate
![]() D. The Hibernate (persistence) framework is selectable to be set up in the New Project wizard when creating web applications.
D. The Hibernate (persistence) framework is selectable to be set up in the New Project wizard when creating web applications.
![]() A, B, and C are incorrect. A is incorrect because JavaServer Faces is a web framework. B is incorrect because Struts is a web framework. C is incorrect because Spring is a web framework.
A, B, and C are incorrect. A is incorrect because JavaServer Faces is a web framework. B is incorrect because Struts is a web framework. C is incorrect because Spring is a web framework.
4. Which web framework makes use of the following three files as part of its framework: tiles-defs.xml, validation.xml, validator-rules.xml?
A. Spring
B. Struts
C. Tapestry
D. JavaServer Faces
![]() B. The Struts web framework makes use of the following files, amongst others: tiles-defs.xml, validation.xml, validator-rules.xml.
B. The Struts web framework makes use of the following files, amongst others: tiles-defs.xml, validation.xml, validator-rules.xml.
![]() A, C, and D are incorrect. A is incorrect because Spring does not make use of the following files as part of its core architecture: tiles-defs.xml, validation.xml, validator-rules.xml. C is incorrect because Tapestry does not make use of the following files as part of its core architecture: tiles-defs.xml, validation.xml, validator-rules.xml. D is incorrect because JavaServer Faces does not make use of the following files as part of its core architecture: tiles-defs.xml, validation.xml, validator-rules.xml.
A, C, and D are incorrect. A is incorrect because Spring does not make use of the following files as part of its core architecture: tiles-defs.xml, validation.xml, validator-rules.xml. C is incorrect because Tapestry does not make use of the following files as part of its core architecture: tiles-defs.xml, validation.xml, validator-rules.xml. D is incorrect because JavaServer Faces does not make use of the following files as part of its core architecture: tiles-defs.xml, validation.xml, validator-rules.xml.
Understanding the Visual Web JSF Framework
5. Which item is not a Woodstock basic component? Note that these components were indirectly referenced by links to the ADF Faces and ICEfaces migration matrix URLs.
A. Text Area
B. Hyperlink
C. Dial
D. Tree
![]() C. Dial is not a Woodstock basic component.
C. Dial is not a Woodstock basic component.
![]() A, B, and D are incorrect. A is incorrect because Text Area is a Woodstock basic component. B is incorrect because Hyperlink is a Woodstock basic component. D is incorrect because Tree is a Woodstock basic component.
A, B, and D are incorrect. A is incorrect because Text Area is a Woodstock basic component. B is incorrect because Hyperlink is a Woodstock basic component. D is incorrect because Tree is a Woodstock basic component.
6. What tag pair corresponds to a table column in the Visual Web JSF Framework?
A. <webuijsf:tablecolumn></webuijsf:tablecolumn>
B. <webui:tablecolumn></webui:tablecolumn>
C. <ice:tablecolumn></ice:tablecolumn>
D. <ice:column></ice:column>
![]() A. <webuijsf:tablecolumn></webuijsf:tablecolumn> are the tags used for table columns in the Visual Web JSF Framework.
A. <webuijsf:tablecolumn></webuijsf:tablecolumn> are the tags used for table columns in the Visual Web JSF Framework.
![]() B, C, and D are incorrect. B is incorrect because the webui:tablecolumn tags are invalid. C is incorrect because the ice:table column tags are invalid. D is incorrect because ice:column is the ICEfaces equivalent of webuijsf:tablecolumn.
B, C, and D are incorrect. B is incorrect because the webui:tablecolumn tags are invalid. C is incorrect because the ice:table column tags are invalid. D is incorrect because ice:column is the ICEfaces equivalent of webuijsf:tablecolumn.
7. Considering the following Illustration, what JSF configuration file is being displayed in the PageFlow Editor?

A. sun-web.xml
B. faces-config.xml
C. web.xml
D. web-config.xml
![]() B. The faces-config.xml file is shown with the PageFlow Editor.
B. The faces-config.xml file is shown with the PageFlow Editor.
![]() A, C, and D are incorrect. A is incorrect because the sun-web.xml file is not displayed in the illustration. C is incorrect because the web.xml file is not displayed in the illustration. D is incorrect because the web-config.xml file is not displayed in the illustration, nor is it a valid file.
A, C, and D are incorrect. A is incorrect because the sun-web.xml file is not displayed in the illustration. C is incorrect because the web.xml file is not displayed in the illustration. D is incorrect because the web-config.xml file is not displayed in the illustration, nor is it a valid file.
Working with Server Instances
8. How is the GlassFish Update Center opened?
A. In the Services window, right-click the Servers node, and select the View Update Center menu item.
B. In the Services window, expand the Servers node, right-click the GlassFish node, and select the View Update Center menu item.
C. In the Servers window, expand the Services node, right-click the GlassFish node, and select the View Update Center menu item.
D. There is no GlassFish Update Center.
![]() B. In the Services window, expand the Servers node, right-click the GlassFish node, and select the View Update Center menu item to invoke the GlassFish Update Center.
B. In the Services window, expand the Servers node, right-click the GlassFish node, and select the View Update Center menu item to invoke the GlassFish Update Center.
![]() A, C, and D are incorrect. A is incorrect because there is no View Update Center menu item directly associated with the Servers node. You must right-click the application server’s node to get this menu item. C is incorrect because there is no Servers window or Services node. There’s a Services window and a Servers node. D is incorrect because a GlassFish Update Center does exist.
A, C, and D are incorrect. A is incorrect because there is no View Update Center menu item directly associated with the Servers node. You must right-click the application server’s node to get this menu item. C is incorrect because there is no Servers window or Services node. There’s a Services window and a Servers node. D is incorrect because a GlassFish Update Center does exist.
9. Server support plugins are available/installed for which application and/or web servers by default? That is, the plugin does not need to be obtained through the Plugin Manager or Plugin Portal.
A. Apache Tomcat
B. Sun GlassFish
C. Oracle OC4J
D. OW2 JOnAS
![]() A and B. Server support plugins are available for Apache Tomcat web server and Sun GlassFish application server by default.
A and B. Server support plugins are available for Apache Tomcat web server and Sun GlassFish application server by default.
![]() C and D are incorrect. C is incorrect because Oracle OC4J is available through the Plugin Manager and not by default. D is incorrect because OW2 JOnAS is available through the Plugin Portal and not by default.
C and D are incorrect. C is incorrect because Oracle OC4J is available through the Plugin Manager and not by default. D is incorrect because OW2 JOnAS is available through the Plugin Portal and not by default.
Building and Deploying Web Applications
10. What format is used in the Exclude From WAR File edit box found in the Build/Packaging node of the Project Properties dialog box to exclude all Java source files for the target WAR file?
A. *.java
B. */**.java
C. *all*.java
D. **/*.java
![]() D. The **/*.java format is used in the Exclude From WAR File edit box found in the Build/Packaging node of the Project Properties dialog box to exclude all Java source files for the target WAR file.
D. The **/*.java format is used in the Exclude From WAR File edit box found in the Build/Packaging node of the Project Properties dialog box to exclude all Java source files for the target WAR file.
![]() A, B, and C are incorrect. A is incorrect because *.java does not ensure exclusion of all Java source files from the target WAR file. B is incorrect because */**.java does not ensure exclusion of all Java source files from the target WAR file. C is incorrect because *all*.java does not ensure exclusion of all Java source files from the target WAR file.
A, B, and C are incorrect. A is incorrect because *.java does not ensure exclusion of all Java source files from the target WAR file. B is incorrect because */**.java does not ensure exclusion of all Java source files from the target WAR file. C is incorrect because *all*.java does not ensure exclusion of all Java source files from the target WAR file.
11. When running a web application, how can you ensure that the web browser is displayed when an application is deployed?
A. Select the Display Browser On Run checkbox associated with the Run node in the Project Properties dialog box.
B. Select the Display Browser On Run checkbox associated with the Build/Packaging node in the Project Properties dialog box.
C. Ensure the web browser is open on your desktop, because the application will only run in the browser if it’s already open.
D. Click the Display Browser On Run icon in the Run toolbar.
![]() A. When running a web application, you can ensure that the web browser is displayed at runtime by selecting the Display Browser On Run checkbox associated with the Run node in the Project Properties dialog box.
A. When running a web application, you can ensure that the web browser is displayed at runtime by selecting the Display Browser On Run checkbox associated with the Run node in the Project Properties dialog box.
![]() B, C, and D are incorrect. B is incorrect because there is no Display Browser On Run checkbox associated with the Build/Packaging node in the Project Properties dialog box. C is incorrect because the web browser does not need to be currently open in order for the browser to be displayed at runtime. D is incorrect because there is no Display Browser On Run icon.
B, C, and D are incorrect. B is incorrect because there is no Display Browser On Run checkbox associated with the Build/Packaging node in the Project Properties dialog box. C is incorrect because the web browser does not need to be currently open in order for the browser to be displayed at runtime. D is incorrect because there is no Display Browser On Run icon.