
This chapter explains the most important aspect of network programming, the socket. It is essential to fully understand how to use sockets in .NET before proceeding to the following chapters. Examples in this chapter will enable the user to send files and messages over the Internet, using simple network applications.
Two socket-level protocols are described in this chapter. Both protocols are demonstrated as a pair of applications—one client, one server. This follows the classic client/server model, which is prevalent in most distributed applications. The chapter follows this structure, describing the client first, followed immediately by an implementation of the server.
A socket is an object that represents a low-level access point to the IP stack. This socket can be open or closed or one of a set number of intermediate states. A socket can send and receive data down this connection. Data is generally sent in blocks of a few kilobytes at a time for efficiency; each of these blocks is called a packet.
All packets that travel on the Internet must use the Internet protocol. This means that the source IP address, destination address must be included in the packet. Most packets also contain a port number. A port is simply a number between 1 and 65,535 that is used to differentiate higher protocols, such as email or FTP (Table 3.1). Ports are important when it comes to programming your own network applications because no two applications can use the same port. It is recommended that experimental programs use port numbers above 1024.
Packets that contain port numbers come in two flavors: UDP and TCP/IP. UDP has lower latency than TCP/IP, especially on startup. Where data integrity is not of the utmost concern, UDP can prove easier to use than TCP, but it should never be used where data integrity is more important than performance; however, data sent via UDP can sometimes arrive in the wrong order and be effectively useless to the receiver. TCP/IP is more complex than UDP and has generally longer latencies, but it does guarantee that data does not become corrupted when traveling over the Internet. TCP is ideal for file transfer, where a corrupt file is more unacceptable than a slow download; however, it is unsuited to Internet radio, where the odd sound out of place is more acceptable than long gaps of silence.
This program will send the words “hello world” over a network. It consists of two executables, one a client, the other a server. These two programs could be physically separated by thousands of kilometers, but as long as the IP addresses of both computers are known, the principle still works.
In this example, the data will be sent using UDP. This means that the words “hello world” will be bundled up with information that will be used by IP routers to ensure that the data can travel anywhere it wishes in the world. UDP data is not bundled with headers that track message integrity or security. Furthermore, the receiving end is not obliged to reply to the sender with acknowledgments as each packet arrives. The elimination of this requirement allows UDP data to travel with much lower latency than TCP. UDP is useful for small payload transfers, where all of the data to be sent can be contained within one network packet. If there is only one packet, the out-of-sequence problems associated with UDP do not apply; therefore, UDP is the underlying protocol behind DNS.
To get started, open Visual Studio .NET, click New Project, then click Visual C# projects, and then Windows Application. Set the name to “UDP Client” and press OK. You could alternately click Visual Basic .NET projects and follow the code labeled VB.NET in the examples.
Now, design the form as shown in Figure 3.1. Name the button button1 and the textbox tbHost.

Click the button and type in the source code as follows:
C#
private void button1_Click(object sender, System.EventArgs e)
{
  UdpClient udpClient = new UdpClient();
  udpClient.Connect(tbHost.Text, 8080);
  Byte[] sendBytes = Encoding.ASCII.GetBytes("Hello World?");
    udpClient.Send(sendBytes, sendBytes.Length);
}
VB.NET
Private sub button1_Click(sender as object, e as _
System.EventArgs) Handles button1.Click
  Dim udpClient as new UdpClient()
  udpClient.Connect(tbHost.Text, 8080)
  Dim sendBytes as Byte()
  sendBytes = Encoding.ASCII.GetBytes("Hello World?")
    udpClient.Send(sendBytes, sendBytes.Length)
End sub
From the code, we can see that the first task is creating a UDP Client object. This is a socket that can send UDP packets. A port number is chosen arbitrarily. Here, the port number 8080 is used, simply because it is easy to remember and it is not in the first 1024 port numbers, which are reserved for special use by IANA.
The first argument in the Connect method indicates where any data should be sent. Here, I have used tbHost.Text (i.e., whatever is typed into the textbox). If you have access to only one computer, you would type localhost into this window; otherwise, if you are using two computers, type the IP address of the server.
You also need to include some assemblies by adding these lines to just under the lock of the using statements at the top of the code:
C#
using System.Net;
using System.Net.Sockets;
using System.Text;
using System.IO;
VB.NET
imports System.Net
imports System.Net.Sockets
imports System.Text
imports System.IO
Now, press F5 to compile and run the application. You should see your application resembling Figure 3.1.
Table 3.2 shows the significant methods and properties for UdpClient.
Table 3.2. Significant members of the UdpClient class.
Method or Property | Purpose |
|---|---|
| Initializes a new instance of the |
| Closes the UDP connection. |
| Leaves a multicast group. |
| Adds a |
| Returns a UDP datagram that was sent by a remote host. This may be invoked thus: |
| Sends a UDP datagram to a remote host. This may be invoked thus |
| Gets or sets a value indicating whether a connection to a remote host has been made. Returns |
| Gets or sets the underlying network sockets. Returns |
The purpose of the UDP server is to detect incoming data sent from the UDP client. Any new data will be displayed in a list box.
As before, create a new C# project, but with a new user interface, as shown below. The list box should be named lbConnections.
A key feature of servers is multithreading (i.e., they can handle hundreds of simultaneous requests). In this case, our server must have at least two threads: one handles incoming UDP data, and the main thread of execution may continue to maintain the user interface, so that it does not appear hung. The details of threading are not within the scope of this book.
First, we write the UDP data handling thread:
C#
  public void serverThread()
  {
   UdpClient udpClient = new UdpClient(8080);
   while(true)
  {
    IPEndPoint RemoteIpEndPoint = new IPEndPoint(IPAddress.Any,
     0);
   Byte[] receiveBytes = udpClient.Receive(ref
 RemoteIpEndPoint);
   string returnData = Encoding.ASCII.GetString(receiveBytes);
   lbConnections.Items.Add(
    RemoteIpEndPoint.Address.ToString() + ":" +
 returnData.ToString()
   );
  }
}Public Sub serverThread() Dim udpClient as new UdpClient(8080) While true Dim RemoteIpEndPoint as new IPEndPoint(IPAddress.Any, 0) Dim receiveBytes as Byte() receiveBytes = udpClient.Receive(RemoteIpEndPoint) Dim returnData As String = _ Encoding.ASCII.GetString(receiveBytes) lbConnections.Items.Add _ RemoteIpEndPoint.Address.ToString() + ":" + _ returnData.ToString() Wend End Sub
Again, we use the UdpClient object. Its constructor indicates that it should be bound to port 8080, like in the client. The Receive method is blocking (i.e., the thread does not continue until UDP data is received). In a real-world application, suitable timeout mechanisms should be in place because UDP does not guarantee packet delivery. Once received, the data is in byte array format, which is then converted to a string and displayed on-screen in the form source address: data.
There is then the matter of actually invoking the serverThread method asynchronously, such that the blocking method, Receive, does not hang the application. This is solved using threads as follows:
C#
private void Form1_Load(object sender, System.EventArgs e)
{
 Thread thdUDPServer = new Thread(new
ThreadStart(serverThread));
 thdUDPServer.Start();
}Private Sub Form1_Load(ByVal sender As System.Object, _ ByVal e As System.EventArgs) Handles MyBase.Load Dim thdUDPServer = new Thread(new ThreadStart(AddressOf _ serverThread)) thdUDPServer.Start() End Sub
To finish off, the following assemblies are to be added:
C#
using System.Threading;
using System.Net;
using System.Net.Sockets;
using System.Text;
VB.NET
imports System.Threading
imports System.Net
imports System.Net.Sockets
imports System.Text
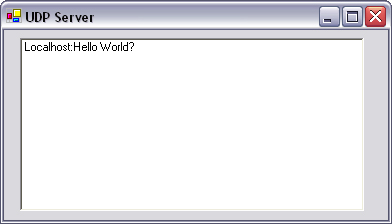
To test this application, execute it from Visual Studio .NET. On the same computer, open the UDP client and execute it. Type localhost into the textbox and press the button on the UDP client. A message “Localhost:Hello World?” should appear, such as shown in Figure 3.2.
If you have a second PC, get its IP address and install the server on this second PC and execute it. Again open the client, but type the IP address into the textbox. When you press the button on the client, the server should display the “Hello World” message. Voilà! You have used .NET to send data across a network.
Most networked applications use TCP/IP because there is no risk of data becoming corrupted while traveling over the Internet. It is said to be connection oriented; that is, both client and server after a setup phase treat a set of IP packets as being sent along a virtual channel, allowing for data that is too large to fit into a single IP packet to be sent and for retransmission to occur when packets are lost.
This sample application will allow you to send any file from one computer to another. Again, it is client/server based, so you will need either two computers or to run both the client and server on the same computer.
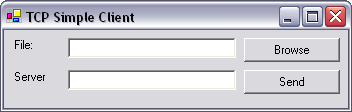
Create a new project as usual, and design a form as shown in Figure 3.3. Name the Send button btnSend, the Browse button btnBrowse, the File textbox tbFilename, and the Server textbox tbServer. Also add an Open File Dialog control named openFileDialog.
Click on the Browse button and add the following code:
  private void btnBrowse_Click(object sender,
System.EventArgs e)
  {
    openFileDialog.ShowDialog();
    tbFilename.Text = openFileDialog.FileName;
  }
VB.NET
  Private Sub btnBrowse_Click(ByVal sender As _
     System.Object, ByVal e As System.EventArgs) _
     HandlesbtnBrowse.Click
   openFileDialog.ShowDialog()
   tbFilename.Text = openFileDialog.FileName
  end sub
This code opens the default file open dialog box. If the user does not select a file, openFileDialog.Filename will return an empty string.
Click on the Send button and add the following code:
C#
private void btnSend_Click(object sender, System.EventArgs e)
{
  Stream fileStream = File.OpenRead(tbFilename.Text);
  // Alocate memory space for the file
  byte[] fileBuffer = new byte[fileStream.Length];
  fileStream.Read(fileBuffer, 0, (int)fileStream.Length);
  // Open a TCP/IP Connection and send the data
 TcpClient clientSocket = new TcpClient(tbServer.Text,8080);
 NetworkStream networkStream =  clientSocket.GetStream();
  networkStream.Write(fileBuffer,0,fileBuffer.GetLength(0));
  networkStream.Close();
}
VB.NET
Private Sub btnSend_Click(ByVal sender As System.Object, _
ByVal e As System.EventArgs) Handles btnSend.Click
  Dim filebuffer As Byte()
    Dim fileStream As Stream
    fileStream = File.OpenRead(tbFilename.Text)
    ' Alocate memory space for the file
    ReDim filebuffer(fileStream.Length)
    fileStream.Read(filebuffer, 0, fileStream.Length)
    ' Open a TCP/IP Connection and send the data
    Dim clientSocket As New TcpClient(tbServer.Text, 8080)
    Dim networkStream As NetworkStream
    networkStream = clientSocket.GetStream()
    networkStream.Write(filebuffer, 0, fileStream.Length)
end sub
The above code reads in a file and sends it over a network connection. To read in a file, a stream for this file is created by passing the filename to the OpenRead method. This stream is read into the file buffer array. An alternate means of reading this file would be to pass the file stream as a parameter to the constructor of a StreamReader, then to call the ReadToEnd method, although this approach would only be useful for text-only files.
It then opens a TCP/IP connection with the server on port 8080, as specified in tbServer.Text. The TcpClient constructor is blocking, in that code execution will not continue until a connection is established. If a connection cannot be established, a SocketException will be thrown: “No connection could be made because the target machine actively refused it.” As usual, the following assemblies are added:
C#
using System.Threading;
using System.Net;
using System.Net.Sockets;
using System.Text;
using System.IO;
VB.NET
imports System.Threading
imports System.Net
imports System.Net.Sockets
imports System.Text
imports System.IO
Table 3.3 shows the significant methods and properties for TcpClient.
Table 3.3. Significant methods and properties of TcpClient.
Method or Property | Purpose |
|---|---|
| Initializes a new instance of the |
| When set to |
| Gets or sets the size of the receive buffer. Returns |
| Gets or sets the size of the send buffer. Returns |
| Gets or sets the amount of time a |
| Closes the TCP connection. |
| Connects the client to a remote TCP host using the specified host name and port number. It may be invoked thus: |
| Returns the stream used to send and receive data. Returns |
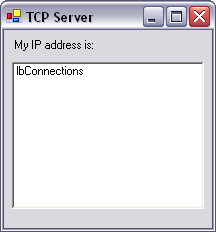
Open a new project as before, and design a user interface as depicted in Figure 3.4. The label should be named lblStatus, and the list box, lbConnections.
Like the UDP server in a preceding example, the TCP server is multithreaded. In this case, three threads are used: the main thread maintains the user interface, a second thread listens for connections, and a third thread handles the connections.
One socket is required for each connection and will remain loaded in memory until the connection is closed. These sockets need to be stored in an ArrayList rather than a standard array because it is impossible to predict how many connections will be received.
To start, declare a global ArrayList variable:
public class Form1 : System.Windows.Forms.Form
{
  private ArrayList alSockets;
  ...
VB.NET
Public Class Form1 Inherits System.Windows.Forms.Form
  private alSockets as ArrayList
  ...
Because any client wishing to connect to this server would need to know its IP address, it is helpful to display this on-screen. This is a cosmetic feature, but it may come in handy in other applications. In order to retrieve the local IP address, we call the static method Dns.GetHostByName. This returns an IPHostEntry object, which is a collection of IP addresses, to accommodate multihomed computers, which many are. Element zero in this array is commonly the external IP address for the computer.
The Form1_Load method displays the local IP address on the form and starts the thread that will wait for incoming connections. If the listenerThread method were to be called directly, the program would become unresponsive and appear to hang, while the socket waited on incoming connections. This effect is avoided by executing the listenerThread method in a separate thread of execution, which can block without adversely affecting the user interface.
private void Form1_Load(object sender, System.EventArgs e)
{
 IPHostEntry IPHost = Dns.GetHostByName(Dns.GetHostName());

  lblStatus.Text = "My IP address is " +
IPHost.AddressList[0].ToString();
  alSockets = new ArrayList();
  Thread thdListener = new Thread(new
ThreadStart(listenerThread));
  thdListener.Start();
}
VB.NET
Private Sub Form1_Load(ByVal sender As System.Object, _
  ByVal e As System.EventArgs) Handles MyBase.Load
  Dim IPHost as IPHostEntry
  IPHost = Dns.GetHostByName(Dns.GetHostName())
  lblStatus.Text = "My IP address is " + _
  IPHost.AddressList(0).ToString()
  alSockets = new ArrayList()
  Dim thdListener As New Thread(New ThreadStart _
  (AddressOf listenerThread))
  thdListener.Start()
End Sub
The listenerThread method’s function is to wait indefinitely for TCP connections on port 8080 and then to redelegate the work of handling these requests to the handlerThread method. This function also reports the source of the connections.
This time, the reason for redelegating work to a thread is not to maintain the responsiveness of the user interface, but rather to ensure that the application will continue to listen for new connections while it is handling a previous client. The new thread will be required to have access to the socket that is dealing with the current client. Otherwise, there would be no means of returning data.
This thread will block on the call to AcceptSocket. Execution will not continue until an incoming connection has been detected; when it has, a new socket is created and dedicated to handling this particular client. Once this socket has established a connection, the socket is placed on top of the alSockets array list to await pickup by the handler thread.
It may seem unusual that the socket is not passed directly to the thread. This is because it is not valid to specify parameters when defining the starting point of a thread, for example, making an erroneous statement such as
New ThreadStart(AddressOf handlerThread(Parameter))
Therefore, another means of passing parameters to threads is required. In this example, a public array list of sockets is used, where the top-most entry is used by the newest thread, and so forth. Another common technique for passing parameters to threads is to encapsulate the thread’s methods in a separate class, with public variables acting as parameters. When a new instance of this class is created, it can be passed to the ThreadStart constructor.
Once the socket has been added to the array list, the handler thread is invoked, and this thread continues to listen for incoming connections.
Note
You may notice a port number added to the end of the source IP address. This is an internally negotiated port number used by TCP/IP. More details on this topic can be found in Chapter 13.
C#
public void listenerThread()
{
  TcpListener tcpListener = new TcpListener(8080);
  tcpListener.Start();
  while(true)
  {
    Socket handlerSocket = tcpListener.AcceptSocket();
    if (handlerSocket.Connected)
    {
     lbConnections.Items.Add(
      handlerSocket.RemoteEndPoint.ToString() + " connected."
     );
     lock (this)
     {
      alSockets.Add(handlerSocket);
     }
     ThreadStart thdstHandler = new
     ThreadStart(handlerThread);
     Thread thdHandler = new Thread(thdstHandler);
     thdHandler.Start();
    }
  }
}Public sub listenerThread()
Dim tcpListener as new TcpListener(8080)
Dim handlerSocket as Socket
Dim thdstHandler as ThreadStart
Dim thdHandler as Thread
tcpListener.Start()
do
handlerSocket = tcpListener.AcceptSocket()
if handlerSocket.Connected then
lbConnections.Items.Add( _
handlerSocket.RemoteEndPoint.ToString() + _
"connected.")
SyncLock (Me)
alSockets.Add(handlerSocket)
end SyncLock
thdstHandler = New ThreadStart(AddressOf _
handlerThread)
thdHandler = New Thread(thdstHandler)
thdHandler.Start()
end if
Loop
End subThe remainder of the work is carried out in the handlerThread method. This function finds the last used socket and then retrieves the stream from this socket. An array is allocated to the same size as the stream, and once the stream is fully received, its contents are copied into this array.
Once the connection closes, the data is written to file at c:my documentsupload.txt. It is important to have the lock() keyword around the lines of code associated with file access; otherwise, if two concurrent connections try to access the same file, the program will crash. The contents of the file are then displayed in the list box on-screen. The socket is then set to null to remove it from memory. If this point were omitted, the array list would quickly fill with sockets that had lost connection with their clients.
Note that the constructor for TcpListener that takes only a single int for a port number is now obsolete. To stop the compiler complaining about this line of code, simply call the constructor thus:
new TcpListener(IPAddress.Any,8080)
C#
public void handlerThread()
{
 Socket handlerSocket = (Socket)alSockets[alSockets.Count-1];
 NetworkStream networkStream = new
 NetworkStream(handlerSocket);
   int thisRead=0;
   int blockSize=1024;
   Byte[] dataByte = new Byte[blockSize];
   lock(this)
   {
   // Only one process can access
   // the same file at any given time

   Stream fileStream = File.OpenWrite("c:\my documents
   upload.txt");
   while(true)
   {
    thisRead=networkStream.Read(dataByte,0,blockSize);
    fileStream.Write(dataByte,0,thisRead);
    if (thisRead==0) break;
   }
   fileStream.Close();
  }
  lbConnections.Items.Add("File Written");
  handlerSocket = null;
 }
VB.NET
Public Sub handlerThread()
    Dim handlerSocket As Socket
    handlerSocket = alSockets(alSockets.Count - 1)
    Dim networkStream As NetworkStream = New _
       NetworkStream(handlerSocket)
    Dim blockSize As Int16 = 1024
    Dim thisRead As Int16
    Dim dataByte(blockSize) As Byte
    SyncLock Me
    ' Only one process can access the
    ' same file at any given time
    Dim fileStream As Stream
        fileStream = File.OpenWrite("c:upload.txt")
        While (True)
            thisRead = networkStream.Read(dataByte, _
               0, blockSize)
           fileStream.Write(dataByte, 0, dataByte.Length)
            If thisRead = 0 Then Exit While
        End While
        fileStream.Close()
    End SyncLock
    lbConnections.Items.Add("File Written")
    handlerSocket = Nothing
End Sub
As before, add the namespace references to the head of the code:
C#
using System.Threading;
using System.Net;
using System.Net.Sockets;
using System.Text;
using System.IO;
VB.NET
imports System.Threading
imports System.Net
imports System.Net.Sockets
imports System.Text
imports System.IO
To test the application, run the server application, and take note of the IP address displayed. Then, run the client application. Type the IP address into the box provided. Click on browse to select a file. Press send to transfer the file. A file will soon appear on the server at c:my documentsupload.txt, which is an exact copy of the file that was located on the client.
To further demonstrate this principle, you can use a telnet program to write text to c:upload.txt remotely.
On Windows 95, 98, or ME machines, click Start→Run, then type Telnet. Click Connect→Remote System. Type the server IP address into the host name textbox, and type 8080 into the port textbox. Press Connect. Type some text into the window, and when finished, press Connect, Disconnect. A file will soon appear on the server at c:my documentsupload.txt.
On Windows NT, 2000, and XP machines, click Start→Run, then type Telnet. Type Open 127.0.0.1 8080. Replace 127.0.0.1 with the IP address of your server, if you have two computers. Type some text into the window, and when finished, close the window. A file will soon appear on the server at c:upload.txt.
Ways have already been developed to send files through the Internet. Anybody who has ever written a Web site would be familiar with programs such as cuteFTP and smartFTP, which do exactly what was demonstrated in the previous example, albeit with a much more flexible interface.
It is rarely a good idea to try to reinvent the wheel and develop a new way to send data through the Internet. The global standardization of protocols has made the Internet what it is today.
Table 3.4 shows the significant methods and properties for TcpListener.
Table 3.4. Significant members of the TcpListener class.
Method or Property | Purpose |
|---|---|
| Initializes a new instance of the |
| Gets the underlying |
| Accepts a pending connection request. Returns |
| Accepts a pending connection request. Returns |
| Determines if there are pending connection requests. Returns |
| Starts listening to network requests. |
| Closes the listener. |
| Gets a value that indicates whether |
| Gets the underlying network socket. Returns |
Network connections can and do break, and other applications may be already using the ports you want to use. It is therefore foolhardy to assume that a call to a Connect or Listen method will always succeed. For this reason, the try/catch construct should be employed as demonstrated below:
C#
try
{
 serverSocket.Bind(ipepServer);
 serverSocket.Listen(-1);
}
catch(SocketException e)
{
 MessageBox.Show(e.Message);
}
catch(Exception e)
{
 MessageBox.Show(e.Message);
 Application.Exit();
}
VB.NET
try
 serverSocket.Bind(ipepServer)
 serverSocket.Listen(-1)
catch e as SocketException
 MsgBox(e.Message)
Catch e as Exception
 MsgBox(e.Message)
 Application.Exit()
End try
Another type of problem that plagues network applications is scalability. This is where the software cannot cope with a large number of sequential or concurrent connections, or both. To discover scalability problems, you can either repetitively hit the Connect and Send buttons on your client or write a stress test program to do this for you over long periods. The program may run out of memory if sockets are not set to null after use, or it may crash because of simultaneous access to a limited resource, or start dropping connections, or work perfectly.
To locate problems in multithreaded applications, tracing statements are invaluable. A good mechanism for doing this is the System.Diagnostics.Trace class or simple Console.WriteLine statements at the entrance and exit of methods. Once the problem has been located, placing Lock statements around non-thread-safe code usually aids system stability; however, placing a Lock clause around a blocking statement may cause your application to hang.
When developing an application that interfaces with a third-party distributed application, it is sometimes quite difficult to see exactly what is being sent between client and server. This matter can be further complicated if the protocol is proprietary, with little or no technical information.
Many protocols are inherently text based and were originally designed for users to access by typing the commands directly into the server, rather than using a GUI. Nowadays, nobody would have the patience to upload a file via FTP by typing the FTP commands directly into the server, but because Internet standards are somewhat immortal, these old systems have remained.
This rather arcane way of accessing Web-based services may no longer be relevant to the end-user, but it is a godsend to the developer. Say, for example, you are developing a program that is designed to interface an IMAP (email) server. If the program is not receiving emails, after you’ve meticulously implemented the protocol as per RFC spec, you can always open up telnet and go through the paces of receiving an email by typing text into telnet. If you can re-create the error manually, it should help solve the problem from a programmatic perspective. This approach would not work with binary protocols such as Distributed Common Object Model (DCOM).
If you are working with an unofficial or proprietary protocol, there may be little chance you can guess how it works. The first step in approaching any such protocol is to determine on which port it is operating. A useful tool in doing this is netstat. To see it in action, open the command prompt and type netstat (Figure 3.5).
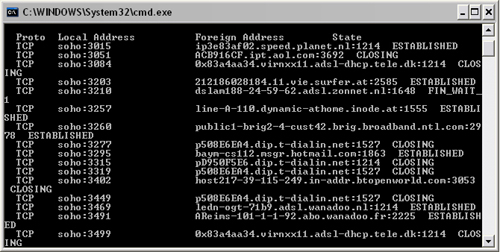
This lists all of the current outgoing and incoming connections to your computer at that time, along with the port in use. To isolate the port used by any particular application, use the process of elimination. If you turn off all nonessential network services apart from the application that you are trying to analyze, take note of the list of ports, then turn off the application, and compare the new list with the old list; whatever port is missing is the application’s port.
Knowing the port number is only one step toward tapping into a protocol. To see exactly what bits and bytes are being sent between the two applications, you can use one of the example protocol analyzer programs described in Chapter 13 or a ready-made application such as Trace Plus from www.sstinc.com.
It is often necessary to understand network code written by other developers in order to debug it or adapt it to your own application. After all, no program is ever written without referring to some existing code.
This book will consistently use the most concise code possible, but it is important to realize that there are many techniques to implement networked applications in .NET. It is equally important to be able to understand and recognize these techniques when they are used in code written by other developers.
The most important class in .NET networking is the Socket class. This can be used for either TCP/IP or UDP as either a client or server; however, it requires the help of the Dns class to resolve IP addresses and is quite difficult to use. Three other classes exist, which are simpler to use, but less flexible: TcpListener, TcpClient, and UdpClient. To illustrate the differences between the two techniques, listed below is code that demonstrates how a socket can be made to listen for incoming connections on port 8080 and display any received data on screen.
The example below shows how to create a single-threaded TCP server using only the Socket class. Begin a new project in Visual Studio .NET. Drag a textbox onto the form, named tbStatus, which has its multiline property set to true. Also add a button, named btnListen. Click on this button and add the following code:
C#
private void btnListen_Click(object sender, System.EventArgs e)
{
  int bytesReceived = 0;
  byte[] recv = new byte[1];
  Socket clientSocket;
  Socket listenerSocket = new Socket(
        AddressFamily.InterNetwork,
        SocketType.Stream,
        ProtocolType.Tcp
        );
  IPHostEntry IPHost = Dns.GetHostByName(Dns.GetHostName());
  IPEndPoint ipepServer = new
  IPEndPoint(IPHost.AddressList[0],8080);
  listenerSocket.Bind(ipepServer);
  listenerSocket.Listen(-1);
  clientSocket = listenerSocket.Accept();
  if (clientSocket.Connected)
  {
    do
    {
      bytesReceived = clientSocket.Receive(recv);
      tbStatus.Text += Encoding.ASCII.GetString(recv);
    }
      while (bytesReceived!=0);
  }
}Private Sub btnListen_Click(ByVal sender As Object, _
ByVal e As System.EventArgs)
Dim bytesReceived As Integer = 0
Dim recv() As Byte = New Byte(1) {}
Dim clientSocket As Socket
Dim listenerSocket As New Socket( _
AddressFamily.InterNetwork, _
SocketType.Stream, _
ProtocolType.Tcp)
Dim IPHost As IPHostEntry = _
Dns.GetHostByName(Dns.GetHostName())
Dim ipepServer As IPEndPoint = New _
IPEndPoint(IPHost.AddressList(0), 8080)
listenerSocket.Bind(ipepServer)
listenerSocket.Listen(-1)
clientSocket = listenerSocket.Accept()
If clientSocket.Connected Then
Do
bytesReceived = clientSocket.Receive(recv)
tbStatus.Text += Encoding.ASCII.GetString(recv)
Loop While bytesReceived <> 0
End If
End SubSo far, the sockets we have dealt with have been abstracted to perform specific tasks, and as such provide specialized methods that make the coding easier. The generic socket object can be either a server or client.
The listener socket is created with a constructor that is passed three parameters: addressing scheme, socket type, and protocol type.
Table 3.5 shows supported addressing schemes.
Table 3.5. Addressing schemes supported by Socket.
Addressing scheme | Usage |
|---|---|
| AppleTalk address, used for communications with Apple Macintosh computers. |
| Native asynchronous transfer mode (ATM) services address. |
| Banyan VINES (Virtual Networking System) address. |
| Addresses for protocols such as X.25. |
| Address for CHAOS protocols, in format 007.x.y.z. |
| Address for Microsoft cluster products, such as MSCS. |
| Address for Datakit protocols, such as the universal receiver protocol. |
| Direct data-link (MAC) interface address. |
| DECnet address, designed for DEC minicomputers. |
| European Computer Manufacturers Association (ECMA) address, used for circuit-switched call control. |
| FireFox address, runs over TCP 1689. |
| NSC hyperchannel address, defined in RFC 1044. |
| IEEE 1284.4 workgroup address, commonly known as DOT4 and used by HP printers. |
| ARPANET interface message processor (IMP) address. |
| IPv4 address, most commonly used for Internet transfers. |
| IPv6 address, used for the next version of IP. |
| Internetwork packet exchange (IPX) address. |
| Infrared data association address. |
| Address for ISO protocols, such as ISO-IP. |
| Local area transport protocol address, used with DEC minicomputers. |
| MAX address. |
| NetBios address, used for Windows file and printer sharing. |
| Address for Network Designers OSI gateway-enabled protocols. |
| Address for Xerox NS protocols, such as IDP. |
| Address for PARC universal packet (PUP) protocols. |
| IBM Systems Network Architecture address. |
| UNIX local-to-host address. |
| VoiceView address, used in voice and data telephony. |
Most of these addressing schemes would rarely be used in a modern Windows environment, but they could be used when interfacing to minicomputers or legacy systems.
Table 3.6 shows upported protocol types.
Table 3.6. Protocol types supported by socket.
Addressing scheme | Usage |
|---|---|
Gateway to gateway protocol (GGP), used for interrouter communications | |
| Internet control message protocol (ICMP), also known as Ping and used to report network errors |
| Internet datagram protocol (IDP), the underlying transport for Xerox networking protocols |
| Internet group management protocol (IGMP), used in multicasting |
| Internet protocol (IP), the underlying transport for all communications on the Internet |
| Internetwork packet exchange (IPX), Novell’s implementation of IDP |
| Specifies an unofficial protocol named net disk (ND) |
| PARC universal packet (PUP) protocol, a predecessor of routing information protocol (RIP) |
| Raw socket data; excludes frame headers |
| Sequential packet exchange (SPX), Novell’s transport layer protocol that provides a packet delivery service |
| Sequential packet exchange 2 (SPX2), a more modern implementation of SPX |
| Transmission control protocol (TCP), the most common protocol for Internet data transfer |
| User datagram protocol (UDP), used for high-speed, low-integrity data transfers on the Internet |
The next section of code following the socket constructor is used to resolve the local IP address of the computer. Using the same construct as before, Dns.GetHostByName returns an IPHostEntry object. Element number 0 of the AddressList array is then assumed to be the external address.
An IPEndPoint object is created from the local IP address and the port number 8080. The listener socket is then bound to the endpoint. The socket does not start listening until the Listen method is called. The parameter specifies the number of clients to keep on hold at any one time; -1 indicates an indefinite holding time.
As before, when the Accept method is called, execution stops until a connection request is received. Once a connection request is received, a new socket dedicated to this client is returned. Once a connection has been established, the socket will read incoming data one byte at a time and append it to the textbox tbStatus. When the Receive method returns 0, the remote end will have closed the connection. Because this example does not use threading, it cannot handle more than one client at a time and will appear to hang during operation.
To complete the program, you will also require the following namespaces:
C#
using System.Text;
using System.Net.Sockets;
using System.Net;
VB.NET
Imports System.Text
Imports System.Net.Sockets
Imports System.Net
To test this application, run it from Visual Studio .NET. Press the listen button. At this point, the application will become unresponsive and appear to hang. Open telnet on the local machine with the following command:
telnet localhost 8080
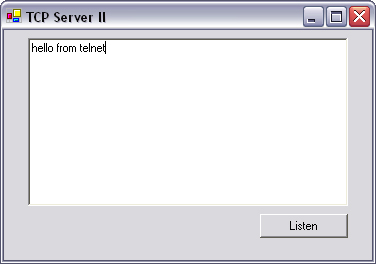
Type some text, and then quit telnet. You should see that text on the application window, as depicted in Figure 3.6.
Most networked applications deal with the interchange of commands and data between client and server. Because TCP/IP requires connections to be explicitly opened and closed, it is possible to locate where networking code starts by searching for phrases such as “new TcpListener” or “Listen” for servers, and “new TcpClient” or “Connect” for clients.
It is both unprofessional and irritating to users if your application becomes unresponsive during normal operation. To avoid this problem, you could use threading, as was demonstrated in examples earlier in this chapter; however, another technique is sometimes employed. Asynchronous sockets are arguably more complicated than threading, but can sometimes offer higher performance when you are handling a large number of concurrent connections. Asynchronous operation is mapped to low-level I/O completion ports in the operating system.
The following code modifies the above example such that it does not become unresponsive when waiting for incoming requests or data. Reopen the previous example in Visual Studio .NET, and add the following public variables directly inside the Form class:
C#
private AsyncCallback acceptCallBack;
private AsyncCallback receiveCallBack;
public Socket listenerSocket;
public Socket clientSocket;
public byte[] recv;
VB.NET
Private acceptCallBack As AsyncCallback
Private receiveCallBack As AsyncCallback
Public listenerSocket As Socket
Public clientSocket As Socket
Public recv() As Byte
These variables need to be accessible to any function within the form because server operation is split between three functions: btnListen_Click uses a socket to listen on port 8080; acceptHandler accepts incoming connections; and receiveHandler handles incoming data.
Double-click on the Listen button, and replace the code with the following code:
private void btnListen_Click(object sender, System.EventArgs
e)
{
  acceptCallBack = new AsyncCallback(acceptHandler);
  listenerSocket = new Socket(
    AddressFamily.InterNetwork,
    SocketType.Stream,
    ProtocolType.Tcp
    );
  IPHostEntry IPHost = Dns.GetHostByName(Dns.GetHostName());
  IPEndPoint ipepServer = new
IPEndPoint(IPHost.AddressList[0],8080);
  listenerSocket.Bind(ipepServer);
  listenerSocket.Listen(-1);
  listenerSocket.BeginAccept(acceptCallBack,null);
}
VB.NET
Private  Sub btnListen_Click(ByVal sender As Object, _
   ByVal e As System.EventArgs)
   acceptCallBack = New AsyncCallback(AddressOf _
   acceptHandler)
   Dim listenerSocket As Socket = New Socket( _
                        AddressFamily.InterNetwork, _
                        SocketType.Stream, _
                        ProtocolType.Tcp _
                        )
   Dim IPHost As IPHostEntry = _
   Dns.GetHostByName(Dns.GetHostName())
   Dim ipepServer As IPEndPoint = New _
       IPEndPoint(IPHost.AddressList(0), 8080)
   listenerSocket.Bind(ipepServer)
   listenerSocket.Listen(-1)
   listenerSocket.BeginAccept(acceptCallBack, Nothing)
End Sub
Instead of calling Listen on the socket, BeginListen is called. By doing this, the function will return immediately, and .NET knows that if an incoming connection appears on the port, the function acceptHandler is to be called. The second parameter passed to BeginAccept is Nothing, or null because no extra information needs to be passed to the callback function once it is called.
Now, add the callback function to handle incoming connections:
C#
public void acceptHandler(IAsyncResult asyncResult)
{
  receiveCallBack = new AsyncCallback(receiveHandler);
  clientSocket = listenerSocket.EndAccept(asyncResult);
  recv = new byte[1];
  clientSocket.BeginReceive(recv,0,1,
  SocketFlags.None,receiveCallBack,null);
}
VB.NET
Public Sub acceptHandler(ByVal asyncResult As IAsyncResult)
  receiveCallBack = New AsyncCallback(receiveHandler)
  clientSocket = listenerSocket.EndAccept(asyncResult)
  recv = New Byte(1) {}
  clientSocket.BeginReceive(recv,0,1, _
  SocketFlags.None,receiveCallBack,Nothing)
End Sub
The EndAccept method returns the same socket as would be created by the Accept method; however, EndAccept is nonblocking and will return immediately, unlike Accept.
Just as incoming connections are asynchronous by nature, incoming data also arrives asynchronously. If the connection is held open for longer than a few seconds, users will begin to notice that the application has become unresponsive; therefore, a second asynchronous call is used here. Instead of calling Receive, BeginReceive is called on the socket. This is passed an array buffer, which it populates asynchronously as data arrives. Again, an AsyncCallback object is passed to it because this object contains the reference to the callback function: receiveHandler.
Now, add the callback function to handle incoming data:
C#
public void receiveHandler(IAsyncResult asyncResult)
{
  int bytesReceived = 0;
  bytesReceived = clientSocket.EndReceive(asyncResult);
  if (bytesReceived != 0)
  {
    tbStatus.Text += Encoding.UTF8.GetString(recv);
    recv = new byte[1];
    clientSocket.BeginReceive(recv,0,1,
     SocketFlags.None,receiveCallBack,null);
  }
}Public Sub receiveHandler(ByVal asyncResult As _
IAsyncResult)
Dim bytesReceived As Integer = 0
bytesReceived = clientSocket.EndReceive(asyncResult)
if bytesReceived <> 0 then
tbStatus.Text += Encoding.UTF8.GetString(recv)
recv = New Byte(1) {}
clientSocket.BeginReceive(recv,0,1, _
SocketFlags.None,receiveCallBack,Nothing)
End if
End SubIn this example, the array buffer is only one byte long, so this function will be called every time one byte of data appears on port 8080. This function is also called when the connection closes, but in this case, the number returned from EndReceive is 0. If data is received, the asynchronous read must be continued by calling BeginReceive again.
To complete the program, you will also require the following namespaces:
C#
using System.Text;
using System.Net.Sockets;
using System.Net;
VB.NET
Imports System.Text
Imports System.Net.Sockets
Imports System.Net
Test the application in the same way as before. This time, you will notice that the application does not become unresponsive once the Listen button is pressed.
Socket-level programming is the foundation of all network programming. This chapter should provide enough information to assist you in implementing any TCP- or UDP-based protocol, proprietary or otherwise.
Not all network protocols need to be coded at the socket level; extensive support for HTTP is provided through classes provided by the .NET framework. Leveraging this ready-made functionality can cut down on the development time required for socket-level implementation.
The next chapter takes a detailed look at HTTP and how to write programs in .NET that communicate with Web servers.