
Anybody with experience in Web design knows that in order to put the site “live,” the Web page files need to be sent to a Web server provided by your hosting company or ISP. Most people never get to see the physical machine that their Web site is hosted on, and their only contact with it is through a file transfer protocol, or FTP, program such as cuteFTP or smartFTP.
FTP is the most common cross-platform file transfer mechanism between computers over the Internet. FTP software is freely available for all major operating systems, including Windows, UNIX, and Mac OS X. This cross-platform interoperability is very important for Web site development because most Web designers work on Windows and most Web servers run from UNIX, Linux, and Netware OS.
FTP as defined in RFC 1350 supersedes an older protocol known as trivial file transfer protocol (TFTP). This system is very seldom used on the Internet, but it can be used for procedures such as diskless booting on a network. It has no authentication facilities.
A competing technology developed by Microsoft is the Common Internet File (CIF) system. This is the native file-sharing protocol of Windows 2000 and XP. It is an extension of the earlier server message block (SMB) protocol used in prior versions of Windows. It is used to provide for the network drive functionality and print sharing. It is more secure than FTP, because of NTLM encryption, and generally faster; however, non-Windows implementations are not commonplace, but do exist for VMS and UNIX. The protocol is largely proprietary, which is often a deterrent to non-Microsoft developers.
Windows file sharing is most commonplace within office networks, where many employees share a printer or a central repository for files. From a programmer’s perspective, it is an ideal technology to use as a once-off solution at a company where all of the system users would be on the same internal network. If, for instance, an architecture firm were looking for a central repository for drawings, network share would be ideal because it requires no programming. The equivalent system using FTP would be slower, more awkward, and less secure; however, if the same firm wanted to share drawings with other firms, then FTP would be more suitable because of its interoperability and ease of deployment on Internet (rather than intranet) environments.
The terms NETBIOS and NETBEUI are the more correct names for Microsoft file and print sharing. A flavor of NETBIOS, NBT runs over IP, but all other forms are not based on IP addresses; they use NETBIOS host-names. These hostnames are resolved into physical addresses in one of four ways. They can broadcast the request on the network (B-Node). Alternately, they may query a WINS server (P-Node). Using a combination of these methods, by broadcasting before querying, is M-Node operation, and the reverse is H-Node operation.
This is somewhat of a dinosaur of file-transfer mechanisms, but it regularly appears in networks that have been in place for decades. It is, however, one of the fastest file transfer protocols over internal networks. It is built on top of the Internetworking packet exchange / Sequenced Packet Exchange (IPX/SPX) protocols and is thus nonroutable. Translators are available to convert these packets to TCP/IP, but the performance factor is lost.
The Netware system (also referred to as IntranetWare) is centered on a central Netware server. This server runs the Novell operating system, which is started from a bootstrap DOS application. The server hosts the Netware directory service (NDS), which is used to control authentication and privileges. Older Novell servers (3.x) use a bindery instead of NDS. The difference between the two systems is that the NDS is a relational database and can replicate among other servers, whereas the bindery cannot.
Novell clients are available for almost any platform, from DOS and Windows to Macintosh and UNIX. The clients locate the server by using the Novell core protocol (NCP). When a remote file server is found, it is mapped to a local drive on the client’s machine.
There is no native support for interoperating with Netware in .NET, and it is no small undertaking to integrate a .NET application with a Novell network. If you have to do so, look at the DOS command-line interfaces to the network, or failing that, try interfacing at the IPX level using raw sockets.
FTP operates on two ports: 21, the control socket, and a data socket, which can exist on port 20 or some other, high port. The definitive description of the protocol is found in RFC 959 at www.ietf.org/rfc/rfc959.txt.
Like the email protocols, the commands that flow between client and server are quite human readable and are broken up into lines, like English text; however, it is not feasible to upload or download files using FTP through telnet. If, however, you require a simple batch program to perform a routine upload of files to an FTP server, it may save time to look at the FTP.exe utility.
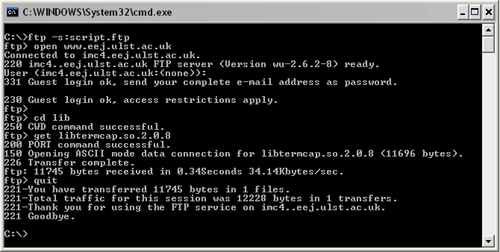
The FTP utility is a DOS-based program with a command-line interface. It can, however, accept script files with the –s command-line parameter, such that it can run autonomously. To try this utility, create a file named script.ftp containing the following text:
open www.eej.ulst.ac.uk
anonymous
[email protected]
cd lib
get libtermcap.so.2.0.8
quit
This FTP script file will open a connection to a server named www.eej.ulst.ac.uk. Log in anonymously, navigate to the lib folder, and download a file named libtermcap.so.2.0.8, and then exit. The downloaded file will be stored in the current local directory.
To run the script as shown in Figure 6.1, go to the command prompt, navigate to the location where script.ftp was saved, and then type the following keywords:
ftp -s:script.ftp
The technique of using the FTP utility is not the best-practice means of transferring files, but it is a simple and straightforward way to perform routine uploads when aesthetics and performance are not important. To leverage FTP from within a .NET application properly, it is necessary to be well-acquainted with the FTP protocol at a socket level, which is not all that dissimilar to learning to use the FTP utility command-line interface.
The FTP protocol facilitates more than uploading and downloading: It must also be able to accommodate all manner of file-manipulation tasks. This includes deleting, renaming, and navigating through folders. You cannot, however, edit the contents of files using FTP, unless you replace them completely.
Commands issued from client to server take the form
<keyword> <parameter> <enter>Commands from server to client take the form:
<status code> <human and/or computer readable message>
<enter>
Table 6.1 lists the main groups for status codes.
Table 6.1. FTP status codes.
Status code range | Meaning |
|---|---|
| Positive preliminary reply. The command has begun on the server. |
| Positive completion reply. The command has been completed successfully. |
| Positive intermediate reply. The command has been accepted, but no action has been taken. |
| Transient negative completion reply. The command has been denied, but can be reissued later. |
| Permanent negative completion reply. The command has been denied and should not be reissued. |
When you open an FTP connection to a server using an FTP client, you sometimes will be shown the raw data being sent to and from the server on the command socket. The text may resemble the following:
220 Serv-U FTP-Server v2.5k for WinSock ready...
    USER secret
331 User name okay, need password.
    PASS (hidden)
230 User logged in, proceed.
    PWD
257 "/" is current directory.
    TYPE A
200 Type set to A.
    PASV
227 Entering Passive Mode (212,17,38,3,11,144)
    LIST -aL
150 Opening ASCII mode data connection for /bin/ls.
226 Transfer complete.
This is a dump of the traffic on the command port. The data port is not shown.
In the email protocols, sections of data of variable length (i.e., emails) could be suffixed with <enter>.<enter> to mark the end of the data. If this character sequence is detected within the body of the email, it could be removed before sending without any real degradation of the legibility of the email; however, in FTP, an executable file could quite easily have this sequence of characters embedded within it, and the removal of those characters could cause the file to corrupt.
To avoid this problem, port 21 is used to send and receive commands and responses, each terminated by an <enter>. When variable length data is sent between client and server, such as files or directory listings, a temporary connection is opened on port 20, the data is transferred, and the port is closed again. In most real-world FTP client implementations, however, the FTP client may be behind a firewall, so the server should do all the serving and the client should do all the requesting.
Passive-mode FTP is where the client instructs the server to listen on a port other than the default data port. The client will then connect to this port and use it for uploading and downloading as usual.
The response to the PASV command will always include a bracketed list of six numbers separated by commas. The first four digit groups represent the IP address of the server, and the final two groups represent the port the server is listening on for its data connection.
In the previous example, the four digits are 212,17,38,3,11,144. This means that the server is located at IP address 212.17.38.3 and listening on port 2960 (11 × 256 + 144).
The server will begin listening on the port as soon as it receives the PASV command. It will return a 227 message to indicate that it has begun listening on this port. Once the client connects to this port, the server will return a 150 message. If the client does not connect to the port in a timely fashion (a few seconds), the server will issue a 425 timeout message. The server will send the requested data on that port and close the connection once all of the data is sent, and then issue a 226 message.
The same process happens in reverse when uploading to the server. In this case, the PASV command is issued, and the client connects to the port specified by the server. The client then places the contents of the file on the new socket and closes the connection once the file is sent.
In the same way, FTP uses a basic authentication mechanism: It accepts a username and password in plain text, which can be seen by anyone using a protocol analyzer at any point between the client and the server. FTP over SSL is recommended when a Web site carries information of substantial value.
An FTP server may allow anonymous access. This is where the username is set to anonymous and the password can be anything. This is the default setup of the Microsoft FTP service.
When you connect to an FTP server on port 21, the server will respond as follows:
220 <some message><enter>Using the same format as the POP3 handshake, the next commands to send are USER and PASS (in that order). The USER command is of this format:
USER <username><enter>The server will generally respond with 331 and request a password, whether there is any record of that user on the system or not. This is to make brute-force attacks more difficult.
331 <some message><enter>The PASS command must then be sent:
PASS <password><enter>The server will either respond with a 530 message for a failed login or 230 for a successful login.
230 <some message><enter>At this point, the user should have access to the FTP server. Depending on the privileges set on the FTP server, the user will be able to read or write operations within a limited section of the remote computer’s disk drives.
Some FTP servers will disconnect inactive users to save resources. Therefore, a periodic NOOP command will keep the FTP server from closing the connection. A NOOP command has no effect on the server beyond this task.
NOOP<enter>
200 <message><enter>
To close the connection, the client may simply close the underlying TCP connection, or issue a QUIT command as follows:
QUIT<enter>
221 <message><enter>
In order to navigate around a remote computer’s file system, you need to know what files and subfolders are contained within each folder.
Like files, this data is returned on the data socket. The process for receiving folder listings is as follows:
Client issues
LISTcommand.Server waits for data socket to be created. A timeout will occur with a 425 response. Otherwise, a 125 response is received.
Server transfers file data, as illustrated below.
Server closes data connection and issues a 226 response on the control socket.
On the Windows FTP service, the default directory listing style is DOS. A listing would resemble the following:
01-18-03  03:22PM                    0 ge.bmp
01-18-03  11:40PM                  733 Project1.vbp
01-18-03  05:00PM                 2498 Readme.txt
01-18-03  03:40PM       <DIR>          wat
The five columns are last modified date, time, folder or file, size, and name, respectively.
For UNIX FTP servers, the directory listing style is in this format:
d---rw-rw-   1 user   group        0 Jan 18  2003 .
d---rw-rw-   1 user   group        0 Jan 18  2003 ..
----rw-rw-   1 user   group        0 Jan 18 15:22 ge.bmp
----rw-rw-   1 user   group      733 Jan 18 23:40 Project1.vbp
----rw-rw-   1 user   group     2498 Jan 18 17:00 Readme.txt
d---rw-rw-   1 user   group        0 Jan 18  2003 wat
Note
The Cerberus FTP server for Windows (www.cerberusftp.com) will also return file data in a UNIX format. The directory listing style is interchangeable in IIS.
This is an unfortunate lack of standardization, but something that developers must be aware of. A quick-and-dirty approach is to read the last word at the end of each line and assume it to be a file if there is a period in it.
A more foolproof implementation is to issue a SYST command to the server and read the response, either 215 UNIX<version><enter> or 215 Windows<version><enter>. Alternately, the NLST command may be used to receive a list of files (only) from the server.
The folder system in FTP is navigated in much the same way as in DOS. To move to a subfolder, the client issues CWD /<foldername><enter>, to which the server replies 250 for success or 550 for failure. To move to the parent folder, the client issues CDUP.
To retrieve the current folder, the client may issue PWD, to which the server replies:
257 "<folder name>"<message><enter>Following is a comprehensive list of FTP commands as would be issued by a client.
Table 6.2. FTP commands.
FTP Command | Action |
|---|---|
| Downloads |
| Uploads |
| Uploads, where the server chooses the name of the remote file; this name is specified in the 250 response |
| Appends |
| Restarts file transfer at a specified position |
| Renames a file ( |
| Renames a file ( |
| Aborts the current data transfer |
| Deletes the specified file |
| Deletes the specified folder |
| Creates a new folder |
| Responds with the current working directory |
| Responds with the contents of the current working directory in human-readable format |
| Responds with a list of files in the current working directory |
| Provides proprietary FTP services |
| Responds with the name of the operating system (or the OS being emulated) |
| Responds with the status of a data transfer |
| Responds with human-readable text with information about the server |
| No effect |
| Specifies the username of the user |
| Specifies the password of the user |
| Indicates the format of the data, either |
To access an FTP server, you need to know its IP address and have a user-name and password with it. Most ISPs provide you with a small amount of Web space on their servers when you sign up, and you should be able to get these details if you call your ISP.
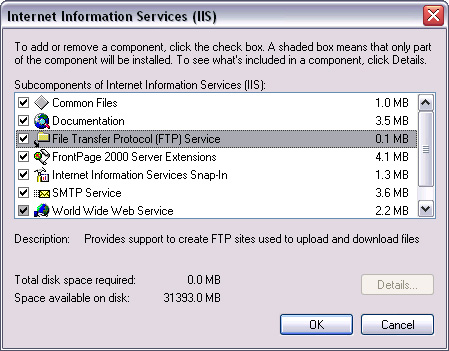
Some versions of Windows come with an option to install an FTP server. Click Control Panel→Add/Remove Programs→Add or Remove Windows Components→Internet Information Services→Details→FTP Service (Figure 6.2).
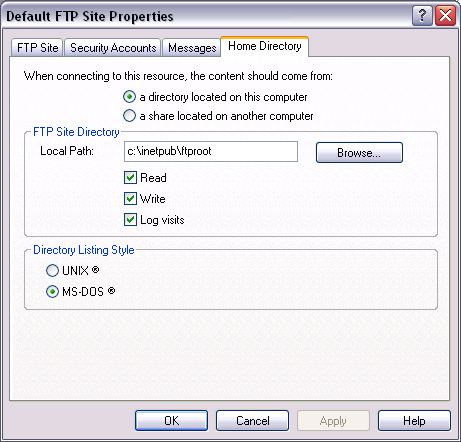
To administer the FTP server once it is installed, click Control Panel→Administrative Tools→Internet Information Services→FTP Site→Default FTP site. Then right-click and go to Properties.
Click on the Home Directory tab (Figure 6.3). This is where you can set the FTP site directory path, which is where uploaded FTP files are stored on your local hard disk. For the purposes of the code examples in this chapter, you should check both the read and write options.
To test out your FTP server, type ftp://localhost into Internet Explorer. You can download various FTP clients from the Internet (e.g., smartFTP, www.smartftp.com, or cuteFTP, www.globalscape.com).
A full implementation of FTP is quite an undertaking. It may be worthwhile to consider the Microsoft Internet Transfer Control if you need to perform this task. It is a legacy COM control (and thus carries a lot of overhead for .NET applications). Native .NET components are available commercially from Dart and IP*Works.
Having said that, for many applications you don’t need an all-singing, all-dancing implementation of FTP to get your job done. If you are writing a feature to an application to perform a scheduled upload of files to a server, you probably don’t want to confuse the user with details of the remote computer’s directory structure. All you may need is a few lines of code to transfer the file to a predetermined location.
Create a new Windows application project in Visual Studio .NET as usual, and draw two textboxes, one named tbServer and the other tbFile. Add two buttons, btnBrowse and btnUpload. You will also require an Open File Dialog control named openFileDialog.
Click on the Browse button, and add the following code:
C#
private void btnBrowse_Click(object sender, System.EventArgs
e)
{
  openfileDialog.ShowDialog();
  tbFile.Text = openfileDialog.FileName;
}
VB.NET
Private  Sub btnBrowse_Click(ByVal sender As Object, _
 ByVal e As System.EventArgs) Handles btnBrowse.Click
  openfileDialog.ShowDialog()
  tbFile.Text = openfileDialog.FileName
End Sub
Now, double-click on the Upload button, and add this code:
C#
private void btnUpload_Click(object sender, System.EventArgs
e)
{
  FileInfo thisFile = new FileInfo(tbFile.Text);
  Type ITC;
  object[] parameter= new object[2];
  object ITCObject;

  ITC = Type.GetTypeFromProgID("InetCtls.Inet");
  ITCObject = Activator.CreateInstance(ITC);
  parameter[0] = (string)tbServer.Text;
  parameter[1] = (string)"PUT " + thisFile.FullName + " /" +
                   thisFile.Name;
  ITC.InvokeMember("execute", BindingFlags.InvokeMethod,
                     null, ITCObject, parameter);
}Private Sub btnUpload_Click(ByVal sender As Object, _
ByVal e As System.EventArgs) Handles btnUpload.Click
Dim thisFile As FileInfo = New FileInfo(tbFile.Text)
Dim ITC As Type
Dim parameter() As Object = New Object(1) {}
Dim ITCObject As Object
ITC = Type.GetTypeFromProgID("InetCtls.Inet")
ITCObject = Activator.CreateInstance(ITC)
parameter(0) = CType(tbServer.Text, String)
parameter(1) = CType("PUT " + thisFile.FullName + _
" /" + thisFile.Name, String)
ITC.InvokeMember("execute", BindingFlags.InvokeMethod, _
Nothing, ITCObject, parameter)
End SubAs mentioned earlier, the Internet Transfer Control (ITC) is a legacy COM control rather than a native .NET control. In Chapter 1, the Internet Explorer component (which was also COM) was used as part of an application to form a custom Web browser. This time, instead of including the COM control in the project by right-clicking on the toolbox and adding it there, we call the COM control directly through code.
This is slightly more complex, but offers the advantage of late binding (i.e., the object is loaded at run time rather than compile time). This gives the benefit of fault tolerance; in case the external COM control is accidentally deleted, the host application will still operate, albeit with degraded functionality. Late binding does incur a performance penalty because the code will need to determine the object’s supported methods and types at run time by interrogating the object’s IDispatch interface. The environment would already know the object’s interface if it had been early bound. Late binding is not strictly required for use with the ITC, but it is useful to learn new techniques.
Every COM control has a unique programmatic ID, or ProgID. This string is stored in the registry and is in the format <project name>.<Class name>.<version>. In this instance, the programmatic ID is InetCtls.Inet, with no version number.
The Activator creates an instance of the class at run time. At design time, there is no way of knowing the methods and properties of the object; therefore, the return value is of the generic object type. In order to call methods on an object that has unknown type (at design time at least), we use the InvokeMember method.
In order to invoke the execute method on the object and pass two parameters to it, we need first to define the two parameters. The first is the FTP address to which the object will connect. The second is the FTP command that the object will execute on the server. These two parameters are cast to strings and stored in an array. Finally, the InvokeMember method is called, passing the method name as the first parameter and the parameters to be sent to the COM control as the last parameter.
You will also need the relevant namespaces:
C#
using System.IO;
using System.Reflection;
using System.Threading;
VB.NET
Imports System.IO
Imports System.Reflection
Imports System.Threading
To test this piece of code, first ensure that your FTP server is running. After you have checked this, run the application from Visual Studio .NET. Type the IP address, username, and password into the Server textbox in the standard URL format (i.e., ftp://username:[email protected]). Choose a file from your hard disk by pressing the Browse button, then press Upload (Figure 6.4). Now check your FTP root to ensure that the file is there.
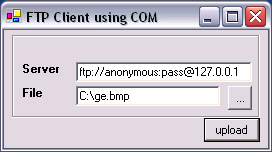
There is an important limitation in the ITC; that is that the file must be in the old DOS 8.3 format, where C:program filesmyile.txt becomes c:progra~1myfile.txt. Please note that you must have write access to the root of the FTP server; otherwise, the code example will not work.
The second parameter passed to the execute method of the ITC determines the action to be performed on the remote FTP server. Table 6.3 lists the possible actions.
Table 6.3. FTP command usage.
FTP command | Action |
|---|---|
| Retrieves the directory listing tree from the specified folder at the remote machine; listing can be retrieved using the |
| Moves to the specified folder on the remote machine |
| Moves to the parent folder (if one exists) on the remote machine |
| Downloads a remote file to a local file |
| Uploads a local file to a remote file |
| Creates a directory on the remote machine |
| Removes a directory from the remote machine |
| Changes the name of a file on the remote machine |
| Retrieves the size of a specified file |
| Closes the connection to the FTP server |
The ITC has several limitations, contains quite a few well-known bugs, and is far from being a high-performance implementation. Furthermore, it is not native to .NET, and many software houses will demand that a .NET project is 100% managed code.
By following the code on the next few pages, you will have a full-fledged FTP client, with the ability to browse a remote file system, upload, and download.
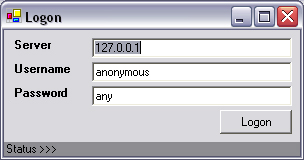
Start a new project in Visual Studio .NET and add two forms, frmLogon and frmMain. On the Logon form, draw four textboxes: tbServer, tbUsername, tbPassword, and tbStatus. The latter should be set with multiline=true and greyed out appropriately. A button, btnLogon, should also be added.
On the Main form, draw two list boxes: lbFiles and lbFolders. Add a textbox named tbStatus in the same style as in the Logon form. Add three buttons: btnUpload, btnDownload, and btnRoot. Also add an File Open Dialog control named OpenFileDialog and a Save File Dialog control named SaveFileDialog.
In the Main form, add a few public variables:
C#
public frmLogon LogonForm = new frmLogon();
public NetworkStream NetStrm;
public string RemotePath = "";
public string server = "";
VB.NET
Public LogonForm As frmLogon = New frmLogon()
Public NetStrm As NetworkStream
Public RemotePath As String = ""
Public server As String = ""
In the Logon form, add the following public variable:
C#
public frmMain MainForm;
VB.NET
Public MainForm as frmMain
The call to new frmLogon() does not make the Logon form visible; instead, it is used to help ensure that only one instance of the Logon form occurs. The NetworkStream variable is used to represent the command socket connection. The data connection is less permanent and does not need to be defined globally. The two strings maintain information about where the server is and what the working folder is on the server.
Double-click on the Main form and add these lines:
C#
private void frmMain_Load(object sender, System.EventArgs e)
{
  LogonForm.MainForm = this;
  LogonForm.Visible = true;
}
VB.NET
Private  Sub frmMain_Load(ByVal sender As Object, _
ByVal e As System.EventArgs)
  LogonForm.MainForm = Me
  LogonForm.Visible = True
End Sub
This shows the Logon form and provides a means for the Logon form to call public methods on this particular instance of the Main form.
On the Logon from, comment out the Dispose method to ensure that it cannot be deleted from memory unless the Main form is closed. You may need to expand the “Windows Form Designer generated code” region to view this method.
C#
protected override void Dispose( bool disposing )
{ }
VB.NET
Protected Overrides Sub Dispose(ByVal disposing As Boolean)
End Sub
On the logon form, click on the Logon button, and enter the following code:
C#
private void btnLogon_Click(object sender, System.EventArgs
e)
{
  TcpClient clientSocket = new TcpClient(tbServer.Text,21);

  MainForm.NetStrm = clientSocket.GetStream();
  StreamReader RdStrm= new StreamReader(MainForm.NetStrm);
  tbStatus.Text = RdStrm.ReadLine();

  tbStatus.Text = MainForm.sendFTPcmd("USER "+
  tbUsername.Text + "
");
  tbStatus.Text = MainForm.sendFTPcmd("PASS "+
  tbPassword.Text+ "
");

  if (tbStatus.Text.Substring(0,3)!="230")
  {
    MessageBox.Show ("Failed to log in");
  }
  else
  {
    MainForm.server = tbServer.Text;
    MainForm.getRemoteFolders();
    MainForm.Text += "[logged in]";
    Visible=false;
  }
}Private Sub btnLogon_Click(ByVal sender As Object, _
ByVal e As System.EventArgs) Handles btnLogon.Click
Dim clientSocket As TcpClient = New _
TcpClient(tbServer.Text,21)
MainForm.NetStrm = clientSocket.GetStream()
Dim RdStrm As StreamReader = New _
StreamReader(MainForm.NetStrm)
tbStatus.Text = RdStrm.ReadLine()
tbStatus.Text = MainForm.sendFTPcmd("USER "+ _
tbUsername.Text + vbcrlf)
tbStatus.Text = MainForm.sendFTPcmd("PASS "+ _
tbPassword.Text+ vbcrlf)
If tbStatus.Text.Substring(0,3)<>"230" Then
MessageBox.Show ("Failed to log in")
Else
MainForm.server = tbServer.Text
MainForm.getRemoteFolders()
MainForm.Text += "[logged in]"
Visible=False
End If
End SubThis code opens a TCP connection to the FTP server on port 21. Once the connection has been made, a stream to the remote host is established. This stream is then extended through a StreamReader. The welcome message from the server is read in and displayed on-screen.
The program then attempts to log in using the username and password supplied. If the FTP server responds with a 230 message, then a message box is displayed. Otherwise, the getRemoteFolders() method is called on the main form, a “Logged in” message appears in the form caption, and the logon form disappears.
The function sendFTPcmd() has not yet been implemented, so insert this code into the Main form:
C#
public string sendFTPcmd(string cmd)
{
  byte[] szData;
  string returnedData = "";
  StreamReader RdStrm= new StreamReader(NetStrm);
  szData = Encoding.ASCII.GetBytes(cmd.ToCharArray());
  NetStrm.Write(szData,0,szData.Length);
  tbStatus.Text += "
Sent:" + cmd;
  returnedData = RdStrm.ReadLine();
  tbStatus.Text += "
Rcvd:" + returnedData;
  return returnedData;
}
VB.NET
Public Function sendFTPcmd(ByVal cmd As String) As String
  Dim szData() As Byte
  Dim ReturnedData As String =  ""
  Dim RdStrm As StreamReader =  New StreamReader(NetStrm)
  szData = Encoding.ASCII.GetBytes(cmd.ToCharArray())
  NetStrm.Write(szData,0,szData.Length)
  tbStatus.Text += vbcrlf +"Sent:" + cmd
  ReturnedData = RdStrm.ReadLine()
  tbStatus.Text += vbcrlf +"Rcvd:" + ReturnedData
  Return ReturnedData
End Function
This code sends a string on the command socket via the public NetworkStream NetStrm. This stream is passed to the constructor of a StreamReader to facilitate easier reading of the stream. The string passed into the function is converted to a character array and sent over the wire using the Write method. The outgoing command is printed on screen. The StreamReader reads incoming data up to the end-of-line character and then displays this on-screen. Finally, the data received is returned to the calling function.
As seen earlier, when the Logon button is pressed, a call is made to getRemoteFolders(). We can now implement this in the Main form:
C#
public void getRemoteFolders()
{
  string[] filesAndFolders;
  string fileOrFolder;
  string folderList="";
  int lastSpace=0;
  folderList =
  Encoding.ASCII.GetString(sendPassiveFTPcmd("LIST
"));
  lbFiles.Items.Clear();
  lbFolders.Items.Clear();
  filesAndFolders = folderList.Split("
".ToCharArray());
  for(int i=0;i<filesAndFolders.GetUpperBound(0);i++)
  {
    if (filesAndFolders[i].StartsWith("-") ||
    filesAndFolders[i].StartsWith("d"))
    {
      lastSpace=59; // UNIX format
    }
    else
    {
      lastSpace=39; // DOS format
    }
    fileOrFolder =  filesAndFolders[i].Substring(lastSpace);
    if (fileOrFolder.IndexOf(".")!=-1)
    {
      lbFiles.Items.Add(fileOrFolder.Trim());
    }
    else
    {
      lbFolders.Items.Add(fileOrFolder.Trim());
    }
  }
}Public Sub getRemoteFolders()
Dim filesAndFolders() As String
Dim fileOrFolder As String
Dim folderList As String = ""
Dim lastSpace As Integer = 0
folderList = Encoding.ASCII.GetString(sendPassiveFTPcmd _
("LIST" + vbCrLf))
lbFiles.Items.Clear()
lbFolders.Items.Clear()
filesAndFolders = folderList.Split(vbCr.ToCharArray())
Dim i As Integer
For i = 0 To filesAndFolders.GetUpperBound(0) - 1
If filesAndFolders(i).StartsWith("-") Or _
filesAndFolders(i).StartsWith("d") Then
lastSpace = 59 ' UNIX format
Else
lastSpace = 39 ' DOS format
End If
fileOrFolder = filesAndFolders(i).Substring(lastSpace)
If fileOrFolder.IndexOf(".") <> -1 Then
lbFiles.Items.Add(fileOrFolder.Trim())
Else
lbFolders.Items.Add(fileOrFolder.Trim())
End If
Next
End SubThis uses the quick-and-dirty method of pulling file and folder details out of the file data received from the FTP server. It issues the LIST FTP command via a passive connection. The passive connection is required because the data returned could potentially be quite large and contains many lines of information.
The data returned is then split into lines by delimiting the string by the end-of-line character and applying the Split method. Going through these lines one by one, everything is stripped off that precedes the final space. If the remaining string contains a period, then it is added to the file list; if not, it is added to the folder list.
In order to receive data from a passive connection, we need to implement the sendPassiveFTPcmd() function:
C#
public byte[] sendPassiveFTPcmd(string cmd)
{
  byte[] szData;
  System.Collections.ArrayList al = new ArrayList();
  byte[] RecvBytes = new byte[Byte.MaxValue];
  Int32 bytes;
  Int32 totalLength=0;
  szData =
  System.Text.Encoding.ASCII.GetBytes(cmd.ToCharArray());
  NetworkStream passiveConnection;
  passiveConnection = createPassiveConnection();
  tbStatus.Text += "
Sent:" + cmd;
  StreamReader commandStream= new StreamReader(NetStrm);
  NetStrm.Write(szData,0,szData.Length);
  while(true)
  {
    bytes = passiveConnection.Read(RecvBytes,
    0,RecvBytes.Length);
    if (bytes<=0) break;
    totalLength += bytes;
    al.AddRange(RecvBytes);
  }
  al = al.GetRange(0,totalLength);
  tbStatus.Text+="
Rcvd:"+commandStream.ReadLine(); // 125
  tbStatus.Text+="
Rcvd:"+commandStream.ReadLine(); // 226
  return (byte[])al.ToArray((new byte()).GetType());
}Public Function sendPassiveFTPcmd(ByVal cmd As String) _
As Byte()
Dim szData() As Byte
Dim al As New System.Collections.ArrayList
Dim bytes As Int32
Dim RecvBytes(Byte.MaxValue) As Byte
szData = _
System.Text.Encoding.ASCII.GetBytes(cmd.ToCharArray())
Dim totalLength As Int32 = 0
Dim passiveConnection As NetworkStream
passiveConnection = createPassiveConnection()
tbStatus.Text += vbCrLf + "Sent:" + cmd
Dim commandStream As StreamReader = New _
StreamReader(NetStrm)
NetStrm.Write(szData, 0, szData.Length)
Do While (True)
bytes = passiveConnection.Read(RecvBytes, 0, _
RecvBytes.Length)
If bytes <= 0 Then Exit Do
totalLength += bytes
al.AddRange(RecvBytes)
Loop
al = al.GetRange(0, totalLength)
tbStatus.Text += vbCrLf + "Rcvd:" + _
commandStream.ReadLine() ' 125
tbStatus.Text += vbCrLf + "Rcvd:" + _
commandStream.ReadLine() ' 226
Return CType(al.ToArray((New Byte).GetType()), Byte())
End FunctionThis code requests a passive connection to the server via the createPassiveConnection() function. It then sends the string on the command socket, and then reads everything sent on the passive connection until the server closes it. This data is then returned to the calling function. Any data sent back on the command socket is more or less ignored, apart from some on-screen reporting.
The next step is to implement the createPassiveConnection() function:
private NetworkStream createPassiveConnection()
{
  string[] commaSeperatedValues;
  int highByte =0;
  int lowByte =0;
  int passivePort =0;
  string response="";
  response = sendFTPcmd("PASV
");
  // 227 Entering Passive Mode (127,0,0,1,4,147).
  commaSeperatedValues = response.Split(",".ToCharArray());
  highByte = Convert.ToInt16(commaSeperatedValues[4]) * 256;
  commaSeperatedValues[5] =
  commaSeperatedValues[5].Substring(0,
  commaSeperatedValues[5].IndexOf(")"));
  lowByte = Convert.ToInt16(commaSeperatedValues[5]);
  passivePort = lowByte + highByte;
  TcpClient clientSocket = new TcpClient(server,passivePort);
  NetworkStream pasvStrm = clientSocket.GetStream();
  return pasvStrm;
}
VB.NET
Private Function createPassiveConnection() As NetworkStream
  Dim commaSeperatedValues() As String
  Dim highByte As Integer = 0
  Dim lowByte As Integer = 0
  Dim passivePort As Integer = 0
  Dim response As String = ""
  response = sendFTPcmd("PASV"+vbCrLf)
  ' 227 Entering Passive Mode (127,0,0,1,4,147).
  commaSeperatedValues = response.Split(",".ToCharArray())
  highByte = Convert.ToInt16(commaSeperatedValues(4)) * 256
  commaSeperatedValues(5) = _
  commaSeperatedValues(5).Substring(0, _
  commaSeperatedValues(5).IndexOf(")"))
  lowByte = Convert.ToInt16(commaSeperatedValues(5))
  passivePort = lowByte + highByte
  Dim clientSocket As TcpClient= New _
  TcpClient(server,passivePort)
  Dim pasvStrm As NetworkStream=clientSocket.GetStream()
  Return pasvStrm
End Function
This function issues a PASV command on the command socket to the server. The received data should resemble the following:
227 Entering Passive Mode (127,0,0,1,4,147)
The final two numbers indicate the port number of the socket that the server has just begun to listen on. In this case, it is 1171 (4 × 256 + 147). To extract these numbers, the string is first split into smaller strings, which are divided up using the comma character in the Split method.
The low-order byte of the new port number is followed by a closed bracket. This bracket must be stripped off before it will convert to an integer. To do this, the IndexOf method locates the superfluous bracket, and Substring removes everything following the final digit.
Once the passive port has been determined, the function then opens a TCP connection to the server on this port. The resultant NertworkStream is sent back to the calling function.
At this point, you can compile and run the code from Visual Studio .NET and check that you can log onto any FTP server and view the root directory listing. The next step is to add the folder-browsing capabilities. We can implement the event that is fired when a user clicks on a folder in the folder list. Click on the folder list, and type this code:
C#
private void lbFolders_SelectedIndexChanged(object sender,
System.EventArgs e)
{
  RemotePath += "/" + lbFolders.SelectedItem.ToString();
  sendFTPcmd("CWD /" + RemotePath +"
");
  getRemoteFolders();
}
VB.NET
Private  Sub lbFolders_SelectedIndexChanged(ByVal _
sender As Object, ByVal e As System.EventArgs) Handles _
 lbFolders.SelectedIndexChanged
  RemotePath += "/" + lbFolders.SelectedItem.ToString()
  sendFTPcmd("CWD /" + RemotePath + vbcrlf)
  getRemoteFolders()
End Sub
The purpose of building up the RemotePath variable is that when the next list of folders is shown, the application must remember that each listing corresponds to /folder/subfolder rather than /subfolder. The folder and file lists are refreshed once the operation is complete. We could, of course, have used the PWD command to get the path from the server, but it is probably easier and quicker to store this information locally. To instruct the FTP server to move to a working directory, the CWD command is used.
This gives a user the means to drill down directories, but no means of returning back up. In this case, we can double-click on btnRoot:
C#
private void btnRoot_Click(object sender, System.EventArgs e)
{
  RemotePath = "/";
  sendFTPcmd("CWD /
");
  getRemoteFolders();
}
VB.NET
Private  Sub btnRoot_Click(ByVal sender As Object, _
ByVal e As System.EventArgs)
  RemotePath = "/"
  sendFTPcmd("CWD /" + vbcrlf)
  getRemoteFolders()
End Sub
This resets the working folder to the root and sends a command to the FTP server to return to the FTP root. It then refreshes the file and folder lists. Again, the CWD command is issued to instruct the FTP server to move working folders.
Now, to implement the core purpose of this application, double-click the Upload button:
C#
private void btnUpload_Click(object sender, System.EventArgs
e)
{
  openFileDialog.ShowDialog();
  NetworkStream passiveConnection;
  FileInfo fileParse = new FileInfo(openFileDialog.FileName);
  FileStream fs = new
  FileStream(openFileDialog.FileName,FileMode.Open);
  byte[] fileData = new byte[fs.Length];
  fs.Read(fileData,0,(int)fs.Length);
  passiveConnection = createPassiveConnection();
  string cmd = "STOR " + fileParse.Name + "
";
  tbStatus.Text += "
Sent:" + cmd;
  string response = sendFTPcmd(cmd);
  tbStatus.Text += "
Rcvd:" + response;
  passiveConnection.Write(fileData,0,(int)fs.Length);
  passiveConnection.Close();
  MessageBox.Show("Uploaded");
  tbStatus.Text += "
Rcvd:" + new
  StreamReader(NetStrm).ReadLine();  getRemoteFolders();
}Private Sub btnUpload_Click(ByVal sender As Object, _
ByVal e As System.EventArgs)
openFileDialog.ShowDialog()
Dim passiveConnection As NetworkStream
Dim fileParse As FileInfo = New _
FileInfo(openFileDialog.FileName)
Dim fs As New FileStream(openFileDialog.FileName, _
FileMode.Open)
Dim fileData(fs.Length) As Byte
fs.Read(fileData, 0, fs.Length)
passiveConnection = createPassiveConnection()
Dim cmd As String = "STOR " + fileParse.Name + vbCrLf
tbStatus.Text += vbCrLf + "Sent:" + cmd
Dim response As String = sendFTPcmd(cmd)
tbStatus.Text += vbCrLf + "Rcvd:" + response
passiveConnection.Write(fileData, 0, fs.Length)
passiveConnection.Close()
MessageBox.Show("Uploaded")
tbStatus.Text += vbCrLf + "Rcvd:" + New _
StreamReader(NetStrm).ReadLine()
getRemoteFolders()
End SubThis function opens the standard File Open dialog and then reads the contents of the specified file into a string by passing the filename to a StreamReader, and reading to the end of the file while storing the data in the fileData string.
A passive connection is then opened to the server, and a STOR command is issued on the command socket. Once the server has responded to the STOR command, the file contents are placed on the passive connection. Once all of the data is sent, the connection is closed. A message is displayed on screen, and the file and folder list is refreshed.
Note that you do not have to pass the local path of the file to the FTP server because the file will be stored in the current working folder. The filename, minus its path, is obtained from the FileName property of the FileInfo class.
Finally, the download functionality can be implemented by clicking on the Download button:
C#
private void btnDownload_Click(object sender,
System.EventArgs e)
{
  byte[] fileData;
  saveFileDialog.ShowDialog();
  fileData = sendPassiveFTPcmd(
         "RETR " + lbFiles.SelectedItem.ToString()+ "
");
  FileStream fs = new FileStream(
            saveFileDialog.FileName,FileMode.CreateNew);
  fs.Write(fileData,0,fileData.Length);
  fs.Close();
  MessageBox.Show("Downloaded");
}
VB.NET
Private  Sub btnDownload_Click(ByVal sender As Object, _
 ByVal e As System.EventArgs)
  Dim fileData As Byte()
  saveFileDialog.ShowDialog()
  fileData = sendPassiveFTPcmd( _
   "RETR " + lbFiles.SelectedItem.ToString() + vbCrLf)
  Dim fs As FileStream = New FileStream( _
    saveFileDialog.FileName, FileMode.CreateNew)
  fs.Write(fileData, 0, fileData.Length)
  fs.Close()
  MessageBox.Show("Downloaded")
End Sub
This event opens the standard File Save dialog window. The file to be downloaded is the one that is currently selected in the files list. A RETR command is issued via a passive connection. The returned data is the contents of the remote file. In order to write this data to the local disk, a new FileStream is created. The FileStream constructor includes the name of the local file. The data to be written to disk is converted from a string into a byte array and then passed to the write method of the stream. A message is shown to signify the end of the operation.
Add these namespaces to both forms, and we’re ready to go:
C#
using System.Net;
using System.Net.Sockets;
using System.Text;
using System.IO;
VB.NET
Imports System.Net
Imports System.Net.Sockets
Imports System.Text
Imports System.IO
To test the application, ensure that you have an FTP server running, and then execute the application from Visual Studio .NET. Note that when compiling this application, if you are prompted for “Sub Main” (VB.NET), please select the Main form for this purpose. When the application is running, you may enter your FTP account details into the Logon window (Figure 6.5) and press Logon.
On the next screen (Figure 6.6), you can navigate around the remote computer’s file system by clicking on the folder names in the list provided. To return to where you started, press the root button.
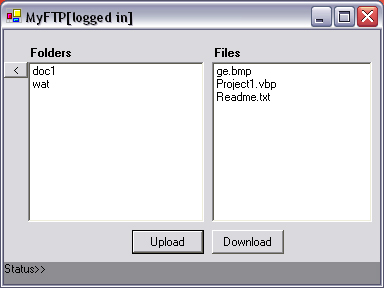
To upload a file, click Upload, then select a file. Wait until you receive a message box, and then you should see the file in the files list. To download a file, click on a file in the files list, and then press Save. Choose a destination for the file (e.g., the desktop). When you press OK, wait until you see a message box, and then you should see the file on the desktop.
In the .NET Framework version 2.0 (Whidbey), FTP support is included in the WebClient class, thus negating the need to use either socket-level programming or COM objects. The following code illustrates the simplicity of this new feature:
C#
public void downloadFile()
{
 string filename = "ftp://ms.com/files/dotnetfx.exe";
 WebClient client = new WebClient();
 client.DownloadFile(filename,"dotnetfx.exe");
}
VB.NET
Sub downloadFile()
 Dim Filename as String = "ftp://ms.com/file/dotnetfx.exe"
 Dim client as new WebClient
 Client.DownloadFile(filename,"dotnetfx.exe")
End sub
This chapter gave a brief overview of Microsoft file sharing and two implementations of FTP clients in .NET: one for a five-minute solution and one as a substantial, flexible implementation of the protocol.
The next chapter deals with the practical issues faced by developers working with real-world networks. It is designed to help solve network problems for individual scenarios and provide tips and tricks to keep your software from crashing on unusual network setups.