
This chapter demonstrates how to pull data from the Web and use it within your own applications. As mentioned in Chapter 1, Web pages are hosted on computers that run Web server software such as Microsoft Internet Information Services (IIS) or Apache. Hypertext transfer protocol (HTTP) is used to communicate with these applications and retrieve Web sites.
There are many reasons why an application may interact with a Web site, such as the following:
To check for updates and to download patches and upgrades
To retrieve information on data that changes from hour to hour (e.g., shared values, currency conversion rates, weather)
To automatically query data from services operated by third parties (e.g., zip code lookup, phone directories, language translation services)
To build a search engine
To cache Web pages for faster access or to act as a proxy
The first half of this chapter describes how to send and receive data to web servers. This includes an example of how to manipulate the HTML data received from the web server. The chapter is concluded with an implementation of a custom web server, which could be used instead of IIS.
Data mining is where an application downloads a Web page and extracts specific information from it automatically. It generally refers to the retrieval of large amounts of data from Web pages that were never designed for automated reading.
A sample application could be a TV guide program that would download scheduling information from TV Web sites and store it in a database for quick reference.
Note
You should always check with Web site administrators whether they permit data mining on their sites because it may infringe copyright or put excessive load on their servers. Unauthorized data mining can result in a Web administrator blocking your IP address or worse!
In order to extract useful data from this HTML, you will need to be well acquainted with the language and good at spotting the patterns of HTML that contain the data required; however, several good commercial products aid developers with data mining from HTML pages, and home-brewed solutions are not always the best idea.
HTTP operates on TCP/IP port 80 and is described definitively in RFC 2616. The protocol is quite straightforward. The client opens TCP port 80 to a server, the client sends an HTTP request, the server sends back an HTTP response, and the server closes the TCP connection.
The simplest HTTP request is as follows:
GET /
<enter><enter>
This request will instruct the server to return the default Web page; however, HTTP requests are generally more complex, such as the following:
GET / HTTP/1.1
Accept: image/gif, image/x-xbitmap, image/jpeg, image/pjpeg,
application/vnd.ms-powerpoint, application/vnd.ms-excel,
application/msword, */*
Accept-Language: en-gb
Accept-Encoding: gzip, deflate
User-Agent: Mozilla/4.0 (compatible; MSIE 6.0; Windows NT
5.1; .NET CLR 1.0.3705)
Host: 127.0.0.1:90
Connection: Keep-Alive
This tells the server several things about the client, such as the type of browser and what sort of data the browser can render.
Table 4.1 shows a complete list of standard HTTP request headers are as follows:
Table 4.1. Standard HTTP request headers.
HTTP header | Meaning |
|---|---|
| Used to specify which media (MIME) types are acceptable for the response. The |
| Used to specify which character sets are acceptable in the response. In the case where a client issues |
| Used to specify if the client can handle compressed data. In the above example, the browser is capable of interpreting GZIP compressed data. |
| Used to indicate the language preference of the user. This can be used to estimate the geographic location of a client; |
| Used to provide authentication between clients and servers. Refer to RFC 2617 or Chapter 9 for more details. |
| Host indicates the intended server IP address as typed in at the client. This could differ from the actual destination IP address if the request were to go via a proxy. The host address |
| Indicates that the page is not to be returned if it has not been changed since a certain date. This permits a caching mechanism to work effectively. An example is |
| This provides for authentication between clients and proxies. Refer to RFC 2617 or Chapter 9 for more details. |
| This provides for a mechanism to retrieve a section of a Web page by specifying which ranges of bytes the server should return; this may not be implemented on all servers. An example is |
| This indicates the last page the client had visited before going to this specific URL. An example is |
| Transfer encoding (TE) indicates which extension transfer encoding it can accept in the response and if it can accept trailer fields in a chunked transfer encoding. |
| Indicates the type of device the client is running from. In the above example, the browser was Internet Explorer 6. |
| Used in |
| Used in |
GET and POST are the most common HTTP commands. There are others, such as HEAD, OPTIONS, PUT, DELETE, and TRACE, and interested readers can refer to RFC 2616 for information on these HTTP commands.
Web developers may be familiar with GET and POST from the HTML form tag, which takes the form:
<form name="myForm" action="someDynamicPage" method="POST">
The difference from a user’s point of view is that form parameters do not appear in the URL bar of the browser when submitting this form. These parameters are contained in the region immediately following the double-line feed. A POST request resembles the following:
POST / HTTP/1.1
Content-Type: application/x-www-form-urlencoded
Content-Length: 17

myField=some+text
When the server receives an HTTP request, it retrieves the requested page and returns it along with an HTTP header. This is known as the HTTP response.
A sample HTTP response is as follows:
HTTP/1.1 200 OK
Server: Microsoft-IIS/5.1
Date: Sun, 05 Jan 2003 20:59:47 GMT
Connection: Keep-Alive
Content-Length: 25
Content-Type: text/html
Set-Cookie: ASPSESSIONIDQGGQQFCO=MEPLJPHDAGAEHENKAHIHGHGH;
path=/
Cache-control: private

This is a test html page!
Table 4.2. Standard HTTP request headers.
HTTP request header | Meaning |
|---|---|
| The entity tag is used in conjunction with the |
| It is used in redirects, where the browser is requested to load a different page. Used in conjunction with HTTP 3xx responses. |
| This provides for authentication between clients and proxies. Refer to RFC 2617 Section 14.33 or Chapter 9 for more details. |
| Indicates the server version and vendor. In the above example, the server was IIS running on Windows XP. |
| This provides for authentication between clients and proxies. Refer to RFC 2617 Section 14.47 or Chapter 9 for more details. |
| Indicates the MIME type of the content returned. In the above example, the type is HTML |
| Indicates the amount of data following the double-line feed. The server will close the connection once it has sent all of the data; therefore, it is not always necessary to process this command. |
| A cookie is a small file that resides on the client. A cookie has a name and value. In the above example, the cookie name is |
The client would display the message “This is a test html page!” on screen in response to this command.
Every HTTP response has a response code. In the above example, the response code was 200. This number is followed by some human-readable text (i.e., OK).
The response codes fall into five main categories shown in Table 4.3.
Table 4.3. HTTP response codes.
HTTP response code range | Meaning |
|---|---|
| Informational: Request was received; continuing the process. |
| Success: The action was successfully received, understood, and accepted. |
| Redirection: Further action must be taken in order to complete the request. |
| Redirection: Further action must be taken in order to complete the request. |
| Server error: The server failed to fulfill an apparently valid request. |
Multipart Internet mail extensions (MIME) types are a means of describing the type of data, such that another computer will know how to handle the data and how to display it effectively to the user.
To illustrate the example, if you changed the extension of a JPEG image (.JPG) to .TXT, and clicked on it, you would see a jumble of strange characters, not the image. This is because Windows contains a mapping from file extension to file type, and .JPG and .TXT are mapped to different file types: image/jpeg for .JPG and text/plain for .TXT.
To find an MIME type for a particular file, such as .mp3, you can open the registry editor by clicking on Start > Run, then typing REGEDIT. Then click on HKEY_CLASSES_ROOT, scroll down to .mp3, and the MIME type is written next to Content Type.
One of the most common uses of HTTP within applications is the ability to download the HTML content of a page into a string. The following application demonstrates this concept.
It is certainly possible to implement HTTP at the socket level, but there is a wealth of objects ready for use in HTTP client applications, and it makes little sense to reinvent the wheel. The HTTP server in the next section is implemented using HTTPWebReqest.
Start a new project in Visual Studio .NET, and drag on two textboxes, tbResult and tbUrl. TbResults should be set with multiline=true. A button, btnCapture, should also be added. Click on the Capture button, and enter the following code:
C#
private void btnCapture_Click(object sender, System.EventArgs
e)
{
 tbResult.Text = getHTTP(tbUrl.Text);
}
VB.NET
Private Sub btnCapture_Click(ByVal sender As Object, _
 ByVal e As System.EventArgs) Handles btnCapture.Click
 tbResult.Text = getHTTP(tbUrl.Text)
End Sub
Then implement the getHTTP function:
C#
public string getHTTP(string szURL)
{
  HttpWebRequest  httpRequest;
  HttpWebResponse httpResponse;
  string          bodyText = "";
  Stream          responseStream;
  Byte[] RecvBytes = new Byte[Byte.MaxValue];
  Int32 bytes;
  httpRequest = (HttpWebRequest) WebRequest.Create(szURL);
  httpResponse = (HttpWebResponse) httpRequest.GetResponse();
  responseStream = httpResponse.GetResponseStream();
  while(true)
  {
   bytes = responseStream.Read(RecvBytes,
   0,RecvBytes.Length);
   if (bytes<=0) break;
   bodyText += System.Text.Encoding.UTF8.GetString(RecvBytes,
   0, bytes);
   }
   return bodyText;
}Public Function getHTTP(ByVal szURL As String) As String Dim httprequest As HttpWebRequest Dim httpresponse As HttpWebResponse Dim bodytext As String = "" Dim responsestream As Stream Dim bytes As Int32 Dim RecvBytes(Byte.MaxValue) As Byte httprequest = CType(WebRequest.Create(szURL), _ HttpWebRequest) httpresponse = CType(httprequest.GetResponse(), _ HttpWebResponse) responsestream = httpresponse.GetResponseStream() Do While (True) bytes = responsestream.Read(RecvBytes, 0, _ RecvBytes.Length) If bytes <= 0 Then Exit Do bodytext += System.Text.Encoding.UTF8.GetString _ (RecvBytes, 0, bytes) Loop Return bodytext End Function
Taking a closer look at this code, it should be relatively easy to identify how it operates. The first action taken as this code is executed is that a static method on the WebRequest class is called and passed the string szURL as a parameter. This creates a webRequest object that can be cast to an HttpWebRequest object, which will handle outgoing HTTP connections.
Once we have an HttpWebRequest object, we can then send the HTTP request to the server and start receiving data back from the server by calling the GetResponse method. The return value is then cast to an HttpWebResponse object, which is then held in the httPresponse variable.
A response from a Web server is asynchronous by nature, so it is natural to create a stream from this returning data and read it in as it becomes available. To do this, we can create a stream by calling the GetResponseStream method. Once the stream is obtained, we can read bytes from it in chunks of 256 bytes (byte.Max). Reading data in chunks improves performance. The chunk size can be arbitrarily chosen, but 256 is efficient.
The code sits in an infinite loop until all of the incoming data is received. In a production environment, therefore, this type of action should be contained within a separate thread. Once we have a string containing all of the HTML, we can simply dump it to screen. No other processing is required. You will also need some extra namespaces:
C#
using System.Net;
using System.IO;
VB.NET
Imports System.Net
Imports System.IO
To test the application, run it from Visual Studio, type in a Web site address (not forgetting the http:// prefix), and press Capture. The HTML source will appear in the body (Figure 4.1).
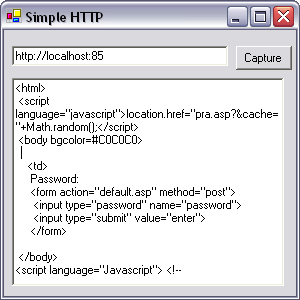
This is a very simple HTTP client, with no error handling, and is single threaded; however, it should suffice for simpler applications.
Table 4.4 shows the significant methods of HttpWebResponse.
Table 4.4. Significant members of the HttpWebResponse class.
Method or property | Meaning |
|---|---|
| Gets the method used to encode the body of the. response. Returns |
| Gets the length of the content returned by the request. Returns |
| Gets the content type of the response. Returns |
| Gets or sets the cookies associated with this request. May be used thus: |
| Gets the headers associated with this response from the server. May be invoked thus: |
| Gets the URI of the Internet resource that responded to the request. May be invoked thus: |
| Gets the name of the server that sent the response. Returns |
| Gets the status of the response. Returns the |
| Gets the specified header contents that were returned with the response. Returns |
| Gets the stream used to read the body of the response. No asynchronous variant. Returns |
Many dynamic Web sites contain forms for login details, search criteria, or similar data. These forms are usually submitted via the POST method. This poses a problem, however, for any application that needs to query a page that lies behind such a form because you cannot specify posted data in the URL line.
First, prepare a page that handles POST requests. In this case, type the following lines into a file called postTest.aspx in c:inetpubwwwroot (your HTTP root):
ASP.NET
<%@ Page language="c#" Debug="true"%>
<script language="C#" runat="server">
  public void Page_Load(Object sender, EventArgs E)
  {
   if (Request.Form["tbPost"]!=null)
   {
    Response.Write(Request.Form["tbPost"].ToString());
   }
  }
</script>

<form method="post">
 <input type="text" name="tbpost">
 <input type="submit">
</form>
ASP.NET is a vast subject that lies outside the scope of this book; however, for the sake of explaining the above example, a quick introduction is necessary. ASP.NET is an extension to IIS that enables .NET code to be executed on receipt of requests for Web pages. This also provides means for .NET code to dynamically generate responses to clients in the form of HTML, viewable on Web browsers.
Incoming requests and outgoing data are mapped to objects in .NET, which can easily be read and manipulated. The most fundamental of these objects are the Request and Response objects. The Request object encapsulates the data sent from the Web browser to the server; of its properties, two of the most important are the Form and QueryString collections. The Form collection reads data sent from the client via the POST method, whereas the QueryString collection reads data sent from the client via the GET method.
The Response object places data on the outgoing HTTP stream to be sent to the client. One of its most important methods is Write. This method is passed a string that will be rendered as HTML on the client.
One of the features that makes ASP.NET more powerful than its predecessor, classic ASP, is its ability to model HTML elements as objects, not merely as input and output streams. For example, an input box would be typically written in ASP.NET as <ASP:TEXTBOX id="tbText" runat="server"/>, and the properties of this textbox could then be modified from code by accessing the tbText object. In classic ASP, the only way to achieve such an effect would be to include code within the textbox declaration, such as <input type="text" <%=someCode%>>, which is less desirable because functional code is intermixed with HTML.
ASP.NET provides better performance than classic ASP because it is compiled on first access (in-line model) or precompiled (code-behind model). It also leverages the .NET framework, which is much richer than the scripting languages available to ASP.
The example above is appropriate for demonstrating the posting method. Every Web scripting language handles posted data in much the same way, so the technique is applicable to interfacing with any Web form.
Web scripting languages share a common feature: some sections of the page are rendered on the browser screen as HTML, and some are processed by the server and not displayed on the client. In the example, anything marked runat="server" or prefixed <% will be processed by the server.
When the user presses the submit button (<input type="submit">), the browser packages any user-entered data that was contained within the <form> tags and passes it back to the server as a POST request.
The server parses out the data in the POST request once it is received. The server-side script can retrieve this data by accessing the Request.Form collection. The Response.Write command prints this data back out to the browser.
To try the page out, open a browser and point it at http://localhost/post-Test.aspx; type something into the textbox, and press Submit. Then you will see the page refresh, and the text you typed appears above the form.
Reopen the previous example and add a new textbox named tbPost. Click on the Capture button and modify the code as follows:
C#
private void btnCapture_Click(object sender, System.EventArgs
e)
{
    tbPost.Text = HttpUtility.UrlEncode(tbPost.Text);
    tbResult.Text =
getHTTP(tbUrl.Text,"tbPost="+tbPost.Text);
}Private Sub btnCapture_Click(ByVal sender As Object, _
ByVal e As System.EventArgs) Handles btnCapture.Click
tbPost.Text = HttpUtility.UrlEncode(tbPost.Text)
tbResult.Text = getHTTP(tbUrl.Text,"tbPost="+tbPost.Text)
End SubThe reason for the call to HttpUtility.UrlEncode is to convert the text entered by the user into a string that is safe for transport by HTTP. This means the removal of white space (spaces are converted to “+”) and the conversion of nonalphanumeric characters, which is a requirement of the HTTP protocol.
Once the data to post is encoded, it can be passed to the getHTTP function, which is described below. It is a modified version of the code previously listed.
C#
public string getHTTP(string szURL,string szPost)
{
  HttpWebRequest  httprequest;
  HttpWebResponse httpresponse;
  StreamReader    bodyreader;
  string          bodytext = "";
  Stream          responsestream;
  Stream          requestStream;

  httprequest = (HttpWebRequest) WebRequest.Create(szURL);
  httprequest.Method = "POST";
  httprequest.ContentType =
  "application/x-www-form-urlencoded";
  httprequest.ContentLength = szPost.Length;
  requestStream = httprequest.GetRequestStream();
  requestStream.Write(Encoding.ASCII.GetBytes(szPost),0,
  szPost.Length);
  requestStream.Close();
  httpresponse = (HttpWebResponse) httprequest.GetResponse();
  responsestream = httpresponse.GetResponseStream();
  bodyreader = new StreamReader(responsestream);
  bodytext = bodyreader.ReadToEnd();
  return bodytext;
}Public Function getHTTP(ByVal szURL As String, _ ByVal szPost As String) As String Dim httprequest As HttpWebRequest Dim httpresponse As HttpWebResponse Dim bodyreader As StreamReader Dim bodytext As String = "" Dim responsestream As Stream Dim requestStream As Stream httprequest = CType(WebRequest.Create(szURL), _ HttpWebRequest) httprequest.Method = "POST" httprequest.ContentType = _ "application/x-www-form-urlencoded" httprequest.ContentLength = szPost.Length requestStream = httprequest.GetRequestStream() requestStream.Write(Encoding.ASCII.GetBytes(szPost), _ 0,szPost.Length) requestStream.Close() httpresponse = CType(httprequest.GetResponse(), _ HttpWebResponse) responsestream = httpresponse.GetResponseStream() bodyreader = New StreamReader(responsestream) bodytext = bodyreader.ReadToEnd() Return bodytext End Function
This differs from the code to simply retrieve a Web page in that once the HttpWebRequest has been created, several parameters are set such that the request also includes the posted data. The chunked reader loop is also replaced with the ReadToEnd() method of StreamReader. This method may be elegant, but it is not compatible with binary data.
The three settings that need to be changed are the request method, content type, and content length. The request method is usually GET but now must be set to POST. The content type should be set to the MIME type application/x-www-form-urlencoded, although this is not strictly necessary. The content length is simply the length of the data being posted, including the variable names, and after URL encoding.
The data to be posted must then be sent to the server using the Write method on the request stream. Once the request has been created, it is simply a matter of receiving the stream from the remote server and reading to the end of the stream.
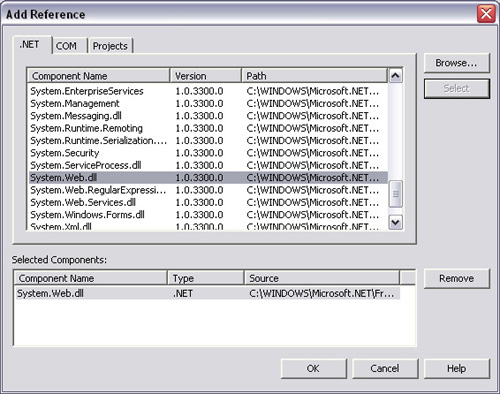
Finally, we need namespaces for the HttpUtility and Encoding objects. You will need to make a reference to System.Web.dll by selecting Project→Add Reference, as shown in Figure 4.2.
C#
using System.Web;
using System.Text;
using System.IO;
using System.Net;
VB.NET
Imports System.Web
Imports System.Text
Imports System.IO
Imports System.Net
To test the application, run it through Visual Studio .NET, enter http://localhost/postTest.aspx into the URL textbox, and add some other text into the POST textbox. When you press Capture, you will see that the posted text appears as part of the Web page (Figure 4.3).
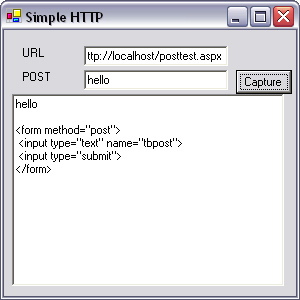
Table 4.5 shows the significant members of HttpWebRequest.
Table 4.5. Significant members of HttpWebRequest.
Method or Property | Meaning |
|---|---|
| Gets or sets the value of the |
| Gets or sets a Boolean value that indicates whether the request should follow redirection (3xx) responses. |
| Gets or sets the |
| Gets or sets the value of the |
| Gets or sets the cookies associated with the request. May be invoked thus: |
| Gets a collection of strings that are contained in the HTTP header. May be invoked thus: |
| Gets or sets the method for the request. Can be set to |
| Gets or sets proxy information for the request. Returns |
| Gets or sets the value of the |
| Gets the original URI of the request. Address is the URI after redirections. May be invoked thus: |
| Gets or sets the time-out value. May be invoked thus |
| Gets or sets the value of the |
| Gets or sets the value of the |
| Returns a |
HTTP does not maintain state information. It is therefore difficult to differentiate between two users accessing a server or one user making two requests. From the server’s point of view, it is possible for both users to have the same IP address (e.g., if they are both going through the same proxy server). If the service being accessed contained personal information, the user to whom this data pertains is legally entitled to view this data, but other users should not be allowed access.
In this situation, the client side of the connection needs to differentiate itself from other clients. This can be done in several ways, but for Web sites, cookies are the best solution.
Cookies are small files stored in c:windowscookies (depending on your Windows installation). They are placed there in one of two ways: by the JavaScript document.cookie object, or by the set-cookie header in HTTP requests. These cookies remain on the client’s machine for a set time and can be retrieved in JavaScript or in HTTP responses.
Cookies are supported in .NET via the HttpWebResponse.Cookies and the HttpWebRequest.CookieContainer objects.
Cookies are domain specific; therefore, a cookie stored on www.library.com cannot be retrieved by www.bookshop.com. In circumstances where both sites are affiliated with each other, the two sites might need to share session state information. In this example, it would be advantageous for bookshop.com to know a user’s reading preferences, so that it could advertise the most relevant titles.
The trick to copying cookies across domains is to convert the cookies into text, pass the text between the servers, and pass the cookies back to the client from the foreign server. .NET offers a facility to serialize cookies, which is ideal for the purpose.
WYSIWYG (what you see is what you get) is a term used to describe Web and graphics editors that enable you to naturally manipulate graphical output, without having to be concerned with the underlying code. This feature is a handy way to let users be more creative in the type of textual messages or documents they create, without requiring them to take a crash course in HTML.
Internet Explorer can run in a special design mode, which is acceptable as a WYSIWYG editor. The trick to accessing design mode in Internet Explorer is simply to set the property WebBrowser.Document.designMode to On. Users can type directly into the Internet Explorer window and use well-known shortcut keys to format text (e.g., Ctrl + B, Bold; Ctrl + I, Italic; Ctrl + U, Underline). By right-clicking on Internet Explorer in design mode, a user can include images, add hyperlinks, and switch to browser mode. When an image is included in the design view, it can be moved and scaled by clicking and dragging on the edge of the image.
More advanced features can be accessed via Internet Explorer’s execCommand function. Only FontName, FontSize, and ForeColor are used in the following sample program, but here is a list of the commands used by Internet Explorer.
Table 4.6. Parameters of Internet Explorer’s execCommand function.
Command | Meaning |
|---|---|
| Inserts a |
| Copies text into the clipboard |
| Pastes text from the clipboard |
| Creates a bulleted list, |
| Tabulates text farther right on the page |
| Retabulates text left on the page |
| Inserts an |
| Inserts an |
| Creates a hyperlink to another Web page |
| Removes a hyperlink from text |
| Sets the font family of a piece of text |
| Sets the font size of a piece of text |
| Creates a bookmark on a piece of text |
| Sets the color of the selected text |
| Is equivalent to pressing CTRL + A |
| Moves all text as far left as space allows |
| Moves all text as far right as space allows |
| Moves all selected text as close to the center as possible |
| Saves the page to disk |
Other functionality not included in this list can be implemented by dynamically modifying the underlying HTML.
To start coding this application, open a new project in Visual Studio .NET. Add a reference to Microsoft.mshtml by clicking Project→Add Reference. Scroll down the list until you find Microsoft.mshtml, highlight it, and press OK. If you have not already done so from Chapter 1’s example, add Internet Explorer to the toolbox. To do this, right-click on the toolbox and select Customize Toolbox. Scroll down the list under the COM components tab until you see Microsoft Web Browser. Check the box opposite it, and press OK.
Draw a Tab control on the form named tabControl. Click on the tabPages property in the properties window and add two tab pages, labeled Preview and HTML. Draw the Microsoft Web Browser control onto the preview tab page and name the control WebBrowser. Add three buttons to the Preview tab page, named btnViewHTML, btnFont, and btnColor. In the HTML tab page, add a textbox named tbHTML, and set its multiline property to true. Also add a button to the HTML tab page named btnPreview. Drag a Color Dialog control onto the form, and name it colorDialog. Drag a Font Dialog control onto the form and name it fontDialog.
Double-click on the form, and add the following code:
C#
private void Form1_Load(object sender, System.EventArgs e)
{
  object any = null;
  object url = "about:blank";
  WebBrowser.Navigate2(ref url,ref any,ref any,ref any,ref
any);
  Application.DoEvents();
  ((HTMLDocument)WebBrowser.Document).designMode="On";
}
VB.NET
Private  Sub Form1_Load(ByVal sender As Object, _
ByVal e As System.EventArgs)
  Dim url As Object =  "about:blank"
  WebBrowser.Navigate2( url)
  Application.DoEvents()
  (CType(WebBrowser.Document, HTMLDocument)).designMode="On"
End Sub
In order to access the HTML contained within the Web browser page, it must first point to a valid URL that contains some HTML source. In this case, the URL about:blank is used. This page contains nothing more than <HTML></HTML>, but is sufficient for the needs of this application. The DoEvents method releases a little processor time to allow the Web browser to load this page. The Document property of the Web browser contains the object model for the page, but it must first be cast to an HTMLDocument object to be of use. The designMode property of Internet Explorer is then set to On to enable WYSIWYG editing.
Click on the view HTML button on the Preview tab page and enter the following code:
C#
private void btnViewHTML_Click(object sender,
System.EventArgs e)
{
  tbHTML.Text=(
  (HTMLDocument)WebBrowser.Document).body.innerHTML;
}
VB.NET
Private  Sub btnViewHTML_Click(ByVal sender As Object, _
  ByVal e As System.EventArgs)
  tbHTML.Text= _
  (CType(WebBrowser.Document, HTMLDocument)).body.innerHTML
End Sub
This button extracts the HTML from the Web Browser control and places it into the HTML-viewer textbox. Again, the Document property must be cast to an HTMLDocument object in order to access the page object model. In this case, the body.innerHTML property contains the page source. If you required the page source less the HTML tags, then body.innerText would be of interest.
Click on the corresponding Preview button on the HTML tab page, and enter the following code:
C#
private void btnPreview_Click(object sender, System.EventArgs
e)
{
 ((HTMLDocument)WebBrowser.Document).body.innerHTML=
 tbHTML.Text;
}
VB.NET
Private Sub btnPreview_Click(ByVal sender As Object, _
ByVal e As System.EventArgs)
 (CType(WebBrowser.Document, _
 HTMLDocument)).body.innerHTML=tbHTML.Text
End Sub
This code simply performs the reverse of the preceding code, replacing the HTML behind the Web browser with the HTML typed into the textbox.
Click on the Font button on the Preview tab page, and enter the following code:
C#
private void btnFont_Click(object sender, System.EventArgs e)
{
  fontDialog.ShowDialog();
  HTMLDocument doc = (HTMLDocument)WebBrowser.Document;
  object selection= doc.selection.createRange();
  doc.execCommand("FontName",false,
  fontDialog.Font.FontFamily.Name);
  doc.execCommand("FontSize",false,fontDialog.Font.Size);
  ((IHTMLTxtRange)selection).select();
}
VB.NET
Private Sub btnFont_Click(ByVal sender As Object, _
ByVal e As System.EventArgs)
fontDialog.ShowDialog()
Dim doc As HTMLDocument = CType(WebBrowser.Document, _
HTMLDocument)
Dim selection As Object = doc.selection.createRange()
doc.execCommand("FontName",False,fontDialog.Font. _
FontFamily.Name)
doc.execCommand("FontSize",False,fontDialog.Font.Size)
(CType(selection, IHTMLTxtRange)).select()
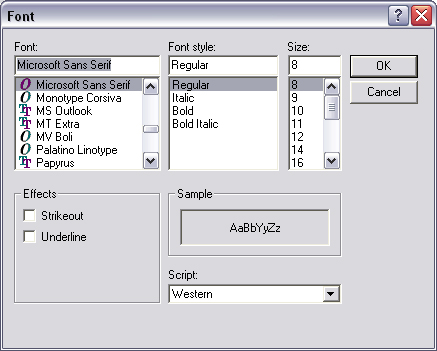
End SubPressing the Font button will bring up the standard font dialog box (Figure 4.4), which allows the user to select any font held on the system and its size. Other properties that may be available on this screen, such as subscript, strikethrough, and so on, are not reflected in the WYSIWYG editor. This works by first capturing a reference to any selected text on the screen using the selection.createRange() method. The execCommand method is called twice, first to apply the font family to the selected text and then the font size. The selection is then cast to an IHTMLTxtRange interface, which exposes the select method and commits the changes to memory.
Now click on the Color button on the Preview tab page, and enter the following code:
C#
private void btnColor_Click(object sender, System.EventArgs
e)
{
  colorDialog.ShowDialog();
  string colorCode = "#" +
      toHex(colorDialog.Color.R) +
      toHex(colorDialog.Color.G) +
      toHex(colorDialog.Color.B);
  HTMLDocument doc = (HTMLDocument)WebBrowser.Document;
  object selection = doc.selection.createRange();
  doc.execCommand("ForeColor",false,colorCode);
  ((IHTMLTxtRange)selection).select();
}
VB.NET
Private Sub btnColor_Click(ByVal sender As Object, _
ByVal e As System.EventArgs)
colorDialog.ShowDialog()
String colorCode = "#" + _
toHex(colorDialog.Color.R) + _
toHex(colorDialog.Color.G) + _
toHex(colorDialog.Color.B)
Dim doc As HTMLDocument = CType(WebBrowser.Document, _
HTMLDocument)
Dim selection As Object = doc.selection.createRange()
doc.execCommand("ForeColor",False,colorCode)
(CType(selection, IHTMLTxtRange)).select()
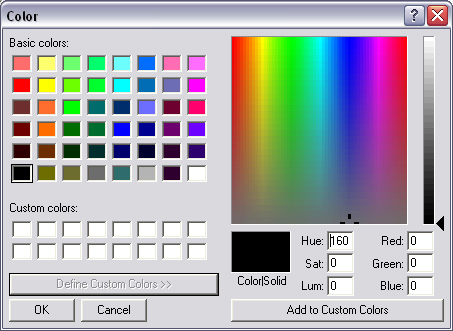
End SubPressing the Color button brings up the standard Color dialog box (Figure 4.5). When a color is chosen, the selected color is applied to any selected text. This code brings up the Color dialog box by calling the ShowDialog method. The color returned can be expressed in terms of its red (R), green (G), and blue (B) constituents. These values are in decimal format, in the range 0 (least intense) to 255 (most intense). HTML expresses colors in the form #RRGGBB, where RR, GG, and BB are hexadecimal equivalents of the R, G, and B values. To give a few examples, #FF0000 is bright red, #FFFFFF is white, and #000000 is black.
Once again, a handle to the selected text is obtained in the same way as before. The execCommand method is called and passed ForeColor, along with the HTML color code. The selected text is cast to an IHTMLTxtRange interface and committed to memory with the Select method as before.
The above code calls the function toHex to convert the numeric values returned from the colorDialog control to hexadecimal values, which are required by Internet Explorer. Enter the following code:
C#
public string toHex(int digit)
{
  string hexDigit = digit.ToString("X");
  if (hexDigit.length == 1){
  hexDigit = "0" + hexDigit;
  }
  return hexDigit;
}
VB.NET
Public Function toHex(ByVal number As Integer) As String
     Dim hexByte As String
     hexByte = Hex(number).ToString()
     If hexByte.Length = 1 Then
         hexByte = "0" & hexByte
     End If
     Return hexByte
 End Function
Finally, the relevant namespaces are required:
C#
using mshtml;
VB.NET
Imports mshtml
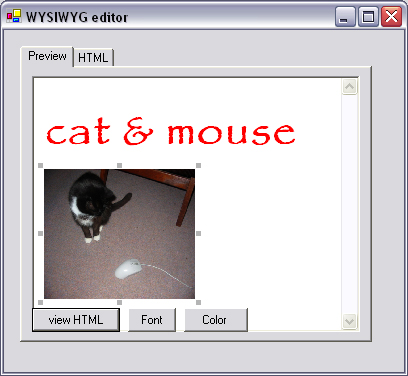
To test this application, run it from Visual Studio .NET. Type into the Web Browser control under the Preview tab. Press the Font button to change the style and size of any text that is selected. Press the Color button to change the color of selected text. You can insert images by right-clicking and selecting Insert image (special thanks to Bella for posing for this photograph!). Press the view HTML button, then switch to the HTML tab page to view the autogenerated HTML (Figure 4.6).
One may ask why you should develop a server in .NET when IIS is freely available. An in-house-developed server has some advantages, such as the following:
Web server can be installed as part of an application, without requiring the user to install IIS manually from the Windows installation CD.
IIS will not install on the Windows XP Home Edition, which constitutes a significant portion of Windows users.
Start a new Visual Studio .NET project as usual. Draw two textboxes, tbPath and tbPort, onto the form, followed by a button, btnStart, and a list box named lbConnections, which has its view set to list.
At the heart of an HTTP server is a TCP server, and you may notice an overlap of code between this example and the TCP server in the previous chapter. The server has to be multithreaded, so the first step is to declare an Array List of sockets:
C#
public class Form1 : System.Windows.Forms.Form
{
  private ArrayList alSockets;
  ...
VB.NET
Public Class Form1 Inherits System.Windows.Forms.Form

    Private alSockets As ArrayList
  ...
Every HTTP server has an HTTP root, which is a path to a folder on your hard disk from which the server will retrieve Web pages. IIS has a default HTTP root of C:inetpubwwwroot; in this case, we shall use the path in which the application is saved.
To obtain the application path, we can use Application.Executable-Path, which returns not only the path but also the filename, and thus we can trim off all characters after the last backslash.
C#
private void Form1_Load(object sender, System.EventArgs e)
{
  tbPath.Text = Application.ExecutablePath;
  // trim off filename, to get the path
  tbPath.Text =
  tbPath.Text.Substring(0,tbPath.Text.LastIndexOf("\"));
}Private Sub Form1_Load(ByVal sender As Object, _
ByVal e As System.EventArgs)
tbPath.Text = Application.ExecutablePath
' trim off filename, to get the path
tbPath.Text = _
tbPath.Text.Substring(0,tbPath.Text.LastIndexOf(""))
End SubClicking the Start button will initialize the Array List of sockets and start the main server thread. Click btnStart:
C#
private void btnStart_Click(object sender, System.EventArgs e)
{
  alSockets = new ArrayList();
  Thread thdListener =
  new Thread(new ThreadStart(listenerThread));
  thdListener.Start();
}
VB.NET
Private  Sub btnStart_Click(ByVal sender As Object, _
 ByVal e As System.EventArgs)
  alSockets = New ArrayList()
  Dim thdListener As Thread =  New Thread(New _
  ThreadStart( AddressOf listenerThread))
  thdListener.Start()
End Sub
The listenerThread function manages new incoming connections, allocating each new connection to a new thread, where the client’s requests will be handled.
HTTP operates over port 80, but if any other application is using port 80 at the same time (such as IIS), the code will crash. Therefore, the port for this server is configurable. The first step is to start the TcpListener on the port specified in tbPort.Text.
This thread runs in an infinite loop, constantly blocking on the AcceptSocket method. Once the socket is connected, some text is written to the screen, and a new thread calls the handlerSocket function.
The reason for the lock(this) command is that handlerSocket retrieves the socket by reading the last entry in ArrayList. In the case where two connections arrive simultaneously, two entries will be written to ArrayList, and one of the calls to handlerSocket will use the wrong socket. Lock ensures that the spawning of the new thread cannot happen at the same time as the acceptance of a new socket.
C#
public void listenerThread()
{
  int port =0;
  port = Convert.ToInt16(tbPort.Text);
  TcpListener tcpListener = new TcpListener(port);
  tcpListener.Start();
  while(true)
  {
    Socket handlerSocket = tcpListener.AcceptSocket();
    if (handlerSocket.Connected)
    {
     lbConnections.Items.Add(
     handlerSocket.RemoteEndPoint.ToString() + " connected."
     );
     lock(this)
     {
      alSockets.Add(handlerSocket);
      ThreadStart thdstHandler = new
      ThreadStart(handlerThread);
      Thread thdHandler = new Thread(thdstHandler);
      thdHandler.Start();
     }
    }
  }
}
VB.NET
Public  Sub listenerThread()
  Dim port As Integer = 0
  port = Convert.ToInt16(tbPort.Text)
  Dim tcpListener As TcpListener =  New TcpListener(port)
  tcpListener.Start()
  do
    Dim handlerSocket As Socket =  tcpListener.AcceptSocket()
     If handlerSocket.Connected = true then
      lbConnections.Items.Add( _
      handlerSocket.RemoteEndPoint.ToString() + " _
      connected.")
      syncLock(me)
        alSockets.Add(handlerSocket)
        Dim thdstHandler As ThreadStart =  New  _
          ThreadStart(AddressOf handlerThread)
        Dim thdHandler As Thread =  New  _
          Thread(thdstHandler)
        thdHandler.Start()
      end syncLock
    end if
  loop
End sub
The handlerThread function is where HTTP is implemented, albeit minimally. Taking a closer look at the code should better explain what is happening here.
The first task this thread must perform, before it can communicate with the client to which it has been allocated, is to retrieve a socket from the top of the public ArrayList. Once this socket has been obtained, it can then create a stream to this client by passing the socket to the constructor of a NetworkStream.
To make processing of the stream easier, a StreamReader is used to read one line from the incoming NetworkStream. This line is assumed to be:
GET <some URL path> HTTP/1.1
HTTP posts will be handled identically to HTTP gets. Because this server has no support for server-side scripting, there is no use for anything else in the HTTP POST data, or anything else in the HTTP Request header for that matter.
Assuming that the HTTP request is properly formatted, we can extract the requested page URL from this line by splitting it into an array of strings (verbs[]), delimited by the space character.
The next task is to convert a URL path into a physical path on the local hard drive. This involves four steps:
Once the physical path is resolved, it can be read from disk and sent out on the network stream. It is reported on screen, and then the socket is closed. This server does not return any HTTP headers, which means the client will have to determine how to display the data being sent to it.
C#
public void handlerThread()
{
  Socket handlerSocket = (
  Socket)alSockets[alSockets.Count-1];
  String streamData = "";
  String filename = "";
  String[] verbs;
  StreamReader    quickRead;
  NetworkStream networkStream =
  new NetworkStream(handlerSocket);
  quickRead = new StreamReader(networkStream);
  streamData = quickRead.ReadLine();
  verbs = streamData.Split(" ".ToCharArray());
  // Assume verbs[0]=GET
  filename = verbs[1].Replace("/","\");
  if (filename.IndexOf("?")!=-1)
  {
    // Trim of anything after a question mark (Querystring)
    filename = filename.Substring(0,filename.IndexOf("?"));
  }

  if (filename.EndsWith("\"))
  {
    // Add a default page if not specified
    filename+="index.htm";
  }
  filename = tbPath.Text + filename;
  FileStream  fs = new FileStream(filename,
  FileMode.OpenOrCreate);
  fs.Seek(0, SeekOrigin.Begin);
  byte[] fileContents= new byte[fs.Length];
  fs.Read(fileContents, 0, (int)fs.Length);
  fs.Close();

  // optional: modify fileContents to include HTTP header.

  handlerSocket.Send(fileContents);
  lbConnections.Items.Add(filename);
  handlerSocket.Close();
}
VB.NET
Public  Sub handlerThread()
  Dim handlerSocket As Socket = _
  CType(alSockets(alSockets.Count-1), Socket)
  Dim streamData As String =  ""
  Dim filename As String =  ""
  Dim verbs() As String
  Dim quickRead As StreamReader
  Dim networkStream As NetworkStream = New _
  NetworkStream(handlerSocket)
  quickRead = New StreamReader(networkStream)
  streamData = quickRead.ReadLine()
  verbs = streamData.Split(" ".ToCharArray())
  ' Assume verbs[0]=GET
  filename = verbs(1).Replace("/","\")
  If filename.IndexOf("?")<>-1 Then
    ' Trim of anything after a question mark (Querystring)
    filename = filename.Substring(0,filename.IndexOf("?"))
  End If

  If filename.EndsWith("\") Then
    ' Add a default page if not specified
    filename+="index.htm"
  End If
  filename = tbPath.Text + filename
  Dim fs As FileStream =  New _
  FileStream(filename,FileMode.OpenOrCreate)
  fs.Seek(0, SeekOrigin.Begin)
  Dim fileContents() As Byte =  New Byte(fs.Length) {}
  fs.Read(fileContents, 0, CType(fs.Length, Integer))
  fs.Close()
  ' optional: modify fileContents to include HTTP header.
  handlerSocket.Send(fileContents)
  lbConnections.Items.Add(filename)
  handlerSocket.Close()
End Sub
Most modern browsers can determine how best to display the data being sent to them, without the need for Content-Type headers. For instance, Internet Explorer can tell the difference between JPEG image data and HTML by looking for the standard JPEG header in the received data; however, this system is not perfect.
A simple example is the difference between how XML is rendered on a browser window and how HTML is displayed. Without the Content-Type header, Internet Explorer will mistake all XML (excluding the <?xml?> tag) as HTML. You can see this by viewing a simple XML file containing the text <a><b/></a> through this server.
And, the usual namespaces are thrown in:
C#
using System.Threading;
using System.Net;
using System.Net.Sockets;
using System.Text;
using System.IO;
VB.NET
Imports System.Threading
Imports System.Net
Imports System.Net.Sockets
Imports System.Text
Imports System.IO
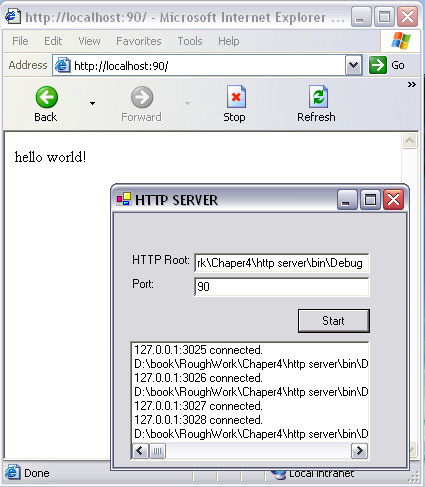
To test the server, you will need a simple HTML page. Save the following text as index.htm in the same folder where the executable is built (the HTTP root).
HTML
<html>
 Hello world!
</html>
Run the server from Visual Studio .NET, change the port to 90 if you are running IIS, and press Start. Open a browser and type in http://localhost:90. Localhost should be replaced by the IP address of the server, if you are running the server on a second computer (Figure 4.7).
As mentioned previously, the server does not return HTTP headers. It is worthwhile to extend the example to include one of the more important headers, Content-Type, to save data from being misinterpreted at the client.
First, implement a new function called getMime(). This will retrieve a file’s MIME type from the computer’s registry from its file extension:
C#
public string getMime(string filename)
{
  FileInfo thisFile = new FileInfo(filename);
  RegistryKey key = Registry.ClassesRoot;
  key = key.OpenSubKey(thisFile.Extension);
  return key.GetValue("Content Type").ToString();
}
VB.NET
Public Function getMime(ByVal filename As String) As String
  Dim thisFile As FileInfo =  New FileInfo(filename)
  Dim key As RegistryKey =  Registry.ClassesRoot
  key = key.OpenSubKey(thisFile.Extension)
  Return key.GetValue("Content Type").ToString()
End Function
If you have never used Windows registry before, this code may need a little explaining. The Windows registry is a repository for information that holds the vast amount of settings and preferences that keep Windows ticking over. You can view and edit the registry using Registry Editor (Figure 4.8); start this by clicking Start→Run and typing regedit or regedt32.
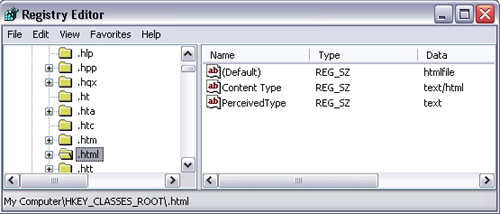
To view MIME types that correspond with file type extensions, click on HKEY_CLASSES_ROOT, scroll down to the file extension in question, and look at the Content Type key on the right-hand side of the screen.
This data is accessed programmatically by first extracting the file type extension using the Extension property of a FileInfo object. The first step in drilling down through the registry data is to open the root key. In this case, it is Registry.ClassesRoot.
The .html subkey is then opened using the openSubKey method. Finally, the Content Type value is retrieved using the getValue statement and returned as a string to the calling function.
Now the final call to the Send method must be replaced by a slightly more elaborate sending procedure, which issues correct HTTP headers:
C#
handlerSocket.Send(fileContents);
VB.NET
handlerSocket.Send(fileContents)
These become:
C#
string responseString = "HTTP/1.1 200 OK
Content-Type: " +
        getMime(filename) + "

";
System.Collections.ArrayList al = new ArrayList();
al.AddRange(Encoding.ASCII.GetBytes(responseString));
al.AddRange(fileContents);
handlerSocket.Send((byte[])al.ToArray((new
byte()).GetType()));
VB.NET
Dim responseString As String
responseString = "HTTP/1.1 200 OK" + vbCrLf + _
"Content-Type: " + getMime(filename) + vbCrLf + vbCrLf
Dim al As System.Collections.ArrayList = New ArrayList
al.AddRange(Encoding.ASCII.GetBytes(responseString))
al.AddRange(fileContents)
handlerSocket.Send(CType( _
al.ToArray((New Byte).GetType()), Byte()))
Finally, to support the registry access functionality, we need to include an extra namespace:
using Microsoft.Win32;
VB.NET
Imports Microsoft.Win32
To demonstrate the difference this makes to running the server, create two files, test.txt and test.xml, both containing the text <a><b/></a>. Save them both in the HTTP root of your server and type in http:localhost/test.xml and http:localhost/test.txt. You will notice that test.xml will be rendered as a collapsible tree, and the text file will be shown as a series of characters.
In .NET 2 Whidbey, a more elegant solution for implementing Web servers exists, namely the HttpWebListener class. This class leverages the Http.sys driver (where available) to deliver unprecedented performance, and integrates many features, such as SSL encryption and authentication, which would be difficult to develop from the ground up.
The HttpWebListener class consists of the significant methods and properties shown in Table 4.7.
Table 4.7. Significant members of the HttpWebListener class.
Method or Property | Description |
|---|---|
| Destroys the request queue. |
| Adds a prefix to the Web listener. |
| Awaits a client request asynchronously. Returns |
| Handles client request. Returns |
| Retrieves all handled prefixes. Returns |
| Awaits a client request synchronously. Returns |
| Removes all prefixes. |
| Removes a specified prefix. |
| Starts the Web server. |
| Stops the Web server. |
| Sets the means by which the server authenticates clients. Returns |
| Determines if the server is running. Returns |
| If Basic or Digest authentication schemes are selected, gets the realm directive. Returns |
The ListenerWebRequest returned by GetRequest contains the significant methods and properties shown in Table 4.8.
Table 4.8.
Method or Property | Description |
|---|---|
| Closes the client connection. |
| Retrieves a reference to the stream sent from the client. Returns |
| Retrieves a reference to the response to be sent to the client. Returns |
| Gets the |
| Gets the digital certificate sent with the client request. Returns |
| Determines if any errors were present in the client certificate. Returns |
| Gets the |
| Gets the length of any data posted in the client request. Returns |
| Gets the |
| Gets the |
| Determines if the client request had an |
| Gets a reference to the set of HTTP headers sent from the client. Returns |
| Gets the |
| Determines the identity credentials in the client request. Returns |
| Gets the |
| Determines if the client sent |
| Determines the local logical endpoint of the communication. Returns |
| Gets the HTTP send method (i.e., |
| Determines the HTTP version used by the client. Returns |
| Gets the URI requested by the client. Returns |
| Gets the |
| Determines the remote logical endpoint of the communication. Returns |
| Gets the URI requested by the client. Returns |
| Gets the |
The ListenerWebResponse returned by GetResponse contains the significant methods and properties listed in Table 4.9.
Table 4.9.
Method or Property | Description |
|---|---|
| Disconnects the client. |
| Retrieves a reference to the stream to be returned to the client. Returns |
| Sets the length of data to be sent back to the client. Returns |
| Sets the |
| Sets the |
| Determines how the response content should be delimited (i.e., |
| Retrieves a reference to the HTTP headers to be sent back to the client. Returns |
| Determines if |
| Sets the |
| Sets the HTTP protocol version to be used in communicating with the client. Returns |
| Retrieves a reference to the HTTP headers to be sent back to the client. Returns |
| Retrieves a reference to the request that initiated the response. Returns |
| Sets the |
| Sets the HTTP status code to be sent to the client. Returns |
| Sets the HTTP status description to be sent to the client. Returns |
Not all HTTP clients are PCs. Many people use their mobile phones to access the Internet. Some applications are infinitely more useful when available wirelessly. Even though mobile phones ferry data in a totally different way from wired networks, a wireless application protocol (WAP) phone will communicate via a WAP gateway, which converts mobile phone signals into TCP/IP and accesses servers in much the same way as browsers.
WAP runs over HTTP and wireless transfer protocol (WTP), with a few extra headers thrown into the HTTP request. The following is a sample HTTP request generated by a WAP phone:
GET / HTTP/1.1
Accept-Charset: ISO-8859-1
Accept-Language: en
Content-Type: application/x-www-form-urlencoded
x-up-subno: Fiach_hop
x-upfax-accepts: none
x-up-uplink: none
x-up-devcap-smartdialing: 1
x-up-devcap-screendepth: 1
x-up-devcap-iscolor: 0
x-up-devcap-immed-alert: 1
x-up-devcap-numsoftkeys: 3
x-up-devcap-screenchars: 15,4
Accept: application/x-hdmlc, application/x-up-alert,
application/x-up-cacheop, application/x-up-device,
application/x-up-digestentry, text/x-hdml;version=3.1, text/
x-hdml;version=3.0, text/x-hdml;version=2.0, text/x-wap.wml,
text/vnd.wap.wml, */*, image/bmp, text/html
User-Agent: UP.Browser/3.1-ALAV UP.Link/3.2
Host: 127.0.0.1:50
WAP clients and PC browsers differ most in the response. WAP clients cannot read HTML and use a simpler language, wireless markup language (WML), which has a MIME type text/vnd.wap.wml.
A minimal page in WML is as follows:
WML
<!DOCTYPE wml PUBLIC "-//WAPFORUM//DTD WML 1.1//EN"
"http://www.wapforum.org/DTD/wml_1.1.xml">
<wml>
<card>
<p align="left">
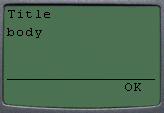
<b>Title</b><br/>
body
</p>
</card>
</wml>To view this page on a WAP phone, save the above text to index.wml. Ensure that the MIME type is registered on your computer by adding a registry key to HKEY_CLASSES_ROOT.wml named Content Type with the value text/vnd.wap.wml.
Run the server as described in the previous section, and copy index.wml into the HTTP root as displayed. Ensure that your computer is online and has an externally visible IP address. Connect your mobile phone to the Internet and type your IP address into it, followed by /index.wml (Figure 4.9).
Note
If you do not have a WAP phone, you can use a WAP emulator such as the UP.SDK from www.openwave.com.
Not all wireless HTTP clients read WML. A competing technology, iMode, which is the most widely used technology in Asia, offers a similar, yet incompatible, system. iMode reads compact HTML (cHTML), which is a stripped-down version of the language with features such as frames, tables, and even JPEG images explicitly unsupported; however, iMode has good support for Unicode and can adequately display many Web pages designed for PCs.
An iMode browser can be recognized by the word DoCoMo in the user agent HTTP request header.
When implementing WAP compatibility in a Web application, it is worth considering the .NET Mobile Web SDK. This enables you to develop applications for WAP in the same way as an ASP.NET Web application. Therefore, there is no need to learn WML.
Note
Utilities are available to convert HTML to WML on-the-fly, but the .NET Mobile Web SDK is freely available.
A sample page could be as follows:
ASP.NET
<%@ Page Inherits="System.Mobile.UI.MobilePage" language="c#"
%>
<%@ Register TagPrefix="mobile" Namespace="System.Mobile.UI"
%>
<mobile:Form runat="server">
<mobile:Label runat="server">
 Hello world!
</mobile:Label>
</mobile:Form>
To try this page out, save it as mobile.aspx in your IIS root (usually c:inetpubwwwroot). Ensure that your computer is online and has an externally visible IP address. Connect your mobile phone to the Internet, and type your IP address into it, followed by /mobile.aspx.