
More emails are sent every day than postal mail. Why? Because email is cheap, informal, fast, and can be picked up at the receiver’s convenience. Emails can be automatically generated and sent, making them ideal for automated status notification. One day, you may receive an email from your home sprinkler system saying simply, “Your house is on fire.”
After reading this chapter you will be able to send and receive emails from your .NET applications. These features can be useful for customer support systems, collaborative personnel management, and many other types of applications.
This chapter begins by describing how emails can be constructed and sent, using either a socket-level approach, or by using in-built .NET classes. Immediately following that, is a description on how emails may be received, again, by either using a socket level approach, or a higher-level methodology, leveraging Microsoft Outlook.
Every email must have a destination email address. An email address takes the following form:
<Username>@<domain name>
The domain name in an email address generally does not include the “www” prefix, which is common for Web site addresses. Despite that, the domain name is globally recognized under the DNS system. The username is recognized only by the recipient mail server.
Emails are not immediately delivered to the recipient; instead, they are initially sent to your ISP’s or company’s mail server. From there, they are forwarded to the recipient’s mail server or held for a period of time until the recipient’s mail server accepts the email. Emails are sent using the simple mail transfer protocol (SMTP), which is described in detail later.
In order to determine the recipient’s mail server, a DNS mail exchange (MX) query is issued to the local DNS server for that domain name. That computer will then return details of where the server or servers that handle incoming mail are located.
You will always be told the IP address of your SMTP server. Unfortunately, you cannot use an SMTP server from another ISP because it will block you with an error message such as “Relaying denied.”
Microsoft virtual SMTP server is available for most versions of Windows and generally appears under IIS when installed.
SMTP is used to send, but not receive, emails. Every mail server in the world must conform to the SMTP standard in order to send emails reliably regardless of destination. The definitive guide to SMTP is held by the Internet Engineering Task Force (IETF) under RFC 821 at www.ietf.org/rfc/rfc0821.txt.
The definitive guides to most major protocols are held at the IETF. They are free to download and should be consulted when you are developing network applications that are designed to work with preexisting or third-party clients or servers.
SMTP is not a difficult protocol to implement from the ground up; however, it is natively supported from .NET and, thus, would be a waste of time to redevelop. Also, many commercial email components are available, which can be imported into your application. One of the most popular is AspEmail from Persits Software. The demo version of this component is adequate for most applications.
SMTP operates on TCP port 25. Before sitting down to code, you should first find out the IP address of your ISP’s SMTP server. In the examples below, the SMTP server smtp.ntlworld.com is used. You should replace this with your own SMTP server, or the examples will not work.
SMTP was originally designed for UNIX users and has a command-line-type feel to it, although the commands are issued over a network connection, rather than a keyboard.
A good way to test the protocol is to open telnet by clicking Start→Run and type telnet. In Windows NT, 2000, and XP, type o smtp.ntlworld.com 25. In prior versions of Windows, click File→Connect, and then type smtp.ntlworld.com into the connection box and 25 into the port box. Then press Connect.
Once the client establishes a TCP connection to the server on port 25, the server will always reply with 220 <some greeting message><enter>. A number is always included at the start of every server response. Any number beginning with 5 is an error and should be dealt with; everything else can be ignored.
The client must then send a greeting back to the server. This is merely a formality and does not contain any useful information. The format is HELLO server <enter>, and the server should reply with 250 server <enter>.
The next step is to send a contact email address for the sender. This is sent in the format MAIL FROM:<email address><enter>. The server should reply 250 OK<enter>.
Following that, the recipient must be indicated. To do this, RCPT TO:<email address><enter> is used. The server should reply 250 OK<enter>.
To create the body of the email, the client sends the command DATA<enter>. To this the server should reply 354 <some instructions><enter>.
The client can then send as much text as required to make up the body of the email. It is recommended to split the mail over several lines because of restrictions in some mail servers. To indicate the end of the mail body, send <enter>.<enter>. The server should reply 250 OK<enter>.
At this point, it is possible simply to close the TCP connection, but it is recommended to send QUIT<enter>. The following passage shows the chain of events between client and server when an email is sent from [email protected] to [email protected]. “S” indicates a transmission from server to client, and “C” indicates a client-to-server transaction.
S: 220 Simple Mail Transfer Service
C: HELO SERVER
S: 250 SERVER
C: MAIL FROM:<[email protected]>
S: 250 OK
C: RCPT TO:<[email protected]>
S: 250 OK
C: DATA
C: 354 Start mail input; end with <CRLF>.<CRLF>
C: Dear sir
C: Please give me a call to discuss your offer
C: .
S: 250 OK
C: QUIT
S: 221 CLOSED
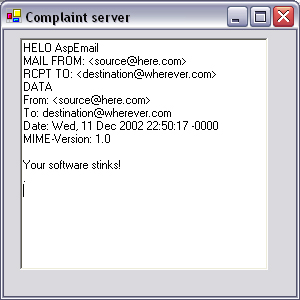
If you ever work in the complaints department of a company, this application will make your life a lot easier. It mimics the communications an SMTP server would make, but it thoughtfully ignores the email content, saving you a lot of stress.
Of course, a real application would be to have it log the emails to a database, but, for the sake of clarity, that feature is not included in this example. Possible derivations of this project could be an email proxy server, which could filter emails for viruses, and so forth.
Start a C# or VB.NET Windows form project as usual, and drag a textbox onto the form. Call it tbStatus, and set multiline to true.
To start with, we must import all of the namespaces we intend to use in this application. Put this code at the beginning of the program:
C#
using System.Threading;
using System.Net;
using System.Net.Sockets;
using System.Text;
Imports System.Threading
Imports System.Net
Imports System.Net.Sockets
Imports System.Text
For simplicity, this server will be single threaded. The thread that listens for incoming connections runs in the background and starts when the form loads. This means that, although the program won’t hang waiting for connections, it can only handle one email at a time.
C#
private void Form1_Load(object sender, System.EventArgs e)
{
  Thread thdSMTPServer = new Thread(new
  ThreadStart(serverThread));
  thdSMTPServer.Start();
}
VB.NET
Private Sub Form1_Load(ByVal sender As System.Object, _
 ByVal e As System.EventArgs) Handles MyBase.Load
        Dim thdSMTPServer As Thread
        thdSMTPServer = New Thread(New ThreadStart( _
          AddressOf serverThread))
        thdSMTPServer.Start()
End Sub
This thread provides the functionality to receive emails sent via SMTP. It listens on port 25 and blocks until an incoming connection is detected. This connection is accepted, and a 250 hello<enter> reply is sent back to the client. Note that here it is possible to use ASCII.GetBytes because SMTP is a text-based protocol, and binary content is not sent at this level.
The function socketReadLine is not defined yet, but its purpose is to store incoming data in a string until the termination character(s) is found.
Data returned from the client is displayed in tbStatus, but no other processing takes place.
C#
public void serverThread()
{
 Byte[] sendBytes;
 TcpListener tcpListener = new TcpListener(25);
 tcpListener.Start();
 while(true)
 {
  Socket handlerSocket = tcpListener.AcceptSocket();
  if (handlerSocket.Connected)
  {
   // Reply 250 hello
   sendBytes = Encoding.ASCII.GetBytes("250 hello
");
   handlerSocket.Send(sendBytes,0,
   sendBytes.Length,SocketFlags.None);
   // Wait for enter (hello)
   tbStatus.Text += socketReadLine(handlerSocket,"
");
   // Reply 250 ok
   sendBytes = Encoding.ASCII.GetBytes("250 ok
");
   handlerSocket.Send(sendBytes,0,
   sendBytes.Length,SocketFlags.None);
   // Wait for enter (mail from)
   tbStatus.Text += socketReadLine(handlerSocket,"
");
   // Reply 250 ok
   sendBytes = Encoding.ASCII.GetBytes("250 ok
");
   handlerSocket.Send(sendBytes,0,
   sendBytes.Length,SocketFlags.None);
   // Wait for enter (rcpt to)
   tbStatus.Text += socketReadLine(handlerSocket,"
");
   // Reply 250 ok
   sendBytes = Encoding.ASCII.GetBytes("250 ok
");
   handlerSocket.Send(sendBytes,0,
   sendBytes.Length,SocketFlags.None);
   // Wait for enter (data)
   tbStatus.Text += socketReadLine(handlerSocket,"
");
   // Reply 354
   sendBytes = Encoding.ASCII.GetBytes("354 proceed
");
   handlerSocket.Send(sendBytes,0,
   sendBytes.Length,SocketFlags.None);
   // Wait for enter.enter (email body)
   tbStatus.Text += socketReadLine(handlerSocket,
   "
.
");
   // Reply 221 close
   sendBytes = Encoding.ASCII.GetBytes("221 close
");
   handlerSocket.Send(sendBytes,0,
   sendBytes.Length,SocketFlags.None);
   handlerSocket.Close();
  }
 }
}Public Sub serverThread()
Dim sendBytes As Byte()
Dim tcpListener As New TcpListener(25)
Dim handlerSocket As Socket
tcpListener.Start()
Do
handlerSocket = tcpListener.AcceptSocket()
If handlerSocket.Connected = True Then
' Reply 250 hello
sendBytes = Encoding.ASCII.GetBytes("250 hello" + vbCrLf)
handlerSocket.Send(sendBytes, 0, sendBytes.Length, _
SocketFlags.None)
' Wait for enter (hello)
tbStatus.Text += socketReadLine(handlerSocket, vbCrLf)
' Reply 250 ok
sendBytes = Encoding.ASCII.GetBytes("250 ok" + vbCrLf)
handlerSocket.Send(sendBytes, 0, sendBytes.Length, _
SocketFlags.None)
' Wait for enter (mail from)
tbStatus.Text += socketReadLine(handlerSocket, vbCrLf)
' Reply 250 ok
sendBytes = Encoding.ASCII.GetBytes("250 ok" + vbCrLf)
handlerSocket.Send(sendBytes, 0, sendBytes.Length, _
SocketFlags.None)
' Wait for enter (rcpt to)
tbStatus.Text += socketReadLine(handlerSocket, vbCrLf)
' Reply 250 ok
sendBytes = Encoding.ASCII.GetBytes("250 ok" + vbCrLf)
handlerSocket.Send(sendBytes, 0, sendBytes.Length, _
SocketFlags.None)
' Wait for enter (data)
tbStatus.Text += socketReadLine(handlerSocket, vbCrLf)
' Reply 354
sendBytes = Encoding.ASCII.GetBytes("354 proceed" + _
vbCrLf)
handlerSocket.Send(sendBytes, 0, sendBytes.Length, _
SocketFlags.None)
' Wait for enter.enter (email body)
tbStatus.Text += socketReadLine(handlerSocket, _
vbCrLf + "." + vbCrLf)
' Reply 221 close
sendBytes = Encoding.ASCII.GetBytes("221 close" + vbCrLf)
handlerSocket.Send(sendBytes, 0, sendBytes.Length, _
SocketFlags.None)
handlerSocket.Close()
End If
Loop
End SubThis thread starts by listening on port 25 for incoming connections. The thread blocks on the call to AcceptSocket() and waits indefinitely until a connection arrives. Once a connection arrives, it is stored in a socket object named handlerSocket. Once the connection is established, the server immediately responds with 250 hello. The server then waits for the client to respond. In response to every command sent by the client, the server responds with 250 ok. The client is then expected to send a mail from command, and the server will wait until the client does so. Once the server has replied, it will wait for a rcpt to command and finally a data command. The server will read in data from the socket until the end-of-message marker (a period on a line by itself) appears. The server then prompts the client to close the connection before closing the connection itself.
The socketReadLine function is called many times from serverThread. It takes a socket and a terminator string as parameters. Again, it reads in from the network stream one byte at a time and builds up the streamData string. If the terminator string appears in the streamData string, or if ReadByte fails because of a network error, then the function returns.
C#
public String socketReadLine(Socket socket,String terminator)
{
  int lastRead=0;
  String streamData = "";
  NetworkStream networkStream = new NetworkStream(socket);
 do
 {
   lastRead = networkStream.ReadByte();
   if (lastRead==-1) break;
   streamData+=(Convert.ToChar(lastRead));
   if (streamData.EndsWith(terminator)) break;
 }
 while(true);
 return streamData;
}Public Function socketReadLine(ByVal socket As Socket, _ ByVal terminator As String) As String Dim lastRead As Int16 Dim streamData As String Dim networkStream As New NetworkStream(socket) Do lastRead = networkStream.ReadByte() If lastRead = -1 Then Exit Do streamData += (Convert.ToChar(lastRead)) If streamData.EndsWith(terminator) Then Exit Do Loop Return streamData End Function
The socketReadLine function may look a little verbose, especially because the StreamReader already has a ReadLine method; however, this function is designed to be generic enough such that it can detect both new-line (
or vbcrlf) message terminators and end-of-message markers (a period on a line by itself). This function creates a NetworkStream to the socket and then reads from the stream one byte at a time, appending the byte to a string, which is returned once the message terminator has been found.
Before running this example, ensure that no other SMTP server is running at the same time. You can check for the default virtual SMTP server by opening IIS from Administrative Tools and expanding your local computer name from within the console. You can stop the SMTP server (if it is installed) by right-clicking on its icon and selecting stop.
To test this example, run it from Visual Studio .NET. Then open an email program (e.g., Microsoft Outlook). Press Tools→Accounts (Figure 5.1), then click Add→Mail, and click Next twice.
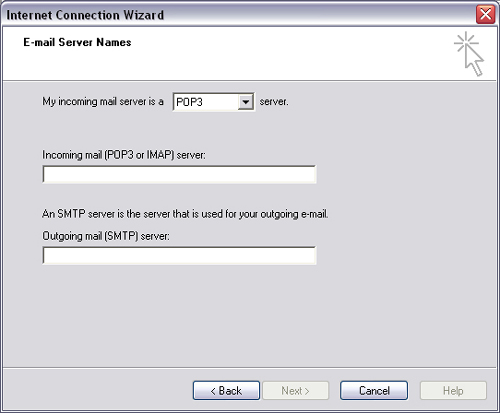
Type anything in the POP3 box, and type the IP address of the computer on which you are running the SMTP Server, or 127.0.0.1 if you only have one computer. Keep pressing Next until you arrive back at the previous screen.
Create a new email as usual, and select your new account to send from. On Outlook, this is selected from an arrow to the right of the Send button; on Outlook Express, this is selected from a drop-down list in the “to” field. Now press Send.
You will see the raw TCP data written as text in the application’s window, as shown in Figure 5.2.
Post office protocol 3 (POP3) is used to receive, but not send, emails. Every ISP has a POP3 server, and many Web hosting companies offer access to a POP3 server to provide personalized email addresses such as [email protected] (fictitious). POP3 is described definitively in RFC 1939, which is downloadable at www.ietf.org/rfc/rfc1939.txt and operates on TCP port 110.
POP3 is used to store emails on behalf of users. Users can then download these emails selectively from the server. Some service providers limit the amount of space devoted to any one user on a POP3 server. Therefore, POP3 also facilitates message deletion.
Again, before rushing into implementing POP3, be aware that there are alternatives; for instance, you can use Microsoft Exchange as a POP3 server, and commercial components by IP*Works or SoftArtisans can be used as POP3 clients.
Like SMTP, POP3 is a command-line-based protocol, where each line is terminated with a line-feed (<enter>) character. For variable length lines, the command is terminated by <enter>.<enter> as in SMTP.
When the server is operating normally, each line will start with +OK. If an error occurs, the line begins with –ERR <some explanation>. Once the client establishes a TCP connection to the server on port 110, the server will always reply with +OK <some greeting message><enter>.
To access a mailbox, the client must authenticate itself with a username and password. The client sends USER <username><enter>. The server then replies with +OK <welcome><enter>. The password is sent as USER <password><enter> with the same response from the server.
To get summary information about the mailbox, the command STAT<enter> is issued. To this the server will reply +OK <number of messages> <total size><enter>. Unlike the previous messages, where the text after the +OK could be ignored, here it must be read and stored for future use.
To read back an email, the client sends the RETR <number> command; Number must be between 1 and the number received in response to the STAT command. The server will respond +OK <some message><enter><mail body><enter>.<enter>. The only piece of important information is the mail body; everything else can be ignored.
To delete emails, the client sends the DELE <number> command. The server will respond +OK <some message><enter>. At this point, it is possible simply to close the TCP connection, but it is recommended to send QUIT<enter>.
To illustrate the protocol more simply, the following text shows the chain of events that occur between a POP3 server and client. As before, “S” indicates a transmission from server to client, and “C” indicates a client-to-server transaction. Here, user Bob is checking his emails, when he receives two messages from Alice and Terry.
S:    +OK POP3 server ready
C:    USER bob
S:    +OK user valid
C:    PASS secret
S:    +OK pass valid
C:    STAT
S:    +OK 2 170
C:    RETR 1
S:    +OK 120 octets
S:    hello, how are you bob?, haven't seen you in
S:    ages, any chance you could give me a call
S:    sometime? I'd love to see you. Alice
S:    .
C:    DELE 1
S:    +OK message 1 deleted
C:    RETR 2
S:    +OK 50 octets
S:    Hi bob, I got the order of 500 widgets placed
S:    with Acme. Terry
S:    .
C:    DELE 2
S:    +OK message 2 deleted
C:    QUIT
S:    +OK
This transcript has been simplified for reasons of clarity. Modern mail messages contain headers, including the subject, date, natural names of the sender and recipient, and technical information concerning what software was used to send the email and how it was relayed.
This is a message header sent from [email protected] to [email protected].
Return-Path: <[email protected]>
Delivered-To: [email protected]
Received: (vpopmail 31497 invoked by uid 16); 11 Jan 2004
21:51:58 +0000
Received: (qmail 31491 messnum 229855 invoked from
network[64.4.19.76/law12-f76.law12.hotmail.com]); 11 Jan 2004
21:51:57 -0000
Received: from law12-f76.law12.hotmail.com (HELO hotmail.com)
(64.4.19.76)
  by mail09.svc.cra.dublin.eircom.net (qp 31491) with SMTP;
11 Jan 2004 21:51:57 -0000
Received: from mail pickup service by hotmail.com with
Microsoft SMTPSVC;
   Sun, 11 Jan 2004 13:51:56 -0800
Received: from 195.92.168.176 by lw12fd.law12.hotmail.msn.com
with HTTP;
  Sun, 11 Jan 2004 21:51:56 GMT
X-Originating-IP: [195.92.168.176]
X-Originating-Email: [[email protected]]
X-Sender: [email protected]
From: "Fiach Reid" <[email protected]>
To: [email protected]
Bcc:
Subject: test message
Date: Sun, 11 Jan 2004 21:51:56 +0000
Mime-Version: 1.0
Status: U
X-UIDL:
1073857917.31497.mail09.svc.cra.dublin.eircom.net,S=1118
Content-Type: text/plain; format=flowed
Message-ID: <[email protected]>
X-OriginalArrivalTime: 11 Jan 2004 21:51:56.0469 (UTC)
FILETIME=[21BF7650:01C3D88D]
Two line-feed characters separate the message header from the body.
SPAM is the term used for mass, unsolicited email. These emails are sometimes accompanied by attached viruses, which can be accidentally opened by unwitting users. This application could be used to safely delete emails containing message fragments indicative of a SPAM email; in this case, the string “free money.”
This simple program scans your mailbox for emails containing the text “free money” and deletes them. This is obviously overly simplistic, but the example is here for illustration, not practicality.
The first step is to draw the user interface; you will need three textboxes, labeled tbServer, tbUsername, and tbPassword. Another textbox is required, named tbStatus; this textbox should be set with multiline to true. Finally, place a button on the form, and call it btnClean.
First, import the required namespaces:
C#
using System.Threading;
using System.Net;
using System.Net.Sockets;
using System.Text;
using System.IO;
VB.NET
Imports System.Threading
Imports System.Net
Imports System.Net.Sockets
Imports System.Text
Imports System.IO
Double-click on the Clean button and type the following code:
C#
private void btnClean_Click(object sender, System.EventArgs
e)
{
 TcpClient clientSocket = new TcpClient(tbServer.Text,110);

  NetworkStream NetStrm = clientSocket.GetStream();
  StreamReader RdStrm= new StreamReader(NetStrm);
  tbStatus.Text += RdStrm.ReadLine();

  sendPOP3cmd("USER "+ tbUsername.Text + "
",NetStrm);
  sendPOP3cmd("PASS "+ tbPassword.Text+ "
",NetStrm);
  string Data = sendPOP3cmd("STAT
",NetStrm);

  string[] BreakDown = Data.Split(" ".ToCharArray());
  int messageCount = Convert.ToInt16(BreakDown[1]);

  for (int i=1;i<= messageCount;i++)
  {
  StringBuilder message = new StringBuilder("");
  Data = "RETR " + Convert.ToString(i) + "
";
  byte[] szData=
  System.Text.Encoding.ASCII.GetBytes(Data.ToCharArray());
  NetStrm.Write(szData,0,szData.Length);
  string szTemp = RdStrm.ReadLine();
  while(szTemp!=".")
  {
    message.Append(szTemp);
    tbStatus.Text += szTemp+"
";
    szTemp = RdStrm.ReadLine();
  }
  if (message.ToString().IndexOf("free money")>0)
  {
    sendPOP3cmd("DELE " + Convert.ToString(i) +
    "
",NetStrm);
  }
  }
  clientSocket.Close();
}Private Sub btnClean_Click(ByVal sender As System.Object, _
ByVal e As System.EventArgs) Handles _
btnClean.Click
Dim clientSocket As TcpClient
Dim NetStrm As NetworkStream
Dim RdStrm As StreamReader
Dim Data As String
Dim BreakDown() As String
Dim messageCount As Int16
Dim message As StringBuilder
Dim szData() As Byte
Dim i As Int16
Dim szTemp As String
clientSocket = New TcpClient(tbServer.Text, 110)
NetStrm = clientSocket.GetStream()
RdStrm = New StreamReader(NetStrm)
tbStatus.Text += RdStrm.ReadLine()
sendPOP3cmd("USER " + tbUsername.Text + vbCrLf, NetStrm)
sendPOP3cmd("PASS " + tbPassword.Text + vbCrLf, NetStrm)
Data = sendPOP3cmd("STAT" + vbCrLf, NetStrm)
BreakDown = Data.Split(" ".ToCharArray())
messageCount = Convert.ToInt16(BreakDown(1))
For i = 1 To messageCount
message = New StringBuilder("")
Data = "RETR " + Convert.ToString(i) + vbCrLf
szData = _
System.Text.Encoding.ASCII.GetBytes(Data.ToCharArray())
NetStrm.Write(szData, 0, szData.Length)
szTemp = RdStrm.ReadLine()
Do While szTemp <> "."
message.Append(szTemp)
tbStatus.Text += szTemp + vbCrLf
szTemp = RdStrm.ReadLine()
Loop
If message.ToString().IndexOf("free money") > 0 Then
sendPOP3cmd("DELE " + Convert.ToString(i) + vbCrLf, _
NetStrm)
End If
Next i
clientSocket.Close()
End SubNote that the sendPOP3cmd function is not yet implemented.
This piece of code uses a different method from the code for the SMTP server to read in lines of data from the network. In this case, the ReadLine method is used for single-line responses and an iterative loop reads multiple-line responses. The chain of events is that the client reads the welcome message from the server, then sends the USER and PASS commands. After it issues the STAT command, the server stores the response in Data.
Data is in the format +OK n1 n2, where n1 is the number of messages and n2 is the total size of the messages. To extract n1 from this string, it is split into an array of strings, delimited by the space character. The second element in this array is now n1.
The program then loops through the messages, issuing the RETR command for each one. The contents of the messages returned are built up using a stringBuilder object, rather than a string, for performance purposes. When it reaches a message that has the string “free money” contained within it, it issues the DELE command.
This code implements the sendPOP3cmd function:
C#
public string sendPOP3cmd(string cmd,NetworkStream NetStrm)
{
  byte[] szData;
  string returnedData = "";
  StreamReader RdStrm= new StreamReader(NetStrm);
  szData =
System.Text.Encoding.ASCII.GetBytes(cmd.ToCharArray());
  NetStrm.Write(szData,0,szData.Length);
  returnedData = RdStrm.ReadLine();
  tbStatus.Text += cmd + "
" + returnedData + "
";
  return returnedData;
}
VB.NET
Public Function sendPOP3cmd(ByVal cmd As String, _
ByVal NetStrm As NetworkStream) As String
  Dim szData() As Byte
  Dim returnedData As String
  Dim RdStrm As StreamReader
  RdStrm = New StreamReader(NetStrm)
  szData = _
  System.Text.Encoding.ASCII.GetBytes(cmd.ToCharArray())
  NetStrm.Write(szData, 0, szData.Length)
  returnedData = RdStrm.ReadLine()
  tbStatus.Text += cmd + vbCrLf + returnedData + vbCrLf
  Return returnedData
End Function
It sends the specified command to the POP3 server and reads back data until it encounters the end-of-line marker
or vbCrLf. The data that is read back is displayed on screen and returned to the calling function.
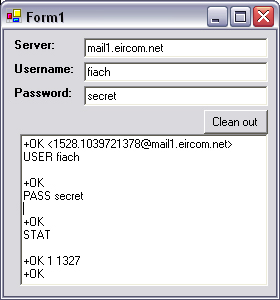
To test this application, run it from Visual Studio .NET. Type your POP3 server’s IP address into the field provided. You will also need to provide your email account username and password.
Using your email program, send an email to yourself with the words “free money” in the subject line. Press Send. Now press Clean out. If you scroll the text to the bottom, you will see the POP3 command DELE, signifying that the email was deleted as shown in Figure 5.3.
There is a built-in mechanism for Windows 2000 and later to send emails. This is called CDOSYS (Microsoft Collaboration Data Objects for Windows 2000). It is much simpler than implementing SMTP, especially where attachments and rich-text emails are involved; however, CDOSYS can only provide functionality for the client side of the email service.
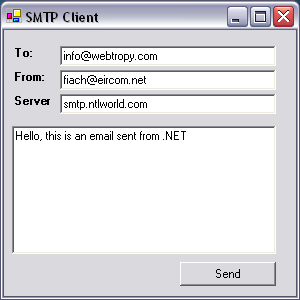
The following example shows how to send a simple email from [email protected] to [email protected] via the SMTP server smtp.ntlworld.com (change this to your own SMTP server).
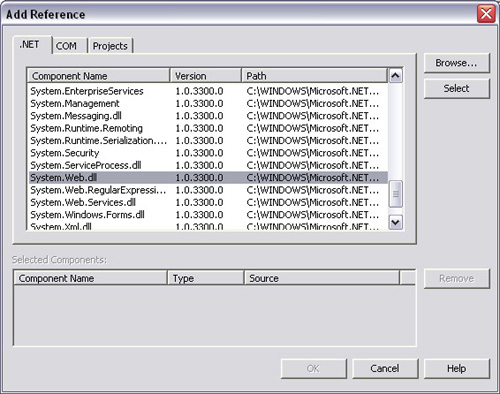
You must first make a reference to System.Web.dll before you can import the System.Web.Mail namespace. This DLL is a .NET assembly, not .COM. To do so, click Project→Add Reference, and then click on the DLL (Figure 5.4).
With that, you can draw your GUI. Drag three textboxes onto the form, name them tbTo, tbFrom, and tbServer. Drag another textbox onto the form, name it tbMessage, and set multiline to true. Finally, place a button on the form, and name it btnSend.
C#
using System.Web.Mail;
Imports System.Web.Mail
Now click on the Send button and type in the following code:
C#
private void btnSend_Click(object sender, System.EventArgs e)
{
        MailMessage email = new MailMessage();
        email.From = tbFrom.Text;
        email.To = tbTo.Text;
        email.Subject = "email from .NET";
        email.Body = tbMessage.Text;
        SmtpMail.SmtpServer = tbServer.Text;
        SmtpMail.Send(email);
}
VB.NET
Private Sub btnSend_Click(ByVal sender As System.Object, _
ByVal e As System.EventArgs) Handles btnSend.Click
        Dim email As New MailMessage()
        With email
            .From = tbFrom.Text
            .To = tbTo.Text
            .Subject = "email from .NET"
            .Body = tbMessage.Text
        End With
        SmtpMail.SmtpServer = tbServer.Text
        SmtpMail.Send(email)
End Sub
This code simply sets the various properties of a MailMessage object and passes it to the SmtpMail object. To test the application, run it from Visual Studio .NET. Fill in your own email address in the “To:” field, your SMTP server in the “Server” field, and then fill in whatever you wish in the other fields and press Send. A few moments later, check your email, and you should have received the message (Figure 5.5).
To elaborate on this example, let’s add an attachment box and change the format to HTML. Drag in the Open File Dialog control, name it ofdAttachment, and then add in a textbox, tbAttachment, and a button, btnAttachment.
Click on the Browse button and type the following code:
C#
private void btnBrowse_Click(object sender, System.EventArgs
e)
{
        ofdAttachment.ShowDialog();
        tbAttachment.Text = ofdAttachment.FileName;
}
VB.NET
Sub btnBrowse_Click(ByVal sender As System.Object, _
 ByVal e As System.EventArgs) Handles btnBrowse.Click
        ofdAttachment.ShowDialog()
        tbAttachment.Text = ofdAttachment.FileName
End Sub
Click on the Send button, and modify the code as follows:
C#
private void btnSend_Click(object sender, System.EventArgs e)
{
        MailMessage email = new MailMessage();
        MailAttachment fileAttachment=new
        MailAttachment(tbAttachment.Text);
        email.Priority = MailPriority.High;
        email.BodyFormat = MailFormat.Html;
        email.From = tbFrom.Text;
        email.To = tbTo.Text;
        email.Subject = "email from .NET";
        email.Body = tbMessage.Text;
        email.Attachments.Add(fileAttachment);
        SmtpMail.SmtpServer = tbServer.Text;
        SmtpMail.Send(email);
}
VB.NET
Private Sub btnSend_Click(ByVal sender As System.Object, _
ByVal e As System.EventArgs) Handles btnSend.Click
        Dim email As New MailMessage()
        Dim fileAttachment As New _
        MailAttachment(tbAttachment.Text)

        With email
            .Priority = MailPriority.High
            .BodyFormat = MailFormat.Html
            .From = tbFrom.Text
            .To = tbTo.Text
            .Subject = "email from .NET"
            .Body = "<html>" + tbMessage.Text + "</html>"
            .Attachments.Add(fileAttachment)
        End With

        SmtpMail.SmtpServer = tbServer.Text
        SmtpMail.Send(email)
End SubAnyone who is familiar with HTML will instantly notice a snag here. On a Web site, if you want to display an image, you use a piece of HTML such as <img src="picture.jpg">; however, where can HTML in an email body look for images?
First, use the following HTML to represent an in-line picture in an email, <img src="cid:picture1">, and then, before calling the send method on the system.web.mail.mailmessage object, call the following:
attachInlineFile("c:picture.jpg", "", "picture1")where c:picture.jpg is the image you wish to display.
Microsoft Outlook provides an interface to applications to access emails stored within its message store. This interface is called the mail application programming interface (MAPI), and it’s based on legacy COM interfaces, but nevertheless can still be accessed from .NET.
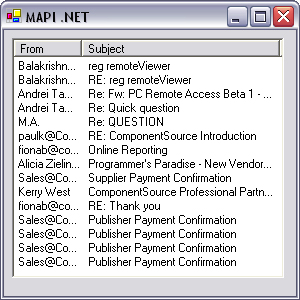
The following example lists the subject lines of all the emails in your Outlook inbox.
Start a new project as usual, draw a list view onto the form, and name it lvOutlook. Set the view to Details, and create two column headers labeled From and Subject. Click on the Project→Add Reference. Click COM, scroll down the list, and select Microsoft Outlook 10.0 Object Library, and then click Select.
Note
You do not need to have version 10.0 of the Microsoft Outlook Object Library; this demonstration program will work fine with older versions.
Add the following code:
C#
private void Form1_Load(object sender, System.EventArgs e)
{
        ListViewItem liEmail;
        Outlook.Application App;
        Outlook.MailItem Msg;
        Outlook.NameSpace NS;
        Outlook.MAPIFolder Inbox;
        Outlook.Items Items;
        int I;

        App = new Outlook.Application();
        NS= App.GetNamespace("mapi");
        Inbox = NS.GetDefaultFolder
        (Outlook.OlDefaultFolders.olFolderInbox);
        Items = Inbox.Items;
        for (I=1;I<Items.Count;I++)
        {
            Msg = (Outlook.MailItem)Items.Item(I);
            liEmail = lvOutlook.Items.Add(Msg.SenderName);
            liEmail.SubItems.Add(Msg.Subject);
        }
}Private Sub Form1_Load(ByVal sender As System.Object, _
ByVal e As System.EventArgs) Handles MyBase.Load
Dim liEmail As ListViewItem
Dim App As Outlook.Application
Dim Msg As Outlook.MailItem
Dim NS As Outlook.NameSpace
Dim Inbox As Outlook.MAPIFolder
Dim Items As Outlook.Items
Dim i As Integer
App = New Outlook.Application()
NS= App.GetNamespace("mapi")
Inbox = NS.GetDefaultFolder _
(Outlook.OlDefaultFolders.olFolderInbox)
Items = Inbox.Items
For i = 1 To Items.Count
Msg = Items.Item(i)
liEmail = lvOutlook.Items.Add(Msg.SenderName)
liEmail.SubItems.Add(Msg.Subject)
Next
End SubThe procedure for receiving emails from outlook via MAPI is relatively straightforward; however, the MAPI interface is huge and offers an extremely flexible means of leveraging Outlook’s functionality. In the above example, a new instance of Outlook Express is created, and a handle to MAPI is obtained using the GetNamespace() method. The inbox folder is then picked up and its contents examined by iterating through its Items collection. Here, only two pieces of information are extracted from each email: the name of the sender and the message subject (Figure 5.6).
This application may take a few seconds to start because Microsoft Outlook must start when the Outlook.Application() object is created.
It is good programming practice to set these types of objects to nothing or null after use to prevent hidden instances of Outlook hogging system resources.
You will note in the above example that some sender names are fully qualified email addresses, whereas some are aliases. To specify email addresses only, the following command should be used in preference to the SenderName property:
Msg.Recipients(1).Address
MAPI can be used to access most features of Microsoft Outlook, some of which may be useful for developers working on plug-in applications for Outlook.
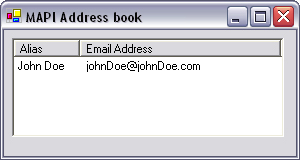
The address book can be accessed via the AddressLists collection in the MAPI namespace (NS in the example above). Each element in the collection contains an AddressEntries collection. Each entry in the latter collection contains a Name and Address property that can be used to extract email addresses and proper names from the Outlook address book.
To create an application that reads the Outlook address book, reopen the example shown above and alter the column headers to read Alias and email address. Now click on the form and enter the following code:
C#
private void Form1_Load(object sender, System.EventArgs e)
{
 ListViewItem liEmail;
 Outlook.Application App;
 Outlook.NameSpace NS;

 App = new Outlook.Application();
 NS= App.GetNamespace("mapi");
 int ListsIndexer;
 int EntriesIndexer;
 Outlook.AddressList CurrentList;
 Outlook.AddressEntry CurrentEntry;

 for(ListsIndexer = 1;
 ListsIndexer<=NS.AddressLists.Count;ListsIndexer++)
 {
  CurrentList = NS.AddressLists.Item(ListsIndexer);
  for(EntriesIndexer=1;
      EntriesIndexer<=CurrentList.AddressEntries.Count;
      EntriesIndexer++)
  {
  CurrentEntry =
  CurrentList.AddressEntries.Item(EntriesIndexer);
  liEmail = lvOutlook.Items.Add(CurrentEntry.Name);
  liEmail.SubItems.Add(CurrentEntry.Address);
  }
 }
}Private Sub Form1_Load(ByVal sender As System.Object, _
ByVal e As System.EventArgs) Handles MyBase.Load
Dim liEmail As ListViewItem
lvOutlook.View = View.Details
Dim App As Outlook.Application = New Outlook.Application()
Dim NS As Outlook.NameSpace = App.GetNamespace("mapi")
Dim ListsIndexer As Integer
Dim EntriesIndexer As Integer
Dim CurrentList As Outlook.AddressList
Dim CurrentEntry As Outlook.AddressEntry
For ListsIndexer = 1 To NS.AddressLists.Count
CurrentList = NS.AddressLists.Item(ListsIndexer)
For EntriesIndexer = 1 To CurrentList.AddressEntries.Count
CurrentEntry = _
CurrentList.AddressEntries.Item(EntriesIndexer)
liEmail = lvOutlook.Items.Add(CurrentEntry.Name)
liEmail.SubItems.Add(CurrentEntry.Address)
Next
Next
End SubTo test this code, first check that there are entries in the Outlook address book by pressing Tools→Address Book in Outlook. If there are no entries, add one by pressing the New→New Contact button. Now run the above application from Visual Studio .NET, and the contact’s name and email address will appear as shown in Figure 5.7.
The Internet message access protocol (IMAP) runs over port 143 and is described definitively in RFC 1730.
Although SMTP and POP3 are the de facto standards for email communication on the Internet, they are both very simple protocols, and some contenders exist for their place on people’s desktops. IMAP is a competing technology for POP3. IMAP is much more richly featured than POP3, but for some reason it is less popular.
Messages stored in an IMAP server can be marked as being answered, flagged, deleted, seen, draft, or recent (fetch only). In POP3, a message is either stored or not deleted. These flags help manage an IMAP account over multiple clients. If a single POP3 account is accessed by numerous clients, it is difficult to keep track of who has seen or sent what.
The protocol itself is line-based, similar to the POP3 protocol. It uses a more complicated, but flexible syntax. Following is an overview of the protocol. It is recommended that you review RFC 1730 for a definitive guide to IMAP.
To access a mailbox, the client must authenticate itself with a username and password. The client sends login <username> <password>, to which the server replies with OK LOGIN completed, assuming the username and password are correct.
To get summary information about the mailbox, the command select inbox is issued. To this the server replies * <number of messages> EXISTS.
To read back an email, the client sends the fetch <number> full command; number must be between 1 and the number received in response to the select inbox command. The server responds with the message body in RFC 822 format, followed by an end-of-message marker, OK FETCH completed.
To delete emails, the client sends the store <number> +flags deleted command. The server responds with OK +FLAGS completed.
To illustrate the protocol more simply, the following text shows the chain of events that occurs between an IMAP server and client. As before, “S” indicates a transmission from server to client, and “C” indicates a client-to-server transaction. Here, user Marc is checking his emails, when he receives 18 new messages. One of these emails is from Terry Gray, which he deletes after reading the subject line.
S:   * OK IMAP4 Service Ready
C:   a001 login marc secret
S:   a001 OK LOGIN completed
C:   a002 select inbox
S:   * 18 EXISTS
S:   * FLAGS (Answered Flagged Deleted Seen
     Draft)
S:   * 2 RECENT
S:   * OK [UNSEEN 17] Message 17 is the first
     unseen message
S:   * OK [UIDVALIDITY 3857529045] UIDs valid
S:   a002 OK [READ-WRITE] SELECT completed
C:   a004 fetch 12 rfc822.header
S:   * 12 FETCH (RFC822.HEADER {346}
S:   Date: Wed, 14 Jul 1993 02:23:25 -0700 (PDT)
S:   From: Terry Gray <[email protected]>
S:   Subject: IMAP4 WG mtg summary and minutes
S:   To: [email protected]
S:   cc: [email protected], John Klensin
     <[email protected]>
S:   Message-Id: <B27397-
     [email protected]>
S:   MIME-Version: 1.0
S:   Content-Type: TEXT/PLAIN; CHARSET=US-ASCII
S:   )
S:   a004 OK FETCH completed
C:   a005 store 12 +flags deleted
S:   * 12 FETCH (FLAGS (Seen Deleted))
S:   a005 OK +FLAGS completed
C:   a006 logout
S:   * BYE IMAP4 server terminating connection
S:   a006 OK LOGOUT completed
Because of its low prevalence in everyday computing, a full implementation of IMAP is not included here.
The network news transfer protocol (NNTP) runs over port 119 and is described definitively in RFC 977.
This protocol is used for efficient management of mailing lists and is gradually becoming obsolete and being replaced by email-based systems. It is based on the idea that many users can send and receive undirected email, which is sorted into subjects of interest.
Two basic tasks can be performed with NNTP: reading postings and creating new postings. To read posts from a newsgroup, a client connects to the news server and retrieves a list of newsgroups by using the LIST command. To select a group, the client issues the GROUP command followed by the group name. The server response to this command includes the number of messages stored for that group. To download one of these messages, the client sends the STAT command, followed by the message number. To view the downloaded message, the client can use either the HEAD or BODY command.
To better explain the procedure, in this example a client wishes to view message number 10,110 in a group named net.unix-wizards. As before, “S” indicates a transmission from server to client, and “C” indicates a client-to-server transaction:
S:      200 wombatvax news server ready - posting ok
C:      LIST
S:      215 list of newsgroups follows
S:      net.wombats 00543 00501 y
S:      net.unix-wizards 10125 10011 y
        (more information here)
S:      net.idiots 00100 00001 n
S:      .
C:      GROUP net.unix-wizards
S:      211 104 10011 10125 net.unix-wizards group
        Selected (there are 104 articles on file,
        from 10011 to 10125)
C:      STAT 10110
S:      223 10110 <[email protected]> article
        retrieved - statistics only (article 10110
        selected, its message-id is
        <[email protected]>)
C:      BODY
S:      222 10110 <[email protected]> article
        retrieved - body follows (body text here)
S:      .
The second operation that can be performed through NNTP is posting to newsgroups. Not all newsgroups allow this function, but for those that do, this is the procedure. Here the user is posting a message to a server named BANZAIVAX:
S:      200 BANZAIVAX news server ready, posting
        allowed.
C:      POST
S:      340 Continue posting; Period on a line by itself to end
C:      (transmits news article in RFC850 format)
C:      .
S:      240 Article posted successfully.
C:      QUIT
S: 205 BANZAIVAX closing connection. Goodbye.This chapter has explained how to send and receive emails from your .NET application, either from high-level code or socket-level operations. This chapter outlined the key facets of SMTP and POP3, in summary:
SMTP is used to send emails from client to server.
POP3 is used to receive emails from server to client.
POP3 can be used to delete emails from the server once received.
Chapter 12 deals with the issue of determining mail exchange servers from domain names. This helps improve the performance of email-driven applications.
The next chapter deals with the file transfer protocol (FTP). This is the de facto standard for transferring files over the Internet and is well worth knowing about.