
Chapter 12. Advanced component frameworks
- Exploring the OSGi Blueprint component framework
- Exploring the Apache Felix iPOJO component framework
- Using Declarative Services, Blueprint, and iPOJO in a single application
In the last chapter, we introduced you to component-oriented programming and how it relates to OSGi. We also introduced a lightweight component framework defined by the OSGi Alliance, called Declarative Services, which you used to recreate your paint program. Declarative Services is just one possible component framework for OSGi. In this chapter, we’ll introduce you to two more: Blueprint and iPOJO. These component frameworks provide more advanced capabilities than Declarative Services.
The numerous component frameworks for OSGi may at first seem daunting, but the good news is that you aren’t necessarily constrained to a single decision for all time. Choose whichever one seems best to you now. We’ll show at the end of this chapter that it’s possible to have different component frameworks collaborate in a single application.
Let’s get started with the Blueprint component framework.
12.1. Blueprint Container
One of the popular component frameworks in Java today is Spring Beans. The Blueprint Container specification (Blueprint for short) from the OSGi R4.2 Enterprise specification is based heavily on the Spring/OSGi integration work done in Spring Dynamic Modules. One benefit of standardizing this work is that it has resulted in several implementations of this specification from other vendors, including the Apache Aries and Eclipse Gemini projects.
It may seem confusing that the OSGi Alliance has defined two “standard” component frameworks: Declarative Services and Blueprint. There’s a method to this apparent madness. Both specifications are interoperable at execution time (see section 12.3) via services, so either can be used to implement a given service interface without impacting clients. Additionally, each specification caters to different use cases:
- Declarative Services focuses on building lightweight components with quick startup times.
- Blueprint focuses on building highly configurable enterprise-oriented applications.
As usual, one size doesn’t fit all. We see this throughout computing: often there are numerous ways to accomplish similar, but not quite identical, tasks. From the OSGi Alliance’s perspective, it makes sense to have different communities standardizing their approaches around OSGi technology, rather than trying to dictate a single approach for everyone.
Let’s look into the Blueprint architecture, after which we’ll discuss how you can build the paint program using Blueprint.
12.1.1. Blueprint architecture
Blueprint defines a component in terms of a number of elements, each of which has an underlying manager in the Blueprint component container. Each Blueprint component definition can contain zero or more of the managers listed in table 12.1.
Table 12.1. Blueprint component container managers
Let’s now look at a concrete example of Blueprint in action.
12.1.2. Providing services with Blueprint
In this section, we’ll explore how to use the Blueprint specification to build the example paint program. As with Declarative Services from the previous chapter, we’ll start by looking at the converted circle bundle. Again, this bundle no longer contains a bundle activator class, but it does contain the circle.xml file shown in the following listing.
Listing 12.1. Blueprint component definition for the circle component
<?xml version="1.0" encoding="UTF-8"?>
<blueprint xmlns="http://www.osgi.org/xmlns/blueprint/v1.0.0">
  <bean id="circle" class="org.foo.shape.circle.Circle" />

  <service id="shape" interface="org.foo.shape.SimpleShape" ref="circle">
    <service-properties>
      <entry key="simple.shape.name" value="Circle"/>
      <entry key="simple.shape.icon">
        <bean class="org.foo.shape.circle.IconFactory"
              factory-method="createIcon"/>
      </entry>
    </service-properties>
  </service>
</blueprint>
Notice that Blueprint uses a different XML syntax than Declarative Services. If you’re familiar with Spring, some of this XML should look a little familiar. For example, Blueprint uses the <bean> element to describe components, which you use here to define the circle component. You also use it again to specify a value for a service property. Spring users should also be familiar with the <entry> element, which is used by Spring and Blueprint to define the entries of map objects. You use <entry> in this case to define the service properties for your service interface. Some less familiar aspects are as follows:
- The top-level <blueprint> element (with a new namespace) as compared to the classic <beans> element from Spring
- The <service> element, which you use to publish the bean associated with the ref identifier circle into the OSGi service registry with the declared set of nested service properties
Let’s dig a little deeper into the details of precisely how you provide services using Blueprint.
Blueprint Service Attributes
At a glance, there appear to be only syntactic differences between the Declarative Services version of this component and the Blueprint one. There’s one big functional difference: the ability to define complex attribute objects. Blueprint introduces a factory bean concept, which you use in the example to create an ImageIcon service property. The code required to implement the factory bean is
public class IconFactory {
  public static ImageIcon createIcon() {
    return new ImageIcon(IconFactory.class.getResource("circle.png"));
  }
}
This factory bean allows you to provide a class to perform the nontrivial actions required to create an ImageIcon from the XML model. The factory-bean pattern also lets Blueprint create objects with nontrivial constructors and use them in the component as services, parameters, or service properties.
Service Interfaces
To provide the circle’s SimpleShape service, you directly specify the interface name as an attribute of the <service> element. Blueprint supports a couple of other options for supplying the service interface: the <interfaces> element and the auto-export attribute. To demonstrate, consider the following trivial XML bean definition:
<bean id="fooImpl" class="FooImpl"/>
This corresponds to a class definition like this:
public class FooImpl implements Foo { ... }
Given this bean and class definition, you can describe the component’s provided Foo service in any of the following equivalent ways:
-
<service id="foo" ref="fooImpl">
<interfaces>
<value>com.acme.Foo</value>
</interface>
</service> -
<service id="foo" interface="com.acme.Foo" ref="fooImpl"/> -
<service id="foo" auto-export="interfaces" ref="fooImpl"/>
The first is the longhand form of a service definition, which allows a Blueprint component to export more than one interface for a given bean. The second is the shorthand form for explicitly exporting a single service interface. The last is an automatic form, where the service manager reflectively calculates the interfaces under which the bean should be registered. For this last form, you must specify one of the following auto-export attribute values:
- disabled—No autodetection of service-interface names is undertaken; the interface names must be explicitly declared. This is the default mode.
- interfaces—The service object is registered using all of its implemented public Java interface types, including any interfaces implemented by super classes.
- class-hierarchy—The service object is registered using its actual type and any public supertypes up to the Object class (not included).
- all-classes—The service object is registered using its actual type, all public supertypes up to the Object class (not included), as well as all public interfaces implemented by the service object and any of its super classes.
Blueprint requires using Java interfaces for services, whereas basic OSGi and Declarative Services allow (but don’t recommend) you to use a Java class as a service. You may wonder why Blueprint requires services to be interfaces. Blueprint injects services into components using dynamic proxies (java.lang.reflect.Proxy), which require interfaces. We’ll discuss Blueprint’s use of proxies more later.
After you’ve described your component and the services it provides in your XML description, you need some way to tell the Blueprint implementation about it. As with Declarative Services, Blueprint introduces a new manifest header to reference the component description file. If you examine the circle bundle’s manifest, you see it has the following entry:
Bundle-Blueprint: OSGI-INF/circle.xml
Following the same approach as Declarative Services, Blueprint employs the extender pattern and probes bundles to determine if they contain this manifest header. If so, the Blueprint implementation manages the contained components; if not, the bundle is ignored.
The Bundle-Blueprint header can take one of a number of forms:
- Absolute path— The path to a resource on the bundle class path. For example: Bundle-Blueprint: OSGI-INF/circle.xml.
- Directory— The path to a directory on the bundle class path. Here, the path must end in a slash (/). For example: Bundle-Blueprint: OSGI-INF/.
- Pattern— The last component of the path specifies a filename with an optional wildcard. The part before is the path of the directory in the bundle class path. For example: Bundle-Blueprint: OSGI-INF/*.xml.
One interesting point to note is that a single logical component can be defined over many Blueprint XML files. This idea is borrowed from Spring Beans, where it’s useful if you need to switch the behavior of a component in different environments—say, for local testing versus enterprise deployment.
Recall from chapter 5 that we discussed bundle fragments. With fragments, it’s possible to define different component configurations by installing different fragments into the OSGi framework, where the host bundle is the base component bundle. In real-world scenarios, you can use this approach to specify entirely new object graphs or service relationships. This is potentially powerful but also very low level because it relies on intimate knowledge of the components being extended in this fashion. Thus you should use this feature with care.
We’ve covered the basics of providing services with Blueprint; next, let’s look at how you consume them.
12.1.3. Consuming services with Blueprint
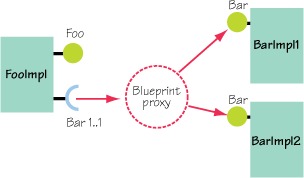
Blueprint tries to simplify dealing with the dynamic nature of OSGi services by using a proxy approach, instead of binding components directly to an OSGi service. The injected proxy is backed by actual service objects from the service registry, as shown in figure 12.1.
Figure 12.1. Blueprint injects a proxy object, which masks changes in the OSGi service registry. If the underlying service provider goes away and returns, the client code is insulated from this dynamism.
Service proxies are injected into Blueprint components using either the reference or reference-list manager. Let’s look into both.
Blueprint References A, B, C’s
The easiest way to demonstrate service reference behavior is with a simple example of injecting a service A into a client B. The following code defines the service interface:
public interface A {
  void doit();
}
And here’s the simple client:
public class B {
  private A a;
  public void setService(A a) { this.a = a }
  public void someAction() { a.doit(); }
}
In this example, you have a class B that depends on a service A, which will be injected via a setService() method. In Blueprint, you can express this dependency as
<reference id="a" interface="A"/>
<bean id="b" class="B">
  <property name="service" ref="a"/>
</bean>
Given this declaration, the Blueprint container knows it must inject an instance of A from the service registry into the component by calling the setService() method. It’s also possible for Blueprint to inject the service proxy via a constructor. The following class C has a dependency on service A, which is injected via a constructor argument:
public class C {
  private A a;
  public C(A a) { this.a = a }
  public void someAction() { a.doit(); }
}
In this case, the Blueprint service-dependency description looks like this:
<reference id="a" interface="A"/>
<bean id="c" class="C">
  <argument ref="a"/>
</bean>
What if your client code doesn’t depend on a single service instance, but instead wants to aggregate several service instances? The following example shows a class D that aggregates many A services from the OSGi service registry:
public class D {
  private List<A> list;
  public void setServices(List<A> list) { this.list = list }
  public void someAction() {
    for (A a : list) {
      a.doit();
    }
  }
}
In this case, class D is injected with a proxied list that aggregates the OSGi services. Changes in the OSGi service registry are reflected in the list. New services are appended to the end of the list, and old services are removed. The XML to describe this sort of dependency in Blueprint is as follows:
<reference-list id="a" interface="A"/>
<bean id="d" class="D">
  <property name="services" ref="a"/>
</bean>
This is similar to the previous dependency on a single service. The difference is that you replace the XML <reference/> element with the <reference-list/> element.
Blueprint uses proxies to mask OSGi service dynamism so you don’t have to worry about the concurrency issues in your code. This approach can’t solve all issues related to dynamism. For example, in this static view of services, what happens if the underlying service goes away and no replacements are available? In this case, the service proxy blocks the calling thread, waiting for a replacement service, and will eventually throw an org.osgi.framework.ServiceUnavailableException after a certain timeout period if no replacement service arrives.
This also applies to the reference-list approach of aggregating services. The Blueprint specification ensures that the hasNext() and getNext() operations are safe with respect to changes in the OSGi service registry. But if a service is removed and has-Next() has already been called, a dummy object is returned that throws Service-UnavailableExceptions when any methods are called, instead of throwing a ConcurrentModificationException during the iteration. These types of issues aren’t specific to Blueprint, but to how Blueprint handles OSGi’s service dynamism.
This covers the basics of service injection. Now let’s look at how Blueprint lets components have a dynamic view of services using reference listeners.
Reference Listeners
Reference listeners allow a component to receive services via bind and unbind callbacks. Consider the following example:
public class E {
  private volatile A a;
  public void addService(A a) { this.a = a }
  public void removeService(A a) { this.a = null }
  public void someAction() {
    A a = this.a;
    if ( a != null ) a.doit();
  }
}
In this example, class E receives callbacks via the addService() and removeService() methods when an A service is registered or unregistered in the OSGi service registry, respectively. The body of the someAction() method must guard against the fact that the service may be null. You express this sort of dependency in Blueprint XML as follows:
<bean id="e" class="E"/>
<reference id="a" interface="A">
  <reference-listener
    bind-method="addService"
    unbind-method="removeService"
    ref="e"/>
</reference>
A reference-listener callback can have any of the following signatures, which have the same semantics as their Declarative Services equivalents (from the last chapter):
-
public void <method-name>(ServiceReference) -
public void <method-name>(<parameter-type>) -
public void <method-name>(<parameter-type>, Map)
One issue to keep in mind: the Blueprint specification mandates that binding methods have public method access. Although the risk is probably minor in most scenarios, it does open Blueprint components exposed as services to the possibility that external code using reflection can inject dependencies even if a security manager is enabled. Concerned users can work around this using a nonservice helper delegate that manages the reference list—although this is a lot of work compared to marking the methods as nonpublic.
Let’s use your newfound Blueprint knowledge and continue to convert the paint program to use it.
Painting with Blueprint
Your paint frame component has a dependency on SimpleShape services, and it provides a Window service. The following listing provides its definition in the Blueprint XML syntax.
Listing 12.2. Blueprint definition of the PaintFrame component
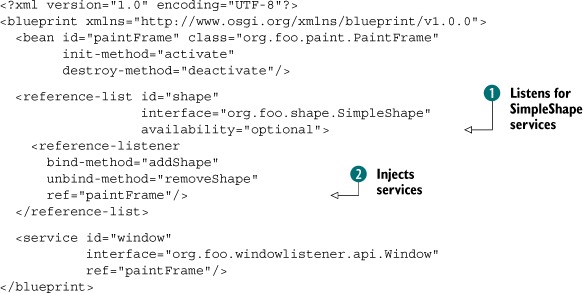
You begin by defining the paint frame component and specifying lifecycle methods to be invoked by the Blueprint container
after its properties have been injected; we’ll leave the details of these for the next section. You use the <reference-list> element at ![]() to ask the Blueprint container to listen for all SimpleShape services it finds in the OSGi service registry.
to ask the Blueprint container to listen for all SimpleShape services it finds in the OSGi service registry.
Notice that you use the availability attribute on the <reference-list> element. As with Declarative Services, Blueprint includes the notion of mandatory and optional service dependencies, where mandatory dependencies impact the component lifecycle and optional ones don’t. We’ll discuss this more when we cover the Blueprint component lifecycle. Possible values for the availability attribute are optional and mandatory; the default is mandatory.
Nested in this <reference-list> element is a <reference-listener> element ![]() . This tells the Blueprint container to inject the services into the addShape() and removeShape() methods of the paint frame component. You choose this approach because your paint frame needs to react dynamically to the
arrival and departure of shape services.
. This tells the Blueprint container to inject the services into the addShape() and removeShape() methods of the paint frame component. You choose this approach because your paint frame needs to react dynamically to the
arrival and departure of shape services.
Finally, you use the <service> element to publish the paint frame bean as a service in the OSGi service registry. Recall that you can’t register classes as services in Blueprint; you must use an interface. As a result, you must define a new interface class to provide the java.awt.Window methods you need to use in the window-listener component. You define this new interface as
public interface Window {
  void addWindowListener(WindowListener listener);
  void removeWindowListener(WindowListener listener);
}
The addShape() and removeShape() methods for the paint frame component look basically the same as the Declarative Services example, but with one minor difference. Here’s the addShape() method:
public void addShape(SimpleShape shape, Map attrs) {
  final DefaultShape delegate = new DefaultShape(shape);
  final String name = (String) attrs.get(SimpleShape.NAME_PROPERTY);
  final Icon icon = (Icon) attrs.get(SimpleShape.ICON_PROPERTY);
  m_shapes.put(name, delegate);

  SwingUtils.invokeAndWait(new Runnable() {
    public void run() {
      //...
    }
  });
}
You’re given the Icon object directly versus having to look it up from the shape’s class loader, as is required for Declarative Services.
You’ve now seen how to define a component, how to publish services, and how to consume services. The next area of the Blueprint specification we’ll explore is the component lifecycle.
12.1.4. Blueprint component lifecycle
Similar to Declarative Services, Blueprint is responsible for managing the lifecycles of its components. Blueprint also supports lifecycle callbacks, eager/lazy component activation, and access to the execution-time container environment. Additionally, Blueprint introduces some new concepts, such as service damping and grace periods. We’ll look into each of these topics in more detail, starting with general Blueprint component lifecycle management.
Component Lifecycle Management
Similar to Declarative Services, a Blueprint component’s lifecycle is controlled overall by its containing bundle’s lifecycle. For individual beans, their lifecycle is tied to the state of their service dependencies. All mandatory service dependencies must be satisfied for a bean to become enabled. When a bean is enabled, any service managers associated with it can register their associated service interfaces in the OSGi service registry.
One important point to note is that for a Blueprint container to treat a bean as dependent on a service reference, the bean must be bound to the service via an injection mechanism—either a property or a constructor argument. A reference-listener callback is not treated as an injection mechanism. So, even though a bean receives a callback when the service appears and disappears, it won’t necessarily stop providing its services unless it has the property or argument injection relationship as well.
For Declarative Services, you learned that if a mandatory service dependency is broken, the component instance immediately becomes invalid. Blueprint handles this differently via the concepts of damping and grace periods.
Service Damping
As we previously mentioned, Blueprint injects proxies into components instead of the actual service objects. These proxies are the mechanism Blueprint uses to provide service-dynamism damping; said a different way, it uses this approach to hide service dynamism from the component.
When a mandatory service is removed from the service registry, the Blueprint container first stops providing any services offered by the impacted component. Additionally, any attempts by the component to use the proxy associated with the missing service block the calling thread. Blueprint proxies block for a configurable amount of time (five minutes by default). If the timeout expires and no new service is found to replace the missing service, the proxy throws a ServiceUnavailableException. Client code should therefore be coded defensively to gracefully deal with execution-time exceptions, but this is true in general and not just in Blueprint.
The benefit of this approach is it eliminates service unpublish/publish waves rippling throughout the framework during bundle updates. But if you’re unaware, it can lead to unexpected lockups in your application, which is particularly interesting in GUI scenarios.
To configure the timeout behavior, you specify the timeout attribute on a service reference. This value specifies the number of milliseconds to wait until the service reappears. The timeout value must be equal to or greater than zero, where a timeout of zero signifies an indefinite wait. In the window-listener component, you can see this in action:
<reference id="window" interface="org.foo.windowlistener.api.Window"
 timeout="1">
Damping isn’t the only mechanism Blueprint employs to hide service dynamism; another one is grace periods.
Grace Periods
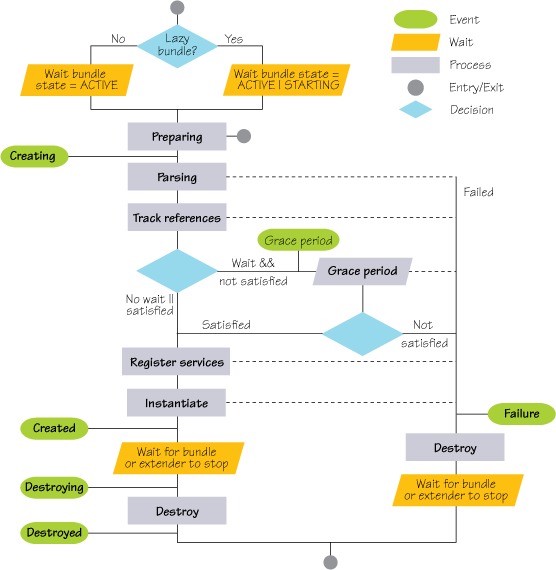
Normally, a Blueprint component container doesn’t enable its component until the component’s mandatory service dependencies are satisfied. The grace period is a period of time the component container waits during component startup for mandatory service dependencies. The grace period ends in success if all mandatory dependencies can be satisfied or in failure if its timeout is exceeded. If the grace period was a success, the component is enabled and its services are registered. If the grace period was a failure, the container is destroyed and the component isn’t created. You can see how this affects the Blueprint component lifecycle in figure 12.2.
Figure 12.2. The Blueprint component lifecycle
You can configure the grace period timeout value using directives on the Bundle-SymbolicName manifest header in the Blueprint component bundle. For example:
Bundle-SymbolicName: com.acme.foo; blueprint.graceperiod:=true;
 blueprint.timeout:=10000
Here, you set the grace period timeout to be 10 seconds. It’s also possible to completely disable the grace period by using blueprint.graceperiod:=false. In this case, the Blueprint container won’t wait for any mandatory service references to be satisfied and will create any Blueprint components contained in the bundle. This results in components being injected with service proxies, which may or may not have backing services available. For those components without backing services for mandatory dependencies, the Blueprint container won’t publish their provided services. This is similar to the case where required services depart at execution time, which means that if any threads try to use them, those threads are blocked.
Activation Callbacks
In listing 12.2, you saw that the Blueprint XML declaration allows you to define callback methods that are invoked by the Blueprint container to initialize and destroy beans when they’re enabled and disabled, respectively. In the paint frame component, you use these callbacks to control when the component is visible, as shown next.
Listing 12.3. Callback methods used in the PaintFrame application
public void activate()
{
  SwingUtils.invokeAndWait(new Runnable() {
    public void run() {
      setVisible(true);
    }
  });
}

public void deactivate()
{
  SwingUtils.invokeLater(new Runnable() {
    public void run() {
      setVisible(false);
      dispose();
    }
  });
}
You still have an issue regarding precisely when your component—in this case, the paint frame—is created. We’ll deal with that next.
Lazy VS. Eager Initialization
As with Declarative Services, Blueprint components are lazy by default, which means components aren’t created in advance to delay class loading until a published service is requested by another bundle. If you need your component to be created eagerly, you can request this behavior from the container. You declare Blueprint managers as eager or lazy using the activation attribute on the associated XML element with a Boolean argument. For example:
<bean id="foo" class="Foo" activation="eager" />
<reference id="bar" interface="Bar" activation="lazy" />
<service id="baz" interface="Baz" activation="lazy" />
The laziness of a component is also impacted by how it provides its services. If the auto-export attribute from section 12.1.2 is used, the Blueprint container must activate the underlying component to perform class loading to calculate the service interfaces.
The final lifecycle-related issue we’ll discuss is how Blueprint components gain access to the underlying OSGi execution environment.
Environment Manager
As you’ve seen so far, the Blueprint specification uses managers to control various aspects (such as services, references, and beans) of a component. Each manager defines and controls the specific lifecycle characteristics of its associated aspect. The same pattern is applied to entities outside of the component; these are called environment managers. In this case, environment managers are effectively property-value macros. They come in four types:
- blueprintContainer—Provides access to the Blueprint container object and allows various forms of component introspection
- blueprintBundle—Provides access to the Blueprint bundle’s Bundle object
- blueprintBundleContext—Provides access to the Blueprint bundle’s BundleContext object
- blueprintConverter—Provides access to an object implementing the Converter interface, which we’ll discuss shortly
Let’s look at how you use the blueprintBundleContext manager in the paint application to access the BundleContext. The WindowListener needs the bundle context so it can retrieve the system bundle to shut down the OSGi framework when the paint frame is closed. In the following snippet’s WindowListener component XML description, you use the environment manager to inject the bundle context into the Window-Listener class as a property:
<bean id="listener" class="org.foo.windowlistener.WindowListener">
  <property name="bundleContext" ref="blueprintBundleContext" />
</bean>
This follows the same pattern as the reference-injection mechanism of accessing service references. The implementation code in the WindowListener class looks like this:
private BundleContext m_context;
...
public void setBundleContext(BundleContext context) {
  m_context = context;
}
The bundle context ends up being injected using an ordinary setter method.
With this, we’ll conclude the discussion of the Blueprint version of the paint program. To see it in action, go to the chapter12/paint-example-bp/ directory of the book’s companion code. Type ant to build the example and java -jar launcher.jar bundles/ to run it. This example uses the Apache Aries (http://incubator.apache.org/aries/) implementation of the Blueprint specification.
In the final section on Blueprint, we’ll look at some other advanced features it provides.
12.1.5. Advanced Blueprint features
The features of Blueprint we’ve described so far are largely comparable to those of Declarative Services. But because Blueprint is an evolution of Spring Dynamic Modules, a lot of experience from that work was carried over into creating the Blueprint specification. This heritage has resulted in some advanced concepts, such as manager values, scopes, type converters, and metadata, which we’ll discuss in this section.
Manager Values
If you’ve developed Spring applications in the past, you likely know it’s possible to define complex object graphs using the Spring XML model. This gives software architects a number of options when composing applications, because the overall program structure doesn’t need to be hardcoded in Java. This is particularly useful for scenarios such as desktop testing versus enterprise deployment; with just a few tweaks of XML, you can wire together a raft of new functions without recompiling code.
Blueprint has inherited this ability and supports several constructs in the XML declaration:
- <value>—An object that can be directly constructed from its text string contents.
- <ref>—A reference to a top-level manager in the same Blueprint container.
- <idref>—The ID of another manager that is checked by the Blueprint container. This is the preferred mechanism to pass in a manager ID compared to an unchecked string value, which would show up later at execution time.
- <map>—A java.util.Map containing a sequence of associations between a key and an object.
- <props>—A java.util.Properties containing string keys and values.
- <list>—A java.util.List containing other values.
- <set>—A java.util.Set containing other unique values.
- <array>—A primitive array containing other values.
It’s also possible to use the various Blueprint managers we’ve been discussing inline in these constructs. Every Blueprint manager has a particular value it provides, similar to macro expansion. You’ve already seen this in action in the way reference managers give access to underlying service references, where the value of a service-reference manager is either a service object or a ServiceReference to a service object. For completeness, table 12.2 lists the value objects associated with each Blueprint manager.
Table 12.2. Blueprint manager value objects
This capability makes it possible to define reasonably sophisticated constructions in the component XML descriptions. Consider a contrived example in the following XML snippet:
<bean class="com.acme.FooImpl">
  <property name="services">
    <map>
      <entry key="bar">
        <service interface="com.acme.Bar">
          <bean class="com.acme.BarImpl"/>
        </service>
      </entry>
    </map>
  </property>
</bean>
In this example, you construct a Foo object into which you inject its services property with a Map. For the map, you set the bar key to the ServiceRegistration object for a service Bar. The Bar service is provided by an inlined bean, constructed from the BarImpl class. The FooImpl class looks something like this:
public class FooImpl {
  public void setServices(Map<String, ServiceRegistration> services) {
    for (Map.Entry<String, ServiceRegistration> e : services.getEntrySet())
    {
      String key = e.getKey();
      ServiceRegistration val = e.getValue();
      System.out.println("Registered service " + key + "=" + val);
    }
  }
}
Here, the FooImpl class is injected with a property whose value is wholly constructed from the Blueprint XML model. This is definitely a contrived example, but it shows the flexibility of the Blueprint model.
Scopes
As with manager values, Blueprint has inherited the concept of scope from Spring Dynamic Modules. A scope can be applied to bean and service managers; it defines the lifetime over which the specified manager is applicable. Blueprint defines two scopes—singleton and prototype—but they imply subtly different behavior depending on whether they’re applied to a bean or a service manager, as shown in table 12.3.
Table 12.3. How Blueprint scopes apply to different managers
|
Prototype |
||
|---|---|---|
| Bean | One instance of the bean object is constructed when the bean is activated. This pattern is usually applied to stateless services and core components. This is the default scope for bean managers. | A new instance of the bean object is constructed each time it’s requested from the Blueprint container using the getComponentInstance() method. All inlined beans (which you saw in the last subsection) are automatically prototype scope. |
| Service | A single service object is shared by all clients of the service. | A new service object is returned to each bundle, which provides a similar result if your bean implements an OSGi ServiceFactory. |
Type Converters
The Blueprint specification defines a rich inversion of control (IoC) framework for wiring objects together at execution time. Often, you need to convert between types in order to perform an injection. The most obvious example is converting from String values in XML to integer, boolean, or other basic Java types. The Blueprint specification defines a default set of type converters that can convert a String value to a target typed value.
The Blueprint specification also allows you to extend the default set of type converters. Type converters are defined in the <type-converters> XML element, which is a child element of the top-level <blueprint> element. In the <type-converters> element, you can use <bean> or <reference> elements, which let you define local converters for one particular Blueprint definition or shared converters in the OSGi service registry. Consider the following XML snippet:
<type-converters>
  <bean class="AtomicConverter">
    <argument ref="blueprintConverter"/>
  </bean>
</type-converters>
Here, you define a type converter using the class AtomicConverter that takes a reference to the top-level Blueprint converter as an argument in its constructor. A type converter doesn’t need to implement any specific interface, although it must implement two methods:
-
canConvert(Object, ReifiedType) -
convert(Object, ReifiedType)
The code for the atomic conversion class is shown in the following listing.
Listing 12.4. Converter class to coerce an Object to an AtomicReference
public class AtomicConverter {
  Converter bpc;
  public AtomicConverter(Converter bpc) { this.bpc=bpc; }

  public boolean canConvert(Object s, ReifiedType T) {
    return T.getRawClass() == AtomicReference.class

      && bpc.canConvert(s, T.getActualTypeArgument(0));
  }

  public Object convert(Object s, ReifiedType T)
    throws Exception {
    Object obj = bpc.convert(s, T.getActualTypeArgument(0));
    return new AtomicReference<Object>(obj);
  }
The canConvert() method checks whether it can convert the supplied object to the given reified type. The convert() method is called by the Blueprint container if the canConvert() method returns true. The top-level Blueprint converter is injected into the constructor of the AtomicConverter class to allow it to convert generic arguments. For example, AtomicConverter can use the top-level converter to convert a source object to an Integer and then create an AtomicReference to this converted object.
Warning
Type converters shouldn’t require type conversion in their initialization because the state of the converter isn’t well defined at this time. The Blueprint built-in type converter delegates to registered converters, so a call to the converter during construction may fail because a needed type converter may not have been registered yet.
Having defined this converter, any injection targeting an AtomicReference<T> value is automatically converted into an AtomicReference of the appropriate type using the example converter. To illustrate, consider the following code:
public class Foo<T extends Integer> {
  public Foo(AtomicReference<T> v) {}
}
Here’s the corresponding XML snippet:
<bean id="foo" class="Foo"> <argument value="6"/></bean>
This pattern of conversion is useful if you have to adapt third-party code that you can’t change, but you nonetheless want to have a common model at execution time.
Next, we’ll discuss metadata, which is the last advanced Blueprint feature before we move on to the iPOJO component framework.
Metadata
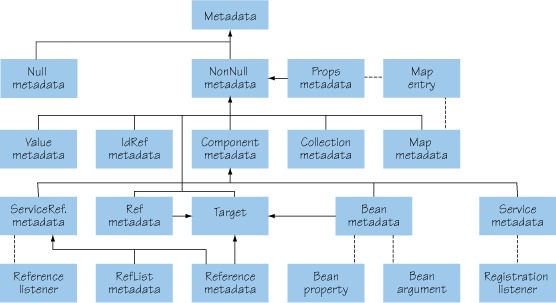
Metadata is a programmatic representation of the XML description of the Blueprint component. In Spring, the main use case for accessing metadata is to dynamically modify the model (add new elements, modify elements, and so on) at execution time. This forms a flexible component pipeline much like aspect weaving in Java code, but at the component level. But in the current Blueprint specification, this model is largely for informational purposes. Still, it’s useful because it can be used to build diagnostic tools to analyze the structure of Blueprint components, for example.
The Blueprint specification defines many classes to model the Blueprint components. We won’t list every method and its meaning here, but figure 12.3 provides a view of the Blueprint metadata interface hierarchy.
Figure 12.3. The Blueprint metadata interface hierarchy
To access the metadata model, the Blueprint specification provides the Blueprint-Container interface, which serves a purpose similar to the ComponentContext in Declarative Services. It has the following signature:
public interface BlueprintContainer {
  void Set getComponentIds();
  Object getComponentInstance(String id);
  ComponentMetadata getComponentMetadata(String id)
  Collection getMetadata(Class type);
}
This concludes our look at the OSGi Blueprint Container specification. We’ll now turn our attention to the last component framework on our list: iPOJO, from the Apache Felix project.
12.2. Apache Felix iPOJO
Outside of the OSGi Alliance, a number of different component models have been built for or ported to the OSGi environment:
- Google Guice peaberry (http://code.google.com/p/peaberry/)
- ScalaModules (http://wiki.github.com/weiglewilczek/scalamodules/)
- Apache Felix iPOJO (http://felix.apache.org/site/apache-felix-ipojo.html)
In this section, we’ll focus on iPOJO due to its novel features and because we (the authors) are all involved in the Apache Felix project. One of the main goals of iPOJO is to simplify creating dynamic, service-oriented applications in OSGi. The biggest difference between iPOJO and Declarative Services or Blueprint is its approach, which includes the following:
- Byte-code weaving—iPOJO instruments component byte code, which enables it to provide features not possible (or easily possible) with other approaches.
- Metadata format agnosticism—Whereas other approaches force you into using the single approach they support to describe your components (XML, annotations, or API), iPOJO allows you to use any of these approaches.
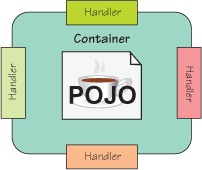
- High level of extensibility—The component management features provided by the iPOJO component container are implemented by handlers from which you can pick and choose. You can also create custom handlers for specific management tasks; see figure 12.4.
Figure 12.4. iPOJO components are an aggregation of handlers attached to the component container at execution time.
In most of the remainder of this chapter, we’ll explore the features of iPOJO, but we won’t cover everything. For starters, we’ll focus on using the annotation approach for describing components, because you’ve already seen enough XML and API. But keep in mind that everything you do with annotations you can do with the XML- and API-based description approaches—it depends on your preference.
12.2.1. Building iPOJO components
iPOJO uses byte-code manipulation to instrument component class files. This instrumentation inserts hooks into the component class file so it can be externally managed. Although iPOJO also supports execution-time byte-code instrumentation, the simplest way to get it done is with a build-time step to process your components. To achieve this, iPOJO integrates with Ant, Maven, and Eclipse. As an example, here’s the Ant task for the circle bundle:
<taskdef name="ipojo"
         classname="org.apache.felix.ipojo.task.iPojoTask"
         classpath="${lib}/felix/org.apache.felix.ipojo.ant-1.6.0.jar" />
<ipojo input="${dist}/${ant.project.name}-${version}.jar"
       metadata = "OSGI-INF/circle.xml"/>
Upon completion of this build step, iPOJO has instrumented the byte code of any components contained in the referenced bundle. The details of how iPOJO instruments the component byte code aren’t as important; but for the curious, iPOJO instruments all components in a single, generic way to enable intercepting member field and method accesses. All functionality provided by the iPOJO component framework (providing services, requiring services, and so on) is provided by handlers using these interception hooks. The hooks themselves don’t change the component behavior; the modified component classes behave the same as before and can still be use without iPOJO, although they now have some code dependencies on it.
We said you’d use annotations, but the previous Ant task references a circle.xml file. What’s the deal?
iPOJO tries to maintain a fairly strict separation of concepts between component types and component instances. In Declarative Services and Blueprint, a component description is typically a component instance description, meaning it results in a component instance. In iPOJO, component descriptions describe a component type; instances must be explicitly instantiated. As you’ll soon see, the circle.xml file doesn’t describe the component: you use it to create an instance.
In addition to instrumenting the component byte code, the iPOJO build step also converts the component description to a canonical form. This approach offers three benefits:
- If you use XML to describe your components, an XML parser is needed only during build time and not at execution time.
- If you use annotations to describe your components, they’re needed only at build time, and the resulting JAR file can still be used on an older JVM.
- Parsing the resulting descriptions at execution time is more efficient, because it’s in a simplified and less verbose form.
As with the other component frameworks, you want to achieve three main tasks with iPOJO: publishing services, consuming services, and configuring components. Let’s look into each of these.
12.2.2. Providing services with iPOJO
As we mentioned, iPOJO supports a variety of approaches for describing components. For this chapter, you’ll use annotations. As before, let’s start with the circle component; the iPOJO version of its source code is shown in the following listing. One of the benefits of using annotations is that the metadata is closely associated with the source code it’s describing.
Listing 12.5. iPOJO declaration of circle component type using annotations
@Component(immediate=true)
@Provides
public class Circle implements SimpleShape {

  @ServiceProperty(name=SimpleShape.NAME_PROPERTY)
  private String m_name = "Circle";

  @ServiceProperty(name=SimpleShape.ICON_PROPERTY)
  private ImageIcon m_icon =
    new ImageIcon(this.getClass().getResource("circle.png"));

  public void draw(Graphics2D g2, Point p) {
    ...
  }
}
You use @Component to declare the Circle class as an iPOJO component; see the sidebar “Immediate components and service properties” for why you use the immediate flag. With the @Provide annotation, you indicate that your component provides a service. You leave iPOJO the task of determining the type of the service, which defaults to all implemented interfaces (only SimpleShape in this case).
You use the @ServiceProperty annotation to declare the m_name and m_icon member fields as service properties, which iPOJO automatically attaches to your provided service and even dynamically updates if the component code changes the field values at execution time. Notice also that because you’re using annotations, which are part of the Java source code, you can use static constant fields for the attribute names, unlike in Declarative Services or Blueprint; this greatly reduces the risks of metadata rot due to changing attribute names.
Just as with Declarative Services and Blueprint, iPOJO delays class loading and component instance creation for as long as possible. Sometimes this delay is inconvenient, and you want the component created immediately. When using @ServiceProperty, iPOJO uses the member field value as a service-property value. But if component creation is deferred (which is the default behavior), iPOJO can’t get the field value because the field doesn’t yet exist.
As a result, iPOJO first registers the service with no service properties. When the service is requested by another component, then the component is instantiated, which causes the field to be initialized and added to the service. To rectify this situation, @ServiceProperty supports a value attribute to set the default value of the service property; but this works only for simple types, not for complex types like this example’s icon. To deal with complex types, you need to use the immediate attribute of @Component to tell iPOJO to instantiate the component immediately.
In listing 12.5, you use the default behavior of @Provides to tell iPOJO to register all of the component’s implemented interfaces as service interfaces, including inherited interfaces. You can also explicitly specify interfaces or classes to provide, as shown in the following snippet:
@Component
@Provides(specifications=java.awt.Window.class)
public class PaintFrame extends JFrame
  implements MouseListener, MouseMotionListener {
As with Declarative Services and Blueprint, the circle bundle no longer needs to have a bundle activator because iPOJO manages service publication. As mentioned previously, you have to modify the component’s build process to include the iPOJO Ant task, but that’s all there is to it. iPOJO takes care of everything at execution time.
Now, let’s look into consuming services.
12.2.3. Consuming services with iPOJO
iPOJO defines two mechanisms for injecting services into a component: method injection and field injection. In most cases, the two can be used interchangeably or mixed and matched. In either case, a component service dependency description can include (among others)
- Service specification— The actual service type of interest
- Optionality— Whether it’s mandatory (default) or optional
- Aggregation— Whether it’s for a single service or many
- Filter— An LDAP filter over service properties for additional constraints
- Binding policy— How dynamism is handled with respect to the component’s life-cycle (we’ll discuss this more when we look at the iPOJO component lifecycle)
- Proxy injection— Whether injected services are proxied
Given the similarities between method and field injection, the approach you choose often comes down to preference. Still, there are some things you can do only with one or the other. For example, if you want to be notified whenever a desired service becomes available, you need to use method injection to get a callback, which makes it possible to react immediately to dynamic changes. Yet it’s possible to use field injection and method injection at the same time to get the best of both worlds.
By default, iPOJO injects proxies instead of the actual service object. This creates a managed reference to the service that can be passed around internally in the component. iPOJO uses byte-code generation instead of Java’s dynamic proxy mechanism, which improves performance and avoids the limitation of working only with interfaces. For platforms like Android where dynamic byte-code generation isn’t supported, iPOJO reverts to Java’s dynamic proxies.
Note that iPOJO proxies aren’t like Blueprint proxies, in that they don’t do any sort of blocking of the calling thread if no backing service is available. Instead, by default, they hide the fact that the service is missing by using the null-object pattern, which we’ll discuss shortly. If you’d rather not use proxies, you can disable them on a dependency-by-dependency basis or completely.
We’ll first explore method injection, because it’s similar to the mechanisms you saw in Declarative Services and Blueprint.
Method Injection
iPOJO defines @Bind and @Unbind method-level annotations to declare the binding methods for a specific service dependency, where @Bind is associated with the method used to inject a service and @Unbind is associated with the method used to remove a previously injected service. These annotations can be applied to methods with any of the following signatures:
- void <method-name>()—A parameterless binding method useful as a simple notification mechanism.
- void <method-name>(ServiceReference ref)—The component receives the service reference associated with the service.
- void <method-name>(<S> svc)—The component receives the service object.
- void <method-name>(<S> svc, ServiceReference ref)—The component receives the service object and its associated service reference.
- void <method-name>(<S> svc, Map props)—The component receives the service object and its associated service properties as a java.util.Map.
- void <method-name>(<S> svc, Dictionary props)—The component receives the service object and its associated service properties as a java.util.Dictionary.
In the first two cases, you need to specify the type of the service dependency using the specification parameter in the annotation; in all the other cases, iPOJO infers the service type from the method signature. Let’s look at some examples. The binding methods for the window-listener component are as follows:
@Bind(filter="(name=main)")
protected void bindWindow(Window window) {
  m_log.log(LogService.LOG_INFO, "Bind window");
  window.addWindowListener(this);
}

@Unbind
protected void unbindWindow(Window window) {
  m_log.log(LogService.LOG_INFO, "Unbind window");
  window.removeWindowListener(this);
}
You annotate the bind and unbind methods right in the Java code. From the method signatures, iPOJO infers that the type of service dependency is java.awt.Window. The particular window service in which your window listener is interested has a name service property with the value main, to differentiate it from other window services that may be in the service registry. To make sure your window listener tracks the correct window, you use the filter attribute of the binding annotation to specify an LDAP filter matching the name service property. This particular dependency is on a single service instance, which is the default in iPOJO.
How do you declare an aggregate dependency? You can see an example in the iPOJO version of the PaintFrame shown in the following listing.
Listing 12.6. Bind and unbind methods for the iPOJO PaintFrame
@Bind(aggregate=true)
public void bindShape(SimpleShape shape, Map attrs) {
  final DefaultShape delegate = new DefaultShape(shape);
  final String name = (String) attrs.get(SimpleShape.NAME_PROPERTY);
  final Icon icon = (Icon) attrs.get(SimpleShape.ICON_PROPERTY);

  m_shapes.put(name, delegate);

  SwingUtils.invokeAndWait(new Runnable() {
    public void run() {
      ...
    }
  });
}

@Unbind
public void unbindShape(SimpleShape shape, Map attrs) {
  final String name = (String) attrs.get(SimpleShape.NAME_PROPERTY);

  DefaultShape delegate = null;

  synchronized (m_shapes) {
    delegate = (DefaultShape) m_shapes.remove(name);
  }
}
Here you declare the paint frame’s binding methods. Because the paint frame depends on all available shape services, you use the aggregate annotation attribute to inform the iPOJO framework. At execution time, iPOJO injects all discovered shape services into the component. The service properties of injected services are also needed to get the service name and icon, so you use the binding method signature that includes the service properties.
Conceptually, a bind method is paired with an unbind method. You aren’t technically required to have both, but if you do, iPOJO treats them as a logical pair. What does this mean exactly? In the previous examples, when you use an attribute (for example, filter or aggregate) on @Bind, you don’t repeat it on @Unbind. This is because iPOJO creates a union of attributes out of paired bind/unbind methods, so it isn’t necessary to repeat the attributes. If you do repeat attributes, they must have the same value, or iPOJO complains.
iPOJO automatically infers bind and unbind pairs based on method names. If the method name starts with bind or unbind, the remaining part of the method name is used as an identifier to match pairs. For example, iPOJO determines that bindFoo() and unbindFoo() are a matched pair with an identifier of Foo. Sometimes it isn’t possible to name your methods following the bind/unbind naming convention: for example, if you’re dealing with legacy or third-party components. In these cases, you can use the id annotation attribute to explicitly specify the pair’s identifier. For identifiers, you should repeat the id attribute in both the @Bind and @Unbind annotations so iPOJO can correctly pair them.
All the component frameworks we’ve covered provide mechanisms to simplify the task of accessing OSGi services; but accessing services is only one part of the challenge. Another issue is dealing with the dynamic nature of services. If services can come and go at any point, you must code a service consumer defensively. Doing so involves one or more of the following patterns:
- Using synchronization logic such as synchronized blocks, AtomicReference, or CopyOnWriteArraySet
- Using timeouts if the service removal is only temporary (during a software upgrade)
- Declaring dependencies as mandatory such that a component is shut down if its dependencies become unsatisfied during execution time
iPOJO offers another option through the use of the @Requires annotation, which we’ll look at next.
Field Injection
iPOJO defines the @Requires field-level annotation to associate a service dependency with a component class-member field, rather than a pair of binding methods. As we mentioned previously, iPOJO performs byte-code instrumentation on components to enable field-access interception. For the @Requires annotation, the iPOJO framework intercepts field access at execution time to provide components access to their required services. At a very high level, this acts as if you’ve sprinkled your code with a liberal number of AtomicRefererences. This ensures that the component always sees a consistent view of the services as they appear in the OSGi service registry at a given moment, without all the tedious boilerplate synchronization code in the source files.
The @Requires annotation also works with collections or arrays to aggregate multiple services from the OSGi service registry. In addition, it can create default objects or null objects if an optional service isn’t available, which greatly simplifies your source code because you don’t need to perform null checks throughout.
Let’s look at how you can use these features in the paint program. The Window-Listener component has an optional dependency on the OSGi Log Service. In Declarative Services and in Blueprint, you use an AtomicReference to ensure that you have a consistent view of the service in your component. In iPOJO, you declare the log service dependency on a field, like so:
@Requires(optional=true)
private LogService m_log;
To access the log service, you use the field like this:
@Override
public void windowClosed(WindowEvent evt) {
  try {
    m_log.log(LogService.LOG_INFO, "Window closed");
    m_context.getBundle(0).stop();
  } catch (BundleException e) {
  } catch (IllegalStateException e) {
  }
}
In Declarative Services and Blueprint, you have to use the AtomicReference to hold the log service and then check for null before using it. In iPOJO, you can use the log service, because optional dependencies automatically receive a null object if no real service is available. A null object implements the target service interface but doesn’t do anything meaningful.
Unless you explicitly tell it not to do so, iPOJO injects a null object in place of missing optional service dependencies. These null objects are created using a trivial mock object pattern where any method that returns void takes no action, and methods that return values return the default false, 0, or null, depending on which is appropriate.
If you’re using service proxies (which is the default), this means the service proxies are injected with null objects if a backing service isn’t available. If you aren’t using proxies, then your component is injected with a null object directly. This approach saves you from having to check for null in your component code. If you don’t desire this behavior, you can disable null object creation like this:
@Requires(nullable=false)
private Foo foo;
If you disable null objects and you’re using proxies, your component code must be prepared to catch runtime exceptions when accessing a proxy object if the backing service is missing (similar to the unavailable service exceptions in Blueprint and indicative of OSGi service dynamism in general). If you aren’t using proxies, you’ll need to check for null service values in your component code. When using proxies, it’s recommended to keep the default behavior of null object creation, because the whole point of proxies is to try to insulate the component from dynamism, but the choice is yours.
In the case where you’re using null objects without proxies, it’s possible for your component to determine whether it has a null object using instanceof, because all null objects implement the Nullable interface.
As a final comment, because a null object is just a default service implementation that doesn’t do anything, iPOJO provides one more wrinkle. You can supply your own default service implementation instead of the normal null object:
@Requires(default-implementation=org.foo.DefaultFoo)
private Foo foo;
When you do this, iPOJO constructs an instance of the DefaultFoo class and injects it into the proxy or component whenever a real Foo service is unavailable.
The @Requires annotation goes even further with respect to service dynamism. The iPOJO runtime ensures that a given field access always returns the same service instance from the moment in time a given calling thread enters a component method and uses a service until it ultimately exits the original entry method. This means that even if the calling thread somehow calls out to another component and reenters the original component, it always sees the same service instances until it exits the original component once and for all. Essentially, iPOJO associates a shadow copy of a component’s field after a thread accesses it and while the thread executes inside the component. Suppose you have a method that does something like this:
@Requires
private Foo m_foo;

public void statelessAccess() {
  m_foo.doA()
  m_foo.doB()
  m_foo.doC()
}
Accesses to m_foo always return the same service instance at the time of the first access to m_foo. This allows iPOJO to simplify the task of dealing with stateful services in the dynamic service environment provided by OSGi. This is cool, but it doesn’t mean you don’t have to worry about anything! Due to dynamism, accessing a service is similar to using remote services, which means they can throw exceptions for unknown reasons. For example, if Foo represents some device that becomes physically disconnected, its service methods are likely to throw exceptions when you access them. In short, you still need to code defensively, just as in distributed computing.
You now know how to describe your components’ provided and required services. Like the other component frameworks you’ve seen, your components’ lifecycles are controlled and managed according to these component characteristics. We’ll look more deeply at the iPOJO component lifecycle next.
12.2.4. iPOJO component lifecycle
As with the other component frameworks, iPOJO component instances are either valid or invalid depending on whether their mandatory service dependencies are satisfied. When a component is valid, iPOJO can publish its provided services in the OSGi service registry. When a component is invalid, iPOJO must remove its provided services from the service registry and release the associated component instance if one was created. At execution time, the iPOJO runtime watches for bundles containing components to be installed into the running OSGi framework. After these bundles are activated, iPOJO takes over their management.
Overall, the component lifecycle is fairly straightforward. iPOJO provides a number of additional ways to impact or hook into a component lifecycle, such as service-dependency binding policy, temporal service dependencies, lifecycle callback methods, component lifecycle participation, and bundle context access. We’ll look into each of these.
Service-Dependency Binding Policy
In addition to treating all service dependencies as either mandatory or optional, iPOJO treats them as either static or dynamic; this is called a binding policy. This concept is also present in Declarative Services and has the same meaning here. The best way to understand the difference between a static and dynamic service dependency is to consider a specific service dependency, such as an aggregate dependency on the SimpleShape service.
For a component with a dynamic, aggregate dependency, iPOJO adds services to and removes them from the component at execution time as the associated services appear and disappear in the service registry without invalidating the component instance (in other words, the component instance lifetime spans service dynamism). For a component with a static, aggregate dependency, iPOJO injects the component with a snapshot of the available services when the component instance was created. iPOJO doesn’t inject later-arriving services; and if a service being used departs, iPOJO invalidates the component instance and throws it away (the component instance lifetime doesn’t span service dynamism).
The main benefit of using static service dependencies is that your component code is simpler because it never has to worry about dealing with dynamism; but, by default, iPOJO assumes service dependencies are dynamic. You can explicitly choose which binding policy iPOJO uses for a given service dependency. The possible values are as follows:
- static—Dependencies are treated as static.
- dynamic—Dependencies are dynamic, but not with respect to service priority (default).
- dynamic-priority—Dependencies are dynamic and automatically change if a higher-priority service appears, and/or aggregate dependencies are re-sorted.
The dynamic-priority policy uses the OSGi service ranking algorithm to determine service priority, but iPOJO also allows you to specify custom sorting algorithms based on java.util.Comparators. You declare the binding policy with the policy annotation attribute on either @Requires or @Bind:
@Requires(policy=static)
private LogService m_log;
The binding policy should be determined on a case-by-case basis for each of your component’s service dependencies. This gives you pretty rich control over your component’s service dependencies, but sometimes this still isn’t sufficient—for dependencies that are potentially very short-lived, for example. For this, iPOJO supports temporal service dependencies.
Temporal Service Dependencies
Service dependencies are generally mandatory (they must be satisfied to instantiate the component) or optional (they aren’t needed to instantiate the component). But some types of service dependencies don’t fit neatly into these two categories. For example, perhaps your component needs a specific service during startup but then never needs it again. Such a dependency can’t be declared optional, because you need it at startup. At the same time, if you declare it mandatory, and it goes away later, your component instance will be invalidated even though it didn’t need the service anymore.
In this scenario, the component only has a dependency on the service at a particular point in time. For this reason, iPOJO supports temporal service dependencies, which don’t impact the overall component lifecycle like optional dependencies, but must be present when used by the component. How does iPOJO ensure this? It blocks the calling thread if a matching service isn’t available.
Declaring a temporal dependency is similar to a normal service dependency. Consider a temporal dependency for a log service:
@Requires
private LogService m_log;
Although the name is the same, this isn’t the same @Requires annotation. The original annotation is org.apache.felix.ipojo.annotations.Requires; this annotation is org.apache.felix.ipojo.handler.temporal.Requires. By using it, whenever a thread accesses m_log, it either gets a log service or blocks until one is available. You can use the timeout annotation attribute to specify a timeout value, which when expired results in a service exception. If you’d rather not receive an exception, you can use the onTimeout annotation attribute to indicate that you’d rather receive a null value, a null object, or a default implementation.
The behavior of iPOJO’s temporal dependencies is similar to the damping concept used by Blueprint. Technically, if you used temporal dependencies liberally, you’d end up with a similar effect of having all your dependencies damped. Although this is possible, it isn’t the intended use case for temporal dependencies, and we advise against it. Generally speaking, most service dependencies are either mandatory or optional. Temporal dependencies are for specific situations as described. The use of damped dependencies may result in systems that exhibit odd behavior when faced with service dynamism.
Lifecycle Callback Methods
iPOJO defines two method-level annotations for declaring lifecycle callback methods in components: @Validate and @Invalidate. The @Validate annotation is applied to component methods to be called when all mandatory service dependencies are satisfied. For example, the paint frame component uses this mechanism to make its frame visible:
@Validate
protected void activate() {
  SwingUtils.invokeAndWait(new Runnable() {
    public void run() {
      setVisible(true);
    }
  });
}
The @Invalidate annotation is applied to component methods to be called when any of the mandatory service references become unsatisfied and iPOJO is going to release the component instance. The paint frame component likewise uses this mechanism to close and dispose of its frame:
@Invalidate
protected void deactivate() {
  SwingUtils.invokeLater(new Runnable() {
    public void run() {
      setVisible(false);
      dispose();
    }
  });
}
Warning
Be careful about using services in the @Invalidate callback, because service departure is the likely cause of the invalidation. This means not all service references are necessarily usable.
Callback methods such as these are nice if you want your components hooked into their own lifecycle. But what if you want them to actively participate in it?
Component Lifecycle Participation
In addition to lifecycle-callback methods, iPOJO components can directly participate in their own instance and service-lifecycle management using the @Controller and @ServiceController annotations, respectively. Both of these annotations can be associated with a boolean member field in the component. For example:
public class MyComponent implements MyService {
  @Controller
  private boolean isValid = true;
  ...
}
This tells the iPOJO runtime to monitor this field to control the lifecycle of the component. If the component sets isValid to false, iPOJO invalidates the component instance and throws it away. You can use this approach to model exceptional conditions, such as an invalid configuration with no reasonable defaults.
@ServiceController is a little more dynamic and allows the component to control when its provided services are published:
public class MyComponent implements MyService {
  @ServiceController
  private boolean isProvided = true;
  ...
}
In this case, if the component sets isProvided to false, the iPOJO runtime removes the instance’s service from the service registry. If isProvided is set to true again, iPOJO publishes the service into the service registry again. You can specify the precise service interface using the specification annotation attribute, if the component provides more than one service. By default, @ServiceController applies to all provided services.
Bundle Context Access
As with the other component frameworks, you can access the underlying OSGi BundleContext object associated with the bundle containing the components. In iPOJO, you do so by declaring the component class with a constructor that accepts BundleContext as a parameter. Here’s an example from the window listener:
@Component(immediate=true)
public class WindowListener extends WindowAdapter {
  private BundleContext m_context;

  public WindowListener(BundleContext context) {
    m_context = context;
    m_log.log(LogService.LOG_INFO, "Created " + this);
  }
iPOJO automatically injects the BundleContext into your component when it’s instantiated. So how do you instantiate your components in iPOJO? You’ll find out next.
12.2.5. Instantiating components with iPOJO
At this point, you’ve seen how to define an iPOJO component using Java annotations, and we’ve looked into component lifecycle issues; but, surprisingly, nothing you’ve learned so far creates any component instances. Unlike Declarative Services and Blueprint, where component definitions are typically treated as configured component instances, iPOJO always treats a component definition as a type definition. The distinction is the same as between a class (type) and an object (instance).
An iPOJO component description defines a template for creating component instances; but creating an instance requires an extra step, much like using new in Java to create an object. How do you accomplish this in iPOJO? There are four possibilities:
- Static XML when the component is instrumented
- Static @Instantiate annotation in the Java source code
- Programmatically using an iPOJO component factory service
- Programmatically using the ConfigurationAdmin service
We’ll look into each of these options in this section.
XML Instance Creation
Recall earlier that when we discussed setting up the build process for an iPOJO component, you saw the following Ant task referencing a circle.xml file:
<ipojo input="${dist}/${ant.project.name}-${version}.jar"
       metadata = "OSGI-INF/circle.xml"/>
Now you can see what this file contains:
<?xml version="1.0" encoding="UTF-8"?>
<ipojo>
  <instance component="org.foo.shape.circle.Circle"/>
</ipojo>
This instructs iPOJO to create an instance of the circle component. Although the circle.xml file is contained in the same bundle as the circle component, this needn’t be the case. The beauty of iPOJO’s strict separation between component type and instance is that you can package all your component types into bundles, deploy which types you need, and then separately deploy a bundle containing an application configuration describing which instances of which components to create and how to configure them. For example, consider the following simple component:
@Component(name="hello")
@Provides
public class HelloImpl implements Hello {
  @Property
  private String name;
  public void sayHello() {
    System.out.println("Hello my name is " + name);
  }
}
This component prints a message telling you its name, where its name is injected into the member field name. You indicate this by using the iPOJO @Property annotation. Here’s how to create and configure four different instances of the component:
<instance component="hello">
   <property name="name" value="David"/>
</instance>
<instance component="hello">
   <property name="name" value="Karl"/>
</instance>
<instance component="hello">
   <property name="name" value="Richard"/>
</instance>
<instance component="hello">
   <property name="name" value="Stuart"/>
</instance>
You declare four different component instances and uniquely configure each. When the bundle containing this component configuration is activated, the iPOJO runtime finds the component type associated with the name hello and instantiates it four times, injecting the appropriate configuration into the corresponding instance. In addition to simple name-value properties, iPOJO also supports lists, maps, arrays, sets, and dictionaries as configuration properties.
This is the recommended approach for creating component instances. And remember, the XML is only parsed at build time—no XML parsing goes on at execution time. Regardless, some people wish to avoid XML, which brings us to the next approach.
@Instantiate Instance Creation
iPOJO also supports the @Instantiate annotation. It provides a way to create a component instance without XML and is largely equivalent to declaring a static singleton in Java code. You use it like this:
@Instantiate
@Component
@Provides
public class FooImpl implements Foo {
   public void doFoo() {

   // Do something...
 }
}
The @Instantiate annotation results in iPOJO creating a component instance at execution time when the containing bundle is activated and the component becomes valid. The main downside of this approach is that it hinders component reusability, because it presupposes that the number and configuration of your component instances are the same for every scenario in which they’re used. This isn’t typically the case.
Although the XML and annotation approaches likely satisfy the majority of use cases for most people, they don’t cover all possibilities. For example, what if you need to dynamically create component instances? iPOJO provides two different ways to accomplish this.
Factory Service Instance Creation
We’ve told you that iPOJO maintains a strict separation between type and instance, but we didn’t tell you how iPOJO does this. For each described component type, iPOJO registers an org.apache.felix.ipojo.Factory service in the OSGi service registry at execution time. The Factory interface is fairly straightforward and largely defines methods for creating configured component instances.
Internally, iPOJO uses these factory services to create the component instances you declare using XML or @Instantiate. To differentiate one component factory service from another, iPOJO registers them with unique factory.name service properties, which is the name of the component class by default but can be any name you choose. How does this allow you to dynamically create component instances? Because these are just OSGi services, you can look them up in the service registry and use them like any normal service. The following listing shows an example.
Listing 12.7. Creating components using the component factory service
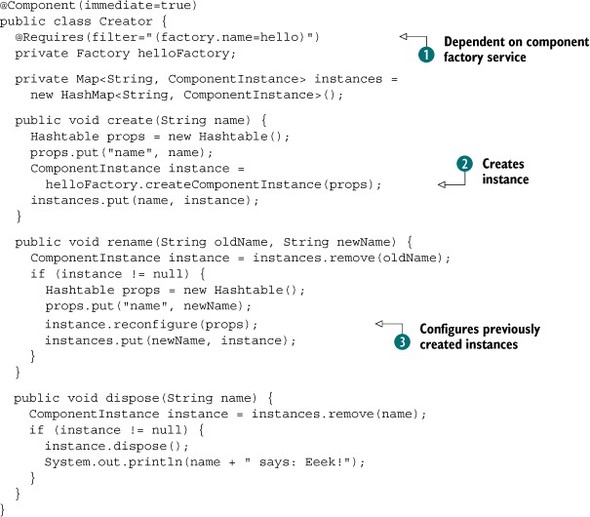
In this example, you define a component with a dependency ![]() on a component factory service for the previous trivial Hello component implementation. You specify the desired factory using the filter attribute of @Requires; in this case, you previously named the component type hello. Like any normal service dependency, the Creator component becomes valid only if a matching factory service is available.
on a component factory service for the previous trivial Hello component implementation. You specify the desired factory using the filter attribute of @Requires; in this case, you previously named the component type hello. Like any normal service dependency, the Creator component becomes valid only if a matching factory service is available.
In the create() method, you prepare a new Hello instance configuration by setting the name property to the passed-in value and then use the factory to create the instance ![]() . In the rename() method
. In the rename() method ![]() , you use the ComponentInstance object returned from the factory service to configure previously created instances. When you’re finished with the instance
you dispose of it in dispose().
, you use the ComponentInstance object returned from the factory service to configure previously created instances. When you’re finished with the instance
you dispose of it in dispose().
This approach is well-suited to pooling, allowing you to programmatically create and release component instances. If you swapped your Hello implementation for a database connection pool or a thread pool, for example, instances could be programmatically created as other components in the framework noticed degradation in application performance. Although this mechanism lets you dynamically create instances at execution time, it ties components to the iPOJO API. But this effect can be minimized: iPOJO provides another approach to eliminate this coupling.
Configuration Admin Instance Creation
The final option for creating component instances uses the ManagedServiceFactory interface from the OSGi Configuration Admin specification. This approach is fairly similar to the iPOJO factory service, except that it uses the standard OSGi interface rather than an iPOJO-specific one. To illustrate, the next listing shows the previous Creator component refactored to use the ConfigurationAdmin service instead.
Listing 12.8. Creating components using Configuration Admin
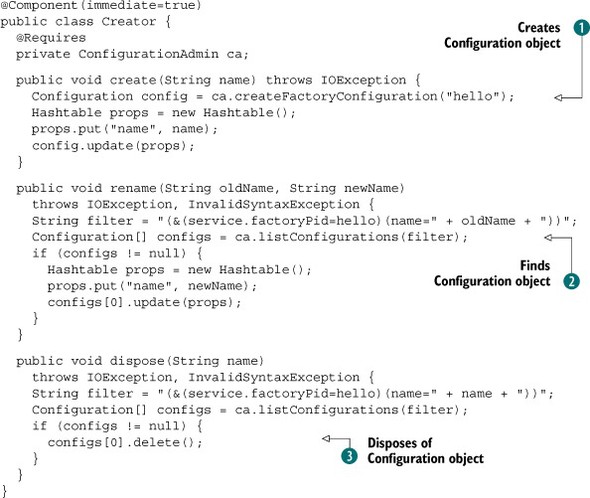
This version of the Creator component requires the Configuration Admin Service. You use it in create() to create a Configuration object for the factory associated with your component ![]() ; iPOJO automatically registers a Configuration Admin Managed-ServiceFactory for component factories and uses the factory name as its PID (see chapter 9 for a refresher on Configuration Admin). You then set the configuration property with the passed-in name and update the configuration.
This results in Configuration Admin creating an instance from the ManagedServiceFactory, which is backed by the iPOJO Factory service.
; iPOJO automatically registers a Configuration Admin Managed-ServiceFactory for component factories and uses the factory name as its PID (see chapter 9 for a refresher on Configuration Admin). You then set the configuration property with the passed-in name and update the configuration.
This results in Configuration Admin creating an instance from the ManagedServiceFactory, which is backed by the iPOJO Factory service.
To update the component, in rename() you find the Configuration object associated with the passed-in name ![]() . If it’s found, you update its name property with the specified value. Finally, in dispose() you again find the Configuration object associated with the passed-in name and delete it
. If it’s found, you update its name property with the specified value. Finally, in dispose() you again find the Configuration object associated with the passed-in name and delete it ![]() , which disposes of the instance. Although this approach is somewhat less direct than using iPOJO factory services, the component
now only depends on standard OSGi APIs.
, which disposes of the instance. Although this approach is somewhat less direct than using iPOJO factory services, the component
now only depends on standard OSGi APIs.
We haven’t touched on all of iPOJO’s features (such as composite service description, which goes beyond what we can cover in this section), but we’ve discussed most of what you’ll need to get started. To see the iPOJO version of the paint program in action, go to the chapter12/paint-example-ip/ directory of the book’s companion code. Type ant to build the example and java -jar launcher.jar bundles/ to run it.
12.3. Mix and match
In this and the preceding chapter, we’ve shown you three OSGi-based component frameworks. You may be wondering which to choose. Unfortunately, there’s no onesize-fits-all answer. You have to pick based on your requirements, but table 12.4 provides a summary of some of the features of each to make this task a little easier.
Table 12.4. Summary of component framework features
|
Feature |
Declarative Services |
Blueprint |
iPOJO |
|---|---|---|---|
| Dependency injection | |||
| Callback injection | Yes | Yes (but methods must be public) | Yes |
| Constructor injection | No | Yes | No |
| Field injection | No | No | Yes |
| Setter injection | Yes | Yes | Yes |
| Proxy injection | No | Yes | Yes |
| List injection | No | Yes | Yes |
| Nullable injection | No | No | Yes |
| Lifecycle | |||
| Callbacks (activate/deactivate) | Yes | Yes | Yes |
| Factory pattern | Yes | Yes | Yes |
| Lazy initialization | Yes | Yes | Yes |
| Damping | No | Yes | Yes |
| Field synchronization | No | No | Yes |
| Component lifecycle control | Yes | Partial | Yes |
| Service lifecycle control | No | No | Yes |
| Configuration | |||
| Property configuration | No | Yes | Yes |
| Field configuration | No | No | Yes |
| Configuration Admin | Yes | No | Yes |
| Services | |||
| Custom attribute type | No | Yes | Yes |
| Lazy initialization | Yes | Yes | Yes |
| Composite services | No | No | Yes |
| Description approach | |||
| XML | Yes | Yes | Yes |
| Java annotations | No | No | Yes |
| API | No | No | Yes |
| Nonfunctional | |||
| Multiple providers | Yes | Yes | No |
Before closing out this chapter, we’ll let you in on a little secret about OSGi component frameworks: you don’t have to choose just one. They can all work together via the OSGi service layer. To a large degree, you can use any combination of these component frameworks in your application. To show this in action, let’s convert the paint application to use the following components:
- Paint frame from Declarative Services
- Shape API from standard OSGi
- Circle from Declarative Services
- Square from Blueprint
- Triangle from iPOJO
- Window listener from iPOJO
To achieve this goal, you need to make a handful of minor changes to your components so they’ll play well together. We hear you asking, “Wait! Why do we need to change the components? I thought you said they can work together.” Technically, they can; but there are some issues due to disparate feature sets. You need to smooth over one or two discontinuities among the various component models; table 12.5 summarizes these issues.
Table 12.5. Component model discontinuities
|
ID |
Difference |
Discussion |
|---|---|---|
| 1 | Declarative Services’ simple service properties | In Declarative Service components, you use simple string service properties with class loading to load icons. This approach causes issues with Blueprint due to issue 2. |
| 2 | Blueprint’s use of proxy objects | Because Blueprint injects proxies into the callback methods, you can’t use the service object to load a resource (i.e., service. getClass().getResource() would search the proxy’s class loader, not the service object’s). |
| 3 | Blueprint’s requirement of only interfaces as services | For Blueprint, you needed to create an interface to represent the java.awt.Window API. All components need to agree on the interfaces they’ll expose. |
Practically, you need to make the following changes:
- In the SimpleShape interface, add an Icon getIcon() method and remove the ICON_PROPERTY constant that’s no longer used. Doing so bridges the gap between Declarative Services capabilities and Blueprint capabilities with respect to service attributes.
- As a consequence, each SimpleShape implementation now loads its own Image-Icon. Also, the DefaultShape class delegates the getIcon() call to the Simple-Shape implementation where possible and handles the loading of the under-construction icon when the service is no longer available.
- The PaintFrame class uses the getIcon() method on SimpleShape to load the icon versus handling this itself.
To run this combined paint program, go to the chapter12/paint-example-mixed directory of the book’s companion code. Type ant to build the example and java -jar launcher.jar bundles to execute it. All the components from the different frameworks integrate nicely into a single application.
12.4. Summary
Component frameworks can simplify the task of creating OSGi-based applications and add useful capabilities, including lazy initialization, complex service-dependency management, and configuration externalization. Often, you’ll end up having to do a lot of this work yourself, so using a component framework can free you from the drudgery.
The following list summarizes the component frameworks we’ve investigated in the past two chapters:
- Declarative Services is an OSGi specification and is the simplest framework, offering management of service dependencies and component configuration.
- Blueprint is also an OSGi specification and provides features similar to Declarative Services, but with a richer configuration model. It’s familiar to developers who come from a Spring background.
- iPOJO is an open source solution that uses byte-code instrumentation of components to offer a well-rounded and sophisticated framework for building dynamic, service-based applications.
- With any of these component frameworks, you can build rich, dynamic, OSGi-based applications, with the added bonus that they can all integrate and collaborate via the OSGi service registry.
Now we’ll switch focus from dealing with the internal structure of your applications to external concerns. Until now, we’ve assumed that applications are a set of bundles running inside an OSGi framework, but sometimes they’re more complicated. For example, you may need to be in control of how your application is launched, or you may not be able to package an entire application as bundles. What do you do then? In the next chapter, we’ll look at how to launch and/or embed an OSGi framework.