
CHAPTER
1
Getting Started with Oracle Database 12c Release 2
Welcome to Oracle Database 12c Release 2 New Features, covering Oracle’s latest release. I’ve done my best to provide as much coverage of the many new features in Oracle Database 12c Release 2 as fits in a book of this size. Oracle Database 12c Release 1 was a big release with a number of new and changed features. Oracle Database 12c Release 2 adds many more features and enhances all of the new ones introduced in Release 1!
This first chapter describes everything you need to know to get started with Oracle Database 12c Release 2. This includes the following topics:
![]() Downloading Oracle Database 12c Release 2
Downloading Oracle Database 12c Release 2
![]() Preparing the OS to install Oracle Database 12c Release 2
Preparing the OS to install Oracle Database 12c Release 2
![]() Installing Oracle Database 12c Release 2 (software-only install)
Installing Oracle Database 12c Release 2 (software-only install)
![]() Preparing to install Oracle Database 12c Release 2 Grid Infrastructure
Preparing to install Oracle Database 12c Release 2 Grid Infrastructure
![]() Staging Oracle Database 12c Release 2 Grid Infrastructure (preinstall)
Staging Oracle Database 12c Release 2 Grid Infrastructure (preinstall)
Even on a single-instance, nonclustered database, we want to use Grid Infrastructure (GI) to leverage Automatic Storage Management (ASM). As the preceding list indicates, we’re doing a software-only install of Oracle Database, so it doesn’t matter whether we set up GI before or after that. The GI setup is “preinstalled” and as such the staging of GI is much easier than in past releases. In any case, you will need to create a GI instance, with storage, before creating your first database, and you’ll find the details on that process in Chapter 2. Let’s start looking at Oracle Database 12c Release 2!
Downloading Oracle Database 12c Release 2 Components
The initial release of Oracle Database 12c Release 2 is available on both OTN (www.oracle.com/technetwork/database/enterprise-edition/downloads/index.html) and via Oracle’s eDelivery service (https://edelivery.oracle.com). Oracle Database 12c Release 2 is considered a “base release” even though it builds on the features introduced in Oracle Database 12c Release 1. Some Oracle documentation calls Oracle Database 12c Release 2 a “patch set,” but since you can do a clean install with no existing databases on your server, I’m calling it a “base release.” When patch sets come out every quarter, they will only be available via Oracle Support (https://support.oracle.com).
NOTE
If you want to experiment with the new features of Oracle Database 12c Release 2 in a preinstalled environment, you can get prebuilt virtual machines (VMs) for use with Oracle Virtual Box or Oracle VM here: www.oracle.com/technetwork/community/developer-vm/index.html. These VMs are not intended for use in a production environment.
If you get the files via the Oracle eDelivery service, here are the packages and descriptions:
![]() V839960-01 Database
V839960-01 Database
![]() V840012-01 Grid Infrastructure
V840012-01 Grid Infrastructure
![]() V840019-01 Global Service Manager
V840019-01 Global Service Manager
![]() V839967-01 64-bit Linux client
V839967-01 64-bit Linux client
![]() V839968-01 32-bit Linux client
V839968-01 32-bit Linux client
![]() V266898-01 Fusion Middleware
V266898-01 Fusion Middleware
Via OTN, here are the filenames:
![]() linuxx64_12201_database.zip Database
linuxx64_12201_database.zip Database
![]() linuxx64_12201_grid_home.zip Grid Infrastructure
linuxx64_12201_grid_home.zip Grid Infrastructure
![]() linuxx64_12201_gsm.zip Global Service Manager
linuxx64_12201_gsm.zip Global Service Manager
![]() linuxx64_12201_client.zip 64-bit Linux client
linuxx64_12201_client.zip 64-bit Linux client
![]() linuxx86_12201_client.zip 32-bit Linux client
linuxx86_12201_client.zip 32-bit Linux client
![]() linuxx64_12201_examples.zip Sample schemas and code
linuxx64_12201_examples.zip Sample schemas and code
![]() linuxx64_12201_gateways.zip Oracle Gateways
linuxx64_12201_gateways.zip Oracle Gateways
For your initial installation of Oracle Database 12c Release 2 and Grid Infrastructure, you will need only the database and grid packages.
Preparing the Operating System for Oracle Database 12c Release 2
In the examples that follow, I’ll be using V839960-01-database.zip and V840012-01-grid.zip to perform the installations. I’ll also be using Oracle Linux 7.3, although most of these guidelines will apply to all hardware and software platforms. Table 1-1 lists the relevant file systems, directories, and raw disk devices in addition to the OS default locations used for all of the examples in this chapter and throughout the book.

TABLE 1-1. Key Installation File Systems and Devices on the Linux OS
At the OS level, there are a number of steps that you need to complete before you start your Oracle Database software installation(s). If the server on which you are going to install Oracle Database 12c Release 2 is already running some other release of Oracle Database, then you might have already performed many of these steps. Regardless, it’s a best practice to review all of the requirements associated with a new release of Oracle Database and ensure that your current hardware and software meet those requirements.
The following list highlights the most important tasks that you should complete before you install Oracle Database 12c Release 2. This list isn’t exhaustive (but covers the most important things to check), and it’s certainly not hardware specific, so you need to consult the installation guide for your specific hardware and OS combination for a more detailed list of things to do. Many of the tasks will seem very familiar to those who have been working with Oracle Database for a long time.
![]() Review the Oracle Database Installation Guides (hereafter generically referred to as the install guides) and Readme files. In many cases, Oracle makes the Readme files accessible online so that you don’t even need to extract the database software to read them.
Review the Oracle Database Installation Guides (hereafter generically referred to as the install guides) and Readme files. In many cases, Oracle makes the Readme files accessible online so that you don’t even need to extract the database software to read them.
![]() Make sure your OS platform has all required updates installed.
Make sure your OS platform has all required updates installed.
![]() Make sure your platform meets the minimum hardware and software requirements. In particular, if you’re moving from a much earlier release of Oracle, make sure that the OS version is one supported by Oracle Database 12c Release 2. You can find which OS versions are supported (down to individual package versions) either from the My Oracle Support portal (using the Certification Search function on the Certifications tab) or by reviewing the install guide for your particular OS platform.
Make sure your platform meets the minimum hardware and software requirements. In particular, if you’re moving from a much earlier release of Oracle, make sure that the OS version is one supported by Oracle Database 12c Release 2. You can find which OS versions are supported (down to individual package versions) either from the My Oracle Support portal (using the Certification Search function on the Certifications tab) or by reviewing the install guide for your particular OS platform.
![]() Create the required OS groups and users. Note that a new administrative role, SYSRAC, is available to provide more granularity with respect to management of Oracle Real Application Clusters (RAC)–related components. You may wish to create a new OS group to support this new role.
Create the required OS groups and users. Note that a new administrative role, SYSRAC, is available to provide more granularity with respect to management of Oracle Real Application Clusters (RAC)–related components. You may wish to create a new OS group to support this new role.
![]() Check and configure the required kernel parameters for your OS platform. This information is platform specific and is contained in the install guide for your OS platform.
Check and configure the required kernel parameters for your OS platform. This information is platform specific and is contained in the install guide for your OS platform.
![]() Check whether any patches to Oracle Database 12c Release 2 are required prior to the install.
Check whether any patches to Oracle Database 12c Release 2 are required prior to the install.
![]() Finish the preinstall steps.
Finish the preinstall steps.
Let’s look at each of these tasks in some additional detail next.
Review the Installation Guide and Readme Files
It’s always a good practice to review the install guide a few times before you install Oracle Database, especially if you’re dealing with a new release. The install guide provides you with a concise list of steps that you should perform as you prepare to install Oracle Database 12c Release 2.

NOTE
For Oracle Database 12c Release 2, the installation guides are at http://docs.oracle.com/database/122/nav/install-and-upgrade.htm.
Additionally, you will find a Readme text file available online that you can review before you download the install media. It’s a good idea to read the online version of the Readme file because it contains the most current list of the various files in the install package and what the purpose of each is. That way, you don’t end up downloading files you don’t need. Readme files are also available in each file of the install media with specific instructions on how to install the files that are on that image. You will also often find other Readme files in other locations within the media that address specific products that you might be installing.
Finally, My Oracle Support usually provides additional documentation online that supplies the most current information with respect to any issues you might encounter when installing Oracle Database 12c Release 2. You will find a link to this My Oracle Support documentation in the Readme files both online and on the install media. It’s a really good idea to read this supplementary documentation before you start installing and upgrading databases to Oracle Database 12c Release 2.
Make Sure Your OS Platform Has All Required Updates Installed
Review the install guide for your specific OS platform to ensure that you are running on a version of that OS that supports Oracle Database 12c Release 2. Additionally, check that guide, the associated Readme files, and the My Oracle Support portal to make sure that you have installed all the OS patches and fixes that are required before installing Oracle Database 12c Release 2. On Oracle Linux, this is as easy as running yum update from a user logged in as root.
Make Sure Your Platform Meets the Minimum Requirements
Before you begin your install, make sure the platform on which you will be installing Oracle Database 12c Release 2 meets the minimum hardware and software requirements. Of course, minimum requirements are just that—minimum requirements—and don’t ensure peak performance of your databases. Total requirements of the platform with respect to disk space, memory, and CPU usage are impacted by other factors such as plans to add databases in the future, the nature of the processing that occurs in the databases, and so on.
Oracle Database 12c Release 2 is fully supported on Oracle Linux (OL) 6.x and 7.x as well as on the equivalent Red Hat Enterprise Linux (RHEL) releases. Otherwise, the general minimum server requirements vary by platform. To give you an example, the following sections outline some of the stated requirements for a Linux x86-64 (64 bit) install on Oracle Linux.
Oracle Database 12c Release 2 Software Storage Requirements
A Linux x86-64 install has the following software storage requirements for the two Oracle Database 12c Release 2 editions and Grid Infrastructure:
![]() Oracle Database Enterprise or Standard Edition: 7.5 GB
Oracle Database Enterprise or Standard Edition: 7.5 GB
![]() Oracle Grid Infrastructure: 8.6 GB
Oracle Grid Infrastructure: 8.6 GB
The space requirements for GI seem a bit steep, but keep in mind that at the heart of GI is another very specialized Oracle Database plus the software required to manage high availability (HA) configurations such as RAC and ASM. The benefits of ASM alone justify the disk space required for the software itself! Also keep in mind that the disk space requirements for the database itself, backups, redo log files, and so forth depend on your application, but to create an empty database with all of the options, it will occupy about 2 GB. Each additional database will be about the same size unless you are using Oracle’s Multitenant Architecture (container databases)—which you should also be using, but those enhancements are a topic for another chapter!
The /tmp directory requires a minimum of 1 GB of space. If you do not have enough space in /tmp, then either increase the amount of space in that file system or set the TMP or TMPDIR environment variable in the Oracle environment.
Oracle Database 12c Release 2 Memory Requirements
The Oracle Database 12c Release 2 memory requirements for a Linux x86-64 install are as follows:
![]() Oracle Database: minimum of 1 GB (recommend 2 GB of RAM or more).
Oracle Database: minimum of 1 GB (recommend 2 GB of RAM or more).
![]() Swap space:
Swap space:
![]() If you have between 1 GB and 2 GB of memory on your system, then you should allocate 1.5 times the amount of RAM for swap space.
If you have between 1 GB and 2 GB of memory on your system, then you should allocate 1.5 times the amount of RAM for swap space.
![]() If you have more than 2 GB of memory on your system, then you should allocate an amount of swap space equal to the amount of memory available on the system, up to 16 GB.
If you have more than 2 GB of memory on your system, then you should allocate an amount of swap space equal to the amount of memory available on the system, up to 16 GB.
![]() Oracle Grid Infrastructure (GI): at least 8 GB.
Oracle Grid Infrastructure (GI): at least 8 GB.
NOTE
To reiterate, these are minimum, bare-bones requirements for database memory. Typically, you will want a great deal more memory on your system. The amount of memory that you will need is very dependent on the nature and number of the databases that you intend to run on the system.
Operating System Requirements
As of this writing, Oracle Database 12c Release 2 supports the following Linux distributions:
![]() Oracle Linux 7.x and Red Hat Linux 7.x distributions for x86-64
Oracle Linux 7.x and Red Hat Linux 7.x distributions for x86-64
![]() Oracle Linux 6.4 and Red Hat Linux 6.4 distributions for x86-64
Oracle Linux 6.4 and Red Hat Linux 6.4 distributions for x86-64
![]() SUSE Linux Enterprise Server 12 SP1
SUSE Linux Enterprise Server 12 SP1
You can use a command such as uname -a, cat /etc/oracle-release, cat /etc/redhat-release, or lsb_release -id to determine the distribution and version of Linux that is installed. Here is an example of checking both the Oracle and Red Hat versions of the OS (the version number should be the same with minor differences in the details):

You will also want to determine whether the required kernel errata is installed by using the uname -r command, as shown here:
![]()
The installation guide indicates that I need to be on the Linux kernel 2.6.x (version 6.4) or later, or kernel 3.8.x (version 7.3) or later, therefore I have the correct server release installed. The current install guide (or updated Readme file) will contain the latest minimum release level required. The Linux distributions from Oracle and Red Hat differ mainly in the availability of the Unbreakable Enterprise Kernel (UEK), which as you might expect has many additional HA features. Unless you are in a 100 percent Red Hat shop or have other licensing issues, Oracle Linux is by far the best choice given that the vast majority of Oracle Database’s development and testing is performed on that platform.
For Linux distributions, a number of packages must be installed. Check the current install guide for a list of these required packages. Use the rpm command to query the system to determine if the correct packages are installed. For example, I might want to check that the correct release for binutils (binutils-2.17.50.0.6 or later as of this writing) is installed. I can use the following command to check this information:
![]()
But there is a much easier way to go about this! If you are using Oracle Linux and are signed up with the Unbreakable Linux Network (https://linux.oracle.com), you can take advantage of the Oracle preinstallation RPM. Simply subscribe to the relevant preinstallation channel and then use yum to install the correct preinstall RPM, as shown here (note that the name of the package might well change over time, so make sure you check the documentation for the correct name):

When you run this package, it creates the OS groups and users that are required, sets various kernel parameters, and performs other required preinstall actions. The installation guides provide a great deal more information on how to use this feature.
Create the Required OS Groups and Users
If this is the first install on the system you are using, then you need to create the Oracle environment. The process to do this has not changed in Oracle Database 12c Release 2. You still create (default names given in parentheses) the Oracle inventory group (oinstall), the OSDBA group (dba), the Oracle software owner (the oracle OS account), and the OSOPER group (oper). A new OS group called the RAC Administrative Group is available in Oracle Database 12c Release 2 and you may want to consider adding a new group to support the functionality of the RAC administrator. Otherwise, for a smaller infrastructure with a single DBA, the only roles you’ll probably need are the oinstall and dba groups. To further divide responsibilities, you can create the grid user to own the GI software directory.
NOTE
If you use the Oracle preinstall package, these users and groups are created for you automatically.
Configure the Kernel Parameters
On a new system, you need to set the OS kernel parameters if you have not used the Oracle RDBMS preinstall RPM referenced earlier in the chapter. Refer to the Oracle Database 12c Release 2 install guide for your specific OS for recommended minimum values. The Oracle install guide for your OS also provides you with the recommended minimums and methods to determine the current settings and reset those settings if required.
NOTE
I often find that the minimum values for the parameters recommended by Oracle quickly become insufficient for larger database installations. If you are not familiar with the operating system you are working with, you should discuss the recommended settings with an experienced OS administrator and determine if higher values are advisable.
I often find that one of the places that I run into problems is with the resource limits defined for the account that owns the Oracle database software and runs the background processes upon database startup (typically this is the oracle user). Make sure that the limits for the oracle account are set to at least the minimum values listed in the install guide.
Check for Patches
Something else to consider when installing Oracle Database 12c Release 2 is that there may be a patch set that you should apply. In fact, I’m a strong believer in keeping all production databases up to date with each quarterly Oracle Database proactive bundle patch (BP), Patch Set Update (PSU), or at a minimum, the Oracle Security Patch Update (SPU) after performing the appropriate regression testing in a QA environment. By the time you read this, there will likely be at least one quarterly BP, PSU, or SPU available for Oracle Database 12c Release 2, so consider applying the most recent version to the base database software install.
All BPs, PSUs, and SPUs can only be found on the My Oracle Support website. If applicable, you would install the BP, PSU, or SPU after you have installed the base Oracle Database software. Figure 1-1 shows the hierarchical content of Oracle quarterly patch sets.

FIGURE 1-1. Quarterly database patch content
A quarterly SPU is included in each PSU, and a BP includes everything in the PSU. Bundle patches will have additional fixes that are generally not critical but include things like optimizer fixes or enhancements. As a result, BPs may require a higher level of regression testing before deploying them in your production environment.
NOTE
Future patch sets will not have stand-alone SPU patch sets—you will be required to install a PSU or BP to get the security fixes. The SPU+PSU gives you the minimum set of patches to ensure a secure database environment with the most important database fixes that affect the vast majority of database users.
Finish the Preinstall Steps
You are almost ready to install the software for Oracle Database 12c Release 2 (database and GI). Before you can begin the install, you need to complete the following steps:
![]() Determine the location of the ORACLE_BASE directory. If you already have a previous release of Oracle Database installed on the system, then you should use the same ORACLE_BASE directory that is already defined. This is not required but highly recommended. For the examples throughout this book, this will be /u01/app/oracle:
Determine the location of the ORACLE_BASE directory. If you already have a previous release of Oracle Database installed on the system, then you should use the same ORACLE_BASE directory that is already defined. This is not required but highly recommended. For the examples throughout this book, this will be /u01/app/oracle:

![]() Ensure that you can start an X terminal session (if installing on Linux) so that you can run the Oracle Universal Installer (OUI). Alternatively, if you are using a Linux desktop on the same server where the software will be installed, you will not need a remote X Windows server.
Ensure that you can start an X terminal session (if installing on Linux) so that you can run the Oracle Universal Installer (OUI). Alternatively, if you are using a Linux desktop on the same server where the software will be installed, you will not need a remote X Windows server.
![]() Unset parameters such as ORACLE_HOME, TNS_ADMIN, and the like.
Unset parameters such as ORACLE_HOME, TNS_ADMIN, and the like.
![]() Make sure that the PATH environment variable does not include an existing $ORACLE_HOME/bin from a previous release.
Make sure that the PATH environment variable does not include an existing $ORACLE_HOME/bin from a previous release.
NOTE
In earlier Oracle Database releases, it was common to set ORACLE_HOME to the location of the new ORACLE_HOME before starting a new software install. It is now recommended that you set the ORACLE_BASE parameter instead. When ORACLE_BASE is set, the OUI creates an ORACLE_HOME path that is compliant with Oracle’s Optimal Flexible Architecture (OFA). It is recommended that you accept the ORACLE_HOME path that the OUI recommends.
Installing Oracle Database 12c Release 2
Now that you have made sure your system is ready to install Oracle Database 12c Release 2, you can begin the installation process. For purposes of demonstration, in this section I am showing the steps for installing Oracle Database 12c Release 2 Enterprise Edition on Oracle Linux x86-64. In this section you will
![]() Prepare the installation environment
Prepare the installation environment
![]() Install Oracle Database 12c Release 2 using the OUI
Install Oracle Database 12c Release 2 using the OUI
![]() Stage the Oracle Database 12c Release 2 Grid Infrastructure software
Stage the Oracle Database 12c Release 2 Grid Infrastructure software
NOTE
Oracle Database 12c Release 2 cannot be installed over an existing ORACLE_HOME location, so you will be installing into a new ORACLE_HOME.
The ZIP files are at /media/zipfiles and you are extracting them into the /install directory identified at the beginning of the chapter:

The actual database installer files are now ready to run from /install/db/12.2.0.1/database.
Prepare the Installation Environment
Before you can start the install, you first need to set up the environment so that you can run an X Windows session, and then you need to log in as the oracle user. There are many ways to run an X Windows session. In the examples that follow, I am logged directly into the server. You could use other methods, like VNC or SSH tunneling with X Server software on your laptop. As with many things, there are a number of ways to get the job done.
Before performing the install, set the ORACLE_BASE directory to /u01/app/oracle:
![]()
Now you are ready to start the Oracle Universal Installer and begin the database install.
Install Oracle Database 12c Release 2 Using the OUI
To begin the install process, cd to the directory in which you extracted the install media. From that directory, you will find the runInstaller program, which is used to start the database software install. Then, start the runInstaller program as shown in this example from a Linux OS prompt:
![]()
This launches the Oracle Universal Installer.
NOTE
Depending on your operating system software, you may need to perform additional steps before you can start the runInstaller program. Additionally, the way you actually start the runInstaller program may vary by platform. This is all documented in the install guide for your platform.
During the install, the OUI presents you with several screens for entering your install information. The look and feel of the OUI has not changed a great deal since Oracle Database 11g Release 2 or Oracle Database 12c Release 1, so if you have installed either of those releases, this process should feel familiar to you.
Figure 1-2 shows the first screen that you will see when you start the OUI, prompting you to enter your email address and your My Oracle Support password to get automated security updates. You can also choose to skip this step and move on if you prefer. Either way, click the Next button.

FIGURE 1-2. OUI Configure Security Updates (and marketing) screen
NOTE
If you do choose not to include an email address, the OUI will ask you if you are sure you wish to remain uninformed of critical security issues. You can simply click Yes and proceed with the install.
Figure 1-2 also provides a good template for the general way the rest of the OUI screens look. There are buttons at the bottom right of the screen that allow you to proceed to the next step, return to the previous step, cancel the install, or proceed with the install when you have answered the required questions. The left pane is a navigation pane that shows the list of installation steps so that you can easily see which step you are currently on, which steps you have completed, and which steps remain to be completed. A Help button is found at the bottom left, which you can click to access help with the specific screen you are on.
The next OUI step is the Select Installation Option screen, shown in Figure 1-3. From this screen you can decide what kind of install you wish to perform.

FIGURE 1-3. OUI Select Installation Option screen
The Select Installation Option screen gives you three options:
![]() Create and configure a database Installs the Oracle Database 12c Release 2 software and also creates a small Oracle database and configures the networking associated with that database. This is probably a good choice if you don’t have a PSU or BP to apply after the database software install. By creating a database, you can test the success of the database software install.
Create and configure a database Installs the Oracle Database 12c Release 2 software and also creates a small Oracle database and configures the networking associated with that database. This is probably a good choice if you don’t have a PSU or BP to apply after the database software install. By creating a database, you can test the success of the database software install.
![]() Install database software only Installs the Oracle Database 12c Release 2 software only. You would need to manually create a database afterward using the Oracle Database Creation Assistant. This is the option I typically choose if I have a PSU or BP that I want to apply. In that case, I first apply the base Oracle Database software install, then I install the BP and any other patches that might be required. After I’ve installed the patches, I then create a test database to test the database software install.
Install database software only Installs the Oracle Database 12c Release 2 software only. You would need to manually create a database afterward using the Oracle Database Creation Assistant. This is the option I typically choose if I have a PSU or BP that I want to apply. In that case, I first apply the base Oracle Database software install, then I install the BP and any other patches that might be required. After I’ve installed the patches, I then create a test database to test the database software install.
![]() Upgrade an existing database Starts the Oracle Database Upgrade Assistant, which will give you an option to upgrade an existing database to Oracle Database 12c Release 2.
Upgrade an existing database Starts the Oracle Database Upgrade Assistant, which will give you an option to upgrade an existing database to Oracle Database 12c Release 2.
As you can see, which option you should choose depends largely on whether you have PSUs or BPs that you want to apply after the initial database install. After you click Next, you will see the Select Database Installation Option screen, shown in Figure 1-4.

FIGURE 1-4. OUI Select Database Installation Option screen
The Select Database Installation Option screen enables you to select the type of install you want. You have three options to choose from:
![]() Single instance database installation Indicates that you want the installer to install a single instance of the Oracle Database software.
Single instance database installation Indicates that you want the installer to install a single instance of the Oracle Database software.
![]() Oracle Real Application Clusters database installation Indicates that you want the installer to install a RAC-compatible version of the Oracle Database software. Oracle RAC is a high-availability option that provides the ability to access an Oracle database from more than one database server.
Oracle Real Application Clusters database installation Indicates that you want the installer to install a RAC-compatible version of the Oracle Database software. Oracle RAC is a high-availability option that provides the ability to access an Oracle database from more than one database server.
![]() Oracle RAC One Node database installation Indicates that you want the installer to install a version of the Oracle Database software that will support Oracle RAC One Node. Oracle RAC One Node provides high availability for single-instance Oracle databases by providing the ability to fail over to a passive database node and also positioning your infrastructure to use Oracle RAC when the time comes.
Oracle RAC One Node database installation Indicates that you want the installer to install a version of the Oracle Database software that will support Oracle RAC One Node. Oracle RAC One Node provides high availability for single-instance Oracle databases by providing the ability to fail over to a passive database node and also positioning your infrastructure to use Oracle RAC when the time comes.
For the purposes of the most common scenario, choose “Single instance database installation.” After you choose that option and click Next, the OUI will ask you which database edition you wish to run. Oracle Database 12c Release 2 offers two different editions: Enterprise Edition and Standard Edition. On the Select Database Edition screen, shown in Figure 1-5, select the edition you are licensed for and then click Next.

FIGURE 1-5. OUI Select Database Edition screen
NOTE
You might have noticed that the number of editions of the Oracle Database that you can install has been reduced. Oracle has discontinued some of its products, such as Standard Edition Two. You should check your licensing and talk to your Oracle sales representative to determine which edition your license permits you to use.
Next, the OUI presents the Specify Installation Location screen, as shown in Figure 1-6. It is from this screen that you choose the location for ORACLE_BASE, which is the base location from which the Oracle Database software will be installed. ORACLE_BASE is part of the Oracle Optimal Flexible Architecture (OFA) feature, which supports the ability to store many different versions of the Oracle Database software on a given database server. The OUI provides a default value for the ORACLE_BASE parameter and it is the same directory we created for that purpose earlier in this chapter, so the default value is perfect!
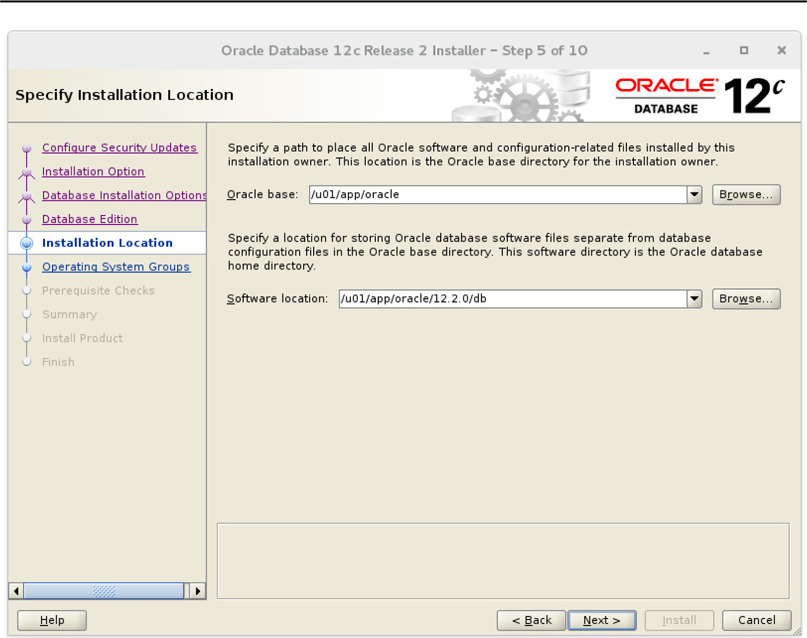
FIGURE 1-6. OUI Specify Installation Location screen
After setting the ORACLE_BASE parameter, set the ORACLE_HOME parameter. The ORACLE_HOME parameter should always start with the ORACLE_BASE parameter. The installer will provide a recommended location to install the Oracle Database software. Make sure that this location is associated with the OS file system that you want the Oracle Database software to be installed on. The OFA standard does define a particular format for the directory naming location that the installer will follow—so use caution when considering changing the default setting for ORACLE_HOME.
Once you have set the ORACLE_BASE and ORACLE_HOME locations, click Next. The OUI presents the Create Inventory screen, shown in Figure 1-7, which defines where Oracle stores the Oracle inventory. Note that this screen typically is only relevant for a system that does not already have Oracle Database software installed. The inventory contains a list of Oracle software, versions, and locations for all Oracle products installed on this server. Typically, you should not need to change anything in this screen, in which case you can just click Next to proceed to the Privileged Operating System Groups screen, shown in Figure 1-8.

FIGURE 1-7. OUI Create Inventory Directory

FIGURE 1-8. OUI Privileged Operating System Groups screen
It is in this screen that you can choose the various operating system groups that are associated with the various database privileges, such as SYSDBA, OSOPER, OSBACKUPDBA, and so on. Select the OS groups that you want to assign to the specific privileged groups and click Next. At this point, the OUI will begin to perform the prerequisite checks. If there are any OS or database settings that don’t comply with Oracle’s minimum requirements, you’ll see this on a findings screen.
Some findings can actually be corrected by the OUI. In those cases, you can click the Fix and Check Again button to correct the problem. Sometimes, you will find that the problem reported is one that can be ignored, but otherwise fix the requirements and retry the prerequisite check.
The Summary screen, shown in Figure 1-9, provides a review of the operations that the OUI is going to be completing. If you wish to change something, you can click Back and return to previous screens. If, after reviewing all of the configuration settings, you are ready to begin the database install, then click the Install button.

FIGURE 1-9. OUI database install Summary screen
The Install Product screen shown in Figure 1-10 appears and indicates the install progress. Toward the end of the product install, the OUI will present you with the Execute Configuration Scripts dialog box, as shown in Figure 1-11. This dialog box will indicate that you should run one or more scripts from the root OS account. You should run each script as root, in the order listed in the OUI screen.

FIGURE 1-10. OUI Install Product progress screen

FIGURE 1-11. Execute Configuration Scripts dialog box
When you run the root.sh script from the $ORACLE_HOME that you just created, it will ask if you want to install the Trace File Analyzer (TFA), a tool that Oracle uses for problem diagnosis. I recommend that you install the TFA when prompted. If you do not install the TFA, the root.sh terminal session will provide you with a link to the location of the TFA should you wish to install it later. Note that if you already have the TFA installed, then you won’t see this message.
After you run the configuration scripts, click the OK button in the Execute Configuration Scripts dialog box. At this point, Oracle will indicate that the install has completed successfully, as shown in the example in Figure 1-12. Click Close to complete the install. When you click Close, Oracle will give you an option to move the log file, which is currently in a temporary location, to a permanent location. If you wish to do so, select a new location to which to move the log file and then click the Move and Exit button. Otherwise, complete the install process by clicking the Exit button.

FIGURE 1-12. OUI Database install completion screen
Installing Oracle Database 12c Release 2 Grid Infrastructure
The Grid Infrastructure setup is optional but recommended even for a single-instance database given the features of ASM alone. You will find out in the sections that follow how to stage the GI installation since it is handled a bit differently from a database software installation—essentially, the GI software is prestaged, so there is no need to run a “software only” installation.
Prepare to Install Oracle Database 12c Release 2 Grid Infrastructure
As with the database part of the installation, you need to create a directory under $ORACLE_BASE for the GI home. It’s essentially another Oracle home to support the components of Grid Infrastructure—in particular, ASM. The preinstall tasks are easy in that you must ensure that the oracle user owns the GI home, as in this example that we’ll be using throughout this book:

Stage Oracle Database 12c Release 2 Grid Infrastructure
The GI software is already preinstalled as part of the ZIP file package. Therefore, before creating your ASM instance (which we’ll do in Chapter 2), all you have to do is unzip the GI package into the directory you just created in the previous section:


Deinstalling Oracle Database 12c Release 2
To deinstall Oracle Database 12c Release 2 (or earlier releases), you need to download and install the Oracle Database deinstallation tool (“deinstaller”). The deinstaller package is contained in the various install images in the Oracle Database Install file collection. To deinstall a release of Oracle Database, make sure that you download the deinstaller that is associated with the specific release that you want to remove. For example, if you want to deinstall an Oracle Database 12c Release 1 ORACLE_HOME, then you would use the deinstaller for Oracle Database 12c Release 1, and not the deinstaller for any other release.
Be careful when you use the deinstaller because it will remove configuration files contained in the ORACLE_HOME that you are going to delete. For example, assume you have two Oracle Database 12c Release 1 ORACLE_HOMEs. All of your databases might be running from the single ORACLE_HOME, but the listener that serves those databases might be configured and running out of the ORACLE_HOME you are planning on removing.
When I remove an ORACLE_HOME in Linux, I always use the lsof utility to determine if that ORACLE_HOME has any files open. I also use utilities like ps to determine if any processes are running that are using software in those ORACLE_HOME directories.
Summary
This chapter has guided you through the installation of Oracle Database 12c Release 2. You learned how to use the OUI to properly install the Oracle Database software as well as how to set up Grid Infrastructure installation. If everything goes wrong, the Oracle deinstallation utility can remove the Oracle Database software. In the next chapter we will discuss creating a new Oracle 12c Release 2 database and upgrading an existing database to Oracle Database 12c Release 2. We will also discuss downgrading from Oracle Database 12c Release 2 if that is required.