
CHAPTER
6
RMAN New Features
Oracle Recovery Manager (RMAN) has been an integral part of Oracle Database since version 10g. Previous to Oracle Database 10g, you had to use manual backup methods such as OS file copies that didn’t have the numerous recoverability and ease of maintenance options that RMAN does. Oracle Database 12c Release 2 offers several significant enhancements to RMAN, including a couple that directly support other new features such as multitenant pluggable database (PDB) archive files.
In this chapter, I’ll explain all of these new features: more flexible table recovery options, duplicating Transparent Data Encryption (TDE) databases and tablespaces, cross-platform PDB transport, and enhanced backup and recovery options for sparse databases. In the case of the new table recovery feature and PDB archive file support, I’ll provide a detailed real-world example that shows how to create a multitenant PDB archive to move a PDB from one CDB to another on the same or a different server.
Table Recovery Enhancements
Before Oracle Database 12c Release 1, if you wanted to restore individual tables from a backup, the easiest way would be to have a recent Oracle Data Pump export dump file and import it from there. The downside to doing it that way was that the export was a logical point-in-time backup and your table may have changed quite a bit since that backup. If your database was in ARCHIVELOG mode and you had an RMAN backup, you could get the table from there, but you had to restore the entire database to get back one table.
In Oracle Database 12c Release 1, RMAN was enhanced to allow selective restoration of one or more tables without having to restore the entire database. If the table is critical but has a very small footprint in your database, using RMAN with the selective restore method saves a lot of I/O and disk space. However, the table has to be restored with the same name to the same schema.
Oracle Database 12c Release 2 makes your recovery operation easier and much more flexible: you can not only restore one or more tables to a different schema but also rename the files during the same restore operation. This is very useful, for example, if the current version of the table is incomplete but can’t be renamed or moved because it’s still in production and needed for ongoing DML operations. You can restore the table from the RMAN backup to a point in time before rows were erroneously dropped to a new schema and with a different name, and then reconcile the differences between the restored table and the table currently in production.
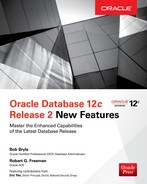
An example will show you how useful this feature is. The container database (CDB) REL2018 has two PDBs: DEV02 and DEV02A. In the PDB DEV02A, the two developer schemas are RJB and KLH. The schema RJB has a table called MY_OBJECTS. Figure 6-1 shows the location of this table when I browse the schemas in DEV02A within Oracle SQL Developer.

FIGURE 6-1. Browsing the RJB schema in Oracle SQL Developer
The REL2018 container database is in ARCHIVELOG mode, so my RMAN backups have archived redo logs to ensure that I can restore and recover the table MY_OBJECTS up to any point in time before the wrong table rows were dropped. I know that the table had all the rows earlier today, so I’ll restore and recover the table using SYSDATE – 0.5 (12 hours earlier) in the UNTIL TIME clause of the RMAN RECOVER command. Here is what the output looks like:


NOTE
You can also recover tables using RMAN and save them directly to an Oracle Data Pump dump file, bypassing the target database.
There are several things to note here:
![]() The recovery operation is very similar to any point-in-time RMAN recovery operation where RMAN creates a temporary auxiliary instance to perform the recovery, dropping the auxiliary instance and any temporary files after the recovery operation is complete.
The recovery operation is very similar to any point-in-time RMAN recovery operation where RMAN creates a temporary auxiliary instance to perform the recovery, dropping the auxiliary instance and any temporary files after the recovery operation is complete.
![]() Using RMAN to restore and recover one or more tables uses Oracle Data Pump under the covers to perform the export and import using the auxiliary instance.
Using RMAN to restore and recover one or more tables uses Oracle Data Pump under the covers to perform the export and import using the auxiliary instance.
![]() RMAN fully supports the multitenant architecture—you can back up and recover individual PDBs, but for this kind of recovery operation, you have to connect directly to the CDB when launching RMAN.
RMAN fully supports the multitenant architecture—you can back up and recover individual PDBs, but for this kind of recovery operation, you have to connect directly to the CDB when launching RMAN.
Looking at the KLH schema via SQL Developer in Figure 6-2, you can see that the MY_OBJECTS table has been successfully restored to a different schema with a different name, HER_OBJECTS.

FIGURE 6-2. Browsing the KLH schema in Oracle SQL Developer
RMAN High Availability and Security Enhancements
Using RMAN should be at the top of your list for your backup and recovery strategy. It can perform any type of backup you’ll need for any recovery scenario: full backups and two types of incremental backups supported by archived redo log files if your database is in ARCHIVELOG mode. You will often use other backup methods, such as Oracle Data Pump, for logical backups, but keep in mind that Oracle Enterprise Manager Cloud Control 13c Release 2 (Cloud Control) will use RMAN backups to recover individual tables with assistance from Data Pump. You might even make a cold backup of Oracle datafiles on occasion, but RMAN should be your primary backup and recovery tool whether you’re managing a small departmental database in a virtual machine or a cluster of Exadata servers for an international e-commerce company.
In Oracle Database 12c Release 2, RMAN has been enhanced to increase your database availability and to make it easier to back up or migrate databases across different hardware and OS platforms or even sparse databases on engineered platforms such as Exadata. I’ll provide a brief overview of these features in the following sections.
Using RMAN to Duplicate TDE Tablespaces
If you have multiple platforms and you have tablespaces encrypted with TDE, Oracle Database 12c Release 2 eases your migration effort and minimizes downtime when copying or moving such tablespaces. Since the tablespace is encrypted, you must back up and restore the TDE key as well. So, the first thing you need to do is wrap the TDE key with a passphrase at the RMAN prompt, like this:
![]()
To minimize downtime, you then perform an incremental RMAN level 0 backup with the ALLOW INCONSISTENT clause along with a series of incremental level 1 backups while the tablespace is still in READ WRITE mode. With one final incremental level 1 backup after the tablespace is put into READ ONLY mode, you will minimize the window during which the tablespace is not available for changes.
Cross-Platform Transport Using RMAN
With the global nature of large organizations and their frequent acquisitions, it’s rare for any larger organization to have the same version of Oracle Database on all of its servers, much less the same hardware and OS versions. For example, an organization may be using Intel-based servers in its data center, but its recently acquired former competitor may have all of its Oracle databases on Itanium servers, which have a different OS (but the same endian format). Because organizations in such scenarios want to maximize their return on investment from existing Oracle hardware, they demand support for cross-platform transport. Prior to Oracle Database 12c Release 1, they had to rely solely on tools such as Oracle Data Pump to migrate or copy databases.
Starting with Oracle Database 12c Release 1, you can use multitenant databases to make database migrations and cloning operations easier, but challenges with cross-platform movement of pluggable databases still exist in Release 1. To address these challenges, Oracle Database 12c Release 2 makes it much easier to use RMAN to migrate a PDB to a different platform (but with the same endian format). There are a few prerequisites for doing this kind of cross-platform migration:
![]() The COMPATIBLE parameter must be 12.2 or higher on both the source and target CDB.
The COMPATIBLE parameter must be 12.2 or higher on both the source and target CDB.
![]() You must have both the XML metadata file and an RMAN backup of the source PDB.
You must have both the XML metadata file and an RMAN backup of the source PDB.
![]() The source and target CDB must be on hardware with the same endian format.
The source and target CDB must be on hardware with the same endian format.
The steps and commands you would use to do the actual clone operation are outlined as follows:
1. Close the PDB within RMAN.
2. Use the BACKUP PLUGGABLE DATABASE command with either the FOR TRANSPORT clause or TO PLATFORM clause to indicate that the backup will be used for a cross-platform operation.
3. Copy or move both the XML metadata and the backup file to a file system accessible to the target CDB.
4. At the target CDB, run the procedure DBMS_PDB.CHECK_PLUG_COMPATIBILITY to ensure that the PDB you just backed up will successfully plug into the target CDB.
5. Run the RMAN RESTORE command with the FOREIGN PLUGGABLE DATABASE and FROM BACKUPSET clauses to plug in the PDB.
6. Open the PDB with the ALTER PLUGGABLE DATABASE … OPEN command as you would for any other PDB.
Note that the PDB is down while you’re running the BACKUP command. If you want to minimize downtime, and your CDB is in ARCHIVELOG mode, use a series of inconsistent level 0 and 1 backups while the PDB is open, and then, when the activity in the PDB is somewhat low, shut down the PDB briefly to run one more incremental level 1 backup. This will almost certainly take less time than doing a full backup when the PDB is down.
Backup and Recovery of Sparse Databases on Exadata
Sparse databases on Exadata (using disk groups specifically for storing snapshot copies of a database) have been available since Oracle Database 12c Release 1. Having sparse databases means that you can have several or even hundreds of different incarnations of a clone master that each have their own changes to the master.
What if you want to back up a sparse database on Exadata? You certainly don’t want to back up the clone master along with your own local changes to the master. Therefore, in Oracle Database 12c Release 2, RMAN supports backups of only the deltas, and you can perform sparse backups at many different levels: datafile, tablespace, or the entire database. The only thing you have to do is add the SPARSE keyword like this:
Remember, you’re not going to back up the entire USERS2 tablespace, just the changed table data in your sparse version of the database.
Cloud Control, PDB Archives, and RMAN, Oh My!
This section presents a case study that combines a new feature of RMAN with Cloud Control to create a multitenant PDB archive to move a PDB from one CDB to another on the same or a different server. (Chapter 3 covers enhancements to Oracle Multitenant and Chapter 12 covers enhancements to Cloud Control 13c.)
In the following example, I demonstrate how to use RMAN within Cloud Control to move the pluggable database DEV02 in REL2018 to REL2017.
Unplugging a PDB Using RMAN and Cloud Control
In Cloud Control, I navigate to the container database, which in this case is REL2018. From the Oracle Database drop-down list, I select Provision Pluggable Databases. This reveals several types of PDB operations, as shown in Figure 6-3.

FIGURE 6-3. Pluggable database provisioning options in Cloud Control
I select the Unplug Pluggable Databases radio button and click Launch. In step 1 of the move (unplug) operation, I specify DEV02 as the PDB to be moved, as shown in Figure 6-4, and click Next.

FIGURE 6-4. Selecting the PDB to unplug
Step 2 offers several ways to unplug, export, and move a PDB, as you can see in Figure 6-5. Oracle Database 12c Release 2 supports PDB archives (a single compressed file with all data and metadata), but not if the PDB is stored in Oracle Automatic Storage Management (ASM), so I’m selecting the next best option: a PDB metadata file and a full RMAN backup stored in an OS file system location. I’m using /u01/app/oracle/pdbrman to store both the backup DFB file and the XML metadata file. Any temporary files needed during the unplug operation will use /tmp for a working area. After selecting the PDB to be unplugged and migrated along with those OS file system locations, I click Next.

FIGURE 6-5. Specifying PDB metadata and backup location for PDB file set
Step 3, shown in Figure 6-6, gives you the option to run the scheduler job either immediately or at a later date. To move this case study along to the final step, I selected Immediately and clicked Next. Figure 6-7 shows a summary of the job I’m about to submit, giving me one more chance to change things. Since everything looks good, I click Submit.

FIGURE 6-6. Scheduling the PDB unplug job to start immediately

FIGURE 6-7. Reviewing PDB unplug parameters
I can monitor the progress of the job in real time as well. As shown in the Provisioning window in Figure 6-8, the unplug and drop of the PDB DEV02 has completed successfully with a detailed log. Looking in the location specified for the compressed RMAN backup and PDB metadata file, I can see that the two files are ready for plugging back into another container:

FIGURE 6-8. Completion status of PDB unplug

In the next section, I’ll show how to put PDB DEV02 back into a different CDB. The REL2017 CDB happens to reside on the same server, but it could easily be on another server in a different hemisphere since all I really need are those two files I created using Cloud Control and RMAN.
Plugging In a PDB Using RMAN and Cloud Control
To plug the DEV02 PDB into REL2017, I navigate to the REL2017 database instance and select Oracle Database | Provisioning/Provision Pluggable Database. As shown in Figure 6-9, I select Create New Pluggable Databases and click Launch.

FIGURE 6-9. Launching the Create New Pluggable Database PDB operation
Figure 6-10 shows the Create Pluggable Database window, where I have selected Plug an Unplugged PDB. The unplugged PDB is the XML metadata and the compressed RMAN backup created in the previous section.

FIGURE 6-10. Create Pluggable Database creation options
In step 2, shown in Figure 6-11, I specify the new PDB name along with the PDB metadata and backup files, which are still at /u01/app/oracle/pdbrman.

FIGURE 6-11. Specifying PDB file set
After clicking Next, I add the additional details regarding where the plugged-in PDB will reside (in ASM in the +DATA disk group) and where to put the temporary files (/tmp), as shown in Figure 6-12. After providing these details, I click Next.

FIGURE 6-12. Storage specification for PDB to be plugged in
Step 4 shows a scheduling screen similar to that shown earlier in Figure 6-6, with the option to start the unplug PDB operation immediately or schedule it to run later. To complete this case study, I chose to run it immediately and clicked Next. Again, I have one more chance to change the job after confirming the details, as shown in Figure 6-13. Note that the PDB Creation Options setting specifies an RMAN file set as input.

FIGURE 6-13. Reviewing parameters for PDB plug-in from RMAN datafile backup
In Figure 6-13, I click Submit to start the import process. There are many more steps when you use Cloud Control to import a PDB created with RMAN—the status window in Figure 6-14 shows all the steps that Cloud Control performs under the covers for me (and which ones didn’t need to be run!).

FIGURE 6-14. PDB provisioning summary
Looking inside the REL2017 CDB, I can see the newly plugged-in DEV02 PDB:


Summary
New RMAN features in Oracle Database 12c Release 2 not only support the new features of multitenant databases but make it even easier to recover individual tables from an RMAN backup and give the recovered table a new name and schema location.
In a heterogeneous software and hardware environment, RMAN eases the transport of databases and individual tablespaces across platforms with minimal downtime. Even TDE tablespaces don’t slow you down as long as you include the TDE key in the backup.
The case for using Enterprise Manager Cloud Control 13c Release 2 is strong even if you only need to manage a few databases and servers, given that Cloud Control automates PDB cloning and management within its user interface by leveraging both RMAN and Data Pump. You may never have to type another RMAN or Data Pump command again!