
CHAPTER
2
Installing or Upgrading to Oracle Database 12c Release 2
This chapter covers both installing Oracle Database 12c Release 2 and Grid Infrastructure from scratch and upgrading your existing Oracle databases to Oracle Database 12c Release 2. In this chapter we cover the following topics:
![]() Installing Oracle Database 12c Release 2 Grid Infrastructure (ASM)
Installing Oracle Database 12c Release 2 Grid Infrastructure (ASM)
![]() Creating a new Oracle Database 12c Release 2 database
Creating a new Oracle Database 12c Release 2 database
![]() Upgrading a non-multitenant Oracle database (including pre–Oracle Database 12c databases)
Upgrading a non-multitenant Oracle database (including pre–Oracle Database 12c databases)
![]() Upgrading a multitenant architecture Oracle database
Upgrading a multitenant architecture Oracle database
![]() Deprecated and desupported features in Oracle Database 12c Release 2
Deprecated and desupported features in Oracle Database 12c Release 2
We’ll start off this chapter by installing Oracle Database 12c Release 2 Grid Infrastructure (GI) of which ASM is the most important component, especially in a single-server environment. This deployment is required in a Real Application Clusters (RAC) environment, but even in a single-instance, single-server environment, using Automatic Storage Management (ASM) makes storage management… well, more automatic, with less DBA and OS storage administrator involvement, while at the same time ensuring the best performance from your storage subsystem.
Once ASM storage is in place, you can install one or more new databases. If you install multiple new databases, they all can share the ASM disk groups created during the Grid Infrastructure install. Ideally, all of your database upgrades would involve creating new databases on the new version and then migrating the data only using tools like Oracle Data Pump. In reality, however, few DBAs have the luxury of that option unless they are migrating the database to a new server with additional storage.
Regarding database upgrades, a bit of a disclaimer is in order. The upgrade process can be very complex because it involves a number of different permutations based on the hardware your database is running on, the Oracle Database release you are moving from, the database features you are using, security you have implemented, your tolerance for outage, and many other considerations. Because of these complexities, it’s not possible for this chapter to be anything close to a comprehensive guide to upgrading to Oracle Database 12c Release 2. Instead, this chapter provides you with some best practices with respect to upgrading your databases and gives you some idea of things you should and should not do; consider this chapter to be more of an introductory swimming lesson than a guide to crossing the English Channel. It is a place to get your feet wet, a summary of the basic methods and tasks involved in upgrading to Oracle Database 12c Release 2.
That being said, before you attempt to upgrade your production databases, please make sure you thoroughly read the Oracle Database Upgrade Guide and the Readme files associated with the database distribution and become comfortable with the entire upgrade process. Also, I recommend doing a few test upgrades in a test environment until you’re comfortable with the process.
Another important thing to note is the list of desupported features at the end of this chapter. In particular, if you are using Advanced Replication, you should know that it’s been desupported as of this release. That might well impact your database upgrade plans just a wee bit. Other changes like desupported parameters can cause upgrade problems, so make sure you carefully review the last part of this chapter.
With those caveats in mind, let’s take a look at how you can upgrade to Oracle Database 12c Release 2, starting with the installation of Grid Infrastructure!
Installing Oracle Database 12c Release 2 Grid Infrastructure
Having a robust storage environment is a foundation for any type of database, whether it be a data warehouse or an online store. Oracle ASM, part of Oracle Database 12c Grid Infrastructure (GI), provides this foundation by managing and optimizing your database storage so you don’t have to. In the following sections, we’ll pick up where we left off in Chapter 1 with the Grid Infrastructure preinstall to create the ASM instance using the Oracle Universal Installer (OUI), add the default disk group for application storage, then use the Oracle ASM Configuration Assistant (ASMCA) to create a fast recovery area to hold database backups, copies of control files, archived redo log files, and more!
Before proceeding with the ASM setup, look at Table 2-1 for the list of raw devices we’ll use for storage. Four of the raw devices are for the DATA disk group and two are for the RECO disk group. Since we’re installing GI on Oracle Linux, we can take advantage of the ASMLib driver, managed via the oracleasm command, and those device names are exposed in the directory /dev/oracleasm/disks and also identified in Table 2-1.

TABLE 2-1. ASM Raw Device and ASMLib Storage Locations
With the Grid Infrastructure software already staged in /u01/app/oracle/12.2.0/grid from Chapter 1, here are the steps we’ll use to get ASM up and running and ready for a database installation:
![]() Configure the Oracle Database 12c Grid Infrastructure software with the DATA disk group
Configure the Oracle Database 12c Grid Infrastructure software with the DATA disk group
![]() Add the RECO disk group using the remaining raw disks
Add the RECO disk group using the remaining raw disks
Configure Grid Infrastructure and Start ASM
The /u01/app/oracle/12.2.0/grid directory contains the script gridSetup.sh, which performs the same function as the very familiar runInstaller script you see when you install the database software. Start the setup from that directory as follows:

The first step of the OUI wizard, Select Configuration Option, is shown in Figure 2-1. Choose the second option, Configure Oracle Grid Infrastructure for a Standalone Server, instead of the first option for configuring a new cluster.

FIGURE 2-1. Selecting a Grid Infrastructure configuration option
Click Next to move to the Create ASM Disk Group step, shown in Figure 2-2, where you create the initial disk group (defaults to DATA). You’ll also see the available disks for new disk groups. I’ll use the first four 32 GB disks for the DATA disk group and use the remaining two for the RECO disk group that is added in the next section.

FIGURE 2-2. Selecting grid disks and redundancy for the DATA disk group

NOTE
If you do not see the disks in the expected location, click Change Discovery Path to inform the OUI of the location of your storage.
For the Redundancy setting, be sure to specify External if your disks are already striped or mirrored on a storage area network (SAN). Otherwise, if they are local physical disks, specify either Normal or High to let ASM handle the disk redundancy—Normal means that two sets of disks are paired and High means three sets of disks are paired. Since I’m relying on the SAN for mirroring, the total disk space for the DATA disk group will be approximately 125 GB. You’ll select Flex if you’re setting up an ASM disk group for an ASM Flex cluster.
Click Next to move to the Specify ASM Password step, shown in Figure 2-3. Specify a SYSASM password for the ASM instance. The SYSASM privilege is analogous to the SYSDBA privilege on a database instance.

FIGURE 2-3. Specifying a password for the SYS account in the ASM instance
Click next to move to the Management Options step, which lets you specify an Enterprise Manager Cloud Control instance to manage and monitor this ASM instance. Provide the hostname and credentials for the Cloud Control instance.
Click Next to move to the Privileged Operating System Groups step, shown in Figure 2-4, where you specify the OS groups you want to use to authorize users for the OSASM, OSDBA, and OSOPER roles within the ASM instance. If your environment is small or you don’t need fine-grained levels of responsibility, you can use the OS dba group for any or all of these.

FIGURE 2-4. Selecting OS groups for ASM administration
Click Next to move to the Specify Installation Location step, shown in Figure 2-5, where you can specify the location for ORACLE_BASE, which in this case is /u01/app/oracle/12.2.0 and is the same ORACLE_BASE for the database instance. As the installer points out, the GI home directory is the same as the software location (/u01/app/oracle/12.2.0/grid).

FIGURE 2-5. Specifying the GI installation location
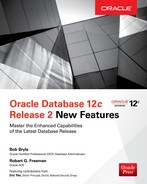
Click Next to move to Create Inventory step, shown in Figure 2-6, where you specify the location of the Oracle Inventory directory. This directory is typically located in ORACLE_BASE.
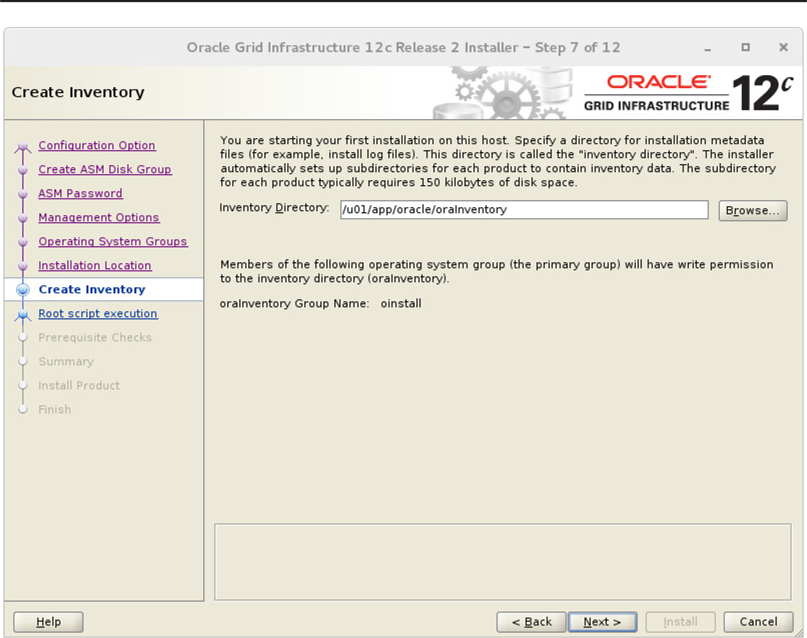
FIGURE 2-6. Choosing the Oracle inventory location
Click Next to move to the Perform Prerequisite Checks step, in which you can configure the OUI to automatically run the required scripts as the root user and alert you to any deficiencies in your system configuration. In this scenario, I’m skipping this window and I’ll run those scripts manually. Figure 2-7 shows an example result of running the prerequisite checks, alerting that the system doesn’t have enough physical memory to run GI. If you get a warning such as this, fix the issue(s) before you start the GI stack.

FIGURE 2-7. Result of running prerequisite checks
Before starting the installation process, the OUI shows you a summary of the configuration. Click the Install button to proceed. Figure 2-8 shows the progress of the installation.

FIGURE 2-8. Installation progress
After completing the first stage of the installation, the OUI specifies the two scripts that you need to run as root to complete the GI setup, as shown in Figure 2-9. After you run the scripts, click OK to finish the install via the OUI.
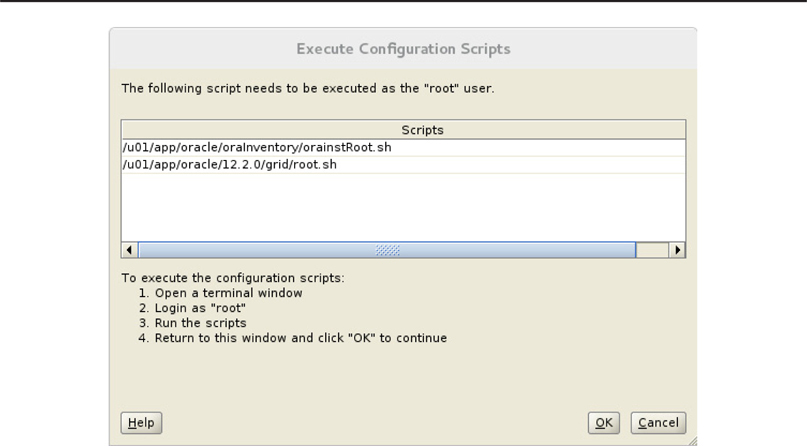
FIGURE 2-9. Scripts to run as root
An ASM instance is now running. The file /etc/oratab shows the new entry for the ASM instance:

Connecting to the ASM instance itself, you can view the size of the DATA disk group:

Next, we’ll create the RECO disk group for recovery-related files—then proceed with creating a database using the new ASM storage!
Add the RECO Disk Group Using asmca
Now that you have an ASM instance running with storage for the primary disk group DATA, you need to set up the RECO disk group using the remaining disks before creating a new database. You want to make sure you have disk space for every database’s control files, redo log file copies, and backup files. To add disks to an existing ASM instance, use the asmca utility as follows after setting up the environment for accessing the ASM instance:

The first window you see when you launch asmca is a menu of options that includes the current ASM configuration. Figure 2-10 shows the menu for the existing disk group DATA.

FIGURE 2-10. ASM Configuration Assistant Welcome screen
To add the new disk group RECO, right-click Disk Groups in the left pane and select Create. Add the remaining available disks, ASM07 and ASM08. Select both of those, enter RECO as the disk group name, and, as with the DATA disk group, specify External redundancy. Click OK to create the new disk group. Figure 2-11 shows the status of all disk groups after RECO has been created.

FIGURE 2-11. ASM Configuration Assistant disk group status
Here’s what the disk group configuration looks like from the command line:

Creating a New Oracle Database 12c Release 2 Database
This is the moment you’ve really been waiting for. Your server is ready, you have the database software ready, and you’ve just created an ASM instance to manage your storage. It’s time to create a database. And not just any database—a multitenant database. You could create a standalone database in Oracle Database 12c Release 1, and you can still create a standalone database in Oracle Database 12c Release 2. But there are no disadvantages—only advantages—to creating a multitenant database even if your container database (CDB) has only one pluggable database (PDB). In future releases of Oracle Database, you won’t be able to create standalone databases, so you might as well start taking advantage of the multitenant architecture right now.
In the following scenario you’ll use the Database Configuration Assistant (DBCA) to create a new database called REL2017 with a single pluggable database called DEV01. To start the process, open a command window on your Linux desktop, navigate to the executables in the Oracle Database software home ($ORACLE_HOME/bin), and launch dbca, as in this example:
![]()
The first step of the DBCA is shown in Figure 2-12, where you can see that I’m creating a new database. If I had already created other databases on this server, I would have the option to modify settings for another database, drop a database, or manage pluggable databases.

FIGURE 2-12. Creating a new database
Clicking Next moves you to the Select Database Creation Mode step, shown in Figure 2-13. I am specifying my container (CDB) name as REL2017, since I want to create a container database; I am creating the first pluggable database (PDB) as DEV01, although I could create an empty CDB and create the PDBs later. The DBCA tool automatically recognizes that ASM is installed and will put the data files in the DATA disk group and put all recovery-related files in the RECO disk group. In Figure 2-13, it seems like there are going to be a lot of steps (this is step 2 of 14), but if you choose “Typical configuration,” most of the intermediate steps are skipped.

FIGURE 2-13. Specifying database characteristics
Clicking Next provides the summary of what the new database will look like, as shown in Figure 2-14 for my configuration. Click Finish to proceed with database creation. Figure 2-15 shows a summary of the database that was created and where the SPFile is located for this database within ASM—remember that ASM will manage the storage for one or a thousand databases on any given server. Using ASM Flex, an ASM instance is not required on every database server.

FIGURE 2-14. Database creation preinstallation summary
FIGURE 2-15. Database creation summary
Looking at /etc/oratab, you can see the new database instance REL2017 in addition to the ASM instance created earlier in this chapter:
![]()
Since I didn’t use the Advanced mode when creating the container database, Oracle picked reasonable defaults for SGA and PGA based on my server’s memory configuration:


Upgrading to Oracle Database 12c Release 2: Traditional Architecture
In this section I am going to discuss upgrading an Oracle database that uses the traditional Oracle architecture to Oracle Database 12c Release 2. Later in this chapter, I will take the same approach to an Oracle database that is running the Oracle Multitenant architecture and provide an example of upgrading a multitenant database in place. Here are the subject areas you need to review before starting your upgrade:
![]() Upgrade paths
Upgrade paths
![]() Preparing for an upgrade
Preparing for an upgrade
![]() Performing the in-place upgrade
Performing the in-place upgrade
![]() In the event of a failure, rolling back the upgrade
In the event of a failure, rolling back the upgrade
Upgrade Paths
It’s an unfortunate fact that if you are running a version of Oracle before 10g, you are going to have quite the upgrade path ahead of you. When upgrading to Oracle Database 12c Release 2, you have a choice of two upgrade paths: a direct upgrade or an indirect upgrade. This section first reviews both direct and indirect upgrade methods, then identifies some upgrade situations we won’t be discussing in this chapter or this book, and wraps up by clarifying what the term “upgrade” encompasses in this chapter in relation to a “migration.”
Direct Upgrades
A direct upgrade refers to an upgrade in which you can use the upgrade tools, scripts, and utilities provided by Oracle to upgrade a database from a supported release level directly to Oracle Database 12c Release 2. No other tools or techniques are required. For example, upgrading from Oracle Database 12c Release 1 to Oracle Database 12c Release 2 usually involves a direct upgrade. Direct upgrades can be done either with the Oracle Database Upgrade Assistant (DBUA) tool or manually. We will discuss direct upgrades in much more detail later in this chapter, in the “Choose an Upgrade Method to Use” section.
Indirect Upgrades
An indirect upgrade refers to an upgrade in which a direct upgrade is not supported from the Oracle Database release you are running to Oracle Database 12c Release 2. Examples of indirect upgrade methods include the following:
![]() Using a series of one or more direct upgrades that moves your database up to a version that Oracle Database 12c Release 2 supports for direct upgrade. For example, upgrading from Oracle7 to Oracle9i, then from Oracle9i to Oracle Database 11g Release 1, and then from Oracle Database 11g Release 1 to Oracle Database 12c Release 2.
Using a series of one or more direct upgrades that moves your database up to a version that Oracle Database 12c Release 2 supports for direct upgrade. For example, upgrading from Oracle7 to Oracle9i, then from Oracle9i to Oracle Database 11g Release 1, and then from Oracle Database 11g Release 1 to Oracle Database 12c Release 2.
![]() Using Oracle Data Pump or the Oracle Export and Import utilities to migrate your database from an older version to Oracle Database 12c Release 2.
Using Oracle Data Pump or the Oracle Export and Import utilities to migrate your database from an older version to Oracle Database 12c Release 2.
![]() Using transportable tablespaces as an indirect upgrade path.
Using transportable tablespaces as an indirect upgrade path.
![]() Using a combination of database links and SQL commands, such as CREATE TABLE AS SELECT, to upgrade your database.
Using a combination of database links and SQL commands, such as CREATE TABLE AS SELECT, to upgrade your database.
Before you can do any kind of upgrade, though, you need to do some serious preparation work, as described in the upcoming section “Preparing for an Upgrade.”
Upgrade Situations I Won’t Be Discussing
The fact of the matter is that there are more ways to upgrade an Oracle database than those covered in this chapter, but the focus of this book is the new features in the database product. Therefore, I decided to limit the upgrade discussion to a single chapter so that I can devote the rest of the chapters to new features. The things I chose to leave out of this chapter are the following:
![]() Clusterware/RAC upgrades
Clusterware/RAC upgrades
![]() Upgrades using replication
Upgrades using replication
![]() Upgrades using standby databases
Upgrades using standby databases
You can find information on how to upgrade these configurations in the Oracle Database Upgrade Documentation or the documentation specific to the product that you want to use to perform the migration (for example, Oracle GoldenGate).
Upgrades, Migrations, and Transporting Data
This chapter is titled “Installing or Upgrading to Oracle Database 12c Release 2,” but it actually covers a number of different ways that you can take your existing data being managed by an earlier release of Oracle Database and ultimately have that data be managed by Oracle Database 12c Release 2. I use the word “upgrade” in a somewhat generic sense in this chapter to refer to all such operations, but it has a much more specific meaning. Generally, if you want your data to be managed by a newer release of Oracle Database, you may choose one of three processes:
![]() Upgrade Move management of data from an earlier release of Oracle Database to a newer release without moving the data.
Upgrade Move management of data from an earlier release of Oracle Database to a newer release without moving the data.
![]() Migration Move management of data from an earlier release of Oracle Database to a newer release by logically moving the data (typically using Oracle Data Pump). Migration also refers to moving data from a non-Oracle database to an Oracle database, but that kind of migration is beyond the scope of this book.
Migration Move management of data from an earlier release of Oracle Database to a newer release by logically moving the data (typically using Oracle Data Pump). Migration also refers to moving data from a non-Oracle database to an Oracle database, but that kind of migration is beyond the scope of this book.
![]() Transport Move management of data from an earlier release of Oracle Database to a newer release through the use of the transportable tablespace mechanism.
Transport Move management of data from an earlier release of Oracle Database to a newer release through the use of the transportable tablespace mechanism.
In this chapter, then, I use the term “upgrade” generically to encompass all three processes, such as when I discuss the specific upgrade path using an upgrade method such as the DBUA or a manual upgrade.
Preparing for an Upgrade
To quote Alexander Graham Bell, “Before anything else, preparation is the key to success.” That certainly applies when upgrading your Oracle database from a previous release of Oracle to Oracle Database 12c Release 2. This section covers the various tasks that you need to perform when preparing for a successful Oracle Database upgrade:
![]() Read, and then read some more
Read, and then read some more
![]() Testing
Testing
![]() Run the Pre-Upgrade Information Tool
Run the Pre-Upgrade Information Tool
![]() Check for compatibility issues
Check for compatibility issues
![]() Remove Oracle Enterprise Manager Database Control
Remove Oracle Enterprise Manager Database Control
![]() Back up the source database
Back up the source database
![]() Choose an upgrade method to use
Choose an upgrade method to use
Read, and Then Read Some More
Oracle Database 12c Release 2 comes with a plethora of documentation. As previously mentioned, you should not consider this chapter to be the essential guide to upgrading to Oracle Database 12c Release 2. Rather, this chapter is just a basic guide. A variety of factors can impact the upgrade process, and the best way to start your preparation for an upgrade is to read the Oracle documentation. In particular, you should read the Oracle Database Upgrade Guide for Release 2 and the installation documentation that pertains to your specific hardware.
This book will provide you with good insight into a number of new features in Oracle Database 12c Release 2, but there may be new features related to a particular component of the database you are using that are not covered in this book. A quick read of the new features section of the documentation related to the components you are using will round out your reading list and help you to put together a plan to upgrade your Oracle databases.
Testing
The pre-upgrade testing process is a critical part of any successful upgrade plan. In fact, inadequate or improper testing is one of the most common major failures I’ve seen in upgrade projects over the years. I don’t have any quantifiable facts behind this number, but I’d wager that of all the failed upgrade projects that I’ve seen, the root cause of some 75 percent of them has been something that was not done right in the testing phase.
With that reminder of the importance of pre-upgrade testing, let’s look at a few key components of the pre-upgrade testing process:
![]() Testing and test plans
Testing and test plans
![]() Testing infrastructures
Testing infrastructures
Testing and Test Plans It is generally considered a best practice to put together test plans before you start your upgrade process. These plans should mandate testing of the database, the application itself, database and application performance, and data integrity issues. The plans should also specify to test backup and recovery, monitoring and alerting, and other infrastructure-related items to make sure they are compatible with Oracle Database 12c Release 2.
Testing connectivity is another item your plans should include. I’ve had more than one upgrade that encountered last-minute problems because one part of the middle tier was not compatible with the new release of Oracle. The middle tier can be so vast that it’s often difficult to find all the components and ensure they are compatible. But, finding those components and ensuring compatibility before you have completed the upgrade is much better than waiting until after the production upgrade has completed. I’ve seen cases where test upgrades went successfully, but the production middle tier included components that were not present in the test environment.
The bottom line is that you need to prepare for these contingencies in your planning and try to address as many of them as you can in planning. Also, document the problems you run into so that you, and everyone else, will have a record of these problems and the solution, in case the problem arises again. I don’t know about you, but I’m exposed to loads of information in a month’s time. I don’t tend to remember everything, and even when I remember the big stuff, I often forget the details. The point is, keep good records, and keep them somewhere that’s accessible to your co-workers so that they can benefit from your experiences.
Testing Infrastructures To establish a successful test environment in which you can craft a process that repeatedly produces results that reflect the results that would appear in production, you need to address the following considerations:
![]() Make sure the hardware components are the same in the test and production environments.
Make sure the hardware components are the same in the test and production environments.
![]() Make sure the operating system and its associated patch levels are the same between production and test environments, unless there is a good reason (such as comparison testing) for a difference.
Make sure the operating system and its associated patch levels are the same between production and test environments, unless there is a good reason (such as comparison testing) for a difference.
![]() Make sure the networking configuration is the same between the test and production environments. This would include hardware, settings, switches, cabling, and all other aspects of the network.
Make sure the networking configuration is the same between the test and production environments. This would include hardware, settings, switches, cabling, and all other aspects of the network.
![]() Make sure the Oracle configuration (including items such as Clusterware, the number of RAC nodes, the database version, and parameter settings) is the same across the test and production platforms unless a divergence is expected for testing.
Make sure the Oracle configuration (including items such as Clusterware, the number of RAC nodes, the database version, and parameter settings) is the same across the test and production platforms unless a divergence is expected for testing.
![]() Review any parameters derived by system configuration information (for example, the number of CPUs or amount of memory) subject to change based on hardware differences. Make sure you understand those differences and how they might impact your test results.
Review any parameters derived by system configuration information (for example, the number of CPUs or amount of memory) subject to change based on hardware differences. Make sure you understand those differences and how they might impact your test results.
![]() Ensure that data volumes are the same across the test and production platforms.
Ensure that data volumes are the same across the test and production platforms.
![]() Make sure the disk characteristics are the same between the test and production platforms, if at all possible. This would include the number of disks that the data is spread across, and the physical connections. For example, do both systems have the same number of host bus adapters (which can make a huge difference with respect to throughput)?
Make sure the disk characteristics are the same between the test and production platforms, if at all possible. This would include the number of disks that the data is spread across, and the physical connections. For example, do both systems have the same number of host bus adapters (which can make a huge difference with respect to throughput)?
![]() Ensure that the transaction types that the application will execute are exercised in the test environment.
Ensure that the transaction types that the application will execute are exercised in the test environment.
![]() Ensure that the level of concurrency in the test environment is comparable to production.
Ensure that the level of concurrency in the test environment is comparable to production.
![]() Ensure that your change management process is sufficient to manage the overall enterprise configuration and in particular the production and test environments. It is important to make sure that any change to either configuration is tracked to ensure that test results are meaningful.
Ensure that your change management process is sufficient to manage the overall enterprise configuration and in particular the production and test environments. It is important to make sure that any change to either configuration is tracked to ensure that test results are meaningful.
I’ve seen each of the preceding issues cause problems at one time or another because they weren’t considered in the setup of the test environment. A test environment that does not even come close to replicating the production environment in any way is going to cause major problems. I also often see cases in which the testing methodology really does not represent the activity that will be occurring in production. Most frequently there is no volume/concurrency testing. That is to say, often the goal of the testing is to make sure that the right answers are being produced, in a reasonable amount of time, from a single process. Many times I’ve seen these “tested” processes fail when moved into production because tens if not hundreds of users started running them all at the same time.
Whole books have been written about how to do appropriate testing, so that’s a topic beyond the scope of this book. Oracle provides a number of tools to help you with your testing. In particular, I recommend that you use Oracle Real Application Testing as you plan your Oracle Database 12c Release 2 upgrade. It will make your upgrade process much easier and provide a higher likelihood that your upgrade will be successful.
Run the Pre-Upgrade Information Tool
The Pre-Upgrade Information Tool is designed to analyze your database and discover any issues that might cause a problem during an upgrade. Although the DBUA will run the tool and ask you to take action on any findings before it performs an upgrade, Oracle recommends that you run this tool manually before you start upgrading a database with the DBUA.
That being said, the old Pre-Upgrade Information Tool script has changed. The preuprd.sql and utlupkg.sql scripts have been replaced with a Jar file called preupgrade.jar. To run the Pre-Upgrade Information Tool, first set the ORACLE_SID for the database that you will be upgrading. The database also needs to be open. Then, use the JDK located in the ORACLE_HOME that you are upgrading from, and run the preupgrade.jar file contained in the ORACLE_HOME that you are going to upgrade to. Here is an example:

Note that you no longer need to copy the Pre-Upgrade Information Tool to the ORACLE_HOME of the database that you want to upgrade. The tool creates fixup scripts and its log files in the $ORACLE_BASE/cfgtoollogs directory of the database under a subdirectory called preupgrade. For example, if you were to run the tool on a database called ORCL, then the log files would be in $ORACLE_BASE/cfgtoollogs/ORCL/preupgrade. The files you will want to review include the following:
![]() preupgrade.log Contains the results of the execution of the Pre-Upgrade Information Tool. Any conditions that need to be remedied are listed here.
preupgrade.log Contains the results of the execution of the Pre-Upgrade Information Tool. Any conditions that need to be remedied are listed here.
![]() preupgrade_fixups.sql Contains scripts that should be run before you upgrade the database either with the DBUA or manually. Note that the DBUA will run the preupgrade_fixups.sql script for you.
preupgrade_fixups.sql Contains scripts that should be run before you upgrade the database either with the DBUA or manually. Note that the DBUA will run the preupgrade_fixups.sql script for you.
![]() postupgrade_fixups.sql Contains scripts that should be run before you upgrade the database either with the DBUA or manually. Note that the DBUA will run the preupgrade_fixups.sql script for you.
postupgrade_fixups.sql Contains scripts that should be run before you upgrade the database either with the DBUA or manually. Note that the DBUA will run the preupgrade_fixups.sql script for you.
If you are running the DBUA, keep in mind that it will run the Pre-Upgrade Information Tool for you and it will run the pre- and post-upgrade scripts. However, it’s still a really good idea to run the tool manually before you upgrade a database and review the log files and the fixup scripts so that there are no surprises later when you’re ready to upgrade your database.
Check for Compatibility Issues
Compatibility issues frequently cause problems in upgrade projects. Often, some component is not compatible with the new Oracle Database release. You want to make sure that all new prerequisites for OS, hardware, and other component versions, settings, or certification issues are reviewed and any discrepancies are addressed. This section addresses the following compatibility issues:
![]() Infrastructure and application compatibility
Infrastructure and application compatibility
![]() OS and hardware compatibility
OS and hardware compatibility
![]() The database COMPATIBLE parameter
The database COMPATIBLE parameter
Infrastructure and Application Compatibility When an upgrade project is delayed by a problem, the problem usually in not with the database upgrade process itself, but rather is a result of a compatibility issue with another component in the system. Therefore, before you upgrade your database to Oracle Database 12c Release 2, make sure Oracle Database 12c Release 2 is compatible with the other parts of your infrastructure. For example, check the following:
![]() Application support and/or certification for Oracle Database 12c Release 2
Application support and/or certification for Oracle Database 12c Release 2
![]() Driver (such as ODBC or JDBC) support for Oracle Database 12c Release 2
Driver (such as ODBC or JDBC) support for Oracle Database 12c Release 2
![]() Infrastructure support for Oracle Database 12c Release 2, such as hardware-related version support (e.g., firmware), network compatibility, storage compatibility, and so on
Infrastructure support for Oracle Database 12c Release 2, such as hardware-related version support (e.g., firmware), network compatibility, storage compatibility, and so on
OS and Hardware Compatibility You need to check that your current operating system and hardware components are compatible with Oracle Database 12c Release 2. Install guides are available for each operating system platform that it supports. Make sure that you check this install guide for your OS to ensure that it is compatible with Oracle Database 12c Release 2. Also check to ensure that your system includes all patches and OS components (such as specific RPMs) that Oracle recommends be installed. You very likely will need to upgrade and patch your OS to install Oracle Database 12c Release 2. It’s also possible that you will need to install new or updated libraries to install Oracle Database 12c Release 2. All of these prerequisites are listed in the Oracle-specific documentation that is associated with your database platform.
The Database COMPATIBLE Parameter The COMPATIBLE parameter has two main purposes. The first is to control which features you can use in the Oracle database. The second, somewhat related to the first, has to do with your ability to back out of a migration done by DBUA or done manually, as discussed later in the chapter.
Generally, when you are migrating your database, I recommend that you keep COMPATIBLE set to the version of the source database until you are comfortable that the migration has been successful with respect to things like connectivity and application performance. Typically you will have this comfort level within a few days as you complete a couple of full application cycles: ETL, backups, batch reporting, and ad hoc reporting.
Rolling back the database upgrade (as discussed later in the chapter) should be a last-gasp affair. It is often indicative of a failure in the planning and testing previous to the production upgrade. Generally, if you find that you have a significant problem after upgrading, call Oracle Support and work with them to correct your problem. Don’t panic and roll back the upgrade, as this makes finding a solution much more difficult.
Once you have migrated the database and tested it, go ahead and let it run in production mode with the COMPATIBLE parameter set to a value of 11.2.0 (the minimum required for an Oracle Database 12c Release 2 database) until you are convinced that everything is working well. Then, after several weeks of successful operation, start using your normal change-control process (meaning test it with gusto!) to change the COMPATIBLE parameter from 11.2.0 to 12.2.0.
Remove Oracle Enterprise Manager Database Control
Oracle Enterprise Manager Database Control was replaced in Oracle Database 12c Release 1 by Oracle Enterprise Manager Database Express, but its desupport deserves mention here because more than a few readers likely will be skipping Oracle Database 12c Release 1 and moving right into Release 2. When you do an upgrade from a pre–Oracle Database 12c environment, you will find that Database Control is not in the Oracle Database 12c install base. In a nutshell, it’s gone.
As a part of the upgrade process, Oracle removes the files in your database that are associated with Database Control. This can make the upgrade take longer, so I recommend you manually remove the files prior to the upgrade by running an Oracle-supplied script called emremove.sql, contained in the Oracle Database 12c Release 2 $ORACLE_HOME/rdbms/admin directory. In addition, in some cases you may need to remove the following files associated with Database Control. These files may or may not exist in your environment, depending on whether your database was previously upgraded.
![]() $ORACLE_HOME/HOSTNAME_SID.upgrade
$ORACLE_HOME/HOSTNAME_SID.upgrade
![]() $ORACLE_HOME/oc4j/j2ee/OC4J_DBConsole_HOSTNAME_SID
$ORACLE_HOME/oc4j/j2ee/OC4J_DBConsole_HOSTNAME_SID
If you are running Windows, you will want to remove the DB Console service associated with the database you are upgrading. This service is normally called OracleDBConsole<SID>. Oracle does provide a method of preserving and referencing historical DB Console information. See the Oracle Database Upgrade Guide for more information on this capability.
Oracle Database Express is a worthy replacement to Database Control—it has most if not all of the features you’d get if you opted to use Cloud Control to manage your database: managing users, managing storage, monitoring the server, and tuning SQL statements.
Back Up the Source Database
One of the most critical actions you can take before upgrading to Oracle Database 12c Release 2 is to make sure the database is backed up. This should be a physical backup, and I strongly recommend that you use RMAN for this backup. To ensure you have a complete backup, you should back up the entire database (an online backup will do), back up all the needed archived redo logs, and back up the current control file.
CAUTION
“Physical backup” means do not use Oracle Data Pump for your pre-upgrade backup! Oracle Data Pump is not a physical backup of a database. If you want to do an Oracle Data Pump export of the database, that might not be a bad idea, but it should not be your primary means to ensure you can recover your database after an upgrade failure.
Choose an Upgrade Method to Use
Direct and indirect upgrades were introduced earlier in the chapter, along with mention of the different kinds of upgrade methods and tools associated with direct and indirect upgrades. This section dives into the supported upgrade methods and tools in a bit more detail. It’s important to select the best upgrade method for your particular situation. Sometimes the seemingly obvious choice might not be the best choice.
In this section we discuss the following upgrade methods:
![]() Direct upgrade using the Oracle Database Upgrade Assistant
Direct upgrade using the Oracle Database Upgrade Assistant
![]() Direct upgrade using the manual upgrade method
Direct upgrade using the manual upgrade method
![]() Indirect upgrade using the Oracle Data Pump utility
Indirect upgrade using the Oracle Data Pump utility
![]() Indirect upgrade using transportable tablespaces
Indirect upgrade using transportable tablespaces
![]() Indirect upgrade using the CREATE TABLE AS SELECT command
Indirect upgrade using the CREATE TABLE AS SELECT command
NOTE
Whichever upgrade method you choose to use, make sure you carefully analyze your space needs and that you have enough space for the upgrade. A database upgrade can consume quite a bit of space between the install image of the software, the new ORACLE_HOME, the space required for the creation and maintenance of guaranteed restore points, additional archived redo log generation, and so on.
Upgrade Using the Oracle Database Upgrade Assistant Oracle introduced the Oracle Database Upgrade Assistant (DBUA) many versions ago, and over time it’s gotten better and better. This tool makes the process of upgrading your existing Oracle database very easy. You can use the DBUA tool when you are upgrading from the following versions of Oracle Database to Oracle Database 12c Release 2:
![]() Release 11.2.0.3 and later
Release 11.2.0.3 and later
![]() Releases 12.1.0.1 and 12.1.0.2
Releases 12.1.0.1 and 12.1.0.2
If you are using an earlier release, you need to do either of the following:
![]() Upgrade from that release to one of the releases in the previous list. For example, if you are running Oracle Database 11.2.0.2, you can upgrade to Oracle Database 11.2.0.3 first, and then use the DBUA to upgrade to Oracle Database 12c Release 2.
Upgrade from that release to one of the releases in the previous list. For example, if you are running Oracle Database 11.2.0.2, you can upgrade to Oracle Database 11.2.0.3 first, and then use the DBUA to upgrade to Oracle Database 12c Release 2.
![]() Use a different method of upgrading to Oracle Database 12c Release 2. The methods that are supported if you are not at one of the releases in the previous list are Oracle Data Pump and the CREATE TABLE AS SELECT command (both of which are discussed later in this chapter).
Use a different method of upgrading to Oracle Database 12c Release 2. The methods that are supported if you are not at one of the releases in the previous list are Oracle Data Pump and the CREATE TABLE AS SELECT command (both of which are discussed later in this chapter).
You can determine which version your database is currently at by issuing the following query:

In this case we are running Oracle Database 12c Release 12.1.0.2, which is supported by the DBUA, so we can use the DBUA to perform the upgrade. Note that if you are upgrading, the COMPATIBLE parameter must be set to 11.2.0 at a minimum. So, if you never reset the COMPATIBLE parameter after your last upgrade, you may need to do so now.
To start an upgrade, set your session to include the path of the new ORACLE_HOME that you want to upgrade to, for example Oracle Database 12c Release 2. Then simply start the DBUA with the dbua command:
![]()
Once it’s started, the DBUA first presents you with a list of databases you can upgrade, as shown in Figure 2-16. If your database is not listed, make sure it’s in your /etc/oratab file. Once you have selected the database to upgrade, the DBUA will run the Pre-Upgrade Information Tool for you and present its findings in the Prerequisite Checks screen, shown in Figure 2-17. In some cases, the Prerequisite Checks screen will actually offer to correct a condition for you. In other cases, if you elect to correct the problems displayed, you will have to make those corrections manually. You can also choose to ignore specific findings if you know they won’t really impact the upgrade.

FIGURE 2-16. Selecting database to upgrade

FIGURE 2-17. Prerequisite Checks findings
Once you click Next to proceed past the Prerequisite Checks screen, the DBUA presents the Select Upgrade Options screen to determine which options you want to enable with the upgrade. You can see some of these options in Figure 2-18.

FIGURE 2-18. Upgrade options
Some of the options you have available to select from include
![]() Running the upgrade in parallel. This can speed up the upgrade process, assuming you have multiple CPUs. Oracle will determine the degree of parallelism for you (or it may decide to run the upgrade in serial).
Running the upgrade in parallel. This can speed up the upgrade process, assuming you have multiple CPUs. Oracle will determine the degree of parallelism for you (or it may decide to run the upgrade in serial).
![]() Recompile invalid object after the upgrade.
Recompile invalid object after the upgrade.
![]() Upgrade time zone data.
Upgrade time zone data.
![]() Gather statistics before the upgrade of the database.
Gather statistics before the upgrade of the database.
![]() Set user tablespaces to read-only status during the upgrade.
Set user tablespaces to read-only status during the upgrade.
Personally, when I do an upgrade, I select all of these options. I recommend that you do the same unless you have a very specific reason not to do so. Along with the options you can select are the names of two scripts, pre- and post-SQL scripts, which can be run before and after an upgrade. Typically, you will not need to run any scripts before or after an upgrade.
Once you have selected the upgrade options, you will be presented with a list of database backup and recovery options, shown in Figure 2-19, that can be used to restore the database if the DBUA upgrade process should fail.

FIGURE 2-19. Recovery options
Options on the Select Recovery Options screen include
![]() Create a guaranteed restore point, which is part of Oracle’s Flashback Database feature. This option is only available to you if the database is in ARCHIVELOG mode. You can also use a manually created guaranteed restore point.
Create a guaranteed restore point, which is part of Oracle’s Flashback Database feature. This option is only available to you if the database is in ARCHIVELOG mode. You can also use a manually created guaranteed restore point.
![]() Create an offline RMAN backup. You can also take an RMAN backup before you start the upgrade and indicate to the DBUA that you want to use that backup to recover the database.
Create an offline RMAN backup. You can also take an RMAN backup before you start the upgrade and indicate to the DBUA that you want to use that backup to recover the database.
![]() You can also indicate to the DBUA that you do not want to have it use any backup or restore strategy, and that you have your own strategy in place should you need it.
You can also indicate to the DBUA that you do not want to have it use any backup or restore strategy, and that you have your own strategy in place should you need it.
Once you have selected your recovery options, you will be asked if you want to upgrade an existing listener, if one exists that is not currently running Oracle Database 12c Release 2. You can select an existing listener from a list that is presented. Also, the DBUA provides the ability to create a new listener if you prefer.
The DBUA will also provide a way for you to configure Oracle Enterprise Manager Express, which is the replacement for Oracle Enterprise Manager Database Control. As previously mentioned, Oracle Enterprise Manager Express was introduced in Oracle Database 12c Release 1, and Database Control is no longer available on any Oracle Database 12c database. The DBUA also provides the ability to register the upgraded database with Oracle Enterprise Manager Cloud Control.
Once the interview questions are completed, you will be presented with a summary of the upgrade process that Oracle is about to start running, as shown in Figure 2-20. Start the upgrade by clicking Finish; an upgrade progress window will appear similar to Figure 2-21. Keep in mind that if you are running the upgrade with the parallel option enabled, you may see more than one of the steps with a status of In Progress at any one time.

FIGURE 2-20. Upgrade database summary

FIGURE 2-21. Database upgrade progress
You can stop the upgrade at any time. If you have chosen a restore method, then the DBUA will attempt to restore the database to the point and time of that restore point, or use RMAN to restore to a point in time before the upgrade started. You can also choose to stop the upgrade and not restore the database if that is your preference—depending on when you stop the upgrade, nothing has been changed on the original database yet, so you’re safe to just start it up and figure out how to perform the upgrade again later.
You can monitor the upgrade progress from the log file indicated on the DBUA Progress screen. Very often I will use the Linux tail-f command to monitor the progress of the DBUA in the alert log or the log created by the DBUA itself.
Once the DBUA is complete, a Results screen of the actions taken, along with any problems or warnings, is displayed.
Upgrade Using the Manual Upgrade Method The manual upgrade method is used to upgrade from an earlier Oracle Database release to Oracle Database 12c Release 2. The Oracle Database releases that support the manual upgrade method are the same as the Oracle Database releases that support upgrade via the DBUA (Release 11.2.0.3 and later and Releases 12.1.0.1 and 12.1.0.2). The manual upgrade method requires the execution of a number of scripts, and no GUI is available as in the DBUA method. The manual upgrade process can be a bit more error-prone since you have to manually execute the steps in the right order, which the DBUA does for you.
On the other hand, the manual upgrade method provides a bit more granularity to the upgrade process because you start and observe each step. When an error occurs, you can deal with it directly rather than depend on the software. Some DBAs prefer this “human” touch to upgrades, while others prefer to rely on the DBUA. In the past, the manual upgrade process provided some opportunity to recover from a mid-upgrade error, whereas the DBUA was almost an all-or-nothing approach. This has changed in the last few Oracle Database releases and the DBUA now provides many “restart” points that allow you to fix error situations and then restart the upgrade. At the end of the day, some DBAs will always prefer one method over the other. I generally prefer to use the DBUA for less critical databases and a manual upgrade for more critical databases, but that’s just my preference. Your preference is what it boils down to most of the time when choosing which method to use.
To manually upgrade a database, you would follow these high-level steps:
1. Run the Pre-Upgrade Information Tool, which is described earlier in this chapter. Resolve any issues detected by the Pre-Upgrade Information Tool.
2. Back up the database before you start the upgrade process. I also recommend setting a guaranteed restore point.
3. Shut down
the database normally and then exit SQL*Plus.
4. Modify the /etc/oratab file to reflect the new ORACLE_HOME for the database you will be upgrading. Make sure that you then set the environment (ORACLE_HOME, PATH, etc.) to point to the new ORACLE_HOME directory location. Make sure that ORACLE_SID points to the name of the database you will be upgrading.
5. Change to the rdbms/admin directory of the new ORACLE_HOME.
6. Start SQL*Plus. Make sure you are running the new version of SQL*Plus by checking the banner. Then, start the database in UPGRADE mode using the STARTUP UPGRADE command. Once the database has started in upgrade mode, exit SQL*Plus.
7. Start the upgrade by doing one of the following:
a. On Linux or Unix, run the dbupgrade script like this:
./dbupgrade
The dbupgrade script is a new feature in Oracle Database 12c Release 2 that automates the startup of the parallel upgrade utility.
b. On Windows, start the parallel upgrade utility manually by calling the catctl command as shown in this example:
catctl catupgrd.sql -l
8. Once the upgrade script is complete, use the catcon.pl utility and run the $ORACLE_HOME/rdbms/admin/utlrp.sql script to recompile any objects that might be invalid:
$ORACLE_HOME/perl/bin/perl catcon.pl -n 1 -e -b utlrp -d '''.''' utlrp.sql
9. Log into an account with DBA privileges with SQL*Plus and run the $ORACLE_HOME/rdbms/admin/postupgrade_fixups.sql script while logged in as SYSDBA.
10. Use catcon.pl again and run the $ORACLE_HOME/rdbms/admin/utlu122.sql script. This script performs final upgrade activities that can occur while the database is not in UPGRADE mode. For example, if your ORACLE_HOME has had a Patch Set Update (PSU) applied, this script will apply any scripts that need to be run that are associated with that PSU:
$ORACLE_HOME/perl/bin/perl catcon.pl -n 1 -e -b utlul122 -d '''.''' utlul122.sql
11. When the upgrade has completed, the database will be up and running and ready to be used.
12. I strongly advise that you make a backup of the database after the upgrade has been completed. Doing this before you allow users to log in is probably a good idea, but not always practical.
If you are running other Oracle software such as RAC, GoldenGate, and so on, you may need to run additional scripts, or configure additional components during the upgrade process. For example, if you are running RAC, you will need to update the Oracle Clusterware database configuration after the upgrade is complete by using the srvctl upgrade database command.
Upgrade Using the Oracle Data Pump Utility If you are running an Oracle Database release that is not supported by the DBUA or the manual upgrade method, and you do not want to or cannot migrate that database to an Oracle Database release that supports these tools, then you can use Oracle Data Pump to perform an upgrade. Another case where you will need to use the Oracle Data Pump Utility is if you are moving your database between platforms with different endian byte configurations. For example, if you are moving your Oracle Database 11g database from a Sun SPARC platform to an Oracle Exadata platform, which have different endian byte formatting configurations, the only supported methods of upgrading across platforms are to use Oracle Data Pump or the CREATE TABLE AS SELECT command.
When you use Oracle Data Pump, you create the Oracle Database 12c Release 2 database first, and then you load the database metadata and data using Oracle Data Pump. The main drawback to using Oracle Data Pump over the previously described upgrade methods (DBUA and manual database upgrade) is that Oracle Data Pump is slower. You can use Oracle Data Pump features such as compression, direct network connection, and parallelism to improve performance of the export/import operations.
Another option available with Oracle Data Pump is to use its network import mode, which allows you to move the database between a source and target database over the network, without needing to create any Data Pump dump files (which means you’ll need non-database storage—count on half the size of your database). Obviously, the larger the database, the more network throughput you will need to complete the migration in a timely fashion.
Upgrade Using Transportable Tablespaces Using transportable tablespaces is a great option when upgrading a database. This option is particularly useful when you want to also move your database to new hardware as you upgrade it. Oracle also offers different variations on transporting data: you can transport individual tablespaces, transport sets of tablespaces, or transport the entire database.
If you decide to use this option, make sure to review the Oracle Database Administrators Guide with respect to limitations related to using transportable tablespaces as an upgrade option. For example, if you are using encrypted tablespaces, then you cannot transport them to a database platform with a different endian byte format. As another example, you have to check the compatibility of character sets between the databases you are transporting tablespaces from and to. You will also want to review the various Oracle documentation on the best way to transport the database tablespaces, including using Data Pump, RMAN, or a manual migration of the tablespace-related datafiles.
Database version compatibility is also an issue to consider when dealing with the different versions of transportable tablespace functionality. Table 2-2 provides a quick list of the minimum compatibility requirements that must be present for different transportable tablespace situations.

TABLE 2-2. Source and Target Database COMPATIBLE Settings for Transportable Tablespaces
NOTE
The TRANSPORT TABLESPACE command was not available in RMAN until Oracle8i. I’d do a lot of testing if you plan on using any version of RMAN to transport tablespaces between any release of Oracle Database prior to Oracle Database 11g and make sure that you don’t run into problems.
As you can see, there are a lot of options, and some complexity, associated with the use of transportable tablespaces. On the other hand, in many cases using them is a very viable option for moving to Oracle Database 12c Release 2.
Upgrade Using the CREATE TABLE AS SELECT Command The Oracle CREATE TABLE AS SELECT (CTAS) command is another supported method of migrating to Oracle Database 12c Release 2. Using this method, you create an Oracle Database link and then move the data over that database link from the old database to the new Oracle Database 12c Release 2 database.
This method has a few drawbacks that are readily apparent. First, you are dependent on your network bandwidth for movement of the data. Second, you have to create a CTAS statement for each table. Third, you have to re-create the various constraints and indexes and other supporting structures in the new database. As a result, this method is rarely used, as it can be quite time-consuming to write the scripts to re-create a given database in its entirety. Oracle Data Pump is preferable to the use of this method.
The Last Word on Upgrading the Traditional Architecture
Usually, at this point I’d present another scenario using the DBUA and, perhaps, show some examples of a manual upgrade process. The truth is that the upgrade process has grown up now. The different ways you can move a database from an older release of Oracle Database to Oracle Database 12c Release 2 are numerous, and the best method of upgrading the database is dependent on a number of factors. Additionally, we still need to address upgrades in a multitenant environment, which offers its own degree of fun and excitement.
Still, I feel like I should give you my thoughts with respect to the question, “Which method of upgrading should I use?” It’s a good question, and providing my own opinion is probably more useful to you than providing a long, drawn-out example or two that might not even apply to your situation.
In my opinion, if you can use the DBUA, you should. It has matured a great deal over the years. Upgrades can be complex, and having a guided method of performing the upgrade just makes the most sense to me. In the old days, if the DBUA failed, you had to restore your database and start over. Now, in most cases, you can simply restart the upgrade process in some cases, or just complete the upgrade manually if you experience a failure—no restore required. That makes the DBUA a winner in my book.
Obviously, there are upgrade situations where you can’t use the DBUA. In these cases, I recommend that you do some quick analysis of your situation and use whichever method of upgrading (or migrating or transporting tablespaces) to Oracle Database 12c Release 2 offers you the most direct path from where you are to where you want to be. From a sheer time-savings point of view, using transportable tablespaces is likely the best option. If minimizing downtime is more important, using a combination of RMAN and transportable tablespaces may be the best option. If downtime is a real issue, then you will need to look at more complex migration techniques that involve things like using GoldenGate for replication.
One last comment. Oracle has announced the deprecation of the traditional Oracle Database architecture (non-multitenant). This means that, at some point in the future, Oracle will stop supporting the old architecture. That being said, it might be time to start strongly considering the Oracle Database Multitenant architecture, discussed later in this chapter.
In the Event of Failure
Should your upgrade effort fail, there are a few different ways you can respond to the failure:
![]() Restore the partially upgraded database
Restore the partially upgraded database
![]() Correct the problem and restart the upgrade from the beginning
Correct the problem and restart the upgrade from the beginning
![]() Correct the problem and restart the upgrade from a specific phase that failed
Correct the problem and restart the upgrade from a specific phase that failed
Let’s look at each of these options in a bit more detail.
Restore the Partially Upgraded Database
One option if an upgrade fails is to restore the database using the backup you created before the upgrade, or restore it to the guaranteed restore point you created. You will also need to reset any changed environment variables, move any configuration files, and reverse out any other processes you followed when upgrading the database. You should use this option only as a last resort, in my opinion, but it is usually necessary if you have run into some problem during the upgrade that is not immediately solvable—perhaps some part of the upgrade process keeps stalling, or some incompatibility exists between the Oracle database and your server.
If you are running the DBUA and the upgrade fails, the DBUA may offer you an option to restore the database and the database environment. In this event, you can let the DBUA do all the work for you.
It is possible that the DBUA will not offer you an option to restore the database. For example, the DBUA may just stop running for some reason. Also, if you’re doing a manual upgrade, the DBUA will not be able to manage your restore for you. In these cases, manual recovery may be the only way to start the recovery process. First, you would need to stop the DBUA (possibly by killing the process at the OS level if it’s truly locked up). You would then need to reset the database environment back to the old ORACLE_HOME environment. This would include changing environment variables, making sure that the database parameter file and password file are in the correct place, making sure any listener.ora files are in the correct place, and so on. This is why it’s important to back up not only the database before you do an upgrade, but also database-related files such as the parameter file, the password file, and other critical files.
Once you have restored the environment, you can then proceed to restore the database using either RMAN or the guaranteed restore point you created before you started the backup. There is really nothing special about the recovery process after that point—it’s like any other database restore.
Correct the Problem and Restart the Upgrade from the Beginning
Oracle Database 12c Release 2 provides the ability to restart an upgrade after it has failed in most cases. This functionality is available if you started the upgrade using either the DBUA or the manual upgrade method. This functionality requires that you complete the upgrade manually, because the DBUA interface does not allow for a restart of a failed upgrade from that interface.
Restarting the upgrade process from the beginning essentially requires that you shut down the database (if it’s not already shut down) and issue the STARTUP UPGRADE command. Then, you simply follow the manual upgrade steps previously discussed in the “Upgrade Using the Manual Upgrade Method” section from the point at which you issue the STARTUP UPGRADE command, completing the upgrade. It’s not too difficult, really.
Correct the Problem and Restart the Upgrade from a Specific Phase that Failed
Oracle Database 12c Release 2 offers a new feature that allows you to restart a migration at various points in the overall migration process. As with restarting the entire upgrade process, restarting an upgrade from a specific point in the upgrade process is a manual process. The DBUA does not support restarting of upgrades through its interface. To restart the upgrade process from a specific point in the upgrade workflow, do the following:
1. Review the DBUA log files. The upgrade is divided into phases, and one or more phases may be logged in a given log file.
2. Look in the last log file for the first occurrence of the words “error occurred in phase” (obviously, this syntax might change at some point). When you find the first occurrence of this phrase, you should find a statement that indicates in which phase the process failed. For example, you might see this statement that indicates the error occurred in phase 20:
catupgrd1.log error occurred in phase 20:
3. Once the failed phase has completed, dbupgrade will return to the OS prompt. Check the logs to find out what the issue is, and fix the issue. After that, you can then continue the upgrade by restarting the upgrade at the failed phase. To restart the upgrade, issue the dbupgrade command using the –p parameter. The –p parameter starts the upgrade at the step indicated and will not repeat a successful step. In our current example, since the failed phase was phase 20, we would indicate that stage as the stage to restart the upgrade at:
dbupgrade -p 20 catupgrd.sql
Oracle will then execute all of the remaining phases of the upgrade until the upgrade is complete (or it fails on some other step). Once the upgrade is completed, simply follow the remaining manual upgrade steps after the step that has you run the dbupgrade script.
Upgrading to Oracle Database 12c Release 2: Multitenant Architecture
Oracle released the Multitenant database architecture in Oracle Database 12c Release 1. We are not going to spend a great deal of time discussing the basic principles of multitenant databases here. Suffice it to say that a multitenant database is an architecture that enables a single instance, called a container database (CDB), to manage one, but usually many instances, individually called pluggable databases (PDBs). Oracle Database 12c Release 2 provides a number of new features with respect to multitenant databases, which we will cover in Chapter 3.
In this section we are going to cover upgrading an existing multitenant database to Oracle Database 12c Release 2.
![]() Upgrading to Oracle Database 12c Release 2 for Multitenant
Upgrading to Oracle Database 12c Release 2 for Multitenant
![]() In the event of a failure
In the event of a failure
Upgrade Methods for Multitenant Databases in Oracle Database 12c Release 2
Just as there are many ways you can upgrade a non-multitenant database, there are many ways to upgrade a multitenant database. The most common methods are as follows:
![]() Upgrading the entire CDB and all of its PDBs using the DBUA
Upgrading the entire CDB and all of its PDBs using the DBUA
![]() Manually upgrading the entire CDB and all of its PDBs
Manually upgrading the entire CDB and all of its PDBs
![]() Upgrading specific PDBs by manually unplugging PDBs from their current CDB and plugging them into a CDB running the release of Oracle Database to which you want to upgrade
Upgrading specific PDBs by manually unplugging PDBs from their current CDB and plugging them into a CDB running the release of Oracle Database to which you want to upgrade
We will discuss each of these upgrade methods in more detail next. Other, less-common methods exist, such as using Data Pump or transportable tablespaces, but we won’t discuss them here.
Upgrading a CDB and Its PDBs with the DBUA
The overall look and feel of the DBUA when doing a multitenant upgrade is not much different from when you are upgrading a non-multitenant database, but there are a couple of differences. First, there is an additional screen that provides the ability to pick and choose which PDBs you want to upgrade and which ones you do not want to upgrade. Second, when you choose to do a parallel upgrade, this will also result in PDBs being upgraded in parallel.
Beyond those two differences, you still can do the same things with DBUA that you’d do during a non-CDB upgrade, such as upgrading the time zone files and keeping the user tablespaces available in read-only mode while the upgrade is running. Refer back to Figure 2-18 for the available options you can include during a multitenant upgrade.
When you start an upgrade with the DBUA, Oracle first upgrades the root container (CDB$ROOT) of the CDB. You have the option to leave the root container in UPGRADE mode until after all the PDBs are upgraded, or you can open the root container in READ WRITE mode after it has been upgraded and then upgrade some or all of the PDBs. When you choose to open the root container after its upgrade is complete, you can subsequently open and use PDBs after they have been upgraded. If you choose to wait to open the root container until after the PDBs have all been upgraded, then you will not be able to use any of the PDBs until the entire upgrade is complete.
Once the root container is upgraded, the DBUA proceeds to upgrade the remaining PDBs in the database. You can choose to have the DBUA upgrade PDBs in parallel or one at a time. Once the DBUA is finished, it will leave the upgraded CDB open in READ WRITE mode. It will also leave all upgraded PDBs open in READ WRITE mode if you chose to upgrade them. Any PDB that you chose to not upgrade will not be open and cannot be opened until it has been upgraded.
Upgrading a CDB and Its PDBs Manually
The process of upgrading a multitenant database involves using the same basic steps that you use when upgrading a non-multitenant database, with a few additions. Here are the basic steps involved in a manual upgrade of a CDB and all of its PDBs:
1. Run the Pre-Upgrade Information Tool, as discussed earlier in this chapter. Resolve any issues detected by the Pre-Upgrade Information Tool.
2. Back up the database before you start the upgrade process. I also recommend setting a guaranteed restore point.
3. Shut down the database normally and then exit SQL*Plus.
4. Modify the /etc/oratab to reflect the new ORACLE_HOME for the database you will be upgrading. Make sure that you then set the environment (ORACLE_HOME, PATH, etc.) to point to the new ORACLE_HOME directory location. Make sure that ORACLE_SID points to the name of the database you will be upgrading.
5. Change to the rdbms/admin directory of the new ORACLE_HOME.
6. Start SQL*Plus. Make sure you are running the new version of SQL*Plus by checking the banner. Then, start the database in UPGRADE mode using the STARTUP UPGRADE command.
7. Open all of the PDBs in the CDB by using the ALTER PLUGGABLE DATABASE ALL OPEN UPGRADE command. You can check the status of the PDBs with the SHOW PDBS command from SQL*Plus. They should all show a status of MIGRATE. Once the database has started in UPGRADE mode, exit SQL*Plus.
8. Start the upgrade by doing one of the following:
a. On Linux or Unix, run the dbupgrade script like this:
dbupgrade
The dbupgrade script is a new feature in Oracle Database 12c Release 2 that automates the startup of the parallel upgrade utility.
b. On Windows, start the parallel upgrade utility manually by calling the catctl command as shown in this example:
catctl catupgrd.sql -l
When you upgrade a PDB with the dbupgrade script or catctl command, Oracle first upgrades the root container of the CDB, then upgrades the seed database (PDB$SEED) of the CDB, and finally upgrades the individual PDBs in parallel. Oracle calculates the degree of parallelism to be used based on the number of CPUs divided by 2. You can pass parameters into the dbupgrade script and catctl commands to control the degree of parallelism or even force the database PDBs to be upgraded in a serial manner.
Note that Oracle does support partial upgrades of PDBs. Any PDBs that are not upgraded will not be able to be opened until they are upgraded later. Also note that you can choose to just upgrade the root and seed containers of the CDB. After they are upgraded, you can upgrade the PDBs of that CDB by unplugging them from the CDB and then plugging them back in again.
9. After the upgrade script has completed, log back into the CDB and open all of the PDBs with the ALTER PLUGGABLE DATABASE ALL OPEN command.
10. Once the upgrade script is complete, use the catcon.pl utility and run the $ORACLE_HOME/rdbms/admin/utlrp.sql script to recompile any objects that might be invalid:
$ORACLE_HOME/perl/bin/perl catcon.pl -n 1 -e -b utlrp -d '''.''' utlrp.sql
11. Run the $ORACLE_HOME/rdbms/admin/postupgrade_fixups.sql script while logged in as SYSDBA using SQL*Plus, or you can use the catcon.pl script.
12. Use the catcon.pl utility to run the $ORACLE_HOME/rdbms/admin/utlu122.sql script. This script performs final upgrade activities that can occur while the database is not in UPGRADE mode. For example, if your ORACLE_HOME has had a PSU applied, this script will apply any scripts that need to be run that are associated with that PSU:
$ORACLE_HOME/perl/bin/perl catcon.pl -n 1 -e -b utlu122s -d '''.''' utl122s.sql
13. When the upgrade has completed, the database will be up and running and ready to be used.
14. I strongly advise that you make a backup of the database after the upgrade has been completed.
As with manual upgrades of non-multitenant databases, be aware that if you are running other Oracle products, you may need to run additional scripts to complete the upgrade to Oracle Database 12c Release 2.
NOTE
Oracle provides functionality that allows you to prioritize the order in which PDBs get upgraded. This is documented in the Oracle Database Upgrade Guide.
Manually Upgrading a CDB and All PDBs Using the Unplug/Plug Method
The previous two methods of upgrading a CDB and its PDBs enable you to upgrade the PDBs in parallel. You can also choose to use the unplug/plug method to upgrade a PDB. The unplug/plug method is a serial method of upgrading PDBs. The unplug/plug method provides the ability to
1. Unplug PDBs from a CDB at the release of Oracle Database you want to upgrade from.
2. Plug the PDBs into a CDB at the release of Oracle Database you want to upgrade to.
When using the unplug/plug method, you would typically create a new CDB using the release of Oracle Database you wish to upgrade to. You would then unplug the PDB from its current CDB. You would then plug the PDB into the new CDB and apply the required scripts to upgrade the PDB. I would suggest doing just one PDB first, resolving any issues, then using the unplug/plug method on the rest at the same time.
The following sections provide the high-level steps you would take assuming you are going to be moving PDBs from an Oracle Database 12c Release 1 database to an Oracle Database 12c Release 2 database. The exact steps may vary based on a number of conditions. First, we will look at the steps related to unplugging the PDB from the old ORACLE_HOME CDB. We will then look at plugging the PDB into the new ORACLE_HOME CDB. Finally, we will look at the steps involved in completing the upgrade of the PDB you just plugged in.
Unplugging the PDB to Be Upgraded from the Old Database The first step in the unplug/plug upgrade process is to unplug the PDB you wish to upgrade. The following steps typically are used to perform this task:
1. Use the ALTER SESSION SET CONTAINER command to point your session to the correct PDB.
2. From the old ORACLE_HOME directory structure, run the Pre-Upgrade Information Tool on the PDB to be unplugged and upgraded.
3. Run the preupgrade_fixups.sql script on the source database. Review the results and take any action as required.
4. Close the PDB with the ALTER PLUGGABLE DATABASE CLOSE command.
5. Unplug the PDB with the ALTER PLUGGABLE DATABASE UNPLUG INTO command, passing the location of the resulting XML file that will get created.
6. Drop the PDB with the DROP PLUGGABLE DATABASE command using the KEEP DATAFILES option.
Note that these steps assume that you do not need to move the datafiles of the PDB (as indicated by the KEEP DATAFILES option in step 6). If you want to move the datafiles to a completely different server, the process will be different—you’ll use the cp command within the asmcmd interface to copy the datafiles to an OS file system accessible by the other server, then use the cp command within the asmcmd interface on the destination ASM instance to copy the files into the new disk group before plugging the PDB into the upgraded database.
Plugging the PDB into the New Database The second step in the unplug/plug upgrade process is to plug the PDB you want to upgrade into the CDB running the new version of the Oracle Database software. The following steps typically are used to perform this task:
1. Connect to the new CDB.
2. Plug in the PDB you wish to upgrade using the CREATE PLUGGABLE DATABASE USING command, passing the XML file that was created in the first step when you unplugged the PDB.
Upgrading the Newly Plugged-in PDB Finally, you need to upgrade the PDB. Some upgrade steps occur automatically when you plug the PDB into the new CDB. However, you still have to perform the following steps:
1. Run the catupgrd.sql script via the $ORACLE_HOME/rdbms/admin/catctl.pl script. This upgrades the PDB. Pass the catctl.pl script the –c parameter, followed by the name of the PDB that you are upgrading. This name should be in capital letters.
2 Log into the container database where the new PDB resides using a SYSDBA account. Use the ALTER SESSION SET CONTAINER command to make the container you are upgrading the current container.
3. Start the container using the STARTUP command.
4. Using the catcon.pl script, run the postupgrade_fixups.sql script that was created by the Pre-Upgrade Information Tool earlier.
5. Using the catcon.pl script, run the utlrp.sql script to make sure any invalid objects are recompiled.
This will complete the upgrade of the PDB and it should be ready for use. You should back up the PDB after using this method of upgrading it.
In the Event of Failure
Recovering from a failed upgrade of a container database follows the same process that you would follow with a non-multitenant database, with a few exceptions. For example, each PDB is upgraded in turn, and one or more of the PDBs may have an issue that prevents the upgrade of the problematic PDB and all remaining PDBs.
After fixing the reason for the PDB upgrade failure, restart the database upgrade using the dbupgrade utility along with the –p parameter and the –c parameter, followed by the step that the previous upgrade failed on. For example, to restart a failed upgrade on phase 20 with a PDB named DEV01, the command would look like this:
![]()
Going...Going...Gone: Deprecated and Desupported Features
As always, Oracle Database new releases move some features into the deprecated category and some into the desupported category. Deprecated means that the feature is no longer being enhanced and, at some point in time, will no longer be available in Oracle Database. It’s a warning that the feature is on the road to being desupported. Desupported means Oracle is no longer fixing bugs in the feature and that the feature may well just disappear (if it has not already). It’s the tolling of the bell that indicates, if you’re still using the feature, you probably waited too long.
This section discusses the deprecated and desupported features in Oracle Database 12c Release 2. We will then review parameters that have been deprecated, parameters that no longer are supported, and one parameter that has had a default value change.
Features Deprecated in Oracle Database 12c Release 2
The following features have been deprecated in Oracle Database 12c Release 2:
![]() The DBMS_JOBS package.
The DBMS_JOBS package.
![]() Direct file system placement for Oracle Cluster Registry (OCR) and voting files. The upshot of this is that you will have to use Oracle Automatic Storage Management (ASM) once this feature becomes desupported.
Direct file system placement for Oracle Cluster Registry (OCR) and voting files. The upshot of this is that you will have to use Oracle Automatic Storage Management (ASM) once this feature becomes desupported.
![]() Intelligent Data Placement for ASM disks.
Intelligent Data Placement for ASM disks.
![]() The oracle.jdbc.OracleConnection.unwrap() and oracle.jdbc.rowset packages.
The oracle.jdbc.OracleConnection.unwrap() and oracle.jdbc.rowset packages.
![]() oracle.sql extensions. Replace with standard Java types or use the oracle.jdbc extensions.
oracle.sql extensions. Replace with standard Java types or use the oracle.jdbc extensions.
![]() The V$MANAGED_STANDBY view, in favor of the V$DATAGUARD_PROCESS view.
The V$MANAGED_STANDBY view, in favor of the V$DATAGUARD_PROCESS view.
![]() Some XML DB features and functions.
Some XML DB features and functions.
Features Desupported in Oracle Database 12c Release 2
The following features are desupported in Oracle Database 12c Release 2 and are no longer available for use in most cases:
![]() Advanced Replication.
Advanced Replication.
![]() JPublisher.
JPublisher.
![]() Oracle Data Provider for .NET APIs for Transaction Guard.
Oracle Data Provider for .NET APIs for Transaction Guard.
![]() SQLJ support inside of the database.
SQLJ support inside of the database.
![]() Some XML DB features. Please reference the Oracle Database Upgrade Guide for a complete list of desupported XML DB features.
Some XML DB features. Please reference the Oracle Database Upgrade Guide for a complete list of desupported XML DB features.
Deprecated Parameters in Oracle Database 12c Release 2
The following parameters are deprecated beginning with Oracle Database 12c Release 2:
![]() O7_DICTIONARY_ACCESSIBILITY This parameter controls accessibility to the Oracle Database data dictionary. Oracle Database version 7 allowed for somewhat looser access standards to the data dictionary. This parameter allowed those looser access standards to be maintained when Oracle increased the security around access to the data dictionary.
O7_DICTIONARY_ACCESSIBILITY This parameter controls accessibility to the Oracle Database data dictionary. Oracle Database version 7 allowed for somewhat looser access standards to the data dictionary. This parameter allowed those looser access standards to be maintained when Oracle increased the security around access to the data dictionary.
![]() PARALLEL_ADAPTIVE_MULTI_USER You should migrate to using parallel statement queuing instead of using this parameter.
PARALLEL_ADAPTIVE_MULTI_USER You should migrate to using parallel statement queuing instead of using this parameter.
![]() UTL_FILE_DIR Oracle recommends converting to the use of directory objects (created with the CREATE DIRECTORY command) instead of using the UTL_FILE_DIR parameter.
UTL_FILE_DIR Oracle recommends converting to the use of directory objects (created with the CREATE DIRECTORY command) instead of using the UTL_FILE_DIR parameter.
![]() UNIFIED_AUDIT_SGA_QUEUE_SIZE This parameter can still be set but it will be ignored—the queue size for the unified audit trail is automatically managed.
UNIFIED_AUDIT_SGA_QUEUE_SIZE This parameter can still be set but it will be ignored—the queue size for the unified audit trail is automatically managed.
You can also run the following query to get the full list of deprecated parameters from the database itself:
![]()
Of special note is that the SEC_CASE_SENSITIVE_LOGON parameter is deprecated in Oracle Database 12c Release 2. This is because standards-based verifiers (SHA-1 and SHA-512) do not support case-sensitive password matching. Even though this parameter is deprecated, Oracle still suggests in the Oracle Database Security Guide that you enable this parameter and make your passwords case sensitive.
Desupported Parameters in Oracle Database 12c Release 2
The following parameters are desupported in Oracle Database 12c Release 2. All of these parameters have previously been deprecated by Oracle. If you try to start an Oracle Database 12c Release 2 database with any of these parameters in use, the instance will fail to start.
![]() GLOBAL_CONTEXT_POOL_SIZE
GLOBAL_CONTEXT_POOL_SIZE
![]() MAX_ENABLED_ROLES
MAX_ENABLED_ROLES
![]() PARALLEL_IO_CAP_ENABLED
PARALLEL_IO_CAP_ENABLED
![]() PARALLEL_SERVER
PARALLEL_SERVER
![]() PARALLEL_SERVER_INSTANCES
PARALLEL_SERVER_INSTANCES
Summary
In this chapter we have covered a number of different topics related to Oracle Database 12c Release 2. I discussed the upgrade process using the Database Upgrade Assistant (DBUA), upgrading both multitenant databases and databases not using the multitenant architecture. When you can’t use DBUA to upgrade or migrate a database, you can use other Oracle tools such as Oracle Data Pump or perform a manual upgrade. If something goes wrong during the upgrade, it’s even easier to fix the issue and pick up where you left off.
Every database release has new initialization parameters and a number of parameters that are deprecated or desupported—Oracle Database 12c Release 2 is no exception. I pointed out a few that you may still be using and those that are critical to the security of your database.
Now that you have a new Oracle 12c Release 2 database ready to go, or you upgraded from a previous release, we’re ready to look at how to leverage the new features. The next chapter identifies the new features of Oracle Multitenant and in particular how those new features dramatically improve your database’s availability in a multitenant environment.