Using Java
This part of the chapter explains and illustrates building a servlet, a server-side Java program that will be accessed by using the Oracle9iAS. To review how these pieces fit together, please refer to Figure 8.3 and its accompanying description in Chapter 8.
Building a Java Servlet with JDeveloper v3.0
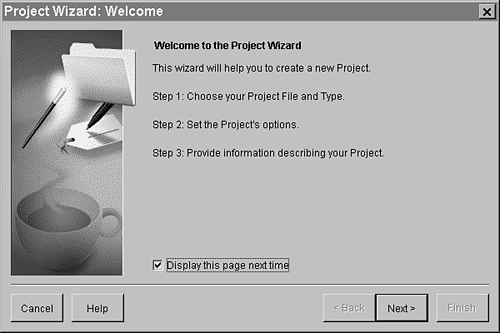
Figure 10.1 shows the JDeveloper interface. Access the Project Wizard from the File, New Project menu item. This wizard guides you through all the necessary pieces to build a server-side Java program that will access the EMP demonstration table.
Figure 10.1. JDeveloper v3.0 Project Wizard.
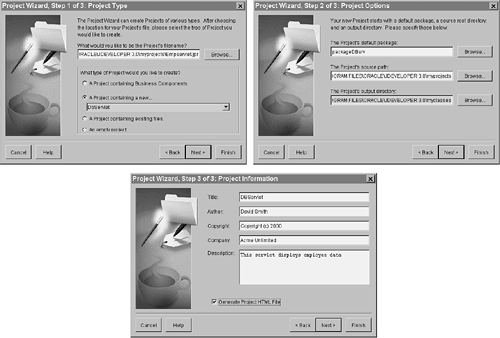
After you click the Next button, the Project Wizard begins a three-step project setup. You must name the project and tell JDeveloper where to store it on your computer's hard disk. Notice in Figure 10.2 that the name of the new servlet is Empservlet.jar. Also notice that DbServlet is selected from the A Project containing a new option. Step 2 of 3 defines the project name, where to store the actual servlet code, and the Java classes code. Step 3 of 3 tracks where the project is documented. None of these fields is actually required, but the information might be convenient for others who might be making future changes to this program.
Figure 10.2. JDeveloper v3.0 project setup steps 1–3.
NOTE
.jar file— It's being created by JDeveloper and contains all the code necessary for the Web browser to access and run this particular Java program. Jar stands for Java archive file.
Figure 10.3 shows all the recently entered project information. If this information is correct, click Finished. If this information is not correct, use the Back button to return to where the incorrect information was entered and correct it.
Figure 10.3. JDeveloper v3.0 project setup finish.

NOTE
If you have clicked Finish and you later find that some of the information is incorrect, you probably should start again. JDeveloper uses some of this information inside various components being generated. Some of the options, such as source path and output directory, can be changed via the preferences selection in the menu bar.
The DbServlet Wizard automatically starts based on selections made in the Project Wizard. This wizard can also be started from the menu bar by selecting File, New, DbServlet. This wizard actually builds the Java code needed to access a database table. It automatically stores its resulting code in the project that is highlighted—if the wizard started automatically, it will be stored in the project you just created. If you have to manually start the wizard, be sure to highlight the project for which you want to create the DbServlet. The wizard walks you through the process of creating the DbServlet with the following five steps:
1. |
In the first wizard window, be sure to select whether this is an individual table or a master-detail relationship type database access. Click Next. |
2. |
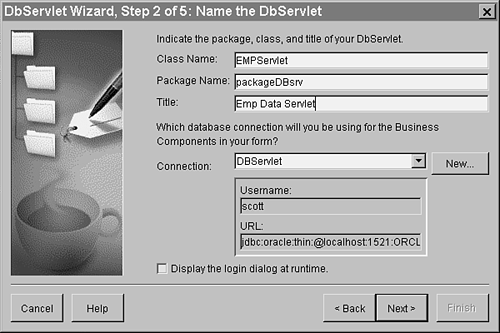
Next, name the actual servlet and establish the type of connection to the database (see Figure 10.4). Notice that the DBServlet connection type is selected. This fills in the default URL needed to access this Java servlet from a Web browser. Also notice the check box designed to prompt the user for a valid password. Click Next. Figure 10.4. DbServlet Wizard step 2—name and connection information.
|
3. |
In this step you define the database object the servlet will reference. Notice in Figure 10.5 that the user SCOTT is used. When you click the Tables check box, the table objects appear in the window. Highlight the EMP table by clicking. Figure 10.5. DbServlet Wizard step 3—database object selection.
|
4. |
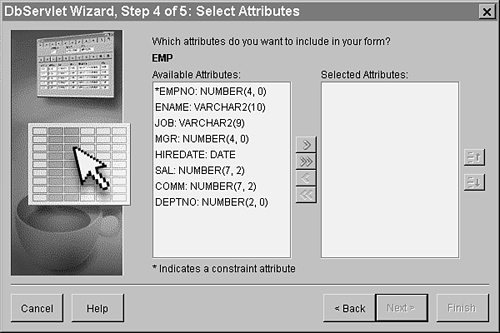
Next, the available database columns are displayed. Use the >> button to select all the columns, as shown in Figure 10.6. When all the desired columns are moved to the Selected Attributes column, click Next. Figure 10.6. DbServlet Wizard step 4—database column selection.
|
5. |
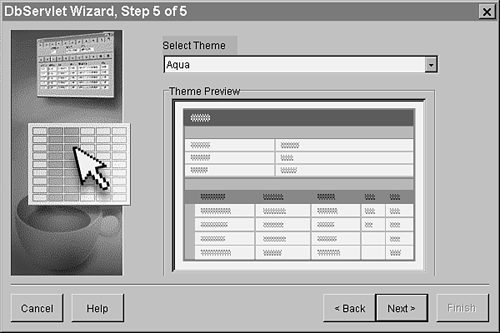
Figure 10.7 shows the final step, which is to select a color pattern for the servlet. When you have chosen your desired color theme, click Next. The final step is the DBWizard Completion screen. This lists all the pertinent information about the name, the table being accessed, and the name and full path of the project where all these items will be stored. To exit the wizard, click Finish. Figure 10.7. DbServlet Wizard step 5—form template layout selection.
|
Select File, Save As to save the JDeveloper workspace (see Figure 10.8). Notice the items in the recently created project in Figure 10.9. The HTML file will be accessed by the Web browser. This file contains the necessary HTML code to access the Empservlet.java program.
Figure 10.8. Items developed with JDeveloper.

Figure 10.9. Saving the JDeveloper workspace.

Deploying the Java Servlet Application
Because this is a server-side piece of code, it needs to be copied to the computer that has the Web server with the Java interface. This is accomplished by using the deployment feature of JDeveloper.
Figure 10.10 shows the EmpServlet project with the DBServlet package inside. From the menu, select Project, Deploy to start the Deployment Wizard. Walk through the wizard and complete the information as it pertains to your computing environment. Figure 10.11 shows the actual deployment. Make sure to check this screen for any errors that might have occurred.
Figure 10.10. Deploying the Java DBServlet.

Figure 10.11. Deployment Wizard finished screen.

Running the Java Servlet Application
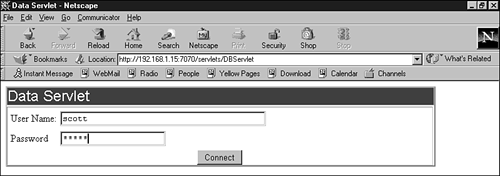
Chapter 8 covered some basic administrative issues, such as virtual paths. Figure 10.12 uses one of these virtual paths to point to where the DBServlet was deployed. Notice the URL in Figure 10.12. You see the http://<IP Address>:<Port Number> of the computer with the Oracle Application Server. Servlets is the virtual path that will be translated by Oracle9iAS into a directory path on this computer, and DBServlet is the name of the previously created and deployed servlet that will be found in this virtual path. Because this servlet is using the JDBC thin drivers, it will prompt the Web browser user for a user ID and password.
Figure 10.12. Netscape browser accessing the DBServlet.
DBServlet then prompts the Web browser user for the information to be displayed from the EMP table. Notice the pick list buttons that display the various options in Figure 10.13.
Figure 10.13. DBServlet query screen.

Figure 10.14 illustrates the DBServlet displaying information from the SCOTT.EMP table. Notice the buttons across the top of the displayed form. The + enables a record to be added, and the X enables a record to be deleted. The next set of blue buttons controls the capability to access the next or previous records in the table, and the key buttons enable the Web browser user to lock a record or unlock a record for update purposes.
Figure 10.14. DBServlet displaying SCOTT.EMP table information.

iAS and Java Setup
The iAS environment needs to know about the servlets it is to manage, how to access the database (the DAD configuration), and even the installation and setup of the Java cartridge.
Figure 10.15 shows the configuration of the DAD in the iAS Server Manager. This database descriptor is used by servlets to make automatic connections to the database when the DAD name is referenced in the URL.
Figure 10.15. DAD configuration for Web site examples.
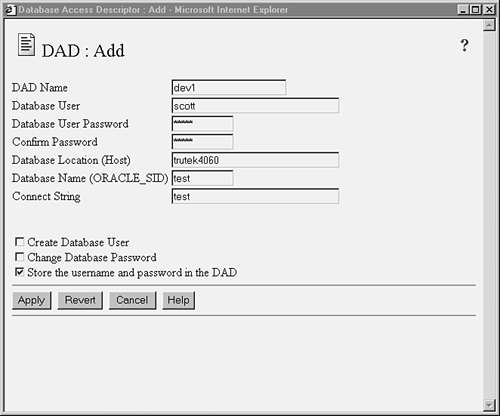
Figure 10.16 shows the virtual path-mapping configuration of the samplej virtual path. Notice the URL in Figure 10.17. The hostname trutek4060 matches the description of the DAD, and the virtual path samplej is also illustrated when accessing a HelloWorld servlet (which will be built in the next section of this chapter).
Figure 10.16. Virtual path configuration for Web site examples.
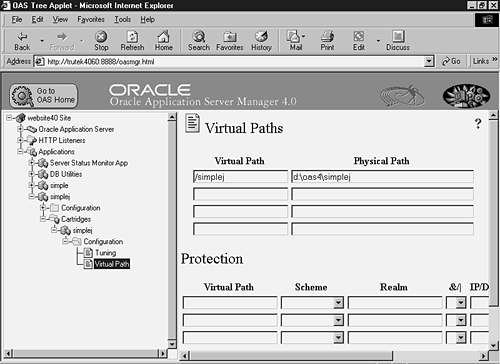
Figure 10.17. URL example for Web site examples.

Figure 10.18 illustrates the simplej Java cartridge configuration area. The simplej in this case is both a virtual path and an indication to the iAS that this is Java code that will need to be passed to the Java cartridge.
Figure 10.18. simplej Java cartridge configuration.
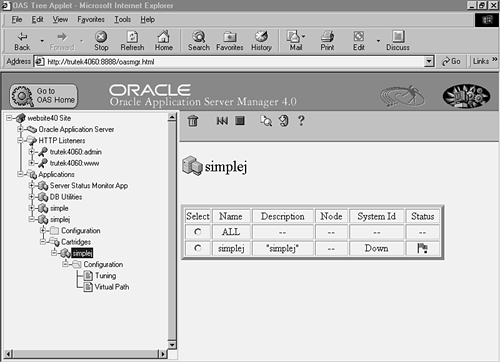
Figures 10.19 and 10.20 illustrate how to manually configure a Java cartridge. Notice in Figure 10.19 that the manual radio button is selected and that in Figure 10.20 the cartridge is named (test, in this example) and is assigned a virtual path.
Figure 10.19. Manually defining a Java cartridge.

Figure 10.20. Configuring the manually defined Java cartridge.

To test the Java cartridge, build the HelloWorld servlet illustrated in Listing 10.1, locate the output in the physical path as defined by the virtual path configuration (refer to Figure 10.16), and use the URL (as defined in Figure 10.17) to display the output as shown in Figure 10.17. Listing 10.2 shows the generated HTML output by the out.println code in Listing 10.1. This can be seen from your browser by displaying Source Code.
Listing 10.1. HelloWorld Java Servlet Syntax

import java.io.*;
import java.sql.*;
import javax.servlet.*;
import javax.servlet.http.*;
import java.util.*;

public class HelloWorld extends HttpServlet {


  public void doGet(HttpServletRequest req, HttpServletResponse res)
        throws ServletException, IOException{

    res.setContentType("text/html");
    PrintWriter out = res.getWriter();
    out.println("<HTML>");
    out.println("<BODY>");
    out.println("Hello World!");
    out.println("</BODY>");
    out.println("</HTML>");
  }
}
|
Listing 10.2. HTML Output from HelloWorld Java Servlet

<HTML> <BODY> HelloWorld </BODY> </HTML> |
Displaying Pictures and Passing Parameters with Java
Parameters are passed to Java from the URL in the same manner as parameters are passed to any other Web process: http://yourdomain.com/virtual_path_for_servlet/servlet?param=1.
Listing 10.3 expands on the HelloWorld example by building the Metro Motors banner page (see Figure 10.21) and prompts the Web browser user for input if a parameter is not supplied. Notice that req.getParameter in line 12 retrieves a parameter, p_name, and puts this parameter's contents into the variable myname. If the parameter does not exist on the URL line, myname is set to null. myname is then used later in the program in line 29. Notice that this will be displayed only if something exists in myname. This enables the program to have a parameter or to continue without error even if no parameter is supplied.
Figure 10.21. HelloWorld Java servlet.

Lines 16–26 process the Metro Motors banner. Notice line 21 makes reference to the virtual address ows-img where the metro_motors.jpg file should be located.
Line 36 defines the input text box, and line 37 defines the submit button.
Listing 10.3. HelloWorld Displaying Metro Motors Banner and Accepting a Parameter

1:  import java.io.*;
2:  import java.sql.*;
3:  import javax.servlet.*;
4:  import javax.servlet.http.*;
5:  import java.util.*;
6:
7:  public class HelloWorld extends HttpServlet {
8:
9:  public void doGet(HttpServletRequest req, HttpServletResponse res)
10:        throws ServletException, IOException{
11:
12:    String myname = req.getParameter("p_name");
13:
14:    res.setContentType("text/html");
15:    PrintWriter out = res.getWriter();
16:    out.println("<HTML>");
17:    out.println("<HEAD><TITLE>Metro Motors Web Site</TITLE></HEAD>");
18:    out.println("<BODY>");
19:    out.println("<TABLE><TR VALIGN=CENTER>");
20:    out.println("<TD>");
21:    out.println("<IMG WIDTH=100 SRC=/ows-img/metro_motors.jpg>");
22:    out.println("</TD>");
23:    out.println("<TD>");
24:    out.println("<B>Metro Motors Web Site</B>");
25:    out.println("</TD>");
26:    out.println("</TR></TABLE>");
27:
28:    if ( myname != null ) {
29:      out.println("Hello " + myname);
30:    }
31:    else {
32:      out.println("HelloWorld");
33:    }
34:
35:    out.println("<FORM URL=HelloWorld METHOD=get>");
36:    out.println("<INPUT TYPE=TEXT NAME=p_name maxlength=20>");
37:    out.println("<INPUT TYPE=SUBMIT VALUE='Say Hello to'>");
38:    out.println("</FORM>");
39:    out.println("</BODY></HTML>");
40:  }
41: }
|
Java Code Reuse
Java enables the easy reuse of code in the form of modules or public classes. Notice that lines 7–14 in Listing 10.4 is the same code as lines 19–26 in Listing 10.3.
Listing 10.4. Java stcarsutil Public Class
1:  import java.io.*;
2:
3:  public class stcarsutil {
4:
5:  public static void banner(PrintWriter out, String caption) {
6:
7:     out.println("<TABLE><TR VALIGN=CENTER>");
8:     out.println("<TD>");
9:     out.println("<IMG WIDTH=100 SRC=/ows-img/metro_motors.jpg>");
10:    out.println("</TD>");
11:    out.println("<TD>");
12:    out.println("<B>" + caption + "</B>");
13:    out.println("</TD>");
14:    out.println("</TR></TABLE>");
15:   }
16: }
|
To use the new public class, notice line 20 in Listing 10.5 makes reference to the class stcarsutil and the routine banner and passes the text string Metro Motors Web Site. As in the PL/SQL example of Chapter 9, “Using PL/SQL to Build Web Sites,” this routine or Java class can now be used to give constant visual attributes to our Web site, without having to add the same code to each Web page.
Listing 10.5. Java HelloWorld Calling Public Class stcarsutil.banner
1: import java.io.*;
2: import java.sql.*;
3: import javax.servlet.*;
4: import javax.servlet.http.*;
5: import java.util.*;
6:
7: public class HelloWorld extends HttpServlet {
8:
9:
10:  public void doGet(HttpServletRequest req, HttpServletResponse res)
11:        throws ServletException, IOException{
12:
13:    String myname = req.getParameter("p_name");
14:
15:    res.setContentType("text/html");
16:    PrintWriter out = res.getWriter();
17:    out.println("<HTML>");
18:    out.println("<HEAD><TITLE>Metro Motors Web Site</TITLE></HEAD>");
19:    out.println("<BODY>");
20:    stcarsutil.banner(out,"Metro Motors Web Site");
21:    if ( myname != null ) {
22:      out.println("Hello " + myname);
23:    }
24:    else {
25:      out.println("HelloWorld");
26:    }
27:
28:    out.println("<FORM URL=HelloWorld METHOD=get>");
29:    out.println("<INPUT TYPE=TEXT NAME=p_name maxlength=20>");
30:    out.println("<INPUT TYPE=SUBMIT VALUE='Say Hello to'>");
31:    out.println("</FORM>");
32:    out.println("</BODY></HTML>");
33:  }
34: }
|
