
5 Redscale
Warming up your photography
Tracy Packer
The Idea
Get bold, eye-catching reds, oranges, and golds in your photographs without using filters, even on rainy days, Take some color film and put it in your camera the "wrong way" round so that you are exposing the back of the film to the light instead of the front. Most people respond to this idea in one of two ways; with utter disbelief, or with an astonished "Why?" Well, it really can be done. Try it and see the results for yourself.
Urban Conflict
The key to achieving this more subtle effect is overexposure. I shot the daisies 2 stops over and then reshot the fountains, also 2 stops over, There was a lot of light reflecting off that water. The softer tones give it a less bombastic character than generally associated with redscale.
The Ingredients
- ▶ New roll of color film
- ▶ Old roll of film
- ▶ Scissors
- ▶ Sellotape
- ▶ Old wooden peg
- ▶ Dark bag (or a lightproof space under the quilt)
- ▶ A little patience
The Process
For these photos I used a Vivitar Ultra Wide & Slim (UWS), a palm-sized, lightweight plastic camera with a 22mm plastic lens. Originally given away as a free gift for bank customers in the Far East, you can find Vivitars on eBay and, occasionally, in thrift stores. You can use any camera you like, but lo-fi cameras are particularly suited to this technique. On a practical level, the more high-end cameras have an automatic rewind function, which rewinds the film all the way back into the canister after you've shot it. On top of that, as automatic rewind motors are quite powerful, it is possible that the film will be pulled off the tape while it is still in the camera. With lo-fi cameras you don't have these problems. Another advantage is that the aperture and shutter speed on a Vivitar UWS are fixed at f/11 and 1/125 sec. This means that, on a sunny day, it lets in quite a bit of light, and you need that with red scale.
Aesthetically, redscale can give you vibrant, punchy colours and plenty of vignetting, both of which are expected with the output from lo-fi cameras. They are neither the inevitable nor the most subtle results you can get with redscale, but they are the easiest to achieve, and the ones most people expect.
If you have a very cheap roll of film and you are prepared to waste it (heresy, I know), you can do a practice run in daylight so that you can actually see what you are doing. Otherwise, just take your time. You'll probably need 15 to 20 minutes the first time you try, but once you gain confidence you'll be able to redscale a whole roll in less than five minutes.
An ISO 200 or 400 film would be a good choice for your first try. Because redscale film is reversed, when you take a picture, the light has to travel through the camera and the thick red layer normally on the back of the film, so you need more light to get a reasonable image. This means you usually need to shoot 1, or even 2 stops brighter than intended for the film; 200 film can be exposed in 100 or 50 light conditions. Using faster film (200 or even 400 film) gives you a better chance of getting enough light, Just follow these steps:
1. Clear a table or flat surface and put everything you need in front of you.
2. At the table, carefully pull the old film from its canister, all the way out. Using your scissors, cut the film with a clean, straight cut, leaving about 6in (c. 15cm) attached to the canister. Discard the excess film. You should now have a mostly empty canister with about 6in of film protruding. Put this to one side.
3. Take your new film canister, carefully pull the film leader from it, then cut it to give it a straight edge along the full width of the film. Try to cut as close to the point where the leader opens out as possible so that you don't waste film.
4. Join the new film to the end of the old film, taking care to attach the new film the "wrong way" round. To do this, place the old film canister in front of you so that the shiny side (the front) of the remaining 6in (c. 15cm) of film is facing you. Place the new film canister in front of you so that about 2-3in (5-7.5cm) of the new film-and no more-is exposed, with the matte side (the back) of the film facing you.
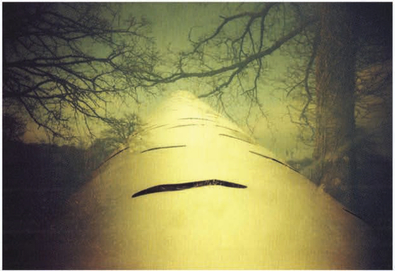
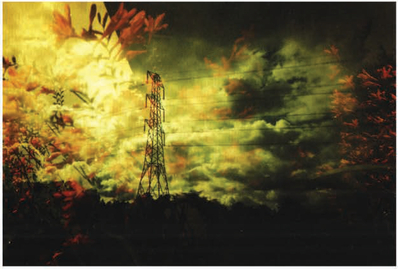
Life Force In order to achieve these greens and blues, I overexposed both layers of the composition as much as I could get away with There's more to redscale than red.
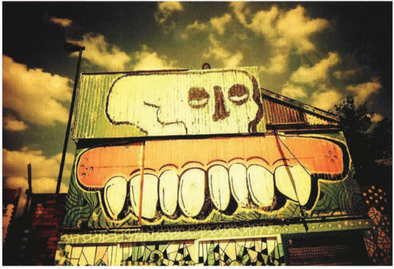
Dominates This was double-exposed, but very little of the first layer came through; I deliberately underexposed it to keep the dark tones in the background. Exposing the second layer over such an expanse of white not only provides a good contrast, it also adds to the overall level of overexposure, which, in turn, results in this more muted color palette.
5. Cut a piece of Sellotape and use this to join the two film strips, Wrap the tape around both sides to make sure the film is secure. You can overlap the film a little if you like, but try to avoid wrinkles and excessive layers of tape. Don't use electrical tape for this-it's too thick and may cause your film to jam in the canister.
6. The film strips from your two film canisters should now be joined so that, from whichever side you view it, the section on one side of the Sellotape is shiny and the section on the other side is matte. Check this to make sure you have joined your film strips correctly.
7. You now have to wind the new film all the way into the old film canister. Take one half of a wooden peg, stick it in the round hole at the top of the old canister, and rotate it 360'; you should see the film moving from the new canister into the old canister. If you are confident that the film is moving in the right direction, put the two canisters and the peg into your dark bag (or get under your quilt in a darkened room) and continue to turn the peg in that direction until all the film has been spooled into the old canister. You'll know this is done when the new canister is touching the old one.
8. You can now take the canisters back into the light, Pull the new (now empty) canister a little so that there is some give in the film and cut it off. Cut your own leader into your newly redscaled roll of film.
9. Use a sticker to identify the old canister or keep a note of what film you have redscaled.
10. Place the film in your camera of choice (try to avoid cameras with wind-on motors unless you are supremely confident in the strength of your taping), and you are good to go.
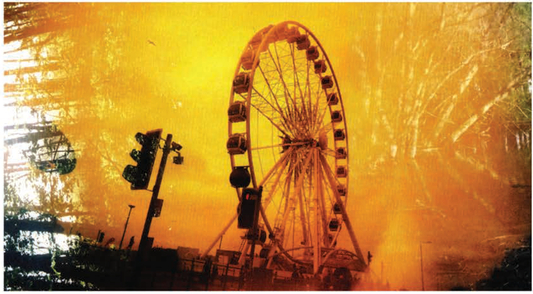
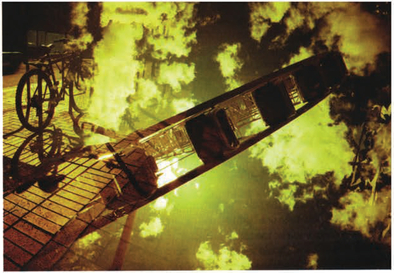
The Great Escape! This was shot conventionally, then redscaled and shot again. Once you've gained confidence, you can start to really experiment with the technique. The natural print-film colors blend with the characteristic redscale tones.
General principles
It is generally understood that, for optimal results, redscale film should be overexposed by 2 stops. This gives the light a better chance to penetrate the red layer on the back of the film. So, if you have redscaled an ISO 400 film/the accepted wisdom is that you should expose it at ISO 100. Try not to get too uptight about that though-it's more helpful to think of what mood or tones you are trying to achieve and change your exposure according to that. Optimal exposure leads to strong red, orange, and gold tones with a little vignetting, and matte black shadow tones. Each extra stop that you overexpose decreases the saturation of those red tones, and each stop underexposed increases it. As you overexpose, more subtle yellow, tobacco, and even sepia tones will take over, and there will sometimes be considerably less vignetting. The more you underexpose, the darker and more intense the image will be and the greater the degree of vignetting you will get.
While the bold oranges and reds are dramatic, don't fall into the trap of thinking this is all you can achieve with redscale. Given a chance, redscale will pick up greens and blues. This generous exposure latitude works beautifully with double exposures, and, because of the method of making redscale, if you fancy some hybrid double exposures, you can even shoot your first layer of film before you redscale it. Don't be afraid to try different types of film-even slide film can be redscaled if you have the budget and the inclination. Once you've shot your carefully prepared film, it can be developed like any color print film. Give it a try. You really are limited only by your imagination.
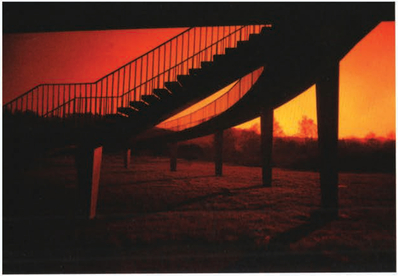
Under the Overpass Another image taken from my first roll of redscale film, and underexposed by about 1 stop. This uses the bright sun to get the correct exposure and the colors I wanted, but hides it behind an interesting silhouette.
The Dead Live On The overall color of this image is more pink in tone. Expenment with different film and levels of exposure to find the tones you most like to work with.
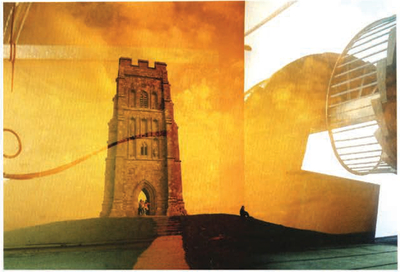
Glastonbury Patterns If you want an abstract image, try double exposing without fastidiously lining up your film; frame boundaries can sometimes make interesting juxtapositions.

After the Battle I took this on the very first roll of redscale film I was given Placing a dazzling low winter sun behind a suitable tree and shooting straight into it provided me with the bright light conditions required to overexpose by 1 stop.
The Gathering Storm I used natural textures to underpin a double exposure, but this time significantly underexposed the film on both layers. The second layer was taken from the passenger seat of a car, so there is motion blur as well This adds to the dark mood and vignetting in the final image.
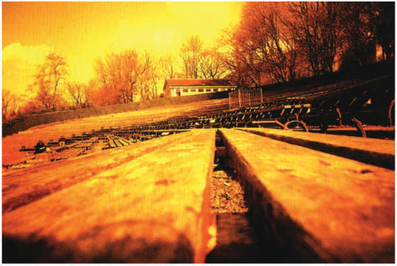
Red Decay This was taken in optimal conditions—lull sunshine on a very bright spring day-so there was no need for silhouettes or sun flares to get the best from the redscale tones. Placing the camera on some old wooden benches in an amphitheater gave me an unusual angle and a wide viewpoint full of textures and tones.
