
13 Aerial: kite shots
A bird's-eye view
Ricardo Mendonça Ferreira
The Idea
Flying has long been a universal dream. Today balloons, airplanes, and satellites enable us to view the Earth from above, but they are very expensive tools beyond the reach of most people. If you dream of photographing the world as seen by birds, there is a simple and cheap alternative: harness the power of the wind and loft your camera with a large kite. You won't have to take your feet off the ground, it's inexpensive, it's safe, and it's a lot of fun.
A Flowform kite, one of the most popular kites for KAP photography
The Ingredients
- ▶ Good, large, stable single-line kite [Flowforms, Rokkakus, and Doperos are all good)
- ▶ Small, lightweight camera with an intervalometer or time-lapse function OR
- ▶ A means of triggering your camera remotely
- ▶ Cut - resistant gloves
- ▶ Line and winder
- ▶ A system to attach the camera to the line of the kite (e.g., a Picavet rig)
- ▶ A friend
- ▶ Wind
- ▶ A spirit of adventure
The Process
Kite Aerial Photography (KAP) is a tried-and-tested technique. It has been used around the world since 1088, but, as one might expect, a few things have changed since then, With our large-capacity memory cards we can now take many more pictures per flight, and our cameras, being lighter and smaller, can be lofted in a wider range of wind speeds. The kites, too, have evolved. The materials with which they are now built make them lighter and stronger. These are just some of the reasons for the increasing popularity of KAP. I'll explain some of the basics to help you start your journey with confidence and, I hope, without breaking the bank. In the past, when men were men and hackers were people who made furniture with an axe, you had to build your own KAP equipment from scratch. Today you can open your web browser or go to a kite store to buy all your kite equipment.
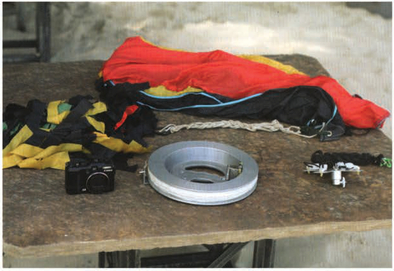
Some of the ingredients for homemade KAP equipment: fuzzy tail and Flowform #16 kite at back; digital camera, line winder, and Picavet at front.
Camera equipment
To become a kite aerial photographer (KAPer), you will also need a camera and some way to trigger the shutter automatically or remotely. To make things as simple as possible, use a camera with an internal intervalometer or a time-lapse movie mode; if your camera doesn't have this function, you'll have to find another way to trigger the camera, You can search the web to inspire your own creative solution or buy an off-the-shelf option. If you don't mind reading manuals or using software that is a bit rough around the edges, and you have a Canon point-and-shoot, check if your model is compatible with CHDK (Canon Hack Development Kit), a free piece of software that teaches new tricks to your camera, giving it the capabilities, for example, of sophisticated intervalometers. And finally, you must find a way to tie your camera to the line of the kite. Once again, you can use the web to find and buy a ready-made solution, but I'll give you some tips if you want to build your own.
![A Picavet is a system of pulleys that suspends your camera from the line of the kite and holds it as level with the ground as possible You can make a Picavet from metal, wood, or any strong and lightweight material. It must be able to withstand vibrations and hold the camera even under the slress of turbulence. There are many plans for homemade rigs available on the web, but David Hunt's page [www.kaper.us/basics/BASlCS_picavet.html] is the one I like best.](http://images-20200215.ebookreading.net/23/4/4/9781136089893/9781136089893__photo-op__9781136089893__Images__fig00133.jpg)
A Picavet is a system of pulleys that suspends your camera from the line of the kite and holds it as level with the ground as possible You can make a Picavet from metal, wood, or any strong and lightweight material. It must be able to withstand vibrations and hold the camera even under the stress of turbulence. There are many plans for homemade rigs available on the web, but David Hunt's page [www.kaper.us/basics/BASlCS_picavet.html] is the one I like best.
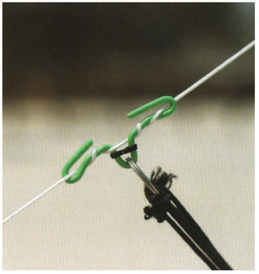
Bend lengths of wire into a crook you can use to hang your Picavet on the line of the kite without damaging the line, and in a way that will prevent the Picavet from sliding down toward you. You can make a couple from one short length of wire. I use electrical wire, but other types of stiff wire will work just as well- As they are so cheap and easy to make, always carry some spares, just in case.
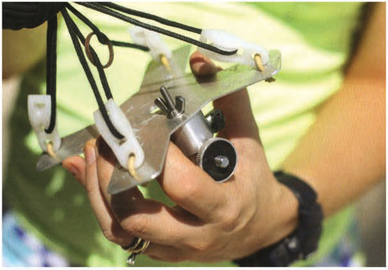
You need a rig attached to the Picavet to hold your camera. This can be almost anything you want. It can have motors and electronics to rotate your camera via a radio transmitter, or you can just use duct tape or Velcro, You can see that I salvaged a small tripod head to use on this Picavet It is simple, but effective
Kites
There is no single "best kite." This will depend on the wind scenario. Each kite has its own wind range, but generally, the stronger the wind, the smaller the kite should be and vice versa. If you try to fly a kite without enough wind it won't loft your camera, while too much wind will make it unstable, damage it, and/ or make it fall down. Some of the most widely used kites for KAP are Flowforms, Rokkakus, and Doperos. Talk to a kite maker or seller and they will help you choose the right kite for the typical winds where you live. If the KAP bug really bites, you will eventually buy more kites so that you are able to fly in a wider range of wind conditions, but I suggest you do that only after gaining some experience.
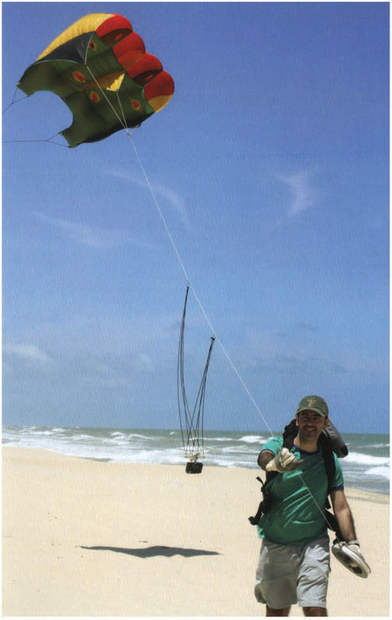
A happy KAPer at work.
Flying your kite
Now go fly a kite! But first, do it without attaching the camera. You must get to know your kite well, so try to launch it several times in different places until you are confident both in the kite and in yourself. For your own safety you should:
- ○ check your equipment before every flight
- ○ always wear gloves to hand le the line
- ○ never fly your kite near power lines
- ○ never fly near airports or airfields
- ○ never fly in stormy weather
- ○ never fly over roads, people, or anywhere your kite might cause damage or injury if it falls
- ○ avoid areas with obstacles such as buildings, trees, and other kites
- ○ have a friend to help you
Rig and suspension system
Before you attach the camera to the kite, wait a minute! If you don't want to smash your beloved camera to pieces, try to fly with a dummy of similar weight first, A plastic bottle filled with water could do the trick. Not only will you get practice, you will also get to test all of your equipment without risking your camera. After a number of successful tries, you can move on to the real thing,
Most KAPers create a rig to hold the camera and a Picavet system to suspend it from the line of the kite. This might be the biggest challenge of KAP, but it's not as hard as you think. Of course, you can fix your camera to the line with duct tape if you want to, but believe me, a simple KAP kit is a great investment of money, or time if you prefer a DIY approach, The simple equipment described here can be made on a small budget; if you would like to try your hand at making a Picavet rig, have a look at the many details available on the web.
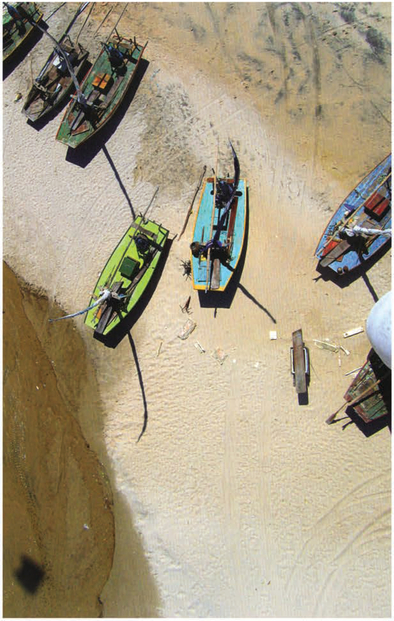
Jangadas Fishermen's ships resting on the beach in Bebenbe. Ceará. Brazil


Blue-and-White / Green-and-Yellow / Lime / Orange Colorful umbrellas at the Porto de Galinhas beach, Pemambuco, Brazil
Configuring your camera
Now that you have your basic equipment and some kite-flying experience, all that is left is to configure your camera correctly. This is crucial because your camera will be moving sideways and up and down most of the time, so if you leave this step out, all your KAP pictures will be blurry. You'll need to configure your camera for a faster shutter speed, around 1/800 sec if possible, in Shutter Priority mode (Tv), If your camera doesn't have this function, you can use the Sports mode. You can also try a higher ISO rating, but on most compact cameras this will degrade the image quality so leave this as a last resort, and to alleviate the problem, avoid flying when there is not enough light available.
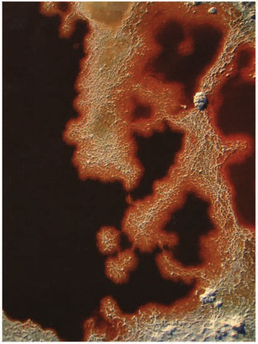
Salt Pond Salt pond on Mento Park, California. USA. The striking colors of the salt ponds in the south of San Francisco Bay—ranging Irom pale green to rich red—are caused by microorganisms like tiny brrne shrimps and halopbitic bacteria
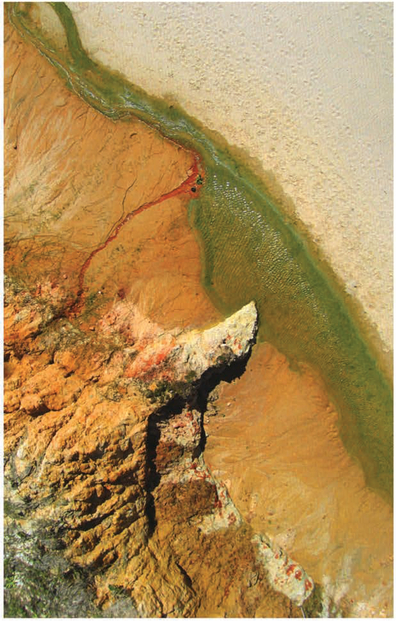
From Above Natural colored sand in Praia das Fontes beach, Bebenbe, Csara, Brazil.
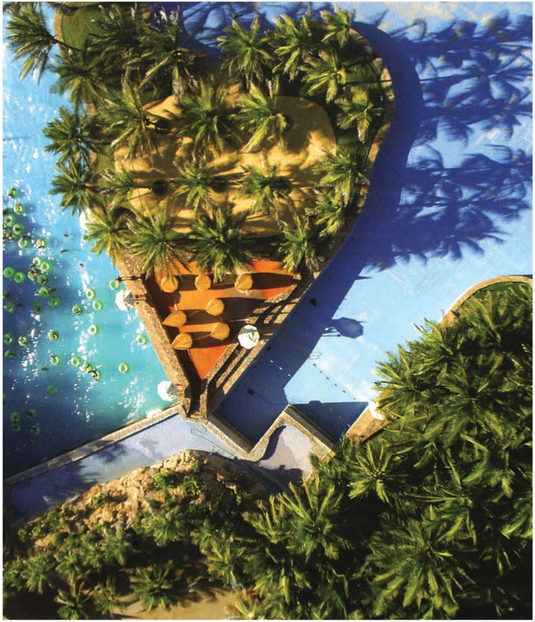
In the Heart of Fun Partial view of Maremolo. Beach Park's wave pool in Aqutraz Inear Forialezal, Ceará, Brazil.
KAPing
Here are the basic steps to follow for every flight:
- ○ always follow the safety advice listed above
- ○ choose the subject you want to photograph
- ○ check and configure your camera before launching the kite
- ○ launch your kite and let it fly about 20m (65½ft) off the ground for S to 10 minutes to see if the wind is stable and your kite is flying without problems (never skip this step!)
- ○ after you have watched your kite flying for so me time, attach the Picavet to the line
- ○ attach your camera to the rig and start the inter valometer (or time-lapse video)
- ○ let out some line for the kite to gain altitude
- ○ take some pictures, then bring the equipment and the kite back down
Now it's time to check the results. I hope you get some nice pictures. If you're lucky, your camera might capture interesting things that you weren't even aware of. This randomness is one of the most thrilling aspects of the KAP experience, in my opinion, Enjoy!
