
48 Panoramas
A combined whole
Kevin Meredith
The Idea
Sometimes you'll want to shoot a wide scene, but you might not have a lens wide enough to capture it. To get around this you can take multiple photos and stitch them together on a computer to create a panoramic image. This is not as quick as taking a single image, but with a little preparation you can avoid some common pitfalls.
Brighton Royal Pavilion
I couldn't have captured the entire building without making a panorama: if I had shot this any farther back, I would have been in the road.
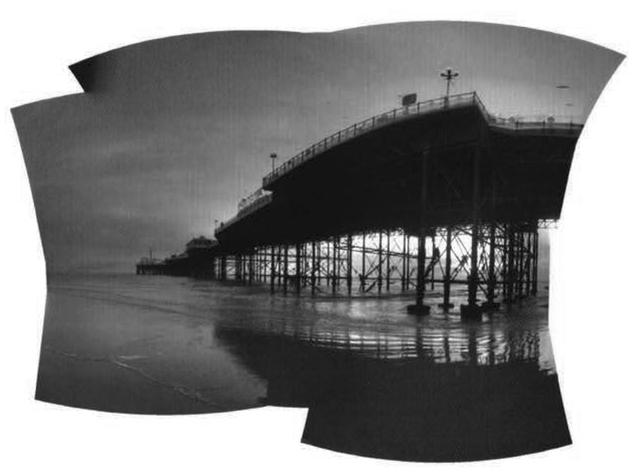
Pier to Pier
This montage of 14 images gives a view of the beach that is more than ISO°. You can see in both directions at once.
The Ingredients
- ▶ Any camera
- ▶ Tripod
- ▶ Hot-shoe spirit level
The Process
It is relatively simple to shoot a panoramic image-you just have to pick the spot you are going to shoot from, then take multiple photos with your camera pointing in different directions to capture a different section of the scene so that they can be stitched together later on a computer. This technique is also useful if you want to print a large-format image from a lo-res camera (like an old point-and-shoot or a camera phone): as the image is made up of multiple shots, it will have a much higher resolution than a single image.
As you turn the camera, you will notice different lighting conditions in each of the shots. If your camera is set to Auto exposure, each of your images will have a different lighting level and they will all look slightly different when viewed side by side. Because of this, it is best to shoot in Manual mode. Photoshop and other applications used to stitch images together can compensate and try to blend differently exposed images, but it is best to get it right in the first place. If the range of lighting conditions in a scene is too varied to keep the camera on one exposure setting you can change it, but do this only by 1 stop so that the exposure doesn't vary too much between adjacent shots. When you change the exposure, it's best to adjust the shutter speed: if you change the aperture from shot to shot, the depth of field, and therefore what is in focus, will also change. Turn the Auto White Balance off and select the balance that best suits your environment, otherwise your white balance will vary between shots and the images won't match.

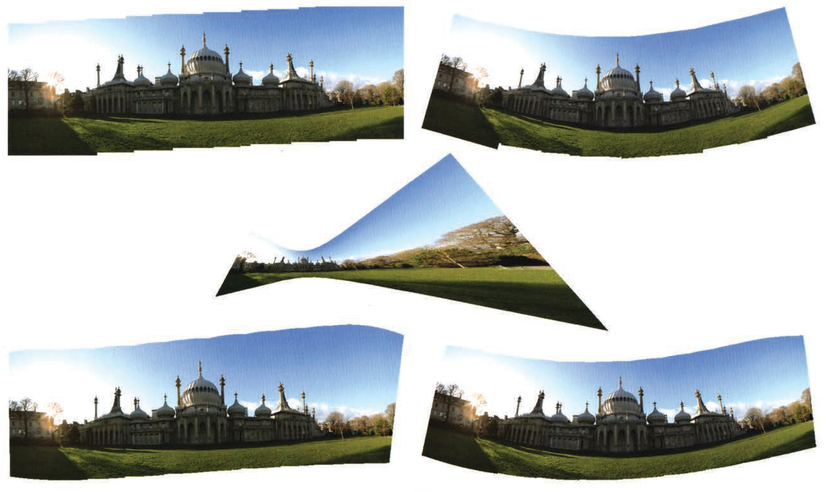
Examples of different ways images can be distorted and put together. Clockwise from left; repositioned, collaged, perspective, spherical, and cylindrical Once you have made your panorama, you would usually crop it.
It is best to: use a tripod, as the key to success is to have the camera held in the same position when you are shooting panoramas. If you don't have a tripod, make an effort to keep the camera in the same spot-don't lean forward or backward. If you are using a tripod you need to keep the camera level as you pan. Some tripods have built-in spirit levels so you can tell when you have it set up correctly. If you have a tripod without this, you can always get a hot-shoe spirit level to fit your camera's flash hot shoe.
You can't have too much overlap. The more you have, the more your computer will have to work with when matching up images. It's best to have 25-50% of each image overlapped. If you are panning to the right, look through your viewfinder and make a mental note of what is at the right edge of the image; as you pan, you want what was at the right edge to be one-third of an image-width in from the left edge of the next image to ensure a good overlap. Make sure you have all the shots you need-it will be a frustrating waste of your time if you don't have enough images to form a complete panorama.
The focal length of your lens will determine the number Of pictures you need to make your panorama. The wider the lens, the lower the number required. If you are using a zoom lens, it's best to zoom it out and have your subject appear farther away, so that you don't have to take as many pictures. You must be really careful not to change the focal length between shots because, if you do, the images won't line up properly and you will have to start shooting again.
To merge your photos using Photoshop CS4 go to File > Automate > Photomerge; if you are using Photoshop Elements 7 or 8 go to File > New > Photomerge, The same dialog box will open in both applications. You will be asked to select all the images you want to stitch together. Once you have selected them, there are a few different options you can select. Experiment with these to see what works best for you. Once you have shot the images, photomerging is the easy part.
You don't actually need a computer to stitch images together-some cameras have a Panorama mode that will do this in-camera. There is even an application for the iPhone that will stitch, and let you crop the resulting image. The best one I have found is AutoStitch.
iPhone Panorama This panorama was stitched together by AutoStich on my iPhone. It includes 21 images.
![Dungeness Nuclear Power Station Panorama images give a wonderful sense of vastness. This image of Dungeness was made up of 11 images. One of the main advantages of a panorama is the level of detail you can include. As you can see from the lighthouse detail, this image could be printed up to 80cm [c. 2½ft] wide and suffer no loss of quality.](http://images-20200215.ebookreading.net/23/4/4/9781136089893/9781136089893__photo-op__9781136089893__Images__fig00454.jpg)
Dungeness Nuclear Power Station Panorama images give a wonderful sense of vastness. This image of Dungeness was made up of 11 images. One of the main advantages of a panorama is the level of detail you can include. As you can see from the lighthouse detail, this image could be printed up to 80cm [c. 2½ft] wide and suffer no loss of quality.
