
50 Patterned bokeh
Quality blurring
Kevin Meredith
The Idea
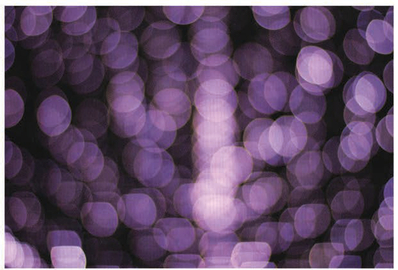
Before you can get to grips with patterned bokeh, you need to know what bokeh is. The term "bokeh" is derived from the Japanese word for "blur" and is used by photographers to refer to the out-of-focus areas in a photograph. If a point of light is out of focus in an image it will turn into a big circle; with patterned bokeh you can turn these circles into any shapes you want, without the use of image-manipulation software.
Carousel Lights I turned the out-of-focus lights on a carousel into arrows by placing a cutout ol an arrow shape on the lens.
The Ingredients
- ▶ SLR and prime lens with a wide maximum aperture
- ▶ Black card
- ▶ Scalpel or craft knife
- ▶ Fairy lights (optional)
The Process
You may notice that if you have a small point of light out of focus in a photo it will turn into a circle, and the more out of focus it is, the bigger it will be. The size is also affected by how wide your camera's aperture can go-the wider the aperture, the bigger the circle. The reason the out-of-focus lights appear as circles is that the aperture inside your lens is circular. In a cheaper lens it might be hexagonal, and then the blurred light points will appear as hexagons. To customize your bokeh, cut a shape out of a piece of card, then place it over your lens so that the shape is in the middle of the lens. Black card is best because it soaks up all the light—if you use white, you might start to see it in your photos. The size of the shape you should cut out will depend entirely on what lens you are using-the bigger the lens, the bigger your cutout has to be. For this reason, it's best if you use an SLR as they have bigger lenses than compacts, It is possible to use this technique with a compact digital, but your cutout would have to be so small it becomes impractical. It is not well suited to film cameras because you really need instant feedback for this technique-you would waste too much film.
To test your cutout, set the focus on your lens to its lowest value {the opposite of infinity), hold the cutout over it, look through the viewfinder, and point it at a distant light source, You should see that your light source is now the shape of your cutout, Move the camera around so that the light source goes to the edge of the picture; if it disappears, you need a bigger cutout. This process can be quite time-consuming, Once you have the perfect-sized cutout, position it centrally over your lens, then put the camera lens on top of your card and trace around the lens. The next step is to cut this circle out, but leave some tabs, which you can use to attach the card to the lens with a rubber band.
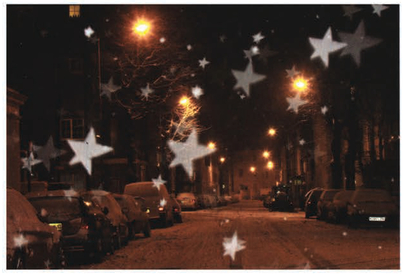
Snowing Stars These stars were created by lighting up snowflakes with a Hash, through a starshaped cutout. I focused the camera on infinity
![Robot and Stars If you are throwing distant lights out of focus, it is possible to focus on a near object. This robot was about 40cm [c. 1ft 4m] from the lens.](http://images-20200215.ebookreading.net/23/4/4/9781136089893/9781136089893__photo-op__9781136089893__Images__fig00467.jpg)
Robot and Stars If you are throwing distant lights out of focus, it is possible to focus on a near object. This robot was about 40cm [c. 1ft 4m] from the lens.
If you aren't that crafty, you can buy kits of cutout shapes designed specifically for the purpose from bokehmasterskit.com. The kit includes shapes that would be really difficult to cut out, like stars, smiley faces, birds, and planes.
Once you have your cutout, you can start shooting. Shooting in the dark is best because this technique is all about turning points of light into shapes. Lights on their own can look great, but if you want to introduce the wow factor, it's best to incorporate something in the foreground. An easy technique, for a still life or portrait, is to use some Christmas tree lights. Set up the lights as a backdrop and position the object you want to shoot as close to you as possible so that the background will be at its most out of focus, which is what you need.
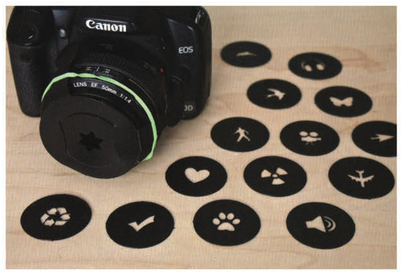
If you're not too handy with a scalpel, you can get the Bokeh Masters Kit from www.bokehmasterskit.com
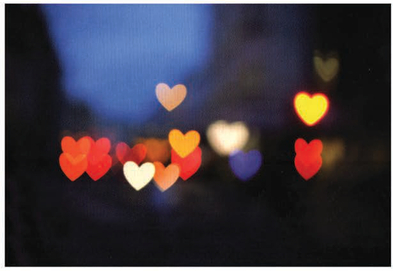
Love Lights I used a heart-shaped cutout for this image. The light sources were traffic lights and car headlights.
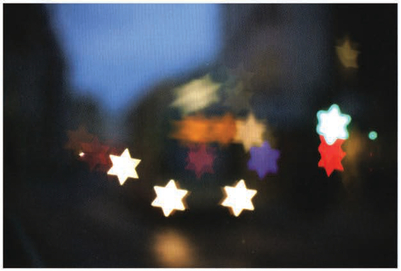
Blurred Lights with Stars The same subject as Blurred Lights, but this time I put a star-shaped cutout over the lens Notice how much smaller the star is than the original circle.
You don't have to have your lights in the distance-you can blur things that are close to you by setting your focus to infinity. Water droplets on a window can be turned into bokeh shapes if there is light shining through them.
Have you ever noticed that if you take a photo with a flash while it's raining or snowing, ail the droplets or snowflakes turn into bright, out-of-focus circles? You can just as easily turn them into a shape of your choosing. Next time it rains or snows at night, grab your camera and cutouts and see what you can do. It does work better with snow, so you might have to wait until you can try it.
