
29 Cut-outs in-camera
There's something in my Holga
Laura Thorn
The Idea
Modify your Holga with some tiny visitors! Place tiny paper shapes inside your Holga to create a silhouette on each photo. The Holga is a simple, and cheap, medium-format plastic camera (120mm roll film) hailing from China. Given that the Holga is built almost entirely from plastic, it produces a very distinctive lo-fi photograph. You can expect blurring, sharpness, vignetting, and light leaks. Hooray!
Retirement
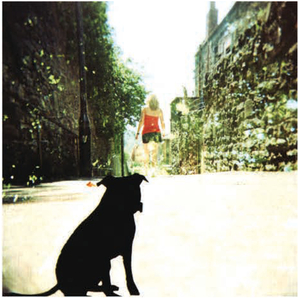
Including a Little lens flare in this image enhances the silhouette effect.
The Ingredients
- ▶ Any camera
- ▶ Holga with 6 × 6cm mask (or similar plastic camera that you don't mind messing with)
- ▶ 120mm, medium-format roll film
- ▶ Thick paper (c. 180gsm|
- ▶ Computer and printer, or pencil and crafty drawing skills
- ▶ Scalpel and cutting board
- ▶ Superglue
- ▶ Patience
The Process
Open the back of your Holga and remove the 6 × 6cm mask, This is what you have to work with, so get an idea of how big it is. Once you have an idea of what size your cut-outs need to be you can let your imagination go nuts!
The shape(s) you choose to cut out will be transposed onto the film and appear in each photo as a silhouette. Choose a shape, some letters, a figure, an animal-whatever you want. I used some vector graphics which I opened in Illustrator, but you could draw your own and cut them out. You can create a "signature" on each photo by printing or writing your name on transparent film (the type you would use with an overhead projector). You need to ensure that your shape(s) is the right size; about 3cm(1 3/16 in) tall is a good place to start. It needs to fit in the mask, without being so big that it covers up too much of the photo.
Alternatively, you might want to make a textured "frame" for each photo. This is dead simple. You can cut a frame about 1cm (⅜ain) wide to fit inside the 12cm mask, which will give each image a nice outline, Toilet paper can work well, as it is slightly transparent.
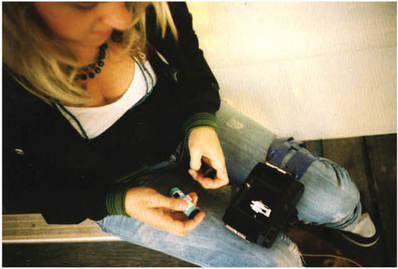
Print or draw your shape onto thick paper or thin card (180gsm is good). Cut out with a scalpel, leaving a tab at one edge to glue the item into the Holga. It is important that you leave enough extra paper to attach the shape; this won't show up on the photo. When you position the shape in the mask remember that all cameras take a flipped image, so things placed on the right will appear on the left, and things at the


His Master's Voice / Comwaths Under Fire / We Go Walking / Mirror To get the best results, think about where your shapes are when you're composing your photos. Old ladies might like to watch people or take it easy down at the seaside; dogs like to chase cats (and they love the piano too); planes like a nice blue sky ...
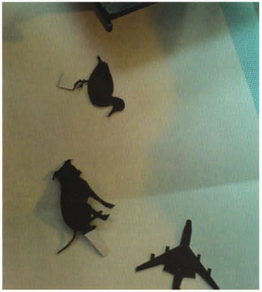

Slicking shapes in the Holga.
top of the mask will appear at the bottom of the image. If you stick people top right so that they hang down inside the mask, they will appear to stand at the bottom left of the image when you see the finished picture. Similarly, if you want to write something, use a transparent film and stick it in back-to-front. It's best if you superglue the tab to the plastic mask so that it doesn't move inside the camera, Wait for the glue to dry properly, You don't want superglue snagging on the film-trust me! Put the mask back into the Holga as usual, load your film, and set out on your photo safari, Finally, develop your film and squeal with delight at the results.
