
Organizing your photos is extremely important, but it's just a lead up to the main event, the editing phase of your workflow. This is when you get to work with your photos on a more intimate level, revealing their important aspects and minimizing any problems. After you learn a few simple techniques, you'll be able to turn an average photo into a great photo in only a few minutes. And after you know what's possible, it will change the way you shoot because you'll begin to shoot with the end result in mind.
Although most photo editing takes place in the Photoshop Elements (PSE) 8 Editor, which is a separate program from the Organizer, you can still do some basic editing within the Organizer using the Fix panel, shown in Figure 5.1. To see this panel, simply click the Fix tab.
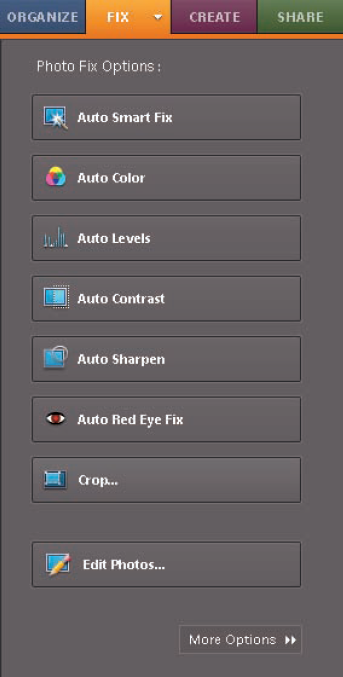
The buttons in this panel are designed to enable you to make some quick edits to get a better look at your photos while organizing them, without taking the time to open them in the Editor. Some are more user-intuitive than others. Here's what they do:
Auto Smart Fix. Auto Smart Fix attempts to fix tonality, contrast, and color all at once. While it seems like a good idea, it tends to overdo some of these adjustments.
Auto Color. Auto Color automatically adjusts color. Color is very personal, so I'd recommend adjusting color with the more powerful features within the Editor.
Auto Levels. Levels is a command used in the Editor to fine-tune a photo's luminance values (brightness and contrast). Auto Levels attempts to make the adjustment automatically. Sometimes it's spot on, while other times it makes a mess of the photo's color.
Auto Contrast. Auto Contrast is similar to Auto Levels, with the same unevenness.
Auto Sharpen. Auto Sharpen adds sharpening to photos. Sharpening can help a photo that's marginally out of focus, but if a photo is really out of focus, there's not much that can be done for it. Because you should almost always do your main sharpening at the end of the workflow, I strongly urge you to not use it here.
Auto Red Eye Fix. Auto Red Eye Fix works pretty well most of the time. It's also extremely easy to correct red eye using the Editor's Red Eye Removal tool.
Crop. The Crop button opens the Crop Photo dialog box, which enables you to crop the photo to preset crop sizes, or custom sizes.
Edit Photos. Clicking Edit Photos launches the (PSE) Editor and opens any selected photos into the editor.
Though I appreciate the intention behind the Fix panel's tools, I have two problems with them. One problem is that the tools — with the exception of the Crop tool — give you no control over how they're applied.
The bigger problem is that any of the edits you perform in the Fix panel are destructive to your photos (see the sidebar in this section).
Because of this, when you first use any of these tools, a duplicate file with the adjustments is automatically created to protect the original from destructive edits.
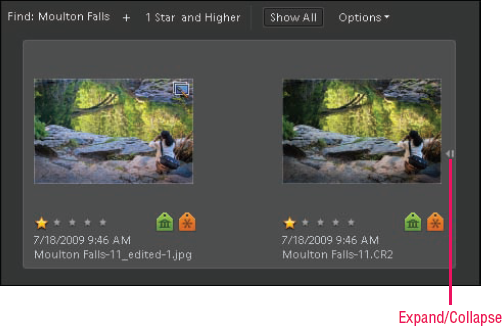
The new file is grouped with the original photo and placed on top of it in the Organizer. This group is called a version set.
A version set is a stack of photos that are different versions of an individual photo. To see all photos in a version set, click the Expand/Collapse icon, as shown in Figure 5.2.
Note
When you save a file that was opened directly from the Organizer into the Editor, you have the option in the Save As menu to add the saved photo as a copy in a version set. Even if it's saved to a different folder, it will still be in the version set with the original.
In addition to expanding and collapsing the photos within it, there are a number of other things you can do with a version set using the Version Set menu.
To see the Version Set menu, right-click a collapsed version set or one of the photos in it when it's expanded. Then hover over the Version Set option in the menu to display the sub-menu shown in Figure 5.3.
The options in this sub-menu enable you to do the following:
Flatten Version Set. This option deletes all versions except for the one on top.
Convert Version Set to Individual Items. This option extracts all files from the version set and creates separate files from them.
Revert to Original. This option deletes all derivative files and keeps only the original.
Remove Item(s) from Version Set. This option removes only the currently selected files within the version set. To select them, you need to expand the version set.
Set as Top Item. This option moves the current selection to the top of the stack so it's the one you see when the set is collapsed.

A version set enables you to keep files that are derived from an original photo grouped with the original — even if it's stored in a different folder. When you use the Photo Fix panel, versions are automatically created. As you see later in this chapter, they can also be created when you save a file in the Editor. Think about using version sets in your workflow to simplify your organizational life.
Though the Organizer's Photo Fix panel seems useful, it's nearly impossible to control it. Because of that, it's best to do almost all editing with the Editor.
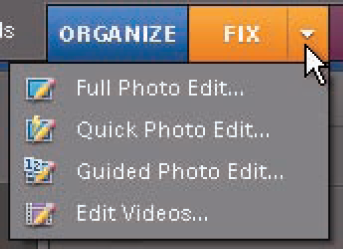
There are three types of editing workspaces available in the Editor when you choose to edit a photo from the Organizer. You can also switch between these different workspaces after a photo is open in the Editor.
To open a selected file from the Organizer into the Editor, select it and click the downward pointing arrow on the Fix tab. Then choose from the menu shown in Figure 5.4. If the Editor isn't currently open, it launches.
Here's what the different editing workspaces are used for:
Full Photo Edit. This option opens the full version of the Editor, which is discussed in detail throughout the rest of this book.
Quick Photo Edit. This option opens a more simplistic version of the Editor.
Guided Edit. This version of the Editor takes you through an average workflow step by step.
Note
If you have Adobe Premiere Elements installed for editing video, the Edit Videos option also appears.
If you're reading this book, you are someone who's interested in making your photos look great. Because of that, I don't discuss the Quick Photo Edit or the Guided Edit versions of the Editor. If you want complete control over your images, you need to know how to use the fully featured Editor.
After you're comfortable with what you can do with it, come back and look at these other two editing options to see if you have any use for them.
You open photos into the Editor using the options in the Organizer's Fix panel, or by choosing the Editor's File
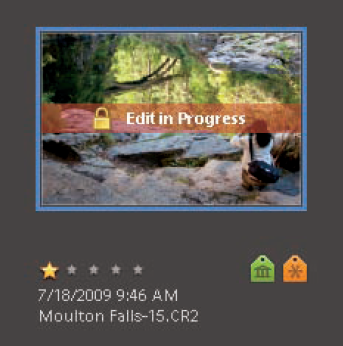
When the thumbnail size is too small to display the textual warning, only the red bar with a lock icon is displayed.
When the Edit in Progress banner appears on a file, you can't change any of its properties in the Organizer — with the exception of adding and removing keywords. You also can't use any of the Photo Fix options in the Fix panel.
Note
see also
The process for opening a raw file is different than the process for opening other image file types. Raw files are covered in detail in Chapter 8.
The PSE Editor has everything you need for editing your photos. Figure 5.6 shows the Editor workspace. Though it looks similar to the Organizer workspace in many ways, it's actually quite different.
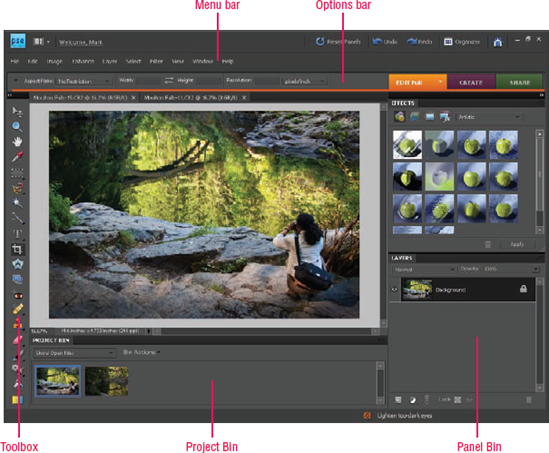
The newly redesigned Menu bar in PSE 8 has a number of handy features. When working with a lower screen resolution with the Windows version, the bar is displayed in two rows, as shown in Figure 5.6.
When working with a higher screen resolution, it's displayed as a single row. The upper row (or the right side of the single-row Menu bar) has a series of workspace tools on the right, including the same Welcome Screen button that's in the Organizer.
You use the Organizer button to the left of the Welcome Screen button to switch back to the Organizer workspace. (Naturally, there are no Welcome Screen or Organizer buttons on the Mac version of PSE.) The row of menus below (on the left of the single-row Menu bar) contains menus that are chock-full of useful features. You visit many of them throughout this book.
Tip
The easiest way to move between the Organizer and the Editor is to leave both programs running and click the appropriate tag in the Windows Taskbar at the bottom of your screen.
On the left side of the workspace is the Toolbox, loaded with lots of great editing tools. You will use some of these tools frequently, while others are more useful when you encounter special problems.
When you hover over a tool, its name and the keyboard shortcut assigned to it are displayed. A small black triangle at the lower right of a tool indicates that other tools are grouped with it, in a stack beneath it. Click and hold on a tool to see all tools in the group.
By default, the Toolbox is displayed in two columns. You can switch it to a single column by clicking the double-headed arrow at the top of the Toolbox.
I prefer the single-column arrangement because it provides more space for images to display. Because of that, when I refer to specific tools in this book, I discuss their location in the Toolbox in its single-column configuration.
However, be aware that if you're working with a lower screen resolution, the bottom of the Toolbox may not be visible in single-column mode.
The Options bar is located just below the menu bar. You use it to set up and fine-tune how tools in the Toolbox are used. The content in the Options bar is contextual to the tool that's currently active.
In Figure 5.6, the Crop tool is active, so all the settings in the Options bar are for the Crop tool only. This bar is an important feature to note because you visit it often in this book.
The Active Image area is the central area where photos are displayed during the editing process. Multiple photos can be displayed in a cascading style, or they can be tabbed, as in Figure 5.6. This enables you to have multiple photos open, but fill the Active Image area with the currently selected photo.
By default, when photos open into the Editor, they aren't automatically tabbed. Instead, they float on top of one another. To tab photos together, click a floating image's title bar and drag it onto a second image's title bar. When you see a blue line appear on the second photo's title bar, release the mouse button.
To pull a photo out of a tab, simply click and grab the photo's title bar and drag it free from the tab. When you do, it becomes a floating window.
The Project Bin enables you to keep track of files that are open in the Editor. By default it displays thumbnails of photos that are currently open. Double-click a thumbnail to make the photo prominent in the Active Image area.
You can change the content of the Project Bin by choosing from the Project Bin menu, shown in Figure 5.7.

To display all currently selected files in the Organizer's Media Browser, choose Show Files from Elements Organizer.
To display the contents of one of your albums, choose the album's name. This is beneficial when you're editing a group of photos from an album because it enables you to keep track of the entire album without needing to move back and forth between the Editor and the Organizer.
Tip
If you're not using the Project Bin, you can hide it by choosing Window
The Editor has a pane arrangement similar to the Organize pane in the Organizer. The contents of the Panel Bin are contextual: They depend on which tab is selected on its header. Clicking the downward-pointing triangle on the Edit tab displays the editing menu that enables you to change the Editing pane to EDIT Full, EDIT Quick, and EDIT Guided. When working in the full edit mode, the Panel Bin is populated with panels that are designed to help you with various editing functions.
Unlike the Organizer workspace, you can customize the Edit workspace quite a bit. You already saw this with the capability to change the layout of the Toolbox and the content of the Project Bin. Look at some of the other things you can do to modify the Editor's workspace.
You can adjust the width of the Panel Bin by clicking and dragging the vertical line that separates it from the Active Image area. Dragging to the left increases the width of the bin and dragging to the right decreases it to its default width.
If you need even more room, especially when you're not using the Panel Bin, click the Expand/Collapse Panels button (a double-headed arrow) at the top of the bin, as shown in Figure 5.8.
Figure 5.8 shows the Panel Bin in its collapsed state. If you need a specific panel while the bin is collapsed, click its name and it pops out to the left.
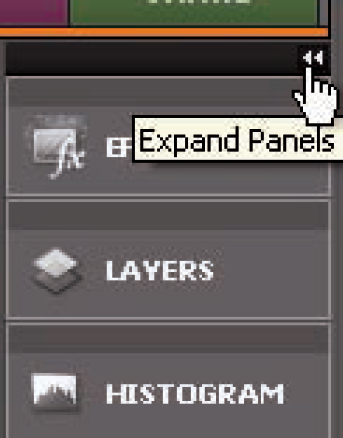
When you're done using the panel, click the Expand/Collapse Panel button on its header or simply click its name again to return it to the Panel Bin. This is a great way to maximize screen space while keeping panels handy.
By default, the Effects and Layers panels are displayed in the Panel Bin. To collapse one of these panels without collapsing the entire Panel Bin, double-click its name. Double-click again to expand it.
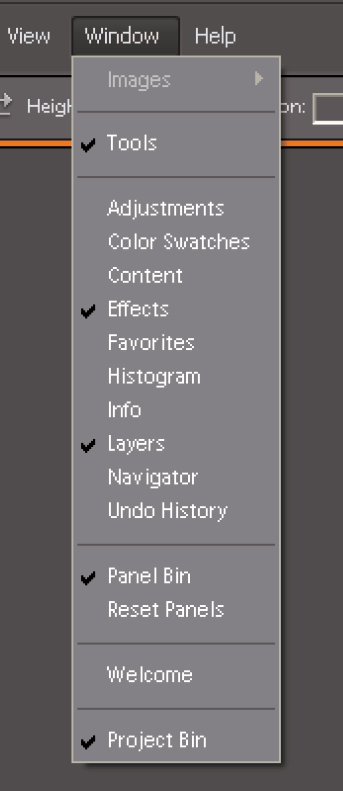
You can also collapse and expand a panel using the Window menu, shown in Figure 5.9. A check mark beside a panel indicates that it's displayed in the bin in uncollapsed form.
When a panel that's displayed in the Panel Bin is unchecked, it isn't removed from the bin; it's collapsed.
Tip
To hide all panels, the Options bar, and the Toolbox all at the same time, press the Tab key. Press it a second time to reveal them.
To completely remove a panel from the Panel Bin, click the panel's title and drag the panel out of the bin. The panel then becomes a floating panel that you can place anywhere on the screen by clicking and dragging its title bar.
This is quite useful for people who use two monitors because it enables them to place all panels on a second monitor, providing more image viewing space on the first monitor. You add floating panels back to the Panel Bin by clicking and dragging them onto the bin. They can be placed anywhere inside the bin. A blue line appears to indicate where the panel is placed when you release the mouse button.
To add a new panel to the Panel Bin, choose it from the Window menu. When it opens, it's added to the bottom of the stack in the Panel Bin. If you want to relocate it higher in the stack, click and grab its title bar and drag it upward. A blue line appears, indicating where the panel will be placed when you release the mouse button. As new panels are added, the height of existing panels is reduced, if necessary, to accommodate the new panels.
You can also group sets of panels together by dragging them from the Panel Bin and then dragging one on top of the other. This creates a floating Panel Group that can be placed anywhere on the screen.
Each panel has a small button at its top right that's used to open the panel's Panel menu. These menus are specific to individual panels. Figure 5.10 shows the Layers panel's Panel menu. The cursor in this figure is on top of the Panel Menu button in the Layers panel.
The Panel menu serves two functions. It provides you with ways to control the look of the panel and, depending on the panel, it also gives you lots of shortcuts to commands that are used with the panel.
For example, the Panel menu for the Layers panel contains a Panel Options command that opens a dialog box for changing the look of the panel.
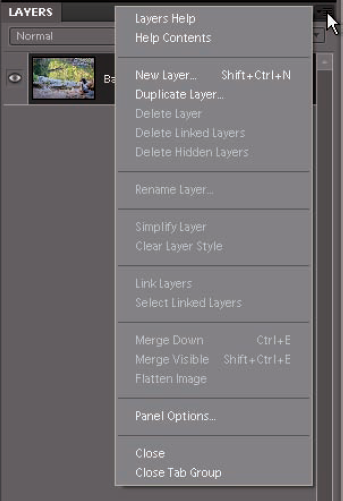
Above the Panel menu are numerous commands that are also found in the Layers menu on the Menu bar. Choosing one of these commands from the list in the Panel menu is a bit faster than locating and using it in the Layers menu.
Each Panel menu also has two other choices at the bottom. Close is used to close a panel and remove it from the bin. Choosing Close Tab Group closes all panels in a floating panel group.
The Editor provides you with lots of ways to view photos while working on them. Some of these options change the way groups of photos are arranged, while others, such as zooming and panning, are typically used on individual photos.
Something that's new in PSE 8 is tabbed viewing. If you've been using PSE for a while, tabbed viewing may be a bit disorienting until you get used to it. As I mentioned earlier in this chapter, when a new photo opens, it floats in its own window. (You can change this behavior using the Editor's preferences, which I cover later in this chapter.)
There are a couple of differences between floating document windows and tabbed document windows that can lead to confusion if you don't understand them.
When documents are tabbed together, you move from one to the other by clicking the title bar of the photo you wish to display. This moves it to the front of the display, making it the only photo visible. When document windows are floating, you move between them in the same way, though you may not see a document's title bar because it's obscured by another floating document.
You can also cycle through open documents using Ctrl+Tab/
This capability to hide what's behind a floating window can lead to some problems. For example, a floating document window hides everything behind it, including panels and the Panel Bin, making it difficult to access the panels.
Something else that's odd is that it's possible to drag the entire Editor workspace to another location, but floating document windows stay where they are instead of moving with the workspace.
Because of these issues, I recommend you work with tabbed document windows until you get used to the differences with tabbed and floating documents. To add a floating document window to a tab, click its title bar and drag it onto another photo's title bar. When a blue line appears around the title bar of the target photo, release the mouse button.
It's also possible to have a group of tabbed photos that are floating. To anchor them to the main viewing area, drag the tab's title bar to the top of the viewing area. A blue box lights up, indicating that the document window is being anchored.
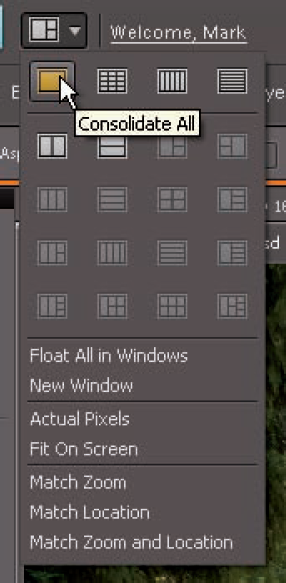
A faster way to consolidate photos into tabs, or to unconsolidate them, is to use the Arrange button, which is located to the left of the Sign In link. Figure 5.11 shows the Arrange menu with all its options.
To consolidate all photos into a tabbed group, click Consolidate All. To Float all photos in individual windows, choose Float All in Windows.
This menu offers numerous other options that enable you to tile photos vertically, horizontally, or in a grid.
In this example, I have only two photos open. Because of that, some of the options in the second section are grayed out. They're only enabled when the appropriate number of photos are open.
To change the magnification of a photo, choose the Zoom tool (Z) from the Toolbox. It's second from the top in the single-column Toolbox. When you choose this tool, the Options bar is populated with Zoom tool options, shown in Figure 5.12.
By default, the Zoom In option (a + symbol) is selected on the left. When you click a photo, the magnification increases. To zoom out, choose the Zoom Out option (the − symbol) and click the photo. When you use this tool, all zooming centers around the area of the photo that you click.
Other ways to zoom using these options are:
Zoom Percentage. Click the downward pointing arrow to open a pop-up magnification slider. Drag the slider to any desired magnification percentage. You can also click and highlight on the percentage number to highlight it and type a specific magnification percentage.
Resize Window to Fit. When working with floating windows, this option is selected to resize the window surrounding the current photo as the photo is zoomed in or out. When it's unselected, the window must be manually resized by clicking and dragging it.
Zoom All Windows. Click this button to have all windows zoom in or out together.
Note
You can temporarily switch the Zoom tool from Zoom In to Zoom Out (or vice versa) without using the Options bar by holding the Alt key while you click with the tool. The cursor on the tool changes to let you know which zooming action is being used.
1:1. Click this button to instantly zoom to 100 percent.
Fit Screen. Click this button to fit the entire image onto the available screen space.
Fill Screen. This button is similar to the Fit Screen button, except that vertical photos are cropped when their width is expanded to fit the screen.
Print Size. Click this button to display the photo at its actual printing size.
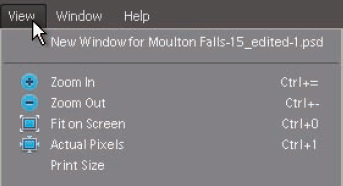
Because zooming is so common when working with photos, there are several keyboard shortcuts for zooming. You can find them in the upper section of the View menu, as shown in Figure 5.13. Committing these shortcuts to memory enables you to zoom without using the Zoom tool.
When you're zoomed in on a photo, you pan it sideways or up and down using the Hand tool, the third tool from the top in the single-column Toolbox. If you want to save a bit of time when editing, hold down the spacebar at any time to temporarily switch the current tool to the Hand tool. When you release the spacebar, the tool returns to the one you were using before panning.
One more way to view a floating photo is to maximize it by clicking the Maximize button that's next to the Close button. In Windows, these buttons are on the right side of the photo's header. On a Mac, they're on the left.
When you maximize a photo, its display fills the entire screen. This is nice, but there's one problem with Maximize view. When a photo is maximized, it covers the rest of the workspace, making it difficult to choose tools or change tool options.
If you already have the tool you need to use selected, Maximize view is useful to help you focus on the job at hand without the distraction of the workspace, or to view the image without the clutter of panels and other images.
The Editor has its own set of preferences that are used to control how the Editor is used. You don't need to be concerned with all the preferences right now, but it's a good idea to look at a few of them before you begin editing photos in the PSE Editor.
To open the General preferences, shown in Figure 5.14, choose Edit
The highlights of the General preferences include:
Step Back/Fwd. By default, the keyboard shortcut for undo is Ctrl/

Allow Floating Documents in Full Edit Mode. This option is selected by default. If you deselect it, all documents automatically open in the tabbed mode. If you like the tabbed viewing mode, consider deselecting this option.
Zoom with Scroll Wheel. This is a cool option that enables you to zoom in or out using the scroll wheel on your mouse. Give it a try and see what you think.

Tip
When you hover over a specific preference, a description of it is displayed.
Another important set of preferences is the Performance preferences, shown in Figure 5.15. The settings in this dialog box enable you to fine-tune how the Editor uses your computer's resources.
If you have lots of computing power, or if your system is somewhat limited, you want to take a moment to address some of these settings.

The areas in the Performance preferences dialog box are as follows:
Memory Usage. The Editor is quite powerful so it needs access to as much of your system's RAM (Random Access Memory) as the system can spare. If you have lots of memory (2GB or more), consider setting this in the 70 percent range.
However, don't go much over 70 percent. If your system is low on memory, keep this value closer to 50 percent. If you're low on memory, consider purchasing more for your system. It's cheap and is the biggest performance boost you can provide the Editor.
History & Cache. Every time you make an edit in PSE, that editing step is recorded in the overall history of the file. This history is accessible in the Undo History panel. By default, only 50 steps are recorded. Additional edits cause the earliest edits to be dropped from history, making them unavailable.
You can increase the number of history steps if you have sufficient RAM in your system. If you're low on RAM, consider reducing this number to somewhere around 30.
Caches are used to control how images are redrawn on the screen after edits are made. A higher number of Cached Levels allows these redraws to occur more quickly, while a lower number allows for greater quality.
Warning
Many of the changes to the PSE preferences don't take effect until the software is closed and relaunched.
Scratch Disks. Next to adding more RAM, this is the best thing you can do to speed up the Editor's performance. Here's how it works: When the Editor runs out of RAM, it reserves a small section of your hard drive and treats it as virtual RAM, which is also called a scratch disk.
If you have a second internal hard drive with lots of space on it, you can designate the second drive for the scratch disk. This is advantageous because when the main system drive is used for a scratch disk, it can slow everything down. That's because it's already being used to run the program and it's being used by your operating system, which requires its own scratch disk.
If PSE and your operating system are using the same disk for scratch disk, the programs need to wait their turns before using it.
Be aware that the drive you choose for a scratch disk must be an internal drive. That's because the connection to external drives, such as USB and FireWire, are too slow for this purpose. Also, if you choose a second drive for a scratch disk, be sure to deselect your system drive so that it's no longer used for the Editor's scratch disk.
The Display & Cursors preferences is the last set of preferences you need to look at now. The most important sections of these preferences are Painting Cursors and Other Cursors.
Figure 5.16 shows the default settings for these cursors, which are icons of the currently active tools as the cursors.
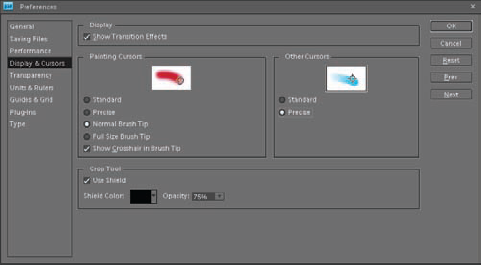
I suppose it's handy for some people to see which tool is active by looking at the cursor. But the problem with using the tool as a cursor is that it's hard to be accurate when clicking the image with the tool because you don't know which part of the tool's icon is the center of the action.
Because of that, I prefer to change the Painting Cursors setting from Standard to Normal Brush Tip and to select Show Crosshair in Brush Tip. I also change the Other Cursors setting from Standard to Precise. Now all cursors display a crosshair, enabling me to use them with precision.
One final thing to look at in this chapter is the options available to you when you save a file. Some of these options concern where the file is saved and others determine the type of file that's saved.
The Save As option (File
The first thing to notice about this dialog box is something I added that isn't part of the normal dialog box. I used the Create New Folder button at the top of the dialog box to create a folder named Edited. It's inside of the main folder for this shoot.
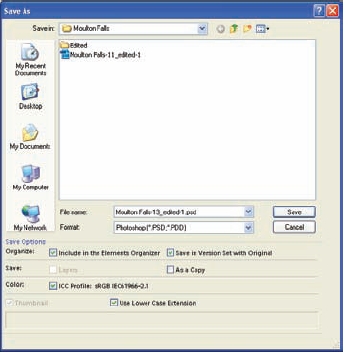
I save all my edited files into sub-folders instead of saving them in the same folder as the original files. This makes it easier for me to keep track of edited images and lets me quickly find them by going straight to their special folders.
Here are some other things to notice about this dialog box:
File name. When a file is first saved, _edited-1 is automatically appended to the filename. This helps to distinguish it from the original file. You can change this to something else if you want to, such as vertical crop.
Include in the Elements Organizer. Choosing this option adds the saved file to the Organizer's catalog. If you decide that you don't want a photo to be part of the catalog, deselect this option.
Save in Version Set with Original. For this option to be available, it's necessary to select Include in the Elements Organizer. The file is added to the version set even if it's in a different folder than the original file.
As a Copy. This saves the file as a copy with all changes and leaves the original name on the open file. When this isn't selected, the open file is renamed with the saved as name and, for all intents and purposes, becomes the saved as file.
Color. Selecting the ICC Profile check box saves the file with the Editor's color working space profile.
One other option in the Save As dialog box is the Format menu. It's used to choose the type of file format to save a photo into. The main options photographers use are JPEG, TIFF, and PSD. Take a closer look at these file types so you know which works best for your uses.
Every digital camera is capable of capturing photos in the JPEG format. This format is popular for two reasons. It's a universal file type that can be viewed by almost every program that's capable of displaying and printing images. It's also a type of file that's easily compressed to make it smaller, which allows more files to be stored.
These two properties of JPEG files are what makes them so popular for e-mailing and displaying on the Web — everyone can see them and they load fast when they are small in size.
Though compression of JPEG files is useful, it also cause problems. That's because it's a style of compression that's called lossy. Whenever a JPEG file is compressed, information is lost. When this compression is minimized, it barely affects the quality of the file. But when lots of compression is used, or when a file is repeatedly re-compressed by saving it in the JPEG format several times, the data loss begins to add up. This loss often manifests as banding in colors.
For example, imagine that you have a photo of the ocean with a nice blue sky that transitions from a light blue by the water to a deep blue higher in the sky. If this file becomes over compressed, some of the subtle colors in between the dark blue and the light blue are lost. Instead of seeing a nice gradient, you see bands of color.
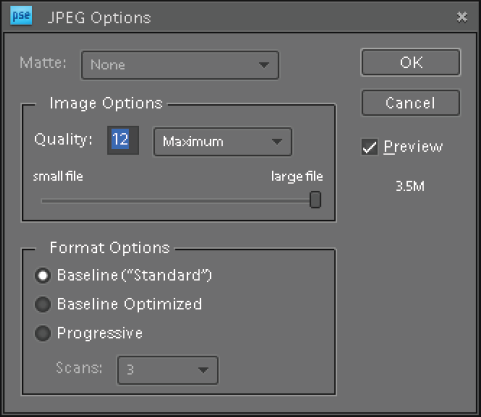
There are two ways to minimize a JPEG file's lossy compression. The first way is to minimize the amount of compression whenever possible while saving a file. Figure 5.18 shows the JPEG options dialog box that's displayed when you select JPEG from the Format menu in the Save As dialog box and click Save.
Unless you need a very compressed file for something such as e-mail or Web display, always choose the highest quality setting of 12. This compresses the file the least amount. With this setting, you can resave a file several times without degrading it. However, if you plan to reopen a file for further editing, it's best to save it in a format that doesn't degrade the file.
TIFF files aren't quite as universal as JPEG files, but they run a close second. Nearly all photo editing software is capable of working with this file type. TIFF files can be saved compressed, or uncompressed using the TIFF Options dialog box that opens after you choose this format.
The difference is that most TIFF compression is lossless, meaning that no information is discarded during the compression process. When compressing a TIFF file, you have three options: LZW, ZIP, and JPEG. Choose either the LZW or the ZIP compression method because the JPEG option is a lossy style of compression.
The PSD file format is Photoshop's native format. Most Adobe products, as well as some editing software from other manufacturers, can open PSD files. By default, a PSD file has some lossless compression applied to it, making it a bit smaller than an uncompressed TIFF.
The advantage of using PSD is that this file type integrates better with PSE, which is why it's the preferred file type for saving photos edited in PSE.
Because of the compression issue with JPEG, it's always best to save edited files in the PSD or TIFF file formats. If hard drive space is an issue, choose a compressed version of TIFF. If it's not, choose PSD for maximum compatibility with PSE. If you ever need a JPEG for printing at a lab or e-mailing, you can open a TIFF or PSD file and save a version of it as a JPEG for that use using the Save As command.
