Before you can begin managing and organizing your photos with the Organizer, you need to let Photoshop Elements (PSE) know the photos exist. The process of doing this is called importing. You can import photos that are already on your system or photos from a digital camera or camera card reader. Fortunately, PSE makes the importing process easy and efficient by using the Adobe Photo Downloader. However, before you begin importing your images, it's a good idea to have an understanding of some basic concepts.
Chapter 1 described the PSE Organizer more as a catalog than a file browser. A file browser enables you to see small thumbnails of all the photo files in any folder you direct it to. A catalog system, on the other hand, displays only files that have been added to the catalog through some sort of importing process. If other files are in the folder you direct it to, they won't be displayed. It's as though they don't exist.
A catalog-style browsing system functions much like the card catalog at a library. If someone places a book on the shelf without adding it to the catalog, it will be virtually impossible to locate the book when it's needed. The only way someone could find it would be by remembering where the book was placed or by accidentally stumbling upon it.
When the book is added to the catalog system, its place on the shelf is recorded and other information about it is added to the catalog listing. For example, the author and the publication date are listed, along with any specific genres the book belongs to, such as science fiction or romance. When this information is in digital form, as it is for most libraries today, it provides extensive searching capabilities when you look for a book by title, author, or genre.
A digital photo catalog system stores a great deal of information about the photos in it. It also stores previews of the photos so that you can quickly view files without needing to go to the source image. This is different than a file browser program. Though it may have the capability to temporarily store some previews of recently viewed files, the file browser eventually needs to go find the photo you want to view at its location on the hard drive before you can see it. This can slow down file browsing, especially when a large number of files are being browsed.
Note
Your files remain where they are originally stored on your hard drive. The catalog has links to them. They do not reside in the catalog itself. This is the same concept as books in a library, which are stored on shelves, not in the card catalog.
Because PSE uses a catalog, it needs to know when you move files outside of the Organizer program. For example, if you use Windows Explorer to move a file, it's like going into the library and moving a book to another shelf without updating the card catalog. When you do this at the library, the book can completely disappear from the system. Fortunately, PSE is a bit smarter than a library card catalog, but you should try to make its job easier by moving files inside of the Organizer.
PSE gives you the capability to have more than one catalog. However, I recommend that you consider limiting yourself to a single catalog for all your photos. Otherwise you lose some of the power of using a catalog in the first place. Think of what it would be like to go to the library catalog and have to search through multiple card catalogs to find the book you're looking for.
With that said, there are some times when more than one catalog may be useful. For example, if you shoot some photos for personal use and others for business, you may find it convenient to place them into separate catalogs. This would be especially useful if other people you work with are using the business catalog. But if you aren't sharing the catalog, consider placing all photos into one catalog. You never know when a business photo might become a personal photo, and vice versa. After they're all in the same catalog, you can identify them so that you can sort for photos based on personal or business use.
Another scenario when creating separate catalogs may be useful is when more than one person is storing photos on a computer with PSE on it. In this case, it is much easier to stay organized if each person's photos are in separate, personal catalogs. Just keep in mind that only one catalog can be open in the Organizer at a single time.
Note
Also, be aware that if you use Photoshop.com to back up or synchronize your catalog, you must use one catalog.
Figure 2.1 shows the PSE Catalog Manager dialog box. You access it by choosing File
Useful things you can do with Catalog Manager include:
Click New to create a new catalog. When you do, you'll be prompted to give the catalog a unique name.
Select a catalog from an earlier version of PSE, if you have one, and click Convert to convert it to the current version.
Select Catalogs Accessible by the Current User to prevent users with different system accounts from viewing your catalog.
Select Custom Location to place your catalog in a different folder location than the default location. This is useful for people who store all their photos on an external hard drive so that they can use it on different computers. It enables them to store the catalog on the same drive as the photos for maximum portability.
Reduce the amount of hard drive space a catalog uses by selecting it and clicking Optimize. This can also improve performance. Be sure the Editor is closed before doing this.
A power failure or other technical glitch can damage a catalog. When this happens, PSE displays a message informing you that there's a problem with the catalog. Click Repair so the Organizer can go through the catalog and fix any errors it finds.

When you launch the Organizer for the first time and you have a catalog from a previous version, you are asked if you'd like to upgrade that catalog to work with version 8. Follow these steps to upgrade:
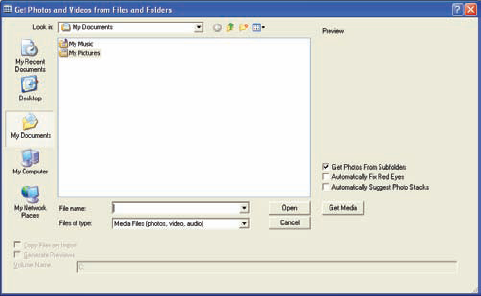
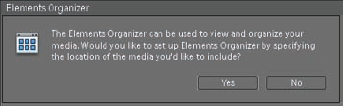
Click Yes to convert your catalog. The Get Photos and Videos from Files and Folders dialog box opens, as shown in Figure 2.2. If you don't have a catalog yet, you get the dialog box shown in Figure 2.3. Click Yes to create a new catalog.
Use the Get Photos and Videos from Files and Folders dialog box to navigate to the folder or hard drive where your files are stored. For example, if your photos are in the My Pictures folder, select that folder without opening it and click Get Media. The Organizer goes to work cataloging every photo or video file it finds in the folder.
Tip
If you choose to wait to create a catalog, you can do so at any time by choosing File
The Get Photos and Videos from Files and Folders dialog box, shown in Figure 2.2, has a few options. Here's what they do:
Get Photos From Subfolders. Selecting this check box enables the Organizer to completely replicate the structure of your folders and import all the photos in them, which is a good idea when you're setting up your main catalog. This option is selected by default.
Automatically Fix Red Eyes. Selecting this check box means any photos that have a red reflection in the subject's eyes will be fixed automatically. I recommend against this for two reasons. First, it's really easy to fix red eyes when you want to. Secondly, it slows the whole import process because every file must be checked.
Automatically Suggest Photos Stacks. Photo stacks are a way of saving visual space in the Organizer by stacking similar photos on top of one another. This can be useful, but it's easy enough to do later, so I recommend leaving this option unchecked until you get used to the Organizer.
When the Organizer is finished importing, the main viewing area is populated with all the photos and videos it found. They are displayed with the newest files at the top. If any photo or video files were located but could not be imported, they are displayed in a list with an error message beside them, letting you know why they didn't import.
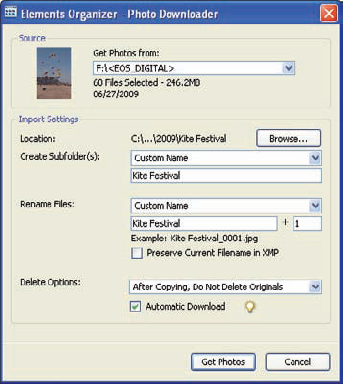
When you plug your camera, or your camera card reader, into your computer, the Adobe Photo Downloader, shown in Figure 2.4, opens.
If the downloader doesn't open, choose File
This dialog box enables you to download photos onto your system and manage the downloading process so that you can organize your files the way you want them organized. Follow these steps to import your files:
Click the Browse button in the Location section of the dialog box. Use it to choose the main folder where you want to place a subfolder for the shoot. In Figure 2.4, I placed my folder into My Pictures/2009. I do this so that each shoot folder is organized by the year. This enables me to keep my photos organized in an intuitive manner. I don't need to change this setting until 2010.
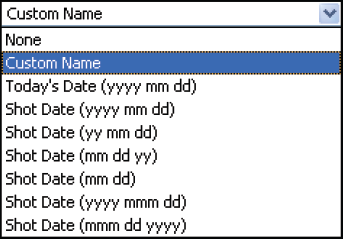
Click on the Create Subfolders menu to open a drop-down menu, shown in Figure 2.5. When you do this, the downloader creates a subfolder for you during the import process. Type a name for the subfolder into the text box below Custom Name. In Figure 2.5, I choose Custom Name from the drop-down menu so that I can use a meaningful name for the folder. The other options, with the exception of Today's Date, use the date that photos were shot to name the subfolder(s) (see the sidebar in this section).
Type the subfolder name into the text box below Custom Name. I typed Kite Festival because these are photos of a kite festival on the Oregon Coast. This subfolder name is added to the Location folder path after the 2009 folder.
Click on the Rename Files menu to open a drop-down menu of different file naming systems. This menu is similar to the subfolders menu shown in Figure 2.5. It enables you to rename the files as they're imported so that you can use more meaningful names than the names the camera assigned to your photos. Choose the naming strategy that you want to use. I usually choose Custom Name, instead of a date, so that I can use a descriptive name for the photos. Quite often this name is the same as the subfolder name used in Step 3.
If you choose Custom Name, type the name in the text box provided. The box directly to the right of it is used to apply a sequence number after the filename so that the filenames are sequenced in chronological order. Notice that a file-naming preview is displayed below the text box so that you can see what the naming structure looks like.
By default, the beginning sequence number is 1, but you can change it to any number you desire. This is useful if you have more than one media card from a shoot. When you download the photos from the second card, you can select a sequence number that continues the numbers from the first card.
Tip
Renaming files with meaningful names is useful for identifying your photos. Another reason it's a good practice is that some cameras always start the naming process beginning with the same number as when a media card is formatted. If this happens, and you don't rename, you end up with lots of files with the same name, which can cause problems down the road.
Make sure that After Copying, Do Not Delete Originals is selected in the Delete Options menu. The other options are After Copying, Delete Originals, and After Copying, Verify and Delete Originals.
There are two reasons I recommend not deleting during import. First, deleting originals during the import without verifying that the imported files are in good shape is risky. Second, even if you choose the verify-before-deleting option, you can run into problems. Most camera manufacturers recommend you delete files in the camera instead of from the computer. This is because you run the risk of corrupting the media card. In fact, it's considered a best practice to delete your files by formatting your media card within the camera, using the camera's menu commands. This way, all files are deleted and the card is prepared for future use all in one step.
Tip
If for some reason photos are deleted from your media card when they shouldn't have been, they can most likely be recovered. Almost any camera store can recover the files for you, provided you haven't started shooting new photos on the card.
Select Automatic Download so that in the future the Photo Downloader dialog box opens when a camera or media card is connected. If for some reason this causes problems when you plug in other devices, such as USB drives, you can configure this action in the Organizer preferences.
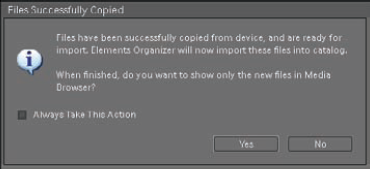
Click Get Photos to begin the download and import process. First, the files are copied to your system. Then the dialog box shown in Figure 2.6 opens, asking you how you prefer to view the files after the completion of the import process. I suggest clicking Yes so that you can focus on the new files. You can always see the rest of your photos by clicking Show All in the Organizer's main viewing window.
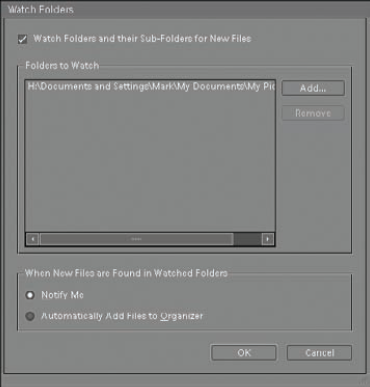
PSE has a cool feature that enables you to designate a specific folder as a watched folder for new photos that are placed into it outside of PSE. When photos are added to this folder, or any of its subfolders, these photos can be automatically added to the Organizer catalog.
By default, the My Pictures folder is a watched folder. You can modify the behavior of this watched folder or add additional folders to the watched folder list by choosing File
When you do, you'll see the Watch Folders dialog box shown in Figure 2.7.
Here are some of the things you can do with the Watch Folders dialog box:
To turn folder watching off, deselect Watch folders and their Sub-Folders for New Files.
To add a new folder to the watched folder list, click Add and then specify the folder to be watched.
To modify the import action of a watched folder, select the folder from the watched folder list and then select one of the actions in the lower section. When you select Notify Me, a dialog box opens to let you know files have been found. You are given the option of adding them to the catalog or ignoring them. Selecting Automatically Add Files to Organizer allows the files to be added automatically.
Specifying a folder as a watched folder is quite handy. If it's your main photo folder, which in most cases is My Pictures, it insures that you are alerted when any new photos are added to the folder, giving you the opportunity to include them in your Organizer catalog.
A really cool feature in PSE 8 is the capability to share your catalog with another computer system running PSE. This is useful in a number of scenarios; for example, when you have a catalog on your system at work and want to have the same catalog on your home system. Another example would be when you and your spouse are sharing the same catalog on two different systems. If one of you makes some changes, it's nice to see those changes reflected in both catalogs.
To synchronize a single catalog on multiple computers, you'll need a Photoshop.com account. Once it is set up, use the album's Sharing pane to select Share to Photoshop.com. After you do that, any changes you make to that album, such as adding, deleting, or editing photos, from either system are replicated on all systems that are set up for synchronization. You can set up sharing on a single album or on multiple albums. If you want to share your entire catalog, you can create an album that contains all photos.