For the most part, the information in this book is presented in the same order as a typical workflow: You import and organize your photos, make basic tonal and color adjustments, apply any necessary retouching, and add creative effects. At this point in the workflow, your photos have almost completed their trip through Photoshop Elements (PSE). However, there are still some critical steps you must perform before they're ready for output. In this chapter, you learn the proper way to make those final adjustments so that they enhance your photos, instead of detracting from the improvements you've already made to them.
For people new to digital photography, resolution can be one of those things that's hard to wrap your head around. When it comes to photography, there are two different types of resolution to consider.
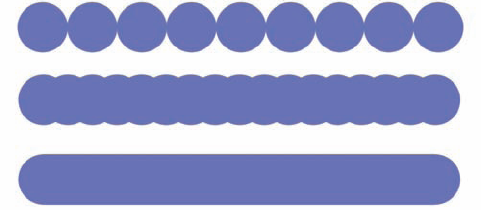
The first is dots per inch (dpi), which refers to the number of dots of ink per inch that are laid down by an inkjet printer's print head. The higher the number, the closer the dots of ink are to one another. If the dots are not close enough to one another, gaps appear, causing edges that should be smooth to appear jagged because the space between the dots is visible.
The illustration in Figure 13.1 demonstrates this point.
The printer driver controls the dpi, and higher settings consume more ink. For example, my inkjet printer has three dpi settings: 720, 1440, and 2880. If I'm printing on absorbent fine-art paper I can use 720 dpi because any space between ink dots is closed as the ink bleeds into the paper.
If I'm printing on glossy paper, I need to use 1440 dpi because the paper isn't absorbent. This setting uses twice as much ink, but it's a necessary expense. I never use 2880 dpi because I've never seen a quality difference between this setting and 1440 dpi.
Note
Some printer drivers don't display the actual dpi numbers. They use names like Text, Photo, and Best Photo to represent 720 dpi, 1440 dpi, and 2880 dpi, respectively.
Sticking with 1440 dpi enables me to get a much longer life from my ink cartridges.
The second type of resolution is pixels per inch (ppi). Ppi is similar to dpi except that it refers to how close the pixels in the image are to one another. The same concept applies — if pixels are farther apart, the space between them becomes apparent, causing jaggedness along edges.
Naturally, these gaps depend on the type of environment that's used to output the file. When printing with an inkjet printer, anywhere from 240 ppi to 320 ppi works quite well. If you're printing on absorbent paper, you can use lower values because the ink bleeding I mentioned previously will occur.
If you understand the simple mathematical relationship between the ppi and the size of a print, the whole resolution issue falls into place. Suppose I have a photo that measures 8 × 10 inches at 150 ppi, and I need to change the resolution to 300 ppi so that the photo can be printed at a lab that requires files to be at 300 ppi.
If I simply change the resolution, twice as many pixels are shoved into each inch. Because of this, the overall size of the photo is reduced by half.
This exercise shows you the math in action with an empty file:
Choose File

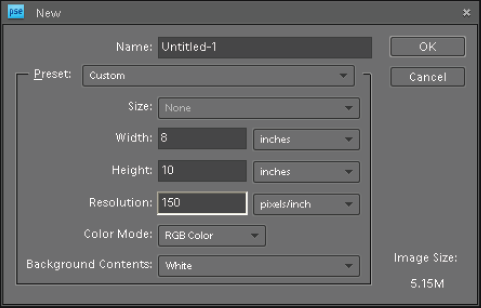
Set the following attributes, as shown in Figure 13.2, and then click OK:
Width = 8 inches
Height = 10 inches
Resolution = 150
Color Mode = RGB Color
Click OK. The new file opens.
Choose Image
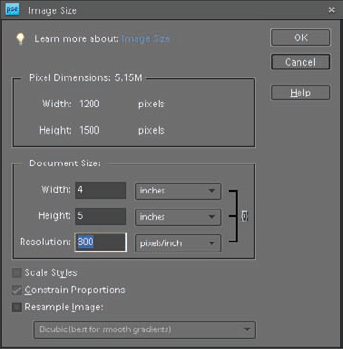
Deselect the Resample Image option. Notice that the Pixel Dimensions area at the top of the Image Size window changes when Resample Image is turned off. The drop-down menus disappear. That means that the number of pixels being used in your image is fixed at 1200 × 1500 pixels.
Change the resolution setting to 300. Notice that the size of the image goes from 8 × 10 to 4 × 5, as shown in Figure 13.3. That's because you're only changing the distance between pixels as you modify the resolution of the file. You have fixed overall pixel dimensions of 1200 × 1500.
When you set your resolution to 300 ppi, the math dictates that the image is 4 × 5 (4 × 300 ppi = 1200 pixels, and 5 × 300 ppi = 1500 pixels). When the resolution is set to 150 ppi, the image must be 8 × 10 in size (8 × 150 ppi = 1200 pixels, and 10 × 150 ppi = 1500 pixels).
In the previous example, I had you deselect the Resample Image option because Resample Image has a special function that affects the math involved in resizing an image.
When you deselected Resample Image, the Pixel Dimensions remained fixed when you changed the resolution value. Take a look at what happens when Resample Image is selected:
Begin with the file you created in the previous set of steps, and return to its original state using the Undo History panel. If you closed it, then go back and complete Steps 1 and 2 in the previous steps.
Leave the Resample Image option selected or select it if it isn't already selected.
Tip
If you still have the Image Size window open from the preceding example, you can reset it to its default settings by holding down Alt and clicking Reset — which appears where the Cancel button used to be. This works with almost every dialog box with a Cancel button.
Change the Resolution to 300. Notice that the Image Size remains at 8 × 10. What changed was the Pixel Dimensions at the top of the window. They went from 1200 × 1500 to 2400 × 3000.
Change the Resolution to 600. Now the Pixel Dimensions changes to 4800 × 6000, but the Document Size remains fixed, as shown in Figure 13.4.
When comparing Figure 13.3 to Figure 13.4, notice the little chain icon that appears to the right of the Document Size settings. This icon indicates that these values are linked. When one value is changed, the other linked value is affected.
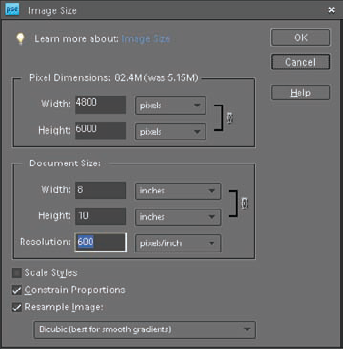
In Figure 13.3, where Resample Image is unselected, the Width, Height, and Resolution settings are all linked. In Figure 13.4, where Resample Image is selected, only the Width and Height values are linked.
Resolution is not affected by changes to these values and vice versa. Also notice that another link icon is next to the Pixel Dimensions in Figure 13.4, indicating that changes to resolution affect pixel dimensions and vice versa. These icons are a great way to remember whether or not to select Resample Image.
When Resample Image is selected, modifications to Resolution or Document Size in the Image Size dialog box affect only the Pixel Dimensions. When you make an image's width and height dimensions smaller, or reduce its resolution, resampling takes pixels from the image. This is called downsampling.
If you make the Document Size larger or increase the Resolution value, resampling adds pixels to the image. This is called upsampling. You can verify that this is taking place by looking at the file size readout next to Pixel Dimensions in Figure 13.4.
The original file size was 5.15 megabytes (M). Now, with the addition of all the new pixels being added by Photoshop, the file size is 82.4M.
Tip
There are two different ways to measure a photo file's size in megabytes. One is the size of the photo when it's open and is determined by the pixel dimensions — width × height × three color channels. This is the size shown next to Pixel Dimensions in the Image Size dialog box. The second measurement is for when the file is saved to disk and varies by the type of file that's saved. For example, a saved TIFF file is always bigger than a JPEG saved from the same file because the JPEG is compressed. This size is shown when you look at the file in your Windows Explorer/ Mac Finder.
There's one more wrinkle to throw at you before moving forward. In the previous examples, you probably noticed a drop-down menu beneath Resample Image in the Image Size dialog box, as shown in Figure 13.5.
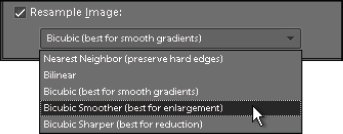
This box enables you to change the image interpolation method used when you resample an image. Different interpolation settings affect the way new pixels are assigned color by examining the color of pixels that surround them. There are five options in this menu:
Nearest Neighbor. Fast, but not very precise; best for illustrations with edges that are not anti-aliased (such as a logo) rather than photos. It preserves hard edges.
Bilinear. Medium-quality results with most types of images.
Bicubic. Slower but more precise; produces smoother graduations than the two previous methods.
Bicubic Smoother. Based on bicubic interpolation, but designed for enlarging images.
Bicubic Sharper. Based on bicubic interpolation, but designed for reducing image size because it maintains the detail of the original image.
Bicubic Smoother and Bicubic Sharper are the two interpolation methods you'll use almost exclusively when resampling photographic images in PSE. When you're upsampling, choose Bicubic Smoother. When you're downsampling, choose Bicubic Sharper.
Sometimes it's necessary to change the document size and resolution at the same time. For example, suppose you have a file that's sized to 8 inches × 10 inches at 250 ppi, and you need to change it to a 4 inches × 5 inches at 300 ppi. The following steps walk you through the Image Size command:
Choose File
Choose Image
Deselect the Resample Image option, and change the resolution to 300. Notice that the Document Size changes to 6.67 × 8.33 because you're moving the pixels closer together.
Select Resample Image with the Bicubic Sharper option from the Resample Image menu, and change the Document Size Width to 4 inches.
Click OK. Now you have a file that is 4 × 5 at 300 ppi.
Because cropping in the Editor is considered destructive — it can't be undone after the file is closed — I always leave original files, and any edited files containing layers, uncropped.
In fact, the reason I waited until now to discuss as basic a thing as the Crop tool is because you shouldn't perform this permanent step until most of the editing work on the image is complete and you have saved the edited file.
After cropping, be sure to save the file with a slightly different name (such as file123-8x10.jpg) to prevent overwriting the original or edited files.
You can use the Crop tool to crop to a predetermined aspect ratio (such as 5 × 7) or you can use it to create a custom crop to suit special needs. Take a look at how this tool works:
Open the Beach_Dog.tif from the downloadable practice files on the Web site (
www.wiley.com/go/pse8aftertheshoot). Before doing anything, check the document size of this image so you know what you're working with (ImageSelect the Crop tool (C) from the Toolbox; it's tenth from the top in the single-column Toolbox. Go to the Options bar, shown in Figure 13.6, and click the downward pointing arrow on the far left and choose Reset Tool to clear any settings from the Crop tool's options and reset the Aspect Ratio to No Restriction. Now the tool is ready to handle any kind of cropping aspect ratio.
Click near the upper-left area inside the image and drag downward to the lower right. Notice that you can create any aspect ratio you want while dragging. After you release the mouse button, use the control handles at the sides or corners of the selection to change the dimensions of the cropping boundaries.
Tip
You may have trouble with the cropping selection trying to jump to the image boundary when you work near the boundaries of the image. This is because the Crop tool tries to snap to the edges of the document. To solve this problem, press and hold the Ctrl/

Click anywhere inside the cropping selection to drag and move it to a different location. You can also use the cursor keys to nudge the box a small amount. Hold down Shift when you use the cursor keys to nudge by a larger amount.
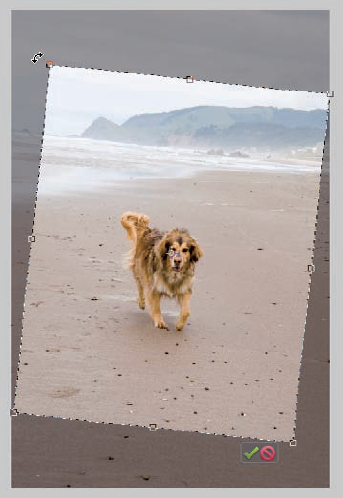
Move the cursor outside the cropping selection until it turns into a curved, double-headed arrow icon. In the Beach_Dog photo the horizon isn't straight, but you can fix it from here.
Click and drag outside the cropping selection to rotate the crop box to any orientation. Drag upward to rotate counterclockwise, and downward to rotate clockwise. Try to match the line of the horizon with the top line of the crop box (make them parallel), as shown in Figure 13.7. Be careful that the cropping selection doesn't extend beyond the edges of the image. If it does, blank space is picked up from the outer area and added to the photo.
When you like the crop, click the Commit button (green check mark) at the bottom right of the cropping overlay. If you want to cancel the crop and begin again, click the Cancel button beside the Commit button. You can also commit a crop by pressing the Enter key and cancel a crop by pressing the Esc key.
This free form cropping works fine when you don't need a specific size, but most often at this point in the workflow you do. Trying to create an exact size using the Crop tool with No Restriction in the Aspect Ratio setting is very hard to do. It's more a matter of trial and error and a lot of luck. Fortunately, you can specify a particular size before cropping.
Return the file to its opening state by clicking the image icon at the top of the Undo History panel.
In the Options bar, type 5 in into the Width field and 7 in into the Height field, and then type 300 in the Resolution field. This is the most common resolution for printing. Keep in mind that it's important to specify a resolution when using the Crop tool to crop to a specified size; otherwise the Editor may change the image's resolution when cropping.
In fact, this is why I ask you to type the numbers into the text boxes; if you simply choose the 5 × 7 preset from the Aspect Ratio drop-down menu without entering a number for resolution, you find that it's no longer 300 ppi after cropping.
Tip
If the measurement abbreviation beside the numbers says something other than in (inches), your ruler preferences are set to something other than inches. This is easy to fix. If the ruler isn't currently visible, choose View
Draw your crop box again and rotate the crop until you like it. This time notice that the aspect ratio is locked and that there are no control handles at the top, bottom, or sides. After committing the crop, notice that you now have a file that's sized for 5 × 7 inches at 300 ppi.

Consider nonstandard options when using the Crop tool, especially when an image lends itself to this treatment. For example, if you have a photo with a great horizon line in it, think about cropping out most of the top and bottom regions of the image to create a panorama of the horizon.
You may have noticed in Chapter 11 that when you use the Move tool to scale a layer, all content of the layer is scaled equally. Sometimes this is desirable, and sometimes it isn't. For example, you may want to scale the sky in a photo to shorten or elongate it, but you may not want to distort the foreground.
A new feature in Photoshop Elements (PSE) 8 called the Photomerge Recompose tool enables you to do this kind of smart scaling. This tool enables you to protect parts of a scene and remove others as you scale a photo's size — things you could never accomplish with standard transformations.
The Recompose tool (C) is stacked with the Crop tool. (You can also open it by choosing Image
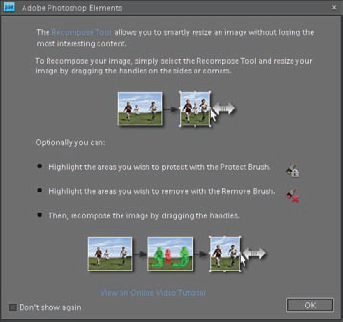
This dialog box is designed to remind you about how the tool is used and serves no other purpose. The upper section depicts a scenario where empty space is automatically removed by dragging one of the side handles inward.
The lower scene shows that you can use the Protect Brush to highlight content you want to keep, and the Remove Brush to highlight content you want to remove before resizing. Both of these brushes are found on the Options bar when the Recompose tool is active.
One thing to notice in the example photos in Figure 13.8 is that the background being removed in both scenes is quite neutral, with little detail that must be blended.
Keep in mind that when there's a lot of background information, the Recompose tool often provides less than satisfactory results.
Tip
After you've seen an information dialog box like this a few dozen times, you probably don't need to see it again. Select the Don't show again check box to prevent it from opening in the future.
Figure 13.9 shows the Options bar settings when the Recompose tool is selected. Here's what these options are used for:
Protect/Remove brushes. These brushes are used to highlight areas you want to protect or remove while resizing. They also have associated eraser brushes that are used to erase highlighting applied with the Protect and Remove brushes.
Size. This option is used to adjust brush size.
Highlight Skin Tones. Clicking this button automatically highlights all skin tones to protect them. Be aware that it also highlights anything that looks like a skin tone, which can be a problem. For example, try using this brush on the practice exercise that follows and notice that it selects most of the brown grass.
Aspect Ratio Preset. This drop-down menu is used to select a predefined aspect ratio to size the image to. Be aware that the sizes listed in this menu are aspect ratios, not final sizes. For example, if you choose 4 × 6, the image isn't cropped to 4 × 6 inches. Instead it's cropped to the 4 × 6 aspect ratio. The Image Size command must be used to complete the sizing to 4 × 6 inches. Notice that there is no 4 × 5 size listed. That's because 4 × 5 and 8 × 10 are the same aspect ratio.
Width and Height. These values provide a real-time read out of the photo's size in inches as it's being recomposed to a different size.
Amount. This value sets the threshold to minimize distortion. Higher values restrict distortion, while lower values allow distortion to occur.

Follow these steps to get a feel for this amazing new tool.
Open the Bike_Race2.tif file from the downloadable practice files on the Web site (
www.wiley.com/go/pse8aftertheshoot). This is a photo of a cyclocross bicycle race — a style of racing on and off road that's very popular in Europe. There's a lot of action going on in this shot, but the central area is dominated by a group of course markers. It would be nice to get rid of that distraction while improving the composition by bringing all the bike racers closer together.Choose the Recompose tool (C), which is stacked with the Crop tool. (You can also select this tool by choosing Image
Choose the Mark for Removal tool from the Options bar, the third brush from the left with a red X on it. Increase the size of the brush to about 125 px and paint all the distracting markers in the center of the image to highlight them with red. Go ahead and continue painting the rest of the middle ground between the groups of riders so that all of it is removed. If you accidentally paint something you don't want to remove, use the Removal Highlights eraser brush to fine-tune your painting.
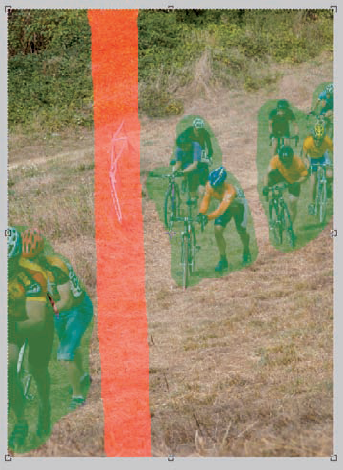
Choose the Mark for Protection brush, the first brush on the left, and highlight all the bike riders and their bikes to highlight them in green and protect them during recomposing. Figure 13.10 shows the protect and removal highlighting.
Choose 4 × 6 from the aspect ratio preset drop-down menu on the Options bar so that the final cropping is set to this predefined aspect ratio. Notice that the image automatically conforms to this aspect ratio and most of the area highlighted for removal disappears from the photo. Be aware that if you're working on a system with limited resources, this process may take a few moments.
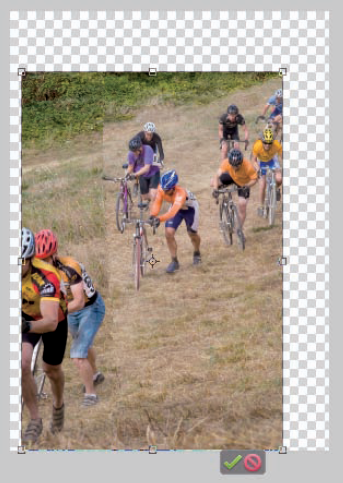
Click and drag the handle on the right and drag inward until the groups of riders are closer together. Then click and drag the handle at the top to reduce the overall height. Notice that the riders are unaffected by the adjustment because they are protected. Also notice that the aspect ratio preset returns to No Restriction because the aspect ratio is changed from 4 × 6.
Figure 13.11 shows the effects of the adjustments.
Click the Commit button at the bottom right of the selection to complete the recompose process. Notice that the new seam between the riders has a hard edge because the Recompose tool had a hard time blending all the detail in the grass and shrubbery. When this happens, which is quite often with this tool, use the Clone Stamp or Healing Brush tools to do any cleanup.
Use the Crop tool to crop the transparent area on the sides and top that were created by the transformation.
As you can see, the Recompose tool is very powerful. Think of it every time you need to compress or extend image content that doesn't have too many details in it.
Tip
If you don't like the scaling and want to start over, click Cancel. Note that canceling does not remove any protector remove highlighting that was previously applied. In fact, you can switch to another tool to do something else and when you come back to the Recompose tool, the highlighting is still in place.
At first thought, sharpening seems like a no-brainer. Who wouldn't want their photos to be sharp? However, the subject is much more complicated. There are three different kinds of sharpening, and an appropriate time to apply each one.
Capture sharpening. By their very nature, digital image files need to have some initial sharpening applied. When you shoot raw, this baseline sharpening is addressed during conversion with Adobe Camera Raw. When you shoot JPEG, it is applied by the camera.
Creative sharpening. This type of sharpening is used to fine-tune an image creatively by modifying the sharpness of selected areas of the image. Creative sharpening also refers to the opposite of sharpening, blurring.
Warning
Most cameras have a sharpening setting that enables you to apply different sharpening presets to your photos as you capture them. If you're shooting raw, this setting has no permanent effect on the image, but it does if you shoot JPEG. I recommend turning off all in-camera sharpening when shooting JPEG; it's easy to add sharpening later but impossible to remove it after the original file is created.
Creative sharpening can be used in the same image to sharpen something of interest, such as someone's eyes, and to blur something else, like the background around the subject, such as the hot rod project in Chapter 9.
The effect of creative sharpening is relative to the rest of the image. The goal isn't to make part of the image perfectly sharp but rather to make it stand out from its surroundings.
Warning
Something you especially want to avoid when possible is sizing and sharpening an image for output, changing its size, and then resharpening it for a new output size without undoing the first sharpening. Sharpening on top of previous sharpening adversely affects the image by introducing unwanted artifacting — distortions introduced by the digital process — causing image details to look crunchy instead of smooth.
Output sharpening. This overall sharpening is designed to prepare an image for final output, such as printing or on-screen viewing. It's applied to the entire image with the intent of getting it ready for a particular output option. One of the things to understand here is that size matters. A file that's being prepared for printing as a 5 × 7 requires a completely different sharpening scenario than the same file being prepared for a 16 × 20. The sharpening on a 5 × 7 file might look great, but the 16 × 20 will not be sharp enough.
Oversharpening degrades the quality of a photo by introducing unwanted artifacts. One way oversharpening occurs is when output-sharpening settings, which are stronger, are used at the capture-sharpening phase.
When the image is sized and prepared for output later, it's necessary to sharpen again, because the resizing affects the first sharpening pass.
When the second sharpening pass is carried out on a previously oversharpened file, it can adversely affect the quality of the image.
Warning
Sharpening is not used to fix severely blurred images. It's used to compensate for some of the effects of digital capture — whether by camera or scanner. If your photo is a little out of focus, you may be able to help it with sharpening. But you'll never be able to make it look the way it would have looked if it had been shot in focus.
It's critical to properly evaluate sharpening on-screen before you use Adjust Sharpness. When the Editor displays a photo on your monitor, it does the best job of showing detail at zoom ratios of 25 percent.
This is easy to see. Simply open a photo and use the Zoom tool to cycle through the magnification presets by clicking the image. As you do, notice that edges look crisp at 25 percent, but not at 33 percent. When you zoom to the next preset of 50 percent, the edges look crisp again, but when you zoom to 67 percent, the edges lose quality again.
When you zoom to 100 percent, they look good again. This is strictly a function of PSE and has nothing to do with the actual image. Because of this, it's important to always zoom to a magnification ratio of 25 percent when doing anything that requires critical judgment — especially sharpening.
Another important viewing factor to consider before sharpening is to display the photo, or its preview in the Adjust Sharpness dialog box, as close to actual size as possible.
Many books tell you to zoom to 100 percent when evaluating sharpening, but because computer displays cannot display a photo at its actual resolution, you end up with the photo being much larger than reality when displayed at 100 percent.
If you sharpen a photo while viewing it at this unrealistic size, you'll find that when you see the finished print, it will be undersharpened.
Note
When sharpening photos for online display, it's best to zoom to 100 percent magnification because they're intended to be viewed on a computer screen at 100 percent.
When the Zoom tool is active, a Print Size button appears on the Options bar. Clicking this button changes the magnification setting to display the photo at its actual size. With my display settings, this is 24 percent.
Though this is close to actual size, it isn't a ratio of 25 percent so I need to use the Zoom tool to zoom in a tiny bit to 25 percent. When I do, I've solved both of the special viewing problems. My image is close to actual size and it's at a ratio of 25 percent.
If you want to know which zoom setting comes closest to reality for your monitor settings, choose View
After you do this once, you'll know what zoom setting to use in the future.
Sharpening enhances the details in an image by increasing the contrast around those details. When the sharpening filter detects an edge, it lightens one side of it and darkens the other side, causing an effect known as sharpening halos.
Figure 13.12 shows some exaggerated sharpening halos.
Notice how the edges along one side of the man's arm are darker on one side and lighter on the other.
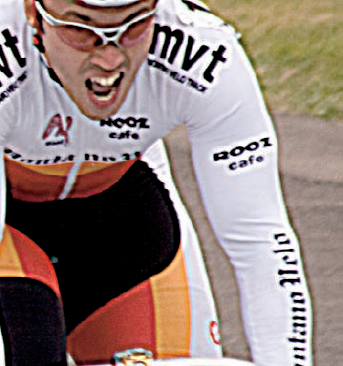
This adjustment to local contrast tricks our eyes into thinking the photo is sharper. The goal when sharpening is to improve sharpness without these sharpening halos themselves being as noticeable as they are in this figure.
The Editor has two sharpening tools: Unsharp Mask and Adjust Sharpness. The Unsharp Mask has been in PSE for many years. Though both these tools work in a similar way, the Adjust Sharpness is a newer version that uses a better system for applying sharpening halos.
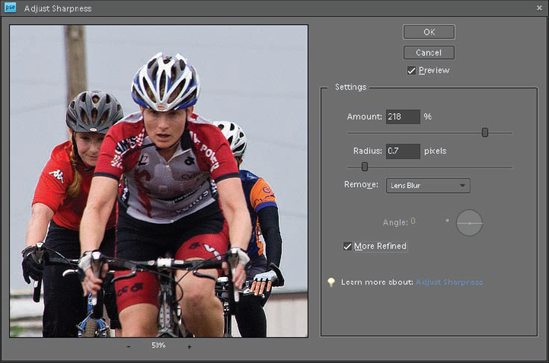
I recommend that you stick to it for your sharpening needs. Figure 13.13 shows the Adjust Sharpness dialog box that's opened by choosing Enhance
Here's what the controls in the Adjust Sharpness dialog box are used for:
Amount. This slider is used to control the amount of contrast between differing pixels, which affects edge contrast. Higher values equal more contrast and lower values equal less contrast.
Radius. The Radius slider is used to determine the number of pixels that are changed when the filter sees tonal variation. Higher values increase the size of the halos, causing the sharpening to be obvious. Exercise caution when using the Radius slider because too high of a value creates sharpening halos that are noticeable. I personally tend to use values lower than 2.0 for most of my sharpening.
Keep in mind that this value is going to vary depending on the subject matter. A higher value can be used with photos rich in edge detail, while a lower value is best for photos that don't have as much detail in them.
Tip
When using Adjust Sharpening, you can use the preview displayed in the dialog box or the actual image to evaluate the effects of the sharpening. Just be certain that you zoom to the appropriate zoom ratio, outlined in the previous section.
Remove. This cool feature adjusts the way the filter works, depending on the problem. The pop-up menu has three options: Gaussian Blur, which is the same algorithm used by the Unsharp Mask; Lens Blur, the best choice for most digital camera files; and Motion Blur, which attempts to compensate for blur caused by motion of the subject during the exposure.
When Motion Blur is selected, the Angle setting is activated. This enables you to input the direction of the motion that caused the blur. For example, if the blur is from a sideways motion during the exposure, use a value of 0. Otherwise, click and rotate the dial to the desired angle.
More Refined. Selecting this option provides a more accurate sharpening effect, but the process takes a bit longer after you click OK.
The general technique for sharpening is to begin with a low Radius value and increase the Amount value until you like the sharpening effect. If you aren't seeing the level of sharpening that you want, increase the Radius incrementally without making the sharpening halos too obvious.
Also be aware that the larger a photo is, the higher values you need to get the same effect. For example, when sharpening an 11 × 14 and a 5 × 7 of the same photo, you find that you can use a similar Radius value on both versions, but you need to use a higher Amount value with the 11 × 14 to get the same level of sharpening as the 5 × 7.
Proper sharpening levels are also dependent on the output process. Photos being printed on absorbent paper can handle greater levels of sharpening, while the same images printed on glossy paper won't need as much. One last thing to be aware of is that sharpening is subjective. Some people prefer higher levels of sharpening.
Just be careful to not overdo it. Evaluate your sharpening after output — whether it's for print or on-screen viewing — until you know what you like.