Downloading and importing your photos into the Organizer catalog is the first step in organizing your photos. That's when the fun really begins: You sort through your images and choose which ones you want to edit and share with the world. However, before you begin spending quality time with your photos, you need to have a clear understanding of the Organizer and how to set up preferences to suit your needs. This chapter details everything you need to know about the Organizer and how to get it ready to use.
When you begin using any software, it's always a good idea to go through the preferences. This allows you to not only get them set up properly so that you start off on the right foot, you also get an overview of where each preference is located. Even if you don't completely understand what all the preferences are used for just yet, you'll know where to find them when the time comes to modify them.
To open the Preferences dialog choose Edit
Note
Some of these preferences are best discussed in the context where they are used, which I do in later chapters. Others are fairly intuitive. In this section, I cover the important preferences you should know about now.
The General preferences enable you to modify some of the basic settings. You can use the Appearance Options to change the interface to a lighter shade of gray. And you can use the Display Options to change how photos are displayed. For example, you can choose whether photos are displayed by the oldest or newest, or change the format of the date so it begins with the month or the day. The Allow Photos to Resize option makes small photos display larger than they actually are. Though this is sometimes useful, you need to remember that the photos may not display optimally if they're resized a great deal more than their actual size.
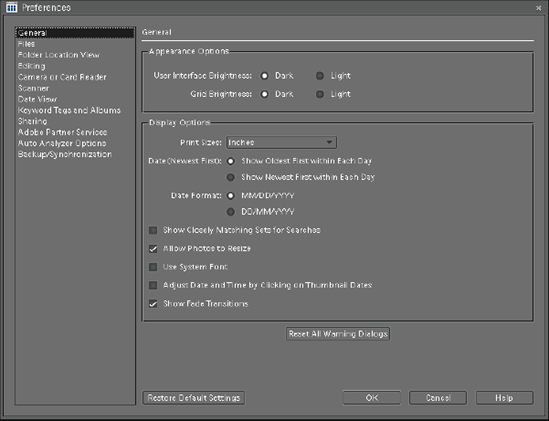
Two of the most useful features in the General preferences dialog are the Reset All Warning Dialogs button and the Restore Default Setting button. These enable you to return these settings to their defaults if you don't like some of the changes to preferences you've made.
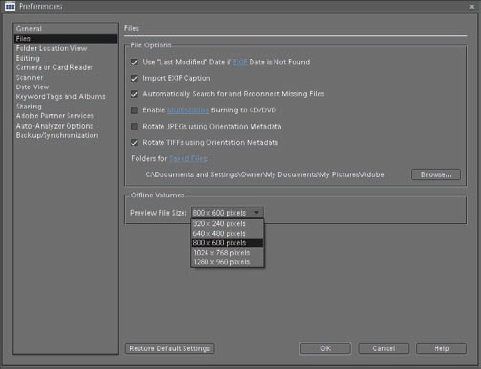
The Files preferences, shown in Figure 3.2, let you change a number of features that affect how your files are managed.
Here are the most important preferences in this set:
Automatically Search for and Reconnect Missing Files. When files are moved with software other than the Organizer, Photoshop Elements (PSE) notices they are missing and tries to find them. This is useful, but if you're working on an older system, it can slow things down while you wait. I recommend leaving this option selected, but be aware that you can deselect it here if you want to and manually reconnect the files.
Enable Multisession Burning to CD/DVD. This option enables you to burn additional data to a disc at a later date after you've already burned something to it. This can be useful, but it can also cause problems when you attempt to read the disc on another system that doesn't work with discs burned in multisession mode. I recommend that you leave this unselected. With a bit of planning, multisession burning is not necessary.
Rotate JPEGs (or TIFFs) using Orientation Metadata. These options use the camera's metadata — information about the photo that's imbedded in the file — to rotate images to their proper orientation, saving you from needing to do it after import.
Preview File Size. Because PSE uses a catalog, it stores a small preview of each image in the catalog. This speeds up image viewing in the Organizer because the preview can be displayed more quickly than the actual image. Choose the size you want to use from the drop-down menu.
When files are offline, as when an external hard drive is not connected, the preview becomes even more important. Without it, you won't be able to view the offline images any larger than a small thumbnail. In most cases, larger previews are better. However, keep in mind that the larger these previews are, the larger your catalog becomes due to the additional pixels. I recommend staying near the middle of the options, such as 800 × 600 pixels so that you can see your images when you zoom in, but you don't dramatically increase the size of your catalog. If you have a large monitor on your computer and plenty of hard drive space, consider using a larger preview file size.
The Camera or Card Reader preferences, shown in Figure 3.3, give you lots of control over the Adobe Photo Downloader and how it interacts with your camera or card reader.
The Save Files In option enables you to choose where your photos are stored as they're imported. You can change this location in the Adobe Photo Downloader dialog when importing photos, but this setting gives the downloader a starting place. The default location is My Pictures.
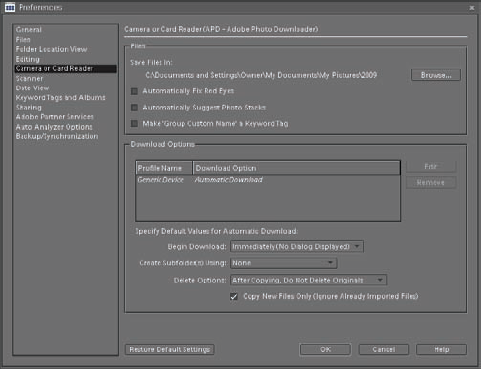
The three check boxes below the Save Files In option enable you to let the Photo Downloader take care of some tasks (such as fixing red eye) during download. I recommend you leave these unchecked because they seriously slow down the downloading process. It's easy enough to take care of these issues after photos are downloaded and imported.
The Download Options section gives you some control as to whether or not the Adobe Photo Downloader opens when an import device, such as a camera card reader, is detected. To change it, select a device from the list and click Edit. When the Edit Download Option dialog opens, you can select Automatic Download, which downloads the photos into the folder specified in the Save Files In section, or you can select Show APD Dialog (Standard) to open the downloader. I recommend leaving this option set to Show ADP Dialog so that you retain control over the Adobe Photo Downloader during the download process.
Note
When a camera card is inserted into a computer using the Windows operating system, it's common for a Windows dialog to open asking you what you want to do with the card. You can cancel this window because it isn't part of the Adobe Photo Downloader.
Below the Download Options is a section called Specify Default Values for Automatic Download. Here you can establish some ground rules for the automatic download process if you choose to use it.
Adobe loves to send lots of e-mail to its product users. It can seem overwhelming at times. The Adobe Partner Services preferences section enables you to decline some of that e-mail. I recommend deselecting everything in the Check for Services section, except for Automatically check for services and notify me about Service Updates. That way, when updates for PSE are available, you'll get a notification.
The Auto Analyzer is used to automatically analyze photos and videos for specific problems. When a problem file is found, a keyword tag indicating the type of problem is added to the preview in the Media Browser. Because these keyword tags are added automatically, they're called Smart Tags.
Because the Auto Analyzer is primarily intended for analyzing videos, it's turned off by default unless you have Adobe Premier Elements installed on your system. When it's turned on, it can cause your system to run slowly while it does its job. If you're not working with video, I recommend that you leave Auto Analyzer turned off because you'll see little gain from using it on still photos.
The PSE Organizer offers a powerful set of features. Figure 3.4 shows the default workspace with thumbnails of the kite festival photos that I imported in the last chapter.
Though this workspace is laid out in a very intuitive manner, it's best to break it down into smaller parts to fully understand it.
The central viewing area is called the Media Browser. It's where you get to look at all the photos and videos in your catalog. You can view these files as small thumbnails, or you can fill the view with a single image.
Along the top of the screen is the Menu bar. In addition to the standard menus, which are organized by topic, it contains the following useful features:
The thumbnail icon on the left-hand side indicates which catalog is currently being viewed. To see the name of the catalog, hover your pointer over it.
On the far right-hand side is the Welcome Screen button, an icon of a house. Clicking it launches the Welcome screen, allowing you to access its features, such as your Photoshop.com account settings and tutorials.
Sign into your account using the Sign in link in the middle of the Menu bar. If you don't have an account, you can create one using the Create New Adobe ID link next to the Sign In link.

The row of tools just below the Menu bar has a number of features. I discuss most of them in a bit, but I want to point out one of the most important features now, which is the Thumbnail View slider. This slider, which is centered just above the Media Browser, adjusts the size of the photo thumbnails. Dragging it to the left reduces the size of the thumbnails, and dragging to the right increases the size. To instantly reduce thumbnails to their smallest size, click the Small Thumbnail Size button to the left of the slider. To fill the display with a single thumbnail, click the Single Photo View button to the right of the slider.
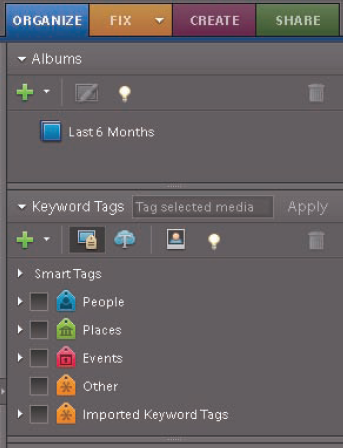
The Task pane is the set of panels on the right of the workspace, shown in Figure 3.5. Each individual panel can be collapsed by clicking the small triangle to the left of the panel's name. If the triangle is pointing downward, the panel is open. If the triangle is pointing toward the panel's name, the panel is collapsed.
These panels are contextual, and depend on which tab is selected from the row at the top of the pane. In Figure 3.5, the Organize tab is selected, so the panels below the tab relate only to that tab.
If you're not using the Task pane, you can temporarily hide it, giving yourself more screen real estate for viewing photos in the Media Browser. To hide the Task pane, choose Window
The narrow bar at the bottom of the Organizer user interface is the Status bar. It displays information, such as the name of the current catalog, the number of items that are currently selected, and the total number of items in the catalog. To the right of that information are two buttons.
The first one looks like a safe. It's used to sign into your Photoshop.com account or manage backups if you're already signed in. The second button is used to pause and restart the Auto Analyzer if it's been turned on in the Auto Analyzer Options preferences. If it hasn't, clicking this button opens those options so that you can enable the Auto Analyzer.
Notifications from Adobe are displayed, such as links to tips and tricks, are displayed on the right side of Status bar.
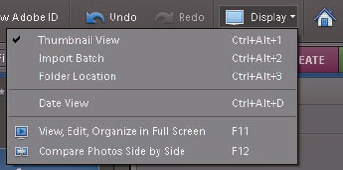
On the Menu bar, directly to the left of the Welcome Screen button (house icon) is the Display Options drop-down menu. The options on this menu (shown in Figure 3.6) change the way photos are displayed.
Here's how the various options affect the way photos are displayed:
Thumbnail View. This is the default view that displays all your thumbnails together. This view sorts thumbnails by date with the newest photos at the top. To reverse this sorting order to oldest first, use the Media Browser Arrangement drop-down menu, directly below the Sign In button.
Import Batch. This view is similar to Thumbnail View except that a bar separates each imported group of photos by date, indicating when they were imported. This bar appears at the top of each import batch. A small icon of a roll of film (remember film?) is on each bar as a reminder that these photos are a group.
I prefer the Import Batch view because it breaks up the thumbnails into groups instead of displaying all of them in one continuous stream.
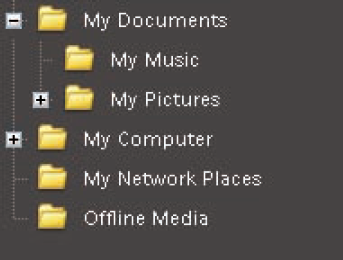
Folder Location. This option doesn't actually change the way the thumbnails are displayed. Instead, it opens a panel to the left of the Media Browser that displays the folder tree of the folders that have been imported into your catalog. This panel, shown in Figure 3.7, enables you to view the folder structure of the catalog. Click on a folder to display its thumbnails in the Media Browser.
Right-clicking on a folder in the Folder Location view enables you to do things such as rename the folder, add it to the watched folder list, or delete it. You can also choose Add Unmanaged Files to Catalog to update the catalog by importing any new files that were added to the folder outside of the Organizer.
After you find the folder you need, you can hide the Folder Location panel by selecting Thumbnail View or Import Batch from the Display Options menu. If you think you may want to keep it around but want to reduce the amount of space it uses, click and drag the vertical line to the left that separates it from the Media Browser.
Tip
You can adjust the width and height of almost every panel by clicking the horizontal and vertical lines that separate them.
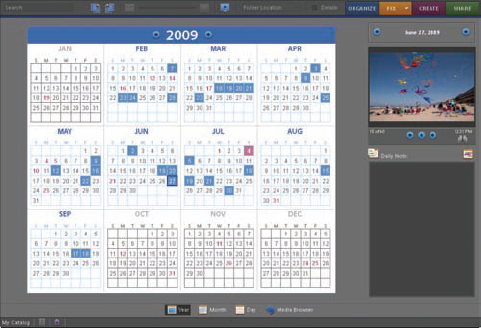
Date View. When you choose this option, a large calendar replaces the thumbnails in the Media Browser, as shown in Figure 3.8. Each date when photos were captured is highlighted on the calendar.
Keep in mind that this date information is retrieved from information that's attached to photo files when they're captured. For it to be accurate, it's important to have the date and time set correctly in your camera's software.
Clicking on one of these highlighted dates loads a thumbnail of the first image in the small window at the top right. Use the Year, Month, and Day buttons underneath the calendar to change the way information is displayed in Date View. Click the Media Browser button to the right of these buttons to return to the Media Browser.
Tip
Use the Date View preferences to customize the calendar; choose Edit
Another useful viewing mode in the Display Options is the Full Screen mode. You can also enter Full Screen mode by clicking the Full Screen button directly to the right of the Thumbnail slider, of by pressing your keyboard's F11 key. To exit Full Screen and return to normal view, press the Esc key.
Note
PSE is loaded with keyboard shortcuts, but because there are so many, I only point out those that I think are most important. A command's shortcut is usually listed to the right on the menu where the command itself is found.
The Full Screen mode isn't new to PSE, but it has been vastly improved. The idea behind the Full Screen view is to let you view your photos in the largest size possible so that you can better evaluate them. You can use the right and left arrow keys on your keyboard to manually move through the photos.
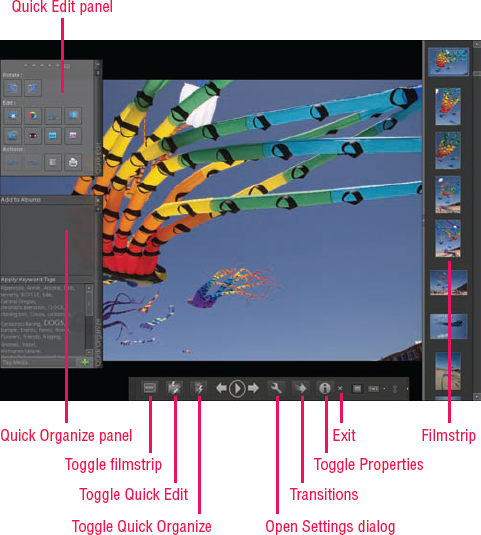
When a photo is in Full Screen view, shown in Figure 3.9, two new panels appear on the left side of the screen. These panels enable you to work with the photos while in Full Screen view. They are designed to speed up your workflow when you use Full Screen view so that you don't need to return to the normal viewing mode. Both panels are set so they're automatically hidden until you hover over them.
Here's what these two panels do:
Quick Edit. This top panel has a set of automatic editing features, such as color and tonal adjustment. You can also add rating stars and perform other actions, such as rotating or deleting a photo from the catalog.
Quick Organize. This panel enables you to quickly add photos to an album or to add keywords to the current photo.
A third Toolbar displays at the bottom of the screen. In Figure 3.9, I expanded it to full size by clicking the small triangle on the far-right side. To start an impromptu slideshow, click the triangle with a circle around it. I always like to do this after importing a new set of photos because it gives me the opportunity to see each of them in full screen without touching my mouse. Then I can go back to the photos one by one and use any of the features on the Quick Edit or Quick Organize panels. To stop a slideshow, press the Esc key.
Other features on this bar, from left to right, are:
Toggle filmstrip. Clicking this button displays a vertical filmstrip on the right side of the screen. Click the button a second time to hide the filmstrip.
Toggle Quick Edit/Organization panel. These buttons alternately hide or reveal the panels on the left side of the screen. When you use these buttons, the panels are no longer in the automatic hide mode. If you hide them, they stay hidden even when you mouse over the left side of the screen.
You can also turn auto hide off and on by clicking the Auto Hide button on each of these panels. This button looks like a pushpin and is located directly below the X that's used to completely close the panels.
Open Settings dialog. Clicking this button opens the Full Screen View Options dialog. It gives you control over a number of options for the slideshow and Full Screen view.
Transitions. Click this button to choose from a set of slideshow transitions.
Toggle Properties panel. Clicking this button displays the Properties panel, which provides a great deal of information about the current photo. Clicking it again hides the panel.
One final feature of the Display Options toolbar is Compare Photos Side by Side (F12). It is very useful when you have similar photos and you're trying to pick the best one. This viewing mode enables you to compare similar photos to see which one is the best. It is quite similar to the Full Screen mode and has the same three panels just discussed.
Note
You can move between Full Screen and Side by Side views using the buttons on the bottom panel. If you don't see these buttons, choose the Show all controls arrow on the right side of the panel. Figures 3.9 and 3.10 show the expanded Toolbar.
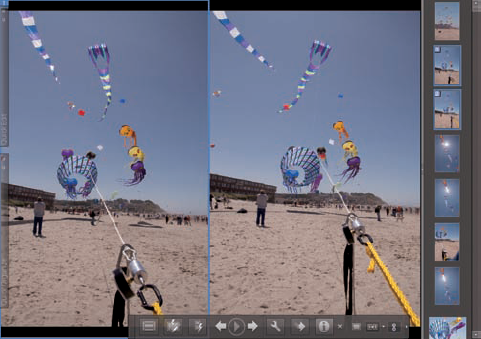
Figure 3.10 shows the Side by Side view with the filmstrip displayed on the right. In this view you can see that I'm comparing two similar photos from the kite festival. The photo on the left has a blue box around it and is labeled 1. Its corresponding thumbnail in the filmstrip also has a blue box around it with a 1 label. If I click the box on the right, the blue box shifts to it and a 2 label is displayed, corresponding to its thumbnail on the filmstrip.
You can change either the #1 or #2 photo to a different photo for comparison by clicking it, so that the blue box is around it, and then choosing a different photo from the filmstrip. You can also use the up and down arrow keyboard keys to move through a group of photos one by one.
After you find the best photo from a group, you can add a star to it to mark it for later reference. If you want to zoom in and compare the focus of the photos, you can use the scroll wheel on your mouse to zoom in and out. To pan the photos, click and drag on them.
If you're zooming and panning photos in the Side by Side view, be sure to activate zoom and pan synchronization by clicking the Sync panning and zooming in Side by Side view button on the right of the expanded Toolbar. It has a small chain link icon on it. When you click this button, both photos zoom and pan together, making it easier to compare the two images.
Note
When you're in the Normal view, you use the mouse wheel to navigate through your photos.
You can also display your photos above and below one another instead of side by side using the Side by Side view. This is particularly useful for comparing horizontal photos. Click the downward pointing arrow just to the right of the Side by Side View button and select Above and Below.
The View menu is used to choose which kinds of media are displayed in the Media Browser and which information about the media is shown. Figure 3.11 shows the View menu with the Media Types submenu displayed. Take a closer look at the most relevant of these options.
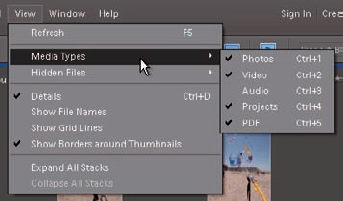
This submenu enables you to choose which types of files are displayed in the Media Browser. In Figure 3.11, you can see that all available media types are selected with the exception of Audio. I left that one unselected because I don't want music showing up in my Media Browser. If there are file types that you don't want to see in the browser, simply deselect them from this menu.
Hidden Files
PSE gives you the option to hide any specific files you don't want to see in the Media Browser; for example, when you're preparing a surprise project for someone who shares the Organizer with you and you don't want him to stumble across it before you're ready to present it.
Tip
To hide a file, choose Edit
The Hidden Files submenu has three options: Hide Hidden Files, Show All Files, and Show Only Hidden Files. The third one is quite useful in case you lose track of which files are hidden. Select it so you can view these files and verify that they should remain hidden.
When you select Details, which is on by default, information about your photos is displayed below each thumbnail. This includes the dates they were shot, keyword labels, and rating stars.
Just be aware that if the thumbnails are displayed at a small size, some of this information cannot be displayed. You can also show or hide the details by selecting or deselecting the Details check box on the Toolbar in the Normal view. It's directly to the left of the Organize tab. If you choose Show File Names, directly below Details, from the View menu, the filenames will be displayed along with the other details. I recommend doing this so that you can more easily identify files when you view them in the Media Browser.
Stacks enable you to stack similar photos on top of one another, giving you more room to view other photos in the Media Browser. These two commands enable you to reveal all photos in all stacks at once, and to restack them when you're through viewing them.
To stack a group of photos, follow these steps:
Select the photos by clicking the first photo and then Shift+clicking on the last photo. If the photos are not next to one another, Ctrl+click those you wish to select.
Choose Edit

To unstack a specific group of photos, select the stack and choose Edit
To reveal photos in a specific stack, select it and choose Edit
To restack them, choose Edit
In Chapter 2, I mentioned that the PSE Organizer uses a catalog system to keep track of the photos that have been imported into it. This adds a great deal of power to the Organizer because it enables you to quickly move through photos and add all sorts of relevant information to them.
The main downside to the catalog system is that when photos are moved, renamed, or deleted outside of the system, the Organizer usually has no clue as to what happened to them. It just sees them as missing. When this happens, a small ? icon displays at the top left of the image, indicating that the image is disconnected (missing).
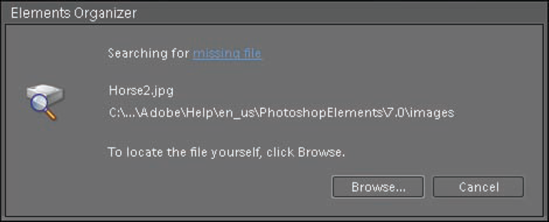
When a file is disconnected, you are unable to do a number of things, including zooming it to full screen and opening it in the Editor. If you try to do either of these actions, you get the PSE Organizer dialog shown in Figure 3.12.
The PSE Organizer dialog is the Organizer's way of trying to help find the file if it's been moved to another location. It searches all your hard drives looking for the file, using its name as the search criteria. If it finds that the hard drive containing the file is not plugged in, the icon at the top left of the image changes from a ? to a red, circular icon that indicates that the file is offline.
When the Organizer knows a file is offline, the dialog in Figure 3.12 no longer appears when you zoom to fill the Media Browser. However, the zoomed photo will be out of focus because the Organizer can't use the photo's file to build a preview for viewing.
If you know that you moved or renamed the file, you can help by clicking the Browse button and manually directing the browser to the correct location. If you deleted the file from the hard drive outside of the Organizer and no longer need it, click Cancel and then delete the photo from the Organizer by selecting it and pressing the Delete key.
Tip
Files become disconnected when they're on an external hard drive and the drive isn't plugged in. To reconnect them, plug the drive in and wait a few minutes for the Organizer to find them.
Another way to reconnect a missing file is to choose File
This enables the Organizer to go through the entire catalog searching for disconnected files. This saves you from needing to reconnect files on a one-to-one basis. It's especially helpful if you've plugged in an external hard drive with missing files, and yet the Organizer isn't finding them.
Just be prepared to leave the Organizer alone for a while so that it can complete the task, which can take some time if you have lots of missing files. After the reconnecting process is complete, any remaining disconnected files are labeled with the disconnected or offline icons.