When you begin using a digital camera, one of the first things you notice is that you begin shooting lots of photos because you can take as many pictures as you like. However, if you don't take time to get organized, this blessing can quickly turn into a curse. That large number of photos you shoot makes it more difficult to find specific photos when you need them. This chapter is designed to show you some common methods for organizing your photos so that you can find any photo whenever you need it.
After you import photos into the Organizer, it's very important to use keyword tags to categorize them. Essentially, keyword tags are virtual tags that are placed on photos to identify image content or some other important feature of a photo. For example, whenever I import a photo of one of my dogs, I always place a keyword on the photos with the name of the dog. Then when I want to find photos of one of them, I do a keyword tag search for whichever dog I'm searching for. No matter where on my system the files are located, if they're tagged correctly, I'll find them instantly.
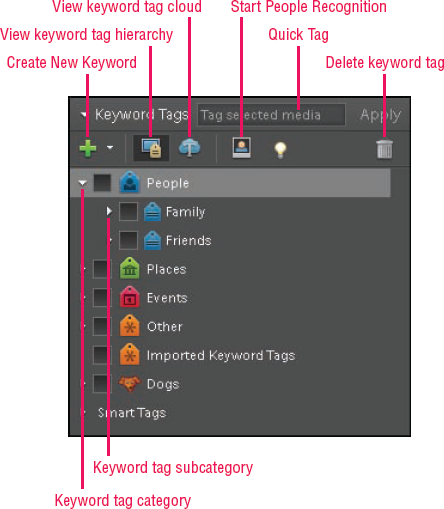
The Keyword Tags panel, shown in Figure 4.1, is where most of the action happens when it comes to keywording. You use it to create and manage all your keywords.
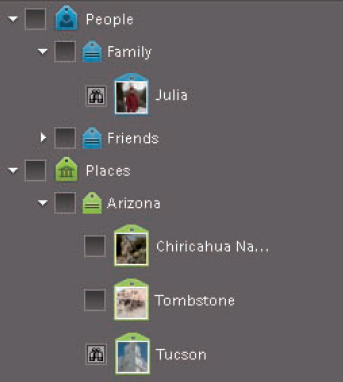
The Keyword Tags panel comes stocked with these standard keyword categories: People, Places, Events, Other, and Imported Keyword Tags. You may not see the Imported Keyword Tags category if none of the photos you imported from your system had keywords applied to them using other software. Notice that in Figure 4.1 the People keyword category is expanded (the triangle beside it points downward) to reveal that it has subkeywords within it, which are Family and Friends. These keyword keywords can also be expanded to show individual keywords that are nested within them.
The keyword categories and sub-categories that come with PSE are intended as a starting place. The idea is that you add your own keywords to these containers so that your keywords are organized, much the same way folders are often organized.
When necessary, you can also add new keyword categories and sub-categories. This kind of organization is important because it's easy to accumulate a huge number of keywords when you take the time to tag all your files. Because keyword tags are sorted alphabetically, they can be spread throughout the list, making it difficult to locate the one you need if you don't take time to organize them.
Creating keyword tags is easy. To add a keyword to one of these categories, select the keyword category and click the Create New Keyword Tag button (the green + symbol at the top left of the panel) and choose New Keyword Tag (Ctrl+N). If you want to create a new sub-category, such as Co-Workers, choose Sub-Category from the list instead. When you choose to create a new keyword, the Create Keyword Tag panel, shown in Figure 4.2, opens.
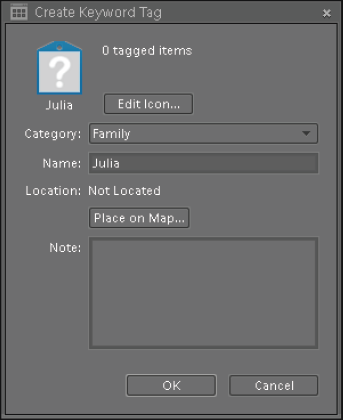
As you can see in this figure, I'm creating a new keyword for my wife, Julia, which will be placed into the Family sub-category. Now, whenever I see a photo of my wife in the Media Browser, I simply drag this keyword tag from the Keyword Tags panel and drop it onto the photo.
If any other keywords apply to the photo, I add them too. For example, if I see a photo of my wife in Tucson, I drag a Tucson keyword tag from the Places category onto the photo as well as her name from the Family sub-category.
Tip
When you choose the Folder Location view from the Display menu, an Instant Keyword Tag button appears at the top of each set of thumbnails. It looks like a blue tag with a yellow lightening bolt on it. Click this button to add the folder's name as a keyword tag to all photos in the folder.
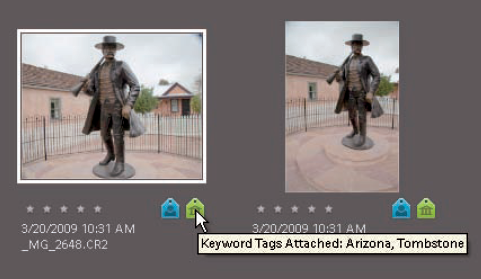
You can also add keyword tags to multiple files all at the same time. To do this, select all the files you want to tag with keywords and then drag the appropriate keyword onto them. To see which keywords are added to a photo, hover your cursor over the tags icons that appear below tagged image thumbnails, as shown in Figure 4.3. The tags below the thumbnail represent each category that's applied to the image. In this case I have a blue People tag for Wyatt Earp, and a Green tag for the location.
Unfortunately, removing keyword tags from a photo isn't quite as intuitive as adding them. To remove a tag from a photo, right-click the tag icon below the photo and choose Remove Keyword Tag. If there are lots of keywords within a single category, a list is displayed, enabling you to choose a specific keyword. To remove a keyword from multiple photos, select them all and then right-click the keyword tag below one of them.
Tip
Using the right-click button on your mouse is extremely powerful in PSE. That's because when you right-click something, a contextual menu opens that's specific to the type of thing you clicked. I mention right-clicking many times in this book, and I encourage you to become comfortable with it because it will speed up your workflow.
Sometimes it's necessary to completely remove a keyword tag from the list in the Keyword Tags panel. You may have an unused keyword, or you may end up with a duplicate keyword. PSE tries to prevent you from creating duplicates by warning you when you attempt to create them, but it can still happen.
To remove a keyword tag, a tag category, or a sub-category from the list, select it and click the Delete Keyword Tag button that looks like a trash can. You can also right-click the tag and choose Delete.
You begin to see the power of keywords when you search (filter) for a specific keyword. For example, when I want to find all photos of my wife, I simply check the box to the left of the Julia keyword tag. This adds a binocular icon to the box to indicate that a search is being performed.
Now any photo of her, no matter where it is on my system, is displayed — provided I took the time to add a keyword tag to it. Only photos with this keyword are displayed in the Media Browser.
If I'm looking for photos of my wife that were shot in Tucson, I also select the Tucson keyword that's in the Places category. Now the binocular icon is on both keyword tags, as shown in Figure 4.4, indicating that a double search is being performed. Only photos with both keywords are shown.
If I were looking for a photo of Julia with our friend, Ruth, who lives in Tucson, I would add that additional keyword to the search. You're probably beginning to see that this is an incredibly powerful system.
I strongly encourage you to begin using keywords now. Even if you have a few thousand photos in your catalog that are not keyworded, it is worth taking the time to keyword them.
Tip
To see all keywords within a single category or sub-category, choose it. For example, if you want to see all photos of family members, select the check box next to the Family sub-category.
When keywording, ask yourself, "How will I want to find this photo later?" If it's a photo of a family member, or a specific place, then it's a no-brainer.
If it's a picture of some random object, you may not want to add a keyword for the object, but instead for the place you shot the photo. For example, I photographed an interesting garbage can at Kitt Peak National Observatory. Because I am not into collecting photos of garbage cans, I didn't assign a Trashcan keyword tag, but I did add Kitt Peak. That way if I really want to find the photo, I'll know where to begin looking.
When you get serious about using keyword tags, the list in your Keyword Tags panel can get quite long. Because of this, it's important to keep your keywords organized. The best way to do that is to follow the category, sub-category keyword tag hierarchy. If you create a keyword that doesn't belong in any of the current categories, create a new category. For example, if you like to shoot lots of nature photos, create a category named Nature. Then create keyword sub-categories such as Flowers, Rivers, Mountains, and Birds. Naturally, you can create more sub-categories within these sub-categories.
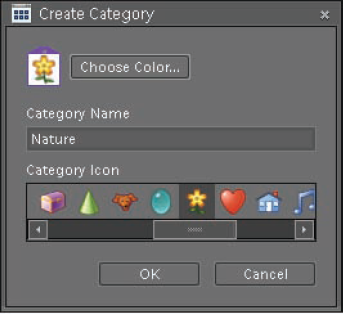
To create a new category or sub-category, click the Create New Keyword Tag button and choose either New Category or New Sub-Category from the menu. Figure 4.5 shows the Create Category dialog you get when you choose New Category.
Use the options in the Create Category dialog to choose the color of your tag, name it, and even add a descriptive icon to it. These specific options are only available for categories, not sub-categories.
If a keyword is in the wrong category or sub-category, you can move it to a new location by clicking and dragging it. For example, if I have a keyword David that is in the Other keyword category, I can click and drag it to the Friends sub-category under the People category.
Sometimes it's necessary to edit a keyword. For example, when you drag a new keyword onto a photo, that photo becomes the icon on the tag itself. You may find that you want to change the icon to a more suitable photo.
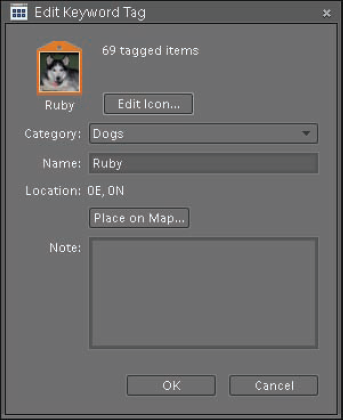
To edit a keyword, click the Create New Keyword Tags button and choose Edit from the menu. You can also right-click a tag and choose Edit from the menu. Either of these actions opens the Edit Keyword Tag dialog, shown in Figure 4.6.
Use the Edit Keyword Tag dialog to change the category or sub-category the keyword belongs to, change its name, add notes about it, or place it onto a map (which is discussed shortly).
The most useful feature of the Edit Keyword Tag dialog is it enables you to change the image that's used for the keyword tag's icon. To do this, click the Edit Icon button. When you do, a new dialog opens where you can scroll through all the photos that the tag is currently applied to. That way you can pick one that's more appropriate or easier to see.
You can also edit keyword tag categories and sub-categories by selecting them and choosing Edit. The options are slightly different for categories and sub-categories because each has its own set of customizable features.
For example, you can promote a sub-category to a category, or you can demote a category to sub-category, depending on which is being edited.
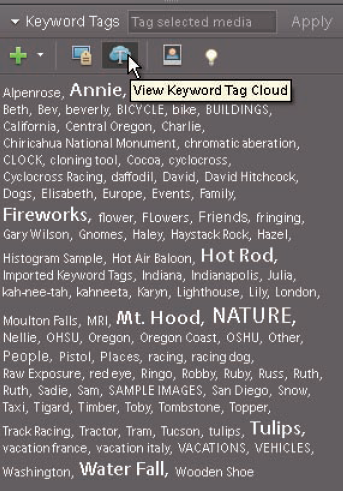
A cool new feature in the PSE 8 Organizer is the Tag Cloud. It provides you with a completely different way to view your keyword tags list in the Keyword Tags panel. To change to this view, click the View Keyword Tag Cloud button at the top of the panel (a T with a cloud behind it). When you choose this option, the view in the Keyword Tags panel is similar to Figure 4.7.
The Tag Cloud in Figure 4.7 displays all your keyword tags in alphabetical order, without the hierarchy of categories and sub-categories.
The font size of a tag is an indication of how many photos it's applied to. The larger the font, the more photos. To filter for a particular tag, click the tag. To add a tag to a photo, click and drag it onto the selected photo in the Media Browser.
Tag Clouds are becoming popular search tools on blogs. They enable you to see all tags at one time and to get a feel for which are the most popular.
The main downside to using the Tag Cloud is that you can only filter for one tag at a time. Also, you can't edit a keyword while in this view.
Tip
To return to the normal keyword tags view, click the View Keyword Tag Hierarchy button to the left of the View Keyword Tag Cloud button.
The Keyword Tags panel has another set of tags called Smart Tags. You may recall that I mentioned this feature in Chapter 3 while discussing the Auto Analyzer preferences.
The Auto Analyzer is used to search through your files for specific problems and then tag any problem files it finds. This feature is primarily intended for video files, so in Chapter 3 I recommended you leave it turned off unless you're using Adobe Premier Elements for video editing.
If this feature is disabled in the preferences, the Smart Tags in the Keyword Tags panel become non-operative. However, you cannot remove it from the panel.
One last goodie in the Keyword Tags panel is the Start People Recognition button, located to the right of the View Keyword Tag Cloud button. People Recognition is an intelligent tagging feature that's used to automatically find faces in selected images.
To utilize this feature, follow these steps:
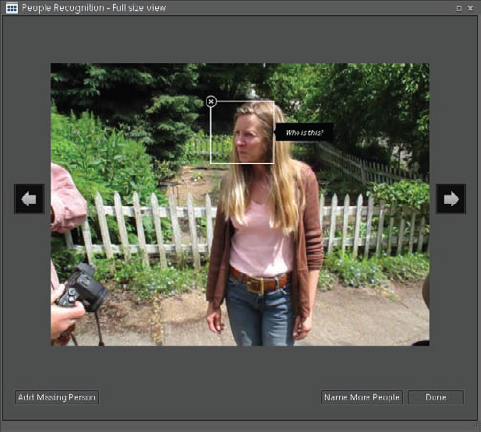
Click the Start People Recognition button. A dialog similar to Figure 4.8 opens with white boxes around all the faces it finds.
Click in a box to display the Who is this? text.
Click the text to open a text box where you can type the person's name to apply a tag. This tag is automatically added to the People sub-category in the Keyword Tags panel.
If you have more than one image selected, click one of the arrows at either side to move to the next or previous one.
If a white box isn't around someone in the photo, click Add Missing Person to display a box that can be dragged onto the person. Then click Who is this? to type her name and add a keyword.
Every time you supply the People Recognition feature with a name to attach to a face, it gets smarter. After it sees the same face a few times, and you confirm whom the face belongs to, it starts asking if the face belongs to that person when it finds other photos of her.
You can set People Recognition to automatic by choosing Edit
Note
Sometimes the Who is this? box appears on a face, even when you have the People Recognition option disabled in the preferences. This is a teaser from Adobe that's intended to draw your attention to the feature.
People Recognition is a cool feature, but it also consumes lots of computer resources. If you take a few moments to add keywords to people when they are first imported, using techniques discussed earlier in this chapter, you won't have much need for this feature. However, it is useful when you import a large number of existing untagged photos when you first create your catalog. If you think this feature will benefit you, then by all means give it a whirl.
Another way to organize photos is to place them on a world map, which is called geotagging. This gives you the ability to search through your photos using the locations where they were photographed. The Organizer provides a map specifically for this purpose.
To display it, choose Window
There are three primary ways to place photos onto the map:
Drag and drop a photo onto the map.
Right-click a photo and select Place on Map from the contextual menu.
Apply a keyword tag to a photo and drag the tag onto the map. You can also designate map locations to keywords using the Edit Keyword Tag dialog.
You can also add a keyword tag to the map when you first create it by clicking the Place on Map button in the Create Keyword Tag dialog.
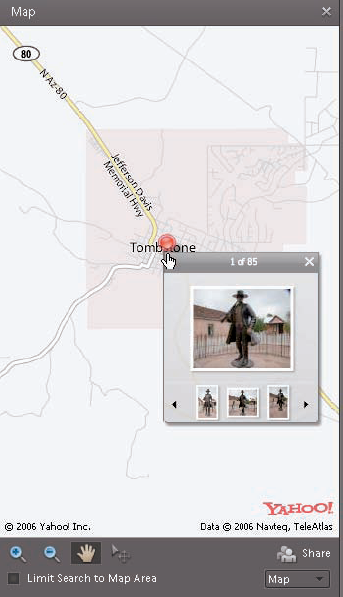
When photos are added to the map, a pushpin icon marks the location. When you click the pin, a small viewer opens, displaying the photos from that location, as shown in Figure 4.9.
The map has a set of tools and options at the bottom of its display. Here's what they do:
Zoom tools. Use the Zoom In and Zoom Out tools to click on the map to change its magnification.
Hand tool. Use the Hand tool to pan around the map while clicking and holding.
Move tool. Use the Move tool to click and drag a pin to the different location. Just be aware that you can't view photos from the location when the Move tool is active. You need to select one of the other tools.
Share. Click this button to share your map with someone else. You can either create a shared album with an integrated map view, or you can share a map on Flickr.
Map menu. Use the map menu to choose from different map displays. The options are Map, Satellite, and Hybrid, which is a combination of the normal map and a satellite map.
Limit Search to Map Area. This limits any searches you do to the currently displayed map area.
Tip
To quickly add an existing keyword to the map, right-click it and choose Place on Map.
Unfortunately, I have to tell you that the map feature in the Organizer consumes lots of resources.
After you add several hundred photos to the map, it can cause the Organizer to run so slowly that you may have problems doing just about anything — especially if you have an older system with fewer resources.
If you have a newer system, go ahead and give it a try. Just be aware that you may need to remove the tags from the map to get your system's speed back up to par.
Note
Flickr.com is an online photo-sharing Web site similar to Photoshop.com.
In addition to keyword tags, a number of other properties are associated with your photos. The easiest way to view and manage these properties is to use the Properties panel, shown in Figure 4.10. Open this panel by choosing Window
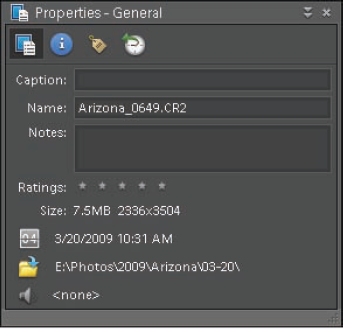
The Properties panel has four buttons just below the header that enable you to view different sets of information. They are, from left to right, General, Metadata, Keyword Tags, and History.
The General properties give you some basic information about the selected photo. This is the view shown in Figure 4.10. You can edit almost all the fields shown here.
Here's how you use them:
Caption. This text box enables you to add a caption to the photo. This is useful if you plan to use the photo in a slideshow because you can display the caption information in the slideshow.
Name. The photo's name is displayed here. You can change the name by deleting this old name and typing a new name into the text box.
Tip
To rename a group of photos, select them in the Media Browser and choose File

Notes. In this text box, you can add notes about a photo to help you remember details at a later date.
Ratings. This area indicates how many rating stars are assigned to the file. You can also add or remove rating stars by clicking them here.
Size. You can see the size of the file in megabytes and pixel dimensions.
Date and Time. The date and time the photo was shot are displayed here. To change this information, click the icon. You have the option of changing to a specific date, matching another file's date and time, or shifting the date and time by a number of hours.
Folder. This field displays the folder that contains the photo. Click the icon to reveal that folder in Windows Explorer.
Audio Caption. If a file has an audio caption attached to it, you'll be able to click it and play it here. If you want to add or remove an audio caption, click the icon.
The word metadata literally means data about data. It's a set of information about another set of information. In fact, keywords are metadata because they are used to describe something about a photo. Figure 4.11 shows the Metadata section of the Properties panel.
The upper section, File Properties, contains basic information about the file, including its name and the date it was created. The lower section, Camera Data (Exif), contains information that was recorded by the camera at the time the photo was shot.
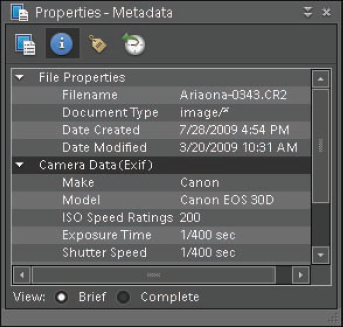
This information can be quite useful when you're trying to diagnose a problem. For example, if the photo is blurry, you can check here to see if you were using a shutter speed that was too slow for handheld shooting.
To see additional metadata, such as which keywords are applied to the photo, select the Complete view from the choices at the bottom of the panel. Now you can see all the metadata that's attached to the file.
One thing to keep in mind is that you cannot modify any of this metadata using this panel view. If you want to change something like a file's name or capture time, you'll need to use the General properties to make the change.
This set of properties displays all the keyword tag details for the selected photo, including the complete hierarchy of its keywords. As in the Metadata view, you cannot modify any of these keywords using this view.
This panel view shows all pertinent history that's associated with the file, including when the file was imported and last modified, and where it's located on your system.
The Properties panel can be quite useful. I often leave it visible by docking it to the bottom of the Organizer pane. That way, when I need to know something about a particular photo, I can find out what I need to know by quickly checking its properties. To dock the panel to the Organizer pane, click the downward pointing, double-headed arrow on the right side of the panel's header. Click it again to undock the panel.
Keywording is one of the most important things that you can do to organize your photo library because keywords enable you to find photos based on image subject matter. However, there's another level to organization that enables you to rate photos and filter your library based on how important the photos are to you. This system uses rating stars.
A rating star is placed on a photo to signify its level of importance. Photos are rated on a scale of one to five stars. You may have noticed that when you have Details selected on the Toolbar or from the View menu (View
Rating stars are incredibly valuable. They enable you to go through the images from a shoot and select your favorites. I usually add one star to every photo that I like.
Tip
When evaluating similar photos to pick the best one, remember to use the Compare Photos view (F12), as discussed in Chapter 3.
Before you begin adding stars to photos in your library, it's important to step back for a moment and think about how you will use the stars and what meaning you attach to them. If you do this, you build consistency into your system. For example, when a three-star rating is applied to individual photos throughout your catalog, it should mean the same thing no matter where the rating is used.
Atypically, a rating system is designed around the needs of an individual photographer. For example, here's how I use rating stars:
No stars. A photo with no stars is an average file. Below average files are deleted.
One star. I use a one-star rating to identify photos I'm interested in taking a closer look at.
Two stars. I use a two-star rating to identify photos that are superior to all one-star photos. This is useful when I have several photos that I like that are similar to one another. I may give them all a star, but when I pick the best of the group, it gets two stars.
Three stars. I use three stars to identify only the very best photos. They are the photos that I consider to be my portfolio images. Because of that, I don't have lots of three-star photos.
Note
You may be wondering why I don't recommend using four- and five-star ratings. I do this because I anticipate every photographer will become better over time and it's best to leave some room to grow a rating system as skills grow.
If you always follow your established rating rules, then every time you encounter a photo with a three-star rating, you know it's one of the best you've shot.
Like many things in PSE, you can use more than one way to add or remove rating stars from a photo. These two methods are the simplest:
Click the appropriate star below the image to add it as a rating. For example, click the first star to add a one-star rating, or click the third star to add a three-star rating. To remove a star rating, click the current star. For example, if the photo has a three-star rating, click the third star to remove it and set the rating to no stars.
Use the number keys on your keyboard. This method is faster and it isn't necessary to have details displayed. To add a one- star rating, press the 1 key. To add a three-star rating, press the 3 key. To remove a star rating, press the 0 key.
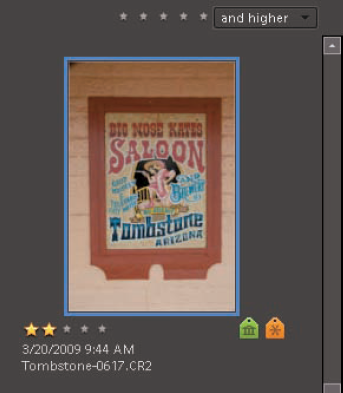
After you rate all interesting photos from a shoot with a single star, you filter the shoot so that you see only the photos with a one-star rating. This enables you to focus on your favorites. To filter for a star rating, click the appropriate star in the Star Rating filter at the top right of the Media Browser. You can see it above the photo thumbnail in Figure 4.12.
To filter for one star and above, click the first star on the filter. Use the menu on the right of the filter to control how the filter is applied. The options are to filter for a particular rating and other ratings that are higher, a particular rating and other ratings that are lower, or only the specified rating.
When you use rating star filtering, your entire catalog is filtered. This is very powerful because it enables you to see all photos with a specific rating no matter where those photos are located. Using my system, I can quickly locate all my best photos by filtering for three stars.
Using keyword tags and rating stars together gives you a great deal of control over how your catalog is filtered.
As I mentioned earlier, when you filter for a rating star, the entire catalog is filtered and the results appear in the Media Browser. Sometimes, this can be a bit overwhelming.
However, if you filter for a keyword first, and then filter for a star rating, you seriously narrow down the search results. For example, if I want to see all my one-star photos from my trip to Tombstone, Arizona, I select the box next to my Tombstone keyword to display all the photos from Tombstone. Then when I click the one star on the Star Rating filter, I'll see only the photos I'm looking for.
Tip
To turn all filtering off with a single click, click the Show All button at the top of the Media Browser.
Filtering for keywords and rating stars is powerful. But sometimes the photos you're looking for may not have either applied to them, or you need to use different criteria to find them.
Fortunately, there are several other ways to find specific photos in the Organizer.
The Timeline is a cool feature in the PSE Organizer that enables you to search your catalog based on dates. To display the Timeline bar, choose Window

The Timeline bar is divided into years, which are subdivided into months. The height of the column for a particular month indicates the quantity of photos within that month. The higher the column, the more photos there are.
To see photos from a month, click the month. If you click and drag the slider right or left, the display in the Media Browser refreshes for each month as you drag across it.
The Timeline bar is a nice feature for getting you into the ballpark with a date, but sometimes you need to find photos that were shot on a specific date. Or maybe you need to do a search using some other search criteria, such as photos that were shot with a specific camera. That's when you need to go to the Organizer's most powerful search feature, the Find menu.
You open the Find menu, shown in Figure 4.14, by choosing Find from the Menu bar at the top of the display. Choosing any of its options enables you to filter your catalog and display the results in the Media Browser.
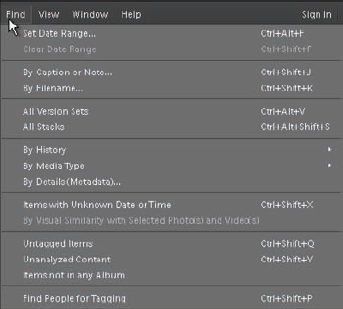
Take a look at some of the powerful search methods this menu provides:
Set Date Range. Use this option to specify an exact date or range of dates. If the Timeline bar is currently displayed, small sliders appear on it, indicating the dates you entered. Click and drag these sliders to modify the search dates.
One thing to be aware of when using Date Range is that the usual Show All button isn't displayed in the Media Browser. In order to get back to viewing all photos, you need to choose Find
By Caption or Note. Earlier I mentioned that you can add captions and notes to individual photos using the Properties panel. Use this option in the Find menu when you want to find photos that have a specific caption or note. Both sets of information are searched for any terms you enter in the Find by Caption or Note dialogs.
By Filename. Use this option to search for a specific file using its filename, or just a portion of the filename. This is where applying meaningful filenames during upload and import can really pay off.
By History. When you hover over this option, a sub-menu pops out on the right side. Choose from the options in this sub-menu to search for photos that were e-mailed to a particular person, printed on a specific date, and more.
By Media Type. This option also has a pop-up menu that enables you to narrow your search by the type of media you're looking for.
By Details (Metadata). Earlier I mentioned that each photo has a range of metadata added to it when you shoot it. This search option enables you to use that metadata as search criteria. When the Find by Details dialog opens, you choose the type of metadata you're looking for from a menu, and then click Search. For example, if I want to see every photo shot with a particular camera, I choose Camera Make from the menu and then use the associated text box to type the name of the camera manufacturer into it.
Items with Unknown Date or Time. If you're using a digital camera, your photos most likely have a date and time associated with them. However, this option is useful for finding any photos that don't have this information so that you can add it using the Properties panel. This way, it will be easier to find them later when using date searches.
By Visual Similarity with Selected Photo(s) and Video(s). The idea behind this is to use one photo to find others like it. I have to admit that the results are very uneven because you never know what the filter is going to find. However, it may be useful to try as a last resort.
Untagged Items. This option is quite useful for locating any photos that have not had keywords added to them. After you find them, you can take some time to add any keywords so that these photos become part of your keywording system.
Find people for tagging. This feature depends on the same technology that's used for face recognition. Unfortunately, it's about as unreliable. When I tried it, the first set of photos it found were photos of my dog and cat sitting on the couch. Though I find this useful, it's not the way the filter is supposed to work. Go ahead and give it a try. Just be prepared for uneven results.
As you see, there's quite a bit to the Find menu. You may not use it often, but when you need some of its features for locating hard to find photos, it can't be beat.
One of the fastest ways to search for something in the Organizer is to use the Search box, located on the left side of the Toolbar just below the menus. To use this feature, simply type the search parameter in the text box.
This filter performs a real-time search as you type. If the term you're typing matches any keyword tags, they're displayed as you type. In Figure 4.15 I started typing Tombstone. As soon as I typed to, all keyword tags that begin with to were listed.
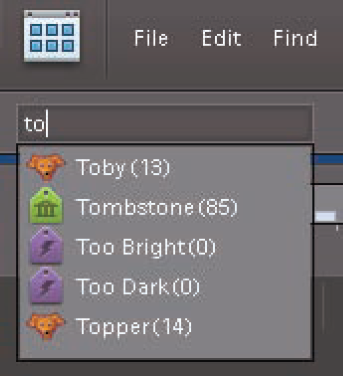
But, as they say in TV-land, that's not all. This Search box isn't limited to filtering for keyword tags. In fact you can type a file or folder name, a date format, or almost any kind of other metadata into the box.
For example, I typed Fuji and the Media Browser was populated with all photos I shot on a Fuji camera. If you know exactly what you're searching for, the Search box is the fastest way to perform the search.
So far in this chapter, I have discussed a number of ways to identify photos and to search for them based on keywords, stars, and other metadata. But what do you do with the photos after you find them?
For example, say that you take a vacation somewhere exotic and you want to share your photos with your friends and family. Back in the film days, this was done by printing photos from the trip and assembling them into a photo album. With digital photography, you have many more options for sharing, such as slideshows and Web galleries. However, if you want to stay organized, the best way to prepare photos for sharing is to add them to a virtual photo album.
The reason the Organizer's albums are virtual is that when you add a photo to them, the original photo isn't moved from its folder to the album. Neither is a copy of the photo placed into the album. What happens is a virtual version of the file is placed into the album. This way, if you make any changes to the original photo, the virtual version in the album is updated with the changes.
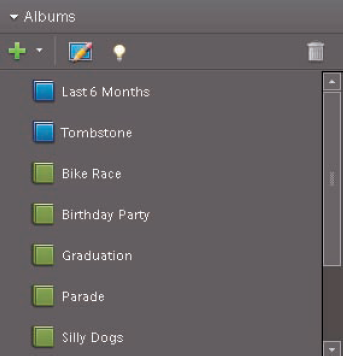
Figure 4.16 shows the Albums panel. It lists all of the albums in alphabetical order, with the blue smart albums listed first.
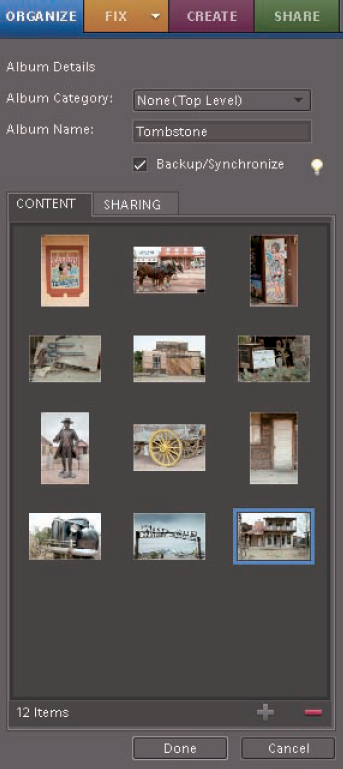
To create an album, click the Create New Album button (the large green + symbol) at the top of the Albums panel. Then choose New Album from the menu. When you do, the Organize pane is filled with the Albums Details shown in Figure 4.17. Type a name for the album, such as Tombstone.
By default, the Backup/Synchronization check box above the Content area is selected. If you have a Photoshop.com account, your album is automatically backed up to the online service. If you aren't using Photoshop.com, deselect this option.
Click and drag photos from the Media Browser into the Content area to add them to the album. These photos can be placed anywhere in the album, so you can arrange them in any order you prefer.
If you filtered for a specific set of photos to put into the album — say all your one-star photos or photos with a particular keyword tag — choose Edit
When you have added all your photos to the album, click Done. This closes the Album Details panel and adds the album to the Albums panel.
If you want to add more photos to the album, simply click and drag them from the Media Browser and drop them onto the album's icon in the Albums panel.
Whenever you want to work with photos in the album, click it in the Albums panel to display its photos in the Media Browser.
You can change the order of the photos, or select photos for editing. Click the album again to return the Media Browser to its Normal view. If you need to edit an album's settings, select the album and click the Edit Album button to the right of the Create New Album button, at the top of the panel.
Smart albums are a cool feature that uses metadata to automatically build albums. For example, I can create a smart album to automatically add any photo that has a Tombstone keyword and a one-star rating.
To create a smart album, click the New Album button and choose New Smart Album. When you do, the New Smart Album dialog, similar to the one in Figure 4.18, opens.
The New Smart Album dialog enables you to set up all the parameters for the content you want in the album. Here are the steps for setting up a smart album that uses a keyword and a one-star rating.
Type the name of the album in the Name text box.
Click the menu box that says Filename and select Keyword Tags from the list.
When you choose Keyword Tags, a second menu box is added to the right. Use this one to choose the keyword. I chose Tombstone.
Now you need a way to specify a one-star rating. To add it to the dialog, click the + symbol to the right. This adds another filter section below the keyword section you just set up.
Click the first menu box and choose Rating, (you can see this in Figure 4.18), then specify 1 in the star box to the right.
Because you're using two filter criteria, select All of the following search criteria to insure that both the keyword and rating criteria are met before any photos are added to the album.
Click OK.

Now any photo that has a specific keyword and a one-star rating added to it is automatically added to the new smart album.
Tip
Another cool way to use a smart album is to create one named Portfolio that automatically adds photos with the highest rating star you use. If you use three stars to signify your best photos, photos with this rating are added to your Portfolio album automatically.
After you create an album, you have a few choices about what you can do with it. Many of those options are found in the Create and Share panes, which are covered in Chapter 14.
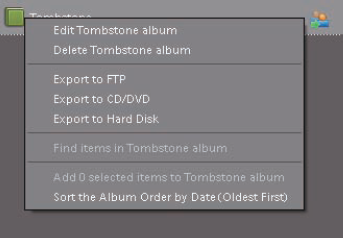
However, there are some things you can easily do within the Albums panel. Right-click the album you want to export or share to display a menu of album options, as shown in Figure 4.19.
Note
These options aren't available for a smart album.
Clicking Edit album opens the same Album Details panel that is used to create an album. You can also use the Edit Album button at the top of the Albums panel to open this dialog.
Select Delete album to delete the album. Deleting an album doesn't affect your photos because every photo in it is a virtual photo. The originals are still in their folders.
You use the next three options as follows:
Export to FTP. Use this option to upload a slideshow to your Web site. When you choose it, the Album Details panel opens with the Sharing tab visible, enabling you to enter all your FTP (File Transfer Protocol) information so that you can upload the album directly from the Organizer.
Export to CD/DVD. Use this option to burn a slideshow of your album to a disc. When you choose this, the Sharing tab displays information regarding any available disc burning drives on your computer system.
Export to Hard Disk. Use this option to copy a slideshow to your computer's hard drive so that you can share it with someone at your system.
Note
Slideshows are saved to disks in a Web-style format. To view a slideshow, open the folder that it was saved into and double-click on the file named index.html.
To share an album with someone using Photoshop.com, click the Share icon to the right of the album's name, or select the album and click the Edit Album button at the top of the panel. Then choose the Sharing tab within the Album Options panel. Next you add e-mail contacts for the people you want to share your contacts with.
Other things you can do here include adding a message, allowing viewers to download photos, and allowing viewers to order prints.
When you choose any of the exporting or sharing options from the previous section, a slideshow is displayed in the Media Browser, as shown in Figure 4.20.
The Slideshow Settings dialog shows transparently on top of the slideshow. When you hover over it, the transparency becomes solid, enabling you to use the dialog to make some minor changes to the slideshow.
Some of the things you can do include changing the name of the slideshow or adding a subtitle to it, and changing the background color.
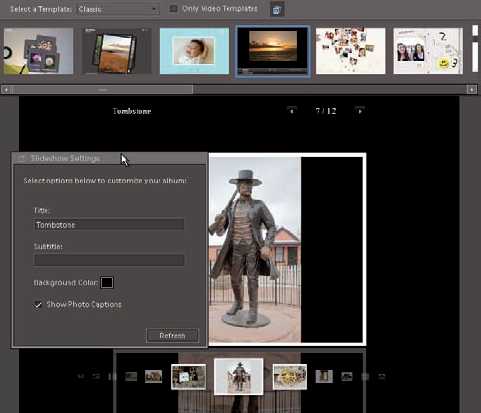
You can also display any captions that were added to photos earlier using the General Properties panel.
After you make changes, click Refresh. If you don't like the transparent Slideshow Settings dialog sitting on top of your slideshow while you work with it, click and drag it off to one side.
Directly above the slideshow is a filmstrip with lots of album templates. To see other templates, use the Select a Template menu to choose a different theme. When you see a template you want to try, double-click it to use it for your slideshow.
Note
see also
Methods for designing a more advanced style of slideshow using the Create pane is discussed in Chapter 14.
Digital photography offers all kinds of creative opportunities that have changed the way photographers work with images. Unlike film, though, digital files can disappear in an instant when a hard drive crashes. Why take the time to organize all your photos if you don't take a few moments to back up all your work?
When working with the PSE Organizer, it's important to understand that there are two different sets of data that need to be backed up. First are all your photos. When your computer crashes unexpectedly and the photos are not backed up, the loss can be devastating.
Second, and almost as important, is all the information that the Organizer uses to keep track of your photos, such as keywords, rating stars, and albums. If this information is lost, all your work in the Organizer is wasted.
Fortunately, the PSE Organizer provides an easy-to-understand backup system for making a single backup of your catalog and all image files contained in it.
To create a backup, choose File
If you have disconnected files, you are prompted to reconnect them before this dialog opens.
Note
If you just need to burn some files to a disc rather than creating a backup, choose File
The Backup dialog gives you two different backup options: Full Backup and Incremental Backup. A full backup copies everything in your catalog — including the actual photos and the information about them — into a backup file. The incremental option is used to update a full backup with new information.
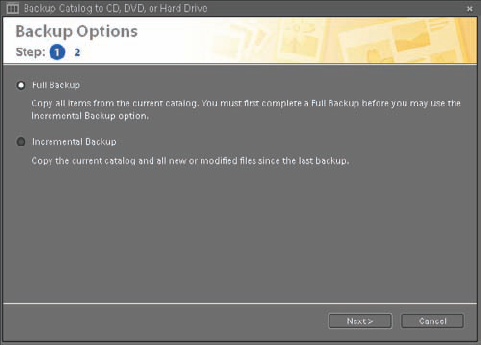
Naturally, you need to create a full backup before you can make incremental changes to it, though you can make incremental changes to a previous incremental backup.
When you click Next, a second dialog opens, enabling you to specify where you want to save the file. If you have a second hard drive, such as an external hard drive, I recommend using it for your backup. Otherwise, burn it to a CD or DVD.
Though it can be useful to save the backup to your main system hard drive that contains the original data, in case the original catalog somehow gets corrupted, if that hard drive crashes, you lose the original and the backup.
Tip
If you use a secondary hard drive, create a backup folder on it to store the catalog backup. That way if you ever need it, you'll know exactly where to look for it.
To restore a catalog backup, choose File
It's best to use a secondary hard drive for your backups, but if you don't have one you can use a CD or DVD. Just be advised that if you have lots of photos, you need several discs to back them up onto. The Backup command tells you how many discs you need after calculating the size of the disc you inserted into your disc burning drive. When a disc fills up during the backup process, PSE prompts you to insert another disc before continuing.
Be sure to label the discs so that you know in which order they were created. If you use an adhesive label, be certain that it's a label designed for CD/DVD discs. Otherwise the adhesive on the label can destroy the disc. If you write directly on the disc with a pen, be sure to use a pen that's designed specifically for writing on discs.
Tip
Backing up and restoring is a convenient way to copy or move your catalog and all of your files to another computer. If you only need to move a select group of files, choose File
Though you can use CD/DVD discs to create a backup, you'll find that the process goes much more smoothly if you use a second internal or external hard drive for your backup.
One further recommendation is to think about purchasing an external hard drive to use as a secondary backup that can be stored off-site, such as at a friend or relative's home. At today's prices, these drives are quite inexpensive. That way, even in a worst-case scenario of theft or fire at your home, your data is protected.
Another way to store your precious photos off-site is to use an online backup service. Photoshop.com offers an automatic method for doing this.
The easiest way to set it up is to log into your Photoshop.com account by clicking the Sign In link at the top of the Organizer. Then choose Edit
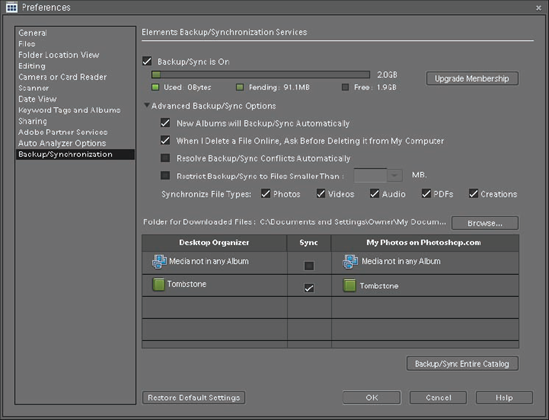
When you see the Elements Backup/Synchronization Services dialog, select Backup/Sync is On, and then select Advanced Backup/Sync Options. When you do, the dialog will look similar to Figure 4.22.
This dialog gives you complete control over your Photoshop.com backups. You can back up your entire catalog by clicking the Backup/Sync Entire Catalog button on the lower right, or you can back up individual albums by selecting them from the list.
Use the advanced options to allow new albums to back up automatically. Also be sure to select When I Delete a File Online, Ask Before Deleting it from My Computer. This prevents the accidental removal of files on your system when you're removing online albums.
Note
The free Photoshop.com account provides you with only 2GB of space for backing up photos. If you want to back up your entire catalog, you'll most likely need to upgrade your account.
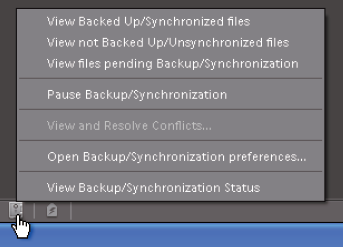
After you have backup/synchronization set up, you can access the Backup/Synchronization menu, shown in Figure 4.23, by clicking the Backup/Synchronization button, which is located on the Status Bar at the bottom of the interface. It looks like a small vault.
This menu gives you several options for viewing and managing files that are backed up or waiting to be backed up. You can also use it to open the Backup/Synchronization preferences.
Online backups are handy. However, don't rely on them as your only backup method because you never know when one of these online servers might crash.
Back up your photos to CD or DVD discs or a hard drive and use the online storage for an additional backup.