Chapter 15. Creating Projects
If you’re into making scrapbooks, greeting cards, and other photo concoctions, Elements is perfect for you. You can dress up your pictures in all sorts of creative ways without using—or buying—any other software. Elements is crammed with add-on graphics, frames, and other special effects; you can even create multipage documents.
This chapter kicks off with an in-depth look at how to create a photo collage. Once you’ve got those steps under your belt, all the other projects (summarized starting on The Favorites Palette) use the same basic method. You’ll also learn how to create photo books and calendars using Kodak EasyShare, Adobe’s online photo-printing partner.
Note
You can also create online albums (photo-filled Web pages) and slideshows in Elements. Learn all about those projects in Chapter 18.
Photo Collages
The Create tab (in both the Editor and the Organizer) helps you create fancy pages featuring your photos, which you can then share either in print or as digital files. Although Elements gives you lots of preset layouts to start from, you can customize every aspect to create projects that are totally your own.
A Photo Collage is a page displaying one or more of your photos, with or without a themed background. (Flip ahead to Figure 15-3 to get a glimpse of what Elements can help you do.) Elements’ wizards (a series of guided questions that lead you from start to finish) all begin with one or more suggested photo placeholders, but you can add or remove photos at will. You can also change the background, frame styles, and other details.
Tip
Photo Collages, like all the printable projects on the Create menu, start off at a resolution of 220 ppi. That’s perfectly fine print quality for most people’s taste. But if you want a higher resolution, your best bet is to cook up your own project from scratch, since increasing the resolution of a pre-built Elements project often throws the layout out of whack. (Photo Books are a little different. If you try to print a single, double-paged spread it prints at 72 ppi—in other words, you’re likely to get poor results—unless you first save your book as a PDF.)
To create a Photo Collage:
Open some photos in the Editor or select them in the Organizer.
This step is optional, but if you preselect photos, Elements can automatically place them into your layout for you, if you like.
Go to Create → Projects → Photo Collage.
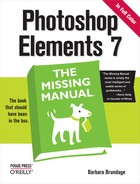
If you start from the Organizer, Elements bounces you over to the Editor to create your collage. The pane shown in Figure 15-1 appears.
Choose your page size from the Page Size pull-down menu.
If you don’t like the measurement units listed in the Page Size menu, you can change them. Go to Edit → Preferences → Units & Rulers → Photo Project Units, and change the Photo Project Units setting to inches, centimeters, or whichever system you prefer.
From the “Choose a Theme” section, if you want, select a theme.
Themes give you coordinated backgrounds and frames for your photos. (You can always choose a different background later if you don’t like the one that comes with the frame, or a new frame to replace the one that comes with the background.) Click once on a theme to select it, and a larger thumbnail appears, giving you a closer look at your choice.
If you choose a theme and then decide you don’t want any theme at all, click the upper-left thumbnail in the list of thumbnails to choose No Theme. If you go theme-less, you just get a blank background, but you can always add backgrounds from the Content palette later.
Choose a Layout style.
Scroll through the thumbnails and click the one you like. You can rearrange your layout after you’ve chosen it: Add more photos, remove photos, rotate the images, and so on. The layouts are arranged from one picture per page at the start of the list, to many pictures at the bottom of the group.
Choose from the Additional Options, if you like.
If you leave “Auto-Fill with Project Bin Photos” turned on, the pictures you chose in the Organizer automatically appear in your collage when Elements creates it. If you want to determine which photos go into which slots in the layout yourself, turn off the checkbox.
Figure 15-1. Once you’re in the Create pane in the Editor, you have a choice of two tabs (circled). Select and start your project from the Projects tab. Here you see the Photo Collage pane, where you start your collage. Once you’ve completed your basic layout here, click the Artwork tab to see the Content palette—that’s where you can choose frames, graphics and other doodads to add to your project.There’s also a checkbox for having captions you’ve added to your photos appear in the collage. (You can add text or edit the captions later, so you’re not tied to what’s in the Caption field.) This checkbox is grayed out if you haven’t selected any photos with captions.
If you selected some photos before you started, the “Number of Pages” box tells you how many pages long your creation will be. This number updates to reflect your current Layout choice. So, for example, if you select three photos in the Organizer and choose a single photo per page, the number of pages is three. If you click a layout that uses three photos per page, the number of pages changes to one. (If you haven’t selected any photos yet, you can specify how many pages you want by typing in a number.)
When you’ve made all your choices, click Done.
Elements gets to work creating your collage. If you preselected photos and left autofill turned on, Elements puts your photos right into the frames for you. Your document will have as many pages as needed to place all your photos in the layout you chose. If you didn’t select any photos, you see “Click here to add photo or Drag photo here.” That’s fine, because you can add photos in the next step.
Adjust your photos.
If you haven’t already picked photos for your project, click a frame and then choose a photo from the dialog box that appears, or drag a photo from the Project bin to a frame.
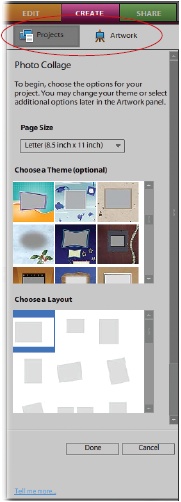
Regardless of how you get photos into the collage, you can make a number of adjustments to them once they’re in. Click once to resize the frame, or double-click any photo and you see the controls shown in Figure 15-2, which let you make a number of different photo tweaks without changing the frame size. Click the green checkmark to apply your changes, or the red Cancel button to get rid of them.
Figure 15-2. When you double-click a photo, you get controls for adjusting it. To resize your picture, move the slider to the left (smaller) or right (larger). Rotate your photo by clicking the blue rectangles (next to the slider), or click the folder icon to choose a different photo. You can also drag a handle of the bounding box to resize your photo or do a manual rotation, just the way you’d use the Move tool (The Move tool).You can also change the frame style by clicking over to the Artwork tab, clicking a photo in your collage, and then choosing a new style from the Content palette (The Content Palette). To change to the new frame, double-click the new style, or drag it to the photo. You can also click it once and then click Apply.
Customize your collage.
Here’s the fun part. Click a photo in your collage and drag it into a different position. Drag in art from the Content palette. These graphics are vector images (Ellipse), which means they’ll look great no matter how big or small you resize them. You can also add text to your collage (find out how to do that in Chapter 14). You can change the background by selecting a new one in the Content palette (The Content Palette). You can even flatten your image and use filters on the entire page. Figure 15-3 shows an example of what you can do with a Photo Collage.
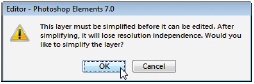
If you click back to the Editor, you can use any tool or filter on your collage, but you may need to simplify a layer (Ellipse) or flatten your image first, so save that step till you’re sure you like your collage. You can use the Move tool to rearrange your collage layers after you simplify them, but once you simplify layers, you can’t make their contents larger than 100 percent without losing quality, just like any normal photo.
Save your collage.
When finished, press Ctrl+S to name your project and save it. You can save it in any standard file format if it’s a one-page collage, but if you have more than one page you must save it as a PSE file, which is a special format just for multipage Elements documents.
There’s almost no limit to what you can do in a Photo Collage. Anything you’ve read in the other chapters of this book works here, too. Plus, here are a few special things you can do with photos in a collage:
Remove a photo from your collage. Right-click the photo and then choose Clear Photo. To remove the photo’s placeholder and frame as well, choose Clear Frame.
Make your photo appear without a frame. Right-click and then choose Clear Frame.
Resize a frame. You can resize a frame, either before or after you put a photo into it. Click once on the frame to bring up handles, and then drag a corner of the frame to make it larger. You can also rotate a photo using the handles on the frame.
Resize the frame to fit the photo. If you want to make the frame fit the photo, instead of the other way around, right-click the photo and then choose “Fit Frame to Photo”.
Tip
You can do all of the above in Full Edit, too, once your collage is complete, but you need to activate the Move tool first or you won’t see correct options when you right-click.
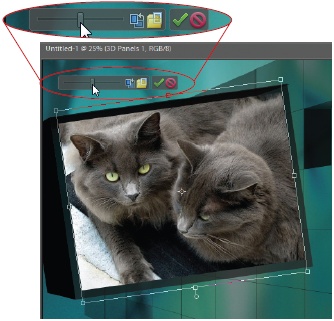
Figure 15-3. This composition was created as a Photo Collage. Except for the photos themselves, all the additional artwork came from the Content palette. The photos and some of the background graphics (like the leaves) were added first, the file was flattened and several filters applied to give it a painted effect (see Chapter 13 for more about filters), and then the remaining graphics (the pen, the dogwood flower, and the paperclips) were added to make them look like they’re lying on a painted page.Add another photo. Just drag a frame from the Content palette to a blank area in your collage. If you get too close to an existing frame, the new frame may just replace the one on an existing photo. If that happens, just press Ctrl+Z to undo it and drag again, more carefully, to another blank spot. You can also drag a photo into your collage from the Project bin.
Change your theme. If you wish you’d gone with a different theme after you’ve already created your Photo Collage, go to Content → By Type → Themes for a list of all the Create themes. Double-click a thumbnail or drag the new theme to your photo, or click the thumbnail once and then click Apply. Presto—you’ve got your existing layout with new frames and background.
Edit the Layer style of a Frame. Click the Edit tab to get back to Full Edit, and in the Layers palette, most of the frames have a Layer style icon. Double-click the icon to edit things like the size of the drop shadow on the frame. (See Applying Gradients for more about editing Layer styles.)
What’s more, you can add and delete pages from Photo Collages, as explained in the next section.
Tip
You can apply artwork from the Content palette to any image, not just those in Photo Collages and other Create projects.
Creating Multipage Documents
Elements makes it easy to create a file that’s more than one page long. A Photo Collage automatically starts with as many pages as needed to hold all your pre-selected photos, but you can add pages to any of the Create projects anytime—and remove them, too. (You can also add and remove pages from any Elements file, not just the Create projects.)
The size and resolution of your existing page determines the size and resolution of pages you add. In other words, if your current file is just a single 3” x 5” photo and you add a page to it, you get a 3” x 5” page. If you want to add a letter-size page to a small photo file, you must first add canvas to the photo (Adding Canvas) or resize it. (But check Adding Canvas to see why resizing a small photo to letter size probably won’t work well.)
To add a new page to your document, go to the Editor’s Edit menu and choose one of the following commands:
Add Blank Page (keyboard shortcut: Alt+Ctrl+G). This command creates a new, totally empty page with the same dimensions and resolution as your existing page.
Add Page Using Current Layout (shortcut: Alt+Shift+Ctrl+G). When you choose this option, Elements creates a page that’s exactly like the current state of your existing page, including any changes you’ve made. Instead of photos, there are placeholders for you to fill in. So, for example, if you’ve changed frame styles and dragged a photo to another position, the new frame and positioning (without the photo) appears in your new page. Any graphics you’ve added from the Content palette show up as well. This option is a big help when you’re making photo books or scrapbooks.
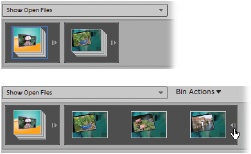
You can navigate through all the pages in your document using the Project bin, as shown in Figure 15-5. If you decide you’ve got too many pages, go to Edit → Delete Current Page, and the currently active page is history. You can also do any adding and deleting of pages right from the Project bin by right-clicking and choosing what you want to do from the pop-out menu, a big help when you’re editing a multipage project.
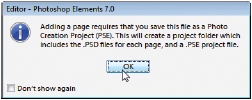
No matter what kind of file you start with—whether it’s from the Create projects or just a regular JPEG—you must save your file as a PSE format file if you add pages to it. Elements reminds you with the dialog box in Figure 15-6. While it’s very, very nice to be able to create multipage documents in Elements, the PSE format has some drawbacks, too, as explained in the box on The Content Palette.
Working with the Content and Favorites Palettes
Adobe gives you a ton of artistic goodies to use for customizing your projects, and a special palette just to hold it all: the Content palette. You also get a Favorites palette, where you can keep the items you use most often from the Content palette (and from the Effects palette, too).
The Content Palette
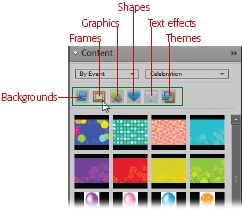
This palette holds backgrounds, frames, graphics, shapes, text effects, and themes to use in projects. The Content palette works something like the Effects palette, with menus and a row of little icons for each of its major categories (see Figure 15-7). Here’s how it works:
Make the Content palette visible.
Go to Create → Artwork. This palette is always visible in the Artwork pane, but you can make it visible in Full Edit, as well, by going to Window → Content. (It still appears in Artwork, even when you make it visible in the Editor. You can’t remove it from the Artwork pane, even if you wanted to.)
Figure 15-7. Once you’ve winnowed down your choices by selecting from the two pull-down menus shown here, use these little category icons (labelled) to further control which thumbnail patterns appear in the Content palette. Elements starts you off by including all the categories (a gray outline around a button means it’s active and that category is included in your search). Click any of the buttons to turn them off and exclude that category from your search. So here you see the results of searching By Event → Celebration. And since the Frames button is turned off no frames appear in the thumbnail area.Choose how you want to search.
In the left-hand pull-down menu, choose to search by type (like backgrounds, frames, and so on), or choose Show All to see everything in the palette.
Refine your search.
In the right-hand pull-down menu, choose specifically what you want. The contents of this menu change depending on your choice in the left-hand menu. So if you choose By Type on the left, you see Backgrounds, Frames, Graphics, and so on. If you choose By Mood, the right-hand menu offers you choices like Active, Adventurous, Fun, Romantic, or Thoughtful.
If you like, filter your results.
Here’s where those category buttons below the menus come into play. You may still get an awful lot of results from some of your menu choices, so you can use the buttons to filter out items you don’t want. If you chose By Seasons and Winter in the menus but don’t want to see frames, just turn off the Frames button (click it to get rid of the gray highlight around it) and frames are excluded from your results. (From left to right the buttons are Backgrounds, Frames, Graphics, Shapes, Text Effects, and Themes.) You can turn on and off as many buttons as you want, to include or exclude as many kinds of content as you like. To bring something you’ve excluded back into your search results, click its button again to turn it back on.
Of course, if you’re like a lot of people, most of the time you’ll want to stick with By Type and choose the category you want. In that case the buttons are dimmed out.
Add your choice to your image.
To use anything from the Content palette, double-click the thumbnail, or drag it to your image. (You can also click your selection once and then click Apply.)
To remove it, press Ctrl+Z if you just added it, or click the object with the Move tool and then press Backspace. If you use the Backspace key, Elements asks if you want to “Delete the Layer.” You do.
Warning
Don’t use the trashcan icon in the Content palette to delete an object from your project. That seems like a logical thing to do—after all, that’s how it works for the Layers palette. But with the Content palette, the trashcan deletes the graphic, frame, or whatever from the palette, not just from your image. Only use the trashcan for Content palette items you never want to use again. For example, if you’ve downloaded and installed a frame (as described on Beyond This Book) and know you don’t want to use it again, then it’s time to use the trashcan.
If that seems like a lot of navigation, check out the Favorites palette (described in the next section) for a faster way to reach Content palette items you use a lot.
Note
One advantage of signing up for a Photoshop.com account (Photoshop.com) is that the Content palette displays a lot of extra items that you can download. Free downloads display a blue banner across the corner of the palette thumbnail, while items only available for those with paid accounts have a gold banner.
The Favorites Palette
If you use the same effects, graphics, and styles over and over, you may find it tedious to keep navigating to them in the Content or Effects palettes. Make your life simpler by saving your Content and Effects standbys in the Favorites palette. Then you can get to these items with just a click or two.
To see the Favorites palette, go to Create → Artwork; you should see it at the bottom of the bin. To see the Favorites palette in the Editor, go to Window → Favorites to bring it up as a free-floating palette. (You can make sure it’s always visible in the Palette bin, even when you’re not in Artwork mode, by opening it as a floating palette, clicking the More button [the double arrows], and then choosing “Place in Palette bin when closed”.)
To add an item to Favorites, right-click its thumbnail in the Content or Effects palette and then choose “Add to Favorites”, or just drag its thumbnail to the palette.
To streamline the process of adding Content items to the Favorites palette, Elements lets you expand Create → Artwork into a full-screen view. Just click the arrows at the top of the Create pane, to the right of the Artwork tab; the Artwork pane expands to fill the Elements window. You can’t add anything to an image from here, though. It’s just to make it easier to see and drag things from the Content palette into the Favorites palette. When you’re done, click the arrows again to collapse the Artwork pane back to its usual size.
To delete a favorite, right-click its thumbnail and then choose “Remove from Favorites”. Or click it once to highlight it and then click the trashcan icon at the bottom of the palette (unlike the Content palette, trashing something here just removes it as a favorite, not from the program altogether). If you forget what a thumbnail is for, right-click it and choose Details, and Elements will tell you about it.
Photo Books
Elements lets you create 10.25” x 9” pages for use in a bound book of photos—a very popular gift item. If you wish to order yours from Kodak’s EasyShare Gallery (see The Favorites Palette to learn how to set up an account), you need at least 20 pages.
Creating a photo book is something like creating a collage; Elements walks you through the process with plenty of hand-holding:
If you want, choose your photos.
If you want Elements to automatically layout your photos in the book, make sure you have them open in the Project bin and in the correct order before you start. Or if you prefer, you can wait and add each picture manually after you create the book layout.
Start your book.
In either the Editor or the Organizer, go to Create → Photo Book. Elements switches over to the Editor, if you aren’t there already, and presents your first set of choices for your book.
Choose a title page photo.
Photo books usually have a cutout cover through which you can see one large image on the title page. This page has a different layout from the rest of the book. If you’re using photos in the Project bin, drag the photo you want for the title page so that it’s the first photo in the lineup. If you prefer, you can wait and choose your title page photo after you complete the book layout.
Click Next to go to the next pane.
Choose a layout and theme for your book.
You have two choices:
Random Photo Layout. Elements makes the decisions for you about how many photos will be on each page; every page may be different. It’s best to avoid this option unless you have a lot of photos, since some of the layouts have as many as 20 tiny photos on a page—although, of course, you can edit things later.
Choose Photo Layout. Click this option and Elements presents you with a long list of possible page layout thumbnails. Click a thumbnail to select it. You need to pick left-and right-hand page layouts, which can be the same or different, as you prefer. Click Next to return to the main Photo Book pane.
Now choose a theme. When you click a thumbnail in the theme list, Elements takes a few seconds, and then displays a little thumbnail showing the selected theme’s style.
Your other choices are the same as for a Photo Collage. “Number of Pages” says 20 when you start your Photo Book; you need to have between 20 and 80 pages for a book. If you choose a number outside that range, you’ll get a warning. (You don’t have to enter a number here, incidentally, if you don’t feel like counting. If you have more photos than will fit on 20 pages, the number of pages updates automatically.)
Create your book.
Click Create, and Elements creates and opens a PSE file for you. You can edit anything in the file, exactly the same way you can change things in a Photo Collage. Once Elements creates the book, you see it, along with some special controls for navigating through the layout, as explained in Figure 15-8. The bright aqua lines towards the boundaries of the pages are the printing guides—they mark the actual page edges, so anything outside them will be cut off when your book is printed. Pay attention to them when moving or resizing your photos.
Figure 15-8. When you click Create, Elements gives you a helpful double-page view of your book so that you can make any edits to the pictures or changes to the layout. The control strip shown here lets you move through your pages to see each double-page spread, or add or remove pages. You can reposition it anywhere in the work area that’s convenient so it doesn’t cover up your photos.
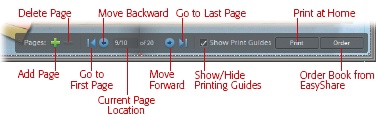
Don’t forget to save the PSE file. When you’re ready to print, you can upload the book to EasyShare for printing (Ordering Prints Online ) right from the Editor by clicking the Order button in the control strip (see Figure 15-8). If you don’t want to order from EasyShare, you can save your book as a PDF file to send to other photo book publishers.
Note
If you want to print your Photo Book pages somewhere other than Kodak’s EasyShare Gallery, you’ll need to use the workaround explained in the box on The Content Palette.
You can also create a book of photos without using the Elements Photo Book feature at all. You can connect to EasyShare and upload your photos, as explained on Ordering Prints Online , and choose to have EasyShare print them in its own style of photo book. (You don’t get any page decorations or layout choices when you use the EasyShare wizard, though.) One thing to keep in mind if you’re getting a bound photo book: Whether you order from EasyShare or another publisher, almost all books use only a single photo for the first page because that’s what shows through the cover cutout.
Greeting Cards
Adobe calls them Greeting Cards, but they’re more like what most people would call postcards. An Elements Greeting Card is a 4” x 6” or 5” x 7” single-sided page rather than a folded card. Go to Create → More Options → Greeting Card to get started. The layout and template choices are identical to those offered for Photo Collages, and the procedure is exactly the same, too. Just follow the steps for Photo Collages (Photo Collages).
Tip
You can also order greeting cards from Kodak EasyShare Gallery, as explained on CD/DVD Label.
CD/DVD Jacket
In Elements, you can create CD jewel case inserts or DVD inserts, which appear on the front and back of the case. To make a CD insert, in either the Editor or the Organizer, just go to Create → More Options → CD Jacket; you get a variety of different templates, all the correct size for use in a CD case.
The steps for creating your CD Jacket are the same as for a Photo Collage, but the layout choices, of course, are different. Pay special attention to the photo placement when choosing your layout: The right side of the layout is the front cover. You can turn “Auto-Fill with Project Bin Photos” off or on to suit you. (If you have five photos in the Project bin, you don’t want to get a five-page CD Jacket, which is what may happen. If there aren’t enough slots on one page for all the open photos, Auto-Fill will just make extra pages to place the open images. So turn Auto-Fill off if you don’t want all your open photos used.)
Unfortunately, only the “2 Centered” CD insert layout even approximately marks out the general spine area, where most CDs display their titles. If you decide to enter text that you want to appear on the spine, click the Horizontal Type tool (Adding Type to an Image), type away, and then go to Image → Rotate → Layer 90° Left. Then use the Move tool to place the text where you want it.
Tip
If you use a theme (Photo Collages) and want to add spine text, remember that home inkjet printers don’t do a good job printing small white type on a dark background. You’re better off going with dark type on a light background.
The DVD Jacket wizard (Create → More Options → DVD Jacket) is identical except for the layout choices.
CD/DVD Label
You can create stick-on labels for CDs and DVDs with Elements (Create → More Options → CD/DVD Label) and print them on blank label sheets from any office supply store. Elements gives you templates that create a single label layout. When you’re done, you need to place your work into the template that goes with your brand of labels. (Most CD or DVD labels print two to a page.) The major brands, like Avery (www.avery.com) and Neato (www.neato.com), have free downloadable templates on their Web sites to help you position labels properly on the page.
Note
While labels make your discs look great, it’s risky to put a stick-on label on any disc you’ll use in a computer. If the label gets stuck in the disk drive, you may have to replace the drive. Consider using a marker to label discs for computer use, or buying printable discs if you have a printer that will take them.
Online Creations
Besides what you can do in Elements, you can create a handful of projects online at Kodak’s EasyShare Gallery (Ordering Prints Online ). You can order Kodak greeting cards (using their formats and templates instead of the Elements Greeting Card choices), for example. First, select your photos in the Organizer or open them in the Editor.
Then go to Create → More Options → Order Kodak Photo Greeting Cards. Elements automatically uploads your photos, and you see them in the EasyShare wizard, which walks you through creating and ordering cards. You need to set up an EasyShare account the first time you use the service. Setting up an account and using EasyShare are explained on Ordering Prints Online .
You can also create calendars with EasyShare. Before you start, you must select 12 photos in the Organizer. Then go to Create → Photo Calendar, and Elements whisks you off to EasyShare. You can access the Photo Calendar menu choice from either the Organizer or the Editor, but it’s the photos you’ve selected in the Organizer that get uploaded. If you select fewer than 12 photos, the EasyShare wizard nags you to add more, and you don’t have the option of using the same photo for each month. (Elements doesn’t include templates for creating calendars to print at home or take to your local print shop.)
Another online ordering option (if you’re in the United States) is PhotoStamps. This is real, legitimate postage that features the photo of your choice. If you’ve always wanted to be immortalized on a stamp, here’s your opportunity. Select one or more photos if you like, and then go to Create → More Options → PhotoStamps. Elements automatically uploads your photos to Stamps.com. Create an account with Stamps.com, and then order away.
Note
While PhotoStamps are fun, they’re definitely for people with lots of disposable income, or for very special occasions, like sending wedding announcements, for example. Before you spend a lot of time preparing photos, check the price list to see whether you really think the stamps will be worth the cost.