
Applying Office Themes and Layouts
THE PAGE LAYOUT TAB, shown in Figure 5-40, contains tools for adjusting the overall look of your worksheet—not individual cells, but the entire worksheet itself. Your choices on this tab include:
Figure 5-40. Make sweeping visual changes to your whole worksheet through the Page Layout tab’s options.

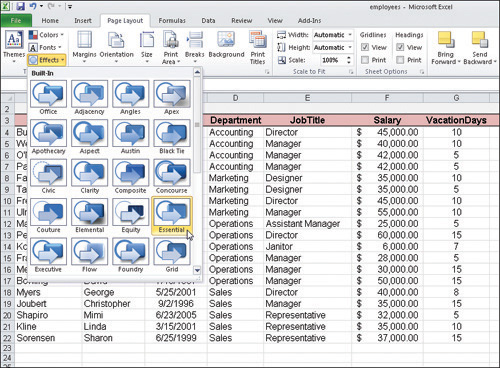
Themes. This tab group contains Themes, which are collections of formats that combine compatible colors, fonts, and border styles, and three separate buttons for Colors, Fonts, and Effects, if you want to customize things a bit more. Click any of the buttons to view a palette of options, each represented by color swatches and/or graphical examples of the impact the selection would have on your worksheet. Figure 5-41 shows the Effects palette and all the special effects that each offers.
Figure 5-41. Choose from a series of special Effects for your worksheet elements—text, graphics, borders, and so on.
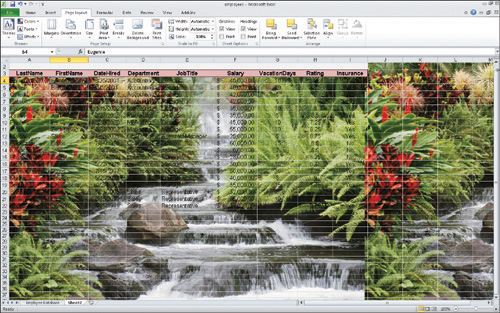
Page Setup. Working with any of the seven buttons in this group allows you to change how your worksheet will print— where page breaks will occur, what will print on each page (a pre-set print area, titles, and so on), and whether or not your page will have a background image—a photo or other image that appears behind the gridlines and your worksheet content.
Tip
Unless your photo or other image is very light, don’t apply a background image. It can really interfere with legibility, as shown in Figure 5-42, where the photo makes it impossible to read the worksheet’s content.
Figure 5-42. Background images, applied through the Page Setup group of the Page Layout tab, are usually a distraction from your worksheet content.
Scale to Fit. Use these commands to force a certain number of columns and/or rows onto the printed pages of your worksheet. You can specify the number of pages wide or tall, or set a scale, which shrinks or expands the worksheet to fit on the page.
Sheet Options. These commands allow you to choose what will be included on your printed worksheet (using the Print checkboxes) or only visible onscreen (using the View checkboxes).
Arrange. The six commands in this last group of the Page Layout tab allow you to change the stacking order of graphics on the page—charts, pictures, drawn shapes and lines, text boxes—just about anything you add to the worksheet via the Insert tab. You don’t need to tinker with the stacking order unless things overlap, but if they do, these commands can be quite handy to make sure the overlap doesn’t obscure something important. By default, things stack in the order you added them—last items on top.