
Considering Your Collaboration Options
WHENEVER MORE THAN ONE person is working on a single Excel worksheet or workbook, it’s important to keep things straight—who added or changed the information, where they got the information, and whether the additions and changes are to be kept as they are, edited further, or removed entirely. Much of the process of collaborating on such a project is manual, in that you’ll have to ask people to add or change the information that they’re responsible for, someone will have to review what’s been added or changed, and there will have to be meetings or some other communication between the collaborators, to make sure everything’s going as planned.
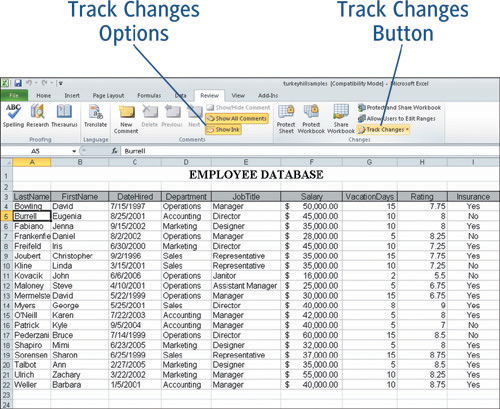
For Excel’s part, however, the process of tracking who did what and when it was done is entirely automatic—once you’ve turned on a feature called Track Changes. As shown in Figure 14-1, Track Changes is turned on via the Review tab’s Track Changes command, through which you can control how Track Changes works—whose changes you want to track, which cells you want to monitor, and whether or not to keep changes a member of the team has made. But don’t worry—while there are a lot of variables, Track Changes is really simple to use.
Figure 14-1. When collaborating on a worksheet, you’ll spend a good deal of time in Excel 2010’s Review tab.
Turning Track Changes On and Off
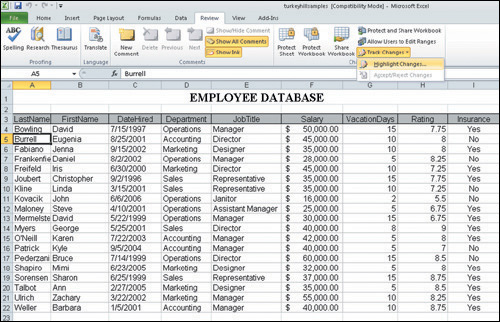
To turn Track Changes on, simply open the workbook you want to track, and from within any of its worksheets, click the Review tab on the Ribbon. As shown in Figure 14-2, the Track Changes command presents a menu, from which you can choose to Highlight Changes—this refers to the very process of tracking changes, which highlights those cells that are changed in any way after Track Changes is turned on.
Figure 14-2. Choose to Highlight Changes from within the Track Changes command menu.
It’s Good to Share…SometimesWhen you turn Track Changes on, your workbook becomes shared. This means that anyone can open and edit it (which may be what you want), but anyone can also turn Track Changes off, which would cause you to lose all the information on the changes made to the workbook. To prevent this, click the Protect Shared Workbook command on the Review tab, and click the Sharing with Track Changes option within the resulting Protect Shared Workbook dialog box. Click OK to close the dialog box and confirm the protection, and later, if desired, click the Unprotect Shared Workbook command to turn this protection off. We’ll discuss more about how to protect your workbooks from undesired viewing or editing later in this chapter. |
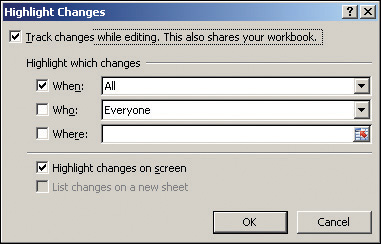
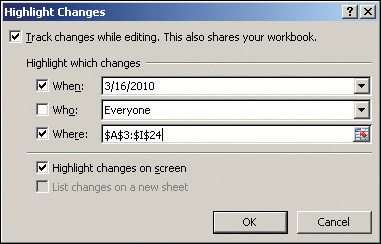
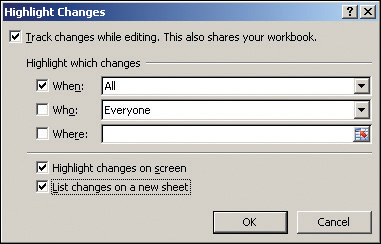
After selecting Highlight Changes, the dialog box shown in Figure 14-3 appears. Click the checkbox next to Track Changes While Editing. This activates the rest of the dialog box, where you can choose from a series of options that determine exactly how Track Changes will work. You can, however, simply check the Track Changes While Editing checkbox, and click OK— the defaults (monitoring all cells in the workbook, made by everyone, from now until Track Changes is turned off) are just fine for most users.
Figure 14-3. Set the When, Who, and Where for how your workbook’s changes will be tracked.
And speaking of turning Track Changes off, to do so, just re-select Highlight Changes from the Review tab’s Track Changes command dropdown menu, and in the dialog box shown in Figure 14-3, uncheck the Highlight Changes While Editing checkbox, and then click OK. Track Changes is now off, and any changes made while Track Changes was on are kept, but are no longer highlighted as changed, and you no longer have the ability to go through all changes and accept or reject them (I’ll discuss how to do this later on in this chapter).
Caution

Choosing Which Changes to Track
As shown in the Highlight Changes dialog box in Figure 14-3, you can easily, and thoroughly, customize how Track Changes works. You don’t need to make any selections from the following options, however, as the default settings were designed to meet the needs of most users and most situations.
If you do want to customize Track Changes, here are the settings you can use to do it:
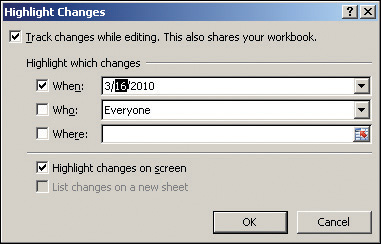
When. This option, which is checked (turned on) by default, allows you to specify which changes will be tracked— those made since the last time you saved, those changes that have not yet been reviewed, all changes (meaning no matter when they’re made), or changes since a particular date. Note the ellipsis after the “Since Date…” option, which, if chosen, inserts the current date, but you can edit it as shown in Figure 14-4. All is the default setting.
Figure 14-4. If you choose “Since Date…”the system date is inserted by default, but you can edit it by retyping some or all of the values for the month, day, and/or year.
Who. When you check this option, you can choose between Everyone and Everyone But Me. This is useful if you know you’ll be continuing to work on the data, but are really only interested in the contributions of others on your team. Everyone is the default.
Where. This option allows you to type a cell or range of cells into the field, or you can click the Collapse button at the right end of the field to shrink the dialog box. Once shrunken, as shown in Figure 14-5, you can click and drag through cells in your worksheet to specify a range of cells to be tracked. You can click any other worksheet in the workbook (note that the sheet name appears in the field if you do so), and once you’ve selected a range of cells to track, press Enter to display them in the dialog box, as shown in Figure 14-6.
Figure 14-5. Shrink the dialog box to give yourself more elbow-room for selecting the cells you want to track.
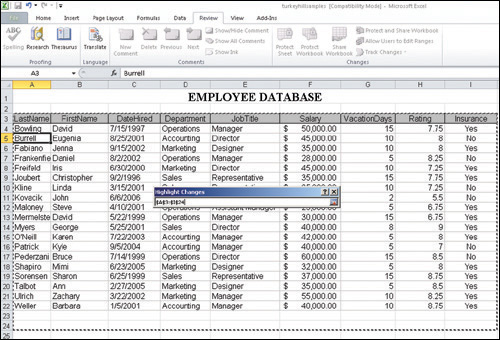
Figure 14-6. Once you’ve picked the worksheet and range of cells within it to track, your selection appears in the dialog box, where you can tweak it as needed.
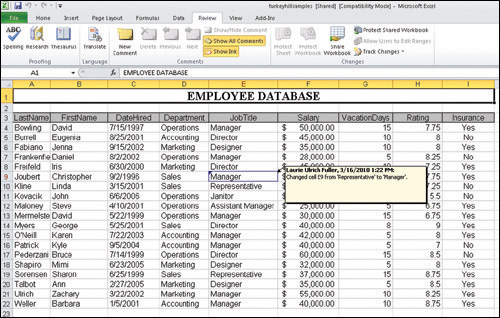
Highlight Changes Onscreen. This option is turned on by default, and simply means that you want some kind of visual notification that Track Changes has detected a change to a cell or cells within the specified range. As shown in Figure 14-7, once a cell has been changed, a blue triangle appears in the upper-left corner of the cell, and if you mouse over the cell, a comment bubble pops up to indicate who made the change, when it was made, and what the change consisted of.
Figure 14-7. Mouse over a highlighted cell to find out what was done to change that cell’s content.
Tracking the Whole Workbook
If you don’t make any selection in the Where box, the entire workbook will be tracked—so you only need to specify a range if you want to restrict the tracking to that range of cells.
Editing with Track Changes
While Track Changes is on, you don’t have to do anything special when editing the worksheet— just work along as you would normally, adding, removing, and changing cell content. You’ll notice, however, as shown in Figure 14-7, that whenever you edit a cell that’s within the tracked range of cells, that a blue triangle appears in the upper-left corner of the cell. You don’t need to do anything with that as you work, just know that as discussed, you can mouse over a cell and see the Track Changes information about what changes were made, by whom, and when.
If you find it distracting to have the triangles appear in the corners of edited cells while Track Changes is on—or if you fear your collaborators will find it distracting—you can turn off the highlighting, while still keeping Track Changes on.
With Track Changes already on, choose Track Changes from the Review tab on the Ribbon.
Select Highlight Changes from the dropdown menu.
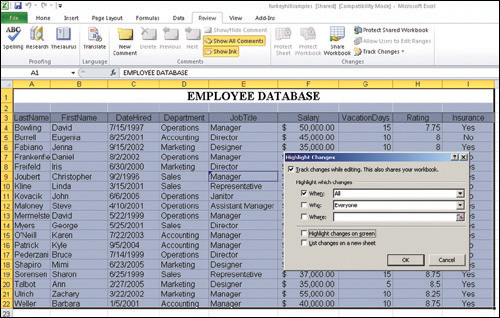
In the resulting dialog box, turn off the checkbox next to the Highlight Changes On Screen option. Figure 14-8 shows the dialog box in place, with a range of cells selected behind it.
Figure 14-8. Highlighting tracked cells is an option you can easily turn off.
Click OK.
Track Changes remains on, but no highlighting will appear as you work.
Listing Tracked Changes in a New Sheet
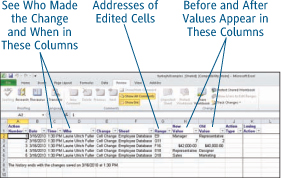
Track Changes in Excel 2010 offers a powerful tool to enhance the collaborative process. The History sheet, shown in Figure 14-9, allows you to see every change made, including which cell was edited, who made the edit, what the previous content of that cell was and what it is now. Note that if a single user makes a series of changes to a single cell, only his or her last change will be listed—if several individuals make changes, however, all of those changes (the last one for each person) will be listed.
Figure 14-9. The entire history of your collaborative work can be documented in a new sheet.
To create the History sheet for your workbook, follow these steps—it’s assumed that Track Changes is on and has been on, and that edits have been made.
Save your workbook. Excel will only create a History sheet for saved changes, and you can save by pressing Ctrl+S, or choosing File > Save.
With your workbook saved, click the Review tab, and click the Track Changes command to display its drop-down menu.
Choose Highlight Changes. The Highlight Changes dialog box opens, as shown in Figure 14-10.
Figure 14-10. A newly available option appears in the Highlight Changes dialog box—to create a new sheet listing all changes made while Track Changes has been in use.
Check the box next to List Changes on a New Sheet.
Click OK. A new History worksheet appears, and is now the active worksheet, as shown in Figure 14-11.
Figure 14-11. Your new History worksheet can be sorted and filtered to display and organize the data in any way you choose.
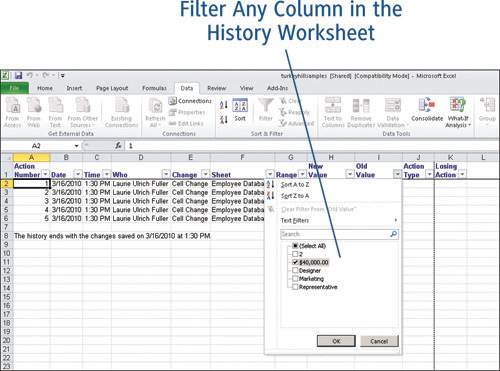
To use the History sheet, review each sheet and cell that is listed. You can use it to see which changes you want to keep and which ones you might want to change again or reject, returning to the content prior to the collaborative process. If your History sheet has an abundance of data in it—row upon row of edited cells, some cells changed multiple times by multiple people— which might make it difficult to make decisions at a glance, you can use the Data tab’s Sort and Filter commands (discussed in Chapters 7 and 8, respectively) to change the order in which the listed changes appear, and to distill the list of changes down to just the few you want to see— perhaps only those in a certain range of cells or performed by a certain person.
Redisplaying Your ChangesThe History sheet does not remain after you save the workbook. If you need to see your listed changes again, you’ll have to repeat Steps 4 and 5 in the previous procedure to display the current list of changes. |
Accepting and Rejecting Collaborative Changes
The process of accepting and/or rejecting edits made by a team of contributors can be performed while Track Changes is still in use, or at the end of the collaborative process, just before turning Track Changes off. You can accept or reject changes on a weekly, daily, or hourly basis, at any interval that works for you. Once you’ve accepted or rejected a change, the cell/s are no longer highlighted (with that blue triangle you’ve seen so much in this chapter), and the cell will only be highlighted again if a change is made subsequent to the acceptance or rejection of its current content.
To accept or reject tracked changes, follow these steps:
1. | In the workbook in which Track Changes is on, click the Review tab on the Excel Ribbon. |
2. | Click the Track Changes command, and choose Accept/Reject Changes from the drop-down menu, as shown in Figure 14-12. Figure 14-12. Return to the Review tab to begin the process of accepting or rejecting the changes you and your team have made to the workbook.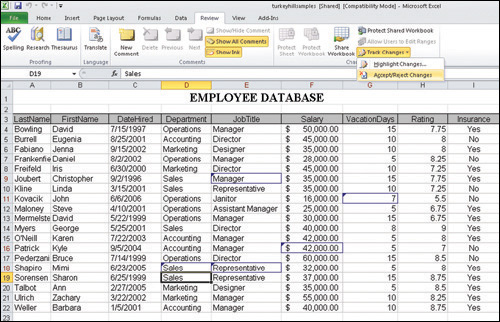
|
3. | In the resulting Select Changes to Accept or Reject dialog box, shown in Figure 14-13, choose which changes you want to deal with. Your choices are: Figure 14-13. The Select Changes to Accept or Reject dialog box allows you to fine-tune your reviewing process.
|
4. | With your settings in place, click OK. |
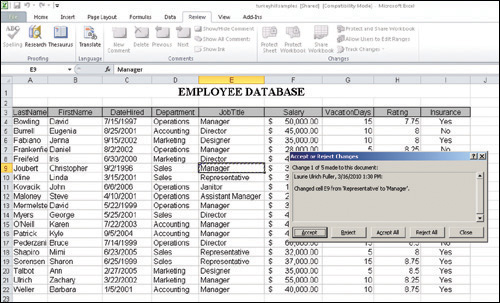
5. | In the resulting Accept or Reject Changes dialog box (shown in Figure 14-14), view the changes as they are displayed one at a time— clicking the Accept or Reject button to move through them individually. |
6. | To end the process before reviewing all the edited cells, click Close. Otherwise, if you accept or reject all the edits (one at a time or using the All-version buttons), the dialog box closes on its own. Tip You can also make a sweeping decision and not view all the changes individually, by clicking Accept All or Reject All. You can also Close the dialog box without making any acceptances or rejections, at any point in the process. |

You Can Review Some Changes LaterYou can use this process to review just a few of the edited cells, by making Accept or Reject decisions one at a time and then clicking Close to leave the rest undecided (for now), and come back to them later. There’s no requirement that you review and decide on all the changes just because you’ve started this process. As long as Track Changes remains on, your contributors’ changes will continue to be tracked and highlighted, and you can review them at any time. If you decide to use the History sheet as your reviewing tool, when you’re ready, you can use the previous steps to open the Accept or Reject Changes dialog box and then click Accept All or Reject All. |