
In this chapter, we are going to dive deeper into the features of TensorFlow.js by building a couple of web applications that detect objects in images.
There will be more complete code samples with explanations, so you get a better understanding of how to implement machine learning into your projects.
3.1 Using a pre-trained model
The first project we are going to build is a quick game in which you are prompted to find specific objects around you, take a picture of them using your device’s camera, and check if the machine learning model recognizes them.
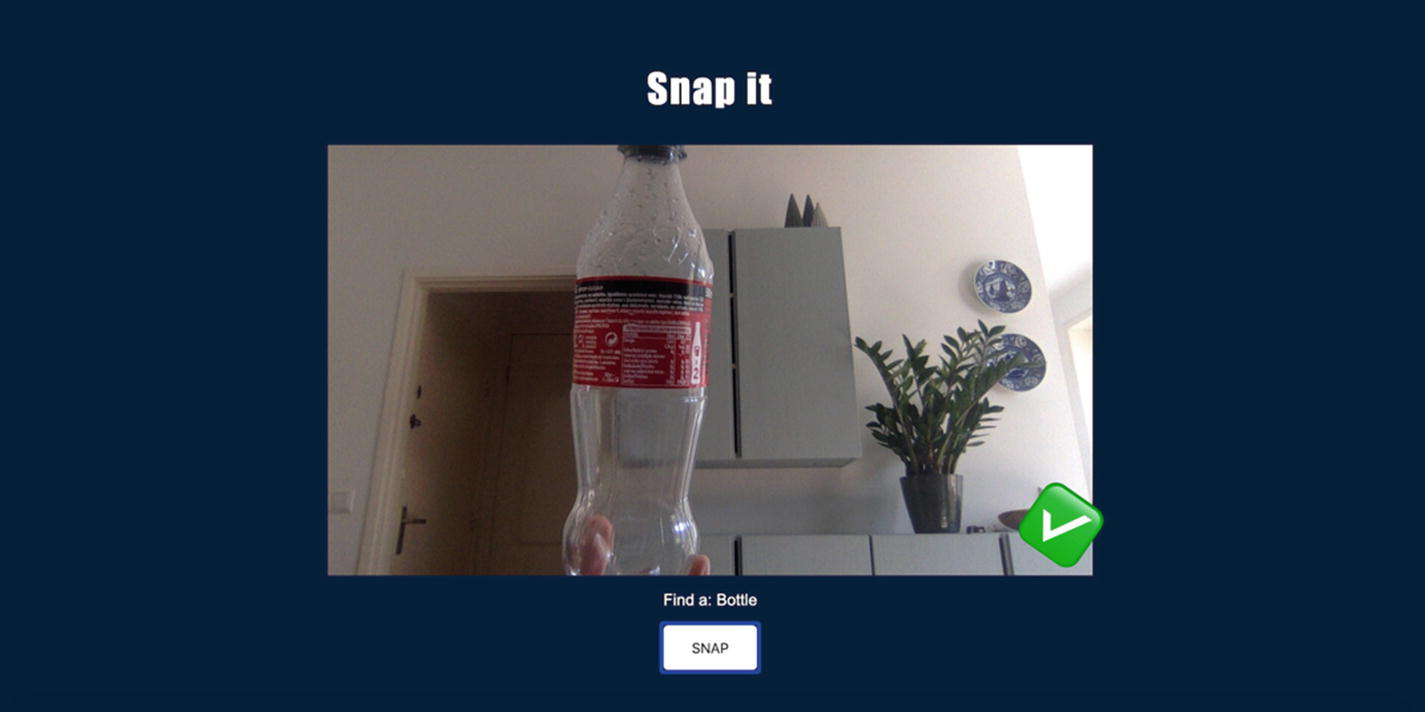
Snapshot of the image classification project
At the core of this project is the same object detection model we talked about previously, called mobilenet .
This model is pre-trained using the open source ImageNet database made of images organized in 1000 different classes.
What this means is that the model is able to recognize 1000 different objects based on the data it has been trained with.
To start this project, we need to import both TensorFlow.js and the mobilenet model.
Importing TensorFlow.js and mobilenet
Or, if you are using a front-end framework, for example, React.js, you can install TensorFlow.js in your dependencies and then import it in a JavaScript file.
Installing the TensorFlow.js and mobilenet modules
Importing the modules
Importing these two files gives us access to the tf and mobilenet objects.
Loading the model

Console output of a model
Models being pretty heavy files, they can take a few seconds to load and therefore should be loaded using async/await.
If you are curious to know what this object contains, you can log it and look at its properties.
Please remember that you do not have to understand every property in the object to be able to use it.

Console output of a model
This property shows us the type of input used to train the model. In this case, we can see that images were used, which makes sense considering this is an object detection model. More importantly, we can see the shape of the data used in the training process.
The shape attribute reveals the value [-1, 224, 224, 3], which means that the images fed to the model were RGB images (the value 3 at the end of the array represents the number or channels) of size 224*224 pixels.
This value is particularly interesting for the next part of this chapter, where we will look at doing transfer learning with the mobilenet model.
Feel free to explore the model further.
The next step to build this application is to allow TensorFlow.js to have access to the input from the webcam to be able to run predictions and detect objects.
As our project uses the device’s webcam, we have a <video> element in our HTML.
Instantiating a webcam object
These two lines are still part of the setup process of our application. At the moment, we only loaded the model and created this webcam variable that will transform snapshots from the camera to tensors.
Button to capture an image
Classifying an image
To capture an image from the video feed, TensorFlow.js has a capture() built-in method that needs to be called on the object previously created using tf.data.webcam.
It allows to transform a single image directly into a tensor so it can then easily be used with other TensorFlow.js operations.
After capturing an image, we generate predictions by passing it in mobilenet.classify.
This will return an array of predictions.

Live object classification

Prediction result printed in the console
As you can see, the first prediction, the one the model is the most confident about, has a label of “pop bottle, soda bottle”. It successfully detected the presence of a bottle in the image; however, the probability is really poor, even though it is the correct result.
The fact that the level of confidence in the prediction is only 30% is probably due to the background behind the object. The more complex the background is, the harder it is going to be for the model to be able to find the object in the image and classify it.
This issue is more related to the field of computer vision itself than a framework problem.

Prediction results on a clearer background
Not only is the probability much higher, at almost 89%, but the following predictions are also more accurate.
In the first example, the second prediction was “vacuum cleaner”, which is far from accurate, but here, it comes back with “water bottle”, which is a result much closer to the truth.
This limitation is definitely something you should take into consideration if you are planning on integrating object detection into your application. Thinking about the context in which your project will be used is important to avoid a bad user experience.
Finally, there is one last step in this process. We need to clear up the memory we aren’t going to need anymore. Once the image is captured and fed to TensorFlow.js to be classified, we don’t need it anymore and therefore should free up the memory it is taking.
Free some memory with the dispose method
We’ve covered the main part of the logic around object detection. However, the first part of the game is to be prompted to find specific objects to take a picture of.
This code is not TensorFlow.js specific and can be a simple UI that asks you to find a new object every time you’ve successfully found the previous one.
However, if your UI asks you to find a mobile phone, you would need to make sure the model has been trained with pictures of mobile phones so it can detect the correct object.
Luckily, a list of the classes of objects that can be recognized by the mobilenet model is available in the repository at https://github.com/tensorflow/tfjs-models/blob/master/mobilenet/src/imagenet_classes.ts.
If you import this list in your application, your code can then loop through this object of 1000 entries and display a random one in the UI to ask the user to find this object around them.
As this code does not involve the use of the TensorFlow.js library, we are not going to cover it in this book.
Complete HTML file
Complete JavaScript code
In this subchapter, we’ve used object detection to build a small game, but it can be used for very different applications.
3.2 Transfer learning
Using a pre-trained model is really useful, allowing you to build projects very fast, but you can quickly reach its limits if you find yourself needing something more customized.
In this subchapter, we are going to leverage some parts of the code we wrote in the last few pages, and adapt them to use custom input data.
We’re going to collect custom data samples from our webcam to build a model that can recognize our head movements. This can then be used as potential controls for interfaces, so you could imagine using this model to scroll a web page by tilting your head up and down or using the same movements to navigate a map.
This project is going to focus on training the model to recognize new samples and testing its predictions.
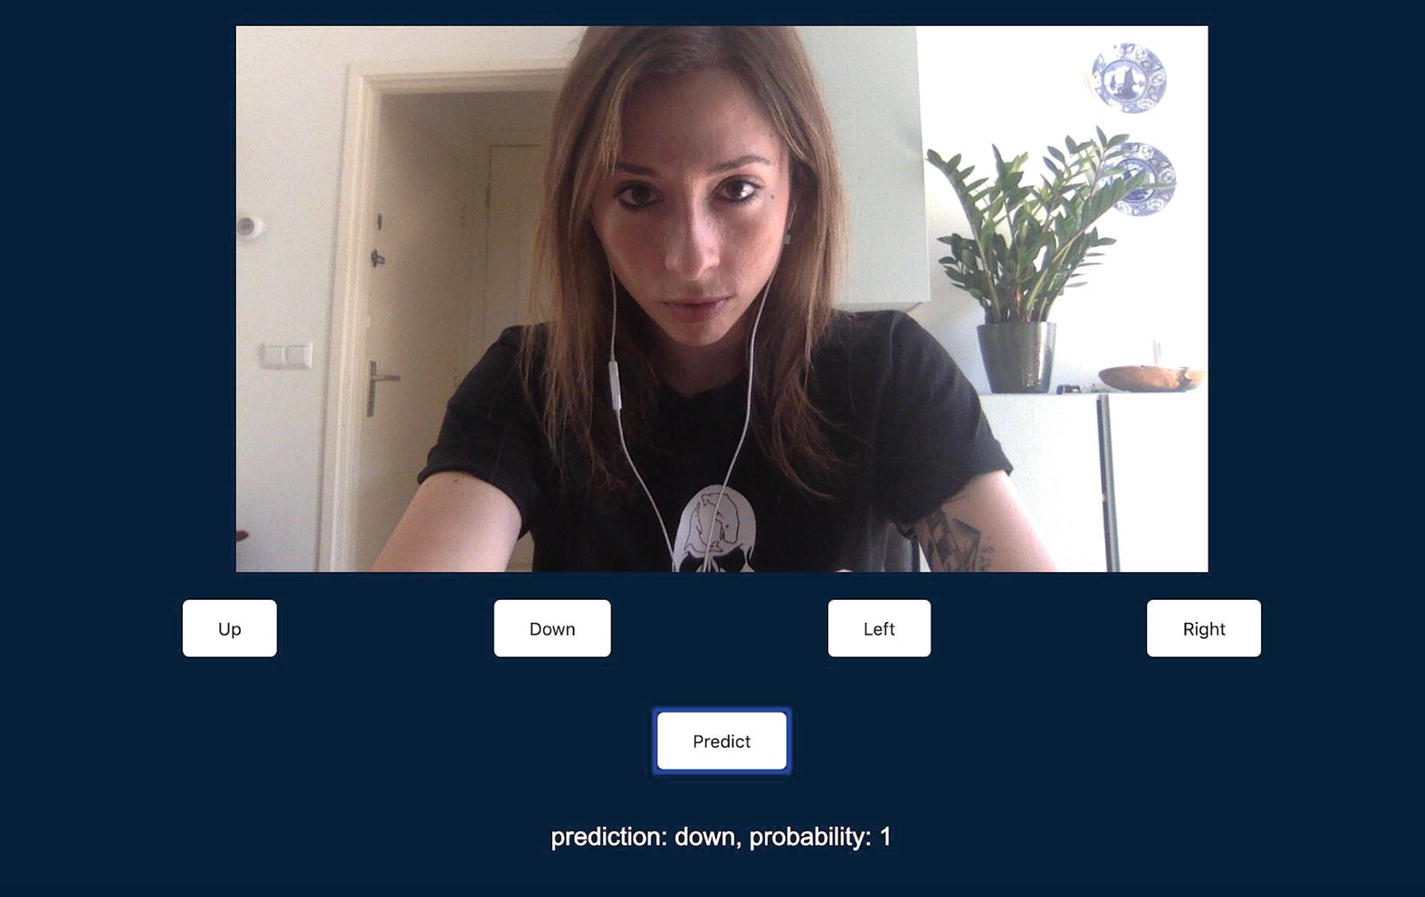
Classifying head movements from webcam input

Classifying head movements from webcam input
As you can see in the preceding screenshots, head movements between down and left are predicted accurately.
Importing TensorFlow.js, mobilenet, and a KNN classifier
HTML elements needed for this project
In a JavaScript file, we need to write the logic that will collect a sample from the webcam when we click the buttons and feed it to the KNN classifier.
Instantiating the classifier, loading the model, and preparing the webcam object
On the last line, the webcamElement variable refers to the HTML video element you would get by using standard Document interface methods such as getElementsByClassName.
To implement the logic, we can create a new function we are going to call addExample. This function is going to capture an image from the webcam, transform it into a tensor, retrain the mobilenet model with the image tensor and its label, add that example to the KNN classifier, and dispose of the tensor.
addExample function to retrain the model with custom inputs
The second line allows us to capture a single image from the webcam feed and transform it directly into a tensor, so it can be used with other TensorFlow.js methods right away.
The activation variable holds the value of the mobilenet model retrained with the new image tensor from the webcam, using one of its activation functions called “conv_preds”.
An activation function is a function that helps a neural network learn complex patterns in data.
The next step is to use the result of retraining the model and add it as an example to our classifier, with a class ID so it can map the new sample to its label.
In machine learning, even though we usually think of labels as strings, for example, in our case “Right”, “Left”, and so on, during the training process, these labels are actually swapped with their index in an array of labels.
If our classes are ["up", "down", "left", "right"], the class ID when we train the model to recognize our head moving down would be 1 as “down” is the second element in our array.
Finally, we dispose of the image tensor once it has been used, to free up some memory.
Looping through the buttons elements to attach an onclick event listener that will trigger the addExample function
Considering that the buttons variable holds the buttons elements present in the DOM, we want to trigger our addExample function on all buttons except the one used to run the predictions.
We pass the button index to the function, so when we click the “Up” button, for example, the class ID will be 0.
This way, every time we click one of our four buttons, an example will be added to the classifier, with the corresponding class ID.
Calling the runPredictions function when clicking the predict button
The runPredictions function
In the preceding sample, we wrap the logic inside a while loop because we want to continuously predict the input from the webcam; however, you could also replace it with an onclick event if you would like to get predictions only after clicking an element.
Steps repeated between training the classifier and running the predictions
We then pass this data in the predictClass method called on the KNN classifier to predict its label.

Output of the classification in the console
In this case, I was tilting my head to the right, so the classIndex and label come back with a value of 3, as the button to train the model to recognize this gesture was the last of 4.
The confidences object shows us the probability of the predicted label. The value of 1 means that the model is very confident that the gesture recognized is the correct one.
The probability value can vary between 0 and 1.
After getting the result from the prediction, we dispose of the image to free up some memory.
Finally, we call tf.nextFrame() to wait for requestAnimationFrame to complete before running this code again and predicting the class of the next frame.
Complete HTML code
Complete JavaScript code
Using transfer learning allows us to retrain a model really fast to fit tailored inputs. In only a few lines of code, we are able to create a customized image classification model.
Depending on the new input data you feed it, you might have to add more or less new examples to get an accurate prediction, but it will always be faster than gathering a full new labelled dataset and creating your own machine learning model from scratch.