
In the previous chapter, we focused on using image data to learn more about machine learning and build an image classifier. In this chapter, we are going to talk about using text data, cover a few concepts of natural language processing, and build a few experiments around sentiment analysis.
4.1 What is sentiment analysis?
Sentiment analysis, also sometimes referred to as sentiment classification, opinion mining, or emotion AI, is the process of interpreting and categorizing emotions expressed in a piece of text to determine the overall sentiment of the person writing it – either positive, negative, or neutral.
It uses natural language processing to identify, extract, and study affective states and subjective information.
Natural language processing, or NLP, is a branch of artificial intelligence which objective is to program computers to process, analyze, and make sense of natural language data.
Giving computers the ability to understand the nuances of human language is a complicated task. It is not only about identifying and extracting keywords in a sentence, but about analyzing and interpreting the meaning behind those words, for example, being able to recognize figures of speech, detect irony, and so on.
In this chapter, we will mainly focus on classifying pieces of text data into three categories: positive, negative, and neutral, as well as looking into toxicity detection.
Before diving into how to implement sentiment analysis in JavaScript with TensorFlow.js, let’s try to understand more about the mechanics of this technique.
4.2 How does natural language processing work?
The way we express ourselves carries a lot of contextual information. From our selection of words to our tone, the extent of our vocabulary, and the way we construct our sentences, human language is extremely complex but also rich enough to reveal a lot about us.
To allow computers to develop an understanding of language and its intricacies, natural language processing uses a few different techniques and algorithms. Let’s start by defining some concepts.
4.2.1 Common concepts – Basics of NLP
Before diving into how to implement some natural language processing in JavaScript, let’s cover some basic concepts.
Bag-of-words
Bag-of-words is a model you will probably come across if you decide to do some extra research on NLP as it is quite commonly used.
It is a simplifying representation used to count the occurrence of all words in a piece of text, disregarding grammar.
This approach seems a bit simplistic as it does not take into consideration any semantic meaning and context, but it intends to add some weight to different terms in a text, based on how often they are used. This information is then used as features for training a classifier.
This process is also sometimes referred to as vectorization, as it aims to turn pieces of text into fixed-length vectors.
Concepts without examples can be difficult to understand, so let’s use the following four sentences to see how the Bag-of-words model would apply.
Win millions of dollars
Win a Tesla
Request for help
Help millions of developers
Win
Millions
Of
Dollars
A
Tesla
Request
For
Help
Developers
Table representing the occurrences of each word in the preceding list
Document | Win | Millions | Of | Dollars | A | Tesla | Request | For | Help | Developers |
|---|---|---|---|---|---|---|---|---|---|---|
Win millions of dollars | 1 | 1 | 1 | 1 | 0 | 0 | 0 | 0 | 0 | 0 |
Win a Tesla | 1 | 0 | 0 | 0 | 1 | 0 | 0 | 0 | 0 | 0 |
Request for help | 0 | 0 | 0 | 0 | 0 | 0 | 1 | 1 | 1 | 0 |
Help millions of developers | 0 | 1 | 1 | 0 | 0 | 0 | 0 | 0 | 1 | 1 |
Win millions of dollars: [1, 1, 1, 1, 0, 0, 0, 0, 0, 0]
Win a Tesla: [1, 0, 0, 0, 1, 0, 0, 0, 0, 0]
Request for help: [0, 0, 0, 0, 0, 0, 1, 1, 1, 0]
Help millions of developers: [0, 1, 1, 0, 0, 0, 0, 0, 1, 1]
These vectors can then be used as features to train an algorithm.
The two first sentences (“Win millions of dollars” and “Win a Tesla”) could be labelled as “spam” and the two last (“Request for help” and “Help millions of developers”) as “non-spam”.
Table representing the occurrences of each word in a spammy phrase vs. a non-spammy phrase
Label | Win | Millions | Of | Dollars | A | Tesla | Request | For | Help | Developers |
|---|---|---|---|---|---|---|---|---|---|---|
Spam | 1 | 1 | 1 | 1 | 0 | 0 | 0 | 0 | 0 | 0 |
Spam | 1 | 0 | 0 | 0 | 1 | 0 | 0 | 0 | 0 | 0 |
Non-spam | 0 | 0 | 0 | 0 | 0 | 0 | 1 | 1 | 1 | 0 |
Non-spam | 0 | 1 | 1 | 0 | 0 | 0 | 0 | 0 | 1 | 1 |
Considering that similar kinds of words are used in similar documents, the bag-of-words approach can help us determine the likelihood of a sentence being spam or not, based on our previous example dataset.
If the word “win” is often contained in a text labelled as spam, the probability of a new sentence such as “Win the trip of your dreams” being spam is higher than the probability of another sentence like “Feedback on performance”.
It is important to notice that the order of the words in the text does not matter; only the amount of times these words are used.
In real applications, the dataset should be much larger, containing a more diverse corpus, to increase the accuracy of the predictions.
Tokenization
In natural language processing, two common types of tokenization include sentence tokenization and word tokenization.
Sentence tokenization , also called sentence segmentation, is the process of dividing a string into its component sentences. One way to do this is to split sentences whenever we see a full stop (.).
For example, a paragraph such as
“13th is a 2016 American documentary film by director Ava DuVernay. The film explores the “intersection of race, justice, and mass incarceration in the United States;” it is titled after the Thirteenth Amendment to the United States Constitution, adopted in 1865, which abolished slavery throughout the United States and ended involuntary servitude except as a punishment for conviction of a crime.”
- 1.
“13th is a 2016 American documentary film by director Ava DuVernay"
- 2.
“The film explores the “intersection of race, justice, and mass incarceration in the United States;” it is titled after the Thirteenth Amendment to the United States Constitution, adopted in 1865, which abolished slavery throughout the United States and ended involuntary servitude except as a punishment for conviction of a crime.”
Word tokenization , also called word segmentation, is the process of dividing a string into its component words. This can be used by splitting a sentence using a space character as the divider.
Example array representing the output of word tokenization on the sentence “13th is a 2016 American documentary film by director Ava DuVernay”
Text lemmatization and stemming
Text lemmatization and stemming are techniques to reduce inflectional forms of a word to a common base form.
As related words can have similar meanings, these tools help reduce them to a single one.
“Eat”, “Eats”, “Eating” becomes “Eat”.
“Computer”, “Computers”, “Computer’s” becomes “Computer”.
The result of this mapping would look something like this:
“They are all eating in front of their computers” => “They are all eat in front of their computer”.
This kind of technique is helpful for use cases where we would want to find results for more than an exact input, for example, with search engines.
When we execute a search, we generally are interested in getting relevant results, not only for the exact search terms that we used but also for other possible forms of these words.
For example, if I run a search using the words “Hike Europe”, I’m also interested in results that will have the word “hikes” and “hiking” or “hikers”, and so on.
Stop words
Stop words are words that can add a lot of noise and are considered irrelevant in a text. They are filtered out before or after processing a text.
Examples of stop words include “and”, “the”, and “a”, but there is no definitive list as it will vary based on language and application.
After filtering out a text for stop words, a sentence like “They are meeting at the station tomorrow at 10am” would end up being [“They”, “are”, “meeting”, “station”, “tomorrow”, “10am”].
As we can see, the sentence did not lose any meaning after removing the stop words.
As machine learning operations can be time-consuming, removing words that do not change the semantic meaning of a text can improve performance without impacting negatively the accuracy of the predictions.
4.3 Implementing sentiment analysis in TensorFlow.js
Now that we have covered some of the basics of natural language processing, let’s work on a couple of applications implementing sentiment analysis in JavaScript using TensorFlow.js .
4.3.1 Positive, negative, and neutral
As a first project, let’s build an application that can predict the overall sentiment of a piece of text and classify it between three categories: positive, negative, and neutral.
Importing the model
Importing TensorFlow.js as a script tag in an HTML file
Importing TensorFlow.js as a package in a JavaScript file
Loading the model
Function named loadModel to load the machine learning model
Function named loadMetadata to load the machine learning metadata
Predictions
Now that we have the main tools we need to run the prediction, we also need to write some helper functions that will turn our input text into vectors, like we talked about in the previous section of this chapter.
Input text cannot be fed to an algorithm as a string, as machine learning models primarily work with numbers, so let’s look into how to execute vectorization in JavaScript.
Code sample to vectorize a string in JavaScript
This piece of code will turn a string like “I learned a lot from this talk” into [“i”, “learned”, “a”, “lot”, “from”, “this”, “talk”].
We start by calling the trim() function to remove potential whitespace at the beginning and end of the string. We then make everything lowercase, remove all punctuation, and split it into an array of substrings using the space character as separator.
Once this is done, we need to turn this array into an array of numbers using the metadata we loaded just previously.
This metadata is a JSON file with the sample data used to train the model we are loading into our application. It contains about 20,000 words.
Code sample to map words to their index in the metadata file
What this code sample does is loop through the array of substrings we created previously and see if each element exists in the metadata. If it does, it sets the variable wordIndex to the index found in the metadata; otherwise, if the word from our input text was not found in the data used to train the model, it sets the value of wordIndex to 2.
This number 2 is going to be our index for out-of-vocabulary (OOV) words.
Sample output produced by the code earlier
These numbers are the indices of each word in our metadata file. As we can see, the number 2 is not present, which means that each word in the sentence “I learned a lot from this talk” was present in the dataset used to train the model.
Before we can use this to run predictions and get the overall sentiment, we need to do one last step of transforming the data.
As explained previously, when training a machine learning model, you need to make sure that the data used has the same shape.
For example, if you were working with images, you could not use images of different sizes (280x280 pixels, then 1200x800 pixels, etc.) in your dataset.
The same principle applies to text data. Our example text “I learned a lot from this talk” has a length of 7; however, our model has been trained with vectors which length were 100.
This value can be found in the metadata.json file as the value of the property max_len.
What this means is that the longest piece of string in the dataset used to train the model contained 100 words.
As we need to work with fixed-length vectors, we need to transform our vector of length 7 to a vector of length 100.
To do this, we need to write a function that will prepend a certain amount of 0s until the length of the vector equals 100.
Function to transform the data and create fixed-length vectors
This function should be used for text data that is less than 100 words long, but what about strings which length exceeds 100?
The process for this case is kind of the opposite, we loop through the array of indices, and when we reach the maximum length, we slice the array and get rid of the rest.
Output array after prepending 0s to create a fixed-length vector
As we can see, we still have our seven indices representing our sentence “I learned a lot from this talk, but prepended with the correct amount of 0s to make this vector have a length of 100.
Code sample to transform the vector into a tensor and generate predictions
This score will be a float number between 0 and 1. The closest the score is to 0, the more negative it is predicted to be, and the closest to 1, the more positive.
The score for our input text “I learned a lot from this talk” is 0.9912545084953308, which means that the sentiment predicted for it is “positive”.
A sentence like “This is really bad” produces a score of 0.007734981831163168, which is “negative”.
Complete example
If we want to put this code altogether in an application that would gather input text from users, this is what it could look like.
HTML tags to get text input from users and a button
JavaScript code to process user input and run predictions
In this code sample, I am using the user’s input as a single string that will be transformed and used for sentiment analysis. However, if you wanted to split a paragraph into different sentences and run sentiment analysis on each sentence separately, you would need to start by creating a function that breaks the paragraph into an array of sentences.
If you decide to implement this and try sentiment analysis on various pieces of text, you might realize that the accuracy of the prediction is not always the best.
For example, a sentence, like “I really hate this”, has a score of 0.9253836274147034, meaning its sentiment is predicted to be “positive”, which seems incorrect.
This is mainly due to the fact that the data used to train the model is a set of 25,000 movie reviews from IMDB, an online database of information related to films, TV shows, and so on.
Even though, to humans, a sentence like “I really hate this” seems pretty clearly negative, the machine learning model only looks at the occurrence of every word in the sentence, compared to what it has learned from the training data.
If the words “i”, “really”, and “this” were found in more sentences and these were labelled as “positive”, it overweighs the fact that the word “hate” looks to us as a negative sentiment. This word was probably used in less sentences in the dataset.
All this is to remind you to never rely entirely on predictions generated by a machine learning model. Even though algorithms are much better than humans at processing large amounts of data and extracting patterns from it, predictions should be used as a way to augment the way we make decisions, not replace it completely.
If you wanted to improve these predictions, you could look for other open source datasets or pre-trained models used for sentiment analysis.
4.3.2 Toxicity Classifier
Now that we looked into implementing a sentiment analysis classifier, let’s use something a little different that will produce more specified predictions.
In this subchapter, we’re going to use TensorFlow’s Toxicity Classifier to label pieces of text based on their type of toxicity.
Insult
Identity attack
Obscene
Severe toxicity
Sexual explicit
Threat
Toxicity
Importing the model
Import TensorFlow.js and the Toxicity Classifier in your HTML file using script tags
Install and import TensorFlow.js and the Toxicity Classifier in your JavaScript file
Predictions
After importing the tools we need, the code to run the prediction on a piece of text is actually pretty small!
Loading the model and classifying new sentences

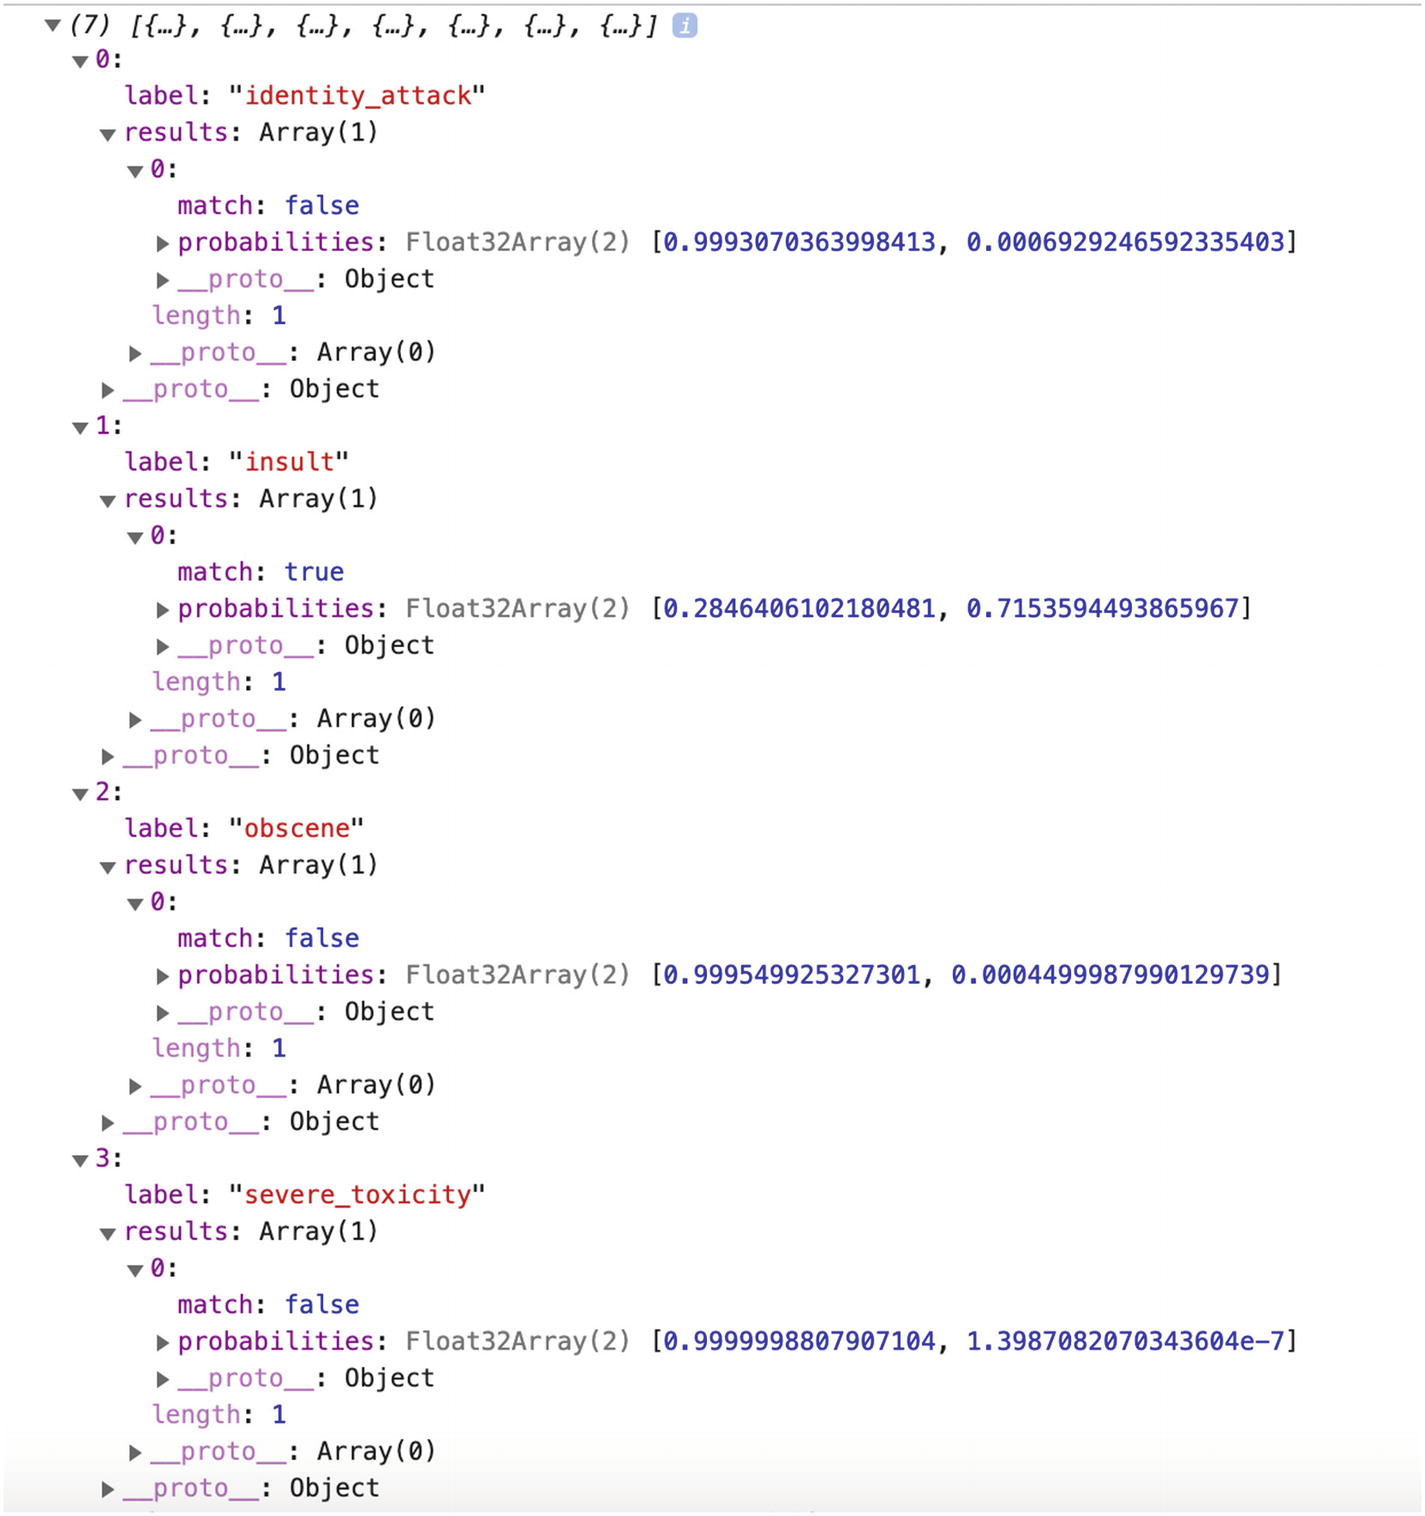
Array of predictions returned by the preceding code sample
At first, you could think that it means the sentence “this is really the most useless talk I have ever watched” has been predicted to belong to the “identity_attack” label; however, that’s not it.
The way the predictions come back with this particular model is as an array of objects that contain data for each label, ordered by alphabetical order.
It can be a bit confusing, as other models used with TensorFlow.js usually produce predictions ordered by score.
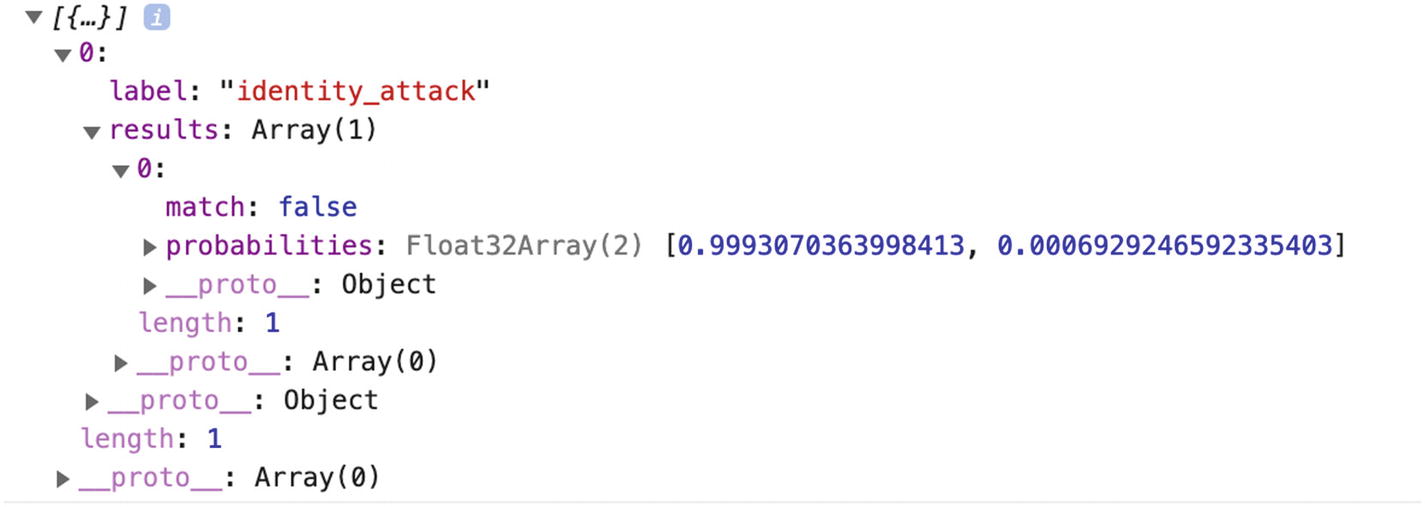
Detailed view of the array of predictions returned by the preceding code sample
This screenshot represents the four first entries in the predictions array. As we can see, they are ordered alphabetically by label.
To understand which label is the correct one for the input text, we need to look at the “probabilities” array and the “match” value.
The probabilities array contains two values, the first representing the probability of the label being falsy, meaning the input text not being classified with that label, and the second value representing the probability of the label being truthy, meaning the input text is classified as being this type of toxic content.
The “match” value is a more straightforward representation. If its value is “true”, it means the text corresponds to that label; if “false”, it doesn’t.
Sometimes, the value of “match” is set to “null”. This happens when neither of the predictions exceeds the threshold provided.
Passing a threshold as argument to the model
This threshold is used to determine the value of the “match” property.
If the first value in the “probabilities” array exceeds the threshold, “match” is set to “false”; if instead the second value exceeds the threshold, “match” is set to true. And, as explained before, if none of the probabilities values exceed the threshold, “match” is set to “null”.
Labels can also be passed as another argument to the model if you only care about certain ones and not all 7.
Passing a label as argument to the model
Predictions array returned after passing a specific label
Similarly to the sentiment classifier built in the previous section of this chapter, the accuracy of the predictions depends a lot on the data used to train the model.
TensorFlow.js’s toxicity model was trained on a dataset of about 2 million user-generated online news comments published from 2015 to 2017.
An interesting aspect of this is that datasets are often originally labelled by humans, meaning people have to go through all the entries and label each of them with a corresponding label based on a set of labels provided.
In the case of the data used for the toxicity model, it means that people had to go through 2 million pieces of text, and label each of them with the label they thought would be the closest to the type of toxicity the comment belonged to, based on the labels “identity_attack”, “insult”, “obscene”, “severe_toxicity”, “sexual_explicit”, “threat”, and “toxicity”.
One potential issue with this is that different people have different opinions about what they might classify as an “insult” or not, or what they would label as “toxicity” instead of “severe_toxicity”, which adds a certain level of bias into the data that is going to be used to train the model.
So, not only the accuracy of the prediction depends on the quality of the data gathered (the online comments), it also depends on how they were labelled.
If you are in a position where you can inspect the data that was used to train a model you are using in your application, I would really recommend to do it.
Now that we went through a couple of examples of what can be done with sentiment analysis with TensorFlow.js, let’s look into some potential applications.
4.4 Applications
A lot of the content we produce and share is text content. From news articles and blog posts to comments, chatbots interactions, social media updates, and so on, this vast amount of text data could offer some really interesting new opportunities, if used with machine learning.
4.4.1 Cognitive assistants and computer therapy
Either it be in the form of chatbots or voice assistants like Siri, certain conversational agents could benefit from integrating sentiment analysis.
In the past few years, some companies have tried to develop systems to provide psychological help and coaching in the form of chatbots.
These companies focus on offering tailored advice and support in the aim of allowing people to do some kind of DIY cognitive behavioral therapy (CBT) .
CBT uses structured exercises to encourage a person to question and change their habits of thought. This step-by-step format seems well suited for chatbots.
Companies, like Orexo, Woebot, Pear, and Wysa, personalize their services to each person based on their answers to questions.
Orexo focuses on helping users change their drinking habits by asking a set of questions about current behavioral patterns and tailoring a program based on the answers provided.
Woebot, a chatbot built on Stanford research, aims at making mental healthcare accessible to everyone, by providing personalized expert-crafted tools to learn about yourself and improve your mood whenever you need it.
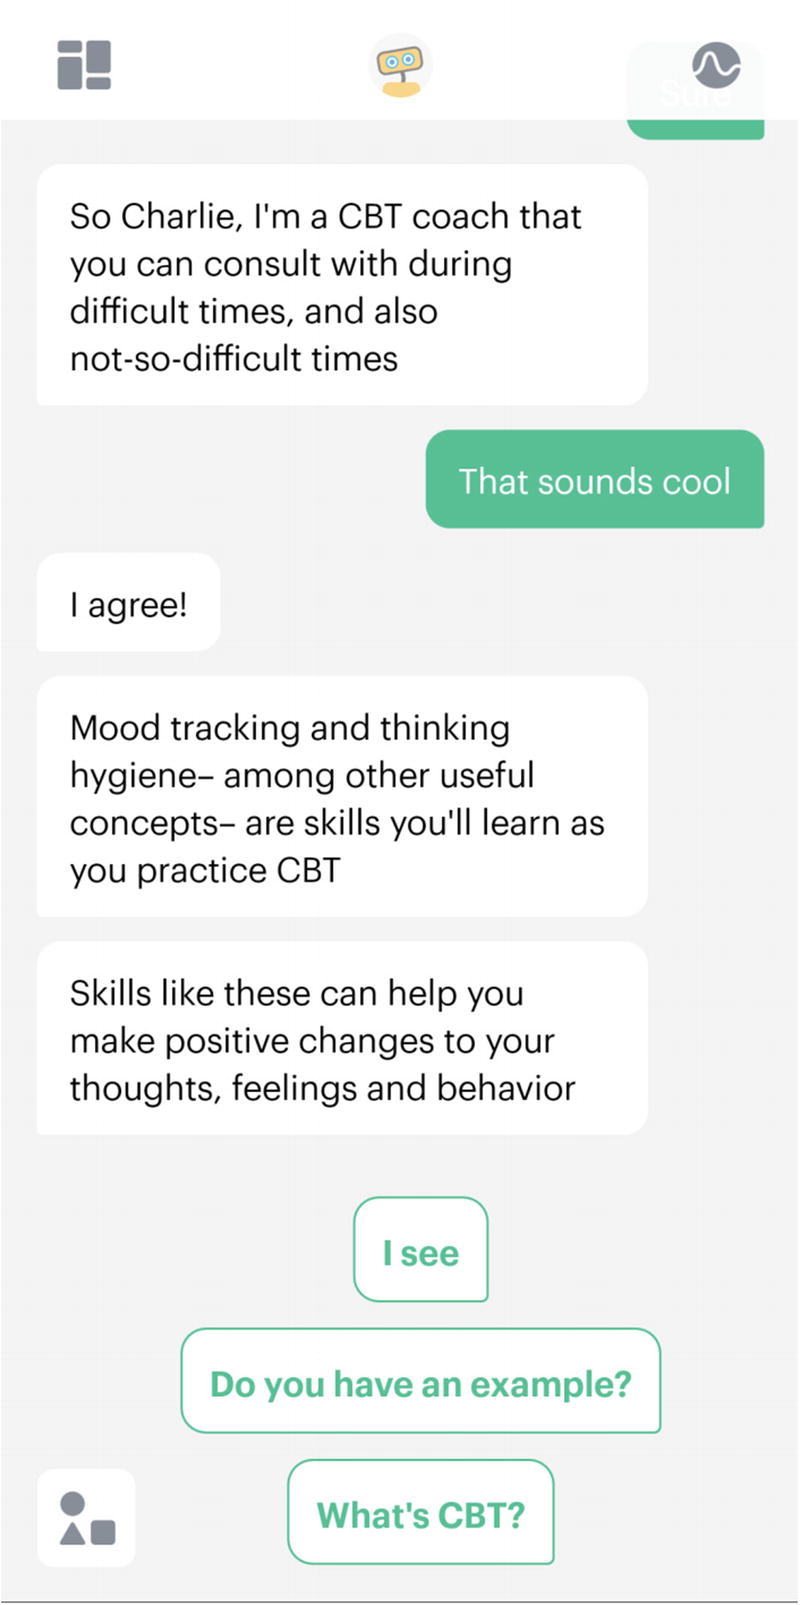
Screenshot of the application Woebot
Pear Therapeutics is a company at the intersection of biology and software that aims at creating the next generation of therapeutics. It has released two digital services called reSET and reSET-0 that intend to provide support and CBT to people with substance abuse disorders.
Wysa, an AI-based “emotionally intelligent” chatbot, provides self-care exercises organized in packs to help deal with issues such as managing your mood, overcoming loneliness, improving sleep, and so on. Unlike other applications, it also gives you the opportunity to pay for a real session with a professional therapist within the app.

Screenshot of the home screen of the application Wysa

Screenshot of the self-care packs found in the application Wysa
Some of these applications even got approved by the FDA, the Food and Drug Administration in the United States.
Another one of them is a game called EndeavorRx by Akili Interactive, which trials showed it can help children with ADHD (attention deficit hyperactivity disorder) improve their level of attention. This game was built based on research to deliver sensory and motor stimuli to selectively target and activate specific cognitive neural systems in the brain.
Even though these applications do not replace face-to-face interactions with a therapist, one of their benefits is their constant availability. Getting a daily consultation with a real doctor would be very costly and time-consuming; however, a digital one on your phone can make it easier to keep track of your progress and provide help in urgent moments.
Besides, there are probably not enough clinicians available to help the amount of people in need. For example, the chatbot Woebot exchanges about 4.7 million messages with people per week; there just wouldn’t be enough practitioners to handle that.
Even though there is potential in these self-help digital services, it is very important to remember that the technology is not perfect.
As machine learning algorithms get better at analyzing and understanding all information contained in the way we communicate, there can only be improvements in the future, but for now, a lot of these applications have limited abilities and should be used with that in mind.
If this is a space you are interested in, I would highly recommend to try a few of these applications to get a better sense of the features and interactions currently available.
4.4.2 Social media monitoring
Another interesting opportunity is in improving users’ interactions on social media by providing some kind of monitoring tool.
If you are regularly using any social media platform like Facebook or Twitter, you are probably familiar with the toxicity of some of the content users decide to share, either in the form of status updates or comments on your posts.
This type of toxic interactions can have a negative psychological impact on people, which could be avoided using sentiment analysis.
At the moment, if anyone is interacting in a toxic way with you on a platform, you do not really have the option to avoid it. You might decide to ignore it, but only after you’ve seen the content at least once, which often already impacts you negatively.
However, if every piece of content shared was first run by a machine learning model to detect the level of toxicity, social media platforms could provide warnings about the content the user is about to see, and let them decide if they want to view it or not.
The same way content described as “adult content” is often hidden behind some kind of warning, platforms could empower users to make their own decisions.

Examples of warnings displayed on tweets that were potentially spreading wrong information. Source: www.vox.com/recode/2020/5/11/21254889/twitter-coronavirus-covid-misinformation-warnings-labels
Users could still click “View” if they wanted to read the content, but were warned that it was potentially harmful, as it was going against guidance from public health experts.
Additionally, this technique could also be used to attempt to prevent the sharing of toxic content by providing a warning to the person about to post.
When using social media platforms, you could imagine an icon next to the usual “Add emojis” or “Add pictures“ icon that would get into an active state if the tweet a user is about to send, or post they are about to share, was classified as being toxic. This would not stop anyone from sharing but would provide people with an opportunity to take a step back and think twice about the impact of their words on other people.
Both of these opportunities do not completely resolve the issue of toxic content on the Internet but use machine learning and sentiment analysis as a help to make the Web a safer place.
4.4.3 Automation tools
There are some situations in our professional lives where some tasks are still done manually that could be automated using sentiment analysis, to free up some time to focus on more interesting challenges. An example of this is around product feedback from customers.
If you work for a product company, you might be familiar with asking your customers for feedback on the product you are building.
This feedback is often stored as a spreadsheet of data, stored in Google Sheets, databases, or other platform.
The company’s employees then usually go through all this data to understand customers’ needs, complaints, and so on. These tasks can take a lot of time; however, sentiment analysis could be used to apply a first filter to the data and group them by feedback that seems positive, negative, and neutral.
People should still read the data manually to get a better understanding of customers’ thoughts, but it could give an idea of the overall sentiment around the product.
Another type of survey where this approach could be useful is in internal company surveys.
When the leadership of a company wants to know how employees are feeling about their work, the culture, or their overall experience, a survey is shared to collect feedback.
Some surveys are rather simple with mainly check boxes where people answer questions or statements by selecting “Strongly agree”, “Agree”, “Disagree”, or “Strongly disagree”; however, some other surveys give employees an opportunity to express themselves further, in their own words.
The latter would be a good use case for sentiment analysis. After collecting feedback from everyone, all the data could be fed to a sentiment analysis model to determine the overall feeling of employees toward the company.
Similarly to the previous example of product surveys, the feedback should still be read and analyzed manually, but getting a first insight over the data may influence the first decisions. If the prediction comes back as overly negative, it is probably important to act on the feedback as soon as possible to avoid getting to the point where employees decide to leave the company.
Finally, another scenario where sentiment analysis could be used for automation is in helping a support team triage tickets based on the toxicity of customer’s complaints. This approach could also be used by developer experience teams that usually have to keep track of what is said about a company on social media.
Using a Toxicity Classifier or sentiment analysis classifier to run an initial check on the data can help prioritize which customers’ feedback should be dealt with, with more urgency.
All in all, using sentiment analysis as an automation tool does not replace entirely the work that should be done by people, it only provides a help to gain some early insights and guide decisions.
In addition to sentiment analysis, other types of techniques are also available to gain a deeper understanding of text data.
4.5 Other types of text classification tools
Even though sentiment analysis provides some useful information about data collected, it can also be paired with other types of text classification tools to generate better predictions and extract more meaningful insights.
4.5.1 Intent analysis
Intent analysis, also called intent classification, goes a step further by trying to analyze and understand the user’s intention behind a message and identify whether it relates to an opinion, news, marketing, query, complaint, suggestion, and so on. It also helps categorize customers’ intents by topics such as Purchase, Downgrade, Demo request, and so on.
To do this, a model needs to be trained with existing data collected from users and labelled with the different intents we would like to use for future predictions.
It works a bit similarly to the Toxicity Classifier I talked about previously in this chapter, but instead of using labels such as “severe_toxicity” or “threat”, the model would be trained with labels such as “Purchase”, “Need for information”, “Cancellation”, and so on.
Feeding this labelled data from real customers’ comments, requests, and complaints to an algorithm would allow it to find patterns of vocabulary used, semantics, arrangements of words in a sentence, used by people when expressing similar intents.
4.5.2 Named Entity Recognition
Named entity recognition (NER) , also known as entity identification, entity chunking, or entity extraction, extracts entities such as people, locations, organizations, and dates from text.
Rosa Louise McCauley Parks (February 4, 1913 – October 24, 2005) was an American activist in the civil rights movement best known for her pivotal role in the Montgomery bus boycott. The United States Congress has called her "the first lady of civil rights" and "the mother of the freedom movement.”
—Quote source: https://en.wikipedia.org/wiki/Rosa_Parks
Person: Rosa Louise McCauley Parks
Location: Montgomery, United States
Date: February 4, 1913, October 24, 2005
Organization: United States Congress
NER models have a wide range of applications including automatic summarizing of resumes to aim at simplifying the recruitment process by automatically scanning a huge amount of documents and shortlist candidates based on terms found in them.
4.5.3 Text summarization
As the name indicates, text summarization is a technique usually used to create an accurate summary that captures the main pieces of information in a longer text.
These summaries allow people to navigate content more effectively by reducing reading time and helping in the selection process of research documents.
The goal of this technique is not only to capture the main words of a document and generate a shorter sentence, but also to create something that reads fluently as a new stand-alone piece of content. It should result in a summary that is as good as those a human would write.
News headlines
Notes from meetings
Synopses
Biographies
For automatic text summarization using machine learning, there exist two approaches: extractive and abstractive.
Extractive text summarization is the process of selecting phrases in a source document to generate a summary. It involves ranking the relevance of phrases in the source and only selecting the ones that are the most relevant to the meaning of the document.
Abstractive text summarization involves generating brand-new phrases that convey the most critical information from the source document. It uses advanced natural language processing techniques to interpret and examine the text and produce shorter sentences in a new way.
4.5.4 Question Answering with TensorFlow.js
Question Answering is a discipline within the field of natural language processing that is concerned with building systems that automatically answer questions posed by humans in a natural language.
A machine learning model takes a passage and a question as input and is able to return a segment of the passage that is likely to answer the question asked, as output.
In the next few pages, we are going to use the MobileBERT model, a lightweight version of the BERT (Bidirectional Encoder Representations from Transformers) model from Google, to build a system capable of answering questions submitted by humans based on a set of paragraphs.
Importing the model
Importing TensorFlow.js and the QNA model in an HTML file
Importing TensorFlow.js and the QNA model as package in a JavaScript file
If you decide to use it as a NPM module, you do not need to import the @tensorflow/tfjs library; however, you will need to make sure you have installed the peer dependencies for tfjs-core and tfjs-converter.
Loading the model
Once the model is imported, we need to load it in our application. Two options are available to do this.
Default way to load the model
This way of loading the model is the one you should probably use if you want to use Google’s Question Answering model hosted on the Google Cloud Platform (GCP) provider.
Loading the model using custom configurations
These two ways of loading the model will return a model object that we can call methods on to predict our answers.
Predictions
Generating predictions
These two parameters need to be strings.
The text property represents the answer to the question the person would have asked. The score is the confidence level for the prediction. The higher it is, the more confident the model is that this answer is correct. The startIndex and endIndex represent the indices of the starting and ending character where the expression was found in the passage.
Complete example
HTML code
JavaScript code in the index.js file
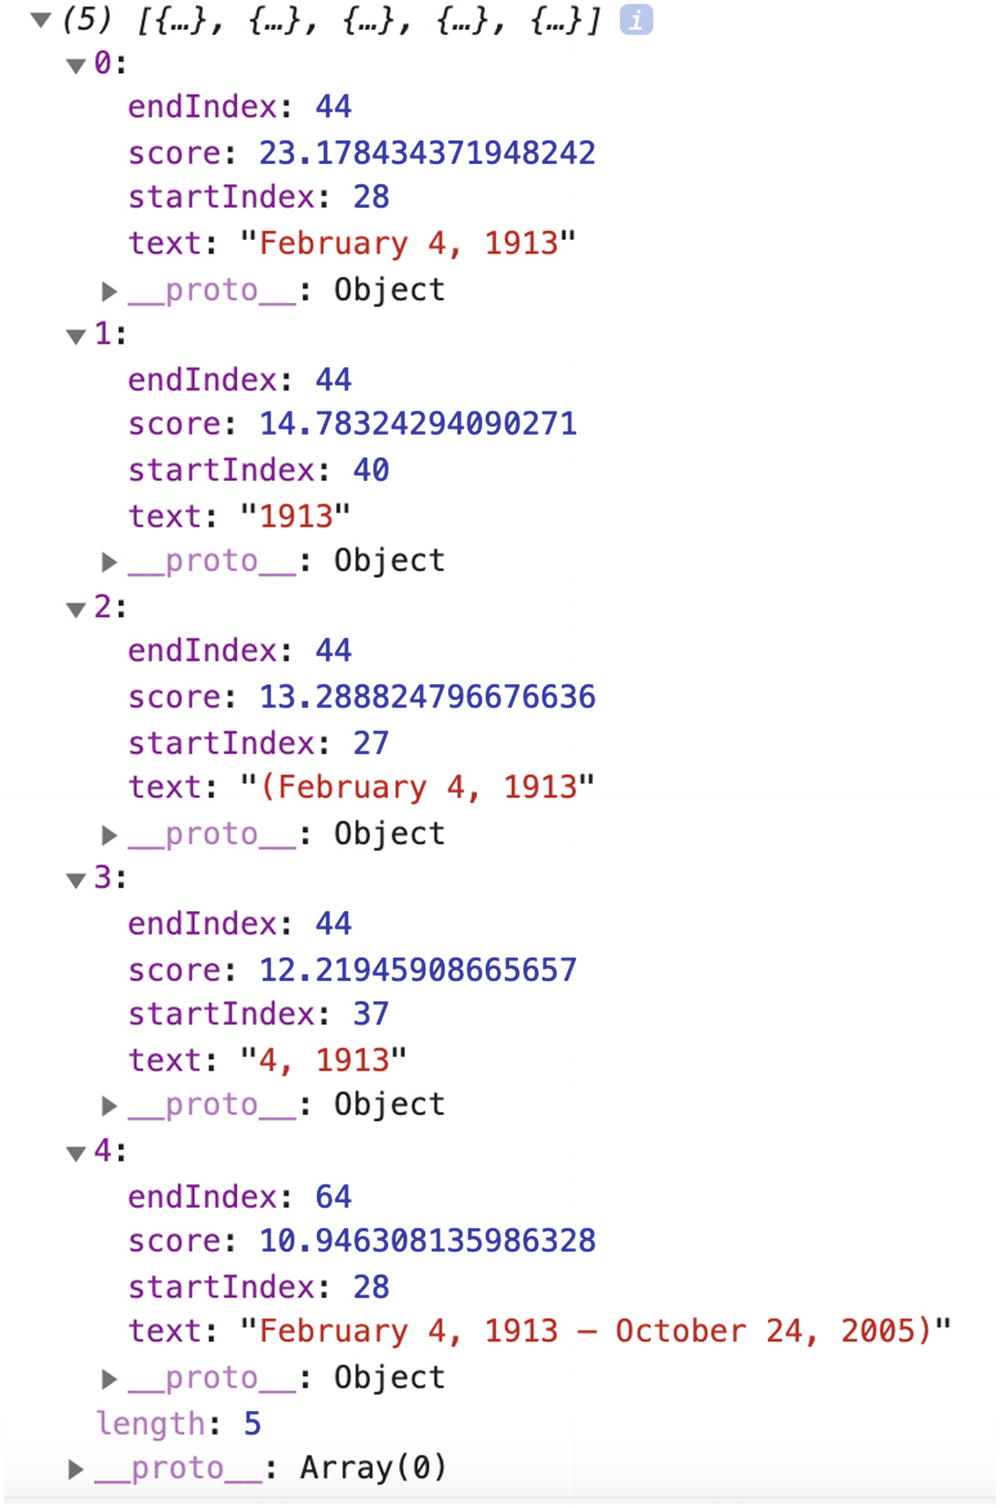
Prediction output in the browser’s console to the question “When was Rosa born?”
As we can see in the preceding screenshot, the answers come back as an array of five elements. The one with the highest score is “February 4, 1913”, which is the correct answer to the question “When was Rosa born?”!
Also, if we observe the subsequent predictions, they are all somewhat correct as they contain either a part of the birth date or the birth and death dates.
We could think maybe we just got lucky on that one, so let’s try another question, for example: “Who was Rosa Parks?”.

Prediction output in the browser’s console to the question “Who was Rosa Parks?”
This time, our answers array contains only two objects. However, these predictions are correct!
An interesting aspect of this is that our question mentioned “Rosa Parks”, whereas our passage mentioned her full name “Rosa Louise McCauley Parks”, and the model was still able to understand who our question was about.
This is pretty impressive and has huge potential, but, as with every machine learning model, it has its limits.
For example, when changing the question to “How was Rosa Parks called?”, expecting the answers “the first lady of civil rights” or “the mother of the freedom movement”, the predictions array came back empty, meaning the model could not find answers to this question in the passage.

First prediction output in the browser’s console to the question “What did the United States Congress call Rosa Parks?”
Unfortunately, asking the question this way would have probably required a certain kind of knowledge from the user. A person unfamiliar with the details of Rosa Parks’ life would have most likely asked the question in a similar format to “What was Rosa Parks called?”, which returned no answer.
Building an interactive education tool
In the preceding code samples, we only used this model to log the results in the browser’s developer tools. However, let’s use this code to build an interactive education tool , in which users would be able to learn about historical figures, using Question Answering.
For this project, to make it simpler, we’re going to store data about a few preselected people in our code base as JSON files. If you are not familiar with it, JSON stands for JavaScript Object Notation and refers to a file format for storing data.
If you wanted to go a step further, you could try to use the MediaWiki API to let users request for any public figure they would want and fetch data dynamically.
The following application is going to have information about three historical figures, let the user decide which one they would like to learn more about, and provide an input field to ask different questions to display the answer with the highest probability, predicted by the machine learning model.

Home page of the project

Page to select the public figure to learn more about

Page to ask questions and display the best answer predicted
As you may have noticed, I kept the design very minimal because I want to focus on the functionality. The important takeaway from this project is how to create a quick user interface using the Question Answering model.
Now that you have a better idea of what we are about to build, let’s dive into the different features and code samples.
Step 1: Loading page

Home page of the project
Loading a pre-trained machine learning model into your application will always have an impact on performance as they tend to be quite heavy. As a result, it is important to think in advance about what kind of user experience you want to create to improve the perceived performance.
This could include loading the model in the background early on, so by the time the user gets to the experience, it is loaded and ready to be used; or providing a loading animation to indicate that the user needs to wait for the interface to be usable.
The latter is not the best option as the user clearly is forced to wait before being able to interact with the experience; however, in the case of this project, this is the method we are going to use, as the only feature of the application is the interaction with the model.
HTML code sample to show some intro text and a button with initial loading state
JavaScript code sample to load the model and update the state of the button when the model is loaded
The preceding code sample shows that, as soon as the loadModel function has finished loading the model, we remove the disabled state of the button to make it interactive and change its content to “Start” to indicate that the user can start the experience.
At this stage, once the user clicks the start button, we hide this content to show the three options available.
Step 2: Selection page

Page to select the engineer to learn more about
HTML code sample with buttons containing the name of the three NASA engineers
In our JavaScript file, we need to add an event listener for clicks on these buttons and fetch the JSON data.
To avoid loading all content at once, I created a JSON file for each person, so that the code is going to fetch only the data the user has asked for.
dorothyVaughan.json
katherineJohnsons.json
maryJackson.json
JavaScript code to fetch data when clicking one of the buttons
In the preceding code sample, I started by creating an object to map the names displayed in the UI to the names of the associated JSON file.
Then, for each of the three buttons, I listen for click events, look at the content of the button clicked to get the name of the JSON file, and use the fetch function to get the data and store it in a figureData variable.
I also use the name of the person the user has chosen, to display it in the title “What would you like to know about…”.
There is a bit more code related to showing and hiding HTML elements as we go through the pages, but I will share the complete code for this project at the end of this chapter.
Now that we know which person the user is interested in knowing more about, and we’ve fetched the related data, let’s move on to the prediction page.
Step 3: Predictions

Page to ask questions and display the best answer predicted
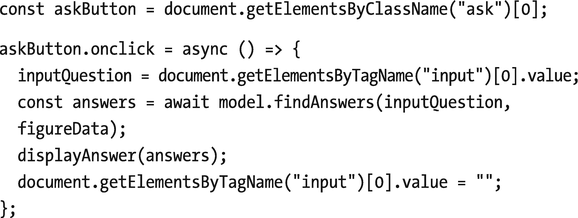
Listing 4-31. JavaScript code sample to get the input string, feed it to the model, and display the output
HTML code sample to display an input field and a section to display the prediction
In our JavaScript file, we need to listen to click events on the button, get the value of the input entered by the user, send it alongside the data fetched as parameters to the method to get the answers from the model, and display the first answer on the page.
The following is the code sample to do this.

Listing 4-31. JavaScript code sample to get the input string, feed it to the model, and display the output
In the first part of the preceding code, we listen to click events, get the input question, and call the findAnswers method with the question and the figureData variable we used in the previous section to store the data fetched from the JSON file.
We then call a function called displayAnswer to which we pass the answers returned by the model, to display it on the page.
As mentioned a bit earlier in this chapter, sometimes, the model is not going to find answers to a question and will return an empty array. We need to handle this case first, and here, we display a generic message.
Then, if the model has found answers, we display the first one in the array as it is the one with the highest probability to be correct.
And that’s it!
In less than 100 lines of JavaScript, you can create a small interactive project allowing users to ask questions and learn about different topics using machine learning!
Complete HTML code
Example JSON data for the file katherineJohnson.json
Example JSON data for the file maryJackson.json
Example JSON data for the file dorothyVaughan.json


Listing 4-36. Complete JavaScript code
In the code samples we just went through, questions are captured in an input field that users have to type in. However, there are other ways to get the same kind of information using another Web API.
In the code samples we just went through, questions are captured in an input field that users have to type in. However, there are other ways to get the same kind of information using another Web API.
Getting input data from the Web Speech API
A way to make this project even more interactive would be to allow people to ask their questions using their own voice rather than typing on their keyboard.
The Web API that enables speech recognition is the Web Speech API. Using this API, we can add speech-to-text functionality to this project and even text-to-speech with SpeechSynthesis, if we want the answers to also be read out loud.
The amount of code needed to add this feature is relatively small. Considering we already went through the core of the application, it will only impact the part that captures user’s input.
Initial setup to use the Web Speech API
These lines will allow you to have access to the speech recognition interface.
Instantiate a new SpeechRecognition instance
Optional parameters
The first one indicates that the listening and recognition is not continuous, meaning you will need a user interaction every time you want to listen to a question from the user. Setting it to false allows you to listen only when the user means to interact with the interface, instead of listening nonstop.
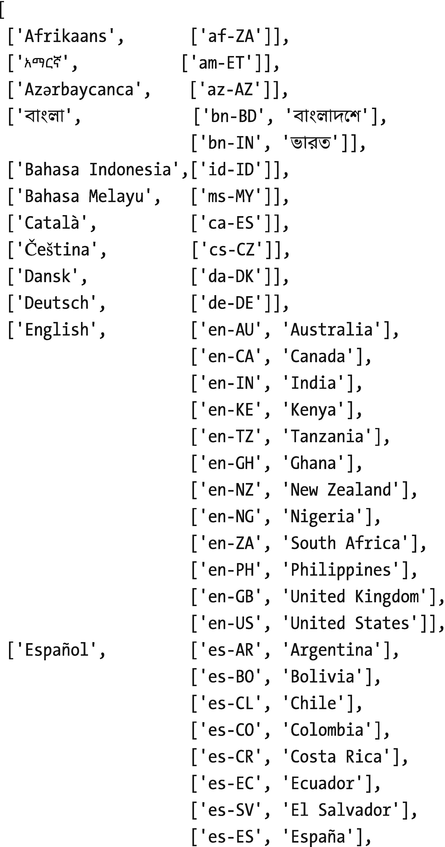
The second setting is the language of the recognition for the request. If unset, it will default to use the language of the HTML document root element, defined in your lang attribute.
At the moment, the list of languages available to use with the SpeechRecognition API includes

Finally, the third setting interimResults set to false indicates I am only interested in getting the last result of the recognition, and not all interim results while I am speaking.
After setting these attributes, we can start the recognition using recognition.start().
If you have not enabled the microphone on the web page already, you will be prompted to do so, but otherwise, the microphone will start listening for inputs.
Getting results from the Web Speech API
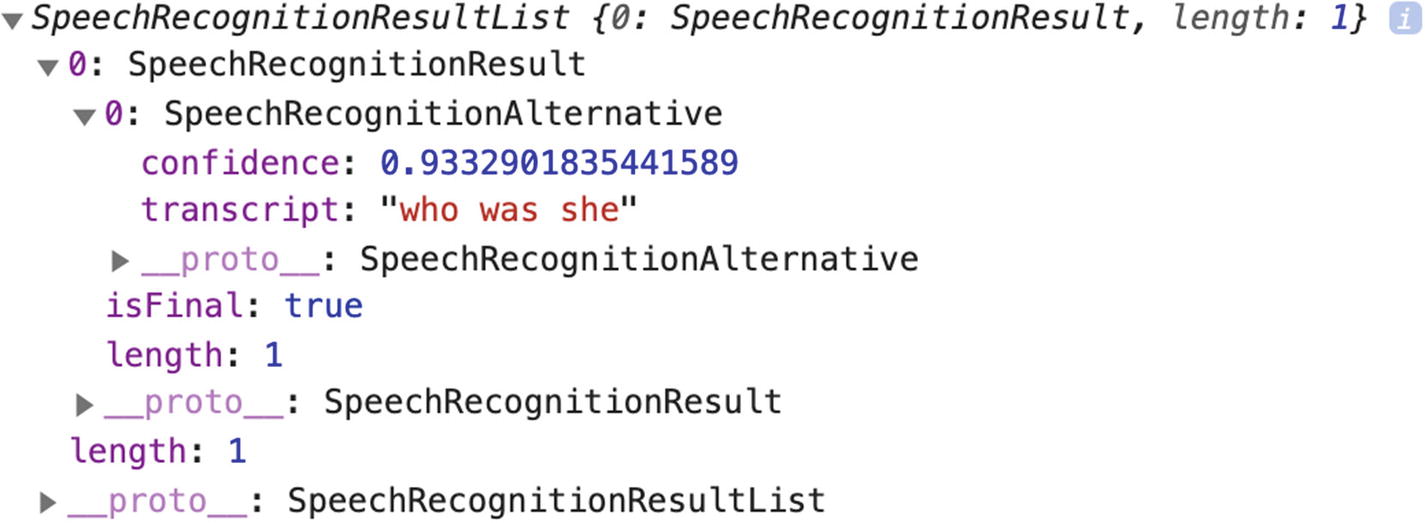
Output of calling the onresult method
Looking at this output helps make sense of the way we are setting the result variable in the preceding code sample: event.results[0][0].transcript.
Another useful method we can call is onspeechend.
Code sample to stop the recognition when the API has detected that the user has stopped talking
In only 20 lines of JavaScript, a web application can listen to a user’s voice commands!
If you wanted to add this to the project we built previously, you could implement it where we added the event listener for clicks on the “ask” button.
Instead of using the input written in the input field, you could trigger the speech recognition on click, listen to the user’s voice input, and feed that to the model, the same way we sent our written input string.
User voice commands with the QNA model
When the user clicks the button, this code starts the speech recognition and, on result, stores the final transcript in the inputQuestion variable. This variable was already sent to the findAnswers method in the original code for this project, but now it contains input from the user’s speech command.
A few changes would need to be done to the UI to reflect this functionality change (e.g., the input field is not necessarily needed anymore), but overall, the change we had to make to go from a written input to a spoken one only took a few lines of code!
Code sample to get the output prediction read out loud using the SpeechSynthesis Web API
These three lines create a speechSynthesis instance, execute a speech request passing the answer from the model, and call the speak method to make the speech service read the information out loud.
The default voice feels pretty robotic but a few parameters can be set to change this. I will not go into details here, but feel free to look at the MDN Web Docs for the Web Speech API for more information.
One last thing to keep in mind if you want to explore this API further is that the browser support is not at 100%. At the moment, it seems to be well supported on Chrome and Edge, but not Safari and Firefox.
Even though it is still pretty experimental, I would encourage you to look into it if you are interested.
This chapter contained a lot of information.
We looked into the basics of natural language processing, different types of text classification tools, various applications, and also how to implement sentiment analysis, toxicity classification, and question answering using TensorFlow.js, as well as experimenting with voice commands as a way to get text data to run predictions on.
If this is the first time you are diving into machine learning, this amount of information can feel a little bit overwhelming. However, as everything new takes time to understand, feel free to take breaks and come back to this chapter later on if you want.
The following chapter will dive into using other kind of data inputs with machine learning.