
C H A P T E R 14
RichFaces CDK: Building Custom Components
In this chapter we will cover one of the most interesting topics in RichFaces: building custom components with the Component Development Kit (CDK). As you can judge from this book and other resources on the Internet, RichFaces is more than just a component library for JSF. It extends JSF with advanced Ajax features and customization, client-side validation, skins, JavaScript component API, and much more. There is one great feature, however, to which we want to dedicate an entire chapter: building custom JSF components with RichFaces CDK. Note that we said JSF components and not RichFaces components. Yes, with CDK you can build custom JSF (not necessarily RichFaces) components. In our opinion, that’s one of the strongest features of CDK.
![]() Note This chapter requires slightly more advanced knowledge of JSF 2 features, such as life cycle, components building foundation, and behavior principles. If you feel you need to brush up your JSF skills, we recommend the following two books: Core JavaServer Faces, Third Edition by David Geary and Cay Horstmann (Prentice Hall, 2010) and JavaServer Faces 2.0, The Complete Reference by Ed Burns and Chris Schalk (McGraw-Hill, 2009).
Note This chapter requires slightly more advanced knowledge of JSF 2 features, such as life cycle, components building foundation, and behavior principles. If you feel you need to brush up your JSF skills, we recommend the following two books: Core JavaServer Faces, Third Edition by David Geary and Cay Horstmann (Prentice Hall, 2010) and JavaServer Faces 2.0, The Complete Reference by Ed Burns and Chris Schalk (McGraw-Hill, 2009).
We will start with a short overview of RichFaces CDK in order to understand how it will help us in our JSF component developer jobs.
JSF component development can be a rather tedious task. Components are usually easy to work with when you are placing them on pages, setting properties, or attaching actions or listeners. However, building the component is usually more challenging. Let’s review the standard JSF component development process from the beginning.
First, you need to create a base component class and add all the component attributes as properties with accessor methods, which allows you to store and access property values by using the StateHelper object. Then, ideally, you will have to create a renderer-specific class, which will consist of all HTML-specific attributes, such as events, styles, and others that are defined in the same manner as the base component class. In addition, if a behavior support (such as Ajax) is present, behavior events should be declared separately, as well. Then you will need to perform another challenging task—writing a renderer that will process the changes made on the client and render the HTML code back. Even for simple components, rendering HTML code inside Java code is not simple. For example, it is challenging to review and debug such code by looking for missed end tags or missed attributes. Things usually get even more complicated when you need to extend your own component from these classes. Finally, in some cases we will need to write the Facelets TagHandler class for our component.
After we are done with these tasks, we will have to become good XML developers. Yes, even in the Java EE6 era, it’s still an important part of the job in many instances. We need to add the JSF configuration file with all the component description information, such as component class, component family, renderkit definitions, and so on. After that, we will create a component.taglib.xml file, which will define a View Definition Language (VDL) tag for the component.
Similar work needs to be done to create client behavior.
How does RichFaces CDK help us? Almost at every step. Let’s take a look at how the basic steps described earlier will be made easier.
- Component classes. CDK allows you to generate a UI class with all the accessors for attributes just from an abstract class marked with a special annotation as a component and with set of abstract getter methods marked with the other annotations as attributes.
In the best cases, when you have no complex component functionality that should be implemented in component classes, you will not need a base abstract class. If you prefer, you could just create faces-config.xml with a few CDK-specific extensions and all the component classes stuff will be generated. - Renderer classes. In the best case scenario, you will not need to write any line of Java code. CDK includes an XML template compiler that will generate renderer from the XML template (which is really just an HTML template under the hood and very similar to a JSF 2 composite component template). But, even if you need some Java utility methods for encoding, you will not need to write much code. Simply define the base class in the XML template and implement the base class with only the methods needed. Then the methods can be used directly in templates.
- XML configuration. There is no longer any need for faces-config.xml and component.taglib.xml XML development. All the information will be extracted from abstract class annotations, and the template and the configuration files will be generated automatically. The only reason to write
faces-config.xmlon your own with CDK is if you prefer to generate a UI-component class instead of writing an abstract component class. - Events, listeners, and behaviors. CDK includes functionality for more easily defining events, listeners, behaviors, and so on.
Now that we have covered the basics of CDK, we are going to build a custom component together.
Before we start, there are two things we want to point out. First, RichFaces CDK is a separate feature in RichFaces. You don’t need to know how to use the CDK to use any of the components we covered in this book. The topic of building custom components is extensive and could probably make up an entire book by itself. In this chapter we are going to introduce CDK and give you an idea of how it works. For anything more, please visit the JBoss Community RichFaces page at http://jboss.org/richfaces. Second, some CDK parts and functionality are still being finalized; so again, make sure to visit the RichFaces site often for any changes and updates.
Development Plan
Our plan is to create a simple spinner component that provides richer UI to simplify numerical input.
First, any component requires simple HTML prototyping work to create a future template to be rendered, and to define core attributes we will add to the component. This will help us prepare the JavaScript part of the component, and if implement carefully, we can add it to the component without any additional changes.
Then we will create a Maven project and see how we will get component and renderer classes generated using an abstract component class and our HTML template moved to a special XML template file.
Next, we will create a project using the RichFaces project archetype and check the component in that application. We will also add a CSS stylesheet to the component, which is based on RichFaces skins, so it will be skinned as all the other RichFaces components.
Client-side Prototyping
Let’s start with the HTML prototype. We won’t be using any complicated markup because the goal is to show you how to use the CDK, not write complicated markup. We will start from the base markup and later you will be able to improve it with any customizations you want.
Listing 14-1 shows the code we will use.
Listing 14-1. Base markup
<!DOCTYPE html PUBLIC "-//W3C//DTD XHTML 1.0 Transitional//EN"
"http://www.w3.org/TR/xhtml1/DTD/xhtml1-transitional.dtd">
<html>
<head>
<meta http-equiv="content-type" content="text/html; charset=UTF-8" />
</head>
<body>
<span id="spinner" >
<input type="text" value="100" id="spinnerInput"/>
<button type="button" id="spinnerDec"><</button>
<button type="button" id="spinnerInc">></button>
</span>
</body>
</html>
Figure 14-1 shows the result.
Figure 14-1. Spinner HTML prototype
Let’s create a jQuery plug-in that will add client functionality to the spinner. First we need to revise the options necessary for making it customizable. Later, we will convert these options to be attributes on the component.
Table 14-1 shows the final attribute list.
| Option | Default | Description |
value |
0 | Current value of the spinner. |
maxValue |
100 | Maximum value that can be entered |
minValue |
0 | Minimum value that can be entered. |
step |
1 | The value by which the current value will be decreased or increased during corresponding UI controls activation. |
You would probably need more attributes if you were to use this component in production, but for the purpose of our example, these are sufficient. Listing 14-2 shows a simple jQuery plug-in that we created. It includes the following functionality:
- Binds the handlers to the buttons, which performs a value change on button click.
- Binds the handler to the keyup keyboard event and performs the same button click when up or down arrows are clicked.
- Binds the handler to the
changeevent of the input, which verifies correctness of the current value and switches it to the last valid, in case the user entered some non-numerical value or a value that is outside of the min/max range.
Listing 14-2. spinner.js from meta-inf/resources/org.richfaces.book
(function($) {

   var defaultOptions = {

      step : 1,

      maxValue : 100,

      minValue : 0

   };

   $.fn.Spinner = function(opts) {

      var options = $.extend({}, defaultOptions, opts);

      return this.each(function() {

         var input = document.getElementById(this.id + "Input");

         var incControl = document.getElementById(this.id + 'Inc'),

         var decControl = document.getElementById(this.id + 'Dec'),

         var inc = function (event) {

            var newValue = Number(input.value) + (options.step);

            if (newValue < options.maxValue){

               input.value=currentValue=newValue;

            } else {

               input.value=currentValue=options.maxValue;

            }

         };

         var dec = function(event) {

            var newValue = Number(input.value) - (options.step);

            if (newValue > options.minValue){

               input.value=currentValue=newValue;

            } else {

               input.value=currentValue=options.minValue;

            }

         };

         var handleKey = function(event) {

            switch (event.keyCode) {

               case 38:

                  inc(event); break;

               case 40:

                  dec(event); break;

               }

         };

         var verify = function(event) {

            var valueToVerify = input.value;

            if (isNaN(valueToVerify)) {

               input.value = currentValue;

               return;

            }

            if (Number(valueToVerify) < options.minValue){

               input.value = currentValue = options.minValue;

               return ;

            }

            if (Number(valueToVerify) > options.maxValue) {

               input.value = currentValue = options.maxValue;

               return ;

            }

            currentValue = input.value;

         };

         $(incControl).click(inc);

         $(decControl).click(dec);

         $(input).keydown(handleKey);

         $(input).change(verify);

         if (!isNaN(options.value)) {

            input.value = options.value;

            verify();

         }

      });

   };

})(jQuery);
The plug-in gets initialized with the options passed to constructor, and at the same time it provides defaults for them. This means that if some options are not passed, the component still works based on default values. In general, that’s a very good practice because in many cases there are a set of parameters that often don’t change. Performing such initialization will reduce the HTML size.
We then obtain DOM elements for the input and buttons because we need to bind handlers to their events. inc() and dec() functions are then defined to increase or decrease the current value from input to the number defined in the step option. The handleKey() function calls inc() or dec() functions depending on the keyCode we get from event. (We want the component to be able to change its value after keyboard events.) The verify() method will be called to verify the entered input when change event occurs. It will check the correctness of the new input (the user could change it manually by typing a non-numerical value in the input) and if it’s incorrect, performs switching to the previous valid value or to some of the boundary values.
Finally, we perform binding on all methods to corresponding DOM element events and perform initialization of input with the initial value passed in options.
That’s it. All we need now is add the script to our HTML template. As our client script is built as a jQuery plug-in, we should remember to add a base jQuery library there as well. We used jQuery 1.5.1, but you should also be able to use jQuery 1.6.x. Listing 14-3 shows what it looks like after the changes.
Listing 14-3. Adding script to the HTML template
<!DOCTYPE html PUBLIC "-//W3C//DTD XHTML 1.0 Transitional//EN"
"http://www.w3.org/TR/xhtml1/DTD/xhtml1-transitional.dtd">
<html>
<head>
<meta http-equiv="content-type" content="text/html; charset=UTF-8" />
<script src="jQuery.js" type="text/javascript"></script>
<script src="spinner.js" type="text/javascript"></script>
</head>
<body>
<span id="spinner" >
<input type=text value="1" id="spinnerInput"/>
<button type="button" id="spinnerDec"><</button>
<button type="button" id="spinnerInc">></button>
<script>
$('#spinner').Spinner({value:10});
</script>
</span>
</body>
</html>
When the page is rendered, we should be able to click on the buttons to increase or decrease value, and perform the same actions when pressing the key-up and key-down keyboard keys (when input has the focus). Figure 14-2 shows the result after rendering and increasing the value.
Figure 14-2. Interactive spinner HTML prototype
![]() Tip If you don’t have much experience with jQuery, we recommend you spend some time learning it. Knowing jQuery is important when you build your own custom components or extend existing components.
Tip If you don’t have much experience with jQuery, we recommend you spend some time learning it. Knowing jQuery is important when you build your own custom components or extend existing components.
Now we are ready to create the actual component. Let’s start by creating a project for it.
Creating the Project
First, we are going to create a project in which we build the custom component.
![]() Note As of writing of this book, no special Maven archetype exists for creating a project where you would build a custom component with CDK. Thus, we are going to create a standard Maven project and add the required dependencies.
Note As of writing of this book, no special Maven archetype exists for creating a project where you would build a custom component with CDK. Thus, we are going to create a standard Maven project and add the required dependencies.
In our case, we are going to create a standard Maven project using the following command:
mvn archetype:generate
We choose the default maven-archetype-quickstart archetype of version 1.1 when prompted, and enter org.richfaces.book as our groupId and spinner as an artifactId. We leave the 1.0-SNAPSHOT version prompted by default and define the package to be the same as the groupId.
Next, we need to add a set of dependencies that are required for dealing with JSF-based classes. But prior to adding the dependencies, you need to add the JBoss repository to your Maven setting.xml, as follows:
http://repository.jboss.org/nexus/content/groups/public-jboss/
![]() Note More information about additional settings can be found on the JBoss Community’s Maven wiki at
Note More information about additional settings can be found on the JBoss Community’s Maven wiki at http://community.jboss.org/wiki/MavenGettingStarted-Users.
Now we are ready to obtain JBoss artifacts by using Maven. Listing 14-4 shows the list of dependencies.
Listing 14-4. List of dependencies
<properties>

   <org.richfaces.version>4.0.1-SNAPSHOT</org.richfaces.version>

   <project.build.sourceEncoding>UTF-8</project.build.sourceEncoding>

</properties>

<dependencies>

   <dependency>

      <groupId>org.richfaces.cdk</groupId>

      <artifactId>annotations</artifactId>

      <version>${org.richfaces.version}</version>

   </dependency>

   <dependency>

      <groupId>org.richfaces.ui</groupId>

      <artifactId>richfaces-components-ui</artifactId>

      <version>${org.richfaces.version}</version>

   </dependency>

   <dependency>

      <groupId>javax</groupId>

      <artifactId>javaee-web-api</artifactId>

      <version>6.0</version>

      <scope>provided</scope>

   </dependency>

    <!-- archetype generated dependencies-->

</dependencies>
You might want to ask why we added richfaces-components-ui to the list. Ideally, we should have neither impl nor RichFaces API as a dependency because CDK works separate from the main project. It’s true but planning ahead we will use some utility classes from the richfaces-ui.jar. This is the only reason. You might not use it, and write your own code rather than be dependent on RichFaces classes.
Try to build the project at that point to check that things are fine and all the Maven settings are good so that the dependencies fetch successfully.
To add actual CDK processing to the project, we should add the plug-in to our POM. Listing 14-5 shows the plug-in definition.
Listing 14-5. The plug-in definition
<build>

   <plugins>

      <plugin>

         <groupId>org.richfaces.cdk</groupId>

         <artifactId>maven-cdk-plugin</artifactId>

         <version>${org.richfaces.version}</version>

         <executions>

            <execution>

               <id>cdk-generate-sources</id>

               <phase>generate-sources</phase>

               <goals>

                  <goal>generate</goal>

               </goals>

            </execution>

         </executions>

      </plugin>

   </plugins>

</build>
The added plug-in performs the generation of the classes and configurations from the base abstract component class and the renderer template is defined.
We need to create two folders in our project srcmain folder. resources and templates folders should be manually added because the default archetype does not generate a resources folder and does not know that we need a templates folder for our renderer template.
![]() Note So far in this book we have been IDE-neutral and only used Maven in our examples. We will continue using Maven, but will import the project into JBoss Tools and show you a number of screenshots throughout the chapter. Using JBoss Tools will make the development simpler. Having said that, you can still only use Maven and, of course, use any IDE that you choose.
Note So far in this book we have been IDE-neutral and only used Maven in our examples. We will continue using Maven, but will import the project into JBoss Tools and show you a number of screenshots throughout the chapter. Using JBoss Tools will make the development simpler. Having said that, you can still only use Maven and, of course, use any IDE that you choose.
JBoss Tools is a set of plug-ins for Eclipse to simply enterprise Java development. It provides source and visual tools for technologies such as JSF, RichFaces, Seam, Hibernate, and Portal, as well as others. To learn more about and install JBoss Tools, go to http://jboss.org/tools.
![]() Tip You can import the generated Maven project into Eclipse by either using the m2eclipse plugin or by generating Eclipse descriptors with Maven from running this command:
Tip You can import the generated Maven project into Eclipse by either using the m2eclipse plugin or by generating Eclipse descriptors with Maven from running this command: mvn eclipse:eclipse
After importing the project, you should see the structure shown in Figure 14-3.
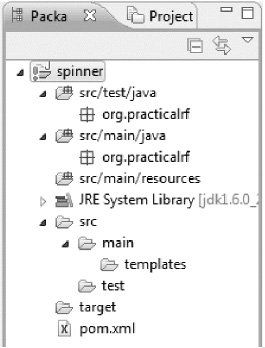
Figure 14-3. Project structure in Eclipse
![]() Note If you are getting “unavailable dependency” errors, most probably the Eclipse support to the project was added via a
Note If you are getting “unavailable dependency” errors, most probably the Eclipse support to the project was added via a mvn eclipse:eclipse call and the “M2_REPO” environment variable was not set. Use Eclipse preferences and point it to your local repository, as shown in Figure 14-4.
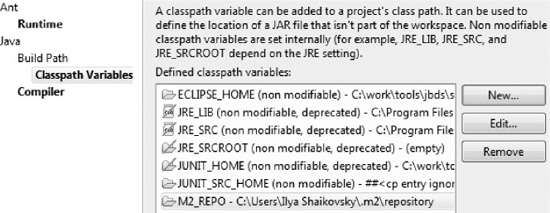
Figure 14-4. Setting Maven repository in Eclipse
Now that we are done with the setup, we can start building the component.
Creating a Components Library
Before creating the component classes and renderer templates, let’s define our tag library from the beginning. Don’t worry, it will not require any XML. Simply create a package-info.java class and put it in the org.richfaces.book package with the content shown in Listing 14-6.
Listing 14-6. Defining the tag library
@org.richfaces.cdk.annotations.TagLibrary(uri="http://org.richfaces.book/spinner", shortName="in")

package org.richfaces.book;
![]() Note if you are working in Eclipse, use “Create File” instead of the “Create Class” wizard to create
Note if you are working in Eclipse, use “Create File” instead of the “Create Class” wizard to create package-info.java. Eclipse will not allow such a file name with a class wizard.
That’s all. Using that annotation, CDK will add base information to the VDL (View Description Language) taglib when it is generated, as shown in Listing 14-7.
Listing 14-7. CDK adds base information to VDL taglib
<facelet-taglib xmlns="http://java.sun.com/xml/ns/javaee"

xmlns:xsi="http://www.w3.org/2001/XMLSchema-instance"

xsi:schemaLocation="http://java.sun.com/xml/ns/javaee http://java.sun.com/xml/ns/javaee/web-facelettaglibrary_2_0.xsd" version="2.0" id="in">

    <namespace>http://org.richfaces.book/spinner</namespace>

    ...

</facelet-taglib>
Later it will be filled (also by the generator) with the tags and their attributes.
Creating an Abstract Component Class
In this section we describe the creation of the abstract component class for the spinner component. We will put it in the org.richfaces.book.component package. That class intention is to describe the generated component contract more easily than creating the UIComponent class manually. Our class will look as shown in Listing 14-8.
Listing 14-8. Abstract component class
@JsfComponent(type = "org.richfaces.book.Spinner", family = "javax.faces.Input", renderer = @JsfRenderer(template = "spinner.template.xml"))

public abstract class AbstractSpinnerComponent extends UIInput {


   @Attribute

    public abstract boolean isDisabled();


    @Attribute(defaultValue = "1")

    public abstract String getStep();


    @Attribute(defaultValue = "0")

    public abstract String getMinValue();


    @Attribute(defaultValue = "100")

    public abstract String getMaxValue();

}
Looking through this class we see a set of CDK annotations. Annotating the class, there are @JsfComponent and @Attribute. The first marks the class as a base component class from which a UI class should be generated. The second one is used for specifying the attributes to be generated in that UI class. Each of the annotations has a set of attributes. We will review the most important attributes in Tables 14-2 and 14-3. Table 14-2 shows the @JsfComponent properties.
Table 14-2. @JsfComponent Properties
Table 14-3 shows the @Attribute properties.
Table 14-3. @Attribute Properties
| Property | Description |
| aliases | Defines different names for the single attribute. |
defaultValue |
Valid Java expression evaluated to the default attribute value. |
| events | An array of ClientBehavior events definitions. The value of the @EventName annotation that should be used is the name itself, and the defaultEvent defined marks the event as a default behavior event. |
| literal | Disables EL expressions for the attribute. |
passThrough |
Defines the attribute to be rendered as an HTML attribute without conversion. |
readOnly |
Disables generation of the setter method. |
| required | Enforces the tag handler to check what the developer provided as an explicit value for that attribute. |
![]() Note These tables list only the most important attributes. For complete listings, please refer to RichFaces CDK documentation.
Note These tables list only the most important attributes. For complete listings, please refer to RichFaces CDK documentation.
You could revise the simple code in Listing 14-8. All we are doing here is specifying the component type and component family, and also pointing the component to the renderer template that we will create later. In addition, we are marking all the abstract getter methods with the @Attribute annotation, and specifying the default value for the attributes where it applies. That’s actually all there is to it!
Now let’s build the project using mvn install.
Going to the target/generated sources folder, you find faces-config.xml in the “main/resources” folder. It contains standard component descriptor entries with some CDK extension tags inside. The more important part is in main/java/org/richfaces/book/component, where you see the UISpinner class.
You should also add the generated Java and resources folders to the source folders list of your IDE. After refreshing the project, the result in your IDE should look like Figure 14-5.
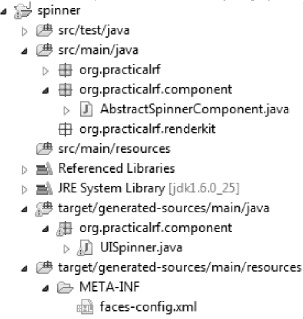
Figure 14-5. Project structure with UISpinner and faces-config.xml generated
Listing 14-9 shows a snippet from the generated UISpinner class.
Listing 14-9. UISpinner class
public class UISpinner extends AbstractSpinnerComponent{

   public static final String COMPONENT_FAMILY="javax.faces.Input";

   public static final String COMPONENT_TYPE="org.richfaces.book.Spinner";

   @Override

   public String getFamily() {

      return COMPONENT_FAMILY;

   }

   protected enum Properties {

      disabled,

      maxValue,

      minValue,

      step

   }

   public boolean isDisabled() {

      Boolean value = (Boolean) getStateHelper().eval(Properties.disabled, false);

      return value;

   }

   // More component attributes accessor methods

}
Keep in mind that we got all this code by simply using @JsfComponent annotation as our abstract component class and only a couple of abstract getter methods annotated with @Attribute. This is all the time we are going to spend on UI-class generation. However, you can read RichFaces documentation to learn more advanced definitions. For instance, you learn that adding the fires=@Event(value=ValueChangeEvent.class,listener=ValueChangeListener.class to a @JsfComponent annotation as a parameter tells the CDK to generate additional methods for handling the ValueChangeListeners.
Creating a Component Renderer Template
Now it’s time to return to the HTML template that we produced and create a renderer class that will encode the markup and script. It’s also time to learn the basics of RichFaces CDK renderer templates.
The template can be used for the following purposes:
- To define the markup of the component in a standard HTML format, this will be transformed to set or
ResponseWritermethods in the generated renderer class. - To allow common, renderer-specific attributes (for example, import common HTML attributes) to be added.
Now let’s look at the first feature in action. The template file is a well-formed XML file that has the same structure as a JSF 2 composite component. Why not just HTML? Because similar to JSF 2 composite components, we also need an additional interface part where we can specify all renderer-related information, add imports, and so on. Also, it’s already standardized by JSF and provides a convenient contract for definitions. The implementation contains an actual HTML template, which will be encoded.
Now let’s go through Listing 14-10. We named the file spinner.template.xml according to CDK conventions and placed it in the src/main/resources/templates folder.
Listing 14-10. spinner.template.xml
<?xml version="1.0" encoding="UTF-8"?>
<cdk:root xmlns="http://jboss.org/schema/richfaces/cdk/xhtml-el"
xmlns:cdk="http://jboss.org/schema/richfaces/cdk/core"
xmlns:cc="http://jboss.org/schema/richfaces/cdk/jsf/composite"
xmlns:c="http://jboss.org/schema/richfaces/cdk/jstl/core"
xmlns:xi="http://www.w3.org/2001/XInclude">
<cc:interface>
<cdk:class>org.richfaces.book.renderkit.SpinnerRenderer</cdk:class>
<cdk:superclass>org.richfaces.book.renderkit.SpinnerBaseRenderer</cdk:superclass>
<cdk:component-family>javax.faces.Input</cdk:component-family>
<cdk:renderer-type>org.richfaces.book.renderkit.SpinnerRenderer</cdk:renderer-type>
</cc:interface>
<cc:implementation>
<span id="#{clientId}">
<input type="text" name="#{clientId}" id="#{clientId}Input"
value="#{getInputValue(facesContext, component)}" />
<button type="button" id="#{clientId}Dec"><</button>
<button type="button" id="#{clientId}Inc">></button>
<script>
<cdk:scriptObject name="options">
<cdk:scriptOption attributes=" step maxValue minValue"/>
<cdk:scriptOption name="value" value="#{component.attributes['value']}" defaultValue="0"/>
</cdk:scriptObject>
$(document.getElementById('#{clientId}')).Spinner(#{toScriptArgs(options)});
</script>
</span>
</cc:implementation>
</cdk:root>
Let’s start from the <cc:interface> section. The tag names explain what they do. We define the name for the generated renderer class. Then, defining that the renderer will extend the SpinnerBaseRenderer class (we will create it a little later), point it to the component family and specify the renderer type.
In the <cc:implementation> section, we copied the HTML template and added some references to component variables. As we already covered the markup during prototyping, let’s move to EL definitions and the new special tags there. You should see clientId, facesContext, and component referenced there. The CDK template exposes these objects like implicit variables so that you can refer to them as needed in the template. You can easily reference any other object that you need in a similar manner. For that, you need to define it in the template using the <cdk:object> tag. (There and across the description we will point you to tags that are available in templates; later we will provide the table with detailed descriptions.)
![]() Caution Before we continue with the description of tags, variables, and other CDK features, let us caution you about an important piece in the code that is not directly related to CDK or JSF.
Caution Before we continue with the description of tags, variables, and other CDK features, let us caution you about an important piece in the code that is not directly related to CDK or JSF. name="#{clientId}" should be used as an input element to make the value of the input passed request parameters properly. Don’t forget that the simple requirement of HTML forms writing your components means that you don’t spend much time debugging your decode() methods.
Input value gets encoded using #{getInputValue(facesContext, component)} method call. In fact, we are showing you a way to calling methods from superclass (we will define that method in SpinnerBaseRenderer). You might want to write any other utility methods and refer from the template as it is done for the value attribute.
Most interesting to us are the <cdk:scriptObject> and <cdk:scriptOption> tags. Considering that most rich components provides interactive UI using JavaScript, we will describe those tags used to initialize the JavaScript objects separately.
The <cdk:scriptObject> tag allows creating a hash map from the parameters defined using <cdk:scriptOption> tags for further referencing JavaScript statements in the template.
We have two script options. One of the options uses the attributes attribute to reference step, maxValue, and minValue component attributes. In this case they will be placed into a map with the same names, and the values will be retrieved from the component object. That’s one way to insert a set of attributes into a JavaScript options map.
The second option shows you the way to output a single option. In fact, in our case we might output value using the first tag in the same way. We wanted to demonstrate an alternative and more flexible usage. We define any name using a corresponding attribute (and not use the same name that the attribute is using). We define defaultValue (in case it’s not defined on a base component class using @Attribute or the class doesn’t exist) and reference the value with any valid EL expression. In our case we are referencing the component using an implicit variable and getting value from the component attributes map.
That object is actually presented using LinkedHashMap in renderer Java code. In order to properly output it as a parameter to our client object initialization method, we should reference the toScriptArgs(hashMap) utility method. It’s a method from org.richfaces.renderkit.RenderKitUtils class.
![]() Note In our initialization script block, instead of using
Note In our initialization script block, instead of using $(‘#id’) as the prototype, we wrapped the #{clientId} with the getElementById() document JavaScript method. That is done in order to avoid escaping colons, which are added by naming containers (for example, the client id could be ‘form:id’ and jQuery will fail to process such a selector).
That’s all for the template. But, we are not ready to build the project yet. We referenced, but did not implement, the base class for the renderer. Again, it’s not required in simple cases. We wanted to show you how to add methods to the base class and reference from templates in case you need some utility staff defined in Java code. Listing 14-11 shows that class. It should be placed in the org.richfaces.book.renderkit package.
Listing 14-11. Shows the class
@ResourceDependencies({ @ResourceDependency(name = "jquery.js"),

@ResourceDependency(library = "org.richfaces.book", name = "spinner.js") })

public abstract class SpinnerBaseRenderer extends InputRendererBase {

   public void decode(FacesContext context, UIComponent component) {

      String clientId = component.getClientId(context);

      Map<String, String> requestParameterMap =
         context.getExternalContext().getRequestParameterMap();

      String newValue = (String) requestParameterMap.get(clientId);

         if (null != newValue) {

            AbstractSpinnerComponent input = (AbstractSpinnerComponent)

               component;

            input.setSubmittedValue(newValue);

        }

    }

   public Object getConvertedValue(FacesContext context, UIComponent

      component, Object val) throws ConverterException {

      return InputUtils.getConvertedValue(context, component, val);

   }

   public String getInputValue(FacesContext context, UIComponent component)

      throws ConverterException {

      return InputUtils.getInputValue(context, component);

   }

}
We did two things in Listing 14-11. First, we declared two @ResourceDependency annotations to reference the scripts we are using. In fact, you do not need a base class for that. It could be done in the template using tags in the interface. But, now you know how to do it the other way as well. Also, note that we do not declare any library for jQuery dependency. That’s because we plan to use the component in the RichFaces environment and the RichFaces resource handler automatically picks that resource from bundled ones (as jQuery is a base library used in RichFaces).
In case you’re not using it, consider declaring library for spinner.js according to standard JSF 2 rules, and add it to component resources. According to our resource dependency annotation, spinner.js should be placed in the org.richfaces.book library. So let’s draw our attention from server-side code for a moment to copy spinner.js, which we used as a prototype to the srcmain
esourcesMETA-INF
esourcesorg.richfaces.book folder in our project.
The second thing is the actual code that we implemented. We defined the decode() method for our component and added the utility method used in our renderer template. Now, let’s look closer to the methods introduced.
The decode() method is used on any input JSF component to process all the changes and events from the client-side and maps them the server-side component instance and raises corresponding server-side events. The decode() method retrieves the value from request map and stores it in the UISpinner submitted value property. As UISpinner extends UIInput, the value will be validated and updated according to a standard JSF UIInput contract.
There are two more methods in the base class. getConvertedValue() overrides the UIInput method, which is called during process validation to convert it prior to validation. The getInputValue() method is referenced in the template to render value in the <input> tag. Both of them call utility methods in org.richfaces.component.util.InputUtils. These methods perform conversions according to the type of server-side properties used as value binding with default converters. So if we use the int or Integer property in the bean as our component value, the component will try to convert it using javax.faces.convert.IntegerConverter.
Now we are ready to build the project. We hope that you also get a “Build successful” message in your Maven log. The result after the build should look as shown in Figure 14-6.
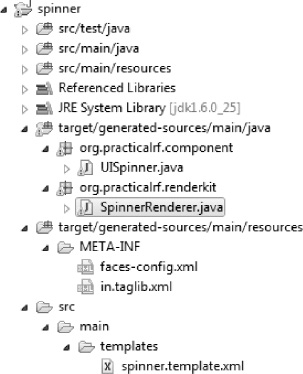
Figure 14-6. Project structure after renderer and taglib generated in Eclipse
![]() Note Rebuilding the project using Maven is required every time changes occur in the
Note Rebuilding the project using Maven is required every time changes occur in the Abstract component class or when the template or faces-config (if used instead of abstract class) is changed. This should be done in order to have a UI-component class and renderer re-generated correspondingly. When updating only utility methods code or resource files, it’s usually sufficient to restart the server.
If we will look in the org/richfaces/book/renderkit package in the target/generated-sources/main/java folder, we can open a new SpinnerRenderer.java class. We will not provide a full listing of the generated renderer because it’s large. Listing 14-12 is a snippet of encode.
Listing 14-12. Encode
@Override

public void encodeEnd(FacesContext facesContext, UIComponent component) throws IOException {

   ResponseWriter responseWriter = facesContext.getResponseWriter();

   String clientId = component.getClientId(facesContext);

   responseWriter.startElement("span", component);

   {

      String value = clientId;

      if (null != value && value.length() > 0) {

        responseWriter.writeAttribute("id", value, null);

      }

   }

   responseWriter.startElement("input", component);

   {

      String value = convertToString(clientId) + "Input";

      if (null != value && value.length() > 0) {

        responseWriter.writeAttribute("id", value, null);

      }

   }

      //More encode code for buttons and script including script object creation.

}
The encodeEnd method will contain all the necessary code, and some utility methods as well. You should now be able to tell how much easier it is to write (and much more important to maintain) your renderer encode portion in the XML template using just HTML code.
As you also see in the Figure 14-6, we also have a VDL configuration (in.taglib.xml) generated.
CDK Renderer Template Tags and Other Features
As promised, we will give you an overview of the available CDK template tags. Table 14-4 provides summary of the most important cdk: tags available for usage in a <cc:interface> section.
Table 14-4. Tags Available in the <cc:interface> Section
| Tag | Description |
<cdk:class> |
Full-qualified Java class name for generated renderer. |
<cdk:superclass> |
Full-qualified Java class name for generated Renderer superclass. That class should extend javax.faces.render.Renderer, and can be used to put decode(), some logic and helper methods. By default if that tag is not used, the generated renderer extends javax.faces.render.Renderer class. |
<cdk:component-family> |
JSF component family id, used to associate renderer with component. |
<cdk:renderer-type> |
JSF Renderer type assigned to the generated renderer. |
<cdk:renders-children> |
Boolean value that will be returned from the getRendersChildren() method. |
<cdk:import> |
Defines additional Java import directives for the generated class. Has next attributes—package, names (comma separated names for imported classes) and static (allows you to generate an “import static” directive). |
<cdk:import-attributes> |
Allows CDK to import the attributes definition from the JSF configuration file fragment, the same as used by the @JsfComponent#attributes. The src attribute should contain a URL for that fragment. |
<cdk:resource-dependency> |
Defines JSF resource used by the component. Resource defined by that element added to @ResourceDependencies annotation for generated type. Attributes available are the same as for annotation. |
![]() Note Table 14-4 lists the most important attributes as of writing of this book. For updates and new attributes in CDK, visit the JBoss Community RichFaces web site at
Note Table 14-4 lists the most important attributes as of writing of this book. For updates and new attributes in CDK, visit the JBoss Community RichFaces web site at http://jboss.org/richfaces.
Table 14-5 describes the tags that could be used in the <cc:implementation> section. (To save space and time, we will not mention tags already described in earlier Listings.)
Table 14-5. Tags Available in <cc:implementation> Section
| Tag | Description |
<cdk:body> |
Allows you to separate the template into parts. All the content before the tag will be generated in the encodeBegin() method. All the content declared inside the <cdk:body> tag is compiled into statements of the encodeChildren() method. And all content declared after the <cdk:body> tag is compiled into statements of the encodeEnd() method. If that tag doesn’t exist in template at all the content is rendered in the encodeEnd() method. |
<cdk:call> |
Arbitrary method invocation statement. Useful when you have some rendering method in abstract class and need to call it to encode some dynamical piece of component. |
<cdk:switch> |
Used to construct Java switch statement. All the expressions should be evaluated into valid code for switch statement. Switch tag uses key attribute, and case tag using values attribute. |
<cdk:object> |
Introduces new variable (The same as implicit facesContext and component). Variable’s scope is limited to the context of the current method, i.e. variables defined before <cdk:body> are not available after it. |
The last group of tags that should be mentioned are JSTL tags, which you are probably already familiar with. Currently CDK supports <c:forEach>, <c:choose>, <c:if>, <c:otherwise>, and <c:when> tags.
CDK templates tags also allow two special attributes to be used in any HTML tag. The first attribute is cdk:passThroughWithExclusions, which renders all attributes allowed for an HTML element except ones defined in attribute value (space separated list). CDK expects that component attribute name to be the same as in HTML. That’s useful to render single-element components or for the root element. We added to our span as follows:
<span cdk:passThroughWithExclusions="id class">
This tells CDK to encode all <span> HTML attributes using the same named attributes at the component. That’s why it’s most useful only for the root element (style, dir, lang, and others should be applied to the root element of the component).
The second attribute is cdk:passThrough. As opposed to cdk:passThroughWithExclusions, it renders all attributes defined in its value (a space-separated list). If component and HTML attributes have the same name, it’s typed as is. Otherwise, the developer can provide a component attribute name separated by a colon, for example:
<span cdk:passThrough=” style class:styleClass”/>
This means render component style attribute as HTML style, and component#styleClass as HTML class.
You should now be able to write templates of any complexity with options such as using special CDK tags, having implicit variables, the ability to define custom variables, and the facility to call the methods from your common classes. We will add a few enhancements a little later using some of these features.
Creating a Sample Application
We will add a number of enhancements to our custom component. Right now, it’s not using any styles and has no client event handlers. But before we do that, let’s create a RichFaces project in which we use the spinner component.
We will use the richfaces-archetype-simpleapp archetype, which is provided by RichFaces. Listing 14-13 creates a new RichFaces project.
Listing 14-13. Using the richfaces-archetype-simpleapp archetype
mvn archetype:generate

   -DarchetypeGroupId=org.richfaces.archetypes

   -DarchetypeArtifactId=richfaces-archetype-simpleapp

   -DarchetypeVersion=4.0.0.Final

   -DgroupId=org.richfaces.book

   -DartifactId=spinner-sample

   -Dversion=1.0-SNAPSHOT
In Listing 14-14we add spinner dependency to the sample pom.xml.
Listing 14-14. Adding a spinner dependency
<dependency>

   <groupId>org.richfaces.book</groupId>

   <artifactId>spinner</artifactId>

   <version>1.0-SNAPSHOT</version>

</dependency>
Open the project you are using in IDE. Because we are not using the m2eclipse plug-in with JBoss Tools, we need to generate the Eclipse project descriptors using a simple Maven call, as follows:
mvn eclipse:eclipse –Dwtpversion=2.0
We can import our code into Eclipse as an existing project. The extra parameter that you see tells Maven to generate additional descriptors for the WTP web-project facet.
![]() Tip After a sample import, we removed the spinner
Tip After a sample import, we removed the spinner JAR entry set to a Maven repository from library dependencies in project properties (Java build path) and pointed it to the spinner project from the workspace instead, as shown in Figure 14-7. We made the same change in the “Deployment assembly” list. This way, we won’t need to refresh/rebuild the sample itself after changing the spinner; it will be done by the IDE.
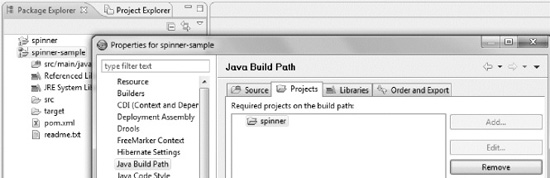
Figure 14-7. Using spinner project as a dependency in Eclipse
![]() Caution Importing a project without m2eclipse while working in JBoss Tools 4.0.0.GA will cause you to get
Caution Importing a project without m2eclipse while working in JBoss Tools 4.0.0.GA will cause you to get src/main/java listed twice in a deployment assembly list for projects generated by a RichFaces archetype. It will result in classes not properly deployed. To prevent this, you need to remove the occurrence targeted to the context root, shown highlighted in Figure 14-8.
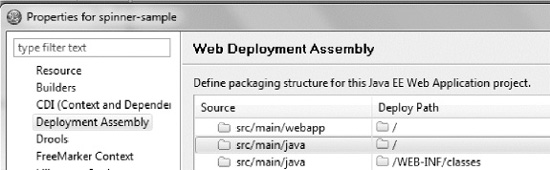
Figure 14-8. Erroneous entry while using Eclipse WTP
We are now set and can deploy the project (we used Tomcat 7 as the default Maven project configuration generated by the archetype defined).
But before running it, we will add the spinner component to the index.xhtml page in the sample WebContent folder, as shown in Listing 14-15.
Listing 14-15. Add the spinner component to index.xhtml page
<!DOCTYPE html PUBLIC "-//W3C//DTD XHTML 1.0 Transitional//EN" "http://www.w3.org/TR/xhtml1/DTD/xhtml1-transitional.dtd">

<html xmlns="http://www.w3.org/1999/xhtml" xmlns:h="http://java.sun.com/jsf/html"

xmlns:f="http://java.sun.com/jsf/core"  xmlns:ui="http://java.sun.com/jsf/facelets"

xmlns:a4j="http://richfaces.org/a4j" xmlns:prf="http://org.richfaces.book/spinner">

<body>

<ui:composition template="/templates/template.xhtml">

    <ui:define name="title">RichFaces Sample</ui:define>

    <ui:define name="body">

    <prf:spinner value="50"/>

    </ui:define>

</ui:composition>

</body>

</html>
Notice the namespace declared is one that we defined in package-info.java for the tag library. After deploying the project, running Tomcat, and pointing the browser to http://localhost:8080/spinner-sample/ our spinner is rendered, and clicking on buttons will cause the value to be changed, as shown in Figure 14-9.

Figure 14-9. Spinner component rendered
Go ahead and try the component with different values, bind it to a bean property, and perform a submit. It should all work.
Adding Common Attributes
We would like to enhance our component to add encoding of styling, event, and other standard attributes. Turns out it’s pretty simple to do. We won’t even make changes to the AbstractSpinner class, defining all those standard attributes using getters marked with @Attribute. At first it’s rather annoying to do that repetitive work for standard properties. And what is more important, it could be the cause of some mistakes and is hard to maintain. As all those attributes are renderer-specific, it would be more logical to group them somehow and, ideally, even add them at renderer-template level. We are able to do so using CDK.
Most of the standard HTML and JSF attributes are already available as common, reusable, JSF-configuration, XML fragments (faces-config CDK extensions) in CDK, so we will do it using the <cdk:import-attributes> tag in the template. And if you prefer this way, can still add them in abstract class using the attributes attribute of the @JSFComponent annotation. It also allows reusable config parts inclusions.
Let’s look at one of the XML fragments from CDK (core-props.xml) in Listing 14-16.
Listing 14-16. XML fragments from CDK
<?xml version="1.0" encoding="UTF-8"?>

<cdk:properties xmlns:xi="http://www.w3.org/2001/XInclude"

   xmlns:cdk="http://jboss.org/schema/richfaces/cdk/extensions"

   xmlns:xsi="http://www.w3.org/2001/XMLSchema-instance"

   xmlns="http://java.sun.com/xml/ns/javaee">

   <property>

      <description>CSS style(s) to be applied when this component is rendered.</description>

      <display-name>CSS Styles</display-name>

      <icon />

      <property-name>style</property-name>

      <property-class>java.lang.String</property-class>

      <property-extension>

         <cdk:pass-through>true</cdk:pass-through>

      </property-extension>

   </property>

   <property>

      <description>Space-separated list of CSS style class(es) to be applied when this element is rendered.

         This value must be passed through as the "class" attribute on generated markup.</description>

      <display-name>CSS Style Classes</display-name>

      <icon />

      <property-name>styleClass</property-name>

      <property-class>java.lang.String</property-class>

      <property-extension>

         <cdk:pass-through>false</cdk:pass-through>

      </property-extension>

   </property>

   <!--more attributes definitions>

</cdk:properties>
![]() Note We will not list all common fragment file names because the list is rather long. We just want to make sure that you are aware that they exist and know that using them will make development simpler. Refer to CDK documentation at
Note We will not list all common fragment file names because the list is rather long. We just want to make sure that you are aware that they exist and know that using them will make development simpler. Refer to CDK documentation at http://jboss.org/richfaces to get a complete file list and listings.
When we include the XML in template or abstract class, corresponding attributes will be added to a generated component class. You’re free to create your own XML fragments to reuse some attributes across similar components.
Let’s see how it works. We need to add the next set of tags to our spinner.template.xml <cc:interface> section, as shown in Listing 14-17.
Listing 14-17. Adding tags to spinner.template.xml <cc:interface>
<cdk:import-attributes src="urn:attributes:events-props.xml"/>

<cdk:import-attributes src="urn:attributes:core-props.xml"/>

<cdk:import-attributes src="urn:attributes:i18n-props.xml"/>

<cdk:import-attributes src="urn:attributes:focus-props.xml"/>

<cdk:import-attributes src="urn:attributes:input-props.xml"/>
Now let’s build the spinner and check the result in UISpinner.java generated class. Note that we are getting even more than expected, except for new attributes in the properties map, you can easily see that our class now implements ClientBehaviorHolder and provides the implementation of interface methods. So all the events like change, keyup, and so on are now available as behavior events.
Interested in how that was achieved? It’s pretty simple; CDK makes the decision whether there are any client behavior events according to the events’ definitions (doesn’t matter if using the @Attribute annotation or a JSF configuration file fragment) and defines event name (using @EventName or <cdk:event-name>) property. If at least one such attribute is found, the component is marked as the client behaviors holder and corresponding attributes are added to a behavior events map.
So the only thing remaining for the attribute to be useful is to use them in an HTML template in the <cc:implementation> section in order for them to render on the page.
We will add most of the attributes to show you how it works. Let’s change the beginning of our template implementation section, as shown in Listing 14-18
Listing 14-18. Changing the beginning of the template implementation section
<cc:implementation>

<span id="#{clientId}"  class="#{component.attributes['styleClass']}"

   cdk:passThroughWithExclusions="id class">

   <input type="text" name="#{clientId}" id="#{clientId}Input" cdk:passThrough="onchange"

      value="#{getInputValue(facesContext, component)}"/>
Note the styleClass encoded using a corresponding attribute at the <span> element and all the pass-through attributes except id and class are encoded there too. Also note that the component change event attribute will be encoded in the <input> element.
Now let’s build the spinner in order for the renderer to be re-generated, and update the sample application code as shown in Listing 14-19.
Listing 14-19. Update sample application code
<h:form>

   <prf:spinner value="50" styleClass="fooClass">

      <a4j:ajax event="change" />

   </prf:spinner>

</h:form>
Let’s examine the source HTML code generated in the result (visually the result will be the same). Listing 14-20 shows how our component code now looks on the client.
Listing 14-20. Component code
<span class="fooClass" id="j_idt7:j_idt8">
<input id="j_idt7:j_idt8Input" name="j_idt7:j_idt8" type="text" value="50"
onchange="RichFaces.ajax(this,event,{"parameters":{"javax.faces.behavior.event":"change",
"org.richfaces.ajax.component":"j_idt7:j_idt8"} ,"sourceId":this} )" />
<button id="j_idt7:j_idt8Dec" type="button"><</button>
<button id="j_idt7:j_idt8Inc" type="button">></button>
<script>
$(document.getElementById('j_idt7:j_idt8')).Spinner({"value":"50"} );
</script>
</span>
Notice the fooClass encoded at the <span> element, and the Ajax behavior for the change event encoded in our <input>.
Implementing the Disabled State
Implementing this feature is pretty simple. All we need to consider is the disabled attribute, which was added as one of the common inputs attributes from the input-props.xml.
We will implement it using JSTL tags support in the renderer template and rendering corresponding property to input and buttons using HTML attributes. See Listing 14-21 for <cc:implementation> section changes.
Listing 14-21. <cc:implementation> section changes
<cc:implementation>
<span id="#{clientId}" class="#{component.attributes['styleClass']}"
cdk:passThroughWithExclusions="id class">
<input type="text" name="#{clientId}" id="#{clientId}Input"
cdk:passThrough="onchange" value="#{getInputValue(facesContext, component)}"
disabled="#{component.attributes['disabled']?'disabled':''}" />
<button type="button" id="#{clientId}Dec"
disabled="#{component.attributes['disabled']?'disabled':''}"><</button>
<button type="button" id="#{clientId}Inc"
disabled="#{component.attributes['disabled']?'disabled':''}">></button>
<c:if test="#{not component.attributes['disabled']}">
<script>
<cdk:scriptObject name="options">
<cdk:scriptOption attributes="step maxValue minValue" />
<cdk:scriptOption name="value" value="#{component.attributes['value']}" defaultValue="0" />
</cdk:scriptObject>
$(document.getElementById('#{clientId}')).Spinner(#{toScriptArgs(options)});
</script>
</c:if>
</span>
</cc:implementation>
As you can see, we added simple conditions for disabled attributes on elements. We wrapped the script declaration with <c:if>, which checks the disabled state because we do not want any scripts to be attached to our component in the disabled state. Now let’s change the declaration of the spinner in the sample to have disabled="true" set (keeping the <a4j:ajax> behavior defined as in the previous sample) and check the HTML output, as shown in Listing 14-22.
Listing 14-22. HTML output
<span id="j_idt7:j_idt8" class="fooClass">
<input type="text" value="50" name="j_idt7:j_idt8" id="j_idt7:j_idt8Input"
disabled="disabled">
<button type="button" id="j_idt7:j_idt8Dec" disabled="disabled"><</button>
<button type="button" id="j_idt7:j_idt8Inc" disabled="disabled">></button>
</span>
Except proper attributes encoded and script not being rendered, the client behaviors (our <a4j:ajax>) are also ignored. This looks absolutely correct as the disabled component is not supposed to fire any events.
Figure 14-10 shows the rendered component on the page when disabled.
Figure 14-10. Spinner component disabled
Skinning the Spinner Component
Finally, it would be a good idea to encode at least a few styles for the spinner to improve its look and feel, and make it consistent with the other RichFaces components, and again show RichFaces’ skins in action.
As shown in Listing 14-23, let’s add the stylesheet with the spinner.ecss name to our META-INF
esourcesorg.richfaces.book folder (the same where the script is placed).
Listing 14-23. Stylesheet with spinner.ecss
.practrf-sp {

   border-width: 1px;

   border-style: solid;

   border-color: '#{richSkin.panelBorderColor}';

   display: inline-block;

   font-size: 1px;

   white-space: nowrap;

}

input.practrf-sp-inp[type="text"] {

   background-color: '#{richSkin.controlBackgroundColor}';

   border: 0px;

   color: '#{richSkin.generalTextColor}';

   font-family : '#{richSkin.generalFamilyFont}';

   font-size : '#{richSkin.generalSizeFont}';

   margin: 0px;

   padding: 0px;

   vertical-align: top;

}

button.practrf-sp-dec, button.practrf-sp-inc{

   background-color:  '#{richSkin.headerBackgroundColor}';

   background-image:none;

}
![]() Note We qualified our CSS selectors with
Note We qualified our CSS selectors with <input> and <button> element names in order to overwrite the standard skinning classes, if standard elements skinning was enabled. By applying at the same time as the standard skinning classes, these selectors will have a higher priority.
Now, we need to encode this resource with the component by adding the following to the SpinnerBaseRenderer after the spinner.js dependency declaration:
@ResourceDependency(library = "org.richfaces.book", name = "spinner.ecss")
The class encoding should be added to our spinner.template.xml template, as shown in Listing 14-24.
Listing 14-24. Adding class encoding to template
<span id="#{clientId}" class="practrf-sp #{component.attributes['styleClass']}" ...>
<input id="#{clientId}Input" class="practrf-sp-inp"... />
<button id="#{clientId}Dec" class="practrf-sp-dec"...><</button>
<button id="#{clientId}Inc" class="practrf-sp-inc"...>></button>
…
</span>
We now need to enable skinning in our test application (by default the RichFaces Maven archetype project doesn’t generate any skin parameter in web.xml). Let’s pick emeraldTown, as shown in Listing 14-25.
Listing 14-25. Enabling skinning
<context-param>

    <param-name>org.richfaces.skin</param-name>

    <param-value>emeraldTown</param-value>

  </context-param>

  <context-param>

     <param-name>org.richfaces.enableControlSkinning</param-name>

     <param-value>false</param-value>

 </context-param>
![]() Note We disabled standard skinning, which is on by default, so that it would not interfere without skinning properties added (buttons and inputs could be affected by it). Now, we can check results in a “clean environment.” Of course, as we continue working, we should turn it back on to check that all our styles are still applied and properly redefining standard skinning styles.
Note We disabled standard skinning, which is on by default, so that it would not interfere without skinning properties added (buttons and inputs could be affected by it). Now, we can check results in a “clean environment.” Of course, as we continue working, we should turn it back on to check that all our styles are still applied and properly redefining standard skinning styles.
We now rebuild the spinner project, refresh the sample, and publish and check the result. It should render like Figure 14-11.
Figure 14-11. Skinned spinner component
By following this approach, you can add additional styling to the custom component.
Summary
As you can see from the results, RichFaces CDK makes is very easy to build rich, custom components. With CDK, we have a readable, HTML-based template that has about 30 lines of code, a small and simple basic renderer class, and a fairly basic abstract class. As a result, we have the UISpinner component class implementation, which has about 400 lines of code and performs all the basics, such as evaluating component attributes properly, storing with StateHelper, and implementing the ClientBehaviorHolder interface.
We now have a renderer class generated, which contains more than 250 lines of code and performs everything needed with component encoding, including the proper encode of behavior events.
Finally, we have large faces-config.xml and taglib.xml files generated without any significant effort.
The RichFaces Component Development Kit tool is one of the RichFaces development team’s biggest achievements. It is worth being used by all JSF component developers—even if you are not using the components from rich:* tag library, but need to create your own custom component.