
C H A P T E R 9
Rich Tree Components
Trees are ideal components to represent hierarchical data. They are one of the most popular complex components in any UI library (probably next to tables). Trees are very useful for building menus, building hierarchical filters, and so on. RichFaces tree components provide everything you need to represent data in a tree-like structure. This chapter will explain the basics and provide advanced examples using RichFaces tree components.
Using <rich:tree>
<rich:tree> is an implementation of a common component designed to display hierarchical data. As any other JSF iteration component, it has to be bound to a model that provides the data for the tree. Figure 9-1 shows the tree component in action.

Figure 9-1. A simple RichFaces tree
One thing to keep in mind is that this component can’t be designed in a static way simply from page code (putting a component on a page without binding to a model is usually possible with other components). The ability to place the component on a page without binding to a data model could be added to RichFaces in the future.
Creating a Tree Model Based on the Swing TreeNode Interface
Let’s start with data model creation. If you ever used Swing’s javax.swing.tree.TreeNode, then you already know how to create a model for the RichFaces tree component. Let’s start with Swing tree node support and explore RichFaces’ proprietary org.richfaces.model.TreeNode interface in upcoming sections.
![]() Note If you have a project where data is organized using Swing’s TreeNode, you should be able to use the data and classes from the project here.
Note If you have a project where data is organized using Swing’s TreeNode, you should be able to use the data and classes from the project here.
Let’s create a simple SwingTreeNodeImpl class that implements a javax.swing.tree.TreeNode interface. Listing 9-1 shows the class.
Listing 9-1. Shows the class
public class SwingTreeNodeImpl implements TreeNode {

   private List<SwingTreeNodeImpl> childNodes;

   private String data;


   // Getters and setters


   public SwingTreeNodeImpl(String data) {

      super();

      this.data = data;

   }

   public void addChild(SwingTreeNodeImpl child) {

      if (child != null) {

         if (childNodes == null) {

            childNodes = new ArrayList<SwingTreeNodeImpl>();

         }

         childNodes.add(child);

      }

   }

   @Override

   public TreeNode getChildAt(int childIndex) {

      return (childNodes == null) ? null : childNodes.get(childIndex);

   }

   @Override

   public int getChildCount() {

      return (childNodes == null) ? null : childNodes.size();

   }

   @Override

   public TreeNode getParent() {

      return null;

   }

   @Override

   public int getIndex(TreeNode node) {

      return (childNodes == null) ? null : childNodes.indexOf(node);
   }

   @Override

   public boolean getAllowsChildren() {

      return true;

   }

   @Override

   public boolean isLeaf() {

      return (childNodes == null);

   }

   @Override

   public Enumeration children() {

      return Iterators.asEnumeration(childNodes.iterator());

   }

   @Override

   public String toString() {

      return data;

   }

}
If you are familiar with TreeNode, then this code should be self-explanatory. Every node has a list that stores child nodes and a simple string data field that contains information on that node. All other methods are implementation methods of the TreeNode interface and return all the needed information to process the node and allow data modifications.
![]() Note Instead of implementing the Swing TreeNode, you can also extend the default
Note Instead of implementing the Swing TreeNode, you can also extend the default org.richfaces.model.SwingTreeNodeImpl<T> implementation provided by RichFaces.
Now that we have covered tree node implementation, let's look at Listing 9-2 to see how we can populate the tree shown in SwingTreeNodeBean.
Listing 9-2. Populate the tree shown in SwingTreeNodeBean
@ManagedBean

@ViewScoped

public class SwingTreeNodeBean {


   List<SwingTreeNodeImpl> rootNodes = null;


   public void initNodes() {

      rootNodes = new ArrayList<SwingTreeNodeImpl>();

      SwingTreeNodeImpl node = new SwingTreeNodeImpl("Desktop Type");

      node.addChild(new SwingTreeNodeImpl("Compact"));

      node.addChild(new SwingTreeNodeImpl("Everyday"));

      node.addChild(new SwingTreeNodeImpl("Gaming"));

      node.addChild(new SwingTreeNodeImpl("Premium"));

      rootNodes.add(node);
      node = new SwingTreeNodeImpl("Customer Reviews");

      node.addChild(new SwingTreeNodeImpl("Top Rated"));

      rootNodes.add(node);

      node = new SwingTreeNodeImpl("Current Offers");

      node.addChild(new SwingTreeNodeImpl("On Sale"));

      node.addChild(new SwingTreeNodeImpl("Special Offers"));

      node.addChild(new SwingTreeNodeImpl("Package Deals"));

      node.addChild(new SwingTreeNodeImpl("Financing offers"));

      node.addChild(new SwingTreeNodeImpl("Outlet Center"));

      rootNodes.add(node);

      node = new SwingTreeNodeImpl("Availability");

      node.addChild(new SwingTreeNodeImpl("In store & Online"));

      node.addChild(new SwingTreeNodeImpl("Online only"));

      rootNodes.add(node);

   }

   public void setRootNodes(List<SwingTreeNodeImpl> rootNodes) {

      this.rootNodes = rootNodes;

   }

   public List<SwingTreeNodeImpl> getRootNodes() {

      if (rootNodes == null){

         initNodes();

      }

      return rootNodes;

   }

}
Now that we have the data initialized, let’s see the RichFaces tree in action. Listing 9-3 shows the page code for displaying the tree.
Listing 9-3. Page code for displaying the tree
<h:form>

   <rich:tree value="#{swingTreeNodeBean.rootNodes}" var="node" />

</h:form>
Pretty simple isn’t it? The tree rendered is shown in Figure 9-2.

Figure 9-2. <rich:tree> built using Swing TreeNode
Note that we don't need to define any markup for tree nodes. The tree is rendered using default implementation and with the help of the SwingTreeNodeImpl toString() method, it returns a string value for the node name. That's fine when you are just getting started, but still would like to have more flexibility in defining tree nodes such as binding to a different property in the node data model object.
Creating a Tree Model Based on the RichFaces TreeNode Interface
RichFaces also supports the org.richfaces.model.TreeNode interface and provides default implementation for this interface. Listing 9-4 shows the interface.
Listing 9-4. The org.richfaces.model.TreeNode interface
public interface TreeNode {

   public TreeNode getChild(Object key);

   public int indexOf(Object key);

   public Iterator<Object> getChildrenKeysIterator();

   public boolean isLeaf();

   public void addChild(Object key, TreeNode child);

   public void insertChild(int idx, Object key, TreeNode child);

   public void removeChild(Object key);

}
Assuming you already read about the RichFaces data iteration components in Chapter 7, you should notice the main difference between that interface and Swing’s. It uses a key–child node relation instead of an index–child node relation. It’s similar to the <rich:dataTable> row key–row data relation explained in the data models section in Chapter 7. As you remember, all the iteration components in RichFaces, including complex components like trees, use ExtendedDataModel as the base abstract model and uses rowKeys to identify the data in the model. That makes the components better integrated with the database layer. Actually, even when defining the Swing-based model you are still using ExtendedDataModel under the hood, as the tree automatically wraps your model to it.
Let's return to the code. This time we will not work on all interface methods implementation. Instead we will extend default TreeNodeImpl implementation, as shown in Listing 9-5.
Listing 9-5. Extend default TreeNodeImpl implementation
public class RichFacesTreeNode extends TreeNodeImpl {


   private String data;


   public RichFacesTreeNode(String data) {

      super();

      this.data = data;

   }

   public String getData() {

      return data;

   }

   public void setData(String data) {

      this.data = data;

   }

   @Override

   public String toString() {

      return data;

   }

}
![]() Note We will be using the RichFaces TreeNode object across all the samples in the remainder of the chapter.
Note We will be using the RichFaces TreeNode object across all the samples in the remainder of the chapter.
Listing 9-6 shows a bean in which we populate the tree. It looks very similar to the one we created using the Swing tree model.
Listing 9-6. Shows a bean used to populate the tree
@ManagedBean

@ViewScoped

public class RichFacesTreeNodeBean {


   private TreeNode rootNode = null;


   public void initNodes() {

      rootNode = new TreeNodeImpl();

      RichFacesTreeNode node = new RichFacesTreeNode("Desktop Type");

      node.addChild("1_1",new RichFacesTreeNode("Compact"));

      node.addChild("1_2",new RichFacesTreeNode("Everyday"));

      node.addChild("1_3",new RichFacesTreeNode("Gaming"));

      node.addChild("1_4",new RichFacesTreeNode("Premium"));

      rootNode.addChild("1",node);

      // other initialization code

   }


   public void setRootNode(TreeNode rootNode) {

      this.rootNode = rootNode;

   }


   public TreeNode getRootNode() {

      if (rootNode == null) {

         initNodes();

      }

      return rootNode;

   }
}
The RichFaces TreeNode-based model should have the only root node (the Swing model Collection of root nodes was supported as value binding). It is not an actual root, but simply a fake node that is not getting rendered to the view, and so should not contain any data. It’s only a placeholder for the set of child nodes that will be the actual set of root nodes (it's designed this way to support backward compatibility with previous RichFaces version).
Listing 9-7 shows the page, which still looks very simple.
Listing 9-7. The simple page
<h:form>

   <rich:tree value="#{richFacesTreeNodeBean.rootNode}" var="node"/>

</h:form>
The tree rendered is shown in Figure 9-3.

Figure 9-3. <rich:tree> built using the RichFaces TreeNode
You are probably curious why the leaf nodes have the same representation as the nodes with children and are not shown as leafs? That's how it’s designed. When we implemented Swing’s TreeNode interface, we implemented the isLeaf() method to return a boolean value, which determines if the collection is empty. RichFaces default Swing node implementation does the same.
On the other hand, org.richfaces.model.TreeNodeImpl doesn’t make the decision if the node is a leaf according to the presence of its children. It has to be defined with a flag passed to the constructor or have its isLeaf() method properly overridden. This is done to allow the developers to manually specify the leaf node property if the developer wants to implement lazy node loading or just needs to have an empty nodes representation. Thus, a node can have no children initialized, but have isLeaf() returning true by default. We will show you a little later how to initialize the RichFaces TreeNodeImpl to be a leaf.
Using <rich:treeNode> to Define Tree Nodes Markup
Let’s see now how we can replace using the toString() method and encode iteration object properties instead. We just need to add a <rich:treeNode> object to the <rich:tree> and define the content of the node inside using the var attribute in the same way as the <rich:column> content inside tables. Then every node will be rendered using that markup. In order to create the same representation but which does not rely on the toString() method, we only make changes to the page code. Listing 9-8 shows the page code.
Listing 9-8. The page code
<h:form>

  <rich:tree value="#{richFacesTreeNodeBean.rootNode}" var="node">

    <rich:treeNode>

      #{node.data}

    </rich:treeNode>

  </rich:tree>

</h:form>
Using this code, we get the tree rendered in Figure 9-4.

Figure 9-4. Creating a custom node using <rich:treeNode>
Using <rich:treeNode> allows you to place outputs such as links, images, formatted text, and so on. The next section will introduce you to another feature of the <rich:treeNode> and demonstrate different ways to render nodes.
Using Different Types of Nodes in a Tree
Suppose we need to show the nodes in a different way according to some conditions or properties of the model node. <rich:tree> easily allows you to do that. <rich:treeNode> provides the type attribute, which should be used for that purpose. All you need to do to use different kinds of nodes is add a property to the node’s model objects, which will identify the node type. It could be any property with any values. Then you need to add a set of <rich:treeNode> components as child components to the <rich:tree> with the type attributes defined according to possible model types. Finally, define the markups inside every <rich:treeNode>.
In order to make a decision about which node should be rendered for the current iteration, the <rich:tree> component provides the nodeType attribute. You should use it to define the property on the node that stores its type. Or, alternatively, use a simple EL expression that will be evaluated to possible types.
In the previous sample we added a single string data property to our RichFacesTreeNode, which was used to represent a node on the client. Now let’s add another property that will identify the node type, as shown in Listing 9-9.
Listing 9-9. Adding another property that will identify the node type
public class TypifiedRichFacesTreeNode extends TreeNodeImpl {

   private String data;

   private SimpleTreeNodeTypes type;


   public TypifiedRichFacesTreeNode(String data, SimpleTreeNodeTypes type) {

      super(type.equals(SimpleTreeNodeTypes.LEAF));

      this.data = data;

      this.type = type;

   }


   public String getData() {

      return data;

   }
   public void setData(String data) {

      this.data = data;

   }


   public SimpleTreeNodeTypes getType() {

      return type;

   }


   public void setType(SimpleTreeNodeTypes type) {

      this.type = type;

   }

}
![]() Note
Note TreeNodeImpl provides constructor with a leaf parameter. In our object, which extends TreeNodeImpl, we call super() passing the leaf parameter according to our type definition. So it will be properly rendered as a leaf by the component for the objects initialized with a true leaf value.
Listing 9-10 shows an Enum for note types.
Listing 9-10. Shows an Enum for note types
public enum SimpleTreeNodeTypes {

    NODE, LEAF

}
The modified bean that initializes data for the tree is shown in Listing 9-11.
Listing 9-11. The modified bean
@ManagedBean

@ViewScoped

public class TypifiedRichFacesTreeNodeBean {


   private TreeNode rootNode = null;


   public void initNodes() {

      rootNode = new TreeNodeImpl();


      TypifiedRichFacesTreeNode node = new TypifiedRichFacesTreeNode(

         "Desktop Type", SimpleTreeNodeTypes.NODE);

      node.addChild("1_1", new

         TypifiedRichFacesTreeNode("Compact",SimpleTreeNodeTypes.LEAF));

      node.addChild("1_2", new

         TypifiedRichFacesTreeNode("Everyday",SimpleTreeNodeTypes.LEAF));

      node.addChild("1_3", new

         TypifiedRichFacesTreeNode("Gaming",SimpleTreeNodeTypes.LEAF));
      node.addChild("1_4", new

         TypifiedRichFacesTreeNode("Premium",SimpleTreeNodeTypes.LEAF));

      rootNode.addChild("1", node);

      //Other nodes initialization

   }

   public void setRootNode(TreeNode rootNode) {

      this.rootNode = rootNode;

   }

   public TreeNode getRootNode() {

      if (rootNode == null) {

         initNodes();

      }

      return rootNode;

   }

}
Notice that we don't need the toString() method anymore, as we are defining the representation using a set of nested <rich:treeNode> tags. Looking through Listing 9-12, notice the nodeType attribute of <rich:tree> and the type attribute defined on every <rich:treeNode>. This is the way to point the <rich:treeNode> to our model type for every iterated tree node.
Listing 9-12. Defining the representation using a set of nested <rich:treeNode> tags
<rich:tree value="#{typifiedRichFacesTreeNodeBean.rootNode}" var="node"

   nodeType="#{node.type}"

   toggleType="client" selectionType="client">

   <rich:treeNode type="NODE">

      <h:outputText value="#{node.data}" />

   </rich:treeNode>

   <rich:treeNode type="LEAF">

      <h:outputLink value="#">

         #{node.data}

      </h:outputLink>

   </rich:treeNode>

</rich:tree>
And finally, Figure 9-5 shows the result. Notice the links rendered at the second level opposite the plain text labels at the root nodes.

Figure 9-5. Different custom nodes within <rich:tree>
During data model iteration, the EL expression defined at the nodeType attribute is evaluated using the current object defined in the var attribute. A lookup is then performed for the node with the same type among nested components. If the node with a corresponding type is found, it will be used for node markup rendering. If the node is not found, the tree will lookup the node without the type specified, and it will become the default node for all the objects, which can’t be associated with any type. If neither default node is found, the tree will create a default one, as was done in previous examples where <rich:treeNode> was not used.
![]() Note If a
Note If a <rich:treeNode> has the rendered attribute evaluated as false in context of an iteration, the node will not be rendered and no default nodes will be used or created.
Tree Toggling and Selection Modes
A RichFaces tree can be defined with different modes to be used while the user performs tree nodes expansion or selects a particular node. Table 9-1 shows the attributes that should be used to define the modes.
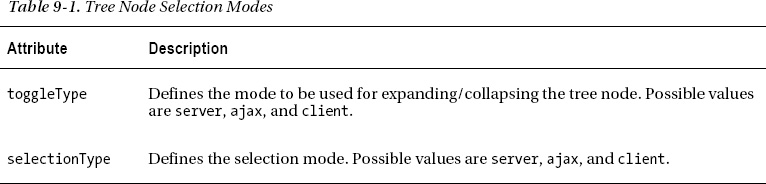
toggleType defines how every tree node child will be loaded. With the client type, the complete tree will be rendered on page load and nodes toggling will be done through JavaScript (on the client). In ajax and server modes, <rich:tree> will perform form submission via Ajax or standard POST in order to load the child components when the tree nodes get expanded.
selectionType can be set to the similar values—client, ajax, server—but for the selection user action. We will use ajax selectionType in all the later samples created in order to show you different options for processing tree events on the server side.
![]() Note
Note <rich:tree> needs to be placed inside <h:form> to perform an Ajax (or standard) request.
![]() Tip A popular question is how to implement a simple navigation tree that does not perform actions, but redirects to another view through simple links. Set
Tip A popular question is how to implement a simple navigation tree that does not perform actions, but redirects to another view through simple links. Set selectionType=client and use <h:outputLink> as the tree node. The tree itself won’t send an Ajax request, but you can navigate via <h:outputLink>.
Selection Event Handling
In a real application, in addition to rendering the tree, we also need to know how to handle the user action when a particular tree node is selected.
In addition to the selectionType definition we need to point the tree to a server-side listener method. <rich:tree> provides the selectionChangeListener attribute in order to do that. That attribute should be defined with the method expression and the method accepts TreeSelectionChangeEvent as a parameter. That event provides two methods that should be used in order to process selection: getOldSelection() and getNewSelection(). These methods return the collection of rowKeys to identify previous and new selections.
Listing 9-13 shows the tree definition with the listener defined.
Listing 9-13. Shows the tree definition
<h:form>

   <rich:tree value="#{richFacesTreeNodeBean.rootNode}" var="node" toggleType="client"

      selectionType="ajax"

         selectionChangeListener="#{richFacesTreeNodeBean.selectionChanged}">

      <rich:treeNode>

         #{node.data}

      </rich:treeNode>

   </rich:tree>

</h:form>
Now we will need to add some code to the RichFacesTreeNodeBean bean that will be used to process user selection. We will add the list in which we store selected objects, such as the panel and the listener method, as shown in Listing 9-14.
Listing 9-14. The bean that will be used to process user selection
private List<String> selection = new ArrayList<String>();


public void selectionChanged(TreeSelectionChangeEvent event){

   selection.clear();

   UITree tree = (UITree)event.getComponent();

   Object storedRowKey = tree.getRowKey();

   for (Object rowKey : event.getNewSelection()) {

      tree.setRowKey(rowKey);

      selection.add(((RichFacesTreeNode)tree.getRowData()).getData());

   }

   tree.setRowKey(storedRowKey);

}
Looks pretty straightforward, doesn’t it? We are just iterating through a collection of rowKeys for newly-selected objects that are passed to the listener, getting the object from the tree model object that corresponds to that key, and placing its data into a result list.
![]() Note In our example,
Note In our example, getData() only returns the selected node object, but you can also get any other object property or complete object.
Now we just need to add a component that will iterate through the result list to show the selection on the page. We will use <a4j:repeat> for that, as Listing 9-15 shows.
Listing 9-15. Using <a4j:repeat>
<a4j:outputPanel layout="block" ajaxRendered="true">

   <rich:panel header="Current selection:" rendered="#{not empty

      richFacesTreeNodeBean.selection}">

      <a4j:repeat value="#{richFacesTreeNodeBean.selection}" var="nodeData">

         #{nodeData}

      </a4j:repeat>

   </rich:panel>

</a4j:outputPanel>
That’s all for now. If the selection list is filled, the panel will be rendered and repeat defined inside that panel will iterate over the selection list. Figure 9-6 shows the result of the node selected.

Figure 9-6. Tree with nodes selection
![]() Note
Note event.getNewSelection() returns a Collection even though only single node selection is supported right now. This is done because a future version of the component should support multiple selections.
Expansion Event Handling
Next, let’s add similar processing for nodes expansion or collapse. You just need to add toggleListener to the <rich:tree> page definition. Listing 9-16 shows a simple page used to create such a sample.
Listing 9-16. Adding toggleListener to the <rich:tree> page definition
<h:form>

  <rich:tree value="#{richFacesTreeNodeBean.rootNode}" var="node" toggleType="ajax"

      toggleListener="#{richFacesTreeNodeBean.nodeToggled}">

    <rich:treeNode>

      #{node.data}

    </rich:treeNode>

  </rich:tree>

</h:form>
We are using the same richFacesTreeNode bean that holds the tree constructed using the simple RichFacesTreeNode. We will add the property that will hold the data of the node that changed state, and the listener that will populate the data, as shown in Listing 9-17.
Listing 9-17. Adding the listener that will populate the data
private String toggledNodeData = null;


public void nodeToggled(TreeToggleEvent event) {

   toggledNodeData = ((RichFacesTreeNode)((UITree)event.getComponent()).getRowData()).getData();

}
Listing 9-18 shows an additional output component to show the changes in the page.
Listing 9-18. Shows an additional output component to show the changes in the page
<a4j:outputPanel layout="block" ajaxRendered="true">

   <h:outputText value="#{richFacesTreeNodeBean.toggledNodeData} has the state changed!"

      rendered="#{not empty richFacesTreeNodeBean.toggledNodeData}" />

</a4j:outputPanel>
Figure 9-7 shows the rendered result.

Figure 9-7. Tree nodes toggling processing
Tree Nodes Lazy Loading
Now let’s create a more interesting sample where we handle node events. Let’s implement simple lazy loading for the nodes when additional nodes get added to the model only on expansion of the parent node. This is a great example, as you will be able to apply these concepts when working with large data sets, such as getting data from a database or a from a remote service call.
First let’s create the bean that holds the org.richfaces.model.TreeNode-based model, as shown in Listing 9-19.
Listing 9-19. Creating the bean that holds the org.richfaces.model.TreeNode-based model
@ManagedBean

@ViewScoped

public class LazyTreeBean {


   private TreeNode rootNode = null;


   public void initNodes() {
      rootNode = new TreeNodeImpl();

      RichFacesTreeNode node = new RichFacesTreeNode("Node 1");

      rootNode.addChild("1", node);

      node = new RichFacesTreeNode("Node 2");

      rootNode.addChild("2", node);

      node = new RichFacesTreeNode("Node 3");

      rootNode.addChild("3", node);

      node = new RichFacesTreeNode("Node 4");

      rootNode.addChild("4", node);

   }

   public void setRootNode(TreeNode rootNode) {

      this.rootNode = rootNode;

   }

   public TreeNode getRootNode() {

      if (rootNode == null) {

         initNodes();

      }

      return rootNode;

   }

}
As you can see, we’re initially instantiating only four root nodes without any children. Now let's put a tree on a page that will use this data model, as shown in Listing 9-20.
Listing 9-20. Putting a tree on a page that will use this data model
<h:form>

   <rich:tree value="#{lazyTreeBean.rootNode}" var="node" toggleType="ajax">

      <rich:treeNode>

         #{node.data}

      </rich:treeNode>

   </rich:tree>

</h:form>
Figure 9-8 shows that when rendered, the tree will be shown as usual; but on node expansion nothing will be shown because the node is just a leaf without children.

Figure 9-8. Tree without child nodes
Next, let’s create a toggle listener that will add child nodes to the node that was expanded. The listener is shown in Listing 9-21.
Listing 9-21. Creating a toggle listener that will add child nodes
public void toggleListener(TreeToggleEvent event) {

   UITree tree = (UITree) event.getComponent();

   RichFacesTreeNode modelNode = (RichFacesTreeNode)tree.getRowData();
   for (int i = 0; i < 5; i++) {

      RichFacesTreeNode node =

         new RichFacesTreeNode(modelNode.getData() + "." + i);

      modelNode.addChild(i, node);

   }

}
Notice that we are getting the UITree instance from the event and not the currently toggled node object. It’s passed to the listener by design, as toggled node data could be easily accessed via the getRowData() method, but at the same time you have the option to operate with a complete tree instance using its API.
After we get the toggled node data object, we simply create five dummy child nodes and add them as child nodes to the current node. <rich:tree> will automatically mark the toggled node to be updated on the client, so we don't need to add any additional render definitions on the page. The only thing we need to do is point the tree component to the listener method.
<rich:tree ... toggleListener="#{lazyTreeBean.toggleListener}">
We are now ready to try this example. After opening the page and a few expand actions, you should see the result shown in Figure 9-9.
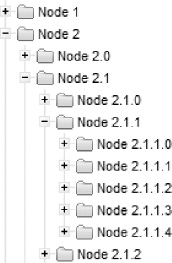
Figure 9-9. Tree with child nodes lazy loaded
This is really simple and could be easily used in any scenario in which you need to load new nodes during runtime.
Now let’s proceed to the next sections, which describe declarative models usage.
Using <rich:tree> Adaptors to Build the Data Model
RichFaces provides two adaptors to construct <rich:tree> data model. Both <rich:treeModelRecursiveAdaptor> and <rich:treeModelAdaptor> allow you to point the tree to an existent, non-hierarchical data model declaratively. It means that if you already have a model that is Collection- or Map-based, you have no need to convert them manually into the hierarchical models in the way we showed earlier. You could easily use all that data to create a tree, as is, with the help of adaptor tags.
Using <rich:treeModelAdaptor>
<rich:treeModelAdaptor> allows you to point the tree to some Collection or Map with any objects and add them as a nodes to the tree model. It has a nodes attribute that’s used to point the adaptor to the data. Tree could be defined with any number of adaptors at the same level, and adaptors can also be nested in order to define child nodes as needed.
Let’s create an example. First, we will create the model that will store data in a List. Listing 9-22 shows the base object, which will define an abstract entity (we called it Entry) with a set of properties defined.
Listing 9-22. Shows an example of the base object
public class Entry {

   private String name;


   private List<String> properties;

   // Getters and setters


   public Entry(String name) {

      super();

      this.name = name;

   }


}
The class defines two properties: the properties list, representing a list of simple string properties related to an entry, and the name string, which stores the name of the entry. Next, in Listing 9-23, let’s create the managed bean that will initialize the collection of entries and that we will use to build the tree.
Listing 9-23. The managed bean
@ManagedBean

@SessionScoped

public class DeclarativeTreeNodesBean {


   private List<Entry> entries = null;


   public void initEntries(){

      entries = new ArrayList<Entry>();


      Entry entry = new Entry("Desktop Type");

      List<String> childEntries = new ArrayList<String>();

      childEntries.add("Compact");

      childEntries.add("Everyday");

      childEntries.add("Gaming");

      childEntries.add("Premium");

      entry.setProperties(childEntries);
      entries.add(entry);


      entry = new Entry("Customer Reviews");

      childEntries = new ArrayList<String>();

      childEntries.add("Top Rated");

      entry.setProperties(childEntries);

      entries.add(entry);


      //More initialization stuff

   }

   public List<Entry> getEntries() {

      if (entries == null) {

         initEntries();

      }

      return entries;

   }

   public void setEntries(List<Entry> entries) {

      this.entries = entries;

   }

}
We have a list of Entry objects, and every Entry is initialized with its properties. We used the same data as from the previous example. In Listing 9-24, let’s review the page code, which defines <rich:tree> and points it to the plain data model using <rich:treeModelAdaptor> tag.
Listing 9-24. Review the page code
<rich:tree var="node" toggleType="client">

   <rich:treeModelAdaptor nodes="#{declarativeTreeNodesBean.entries}">

      <rich:treeNode>

         #{node.name}

      </rich:treeNode>

      <rich:treeModelAdaptor nodes="#{node.properties}"/>

   </rich:treeModelAdaptor>

</rich:tree>
Figure 9-10 shows how it looks. Go ahead review the code more closely.

Figure 9-10. Tree built using model adaptor
![]() Note The adaptor doesn't provide a
Note The adaptor doesn't provide a var attribute. The <rich:tree> var variable can be used at any level.
That’s definitely what we expected to see. Notice that we achieved the result by only using page tags and without any modifications at model level or without creation of any kind of TreeNode objects and storing them hierarchically.
Let’s look at the page code again. The first <rich:treeModelAdaptor> iterates over our list of entries and constructs the first level of the tree. We are using <rich:treeNode> as usual in order to define the markup of the created tree nodes. In our case, we need to name the property of the Entry to be rendered as a node label.
As we mentioned before, adaptors could be nested without any restrictions. In our case, a nested adaptor iterates the list of properties for the currently iterated Entry. Properties objects are just string objects, so we have no need for it in <rich:treeNode> usage, as each will be only used as the labels.
Using <rich:treeModelRecursiveAdaptor>
<rich:treeModelRecursiveAdaptor> is an extension of a <rich:treeNodesAdaptor> component. According to the name, it provides a simple way to create a tree model iterating over an existing model recursively. It should be defined using two base attributes: the roots attribute defines the collection or map used at the top of the recursion, and the nodes is used to add nested nodes recursively.
The most common and probably most often used example for such model is the file system representation. We will show you how to create such a sample using the code, which has no tree-specific objects. The tree data model will again be automatically created by the component with the help of the adaptors tags.
In our example, we will get all the directories and file listings from our application web root folder. Listing 9-25 shows the code for the base FileSystem node class.
Listing 9-25. Shows the code for the base FileSystem node class
public class FileSystemNode {

   private String path;

   private List<FileSystemNode> directories;

   private List<String> files;

   private String shortPath;


   private static final Function<String, FileSystemNode> FACTORY =

      new Function<String,  FileSystemNode>() {

         public FileSystemNode apply(String from) {

            return new FileSystemNode(from.substring(0, from.length() - 1));

         };

   };

   private static final Function<String, String> TO_SHORT_PATH = new

      Function<String, String>() {

      public String apply(String from) {

         int idx = from.lastIndexOf('/'),

         if (idx < 0) {

            return from;

         }

         return from.substring(idx + 1);

      };

   };

   public FileSystemNode(String path) {

      this.path = path;

      int idx = path.lastIndexOf('/'),

      if (idx != -1) {
         shortPath = path.substring(idx + 1);

      } else {

         shortPath = path;

      }

   }

   public synchronized List<FileSystemNode> getDirectories() {

      if (directories == null) {

         directories = Lists.newArrayList();

         Iterables.addAll(directories,

         Iterables.transform(Iterables.filter(getResourcePaths(), Predicates.containsPattern("/$")),

         FACTORY));

      }

      return directories;

   }

   public synchronized List<String> getFiles() {

      if (files == null) {

         files = new ArrayList<String>();

         Iterables.addAll(files, Iterables.transform(

         Iterables.filter(getResourcePaths(),

            Predicates.not(Predicates.containsPattern("/$"))),

            TO_SHORT_PATH));

      }

      return files;

   }

   private Iterable<String> getResourcePaths() {

      FacesContext facesContext = FacesContext.getCurrentInstance();

      ExternalContext externalContext = facesContext.getExternalContext();

      Set<String> resourcePaths = externalContext.getResourcePaths(this.path);

      if (resourcePaths == null) {

         resourcePaths = Collections.emptySet();

      }

      return resourcePaths;

   }

   public String getShortPath() {

      return shortPath;

   }

}
The FileSystemNode object returns the list of directories and files at given levels and defines a set of utility methods used in order to transform path strings, providing simple representation for them. It uses Google's Guava libraries, which make working with collections much simpler. You can learn more about the project from Guava: Google Core Libraries for Java 1.5+ at http://code.google.com/p/guava-libraries.
The bean that defines the root level and operates with the FileSystemNode objects to get the file system structure starting from the root directory is shown in Listing 9-26.
Listing 9-26. The bean that defines the root level and operates with the FileSystemNode objects
@ManagedBean

@RequestScoped

public class FileSystemBean {


   private List<FileSystemNode> rootDirs;
   private List<String> rootFiles;

   private FileSystemNode rootNode = new FileSystemNode("/");


   public List<FileSystemNode> getRootDirs() {

      if (rootDirs == null) {

         rootDirs = rootNode.getDirectories();

      }

      return rootDirs;

   }

   public List<String> getRootFiles() {

      if (rootFiles == null) {

         rootFiles = rootNode.getFiles();

      }

      return rootFiles;

   }

}
Let's look at what we have. The bean returns a list of files and directories for the root level. Besides every FileSystemNode, which actually represents a directory, it's also possible to create a list of directories and files inside. Now we just need to reflect that in the <rich:tree> page definition using adaptor tags shown in Listing 9-27.
Listing 9-27. Create a list of directories and files inside
<rich:tree toggleType="client" var="item">

   <rich:treeModelRecursiveAdaptor roots="#{fileSystemBean.rootDirs}"

      nodes="#{item.directories}">

   <rich:treeNode>

     #{item.shortPath}

   </rich:treeNode>

      <rich:treeModelAdaptor nodes="#{item.files}">

      <rich:treeNode>#{item}</rich:treeNode>

   </rich:treeModelAdaptor>

  </rich:treeModelRecursiveAdaptor>

      <rich:treeModelAdaptor nodes="#{fileSystemBean.rootFiles}">

      <rich:treeNode>#{item}</rich:treeNode>

  </rich:treeModelAdaptor>

</rich:tree>
The recursive tree node adaptor defined first, iterates over the directories starting from rootDirs and recursively retrieving directories as defined in the nodes attribute. In addition to nested <rich:treeModelAdaptor>, adaptor iterates over the files inside every directory.
The second adapter, which is nested inside <rich:tree>, iterates over root-level directory files. Figure 9-11 shows the result after the tree gets rendered and we expanded a few nodes.
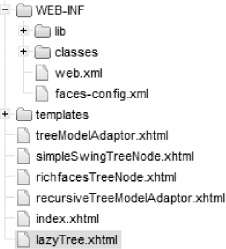
Figure 9-11. Tree built using the recursive model adaptor
![]() Note As of writing of this book and the first release of RichFaces version 4.0, tree components don't provide JavaScript API. We anticipate such API will be added in a future RichFaces release.
Note As of writing of this book and the first release of RichFaces version 4.0, tree components don't provide JavaScript API. We anticipate such API will be added in a future RichFaces release.
Summary
This chapter covered one of the most important components in RichFaces: tree. Although also considered one of the most difficult to use (in any framework), RichFaces provides a number of features that make working with trees rather simple, but at the same time flexible and powerful.
RichFaces allows you to build and display a tree structure based on an existing Swing model, but also allows you to build custom models. We have also shown you how to expand and collapse nodes and invoke server-side listeners when a node is selected. Finally, we covered how to take a list structure and present it in a tree structure using the powerful RichFaces tree adaptors.