
C H A P T E R 11
Rich Validation
Validating user input is a major part of any web application. JSF provides a number of tags to enable basic validation and makes it pretty easy to build custom validators. JSF 2 makes validation even simpler by providing out-of-the-box support for popular Bean Validation (JSR 303). RichFaces takes validation to the next level and extends Bean Validation by providing client-side validation. Client-side validation allows validation to be performed on the client based on Bean Validation constraints. This is a must-have feature for high-performance enterprise web sites. In addition to client-side validation, RichFaces also provides a cross-field or object validation feature where one or two fields can be validated together. That's exactly what we are going to cover in this chapter.
Bean Validation
To start with client-side validation, we first need to tell you about Bean Validation support in JSF 2. Bean Validation is part of a Java EE stack and was born from Hibernate Validator. In fact, Hibernate Validator is the reference implementation for Bean Validation. Instead of putting validation in the view, place validation constraints on the model and have the view call those validations. For example, in Listing 11-1, Bean Validation constraints are applied to three properties. name has to be at least three characters long, age has to be between two and 120, and email has to match the regular expression.
Listing 11-1. Bean Validation constraints are applied to three properties
@ManagedBean

@RequestScoped

public class ValidationBean {

   @Size (min=3)

   private String name;


   @Min (2) @Max (120)

   private Integer age;


   @Pattern (regexp=".+@.+\.[a-z]+")

   private String email;

   // getters and setters

}
![]() Note Regular expression for the e-mail we use is rather simple. You can find a more strict expression for validating an e-mail address.
Note Regular expression for the e-mail we use is rather simple. You can find a more strict expression for validating an e-mail address.
Why is this better than placing validation in the JSF page? If you will be accessing the model from various JSF views, but also in other ways not from a JSF view, then you don't need to repeat validation definitions and validation can be reused. Luckily, Bean Validation support in JSF 2 is built-in; in other words, there is nothing you need to do. Just bind a JSF component to a property with Bean Validation annotation and the validation will be invoked during the Process Validation phase as usual. Listing 11-2 shows the JSF page where components are bound to properties from Listing 11-1.
Listing 11-2. Shows the JSF page
<h:form>

   <h:panelGrid columns="3">

      <h:outputText value="Name:" />

      <h:inputText id="name" value="#{validationBean.name}" >

         <a4j:ajax render="nameMsg"/>

      </h:inputText>

      <h:message for="name" id="nameMsg"/>

      <h:outputText value="Email:" />

      <h:inputText id="email" value="#{validationBean.email}" >

         <a4j:ajax render="emailMsg"/>

      </h:inputText>

      <h:message for="email" id="emailMsg"/>

      <h:outputText value="Age:" />

      <h:inputText id="age" value="#{validationBean.age}" >

         <a4j:ajax render="ageMsg"/>

      </h:inputText>

      <h:message for="age" id="ageMsg"/>

   </h:panelGrid>

</h:form>
![]() Tip Using
Tip Using <a4j:ajax>, you can also set bypassUpdates="true". This will bypass or skip the Update Model phase and the Invoke Application phase, even if the values are valid. This is useful when only validating the form. When only validating, you rarely have a need to update the model and invoke the application. bypassUpdates is covered in more detail in Chapter 3.
There is nothing new here; it looks like a very standard JSF page. Validation (Ajax request) will be sent on a change event. To display the error message we use the <h:message> component. We don't have any validation on the page itself. Instead, when the page will be submitted, user-entered values will be checked against the constraints specified in the managed bean via Bean Validation annotations. Again, you get all this with JSF 2, out of the box. Running the page will produce the result shown in Figure 11-1.

Figure 11-1. Bean Validation standard error messages
A note on the error messages: the messages that are rendered are the standard messages from Bean Validation. One way to customize the error messages is by setting the message property on the validation annotation. For more ways to customize the messages, refer to Bean Validation documentation (see the following Tip for suggestions found on the internet). For example, changing the message for e-mail validation can be done like the following:
@Pattern (regexp=".+@.+\.[a-z]+", message="Email has invalid format")
![]() Tip Learn more about Bean Validation (JSR 303) at the Java Community Process Program web site at
Tip Learn more about Bean Validation (JSR 303) at the Java Community Process Program web site at www.jcp.org/en/jsr/detail?id=303 and from the Java EE 6 Tutorial: Using Being Validation page at http://download.oracle.com/javaee/6/tutorial/doc/gircz.html.
RichFaces Client-side Validation
RichFaces takes validation to the next level by providing client-side validation. In other words, validation can be done on the client without sending an Ajax request. How does RichFaces do it? RichFaces extends standard Bean Validation by bringing the validation to the client. You might be wondering why you need client-side validation when you can “quickly” validate with Ajax? It's true that validating with Ajax can be fast, but an Ajax request is still sent to the server. In high-performance, high-traffic applications, being able to validate on the client and without sending an Ajax request can greatly improve performance.
Let's take our page and add client-side validation to it. To add client-side validation to a form is very easy, probably too easy. All we need to do is place the <rich:validator> tag inside the input component that's being validated. By default, client validation will be invoked on the change event, but we can use any other event by setting the event attribute. The only other thing we need to do is use <rich:message> or <rich:messages> tags to display the error message. Client-side validation error messages will not be displayed with the standard <h:message> tag. There are no changes in the bean because we use the same Bean Validation but now bring it to the client.
Listing 11-3shows the update page with client-side validation.
Listing 11-3. Shows the update page with client-side validation
<h:form>

   <h:panelGrid columns="3">

      <h:outputText value="Name:" />

      <h:inputText id="name" value="#{validationBean.name}" >

         <rich:validator/>

      </h:inputText>

      <rich:message for="name" />

      <h:outputText value="Email:" />

      <h:inputText id="email" value="#{validationBean.email}" >

         <rich:validator/>

      </h:inputText>

      <rich:message for="email"/>

      <h:outputText value="Age:" />

      <h:inputText id="age" value="#{validationBean.age}" >

         <rich:validator/>

      </h:inputText>

      <rich:message for="age"/>

   </h:panelGrid>

</h:form>
As you can see, <rich:validator> is now nested inside each input field. In fact, it's a client behavior just like <a4j:ajax>. And, being a behavior, it attaches to a parent UI component event, just like <a4j:ajax>. As validation is performed on input components, the default event to which <rich:validator> attaches is change. We also replaced <h:message> with <rich:message> because client-side validation messages will be displayed only when using either <rich:message> or <rich:messages>. When the page is rendered, RichFaces will render all the necessary JavaScript to the client to perform validation by looking at bean property and its annotation. Running the page will produce the result shown in Figure 11-2.

Figure 11-2. RichFaces client-side validation
To change the event that triggers client-side validation, set the event attribute. For example, the code that follows will invoke client-side validation on a blur event:
<rich:validator event="blur"/>
![]() Caution
Caution <rich:message> or <rich:messages> must be used when using client-side validation. These components provide the necessary JavaScript to be updated on the client. And, of course, they also work with standard server-side validation as well.
Although Bean Validation is the preferred way to add validation in JSF 2, RichFaces client validation still supports standard JSF validation. This makes it possible to add client-side validation to a page where standard JSF validator tags are already used.
As of writing of this book, client-side validation only supports single field-based validation. What this means is that it's possible to invoke client-side validation when a change event (default event) or blur event (or any other event supported by the UI component) occurs on a particular field. If there is a control to submit the entire form, such as when a button or link is clicked, client-side validation will not be performed but the standard server-side validation will be. There are plans to add client-side validation support when a form is submitted in the future.
Using <rich:message> and <rich:messages>
<rich:message> and <rich:messages> are used to display messages or error messages and work just like the standard <h:message> and <h:messages> tags, but with a number of extra features. Just to remind you, <h:message> or <rich:message> displays a message for a particular component via the for attribute. On the other hand, <h:messages> or <rich:messages> displays all current messages from a current JSF request.
As for differences, one major difference is that the messages are automatically rendered, which means you don't need to point to component via the render attribute. If you remember, we can achieve a similar result where we don't need to use render using <a4j:outputPanel ajaxRendered="true">. Listing 11-4 shows such an example.
Listing 11-4. An example
<a4j:outputPanel ajaxRendered="true">

   <h:message for="email"/>

</a4j:outputPanel>
<a4j:outputPanel ajaxRendered="true"> is always automatically rendered. So, the following is identical to Listing 11-4:
<rich:message for="email"/>
This message will be rendered automatically. We can summarize it like this. Where <a4j:outputPanel ajaxRendered="true"> is an auto-rendered panel, <rich:message> or <rich:messages> is an auto-rendered message.
![]() Note It's possible to turn off auto-rendered panels or messages by setting the
Note It's possible to turn off auto-rendered panels or messages by setting the limitRender="true" attribute on action components and <a4j:ajax> behavior. This limitRender attribute is covered in Chapter 2.
Customizing Message Icons
Another extra feature that you probably noticed is that the error message in Figure 11-2 now has an icon. That's again because we used the <rich:message> tag. To remove the icon, we have to overwrite one of the Skin CSS classes used by the component, as shown in Listing 11-5.
Listing 11-5. Overwrite one of the Skin CSS classes used by the component
<style>

.rf-msg-err {

   background-image: none;

}

</style>
Of course, instead of removing the icon, you could point that CSS property to your own image to be used as an icon.
The CSS class we have shown applies to messages with ERROR severity; for messages with other severity levels, use the following CSS classes: .rf-msg-ftl (FATAL), .rf-msg-inf (INFO), and .rf-msg-wrn (WARNING).
Also remember that <rich:messages> uses rf-msgs-* classes while <rich:message> uses rf-msg-* classes.
Separating Summary and Details Styling
Another simple but cool look-and-feel customization improvement is rendering details and summary parts of messages as separate HTML elements and support for separately styling them. Listing 11-6 shows the page where there is a button and messages. Let's say the button needs to add user-friendly messages when some services required for business action are not responsive. Look closely at the two predefined classes used in the example.
Listing 11-6. Shows the page where there is a button and messages
<style>

   .rf-msgs-sum{

      font-weight: bold;

   }

   .rf-msgs-det{

      font-style: italic;

   }

</style>

<h:form>

   <h:panelGrid>
      <!--Form elements-->

      <rich:messages showDetail="true" showSummary="true"/>

      <a4j:commandButton value="Submit"
         action="#{beanValidation2.serviceAction}"/>
   </h:panelGrid>

</h:form>
Code for the action is shown in Listing 11-7.
Listing 11-7. Code for the action
public void serviceAction(){

   //Business code

   FacesMessage message = new FacesMessage("Service Error. ",

      "Sorry, you caught us doing maintenance.");

   FacesContext.getCurrentInstance().addMessage(null, message);

}
The message consists of two parts. Summary reflects message category, such as services error, and the details provide more specific information. Using different CSS classes, it's possible to style summary and details differently. Everything together is shown in Figure 11-3.
Figure 11-3. Displaying summary and details parts
Changing <rich:messages> Layout
By default <rich:messages> is rendered as a set of <span> elements with the display="block" CSS property defined. Messages are aligned vertically with icon images on the left. If you want to show the messages as a simple HTML unordered list, you can change those <span> element display properties to be list-items, as shown in Listing 11-8.
Listing 11-8. Changing those <span> element display properties to be list-items
<style>

.rf-msgs-err{

   display:list-item;

   margin-left:20px;

   padding-left:0px;

   background-image:none;

}

</style>

<h:form>

   <rich:messages/>

   <h:panelGrid columns="2">

      <h:outputText value="Name:" />

      <h:inputText label="Name" id="name" required="true">

         <f:validateLength minimum="3" />

      </h:inputText>

      <h:outputText value="Job:" />

      <h:inputText label="Job" id="job" required="true">

         <f:validateLength minimum="3" maximum="50" />

      </h:inputText>

      <f:facet name="footer">

         <a4j:commandButton value="Ajax Validate"/>

      </f:facet>

   </h:panelGrid>

</h:form>
On the page there are two inputs with some validation applied using JSF tags, and an Ajax button, which validates the form and the <rich:messages> components.
Notice that we added <style> definition. We are just changing the display property to list-item, removing the icon and making minor adjustments required because of its span-based markup. The result is shown in Figure 11-4.
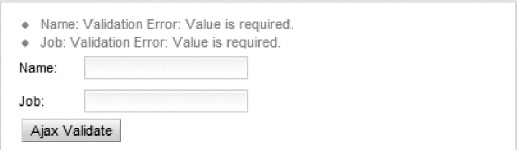
Figure 11-4. Displaying messages as a simple list
If you need table-based markup, update the display property to have table-row value and make CSS adjustments considering that span as a table row.
Falling Back to Server Validation
When you use a validation that doesn't have its client-side implementation, such as when a custom validation is used, RichFaces will automatically fall back to server-side Ajax validation. You don't have to do anything. Currently RichFaces only provides client-side implementations for all validations from Bean Validation (JSR 303) specification. If we take Hibernate Validator, which is the reference implementation (used in our examples), it goes beyond the specification and provides additional validations, such as @Email. @Email will make sure the input has a valid e-mail format. RichFaces currently doesn't support this annotation and in our examples we used a @Pattern annotation. But, using @Email, we can precisely see when client-side validation is used and when server-side validation is used.
![]() Note RichFaces provides client-side implementation for all validators in a
Note RichFaces provides client-side implementation for all validators in a javax.validation.* package. The list of annotations can be found at The Java EE 6 Tutorial: Using Bean Validation page at http://download.oracle.com/javaee/6/tutorial/doc/gircz.html.
First, we need to update the bean. Listing 11-9 shows using @Email instead of the @Pattern annotation on an email property (only partial code is shown, related to @Email annotation).
Listing 11-9. Updated managed bean
import org.hibernate.validator.constraints.Email;

// other imports

@ManagedBean

@RequestScoped

public class ValidationBean {

   @Email

   private String email;

   // Other properties, getters and setters

}
You will notice that @Email annotation is coming from a org.hibernate.validator.* package.
When you run the page, you won't see any difference and that's the desired result. Even though there is no client-side implementation for the @Email constraint, everything worked as expected; validation for email fell back to the server-side behind the scenes. Placing <a4j:log> tag on the page is a very quick and easy way to see when client-side validation is invoked and when server-side validation is invoked. If you remember, <a4j:log> shows the Ajax request and response information. If client-side validation is used, then the <a4j:log> won't display any output. If server-side validation is used, then the <a4j:log> will display the Ajax request and response information.
Graph Validator
Validating a component's value is simple in JSF, but comparing whether two inputs are equals or against any other validation rules, unfortunately, is not an easy task. No built-in JSF feature allows us to “look” at two or more values during validation. You can find workarounds, but RichFaces makes this task a lot simpler with its <rich:graphValidator> tag. The simplest way to understand would be to look at an example, and the simplest example is to see whether two string inputs are equal. Let's start with the JSF page shown in Listing 11-10.
Listing 11-10. The JSF page
<rich:messages />

<h:form>

   <h:panelGrid columns="2">

      <h:outputText value="Text 1:" />

      <h:inputText id="text1" value="#{graphValidationBean.text1}" />

      <h:outputText value="Text 2:" />

      <h:inputText id="text2" value="#{graphValidationBean.text2}" />

   </h:panelGrid>

   <h:commandButton action="result.xhtml" value="Check Input" />

</h:form>
The page is very simple; it has only two inputs. Our goal is to validate each input individually but also make sure both inputs are equals. This is very similar to confirming a password field that you see on many forms today. One more thing to note is that the error messages are displayed at the top of the page using <rich:messages>.
When the button is clicked, we navigate to the result.xhtml page, if the input is valid and also equal. This page can be as simple as displaying the following:
<h4>Inputs are equal.</h4>
Validation constraints are defined in Listing 11-11.
Listing 11-11. Defining validation constraints
@ManagedBean

@RequestScoped

public class GraphValidationBean implements java.lang.Cloneable{

   @NotNull

   @Size (min=3,max=10, message="Text 1 must be between {min} and {max}.")

   private String text1;


   @NotNull

   @Size (min=3,max=10, message="Text 2 must be between {min} and {max}.")

   private String text2;


   @AssertTrue (message="Text 1 and Text 2 are not equal")

   public boolean isTextEqual (){

      return text1.equals(text2);

   }
   @Override

   public Object clone() throws CloneNotSupportedException {

      return super.clone();

   }

   // Getters and setters

}
We can go ahead and run the page. Validation should be invoked as expected. However, we are also able to navigate to the next page, even if the values in the inputs are not equals. If you look carefully at the page and bean, you will notice that input components are bound to text1 and text2 properties. But, there is another constraint defined with @AssertTrue. It's not bound to any UI component on the page, but that's also the constraint that we need. It will check whether the two inputs are the same. How do we make sure this constraint is checked? We enclose all the inputs inside <rich:graphValidator> and set the tags value attribute to point to the managed bean named graphValidator, as shown in Listing 11-12.
Listing 11-12. Using <rich:graphValidator>
<rich:messages for="gv"/>

<h:form>

   <rich:graphValidator value="#{graphValidatorBean}" id="gv">

      <h:panelGrid columns="2">

         <h:outputText value="Text 1:" />

         <h:inputText id="text1" value="#{graphValidationBean.text1}" />

         <h:outputText value="Text 2:" />

         <h:inputText id="text2" value="#{graphValidationBean.text2}" />

      </h:panelGrid>

   </rich:graphValidator>

   <h:commandButton action="result.xhtml" value="Check Input" />

</h:form>
When the page is submitted, each component is validated, as usual, during the Process Validations phase. Error messages are displayed at the top of the page, as shown in Figure 11-5.
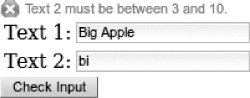
Figure 11-5. Validating each input separately
If every single component passes its validation, that's when the graph validator comes into play. As you can see, the <rich:graphValidator> value property is bound to the managed bean. That's what triggers the validation to be run for the entire bean again, including the constraint that wasn't bound to any UI component. So basically, all the properties that are bound are validated again, and they already hold the valid values. Plus, we validate all the other constraints in the bean. In our example, that would be @AssertTrue, as shown in Figure 11-6.
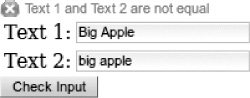
Figure 11-6. Graph validator error message
Where does this validation happen? It happens during the Process Validations phase. You are probably wondering, how can validation be invoked on the entire bean if the values are not yet set in the properties because we haven't passed the Update Model phase? RichFaces makes a copy or clones (called clone()) the bean, the values submitted are copied into the cloned copy, and then the validation is invoked on the cloned copy. That's the reason we need to wrap all the inputs that bound to that bean's properties with the <rich:graphValidator> tag, and the bean has to implement the java.lang.Cloneable interface. The only exception to this is noted in the following caution.
![]() Caution If the bean doesn't implement
Caution If the bean doesn't implement Cloneable, CloneNotSupportedException exception is thrown. In this case, when RichFaces attempts to clone the object, then validation will be done during the Update Model phase (after the model will be actually updated so all the values available). Don't worry, you won't see this exception because RichFaces will catch it and will perform validation during the Update Model phase.
![]() Note For graph validator to be invoked during the Process Validations phase, the
Note For graph validator to be invoked during the Process Validations phase, the clone() method has to be overwritten and be public. In a case of simple properties, you don't need to do anything and just call super(). If there are other properties—such as custom object (so a deep clone needed), lists, or maps—the clone mechanism has to be implemented by the developer.
Summary
Validation is a crucial part of any web application. JSF 2 makes validation easy with out-of-the-box support for powerful and popular Bean Validation. RichFaces takes validation to the next level by providing client-side validation. RichFaces simply extends the Bean Validation model by bringing it to the client. Validation can be performed on the client without sending an Ajax request. In situations where client-side implementation for a particular validation is not available, RichFaces quietly falls back to server-side validation without the developer needing to do anything. Finally, RichFaces provides graph validator, which enables validation of the entire bean again. The graph validator validates all properties bound to UI components, as well as properties not bound to UI components. Graph validator is useful for conditional validation, such as comparing whether two inputs satisfy a validation rule.