
C H A P T E R 7
Rich Data Iteration Components
If you know how to use the standard JSF <h:dataTable> component, then you basically know how to use any data iteration components available in RichFaces. Now, RichFaces offers a number of features above and beyond what the standard data table component provides, such as advanced models, lazy loading, sorting, filtering, skins, and partial-table updates.
JSF 2 provides two components to iterate over data: <h:dataTable> and <ui:repeat>. The <h:dataTable> component generates an HTML <table>..</table> structure. The <ui:repeat> component allows you to iterate over collections wrapping with any HTML markup. However, when displaying collections in real enterprise applications, a simple table format is not always appropriate. You might also need to add scrolls to your tables, implement lazy loading, selection, or columns resizes, and order customization. Or, you might want to display various HTML lists, such as definition, ordered, or unordered. This is where RichFaces components come in.
![]() Note Most screenshots in this chapter utilize the wine skin. Chapter 13 covers how to change skins.
Note Most screenshots in this chapter utilize the wine skin. Chapter 13 covers how to change skins.
RichFaces provides the following components to display collections:
- <rich:dataTable>
- <rich:extendedDataTable>
- <rich:collapsibleSubTable>
- <rich:list>
- <rich:dataGrid>
- <a4j:repeat>
All these components can be bound to the same data types as the standard <h:dataTable> component; however, the most common object that is bound to any type of data iteration component in simple cases is java.util.List. And, in more complex cases we will show you how to use advanced RichFaces data models.
Data Preparation
Let’s start with the creation of the data that we will use across the examples. You might want to take a few minutes to review it (although it’s pretty simple) because to save space, we will not repeat it in future code listings but will add only methods that should be added to the data bean to implement particular functionality. That simple List-based model will populate information about Olympic Games starting from 19th century. We will load the data from an XML file by using JAXB. (Java 6 was used for this example.) Listing 7-1 shows how the XML file looks.
![]() Tip The Java Architecture for XML Binding (JAXB) provides a fast and convenient way to bind between XML schemas and Java representations, making it easy for Java developers to incorporate XML data and processing functions in Java applications. Learn more at http://jaxb.java.net/. You’re free to skip this section if not familiar with JAXB or just not interested in XML-based data creation. Simply review the
Tip The Java Architecture for XML Binding (JAXB) provides a fast and convenient way to bind between XML schemas and Java representations, making it easy for Java developers to incorporate XML data and processing functions in Java applications. Learn more at http://jaxb.java.net/. You’re free to skip this section if not familiar with JAXB or just not interested in XML-based data creation. Simply review the GameDescriptor class. Sample data in this chapter will consist of GameDescriptor class inside a java.util.List. In general, any Java bean with a couple of properties placed inside a list could be used as a data model object.
Listing 7-1. XML file
<games>

   <game>

      <city>Athens</city>

      <country>Greece</country>

      <continent>Europe</continent>

      <flag>greece_old</flag>

      <number>1</number>

      <season>Summer</season>

      <fromDate>4/6/1896</fromDate>

      <toDate>4/15/1896</toDate>

   </game>


<!-- other game entries-->

</games>
Listing 7-2 shows the GameDescriptor object that is used to store single-game information.
Listing 7-2. GameDescriptor object used to store single-game information
public class GameDescriptor implements Serializable {

   private String city;

   private String country;

   private String continent;

   private String flagName;

   private int number;

   private Calendar fromDate = new GregorianCalendar(Locale.US);

   private Calendar toDate = new GregorianCalendar(Locale.US);

   private seasons season;

   private statuses status = statuses.passed;
   private enum statuses {passed, future, canceled};

   private enum seasons {Winter, Summer};

   public int getYear() {

      return fromDate.get(Calendar.YEAR);

   }

   public String getFrom() {

      if (!status.equals(statuses.canceled)) {

         return fromDate.get(Calendar.DAY_OF_MONTH) + " "

            + fromDate.getDisplayName(Calendar.MONTH, Calendar.LONG, Locale.US);

      } else return "";

   }

   public String getTo() {

      if (!status.equals(statuses.canceled)) {

         return toDate.get(Calendar.DAY_OF_MONTH) + " "

            + toDate.getDisplayName(Calendar.MONTH, Calendar.LONG, Locale.US);

      } else return "";

   }

   public String getFlagURI() {

      return "/images/flags/" + flagName + ".png";

   }

   @XmlElement

   public String getCity() {

      return city;

   }

   // Getters and setters

}
As it mentioned, JAXB is used in the example to parse XML and create GameDescriptor objects. Note that all getters are marked with an @XmlElement annotation, such as getCity, as shown in listing 7-2.
getYear, getTo, and getFrom are used to get specific dates’ representation, which will be used in the table. Images are placed in the WebApp/images/flags folder, and the getFlagURI method will transform an image name from an XML file to an image URI used inside a page.
fromDate and toDate getter methods are marked with the @XmlJavaTypeAdapter(value = CalendarConverter.class) annotation. CalendarConverter is used for unmarshalling the String date from XML to a java.util.Calendar property instance. It’s pretty simple, as dates in XML are provided in a short format of US locales. CalendarConverter is shown in Listing 7-3.
Listing 7-3. CalendarConverter
public class CalendarConverter extends XmlAdapter<String, Calendar> {


   @Override

   public String marshal(Calendar v) throws Exception {

      return null;

   }

   @Override

   public Calendar unmarshal(String v) throws Exception {

      Calendar calendar = Calendar.getInstance(Locale.US);

      calendar.setTime(DateFormat.getDateInstance(DateFormat.SHORT, Locale.US).parse(v));

      return calendar;

   }

}
Let’s review the GameParser.java class, which is used for parsing the data. It’s shown in Listing 7-4.
Listing 7-4. GameParser.java class
@ManagedBean

@ApplicationScoped

public class GamesParser {

   private List<GameDescriptor> gamesList;


   @XmlRootElement(name = "games")

   private static final class GameDescriptorsHolder {

      private List<GameDescriptor> games;


      @XmlElement(name = "game")

      public List<GameDescriptor> getGameDescriptors() {

         return games;

      }

      public void setGameDescriptors(List<GameDescriptor> games) {

         this.games = games;

      }

   }

   public synchronized List<GameDescriptor> getGameDescriptorsList() {

      if (gamesList == null) {

         ClassLoader ccl = Thread.currentThread().getContextClassLoader();

         URL resource = ccl.getResource("games.xml");

         JAXBContext context;

         try {

            context = JAXBContext.newInstance(GameDescriptorsHolder.class);

            GameDescriptorsHolder gamesHolder = (GameDescriptorsHolder) context

               .createUnmarshaller().unmarshal(resource);

            gamesList = gamesHolder.getGameDescriptors();

         } catch (JAXBException e) {

            throw new FacesException(e.getMessage(), e);

         }

      }

      return gamesList;

   }

   public List<GameDescriptor> getGamesList() {

      if (gamesList == null){

         gamesList = getGameDescriptorsList();

      }

      return gamesList;

   }

   public void setGamesList(List<GameDescriptor> gamesList) {

      this.gamesList = gamesList;

   }

}
Listing 7-5 shows the managed bean that holds the GamesDescriptors list.
Listing 7-5. Managed bean of GamesDescriptors list
@ManagedBean

@ViewScoped

public class OlympicGamesBean implements Serializable{

   @ManagedProperty(value="#{gamesParser.gamesList}")

   private List<GameDescriptor> games = new ArrayList<GameDescriptor>();

   // Getters and setters

}
We are now ready to create all the samples for various RichFaces iteration components. We will start with the <rich:dataTable> in the next section.
![]() Note Covering JAXB is beyond the scope of this book. Refer to official JAXB documentation for additional information about how it works.
Note Covering JAXB is beyond the scope of this book. Refer to official JAXB documentation for additional information about how it works.
Using <rich:dataTable>
As we already mentioned, <rich:dataTable> basically provides the same functionally as <h:dataTable> with many additional features such as skins, partial-row update, and rows and columns spans. Let’s start with the example in Listing 7-6.
Listing 7-6. <rich:dataTable>
<rich:panel style="width:650px" header="rich:dataTable sample">

   <rich:dataTable value="#{olympicGamesBean.games}" var="game">

      <f:facet name="header">Olympic Games List</f:facet>

      <rich:column>

         <f:facet name="header">Flag</f:facet>

         <h:graphicImage value="#{game.flagURI}" />

      </rich:column>

      <rich:column>

         <f:facet name="header">City</f:facet>

         #{game.city}

      </rich:column>

      <rich:column>

         <f:facet name="header">Country</f:facet>

         #{game.country}

      </rich:column>

      <!--More columns-->

   </rich:dataTable>

</rich:panel>
Figure 7-1 shows the table this code produces.
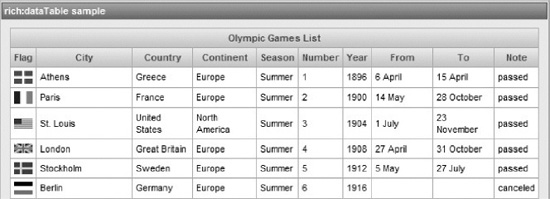
Figure 7-1. Using <rich:dataTable>
Look-and-Feel Customization
Let’s start a deeper component review with a look-and-feel customization. First, let’s add a zebra-style, row hover-effect and additional column styling. For the zebra-style effect and column styling we will use attributes familiar if you used <h:dataTable> before. But, in order to add a row highlight for a hover, we will use events specific to a RichFaces table. For standard events such as onmouseover, onclick, and so on, the RichFaces table components also provides row events like onrowclick, onrowdblclick, and other like events.
As we will only add <rich:dataTable> attributes, let’s look through the table definition in Listing 7-7. All the columns remain unchanged.
Listing 7-7. Adding <rich:dataTable> attributes
<style>

   .odd{

      background-color: #{richSkin.additionalBackgroundColor};

   }

   .even{

      background-color: #{richSkin.tableSubHeaderBackgroundColor};

   }

   .cityColumn{

      font-weight:bold;

   }

</style>


<rich:panel style="width:650px" header="rich:dataTable sample">

   <rich:dataTable value="#{olympicGamesBean.games}" var="game" rowClasses="odd, even"

      columnClasses=",cityColumn" onrowmouseover="this.style.fontWeight='bold'"

      onrowmouseout="this.style.fontWeight='normal'">

      ...

   </rich:dataTable>

</rich:panel>
The result is shown in Figure 7-2. Notice that the rowClasses attribute changed the backgrounds in both odd and even columns. That’s a standard attribute and applies comma-separated class names sequentially to corresponding row elements. Also, columnClasses defines the second-column style class.
Finally, we are using two row event handlers—onrowmouseout and onrowmouseover—which are actually similar to standard HTML onmouseover and onmouseout, but define handlers for corresponding events on every component row. The handlers change all the cell fonts of the hovered row to bold and then back to normal (not bold) when the mouse leaves the row.
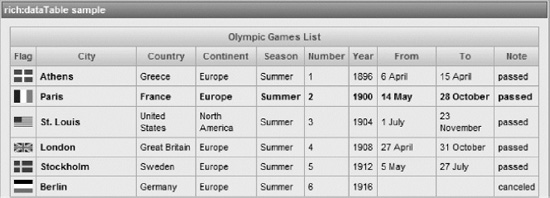
Figure 7-2. Rich data table with column styling and row hover events
Now let’s review the last and most interesting attribute related to CSS styling. rowClass is an attribute specific to RichFaces tables. It gets evaluated during iteration opposite to rowClasses, which gets evaluated prior to iterating the data model, so it can’t be dynamically populated according to the model.
Let’s change the background color of canceled game rows to the red. The code that adds such functionality is shown in Listing 7-8.
Listing 7-8. Changing the cancelled game row background color to red
.red{

    color:red;

}

</style>

<rich:panel style="width:650px" header="rich:dataTable sample">

    <rich:dataTable value="#{olympicGamesBean.games}" var="game"

        rowClasses="odd, even" columnClasses="cityColumn"

        onrowmouseover="this.style.fontWeight='bold'"

        onrowmouseout="this.style.fontWeight='normal'"

        rowClass="#{game.status == 'canceled' ? 'red' : ''}">
Figure 7-3 shows the result.
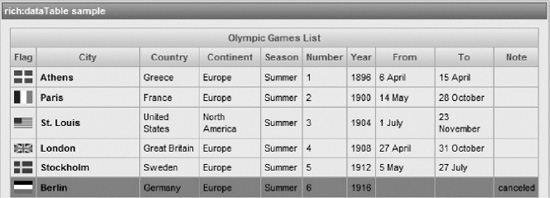
Figure 7-3. Rich data table with rows styled according to iteration data
That’s it. Now you could easily apply any class to the whole row. Other use-cases that could require that feature include Task, Issue, or E-mail tables where rows should be styled according to item importance. In the past, you had to add the same class to all columns; that was not as easily maintainable and also caused much more HTML code to be rendered in the table markup.
Using Sub-Tables and Defining Complex Header Markups
In real applications, you will often have to deal with much more complex table-based data representations. Your tables could require using columns and rows spanning, which is the ability to define complex header structures to properly add the table content descriptions. Luckily, the RichFaces <rich:dataTable> component allows you to define rich, master-details tables using nested sub-tables.
Before we will start with the example, let us introduce the <rich:collapsibleSubTable> component. Used together with the <rich:dataTable>, it allows you to implement master-details tables of any complexity. It should be placed as either a child of <rich:dataTable> or <rich:collapsibleSubTable>, and iterate through a nested data model. And as you can probably guess, according to the name in RichFaces 4, it provides collapse/expand features right out of the box. So let’s start with a simple example. The table we need to implement is shown in Figure 7-4.

Figure 7-4. Collapsible data table
Now, let’s review Listing 7-9, which shows the code used to create this table.
Listing 7-9. Collapsible data table
<rich:dataTable value="#{olympicGamesBean.gamesMapKeys}" var="continent">

   <f:facet name="header">

      <rich:columnGroup>

         <rich:column colspan="9">Games by Continent</rich:column>

         <rich:column colspan="2" breakRowBefore="true"></rich:column>

         <rich:column colspan="3">Place</rich:column>

         <rich:column colspan="3">Dates</rich:column>

         <rich:column>Notes</rich:column>

         </rich:columnGroup>

      </f:facet>

      <rich:column colspan="9">#{continent}</rich:column>

      <rich:collapsibleSubTable value="#{olympicGamesBean.gamesMap[continent]}" var="game">

         <rich:column>

            <f:facet name="header">Season</f:facet>

               #{game.season}

            </rich:column>

         <rich:column>

            <f:facet name="header">Number</f:facet>

               #{game.number}

         </rich:column>

         <!--More columns-->
   </rich:collapsibleSubTable>

</rich:dataTable>
We added the code snippet shown in Listing 7-10 to OlympicGamesBean bean, previously shown in Listing 7-5.
Listing 7-10. Code snippet added to OlympicGamesBean bean
private Map<String, List<GameDescriptor>> gamesMap;


public Map<String, List<GameDescriptor>> getGamesMap(){

   if (gamesMap==null){

      gamesMap = new HashMap<String, List<GameDescriptor>>();

      for (GameDescriptor game : games) {

         List<GameDescriptor> gamesFromMap = gamesMap.get(game.getContinent());

            if (gamesFromMap == null){

               gamesFromMap = new ArrayList<GameDescriptor>();

            }

            gamesFromMap.add(game);

            gamesMap.put(game.getContinent(), gamesFromMap);

      }

   }

   return gamesMap;

}


public List<String> getGamesMapKeys(){

   Map<String, List<GameDescriptor>> map = getGamesMap();

   List<String> continents = new ArrayList<String>();

   Iterator<String> it = map.keySet().iterator();

   while (it.hasNext()){

      continents.add(it.next());

   }

   Collections.sort(continents);

   return continents;

}
Let’s look at the header. The <rich:columnGroup> component is used to encode a set of columns into a row that wraps them in a separate <tr>. Using colspan="9" on the first column and breakBefore="true" on the second, we stretched the first cell to table width and had the next cell encode as a new row prior to rendering. Again using colspan="3", we made the other cells group similar columns under common “Place” and “Dates” headers.
Let’s slightly change the header layout using rowspan, assuming that the “Note” common header is not needed because it’s applied to a single column with its own header.
To create the header shown in Figure 7-5, we changed the header definition, as shown in Listing 7-11.
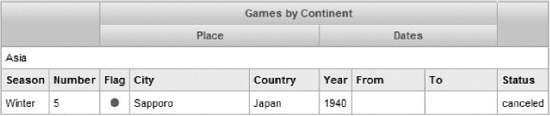
Figure 7-5. Complex header in table
Listing 7-11. Changing the header definition
<f:facet name="header">

   <rich:columnGroup>

      <rich:column rowspan="2" colspan="2"></rich:column>

      <rich:column colspan="6">Games by Continent</rich:column>

      <rich:column rowspan="2" colspan="2"></rich:column>

      <rich:column colspan="3" breakRowBefore="true">Place</rich:column>

      <rich:column colspan="3">Dates</rich:column>

   </rich:columnGroup>

</f:facet>
That’s all there is to header creation. Let’s now look at the rest of the table.
Master-Details Tables with <rich:collapsibleSubTable>
According to the bean code changes, we have a list of continent names that are used as String keys for the map: public List<String> getGamesMapKeys(). The map consists of GameDescriptor object lists: public Map<String, List<GameDescriptor>> getGamesMap(). So, the <rich:dataTable> component iterates through the list of keys and encodes a single column with that key, which is getting stretched using colspan to the entire table length. Then, the <rich:collapsibleSubtable> iterates through every list from the map, retrieving them by the current continent name, and encodes the remaining columns with corresponding data.
![]() Note Later you will see that
Note Later you will see that <rich:dataTable> and <rich:extendedDataTable> share many features using similar definitions. However, the particular features of row and column spanning (both in the header and body) and <rich:collapsibleSubTable> usage are available only with <rich:dataTable>. This will be covered further in the <rich:extendedDataTable> section.
Now let’s cover the <rich:collapsibleSubTable> component, which is used for expanding and collapsing content. All you need to be able to expand or collapse is to add <rich:collapsibleSubTableToggler> inside one of the table columns and point to the sub-table.
Figure 7-6 shows the table with only the “Oceania” sub-table expanded.

Figure 7-6. Table with collapsible sub-table
Listing 7-12 shows the code used to create this table.
Listing 7-12. Table with collapsible sub-table
<rich:dataTable value="#{olympicGamesBean.gamesMapKeys}" var="continent">

   <f:facet name="header">

      <!--header content-->

   </f:facet>

   <rich:column colspan="9">

      <rich:collapsibleSubTableToggler for="sbtable"/>

         #{continent}

   </rich:column>

   <rich:collapsibleSubTable id="sbtable" value="#{olympicGamesBean.gamesMap[continent]}"

      var="game">

   <rich:column>

      <f:facet name="header">Season</f:facet>

         #{game.season}

      </rich:column>

      <!--other columns>

   </rich:collapsibleSubTable>

</rich:dataTable>
By default, toggle encoded as an icon (actually two icons shown for different states: one for expand and one for collapse). To customize the icon, use the expandedLabel, collapsedLabel, expandedIcon and collapsedIcon attributes. You can override the complete markup because you need to use the expanded and collapsed facets. The for attribute is used to point the toggle to the sub-table, which should be controlled via this component.
Now let’s check <rich:collapsibleSubTable>, attributes which should be used to control its state switching. Let’s first mention expandMode. As typical with RichFaces components with states switching, valid values for that attribute are ajax, server, and client. The initial and current sub-table state can be managed using the expanded attribute bound to a boolean property in your model. If set to true, the sub-table for the current row will be expanded.
That’s all there is to basic <rich:dataTable> features usage. There are other advanced features, but because they are shared by other data iteration components, the “Iteration Components Advanced Usage” section found later in this chapter will cover features such sorting, filtering, pagination, and advanced data models.
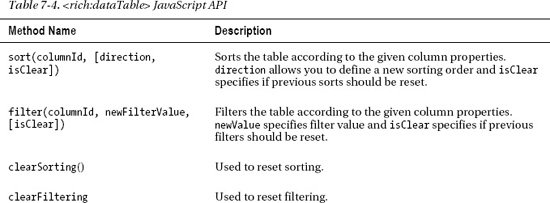
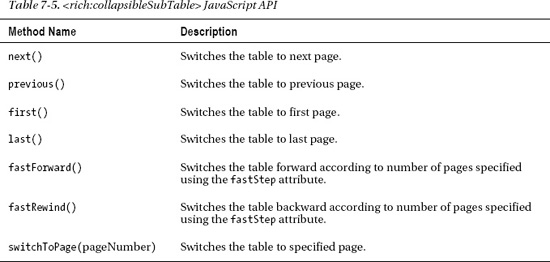
<rich:dataTable> JavaScript API
The <rich:dataTable> component provides the JavaScript functions shown in Table 7-1.
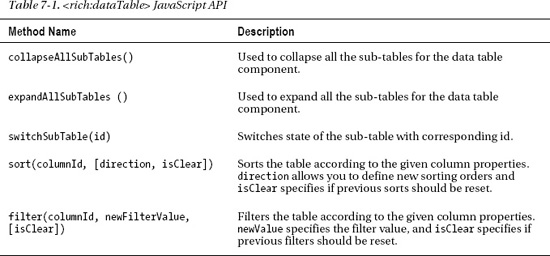
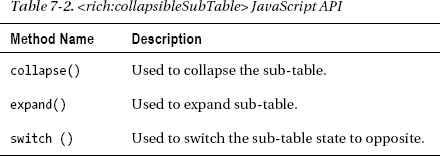
<rich:collapsibleSubTable> JavaScript API
The <rich:dataTable> component provides the JavaScript functions shown in Table 7-2.
Using <rich:extendedDataTable>
The <rich:extendedDataTable> component basically works just like <h:dataTable> and <rich:dataTable>. But, just based on its name, it adds a set of additional features to the standard implementation. The component provides vertical and horizontal scrolling for table body parts, frozen columns on the left side, lazy loading via Ajax while using vertical scroll, columns resizing and reordering, and selection features. That sounds pretty good for an out-of-the-box table component. So, let’s start with a basic example and then we’ll describe the features in more details.
We will use the same code as the first example of <rich:dataTable>, but will change the table tag to create an extended table. Figure 7-7 shows the result.

Figure 7-7. Extended data table
Listing 7-13 shows almost the same code that we used in the very first <rich:dataTable> example.
Listing 7-13. Creating an extended data table
<rich:panel style="width:1000px">

   <rich:extendedDataTable value="#{olympicGamesBean.games}" var="game">

      <f:facet name="header">Olympic Games List</f:facet>

      <rich:column>

         <f:facet name="header">Flag</f:facet>

            <h:graphicImage value="#{game.flagURI}" />

      </rich:column>

      <rich:column>

         <f:facet name="header">City</f:facet>

            #{game.city}

      </rich:column>

         <!--Other columns-->

   </rich:extendedDataTable>

</rich:panel>
That’s it! There is really nothing specific that you need to know to start using this component.
Let’s review features one by one, starting with the column resize feature. As you probably noticed in Figure 7-7, there are additional empty spaces on the right side. The reason for this is pretty simple. The feature to resize columns is always enabled for the component; every column has a default width if it not set explicitly. The table can be stretched to its parent element width (1000 pixels in our case). The remaining space is reserved with an empty column, without any styling, to be used if you try to resize any column. Resize is performed by a drag-and-drop of the column header.
![]() Note If we decrease the panel width, we will see columns on the right become hidden behind the panel border. That’s how the component works; the table gets stretched to the parent element size only until the sum of all the columns’ width is not wider than the parent element, and then the table enlarges to fit them all. One solution is to set a smaller width for some concrete columns. But, if they are later resized by the user, the right columns become hidden again as the table width enlarges. The scrolling feature should be activated in this case.
Note If we decrease the panel width, we will see columns on the right become hidden behind the panel border. That’s how the component works; the table gets stretched to the parent element size only until the sum of all the columns’ width is not wider than the parent element, and then the table enlarges to fit them all. One solution is to set a smaller width for some concrete columns. But, if they are later resized by the user, the right columns become hidden again as the table width enlarges. The scrolling feature should be activated in this case.
Let’s move on to the scrolling feature. The only options you need to specify on this component are the width and height attributes. The defined size attribute made the corresponding scroll active on the component. Let’s review the example. We will decrease the wrapper panel and at the same time define the table size to fit that panel. The code shown in Listing 7-14.
Listing 7-14. Using the scrolling feature
<rich:panel style="width:650px" header="rich:extendedDataTable sample">

   <rich:extendedDataTable value="#{olympicGamesBean.games}" var="game" style="height:200px;

      width:620px;">

      <f:facet name="header">Olympic Games List</f:facet>

      <rich:column>

         <f:facet name="header">Flag</f:facet>

            <h:graphicImage value="#{game.flagURI}" />

      </rich:column>

      <rich:column>

         <f:facet name="header">City</f:facet>

            #{game.city}

      </rich:column>

      <!--Other columns-->

   </rich:extendedDataTable>

</rich:panel>
Figure 7-8 shows the result.
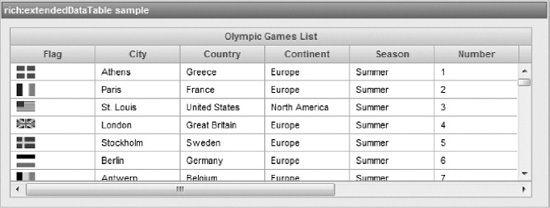
Figure 7-8. Extended data table
Using this code makes all the table data load on the client side and scroll without any additional data fetching. But, for large data sets it’s not a good idea because it will greatly decrease performance. So, the next feature we are going to cover is lazy Ajax loading of rows while performing vertical scrolling. In order to use this feature we should define only one attribute, clientRows. The standard rows attribute determines the number of rows loaded on the client and allows you to implement pagination with external controls. The clientRows attribute tells the component the number of rows that should be preloaded on the client, and the number loaded after a vertical scroll. The following is a simple example:
<rich:extendedDataTable value="#{olympicGamesBean.games}" var="game"

   style="height:200px; width:620px;" clientRows="20">
Only 20 rows will be loaded while the component initially renders and when the vertical scroll position is changed. The next 20 rows corresponding to scroll position will be fetched via Ajax.
![]() Note As any other component that performs an Ajax request,
Note As any other component that performs an Ajax request, <rich:extendedDataTable> requires <h:form> around it when Ajax lazy loading is used.
The ability to define the number of columns on the right as “fixed” or “frozen” is another feature. The frozenColumns attribute set to a number means that that number of columns will not be affected by horizontal scrolling. Let’s look at the following example:
<rich:extendedDataTable value="#{olympicGamesBean.games}" var="game"

   frozenColumns="2" style="height:200px; width:620px;" clientRows="20">
This makes the table scroll horizontally, as illustrated in Figure 7-9. Notice that the columns flag and the city are still visible as the first two columns, even though the other columns scrolled.
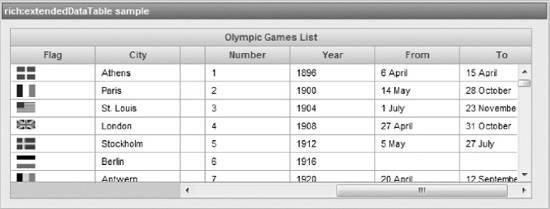
Figure 7-9. Extended data table with “frozen” columns
The last unique feature of the <rich:extendedDataTable> is rows selection. It’s controlled by the set of attributes shown in Table 7-3.
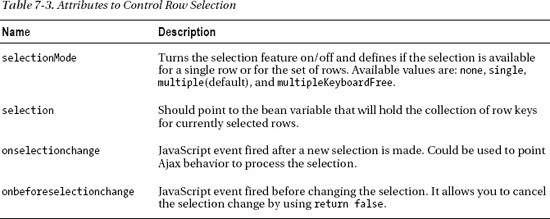
Looking at the default value for the selectionMode attribute, the selection feature is turned on by default and multiple rows could be selected by using the SHIFT and CTRL keys together with row clicks.
Let’s review the selection example. The page code is in Listing 7-15.
Listing 7-15. Using the selection feature
<h:form>

   <rich:panel style="width:600px" header="rich:extendedDataTable sample">

      <h:panelGrid columns="2" columnClasses="top, top">

         <rich:extendedDataTable value="#{olympicGamesBean.games}" var="game"

            frozenColumns="2" selection="#{olympicGamesBean.selection}" style="height:300px">

            <f:facet name="header">Olympic Games List</f:facet>

            <a4j:ajax event="selectionchange" render="details"

               listener="#{olympicGamesBean.showSelectionDetails}" />

            <rich:column>

               <f:facet name="header">Season</f:facet>

               #{game.season}

            </rich:column>

            <rich:column>

               <f:facet name="header">Number</f:facet>

               #{game.number}

             </rich:column>

             <rich:column>

                <f:facet name="header">Year</f:facet>

                #{game.year}

             </rich:column>

         </rich:extendedDataTable>

         <rich:dataTable value="#{olympicGamesBean.selectedGames}" var="sgame" id="details">

            <f:facet name="header">Selected Games Details</f:facet>

            <rich:column>

               <f:facet name="header">Flag</f:facet>

               <h:graphicImage value="#{sgame.flagURI}" />

            </rich:column>

            <rich:column>
               <f:facet name="header">Country</f:facet>

               #{sgame.country}

            </rich:column>

            <rich:column>

               <f:facet name="header">City</f:facet>

               #{sgame.city}

            </rich:column>

            <rich:column>

               <f:facet name="header">From</f:facet>

               #{sgame.from}

            </rich:column>

            <rich:column>

               <f:facet name="header">To</f:facet>

               #{sgame.to}

            </rich:column>

         </rich:dataTable>

      </h:panelGrid>

   </rich:panel>

</h:form>
We use <a4j:ajax> to send an Ajax request every time the selection is changed. Row keys for selected rows will be stored in the #{olympicGamesBean.selection} collection. After the showSelectionDetails() listener is invoked, it will place corresponding objects into the #{olympicGamesBean.selectedGames} list and the result table will be updated with the details of selected rows.
Listing 7-16 shows the bean code that we added to implement this functionality.
Listing 7-16. Java code to manage <rich:extendedDataTable> selection
private Collection<Object> selection = null;

private List<GameDescriptor> selectedGames = null;

...

public void showSelectionDetails(AjaxBehaviorEvent event){

   UIExtendedDataTable table = (UIExtendedDataTable)event.getComponent();

   selectedGames = new ArrayList<GameDescriptor>();

   Object storedRowKey = table.getRowKey();

   for (Object rowKey : selection) {

      table.setRowKey(rowKey);

      selectedGames.add((GameDescriptor)table.getRowData());

   }

   table.setRowKey(storedRowKey);

   ...


}

// Getters and setters
The result is shown in Figure 7-10.
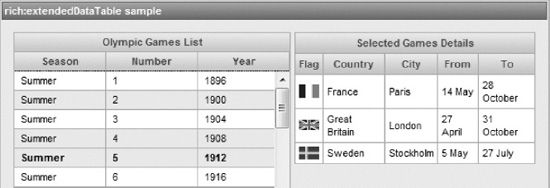
Figure 7-10. Extended data table with row data selection
![]() Note The selection feature is not implemented for <
Note The selection feature is not implemented for <rich:dataTable>. The selection feature might be added to the component in the future. For now, you can use <rich:extendedDataTable> just like <rich:dataTable> when you need the selection feature.
That covers the most important features in <rich:extendedDataTable>. We will cover additional and more advanced features in the “Iteration Components Advanced Usage” section later in this chapter.
<rich:extendedDataTable> JavaScript API
The <rich:extendedDataTable> component provides the JavaScript functions shown in Table 7-4.
Displaying Data in a List with <rich:list>
The <rich:list> component allows creating different HTML lists from the model. Figure 7-11 shows a simple example of a dynamically-populated unordered list.
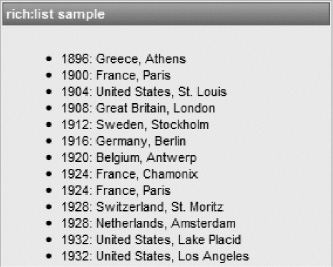
Figure 7-11. RichFaces <rich:list> as an unordered list
The page code used to create the list is shown in Listing 7-17.
Listing 7-17. RichFaces <rich:list> as an unordered list
<rich:panel style="width:280px" header="rich:list sample">

   <rich:list value="#{olympicGamesBean.games}" var="game">

      #{game.year}: #{game.country}, #{game.city}

   </rich:list>

</rich:panel>
The most interesting attribute on this component is type. It specifies the type of list to be rendered. It could be defined with ordered, unordered, and definitions values. As you can see from Listing 7-17, unordered is the default value. Figure 7-12 shows what will be rendered when the value is changed to ordered using
<rich:list type="ordered" …/>.

Figure 7-12. RichFaces <rich:list> as an ordered list
If we want to render a definition list, we need to use a facet for the list term. Listing 7-18 shows the code that populates the definition list.
Listing 7-18. Populating the definition list
<rich:panel style="width:280px" header="rich:list sample">

   <rich:list type="definitions" value="#{olympicGamesBean.games}" var="game">

      <f:facet name="term"><b>#{game.year}</b></f:facet>

      #{game.country}, #{game.city}, #{game.from} - #{game.to}

   </rich:list>

</rich:panel>
In this example, we use the year property as a term. For a description, we list the country, city, and dates of the Olympics, as shown in Figure 7-13.

Figure 7-13. RichFaces <rich:list> as a definition list
That’s all there is to cover for the <rich:list> component. As you can see, it’s a pretty straightforward component. As for <rich:dataTable>, you could use either different class attributes (rowClasses, rowClass) or event handler attributes (onclick, onrowclick) in order to customize the basic look and feel and behavior.
Displaying Data in a Grid with <rich:dataGrid>
<rich:dataGrid> is a mix of <rich:dataTable> and <h:panelGrid>. While the component still iterates over a data model, just like all other components in this chapter, it outputs the component as <h:panelGrid>, placing a specified number of columns.
For example, every three records (objects) will take up one row using the following code from Listing 7-19.
Listing 7-19. Every three records (objects) will take up one row
<rich:panel style="width:650px" header="rich:dataGrid sample">

   <rich:dataGrid  value="#{olympicGamesBean.games}" var="game" columns="3">

      <rich:panel style="with:200px;">

         <h:graphicImage value="#{game.flagURI}" />

         <b>#{game.country} - #{game.city}</b><br/>

         <i>#{game.from} - #{game.to}</i>

      </rich:panel>

   </rich:dataGrid>

</rich:panel>
This code produces the result shown in Figure 7-14.

Figure 7-14. <rich:dataGrid> iterating info panels
If we change columns to “2” for example, we will see two objects (panels) in each row.
And, similar to the table component, you can add a header and footer to the grid using facets with header and footer names.
Iterating over Custom Markup with <a4j:repeat>
Even though the <a4j:repeat> component is part of the a4j: tag library, we decided to cover it in this section because it’s the base component for all data iteration components in RichFaces. So why is it mentioned last, after all the other iteration components? We wanted to highlight the more popular concrete implementations first.
The idea behind the component is the same as in Facelets <ui:repeat>. It’s used to iterate over a data model; however, it doesn’t produce any HTML markup. You, the developer, are responsible for adding any content, HTML, or JSF tags to be iterated. If you ever need to iterate over a list of values but none of the out-of-the-box components provide what you need, this is the component you want to use.
The RichFaces team added special implementation in order to add features not available in <ui:repeat>. In addition to being able to bind to advanced RichFaces data models, it also supports partial-table rendering and pagination.
Let’s cover some of the basic features. The more advanced features will be also covered in the “Iteration Components Advanced Usage” section.
Let’s say we need the output to be similar to the one from the <rich:dataGrid> component from the previous section (or let’s assume we didn’t have <rich:dataGrid> at all). In addition, we want the columns count to depend on the browser window width. Resizing the window should increase the number of columns and setting less width should make it output fewer ones. Take a look at the code in Listing 7-20.
Listing 7-20. Resizing the window and setting less width
<a4j:repeat value="#{olympicGamesBean.games}" var="game"  >

   <rich:panel style="width:220px; height:60px; float:left; margin:5px;">

      <h:graphicImage value="#{game.flagURI}" />

      <b>#{game.country} - #{game.city}</b><br />

      <i>#{game.from} - #{game.to}</i>

   </rich:panel>

</a4j:repeat>
Notice that the component doesn’t produce any markup, but will render a <rich:panel> for each data object. If we open the page and reduce the browser window to about 800 pixels, we will see the result in Figure 7-15.

Figure 7-15. Using <a4j:repeat> to create a grid
By making the browser window twice as big, we will see six columns in one row instead. So <a4j:repeat> is the best option when you need to implement any specific layout using the dynamic model iteration.
As it is the base component for all the other iteration components, most of the features covered in the rest of this book can be used with <a4j:repeat>, as well.
Iteration Components Advanced Usage
This section will show advanced features available on data iteration components. Most of the features are available for all RichFaces data iteration components.
Adding Pagination with <rich:dataScroller>
In the earlier examples, we didn’t use a large data set (50+ Olympic Games since 1896). But in a real enterprise application, you deal with much larger data sets. One of the classical patterns to represent such data sets is adding a pagination control to the table, which allows using a fixed number of objects on each page. Fortunately, RichFaces comes with a component called <rich:datascroller> that provides pagination.
So, let’s start with a simple example. We’ll limit the number of games to 10 per page and add <rich:dataScroller> to our table footer. Figure 7-16 shows that in action.
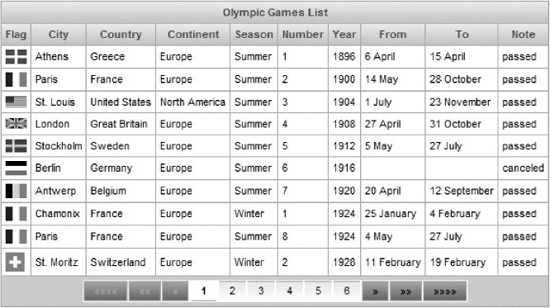
Figure 7-16. Using the <rich:dataScroller> component
All we need to do is add the rows attribute with the number of rows per page, and add the <rich:dataScroller> tag to the table footer without any additional attributes. (rows is a standard attribute from the <h:dataTable> component.) Look through these changes in Listing 7-21.
Listing 7-21. Add the <rich:dataScroller> tag to the table footer
<h:form>

   <rich:dataTable value="#{olympicGamesBean.games}" var="game" rows="10">

      <f:facet name="header">Olympic Games List</f:facet>

         <rich:column>

            <f:facet name="header">Flag</f:facet>

            <h:graphicImage value="#{game.flagURI}" />

         </rich:column>

         <rich:column>

            <f:facet name="header">City</f:facet>

            #{game.city}

         </rich:column>

         <!--Other columns-->

      <f:facet name="footer">

         <rich:dataScroller />

      </f:facet>

   </rich:dataTable>

</h:form>
We added <h:form> around the table. Any component that sends an Ajax request needs to be placed inside a form.
![]() Note
Note <rich:extendedDataTable> could use the same code to add pagination. It uses the same rows attribute to split the model into pages. As we mentioned in the <rich:extendedDataTable> section, this component also uses a separate clientRows attribute to add Ajax loading via vertical scroll. The component can even define both attributes. You should keep in mind, however, that Ajax loading done by clientRows-sized portions and is limited to “rows”—a defined number of rows. <rich:dataScroller> should be still used to switch pages.
We also need to mention that you can use <rich:dataScroller> defined outside the table; and even more than once instance of the scroller can be placed on a page. An example is shown in Figure 7-17.
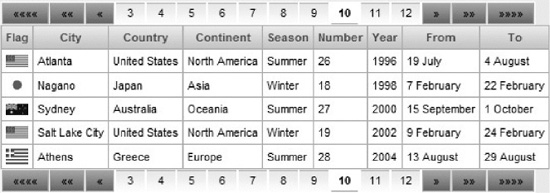
Figure 7-17. Using multiple scrollers outside of the table
To use the <rich:dataScroller> component outside the table, you should use the for attribute pointed to the table id. Updated code is shown Listing 7-22.
Listing 7-22. Using the for attribute pointed to the table id
<h:form>

   <rich:dataScroller for="table"/>

   <rich:dataTable value="#{olympicGamesBean.games}" var="game" rows="5" id="table">

       <!--Columns definitions-->

   </rich:dataTable>

   <rich:dataScroller for="table"/>

</h:form>
There are a few important attributes that should also be mentioned. First, the page attribute can be defined by the page that is currently shown. It allows you to restore the previous state when returning to the view with the table from a details screen. In order to allow such dynamic page setting, it could be defined with EL, as follows:
<rich:dataScroller for="table" page="#{viewController.gamesTablePage}"/>
![]() Note If you will define a non-existent page number or a non-valid value, the component will reset to some of the boundary values. For example, if you set page 10 as the current page, and the table consists of only nine pages, then page 9, the last page, will set automatically. If the value is not valid, or less than 1, then the first page will be shown. When an incorrect value is used, a warning message about the correction is shown in the console.
Note If you will define a non-existent page number or a non-valid value, the component will reset to some of the boundary values. For example, if you set page 10 as the current page, and the table consists of only nine pages, then page 9, the last page, will set automatically. If the value is not valid, or less than 1, then the first page will be shown. When an incorrect value is used, a warning message about the correction is shown in the console.
Customizing the <rich:dataScroller> Look and Feel
<rich:dataScroller> allows flexible look-and-feel customization. It can be defined to be hidden if all values from the data model will fit onto just one page, as follows:
<rich:dataScroller renderIfSinglePage="false"/>
Forward and rewind button behavior can be customized in a similar way. There are three attributes to control them: boundaryControls (for first and next), fastControls (for switching to a few pages forward or back), and stepControls (previous and next).
All the attributes can take the following values: show (default), hide, and auto. If the value is hide, the corresponding controls will not be rendered. If the value is auto, the controls will not be rendered in boundary scroller states (first, rewind, and previous steps controls will not be encoded when the table is on the first page). And if the value is show, the controls will be rendered, but disabled if an action is not available.
By default, the fast-step control will switch to either the previous or next page. Using the fastStep attribute, you can configure how many pages to switch or jump. It should be defined with an integer value that indicates the number of pages that should be skipped on scrolling when using that control.
The following is an example that uses these attributes:
<rich:dataScroller stepControls="hide" boundaryControls="auto" fastControls="auto" fastStep="3"/>
This example demonstrates that the next/previous controls will not be rendered; the first/last and fast-step controls will always be rendered; and that three pages will be switched on any fast-step control activation.
In addition to controlling the behavior of the step and boundary buttons, you can also customize the look and feel of these buttons. The component offers various facets to control the appearance of the first, last, next, previous, fastforward, and fastrewind controls (and their disabled counterparts).
You can create a facet for active (clickable) and inactive (not clickable) controls. An inactive control is, for example, when you are looking at the last page and the next control is disabled.
Listing 7-23 shows an example with all the facets defined.
Listing 7-23. All control facets defined
<rich:dataScroller >

   <f:facet name="first">First</f:facet>

   <f:facet name="first_disabled">First</f:facet>

   <f:facet name="last">Last</f:facet>

   <f:facet name="last_disabled">Last</f:facet>

   <f:facet name="next">Next</f:facet>

   <f:facet name="next_disabled">Next</f:facet>
   <f:facet name="previous">Prev</f:facet>

   <f:facet name="previous_disabled">Prev</f:facet>

   <f:facet name="fastForward">FF</f:facet>

   <f:facet name="fastForward_disabled">FF</f:facet>

   <f:facet name="fastRewind">FR</f:facet>

   <f:facet name="fastRewind_disabled">FR</f:facet>

</rich:dataScroller>
This code produces the result shown in Figure 7-18.
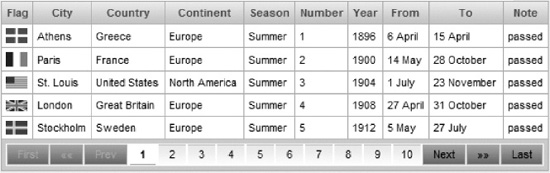
Figure 7-18. Customizing scroller controls using facets
This example uses text to create the controls, but it’s possible to use any other components, as well as images, to create the controls.
That covers boundary and step buttons. Let’s now look at page-number controls. If your data set contains hundreds of the pages, you definitely do not want to show page numbers for all of them. So it’s possible to control the number of page numbers that are displayed by setting the maxPages attribute.
We also want to mention the lastPageMode attribute. It specifies the number of rows to display on the last page. If the last page contains only one row and you want the table to be the same size on any page, you should set the attribute to full. Let’s say you have 42 records, and you display five objects on a page. When you switch to the last page, it will only list the final two objects. With lastPageMode set to full, the last page will display five objects, starting from row 38. If you want to display only the actual rows remaining, use the short value. Usage example for full mode will be shown in an upcoming JavaScript API example.
Using Other Data Components with <rich:dataScroller>
We have been using <rich:dataTable> to show how to use <rich:dataScroller>, but you can use <rich:datascroller> in a similar fashion with any other data iteration components.
Listing 7-24 is an example using <rich:list> with <rich:dataScroller>. Note that the for attribute points to <rich:list>.
Listing 7-24. Using <rich:list> with <rich:dataScroller>
<h:form>

   <rich:panel header="Using rich:datascroller">

      <rich:list type="definitions" value="#{olympicGamesBean.games}" var="game" rows="5"

       id="list">
         <f:facet name="term"><b>#{game.year}</b></f:facet>

            #{game.country}, #{game.city}, #{game.from} - #{game.to}

      </rich:list>

      <rich:dataScroller for="list" maxPages="4"/>

   </rich:panel>

</h:form>
Figure 7-19 shows what the code will produce.

Figure 7-19. Using <rich:dataScroller> with <rich:list>
Using <rich:dataScroller> with <rich:dataGrid>
Listing 7-25 shows an example of <rich:dataGrid> with scroller. There is one difference between using scroller with <rich:dataTable> and <rich:dataGrid>. The <rich:dataGrid> uses the elements attribute instead of rows.
Listing 7-25. <rich:dataGrid> with scroller
<h:form>

   <rich:dataGrid value="#{olympicGamesBean.games}" var="game" columns="3" elements="9"

      id="grid">

      <rich:panel>

         <h:graphicImage value="#{game.flagURI}" />

         <b>#{game.country} - #{game.city}</b> <br />

         <i>#{game.from} - #{game.to}</i>

      </rich:panel>

      <f:facet name="footer">

         <rich:dataScroller maxPages="4" />

      </f:facet>

   </rich:dataGrid>


</h:form>
We are using the elements="9" attribute in this example. It means the same as the rows attribute for all the other iteration components. It was renamed because <rich:dataGrid> renders objects in a line, and so the rows attribute wouldn’t be a good fit. Figure 7-20 shows the result.
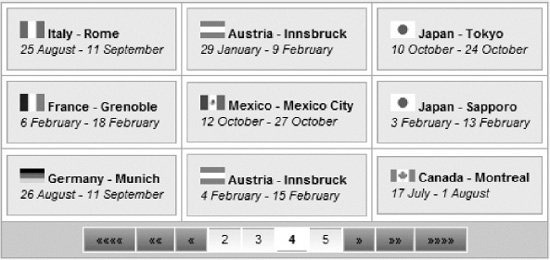
Figure 7-20. Using <rich:dataScroller> with <rich:dataGrid>
<rich:dataScroller> JavaScript API
The <rich:dataScroller> component provides the JavaScript functions shown in Table 7-5.
Using Partial Table Updates
We are ready to cover partial updates for iteration components. This is a very important and powerful feature that allows you to update a limited set of components in defined rows instead of performing a full table update.
We’ll start with the basics and learn how to do updates in the context of a current row. An Ajax component inside the current row can update any component inside the same row by pointing to the component id. You get this functionality out of the box.
In this section, let’s move away from the Olympic Games list example and create a model that shows a simple, editable sales report. Listing 7-26 shows the code for SalesItem object.
Listing 7-26. SalesItem object
public class SalesItem {

   private int productCode;

   private double proposedPrice;

   private double salesCost;

   private String reason;

   private double discount = 0;

   public ArrayList<SelectItem> getReasons() {

   ArrayList<SelectItem> reasons = new ArrayList<SelectItem>();

   if (proposedPrice != 0.0) {

      if (proposedPrice <= salesCost) {

         reasons.add(new SelectItem("Nobody Needs It"));

         reasons.add(new SelectItem("Bad Quality"));

         reasons.add(new SelectItem("Partly Broken"));

      } else {

         reasons.add(new SelectItem("Just Good"));

         reasons.add(new SelectItem("Everybody Asks for It"));

         }

      }

      return reasons;

   }

   public SalesItem(int productCode, double salesCost) {

      super();

      this.productCode = productCode;

      this.salesCost = salesCost;

   }

   public double getProposedGrossMargin() {

      if (proposedPrice == 0)

         return 0;

      else {

         return (proposedPrice-salesCost)/proposedPrice ;

      }

   }

   // Getters and setters

}
Listing 7-27 shows the SalesReport bean code.
Listing 7-27. SalesReport bean code
@ManagedBean

@ViewScoped

public class SalesReport {

   List<SalesItem> items = null;

   private void initData() {

      items = new ArrayList<SalesItem>();

      items.add(new SalesItem(1, 20.00));

      items.add(new SalesItem(2, 10.00));

      items.add(new SalesItem(3, 20.00));

      items.add(new SalesItem(4, 20.00));

   }

   public List<SalesItem> getItems() {

      if (items == null)

         initData();

      return items;

   }

   // Getters and setters

}
We will use this model for all examples in the “Using Partial Table Updates” section.
Now, let’s go through the page definition in Listing 7-28.
Listing 7-28. Page definition
<h:form>

   <rich:panel header="Partial updates in tables">

      <rich:dataTable value="#{salesReport.items}" var="item" rowKeyVar="key">

         <rich:column>

            <f:facet name="header">Product Code</f:facet>

            <h:outputText value="#{item.productCode}" />

         </rich:column>

         <rich:column>

            <f:facet name="header">Proposed Price</f:facet>

            <h:inputText value="#{item.proposedPrice}" size="7">

               <a4j:ajax event="valueChange" render="reason, margin" />

            </h:inputText>

         </rich:column>

         <rich:column>

            <f:facet name="header">Sales Cost</f:facet>

            <h:outputText value="#{item.salesCost}" />

         </rich:column>

         <rich:column>

            <f:facet name="header">Reason</f:facet>

            <h:selectOneMenu id="reason" required="true" value="#{item.reason}">

               <f:selectItems value="#{item.reasons}" />

            </h:selectOneMenu>

         </rich:column>

         <rich:column>

            <f:facet name="header">Proposed Gross Margin</f:facet>

            <h:outputText id="margin" value="#{item.proposedGrossMargin}">

               <f:convertNumber pattern="$###0.000" />
            </h:outputText>

         </rich:column>

      </rich:dataTable>

   </rich:panel>

</h:form>
As you can see, we are setting the render attribute to reason and margin component ids in other columns, and updates in case it occurs in the same row. This is an example of partial-table rendering in the context of the row.
Figure 7-21 shows the result after a number of prices are modified.
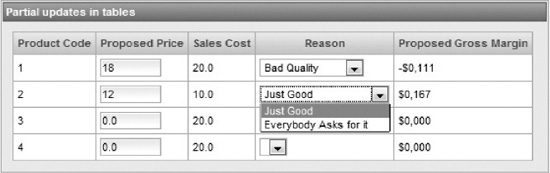
Figure 7-21. Partial updates of the components in context of row
The content of the Reason and Proposed Gross Margin columns are updated by sending it to the client.
Now let’s review a more complex example. Suppose we have to update some subset of objects and want to render corresponding columns. As you know, you can define the render attribute for all the RichFaces Ajax components with an EL expression, which allows us to populate a dynamic list of ids of the component to be updated. That’s one solution to populate a list of updated ids. But, it is not really a convenient or maintainable solution because the model needs know about table id’s (including parent-naming container ids) and the ids of the component placed in columns.
RichFaces (starting with version 4.0) has a special @rows(rowKeysCollection) function available that should be used to define dynamic rows updates. You need a set of model row keys that will define the rows to be updated in the table. Let’s use an actual example. Suppose we have a populated table and want to set discounts on all the items that have negative Proposed Gross Margin values. Listing 7-29 shows the changed page with a new discount column, as well as the button that we added to the form.
Listing 7-29. Changed page with a new discount column and button
<h:form>

   <rich:panel header="Partial updates in tables">

      <rich:dataTable value="#{salesReport.items}" var="item" rowKeyVar="key" id=”table”>

    <!--All the other columns -->

        <rich:column>

           <f:facet name="header">Discount</f:facet>

           <h:outputText id="discount" value="#{item.discount}">

              <f:convertNumber type="percent"/>

           </h:outputText>
        </rich:column>

     </rich:dataTable>

     <a4j:commandButton execute="@this" value="Set 20% discount to unprofitable products"

        action="#{salesReport.addDiscounts}"

        render="table:@rows(salesReport.updatedItems):discount"/>

  </rich:panel>

</h:form>
Let’s review what we added to the code. The most important part is the render defined in the <a4j:commandButton>. It consists of a table id (table), a @rows() function, and a discount component id (discount), all separated with a naming container separator character (usually “:” although it could be configured per application, so be careful there). The updatedItems will be resolved to the rows id in which to update the discount component id. You might be wondering why the special @rows() syntax is used. We can’t really use the standard EL, such as #{rows()}, because it would only give us a single string representation after evaluation. What was needed in our case was to have set of ids for render. And that specific function usage does the trick.
![]() Tip You don’t deal with client ids or containers ids when performing partial table updates. RichFaces makes it very simple by letting you define everything with just component ids and row keys.
Tip You don’t deal with client ids or containers ids when performing partial table updates. RichFaces makes it very simple by letting you define everything with just component ids and row keys.
Now let’s look at the addDiscount method and updatedItems list in Listing 7-30, which hold row keys from SalesReport.
Listing 7-30. addDiscount method and updatedItems list
private List<Integer> updatedItems = new ArrayList<Integer>();

public void addDiscounts() {

   for (SalesItem item : items) {

      if (item.getProposedGrossMargin() < 0) {

         item.setDiscount(0.2);

         updatedItems.add(items.indexOf(item));

      }

   }

}

// Getters and setters
Here we simply iterate over the model and are looking for objects with the negative proposedGrossMargin value. Then we add a discount to that object and put its rowKey in the updatedItems list. Note that for our simple, list-based model, rowKey will be equal to the index in the list. For more complex models (with filtering/sorting and so on) you should not return the index in the original collection, but with a separate object rowKey. We will cover this later in the chapter. When running this, we see only two components updated, as shown in Figure 7-22.

Figure 7-22. Using partial-table update to update a set of rows
Both of the features we just described—updating components within the same row and updating components within a set of rows—works for any RichFaces iteration component, including base <a4j:repeat>.
There is another very handy partial-table update feature that RichFaces provides that allows you to update only the header, footer, or table body. To do this, RichFaces provides three pre-defined values: @body, @header, and @footer. They are supported by both <rich:dataTable> and <rich:extendedDataTable>.
For example, the following is placed outside the table and will update the entire table body; tableId will be replaced with actual table id.
<a4j:commandButton value="Update Data" render="tableId@body"/>
If the component is placed inside the table, then the table id doesn’t need to be specified, as follows:
<a4j:commandButton value="Update Data" render="@body"/>
Request Variables of Iteration Components
Besides the standard var attribute, which provides a request scoped variable bound to the current iteration object, RichFaces components provide two more utility variables: rowKeyVar and iterationStatusVar.
rowKeyVar allows you to reference the rowKey of the current iteration objects. If you have your <rich:dataTable> bound to a simple List of objects, it will be equal to the row index of the object at the current iteration. Figure 7-23 shows a table in which the first column has object indexes.
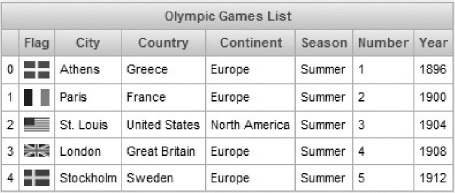
Figure 7-23. Indexes of a row using rowKey
Listing 7-31 shows the page code.
Listing 7-31. Indexes of a row using rowKey
<rich:dataTable value="#{olympicGamesBean.games}" var="game"

   rowKeyVar="key" rows="10" id="table">

   <f:facet name="header">Olympic Games List</f:facet>

   <rich:column>#{key}</rich:column>
   ...
</rich:dataTable>
Note that this will only work when sorting and filtering are not used. (The rowKey is covered in more detail later in this chapter.) You will see this value is an identified object rather than a row index. When you sort or filter a table, the keys will not correspond to indexes because they will be filtered on the page along with bound objects.
Another example that actually shows more proper attribute usage is passing a rowKey as a parameter in order to identify or select an object inside a bean. An example of this is shown in Listing 7-32.
Listing 7-32. Passing a rowKey as a parameter in order to identify or select an object inside a bean
<h:form>

   <a4j:jsFunction name="updateDetails" render="details">

      <a4j:param name="rowKey" assignTo="#{olympicGamesBean.currentRow}" />

   </a4j:jsFunction>

   <rich:panel style="width:650px" header="rich:dataTable sample">

      <h:panelGrid columns="2">

         <rich:dataTable value="#{olympicGamesBean.games}" var="game" style="cursor:pointer;"

            rowKeyVar="key" rows="5" id="table" onrowclick="updateDetails(#{key})">

            <f:facet name="header">Olympic Games List</f:facet>

            <rich:column>

               <f:facet name="header">Country</f:facet>

               #{game.country}

            </rich:column>

            <!--Other columns-->

         </rich:dataTable>

         <rich:panel id="details" header="Selected Game:">
            <a4j:outputPanel layout="block" rendered="#{olympicGamesBean.currentGame ne null}">

               <h:graphicImage value="#{olympicGamesBean.currentGame.flagURI}" />

               <h:panelGrid columns="2">

                  <h:outputText value="Continent:" /> #{olympicGamesBean.currentGame.continent}

                  <h:outputText value="Country:" /> #{olympicGamesBean.currentGame.country}

                  <h:outputText value="City:" /> #{olympicGamesBean.currentGame.city}

                  <h:outputText value="From date:" /> #{olympicGamesBean.currentGame.from}

                  <h:outputText value="To date:" /> #{olympicGamesBean.currentGame.to}

               </h:panelGrid>

            </a4j:outputPanel>

         </rich:panel>

      </h:panelGrid>

   </rich:panel>

</h:form>
Notice that we used rowKey in order to pass the current row key to the server with an assignTo attribute of the <a4j:param>. Now let’s look at a simple getter, which we need to add to our bean for the current sample. This method will return the current game using the passed object. Listing 7-33 shows the Java code.
Listing 7-33. Java code
private Integer currentRow; //Getter and setter


public GameDescriptor getCurrentGame(){

   return (currentRow==null) ? null : games.get(currentRow);

}
It will return a valid object even if you sorted or filtered the table using built-in sorting or filtering, because as we mentioned, row keys are always bound to the same objects. We will show you another example using the database key later in this chapter.
Figure 7-24 shows the page after clicking on a row.
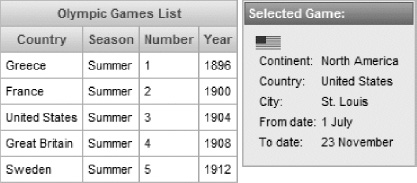
Figure 7-24. Passing a rowKey to the server to identify the clicked row, showing details
iterationStatusVar is another request variable. It allows you to reference an iteration status object, which provides a set of useful properties to get information about current iteration properties. Table 7-6 is a list of properties that can be used on a page.
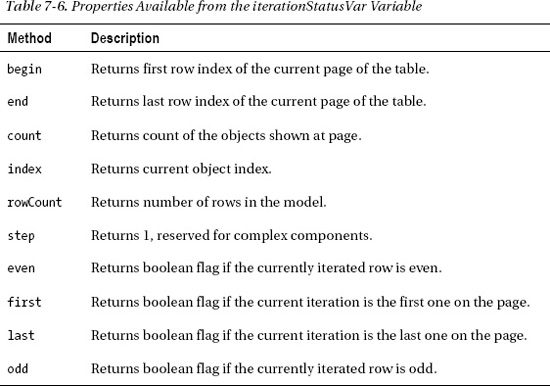
This variable is a lot more useful if you just need to output index as done in the first example using rowKey.
Listing 7-34 is an example using iterationStatusVar.
Listing 7-34. Using iterationStatusVar
<style>

.odd {

   background-color: #{richSkin.additionalBackgroundColor};

}

.even {

   background-color: #{richSkin.tableSubHeaderBackgroundColor};

}

</style>

<h:form>

   <rich:panel style="width:650px" header="rich:dataTable sample">

      <rich:dataTable value="#{olympicGamesBean.games}" var="game" rows="10"

         iterationStatusVar="iter" rowClass="#{iter.even?'even':'odd'}">

         <f:facet name="header">Olympic Games List</f:facet>

         <rich:column>#{iter.index+1}</rich:column>

         <rich:column>

            <f:facet name="header">Flag</f:facet>

            <h:graphicImage value="#{game.flagURI}" />

         </rich:column>

         <rich:column>

            <f:facet name="header">City</f:facet>
            #{game.city}

         </rich:column>

         <!--Other Columns-->

         <f:facet name="footer">

            <rich:dataScroller />

         </f:facet>

      </rich:dataTable>

   </rich:panel>

</h:form>
We perform two tasks using this variable. First, we render column styles based on whether it’s an even or odd row. Second, we render the current row index inside one of the columns. Using this variable, the row indexes will always be correct and will not be affected by pagination, sorting, or filtering. Figure 7-25 shows the result.
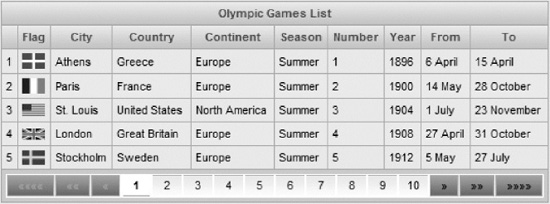
Figure 7-25. iterationStatusVar usage for styling and row indexes output
![]() Note When using the
Note When using the index property to display row numbers, it will start at 0. Most likely, you want to start at 1, so #{iter.index+1} should be used. This should be fixed in a future RichFaces release, or another variable that starts at 1 will be introduced.
Table Sorting
This section will cover sorting functionality available in RichFaces data iteration components. We will use a List-based example and cover a more complex example with a custom data model in the “Iteration Components Advanced Models” section.
Basic sorting functionality can be implemented in two ways: by using JavaScript API or by using external controls.
![]() Note No built-in controls for sorting and filtering are implemented as of writing of this book. We will cover basic API. Please check the JBoss Community’s RichFaces Component Reference at
Note No built-in controls for sorting and filtering are implemented as of writing of this book. We will cover basic API. Please check the JBoss Community’s RichFaces Component Reference at www.jboss.org/richfaces/docs and other informational resources to learn when such controls might be added.
To start sorting, all you need to do is add the sortBy attribute, with it pointing to some object property (based on what you want to sort) to the <rich:column> tag. In order to store the sorting state between requests, use the sortOrder attribute, which should be bound to the server-side object with the values from the org.richfaces.component.SortOrder set (unsorted, ascending or descending).
comparator is another <rich:column> attribute that you can use to customize the sorting. It can be used instead of sortBy in order to define a custom comparator that will be called by the component during sorting for comparison of the objects according to your rules.
![]() Tip We use
Tip We use <rich:dataTable> in the examples; however, the same code can be used with the <rich:extendedDataTable> component.
To start, let’s review sorting using external controls. Listing 7-35 is the code we used to define three columns of the sortable, Olympic Games table.
Listing 7-35. Defining three columns of a table
<h:form>

    <rich:panel style="width:650px" header="rich:dataTable sample">

        <rich:dataTable value="#{olympicGamesBean.games}" var="game" id="table" rows="10">

            <f:facet name="header">Olympic Games List</f:facet>

            <rich:column>

                <f:facet name="header">Flag</f:facet>

                <h:graphicImage value="#{game.flagURI}" />

            </rich:column>

            <rich:column sortBy="#{game.city}" sortOrder="#{sortingBean.sortOrders['city']}">

                <f:facet name="header">

                    <a4j:commandLink value="City" render="table" action="#{sortingBean.sort}">

                        <a4j:param name="sortProperty" value="city" />

                    </a4j:commandLink>

                </f:facet>

                #{game.city}

            </rich:column>

            <rich:column sortBy="#{game.country}"

               sortOrder="#{sortingBean.sortOrders['country']}">

                <f:facet name="header">

                    <a4j:commandLink value="Country" render="table"

                       action="#{sortingBean.sort}">

                        <a4j:param name="sortProperty" value="country" />

                    </a4j:commandLink>
                </f:facet>

                #{game.country}

            </rich:column>

            <rich:column>

                <f:facet name="header">Season</f:facet>

                #{game.season}

            </rich:column>

            <rich:column>

                <f:facet name="header">Number</f:facet>

                #{game.number}

            </rich:column>

            <rich:column sortOrder="#{sortingBean.sortOrders['year']}"

                comparator="#{sortingBean.yearComparator}">

                <f:facet name="header">

                    <a4j:commandLink value="Year" render="table" action="#{sortingBean.sort}">

                        <a4j:param name="sortProperty" value="year" />

                    </a4j:commandLink>

                </f:facet>

                #{game.year}

            </rich:column>

            <rich:column>

                <f:facet name="header">From</f:facet>

                    #{game.from}

            </rich:column>

            <rich:column>

                <f:facet name="header">To</f:facet>

                #{game.to}

            </rich:column>

        </rich:dataTable>

    </rich:panel>

</h:form>
Listing 7-36 shows the SortingBean bean followed by more explanation of this example.
Listing 7-36. SortingBean bean
@ManagedBean

@ViewScoped

public class SortingBean implements Serializable{


   private Map<String, SortOrder> sortOrders = new HashMap<String, SortOrder>();

   private static final String SORT_PROPERTY = "sortProperty";


   // getters and setters


   private void modifySortProperty(Map<String, SortOrder> orders, String sortProperty, SortOrder

      currentOrder) {

      if ((currentOrder == null) || (currentOrder == SortOrder.ascending)) {

         orders.put(sortProperty, SortOrder.descending);

      } else {

         orders.put(sortProperty, SortOrder.ascending);

      }

   }
   private String getSortProperty() {

      String sortProperty = FacesContext.getCurrentInstance()

         .getExternalContext().getRequestParameterMap().get(SORT_PROPERTY);

      return sortProperty;

   }

   public Comparator<GameDescriptor> getYearComparator() {

      return new Comparator<GameDescriptor>() {

         @Override

         public int compare(GameDescriptor o1, GameDescriptor o2) {

            return o1.getFromDate().compareTo(o2.getFromDate());

         }

      };

   }

   public void sort() {

      String sortProperty = getSortProperty();

      SortOrder currentOrder = sortOrders.get(sortProperty);

      sortOrders.clear();

      modifySortProperty(sortOrders, sortProperty, currentOrder);

   }

}
Let’s review the code, starting with the city column. We added sortOrder pointing to #{game.city}, so the city string value will be used for sorting. We pointed the sortOrder attribute to the map object and placed it under the city key. Actually, any key could be used there and you are free to implement any kind of object for storing the sort order. We just used a more convenient and simple code for that simple case.
Next, we added the <a4j:commandLink> control, which will perform an Ajax request for sorting the table. After the sorting the entire table will be changed, so we’ve added its id to the render attribute of that link.
Now, let’s look through our Java code. We are placing the sortOrder of the currently clicked column header link into the map to which we mapped sort orders; or we revert it in case it is already there. The name that we are using on the page to get the sort order from the map passed with <a4j:param> tag. So, all the naming definitions are actually made at view level and we are using a constant to get the column name for sorting from the request variables.
The same simple definitions are used for the country column. The year column is more interesting. We can set sortBy to the year property and rely on built-in sorting because we want the column to be sorted considering month and day properties when the year is the same. To accomplish this, we are going to add a comparator. Objects are passed (#{game} in this case) into the comparator so that any property can be checked and compared. In our bean we use the default Date object comparator method, as follows:
return o1.getFromDate().compareTo(o2.getFromDate());
Now we are sure that as longs as the year is the same, we will compare start dates that consider the month and day, as well.
Figure 7-26 shows the result after sorting by year.
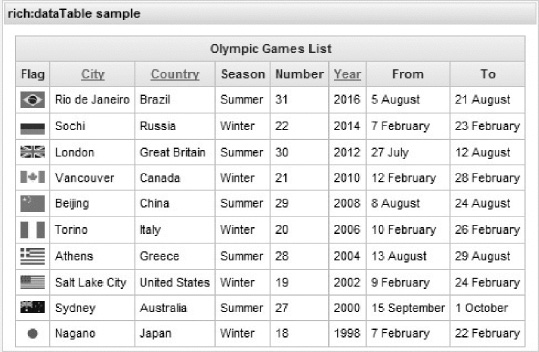
Figure 7-26. Table sorting with the year property
There is one important note about built-in sorting using the sortBy attribute. While sorting string properties, you can use Collator to perform local-sensitive strings comparison. In this case, just set the org.richfaces.datatableUsesViewLocale context parameter to true in your web.xml application.
Table Sorting by Multiple Columns
Almost nothing special needs to be done in order to sort by multiple columns. As you remember in the previous example, we cleared the map used to store sort orders before placing a new one there. Basically, all we need to do is remove that code, as shown at Listing 7-37.
Listing 7-37. Removing the code
<h:form>

    <rich:panel style="width:650px" header="rich:dataTable sample">

        <rich:dataTable value="#{olympicGamesBean.games}" var="game" id="table2" rows="10"

            sortPriority="#{sortingBean.sortPriorities}">

            <f:facet name="header">Olympic Games List</f:facet>

            …

            <rich:column sortBy="#{game.city}" id="city"

                sortOrder="#{sortingBean.sortOrdersMultiple['city']}">

                <f:facet name="header">

                    <a4j:commandLink value="City" render="table2"

                       action="#{sortingBean.sortMultiple}">

                        <a4j:param name="sortProperty" value="city" />

                    </a4j:commandLink>
                </f:facet>

                #{game.city}

            </rich:column>

            <!--More columns-->

        </rich:dataTable>

        <a4j:commandButton value="Reset Sorting" render="table2"

            action="#{sortingBean.resetSorting}"/>

    </rich:panel>

</h:form>
Notice that we use the sortPriority attribute in <rich:dataTable>. That attribute should be bound to a collection of the column ids. It’s used to define which order sorting will be performed. So the order of the ids in that collection will mean the order of the column sorts. Figure 7-27 shows the result after sorting by country and then by city. Note that cities are now also sorted in connection to the country.
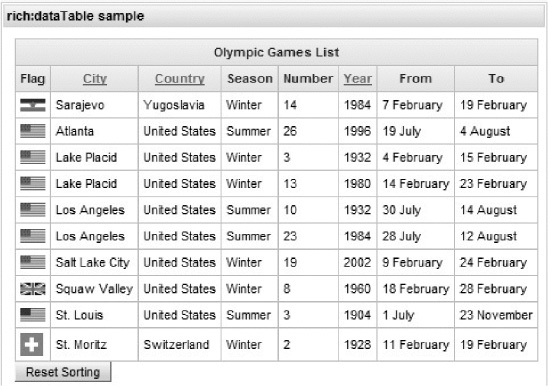
Figure 7-27. Table sorting by multiple properties
The Java code is shown in Listing 7-38.
Listing 7-38. The Java code
@ManagedBean

@ViewScoped

public class SortingBean implements Serializable{


   private Map<String, SortOrder> sortOrdersMultiple = new HashMap<String, SortOrder>();

   private List<String> sortPriorities = new ArrayList<String>();
   private static final String SORT_PROPERTY = "sortProperty";

   private void modifySortProperty(Map<String, SortOrder> orders,


   public void resetSorting() {

      this.sortOrdersMultiple.clear();

      this.sortPriorities.clear();

   }

   String sortProperty, SortOrder currentOrder) {

   if ((currentOrder == null) || (currentOrder == SortOrder.ascending)) {

      orders.put(sortProperty, SortOrder.descending);

      } else {

      orders.put(sortProperty, SortOrder.ascending);

      }

   }

   private String getSortProperty() {

      String sortProperty = FacesContext.getCurrentInstance()

         .getExternalContext().getRequestParameterMap().get(SORT_PROPERTY);

      return sortProperty;

   }

   public Comparator<GameDescriptor> getYearComparator() {

      return new Comparator<GameDescriptor>() {

         @Override

         public int compare(GameDescriptor o1, GameDescriptor o2) {

            return o1.getFromDate().compareTo(o2.getFromDate());

         }

      };

   }

   public void sortMultiple() {

      String sortProperty = getSortProperty();

      SortOrder currentOrder = sortOrdersMultiple.get(sortProperty);

      modifySortProperty(sortOrdersMultiple, sortProperty, currentOrder);

      if (!sortPriorities.contains(sortProperty))

         sortPriorities.add(sortProperty);

      }

   }

}
As we mentioned, we introduced a new sortPriorities list and added the column id to it after sorting on that column was invoked (but only in case it was not added before). Now we are not removing anything from the map prior to adding or changing the sortOrder. Also, you see a simple resetSorting method that clears both the sortOrders map and the sortPriorities list.
Now that we have covered all the attributes, you have full control over the table component sorting state. You will apply the same basic attributes when using more complex custom data models in upcoming sections.
One other example we want to cover is sorting using JavaScript API. It’s optimal for simple cases where you do not need to use links with custom Ajax request options. In fact, the examples we used are simple and JavaScript API usage is sufficient.
The table client object provides the sort() method, which should take three parameters: a column id, sort order, and a clearance boolean flag. The last two parameters are optional. Basically, you define it by which column table should be sorted. Then if needed, define a new sort order for that column (it will be reverted if not passed). The last parameter, clearance flag, tells the table if you want all the previous sorts to be reset prior to when the new sorting was applied.
Listing 7-39 shows the JavaScript API sorting example.
Listing 7-39. JavaScript API sorting
<h:form>

   <rich:panel style="width:650px" header="rich:dataTable sample">

      <rich:dataTable value="#{olympicGamesBean.games}" var="game" id="table3" rows="10">

         <f:facet name="header">Olympic Games List</f:facet>

         <rich:column>

            <f:facet name="header">Flag</f:facet>

            <h:graphicImage value="#{game.flagURI}" />

         </rich:column>

         <rich:column sortBy="#{game.city}" id="city">

            <f:facet name="header">

               <h:commandLink value="City">

                  <rich:componentControl target="table3" operation="sort">

                     <f:param name="column" value="city" />

                     <f:param value="" />

                     <f:param name="reset" value="true" />

                  </rich:componentControl>

               </h:commandLink>

            </f:facet>

            #{game.city}

         </rich:column>

         <rich:column sortBy="#{game.country}" id="country">

            <f:facet name="header">

               <h:commandLink value="Country">

                  <rich:componentControl target="table3" operation="sort">

                     <f:param name="direction" value="country" />

                     <f:param value="" />

                     <f:param name="reset" value="true" />

                  </rich:componentControl>

               </h:commandLink>

            </f:facet>

            #{game.country}

         </rich:column>

         <!--more columns-->

         <rich:column comparator="#{sortingBean.yearComparator}" id="year">

            <f:facet name="header">

               <h:commandLink value="Year">

                  <rich:componentControl target="table3" operation="sort">

                     <f:param name="column" value="year" />

                  </rich:componentControl>

               </h:commandLink>

            </f:facet>

            #{game.year}

         </rich:column>

         <!--more columns-->

      </rich:dataTable>

   </rich:panel>

</h:form>
We’ve used <rich:componentControl> (described in detail in Chapter 12) in order to define JavaScript calls declaratively, and passed parameters using nested <f:param> tags. We do not use sortOrder because while sorting from a client API we rely on component-state saving, which stores sort orders while staying on the same view. Sorting by city and country resets all previous sorting and performs a new one according to the link clicked. Clicking the date sorts the table by the date without resetting previous city or country sorting. Figure 7-28 shows how the table looks after sorting by country and then by year.

Figure 7-28. Table sorted by City and Country columns using JavaScript API
![]() Note Even though there are no Ajax controls on the page, it’s still important to have the table wrapped with
Note Even though there are no Ajax controls on the page, it’s still important to have the table wrapped with <h:form>, because after calling the sort() method, <rich:dataTable> itself will perform an Ajax request for sorting the data.
You’re probably wondering how to reflect the sorting on the page. All our examples thus far lack visual information about the current state. RichFaces doesn’t (yet) provide such a feature, so it’s left to be implemented by us. The simplest way is to use conditional rendering for markers that depend on the same sortOrder values. Listing 7-40 shows an example for sorting where we add a simple text indication to the headers. In your application, you could add some icons that point up and down.
Listing 7-40. Adding a simple text indication to the headers
<h:form>

    <rich:panel style="width:650px" header="rich:dataTable sample">

        <rich:dataTable value="#{olympicGamesBean.games}" var="game" id="table" rows="10">
            <f:facet name="header">Olympic Games List</f:facet>

            <rich:column>

                <f:facet name="header">Flag</f:facet>

                <h:graphicImage value="#{game.flagURI}" />

            </rich:column>

            <rich:column sortBy="#{game.city}" sortOrder="#{sortingBean.sortOrders['city']}">

                <f:facet name="header">

                    <a4j:commandLink value="City" render="table" action="#{sortingBean.sort}">

                        <a4j:param name="sortProperty" value="city" />

                    </a4j:commandLink>

                    <h:outputText value="(a)"

                       rendered="#{sortingBean.sortOrders['city']=='ascending'}"

                        style="font-weight:bold"/>

                    <h:outputText value="(d)"

                       rendered="#{sortingBean.sortOrders['city']=='descending'}"

                        style="font-weight:bold"/>

                </f:facet>

                #{game.city}

            </rich:column>

            <!--More columns-->

        </rich:dataTable>

    </rich:panel>

</h:form>
The result after sorting will look like Figure 7-29.
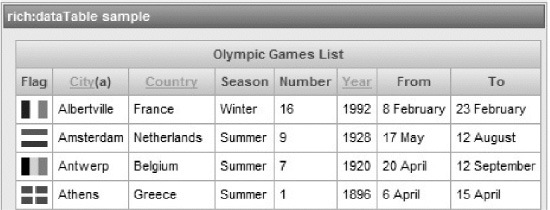
Figure 7-29. Table sorted by City column with simple text indication for sorted state
Table Filtering
This section describes the basics of table filtering in RichFaces. We take a similar approach as the sorting section, showing the main, basic filtering features that can be applied to either <rich:dataTable> or <rich:extendedDataTable> components. We will cover a more complicated case in the “Iteration Components Advanced Models” section, including using a database based filtering.
Analogous to sorting tables, filtering functionality can be implemented in two ways: using JavaScript API or using RichFaces action controls.
![]() Note Similar to sorting functionality, table components don’t provide built-in filtering controls. We will implement them using
Note Similar to sorting functionality, table components don’t provide built-in filtering controls. We will implement them using <a4j:ajax> and JavaScipt API. Make sure to follow the RichFaces Components Guide in order to learn when such built-in controls might become available.
Let’s start with basic attributes that should be used for filtering implementation. We will then build two different examples.
The first attribute is the filterExpression. It is an attribute on <rich:column>. For simple cases where a table’s built-in filtering is used, it should be set to an EL expression that is evaluated to a boolean value, and return true if the current iteration object matches the condition for filtering for that column. You could use JSTL, Seam, or any custom function in this attribute.
An alternative to the declarative approach is using the filter attribute. This attribute should be defined with an EL expression pointing to an object that implements the org.richfaces.model.Filter<T> interface. This object should implements a single accept(T t) method, which should be passed with the row object and return a similar boolean result that shows whether the object satisfies the filter condition or not.
Now that we have covered the concepts, let’s review an example of filtering implementation using inputs in headers that are plugged with <a4j:ajax> behavior in order to filter the table when values get changed.
In this example, we will use JSTL functions, so we need to add proper namespace to the page, as follows:
xmlns:fn="http://java.sun.com/jsp/jstl/functions"
Listing 7-41 shows the page code.
Listing 7-41. Page code
<h:form>

    <rich:panel style="width:650px" header="rich:dataTable sample">

        <rich:dataTable value="#{olympicGamesBean.games}" var="game" id="table">

            <f:facet name="header">Olympic Games List</f:facet>

            <rich:column>

                <f:facet name="header">Flag</f:facet>

                <h:graphicImage value="#{game.flagURI}" />

            </rich:column>

            <rich:column filterExpression="#{fn:startsWith(game.city,

               filteringBean.cityFilterString)}">

                <f:facet name="header">

                    <h:inputText value="#{filteringBean.cityFilterString}">

                        <a4j:ajax render="table@body" />

                    </h:inputText>

                </f:facet>

                #{game.city}

            </rich:column>

            <rich:column filterExpression="#{fn:containsIgnoreCase(game.country,

                filteringBean.countryFilterString)}">

                <f:facet name="header">

                    <h:inputText value="#{filteringBean.countryFilterString}">
                        <a4j:ajax render="table@body" />

                    </h:inputText>

                </f:facet>

                #{game.country}

            </rich:column>

            <rich:column>

                <f:facet name="header">Season</f:facet>

                #{game.season}

            </rich:column>

            <rich:column filter="#{filteringBean.centuryFilter}">

                <f:facet name="header">

                    <h:selectOneMenu value="#{filteringBean.centuryFilterNumber}">

                        <a4j:ajax render="table@body" />

                        <f:selectItem itemLabel="" itemValue="0" />

                        <f:selectItem itemLabel="19th century" itemValue="19" />

                        <f:selectItem itemLabel="20th century" itemValue="20" />

                        <f:selectItem itemLabel="21st century" itemValue="21" />

                    </h:selectOneMenu>

                </f:facet>

                #{game.year}

            </rich:column>

        </rich:dataTable>

    </rich:panel>

</h:form>
On the page we see three columns, which get defined as filterable. The City column uses the fn:startWith JSTL function and the Country column uses fn:containsIgnoreCase. The third column uses the filter attribute bound to a centuryFilter object in our FilteringBean. Current filtering values for the first two columns are stored in two string properties bound to inputs cityFinteringString and countryFilteringString and an integer property stored in the centuryFilteringNumber field of FilteringBean. As a result of filtering, we should update only data in the table and not loose our input focus. We updated only the body of the table from <a4j:ajax> using the body meta-component, which were mentioned in the “Using Partial Table Updates” section of this chapter.
Listing 7-42 shows the bean code.
Listing 7-42. The bean code
@ManagedBean

@ViewScoped

public class FilteringBean implements Serializable{


    private String cityFilterString;

    private String countryFilterString;

    private int centuryFilterNumber;


    public Filter<GameDescriptor> getCenturyFilter() {

        return new Filter<GameDescriptor>() {

            @Override

            public boolean accept(GameDescriptor t) {

                switch (centuryFilterNumber) {

                    case 19:

                        return (t.getYear() >= 1800) && (t.getYear() < 1900);

                    case 20:
                        return (t.getYear() >= 1900) && (t.getYear() < 2000);

                    case 21:

                        return (t.getYear() >= 2000);

                    default:

                    return true;

                }

            }

        };

    }

    //Getters and Setters

}
cityFilteringString and countryFilteringString properties get compared with every Olympic Game corresponding property, according to JSTL functions defined in filterExpression attributes. The CenturyFilter object is probably of most interest to us. As we said earlier, analogous to the sorting comparator usage, the iteration object (GameDescriptor) is passed to the accept method on every iteration to check whether it satisfies filter conditions or not. We use a simple switch statement according to possible select component values to check whether the year for the current object is matching the chosen century.
Figure 7-30 shows how the table looks after filtered by country and century.

Figure 7-30. Table filtering
Pretty simple isn’t it? Now let’s show you the second approach, using JavaScript API. The table client object provides the filter() API method. This method should be passed with three parameters: column id, current filter value, and clearance flag. The first and the second parameter are required and don’t need an explanation. The third parameter determines if the other filtering rules should be cleared on a new filtering call or be added to previous ones.
Listing 7-43 shows the page code for the API usage example.
<h:form>

    <rich:panel style="width:650px" header="rich:dataTable sample">

        <a4j:outputPanel ajaxRendered="true" layout="block">

            <a4j:repeat value="#{filteringBean.continents}" var="cont">

                <h:outputLink value="#"

                   styleClass="#{filteringBean.continentFilterString==cont ?

                   'bold':''}">

                    #{cont}

                    <rich:componentControl target="table2" operation="filter" event="click">

                        <f:param value="contCol"/>

                        <f:param value="#{cont}"/>

                    </rich:componentControl>

                </h:outputLink> |

            </a4j:repeat>

        </a4j:outputPanel>

        <a4j:outputPanel ajaxRendered="true" layout="block">

            <h:outputLink value="#" styleClass="#{filteringBean.centuryFilterNumber==0 ?

               'bold':''}"

                onclick="#{rich:component('table2')}.filter('centCol', 0); return false;">

                    All available

            </h:outputLink> |

            <h:outputLink value="#" styleClass="#{filteringBean.centuryFilterNumber==19 ?

               'bold':''}"

                onclick="#{rich:component('table2')}.filter('centCol', 19); return false;">

                19th century

            </h:outputLink> |

            <h:outputLink value="#" styleClass="#{filteringBean.centuryFilterNumber==20 ?

               'bold':''}"

                onclick="#{rich:component('table2')}.filter('centCol', 20); return false;">

                20th century

            </h:outputLink> |

            <h:outputLink value="#" styleClass="#{filteringBean.centuryFilterNumber==21 ?

               'bold':''}"

                onclick="#{rich:component('table2')}.filter('centCol', 21); return false;">

                21st century

            </h:outputLink> |

        </a4j:outputPanel>

        <rich:dataTable value="#{olympicGamesBean.games}" var="game" id="table2">

            <f:facet name="header">Olympic Games List</f:facet>

            <!--Other columns-->

            <rich:column id="contCol" filterValue="#{filteringBean.continentFilterString}"

                filterExpression="#{(filteringBean.continentFilterString=='') ||

                 (game.continent==filteringBean.continentFilterString)}">

                <f:facet name="header">Continent</f:facet>

                    #{game.continent}

            </rich:column>

            <!--Other columns-->

            <rich:column filter="#{filteringBean.centuryFilter}"

                filterValue="#{filteringBean.centuryFilterNumber}" id="centCol">

                <f:facet name="header">Year</f:facet>
                #{game.year}

            </rich:column>

        </rich:dataTable>

    </rich:panel>

</h:form>
We added the same century filter from Listing 7-42, and for the continents we used empty or equals conditions. In order to perform filtering, we called the filter() API method with target column id and filter value parameters.
All we added to the bean was a continents array with a getter method in order to populate our filter panel dynamically, as follows:
public final static String[] continents = { "Europe", "Asia", "North America", "South

America", "Oceania" };
Figure 7-31 shows the result after clicking the “North America” and “21st Century” links.
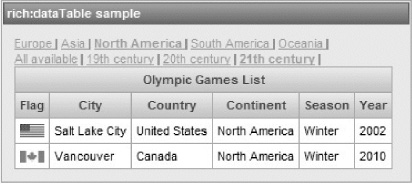
Figure 7-31. Table filtered via JavaScript API
As we have no inputs defined for the filter, we need to define the filterValue attribute with the EL expression set to the bean property, which will be updated with the current filtering value, and so could be used in the Filter object and defined in the filterExpression.
If the filter returns no data, you can use the noDataLabel attribute or the noData facet in order to define the content to be shown in such case. Adding a facet is shown in Listing 7-44.
Listing 7-44. Adding a Facet to Table Filtered via JavaScript API.
<f:facet name="noData">

    <h:outputText value="No games for current filter found" style="font-weight:bold"/>

</f:facet>
The result will be as shown in Figure 7-32 after clicking “Asia” and “19th Century.”
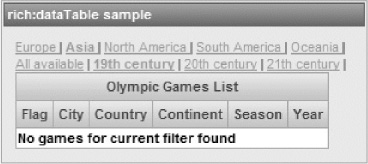
Figure 7-32. No results to display after filtering
Iteration Components Advanced Models
If you previously worked with JSF tables, you know that you can pass not only a simple List to the <rich:dataTable> value, but also point the table to the data model that is an object of a class that extends the javax.faces.model.DataModel<E> abstract class.
RichFaces adds the following two data models:
org.ajax4jsf.model.ExtendedDataModel<E>: A base model abstract class. It defines the abstract model contract, which helps to manage complex data structures like trees, spreadsheets, and so on, in complex iteration components.org.richfaces.model.ArrangeableModel: A model implementation that extendsExtendedDataModeland implements theorg.richfaces.model.Arrangeableinterface. This model adds filtering and sorting operations.
Let’s go over why we need these special data models.
The ExtendedDataModel adds the rowKey entity to a JSF model and uses rowKey instead (in some cases together with) of rowIndex. This key is an abstract property that allows us to identify the object among a wrapped collection. This key can be your database entity id for example. Using keys instead of just indexes guarantees that we will easily and correctly get the object from the wrapped model, in the case of a paginated model, with built-in component selection enabled. Using javax.faces.model.DataModel, which uses indexes, we will need to design and implement additional “model index” or “database object” lookup functionality. When using ExtendedDataModel, all the necessary methods and default implementation are already provided.
ExtendedDataModel has org.ajax4jsf.model.SequenceDataModel<E> simple implementation used as the default model for the iteration components (when sorting and filtering features are not activated). It extends with org.richfaces.model.TreeSequenceKeyModel<V>, which is also an abstract class with implementations used in tree components.
Finally, ArrangeableModel extends the ExtendedDataModel, providing default implementation for abstract classes and implementing the Arrangeable interface. It uses the same methods from the extended model and with an additional arrange() method used to set sorting and filtering rules to the model from the component level.
Let’s review both models by creating two examples.
Data Preparation
In order to get close to a real-world application, we will add a database layer to our application and use Hibernate to work with the data.
We will use HSQLDB (version 1.8.0.2 ) for the database in our example, and Hibernate Core (version 3.6.2).
The next step is to add the Hibernate configuration file (hibernate.cfg.xml) to the application resources. Its content is shown in Listing 7-45.
Listing 7-45. Adding the Hibernate configuration file to application resources
<?xml version='1.0' encoding='utf-8'?>

<!DOCTYPE hibernate-configuration PUBLIC

"-//Hibernate/Hibernate Configuration DTD//EN"

"http://hibernate.sourceforge.net/hibernate-configuration-3.0.dtd">

<hibernate-configuration>

    <session-factory>

        <property name="hibernate.connection.driver_class">org.hsqldb.jdbcDriver</property>

        <property name="hibernate.connection.url">jdbc:hsqldb:mem:iteration-sample</property>

        <property name="hibernate.connection.username">sa</property>

        <property name="hibernate.connection.password"></property>

        <property name="hibernate.connection.pool_size">10</property>

        <property name="show_sql">true</property>

        <property name="dialect">org.hibernate.dialect.HSQLDialect</property>

        <property name="hibernate.hbm2ddl.auto">create</property>

        <mapping resource="gameDescriptor.hbm.xml" />

    </session-factory>

</hibernate-configuration>
That’s a pretty a simple Hibernate configuration file, so we will not spend much time on it. If you need more information on Hibernate, please visit the JBoss Community’s Hibernate page at http://hibernate.org. Most interesting is the mapping that is defined using the <mapping> element. Listing 7-46 shows that mapping.
Listing 7-46. Mapping the hibernate configuration file
<?xml version="1.0" encoding="UTF-8"?>

<!DOCTYPE hibernate-mapping PUBLIC

    "-//Hibernate/Hibernate Mapping DTD 3.0//EN"

    "http://hibernate.sourceforge.net/hibernate-mapping-3.0.dtd">

<hibernate-mapping>

    <class name="org.richfaces.book.examples.model.GameDescriptor">

        <id name="id">

            <generator class="increment" />

        </id>

        <property name="city" />

        <property name="country" />

        <property name="continent" />

        <property name="flagName" />

        <property name="number" />

        <property name="season" />

        <property name="status" />

        <property name="fromDate" />

        <property name="toDate" />

    </class>

</hibernate-mapping>
It’s the GameDescriptor class, id field definition for the class objects and fields definitions. You are already familiar with the class itself, as we used it across the entire chapter, and we just mapped it to the database using that descriptor. One thing we also performed in the code is defining that the GameDescriptor class extends the BaseDescriptor class. And that BaseDescriptor is a simple class, shown in Listing 7-47, which provides a single id property together with accessor methods. So we are using that id property in mapping.
Listing 7-47. BaseDescriptor
public class BaseDescriptor implements Serializable{

   private Integer id;

   public Integer getId() { return id; }

   public void setId(Integer id) { this.id = id; }

}
You are probably wondering why we didn’t use annotations. We could have added the same mappings via annotations in the GameDescriptor class itself to look more modern. But, we just didn’t want to add more annotations to the class that already defined a couple of JAXB annotations (to initialize it from XML).
The easiest way for us to populate the database is to persist the collection we already initialized from XML and used for all the samples earlier. Listing 7-48 shows the application scoped bean, which populates the database.
Listing 7-48. Application scoped bean
@ApplicationScoped

@ManagedBean(eager = true)

public class GamesHibernateBean {


   @ManagedProperty(value = "#{gamesParser.gamesList}")

   private List<GameDescriptor> games = new ArrayList<GameDescriptor>();

   private static final String[] GAME_FIELDS = {"country", "city", "continent", "season",

      "number", "year"};


   @PostConstruct

   public void fillDatabase(){

      Session hibernateSession = HibernateUtils.getSessionFactory().openSession();

         for (BaseDescriptor game : games) {

            try {

               hibernateSession.persist(game);

            }catch (HibernateException e){

                e.printStackTrace();

            }

        }

        hibernateSession.flush();

        hibernateSession.close();

    }


    public String[] getGameFields(){

        return GAME_FIELDS;

    }


    public void setGames(List<GameDescriptor> games) {

        this.games = games;

    }
    public List<GameDescriptor> getGames() {

        return games;

    }

}
According to the eager=true definition, an application scoped bean will be created on application start. The gamesList will be injected from the GameParser, which was used in the beginning of this chapter. We just iterate over the injected list and persist every object into the database.
In order to obtain the Hibernate session, we used the popular HibernateUtils class, which provides basic implementation of session factory programmatic lookup from the Hibernate documentation, as shown in Listing 7-49.
Listing 7-49. HibernateUtils
public class HibernateUtils {

    private static final SessionFactory sessionFactory;

    static {

        try {

            sessionFactory = new Configuration().configure().buildSessionFactory();

        } catch (Throwable ex) {

            System.err.println("Initial SessionFactory creation failed." + ex);

            throw new ExceptionInInitializerError(ex);

        }

    }


    public static SessionFactory getSessionFactory() {

        return sessionFactory;

    }

}
![]() Note We intentionally decided to go with a very basic JSF-Hibernate configuration. Showing different advanced options of plugging Hibernate or JPA, for example, into the JSF application is beyond the scope of this book; we want to concentrate on the UI components data model.
Note We intentionally decided to go with a very basic JSF-Hibernate configuration. Showing different advanced options of plugging Hibernate or JPA, for example, into the JSF application is beyond the scope of this book; we want to concentrate on the UI components data model.
ExtendedDataModel Implementation for Paging
The topic of ExtendedDataModel implementation for paging is one of the most popular among those who play with iteration components and JSF/RichFaces in general. All the component library references show pretty simple examples of pointing the table component to the list from a managed bean and implementing additional functionality on top of that model. But later, getting such a bean connected to the database layer appears too time consuming, for example, to get a complete list to show only 10 to 20 rows using the first and rows table attributes.
The same problem applied to the RichFaces <rich:dataTable>–<rich:dataScroller/> components pair. Simple usage of the tables pointed to List for example and wrapped to the SequenceDataModel by default, obtains the entire list and partially encodes it using the first, rows, and page properties. But a common task for a real application is to optimize database calls and fetch only the data that corresponds to the current page to be displayed. Next, we will implement the model properly to achieve that result.
![]() Note This is a very common question (or even expectation) from new developers. Developers expect the table to be able to perform partial data fetching because it provides a data scrolling component. A UI component in JSF, however, doesn’t know anything about the underlying model and completely relies on the default if proper custom implementation is not provided. The default gets a complete list, wraps it as a model, and makes it available for the page.
Note This is a very common question (or even expectation) from new developers. Developers expect the table to be able to perform partial data fetching because it provides a data scrolling component. A UI component in JSF, however, doesn’t know anything about the underlying model and completely relies on the default if proper custom implementation is not provided. The default gets a complete list, wraps it as a model, and makes it available for the page.
Let’s review more of the ExtendedDataModel abstract class in Listing 7-50.
Listing 7-50. ExtendedDataModel Abstract Class
public abstract class ExtendedDataModel<E> extends DataModel<E> {

    public abstract void setRowKey(Object key);

    public abstract Object getRowKey();

    public abstract void walk(FacesContext context, DataVisitor visitor, Range range, Object

       argument);

}
It defines three new methods extending the standard JSF DataModel. Having only the rowIndex isn’t really enough for complex data models and features. Furthermore, the walk() method should be implemented and provide functionality of iteration over the model using the “Visitor” pattern. Concrete iteration components that use the models based on this will call the walk() method a few times at different request phases. The following parameters will be passed to the method: a FacesContext instance, a visitor object that will perform current iteration data processing, and a range object that specifies the range of iteration component and can accept one more argument depending on implementation.
When we know which methods we should compare to the standard DataModel, let’s look at Listing 7-51, which shows our custom model (other methods will be explained soon).
Listing 7-51. Custom model
public abstract class BasePageableHibernateModel<T extends BaseDescriptor> extends


   ExtendedDataModel<T> {

   protected Class<T> entityClass;

   protected SequenceRange cachedRange = null;

   protected Integer cachedRowCount = null;

   protected List<T> cachedItems = null;

   protected Object rowKey;


   public BasePageableHibernateModel(Class<T> entityClass) {

      super();

      this.entityClass = entityClass;

   }


   @Override

   public Object getRowKey() {

      return rowKey;

   }
   @Override

   public void setRowKey(Object key) {

      this.rowKey = key;

   }


   protected Criteria createCriteria(Session session) {

      return session.createCriteria(entityClass);

   }


   @Override

   public void walk(FacesContext facesContext, DataVisitor visitor, Range range, Object

      argument) {

      // Will be described in details later in the chapter

   }


   @Override

   public int getRowCount() {

      if (this.cachedRowCount == null) {

         Session session = HibernateUtils.getSessionFactory().openSession();

         try {

            Criteria criteria = createCriteria(session);

            this.cachedRowCount = criteria.list().size();

         } finally {

            session.close();

         }

      }

      return this.cachedRowCount;

   }


   @Override

   public T getRowData() {

      for (T t : cachedItems) {

         if (t.getId().equals(this.getRowKey())) {

            return t;

         }

      }

      return null;

   }


   @Override

   public boolean isRowAvailable() {

      return (getRowData() != null);

   }

   // other methods see note below

}
![]() Note To keep the code shorter, we skipped a few methods that are not used in this implementation.
Note To keep the code shorter, we skipped a few methods that are not used in this implementation.
That’s a generic model. It’s marked as abstract and parameterized with t he object class. This allows you to later use the same model code for all our various objects across the application.
Let’s review the methods overridden from the ExtendedDataModel. As we said before, the id of the wrapped object from the database is used as a rowKey for the object. getRowData() simply iterates the cached items (collected during the walk() method execution) and performs lookup for an object id equals to the current rowKey.
The isRowAvailable() is a standard method from DataModel and simply returns the result from checking the current rowData for value. Let’s review another getRowCount() simple method before looking at the walk() method.
We’re using Hibernate Criteria API for retrieving entities. We created Criteria without any new Criterions added in order to get the size of the result set. We’re performing simple caching of that size in session using the cachedRowCount bean property.
Notice that very important parts—getRowIndex() and setRowIndex()—are not required to be implemented properly when using a simple <rich:dataTable> component. We only added them as stub methods. However, if you will want to use <rich:extendedDataTable>, it requires these methods to have proper implementation for selection functionality. The reason for this is rather simple: as the table allows sequential selection of row ranges (for example standard UI SHIFT key + mouse click selection), it can’t use only rowKeys because you can’t characterize a range using anything except indexes. If you require selection, the following two methods need to be implemented:
setRowIndex(index): This method calls thesetRowKey(rowKey)method and passes therowKeyof the object, which corresponds to the index for a given range and sorting/filtering rules applied to the wrapped model.getRowIndex():This returns the index in the wrapped model of the object for a currently setrowKey.
In Listing 7-52, let’s review in detail the most important walk() method, as well as one helper method.
Listing 7-52. walk() method as well as one helper method
protected static boolean areEqualRanges(SequenceRange range1, SequenceRange range2) {

   if (range1 == null || range2 == null) {

      return range1 == null && range2 == null;

   } else {

      return range1.getFirstRow() == range2.getFirstRow() && range1.getRows() == range2.getRows();

   }

}


@Override

public void walk(FacesContext facesContext, DataVisitor visitor, Range range, Object argument) {

   SequenceRange sequenceRange = (SequenceRange) range;

   if (this.cachedItems == null || !areEqualRanges(this.cachedRange, sequenceRange)) {

      Session session = HibernateUtils.getSessionFactory().openSession();

      try {

         Criteria criteria = createCriteria(session);

         if (sequenceRange != null) {

            int first = sequenceRange.getFirstRow();

            int rows = sequenceRange.getRows();

            criteria.setFirstResult(first);

            if (rows > 0) {
               criteria.setMaxResults(rows);

            }

         }

         this.cachedRange = sequenceRange;

         this.cachedItems = criteria.list();

      } finally {

         session.close();

      }

   }

   for (T item : this.cachedItems) {

      visitor.process(facesContext, item.getId(), argument);

   }

}
As you can see, the idea is pretty simple. First, we are checking that we haven’t already cached the data. Even if the data is cached, we then check whether the cached data range matches the current range passed by the table. . If no match, the component is getting rendered first time or it was switched to a different page using the <rich:dataScroller> component or by changing first and/or rows attributes. In this case we use Criteria API, setting parameters from Range as criteria parameters (first object index to fetch and number of objects which should be fetched). After getting the result. we cache it in a session with the current Range object.
Finally, we are iterating over the result set that we just obtained, calling the process() method of the Visitor.
![]() Note The
Note The rowKey passed to the visitor is added to the clientId of nested components for every iteration. getRowKey() has to return a value that is a string-based and is compatible with javax.faces.component.UIComponent#getClientId(FacesContext ctx). In other cases, you have to provide the rowKeyConverter using a corresponding iteration component attribute.
Finally, we need to check the model class for specific GameDescriptor objects and the page that defines the <rich:dataTable> component. Listing 7-53 shows the PageableHibernateModel class.
Listing 7-53. PageableHibernateModel class
@ManagedBean

@SessionScoped

public class PageableHibernateModel extends BasePageableHibernateModel<GameDescriptor> {


   public PageableHibernateModel() {

      super(GameDescriptor.class);

   }


}
Have you ever seen a simpler model class? By now you should realize how important it is to provide a generic model for your data objects. Once implemented, it usually makes concrete models implementations the easiest task. We just passed the GameDescriptor class to initialization. An abstract model we reviewed earlier implements everything we need.
![]() Note We wanted to keep the examples simple, but keep in mind that placing data in a session scope is not always a good idea because you may run into concurrent access problems.
Note We wanted to keep the examples simple, but keep in mind that placing data in a session scope is not always a good idea because you may run into concurrent access problems.
In Listing 7-54, let’s look at the page that uses that model, and render the table with a limited page size and <rich:dataScroller> control.
Listing 7-54. Render the table with a limited page size and <rich:dataScroller> control
<rich:dataTable value="#{pageableHibernateModel}" var="game" rows="10" id="table">

   <f:facet name="header">Olympic Games List</f:facet>

   <c:forEach items="#{gamesHibernateBean.gameFields}" var="column">

      <rich:column id="#{column}">

         <f:facet name="header">

            <h:outputText value="#{column}"/>

         </f:facet>

         <h:outputText value="#{game[column]}"/>

      </rich:column>

   </c:forEach>

   <f:facet name="footer">

      <rich:dataScroller/>

   </f:facet>

</rich:dataTable>
Things are pretty simple here. We are using a registered data model as a table value, and using the rows attribute, limiting the number of rows per page to 10.
Most notable there is <c:forEach> usage, which provides a way to iterate over the gameFields (column names stored in GamesHibernateBean) and dynamically add columns to the table.
![]() Note Using
Note Using <c:forEach> instead of <ui:repeat> is needed in this case. <c:forEach> has to be used in cases where we need to create the actual components in a JSF tree during the view creation phase, rather than iterating over a single instance at the render response phase (as would happen with <ui:repeat>). There are many good JSF-related resources that can provide more information.
The footer facet contains the <rich:dataScroller> component.
Figure 7-33 shows how it will looks on initial rendering.
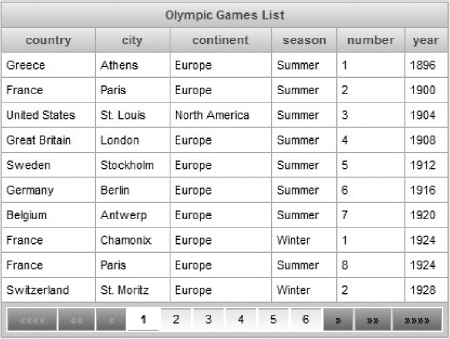
Figure 7-33. <rich:dataTable> with dynamic columns and backed by custom model
When we click to some other page, the table will be switched, as shown in Figure 7-34.
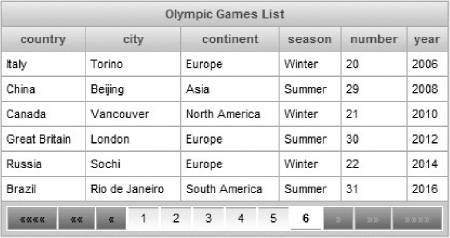
Figure 7-34. <rich:dataTable> with dynamic columns and backed by custom model after page change
You can easily check with debug or adding some logging code to the model that database calls are performed only in the following ways:
- Twice on initial rendering in order to cache all the object counts and to get the first 10 records.
- Once for a page change, when the next 10 records are loaded. In complex cases, a row count should not be cached in such a simple way because the table size could change; but it works for simple cases with static tables.
It turns out that the walk() method is called a few times per request; as many times as the component needed to iterate over the value according to JSF specification (decode, render). And rowCount also gets called a few times by the <rich:dataTable> and <rich:dataScoller> components. So, as previously mentioned, if a table points to a database result set directly, rather than using the model like we created, you will see numerous database calls on initial rendering or a single request. The performance of such implementations will be extremely low.
ArrangeableModel Implementation for Filtering and Sorting
This section shows you ArrangeableModel implementation in order to implement in-database sorting and filtering. ArrangeableModel is based on the same ExtendedDataModel but also implements the Arrangeable interface. We will not implement all the base functionality in our ArrangeableModel from scratch. Instead, we will extend our BasePageableModel.
But first, in Listing 7-55, let’s see how the page will be changed.
Listing 7-55. Code for ArrangeableModel implementation
<h:form>

   <a4j:outputPanel ajaxRendered="true" layout="block">

      <a4j:repeat value="#{filteringBean.continents}" var="cont">

         <h:outputLink value="#" styleClass="#{filteringBean.continentFilterString==cont ?

            'bold':''}">

            #{cont}

            <rich:componentControl target="table" operation="filter" event="click">

               <f:param value="continent" />

               <f:param value="#{cont}" />

            </rich:componentControl>

         </h:outputLink> |

      </a4j:repeat>

   </a4j:outputPanel>

   <rich:dataTable value="#{arrangeableHibernateModel}" var="game" rows="10" id="table">

      <f:facet name="header">Olympic Games List</f:facet>

      <c:forEach items="#{gamesHibernateBean.gameFields}" var="column">

         <rich:column id="#{column}" sortBy="#{column}" filterExpression="#{column}">

            <f:facet name="header">

               <h:commandLink value="#{column}">

                  <rich:componentControl target="table" operation="sort">

                     <f:param value="#{column}" />

                     <f:param value="" />

                     <f:param name="reset" value="true" />

                  </rich:componentControl>

               </h:commandLink>

            </f:facet>

            <h:outputText value="#{game[column]}"/>

         </rich:column>

      </c:forEach>

      <f:facet name="footer">

         <rich:dataScroller/>

      </f:facet>

   </rich:dataTable>

</h:form>
The differences include the following:
- The
sortByandfilterExpressionproperties for the column are from the filtering and sorting section. Instead of setting them to object properties or simple boolean expressions, we passed column names as parameters in order to pick the column names that were activated on the model level. - The FilteringBean remained the same as in the previous example. It contains the same static continents array.
- The block of links for filtering that use a simple JavaScript API.
- The links in headers for sorting are also based on a simple JavaScript API.
It’s now time to dig into the code for BaseArrangeableHibernateModel is just a concrete implementation of the generic one), as shown in Listing 7-56. It extends the BasePageableHibernateModel so that all the base model methods remain at a super-class level and we will see only additional and changed methods. In order to make the code cleaner, we skipped a few utility methods, but will explain them after the initial model review.
Listing 7-56. Code for BaseArrangeableHibernateModel
public abstract class BaseArrangeableHibernateModel<T extends BaseDescriptor> extends

   BasePageableHibernateModel<T> implements Arrangeable {

  private List<FilterField> filterFields;

  private List<SortField> sortFields;


  public BaseArrangeableHibernateModel(Class<T> entityClass) {

    super(entityClass);

  }


  private void appendFilters(FacesContext context, Criteria criteria) {

      // Described in details later. Adds filters to the Criteria.

  }


  private void appendSorts(FacesContext context, Criteria criteria) {

      // Described in details later. Adds sorts to the Criteria.

  }


  private String getPropertyName(FacesContext facesContext, Expression expression) {

      // Described in details later. Used to get properties names defined in sortBy and filterExpression

  }


  @Override

  public void walk(FacesContext facesContext, DataVisitor visitor, Range range, Object argument) {

    SequenceRange sequenceRange = (SequenceRange) range;

    if (this.cachedItems == null || !areEqualRanges(this.cachedRange, sequenceRange)) {

       Session session = HibernateUtils.getSessionFactory().openSession();

         try {

            Criteria criteria = createCriteria(session);

            appendFilters(facesContext, criteria);

            appendSorts(facesContext, criteria);

            if (sequenceRange != null) {
               int first = sequenceRange.getFirstRow();

               int rows = sequenceRange.getRows();

               criteria.setFirstResult(first);

               if (rows > 0) {

                  criteria.setMaxResults(rows);

               }

            }

            this.cachedRange = sequenceRange;

            this.cachedItems = criteria.list();

         } finally {

            session.close();

         }

    }

    for (T item : this.cachedItems) {

      visitor.process(facesContext, item.getId(), argument);

    }

  }


  @Override

  public int getRowCount() {

    if (this.cachedRowCount == null){

          Session session = HibernateUtils.getSessionFactory().openSession();

          try {

             Criteria criteria = createCriteria(session);

             appendFilters(FacesContext.getCurrentInstance(), criteria);

             cachedRowCount = criteria.list().size();

          } finally {

             session.close();

          }

        }

     return this.cachedRowCount;

  }


  public void arrange(FacesContext facesContext, ArrangeableState state) {

    if (state != null) {

      this.filterFields = state.getFilterFields();

      this.sortFields = state.getSortFields();

      this.cachedItems = null;

      this.cachedRange = null;

      this.cachedRowCount=null;

    }

  }

}
Let’s now review what we have here, starting from the getRowCount() method. It creates Criteria and gets the list size in case the row count is still not marked as cached. It only appends filters to the Criteria prior to getting the result set size.
The new arrange() method accepts the FacesContext and ArrangeableState objects as parameters. The ArrangeableState object provides three methods: getFilterFields(), getSortFields(), and getLocale(). The filter fields contain information about filterValue, filterExpression, and Filter objects attached to the column. The sort fields contain information about sortValue, sortBy, and defined Comparators.
If you check RichFaces sources, you will see that in default ArrangeableModel implementation, the arrange() method, performs sorting and filtering. But that’s not usually the case for the custom model. Because of the difference with the default, it doesn’t operate on a full list, but partially loads it according to the current page range in walk(). So we store sorting and filtering fields for further processing in walk() in that method.
Let’s review the walk() method, which looks very similar to the walk() method from the pageable model; the only difference is that it appends sorting and filtering to Criteria prior to fetching the result list.
We’ll look at the trimmed methods in more detail in Listing 7-57.
Listing 7-57. Trimmed methods
private String getPropertyName(FacesContext facesContext, Expression expression) {

   try {

   return (String) ((ValueExpression) expression).getValue(facesContext.getELContext());

   } catch (ELException e) {

    throw new FacesException(e.getMessage(), e);

   }

}


private void appendSorts(FacesContext context, Criteria criteria) {

  if (sortFields != null) {

    for (SortField sortField : sortFields) {

      SortOrder ordering = sortField.getSortOrder();

      if (SortOrder.ascending.equals(ordering) || SortOrder.descending.equals(ordering)) {

        String propertyName = getPropertyName(context, sortField.getSortBy());

        Order order = SortOrder.ascending.equals(ordering) ? Order.asc(propertyName) :

          Order.desc(propertyName);

        criteria.addOrder(order.ignoreCase());

      }

    }

  }

}


private void appendFilters(FacesContext context, Criteria criteria) {

  if (filterFields != null) {

    for (FilterField filterField : filterFields) {

      String propertyName = getPropertyName(context,filterField.getFilterExpression());

      String filterValue = (String)filterField.getFilterValue();

      if (filterValue != null && filterValue.length() != 0) {

        criteria.add(Restrictions.like(propertyName, filterValue,

           MatchMode.ANYWHERE).ignoreCase());

      }

    }

  }

}
This method seems fairly self-explanatory. Every append*() method iterates over the sort or filter fields, obtains the current values for filtering or sorting, and applies it to the criteria by using its API. The getPropertyName() method obtains the column names that were passed using sortBy and filterExpression by getting value from the given ValueExpression.
It’s time to see the result, first looking at the simple concrete object model class shown in Listing 7-58.
Listing 7-58. Simple concrete object model class
@ManagedBean

@SessionScoped

public class ArrangeableHibernateModel extends BaseArrangeableHibernateModel<GameDescriptor> {

   public ArrangeableHibernateModel() {

      super(GameDescriptor.class);

   }

}
Figure 7-35 shows the table after initial rendering.
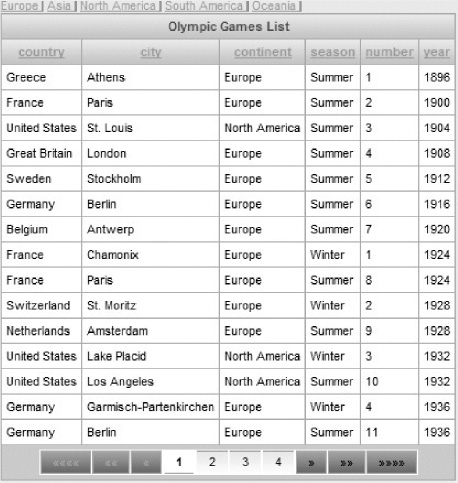
Figure 7-35. Table backed by ArrangeableModel custom implementation
Figure 7-36 shows the table after sorting (by city) and filtering (by continent).
Figure 7-36. Filtered and sorted table
That’s all the coverage related to models and the advanced features they provide. We believe you now have all the information to implement complex data models with RichFaces data iteration components.
Summary
This chapter introduced various data iteration components, from the most basic <a4j:repeat>, which doesn’t produce any markup, to complex components such as <rich:extendedDataTable>. One unique feature that all data iteration components have is partial-table update, where you can specify which specific row(s) to update. The look and feel of all components can be greatly customized via skins, which are covered in Chapter 13. At the end we covered the usage of custom models implementations for complex, in-database paging/sorting/filtering operations in data table components.