
C H A P T E R 2
Getting Started
In this chapter we are going to get our hands dirty. We will set up our working environment so that you can try all the examples. As JSF 2 now has Ajax functionality built-in, we will cover that first and then move on to RichFaces and start showing you how RichFaces extends that functionality.
Setting Up
RichFaces can be used in any container that is JSF 2 compatible. This means all servers compliant with the Java EE 6 specification (JBoss AS6/7, Glassfish 3) and all major servlet containers (Tomcat, Jetty, and Resin).
Adding RichFaces to an Existing JSF 2 Project
Not to tie you to any specific IDE (integrated development environment), but we will use Apache Maven to set up a project. Since RichFaces is built on top of JSF 2, its installation is as easy as adding a few JARs to your project. Configure your repositories following the Maven Getting Started Guide located on the JBoss Community web site at http://community.jboss.org/wiki/MavenGettingStarted-Users. Then, simply add Listing 2-1 to your projects pom.xml. Complete Maven guide can be found at: http://www.sonatype.com/books/mvnref-book/reference.
Listing 2-1. Add this to your projects pom.xml
<dependencyManagement>

  <dependencies>

    <dependency>

      <groupId>org.richfaces</groupId>

      <artifactId>richfaces-bom</artifactId>

      <version>${richfaces.version}</version>

      <scope>import</scope>

      <type>pom</type>

    </dependency>

  </dependencies>

</dependencyManagement>

…

<dependency>

  <groupId>org.richfaces.ui</groupId>

  <artifactId>richfaces-components-ui</artifactId>
</dependency>

<dependency>

  <groupId>org.richfaces.core</groupId>

  <artifactId>richfaces-core-impl</artifactId>

</dependency>
For other build systems, such as Ant, just add the following JARs to your projects WEB-INF/lib directory:
richfaces-core-api-<ver>.jarrichfaces-core-impl-<ver>.jarrichfaces-components-api-<ver>.jarrichfaces-components-ui-<ver>.jarsac-1.3.jarcssparser-0.9.5.jargoogle-guava-r08.jar
![]() Note Version of
Note Version of sac-x.x.jar and cssparster-x.x.x.jar are the most current as of writing of this book. Please check the JBoss Community RichFaces web site at www.jboss.org/richfaces for the latest versions.
Optional Dependencies
There are a number of optional JAR files (dependencies) you may want to add to a RichFaces project depending on your deployment or features you want to use. The optional JAR files are for client-side validation when using Apache Tomcat, caching, and using Component Development Kit annotations.
Validation Dependencies
If you are deploying to Apache Tomcat and will be using client-side validation, then the following JARs are also needed:
validation-api.jarhibernate-validator.jarslf4j-api.jarslf4j-jdk14.jar
Listing 2-2 shows the Maven dependency that should be used.
Listing 2-2. The Maven dependency that should be used
<dependency>

   <groupId>org.hibernate</groupId>

   <artifactId>hibernate-validator</artifactId>

   <version>4.1.0.Final</version>

</dependency>
If deploying to a Java EE 6 server, then these libraries are not needed with the application because they are included in the server. It's still a good idea to include the dependency, but change the scope to provided in order to use during the application build.
Caching Dependencies
For optimal performance it's recommended to add one of the following caching frameworks to the application classpath: Ehcache, JBoss Cache, or OSCache. When you create a new RichFaces project with the RichFaces Maven archetype, Ehcache dependency is present in the pom.xml file, as shown in Listing 2-3.
Listing 2-3. Create a new RichFaces project with the RichFaces Maven archetype
<dependency>

   <groupId>net.sf.ehcache</groupId>

   <artifactId>ehcache</artifactId>

</dependency>
CDK (Component Development Kit) Annotations Dependencies
Listing 2-4 shows compile time dependency. It is only needed if you are creating or accessing RichFaces components instances in your application actions or listeners in order to define CDK annotations.
Listing 2-4. Shows compile time dependency
<dependency>

   <groupId>org.richfaces.cdk</groupId>

   <artifactId>annotations</artifactId>

   <scope>provided</scope>

</dependency>
Creating a New Project with RichFaces
The RichFaces project also contains several Maven archetypes to quickly create projects (including one for a Google App Engine targeted project).
Listing 2-5 shows a simple project generation where groupId defines the package for Java classes (for example, managed beans) and artifactId defines the name for the project.
Listing 2-5. Shows a simple project generation
mvn archetype:generate

  -DarchetypeGroupId=org.richfaces.archetypes

  -DarchetypeArtifactId=richfaces-archetype-simpleapp

  -DarchetypeVersion=<version>

  -DgroupId=<groupId>

  -DartifactId=<artifactId>
Listing 2-6 shows actual code for generating a RichFaces project.
Listing 2-6. Generating a RichFaces project
mvn archetype:generate

  -DarchetypeGroupId=org.richfaces.archetypes

  -DarchetypeArtifactId=richfaces-archetype-simpleapp

  -DarchetypeVersion=4.0.0.Final

  -DgroupId=org.richfaces.book

  -DartifactId=richfaces4-start
Listing 2-7 shows a standard Maven project structure.
Listing 2-7. The standard Maven project structure
richfaces4-start

   /src

   /target

   pom.xml

   readme.txt
The project comes with a simple one-page application. Let's deploy and run the project to make sure everything works. If you open the readme.txt file, you will see the commands to build the application for either a Tomcat or a JBoss 6 server.
![]() Tip If you want to try the latest snapshot version, change the version to 4.0.1-SNAPSHOT or 4.1.0-SNAPSHOT.
Tip If you want to try the latest snapshot version, change the version to 4.0.1-SNAPSHOT or 4.1.0-SNAPSHOT.
The Tomcat command is as follows:
mvn clean package
The following is a Tomcat and JBoss 6 command:
mvn clean package -P release
As you can see, creating a new RichFaces 4 project is very simple and you can easily open it in any IDE that supports importing a Maven-based project. Even though it's possible to use plain Eclipse (we recommend Eclipse for Java EE Developer) there is one IDE that has the best RichFaces 4 support out there, and that's JBoss Tools or JBoss Developer Studio.
JBoss Tools is an open source and free set of plug-ins for Eclipse, which provides wizards, advanced source and visual tools for building JSF 2 and RichFaces 4 applications. Additional features include Seam, CDI, JPA, and Hibernate tools. You can download JBoss Tools from www.jboss.org/tools. As of writing of this book, you would want to download JBoss Tools version 3.2 for Eclipse 3.6 (or the latest version 3.3 for Eclipse 3.7).
You will also find instructions on how to install JBoss Tools. It's rather simple: you will need to download the latest supported Eclipse for Java EE developers and then point to the JBoss Tools plug-ins URL in the Eclipse Install Software screen. Finally, you will need a servlet container such as Tomcat to deploy the application. We recommend Tomcat 7.
If you would rather install everything from one file (Eclipse, JBoss Tools), then you can choose JBoss Developer Studio. You can download JBoss Developer Studio from www.jboss.com/products/devstudio/.
Once you set up Eclipse or Eclipse with JBoss Tools, there are two ways to import the Maven project into Eclipse. One method is to execute the following command inside the project root folder:
mvn eclipse:eclipse -Dwtpversion=2.0
This command makes it possible to import the project into Eclipse by adding Eclipse project configuration files such as .project and .classpath. Once you run this command in Eclipse, select File/Import/General/Existing Project into Workspace and point to the project root directory.
An alternative method is by installing the M2Eclipse (http://m2eclipse.sonatype.org/) plug-in, which helps with working with Maven-based projects in Eclipse. If you install the optional Integration with Web Tools Project (WTP) M2Eclipse extension, it will allow you to easily deploy to a Tomcat server. Once installed, select File/Import/Maven/Existing Maven Projects and point to project root.
![]() Tip If Eclipse is not your cup of tea, NetBeans and IntelliJ are excellent IDEs and both have first class Maven support.
Tip If Eclipse is not your cup of tea, NetBeans and IntelliJ are excellent IDEs and both have first class Maven support.
Configuring RichFaces
There is nothing you actually need to do to configure RichFaces. If you look inside the web.xml file in the generated project, you will see no mention of a RichFaces filter. Starting with RichFaces 4, you don't need to register a filter in the web.xml file. If RichFaces JARs are present in the project, RichFaces will be used.
Configuring a Skin
The only feature you might want to configure is a RichFaces skin. Skins are covered in detail in Chapter 13, but to use any of the out-of-the-box skins, just set the context parameter shown in Listing 2-8.
Listing 2-8. Setting RichFaces skin in web.xml file
<context-param>

    <param-name>org.richfaces.skin</param-name>

    <param-value>ruby</param-value>

</context-param>
ruby is one of the built-in skins. You can choose any skin from the following list:
Ajax in JSF 2
JSF 2 comes with basic Ajax functionality built in. If you have used RichFaces 3, then you will see that JSF 2 Ajax was greatly inspired by the popular RichFaces <a4j:support> tag. You will see that the concepts are the same, with a few things changed, such as attribute names. If you are new to RichFaces, don't worry, in this chapter we will cover everything from the beginning.
Ajax in JSF 2 comes in a form <f:ajax> behavior. Notice that we call it a behavior instead of a component. A behavior is a new concept in JSF 2. A behavior in JSF 2 is a client-side behavior (functionality) that is added to a component. Let's see how to use the standard Ajax functionality in JSF 2 before we get to RichFaces.
When working with Ajax in the context of JSF, you need to keep three things in mind: First, how to send an Ajax request; second, what to process on the server (partial view processing); and third, what to render (partial view rendering).
Sending an Ajax Request
Sending an Ajax request is pretty straight forward: you really just have one option and that's using <f:ajax> behavior. This behavior is always attached to another UI component on a page; it's never used by itself. Listing 2-9 shows an example.
Listing 2-9. Sending an Ajax Request
<h:inputText value="#{bean.text}">

   <f:ajax />

</h:inputText>
That's pretty simple, right? We just added the ability to fire an Ajax request when the value inside the input field changes. The Ajax request is fired from the client (browser) and always on some browser event, such as click, change, and so forth. To be more precise, it can be any event supported by the parent UI component. Components represent HTML elements in the browser, so it's all the events that are supported by that particular HTML element.
The managed bean is shown in Listing 2-10.
Listing 2-10. Managed bean
@ManagedBean

@RequestScoped

public class Bean {


   private String text;


   // getter and setter

}
You probably noticed that we didn't actually specify the event, but said that the Ajax request would be fired when the value in the input field changes. The reason the Ajax request would fire on value change is because the default value change event is used. Every UI component in JSF 2 has a standard event on which the Ajax request would be fired if one is not explicitly specified. For example, with <h:commandButton> the default event is action.
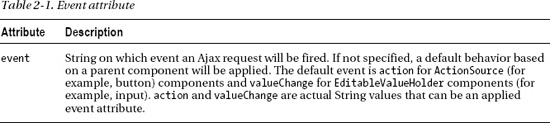
When we want to fire an Ajax request on an event other than the default, or when we just want to make the code more readable by showing the event, then the event attribute is used. It is described in Table 2-1.
If we wanted to specify the change event in our example, which is also the default event, it would look like in Listing 2-11 and work exactly the same way.
Listing 2-11. Specify the change event
<h:inputText value="#{bean.text}">

   <f:ajax event="change"/>

</h:inputText>
Or we could use a different event, as shown in Listing 2-12.
Listing 2-12. Changing the default event
<h:inputText value="#{bean.text}">

   <f:ajax event="keyup"/>

</h:inputText>
![]() Note If you are familiar with RichFaces 3, you specify the event with on [eventName], for example
Note If you are familiar with RichFaces 3, you specify the event with on [eventName], for example onchange. In JSF 2 and RichFaces 4, you only specify the actual action: keyup.
If we were using a button, it would look like in Listing 2-13.
Listing 2-13. Example button
<h:commandButton value="Save">

   <f:ajax/>

</h:commandButton>
We are not specifying the event, as it will default to click. If we wanted to specify a different event, we would use the event attribute shown in Listing 2-14.
<h:commandButton value="Save">

   <f:ajax event="mouseover"/>

</h:commandButton>
Now that we covered the basics of firing an Ajax request, let's add a very important part: partial view rendering.
Partial View Rendering
Now that we know how to fire an Ajax request, we also would like to do a partial page update or partial view rendering.
![]() Note From now on, whenever we use
Note From now on, whenever we use <f:ajax> tag, we will specify the event even if it's the default event. We believe it makes the code more readable and easier to understand.
As we are in the context of JSF, we can specify which component or components we would like to update or render via the render attribute described in Table 2-2.

Updating our example would look like Listing 2-15.
Listing 2-15. Updating the example
<h:form>

   <h:panelGrid>

      <h:inputText value="#{bean.text}" >

         <f:ajax event="keyup" render="text"/>

      </h:inputText>

      <h:outputText id="text" value="#{bean.text}" />

   </h:panelGrid>

</h:form>
On every keyup, an Ajax request will be fired to the server. The request will go through the standard JSF life cycle, but instead of rendering the entire view, we are only going to render the <h:outputText> component with text id.
![]() Note In RichFaces 3, the attribute to specify what to re-render is called
Note In RichFaces 3, the attribute to specify what to re-render is called reRender. In JSF 2 it is called render. As RichFaces 4 is based on JSF 2, it uses render in all components. You could also define ids using absolute addressing, such as when updating a component with the same “text” id placed in other form. For example, render=":form2:text".
In the earlier example, we set render to one component. We can also decide to render more than one component. In this case, we would just list the ids of all components, space separated, as follows:
<f:ajax event="keyup" render="id1 id2 id3"/>
In case you don't want to list every single component, it's possible to render just the parent container, such as <h:panelGrid>. In this case, all its children components will also be rendered, as shown in Listing 2-16.
Listing 2-16. Rendering all components inside a panel
<h:commandButton value="Save">

    <f:ajax event="click" render="out"/>

</h:commandButton>

…

<h:panelGrid id="out">

   <h:outputText />

   <h:outputText />

</h:panelGrid>
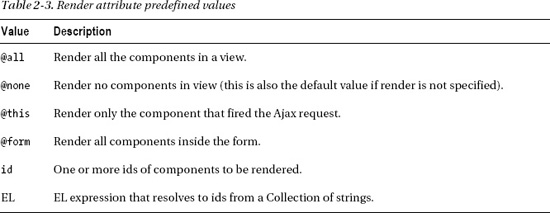
In addition to the component id, render can also be set to a number of predefined values, as shown in Table 2-3.
Before we move on to partial view processing, there is one more thing we want to tell you. You will hear people use the terms partial page update and partial view rendering interchangeably. That's absolutely fine, but it's worth pointing out how they relate in the context of JSF.
In JSF, the view is rendered on the server. When we add Ajax, the view is still rendered on the server—we just don't need to render everything. We render specified components and thus we refer to it as partial view rendering. When the rendered response (after an Ajax request) is sent to the browser, that's where the partial page update happens in the browser. There is a JavaScript library that takes the response and does the DOM (Document Object Model) update. It's fine to use a partial page update or partial view rendering—as long as you understand that the markup is rendered on the server and the actual page update happens in the browser.
Partial View Processing
Without Ajax, when a page (form) is submitted, the entire form is processed on the server. When we say processed on the server, we refer to input or action components that go through the JSF life cycle; in particular, phases such as Apply Request Values, Process Validation, Update Model, and Invoke Application.
Again, without Ajax it's simple. The entire form or all the components within the form are processed. When working with Ajax, the situation is different. We might want only a particular component to be processed and not process all other components; for example, if we only want to validate one component and don't need to validate anything else. In such case, we need to be able to select which component is processed.
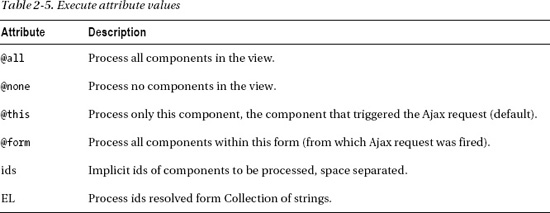
Deciding what to process is done via the execute attribute, described in Table 2-4.

The execute attribute can have different values, as shown in Table 2-5.
Notice that default value is @this, which means that the component firing the Ajax request will be processed by default. Listing 2-17 shows an example.
This is equivalent to Listing 2-18.
Listing 2-18. Another example
<h:commandButton value="Click">

  <f:ajax execute="@this" render="id"/>

</h:commandButton>
Everything is good if we only want to process (execute) the button. But what happens if we have something like Listing 2-19?
Listing 2-19. Example code
<h:form>

   <h:panelGrid columns="2">

      <h:outputText value="Text:" />

      <h:inputText value="#{bean.text}" />


      <h:outputText value="Echo:" />

      <h:outputText id="text" value="#{bean.text}" />


      <h:outputText value="Count:" />

      <h:outputText id="count" value="#{bean.count}" />

   </h:panelGrid>

   <h:commandButton value="Submit">

      <f:ajax render="text count" listener="#{bean.countListener}" />

   </h:commandButton>

</h:form>
The managed bean is shown in Listing 2-20.
Listing 2-20. Managed bean
@ManagedBean

@RequestScoped

public class Bean {


   private String text;

   private Integer count;


   public void countListener(AjaxBehaviorEvent event) {

      count = text.length();

   }

}
Everything appears to be fine, but when you run it you will get an error. Do you see where the problem is? We attached Ajax behavior to a button, using the default value for execute, which is @this. When the button is clicked, only that button is processed; the input fields are not processed and inside the listener you will get an exception (NullPointerException as the text property is null).
This code example introduced another <f:ajax> behavior attribute, listener, which is described in Table 2-6.

Notice that the listener takes one argument of a type AjaxBehaviorEvent, as shown in Listing 2-21.
Listing 2-21. The listener takes one argument of a type AjaxBehaviorEvent
import javax.faces.event.AjaxBehaviorEvent;


public void listenerName(AjaxBehaviorEvent event) {

   …

}
![]() Note The entire form is still submitted to the server. But only the button is processed (executed) on the server. If you have been using RichFaces 3, then this is something you will run into immediately because the entire form was processed by default.
Note The entire form is still submitted to the server. But only the button is processed (executed) on the server. If you have been using RichFaces 3, then this is something you will run into immediately because the entire form was processed by default.
There are a number of ways to fix the problem. First, we can list the ids we want to process in the execute attribute, as shown in Listing 2-22.
Listing 2-22. Listed ids we want to process in the execute attribute
<h:form>

   <h:panelGrid columns="2">

      <h:outputText value="Text:" />

      <h:inputText id="inputText" value="#{bean.text}" />


      <h:outputText value="Echo:" />

      <h:outputText id="text" value="#{bean.text}" />


      <h:outputText value="Count:" />

      <h:outputText id="count" value="#{bean.count}" />

   </h:panelGrid>

   <h:commandButton value="Submit">

      <f:ajax render="text count" listener="#{bean.countListener}"

         execute="inputText"/>

   </h:commandButton>

</h:form>
![]() Note Even though we don't list a button in the
Note Even though we don't list a button in the execute list, the button is processed automatically because it's the control that's being activated.
Instead of listing the ids, another option is to use the predefined value @form to process the entire form, as shown in Listing 2-23.
Listing 2-23. Option to use the predefined value @form
<h:form>

   <h:panelGrid columns="2">

      <h:outputText value="Text:" />

      <h:inputText id="inputText" value="#{bean.text}" />


      <h:outputText value="Echo:" />

      <h:outputText id="text" value="#{bean.text}" />


      <h:outputText value="Count:" />

      <h:outputText id="count" value="#{bean.count}" />

   </h:panelGrid>

   <h:commandButton value="Submit">

      <f:ajax render="text count" listener="#{bean.countListener}"

         execute="@form"/>

   </h:commandButton>

</h:form>
You are probably wondering at this point, where is the RichFaces coverage? Well, we wanted to make sure that you are familiar with basic Ajax features in JSF 2 first, as everything in RichFaces 4 is based on the core JSF 2 functionality.
Now that we have covered the basics, we can start learning how RichFaces upgrades and makes more powerful this basic feature set. If you feel that you need a little more JSF 2 coverage, we recommend the following two books: Core JavaServer Faces (Third Edition) by David Geary and Cay Horstmann (Prentice Hall, 2010), and JavaServer Faces 2.0: The Complete Reference by Ed Burns and Chris Schalk (McGraw-Hill, 2009).
RichFaces <a4j:ajax>
The first thing we should tell you is that the good old and popular a4j:support has been retired. Instead, there is now the new and shiny <a4j:ajax> tag. Why the change? RichFaces 4 is based on JSF 2 and in order to show that RichFaces simply extends the core functionality, the tag follows the same naming convention, and so is now called <a4j:ajax>.
At this point you are probably wondering what's the difference between the standard <f:ajax> and <a4j:ajax> tag. First of all, <a4j:ajax> is 100-percent based on <f:ajax> behavior functionality.
Listing 2-24 shows one of the examples used in this chapter.
We can rewrite as shown in Listing 2-25.
Listing 2-25. Rewrite of Listing 2-24
<h:inputText value="#{bean.text}">

   <a4j:ajax event="change"/>

</h:inputText>
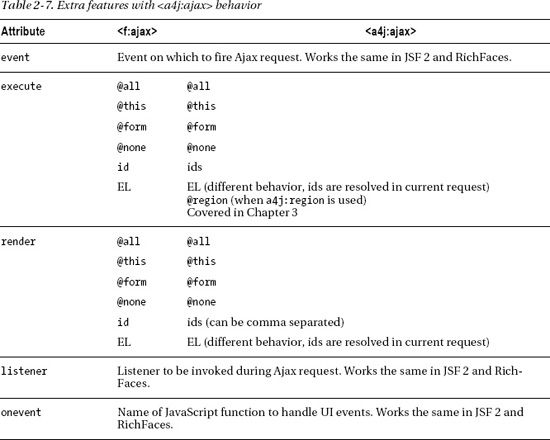
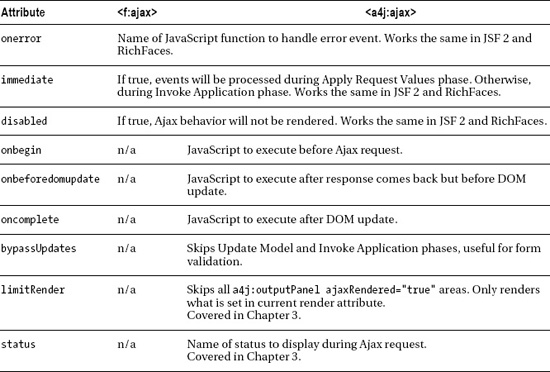
And it's going to work exactly the same way. In other words, anywhere you see <f:ajax>, it can be replaced with <a4j:ajax>, and everything will work exactly the same way. What else do you get besides a name change? Table 2-7 summarizes the extras you get when using the <a4j:ajax> tag.
Let's now explore each feature or upgrade in more detail.
render Attribute Options
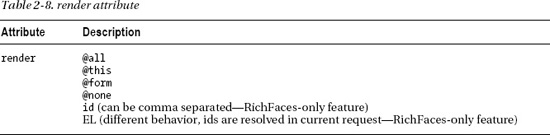
As you have seen, the render attribute works the same way except for a few differences when using id or EL, as shown in Table 2-8.
In standard JSF 2, it's possible to list any number of ids in render, each separated by a space, as shown in Listing 2-26.
Listing 2-26. List any number of ids, each separated by a space
<h:inputText value="#{bean.text}">

   <f:ajax event="change" render="id1 id2 id3 idX"/>

</h:inputText>
When using <a4j:ajax>, in addition to a space, it's also possible to separate with a comma (,) as shown in Listing 2-27.
Listing 2-27. Example of separating ids with a comma instead of just a space
<h:inputText value="#{bean.text}">

   <f:ajax event="change" render="id1, id2, id3, idN"/>

</h:inputText>
We believe using a comma is a little easier and more familiar for those who used <a4j:support> with RichFaces 3, but it's really up to you.
The second difference is more important. Next, we'll use an example to show how it works in JSF 2.
Dynamic render
To show how a dynamic render works in JSF 2, we'll create a sample page to look like Figure 2-1.
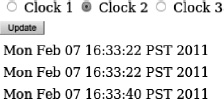
Figure 2-1. Dynamic render with three clocks
Instead of hard coding the component to render, we are going to select which component we would like to update. Now, being able to set the render attribute to an EL is supported by JSF 2; however, it works slightly different when using RichFaces.
Listing 2-28 shows the JSF page.
Listing 2-28. Shows the JSF page
<h:form id="form">

   <h:panelGrid>

      <h:selectOneRadio value="#{bean.selection}">

         <f:selectItem itemValue="clock1" itemLabel="Clock 1" />

         <f:selectItem itemValue="clock2" itemLabel="Clock 2" />

         <f:selectItem itemValue="clock3" itemLabel="Clock 3" />

      </h:selectOneRadio>

      <h:commandButton id="updateButton" value="Update">

        <f:ajax event="click" execute="@form" listener="#{bean.selectComponents}"

                render="#{bean.renderComponents}" />

       </h:commandButton>

   </h:panelGrid>

   <h:panelGrid cellspacing="6">

      <h:outputText id="clock1" value="#{bean.clock1}" />
      <h:outputText id="clock2" value="#{bean.clock2}" />

      <h:outputText id="clock3" value="#{bean.clock3}" />

   </h:panelGrid>

</h:form>
Listing 2-29 shows the managed bean.
Listing 2-29. Shows the managed bean
import java.util.ArrayList;

import java.util.Date;

import java.util.List;


import javax.annotation.PostConstruct;

import javax.faces.bean.ManagedBean;

import javax.faces.context.FacesContext;

import javax.faces.event.AjaxBehaviorEvent;


@ManagedBean

@RequestScoped

public class Bean {


   private String selection;

   private List <String> renderComponents;


   @PostConstruct

   public void init (){

      renderComponents = new ArrayList <String>();

      renderComponents.add("updateButton");

   }

   public void selectComponents (AjaxBehaviorEvent event){

      renderComponents.add(selection);

   }

   public List<String> getRenderComponents() {

      return renderComponents;

   }

   public String getSelection() {

      return selection;

   }

   public void setSelection(String selection) {

      this.selection = selection;

   }

   public Date getClock1() {

      return new Date();

   }

   public Date getClock2() {

      return new Date();

   }

   public Date getClock3() {

      return new Date();

   }

}
Select Clock 2 and press update. Nothing happens. Now go ahead and select Clock 3. Click update. Clock 2 got updated. That's not a bug, that's how JSF 2 works with render bound to an EL.
Let's take it step by step, as follows:
- Page is rendered for the first time
- Select any clock, let's say Clock 1. Click submit.
- The value of
Clock1is sent to the server. At this point we would expect componentClock1to be rendered (but, it will only happen on next request). - During rendering,
#{bean.renderComponents}is resolved and theClock1id is rendered into the page. - When we next select Clock 3, for example, and fire the request, the
Clock1id that was rendered into the page will now be rendered.
As you can see, when using EL in render, there is a one request delay when rendering the components. What this means is that components (ids) to be rendered need to come from the browser. In order for the desired component id to be updated at each request, we need to render the actual button—so that #{bean.renderComponents} will be resolved and a new value will be rendered. This is accomplished by the following init() method:
renderComponents.add("updateButton");
To solve this problem, we can work directly with JSF's PartialViewContext class. This class holds the ids to be rendered; and if we add the id programmatically, then the render will happen at the right time. The updated selectComponents method will look like Listing 2-30.
Listing 2-30. The updated selectComponents method
public void selectComponents (AjaxBehaviorEvent event){

   UIComponent button = event.getComponent();

   UIOutput output = (UIOutput)button.findComponent(selection);

   FacesContext.getCurrentInstance().getPartialViewContext().getRenderIds().

      add(output.getClientId());

}
We first get a reference to the button component that fired the Ajax request. We then use findComponent(id) method to find the output component that we want to render. On the last line, we get the output component client id and add the components to be rendered.
This allows us to include the component id to be rendered in the current request, instead of being one request behind as we saw before. With this change, we can also update the init() method shown in Listing 2-31.
Listing 2-31. Update the init() method
@PostConstruct

public void init (){

   renderComponents = new ArrayList <String>();

}
We can take out render="#{bean.renderComponents}" because it's no longer used. The button will look as shown in Listing 2-32.
Listing 2-32. Displays how the button will look after you take out render ="#{bean.renderComponents}"
<h:commandButton id="updateButton" value="Update">

   <f:ajax event="click" execute="@form" listener="#{bean.selectComponents}"/>

</h:commandButton>
This approach works, but we believe it should be simpler. We believe it would have been simpler if we could continue using render="#{bean.renderComponents}" and having the ids resolved in the same request. That's possible if we use the RichFaces <a4j:ajax> behavior.
![]() Tip JSF 2 just passes all the parameters from the client side to the server. RichFaces 4 also evaluates the parameters on the server side.
Tip JSF 2 just passes all the parameters from the client side to the server. RichFaces 4 also evaluates the parameters on the server side.
Dynamic render with RichFaces
When using RichFaces <a4j:ajax> and render="#{bean.renderComponents}", the component ids to be rendered are resolved in the current request. To go back to our original example, just switch to using <a4j:ajax> and everything will work. Listing 2-33 shows the JSF page again.
Listing 2-33. Shows the JSF page
<h:form id="form">

   <h:panelGrid>

      <h:selectOneRadio value="#{bean.selection}">

         <f:selectItem itemValue="clock1" itemLabel="Clock 1" />

         <f:selectItem itemValue="clock2" itemLabel="Clock 2" />

         <f:selectItem itemValue="clock3" itemLabel="Clock 3" />

      </h:selectOneRadio>

      <h:commandButton id="updateButton" value="Update">

      <a4j:ajax event="click" execute="@form"

         listener="#{bean.selectComponents}"

            render="#{bean.renderComponents}"/>

       </h:commandButton>

   </h:panelGrid>

   <h:panelGrid cellspacing="6">

      <h:outputText id="clock1" value="#{bean.clock1}" />

      <h:outputText id="clock2" value="#{bean.clock2}" />

      <h:outputText id="clock3" value="#{bean.clock3}" />

   </h:panelGrid>

</h:form>
All we did is change the behavior name from <f:ajax> to <a4j:ajax>.
Listing 2-34 shows the managed bean.
Listing 2-34. Shows the managed bean
@ManagedBean

@RequestScoped

public class Bean {


   private String selection;

   private List <String> renderComponents;


   @PostConstruct

   public void init (){

      renderComponents = new ArrayList <String>();
   }

   public void selectComponents (AjaxBehaviorEvent event){

      renderComponents.add(selection);

   }

   public List<String> getRenderComponents() {

      return renderComponents;

   }

   public String getSelection() {

      return selection;

   }

   public void setSelection(String selection) {

      this.selection = selection;

   }

   public Date getClock1() {

      return new Date();

   }

   public Date getClock2() {

      return new Date();

   }

   public Date getClock3() {

      return new Date();

   }

}
Notice that we no longer need to add the button to the list of components to be rendered. Running the application, everything is now updated as you would expect.
Simplicity is just one of the advantages to using <a4j:ajax> and the render attribute bound to EL. One more advantage is that evaluating the ids on the server instead of getting them client side is more secure, as anyone could send a request with ids using <f:ajax>. If this happens with <a4j:ajax>, these ids will simply be ignored.
![]() Note The same functionality is available on other RichFaces tags, such as
Note The same functionality is available on other RichFaces tags, such as <a4j:commandButton>, <a4j:commandLink>, <a4j:poll>, and <a4j:jsFunction>. We will cover this in Chapter 3. We used the listener attribute on either <f:ajax> or <a4j:ajax> behaviors. If you have an action or an actionListener set on the button or link, those will be invoked in a standard way.
execute Attribute Options
The same way it's possible to bind the render attribute to EL or decide which components to render in runtime, it's also possible to decide which components to execute in runtime or bind the execute attribute to EL. For example:
<f:ajax event="blur" execute="#{bean.executeComponents}" render="out"/>
When using just JSF 2, execute works in similar fashion to render in regards to when the ids are resolved. As with render, the ids in execute are resolved but then rendered to the page and only used on the next request. When using RichFaces a4j:ajax behavior instead of f:ajax, then ids are resolved and those components are executed in the current request.
<a4j:ajax event="blur" execute="#{bean.executeComponents}" render="out"/>
While determining which components to render at runtime is common, determining which components to execute is rarely used, if at all. But, it's important to understand the difference in when ids are resolved and when they are used when using JSF 2 <f:ajax> and RichFaces <a4j:ajax> behaviors.
RichFaces offers one more option for deciding what to execute with its <a4j:region> tag. This tag will be covered in Chapter 3.
bypassUpdates Attribute
Validation is obviously a very common task in any Web application. When only validating form inputs, it's usually not necessary to go through all the JSF life cycle phases, in particular Update Model and Invoke Application phases. In this section you will learn how to skip these two phases when validating form fields to optimize the JSF request. Let's start with a very simple example that looks like Figure 2-2.
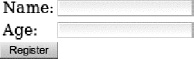
Figure 2-2. A simple registration form.
Figure 2-3 shows how it looks when an error has occurred.

Figure 2-3. A simple registration with an error message
Listing 2-35 shows the register.xhtml page.
Listing 2-35. Shows the register.xhtml page
<h:form>

   <h:panelGrid columns="3">

      <h:outputText value="Name:" />

      <h:inputText id="name" value="#{bean2.name}">

         <f:validateRequired/>

         <f:validateLength minimum="3"/>

         <a4j:ajax event="blur" render="errorName"/>

      </h:inputText>

      <h:message id="errorName" for="name"/>


      <h:outputText value="Age:" />

      <h:inputText id="age" value="#{bean2.age}">

         <f:validateRequired/>

         <f:validateLongRange minimum="0"/>

         <a4j:ajax event="blur" render="errorAge"/>

      </h:inputText>

      <h:message id="errorAge" for="age"/>

   </h:panelGrid>

   <h:commandButton value="Register" action="result"/>

</h:form>
Listing 2-36 shows the result.xhtml page.
Listing 2-36. Shows the result.xhtml page
<h:panelGrid>

      <h:outputText value="#{bean2.name}, #{bean2.age}" />

</h:panelGrid>
Listing 2-37 shows the managed bean.
Listing 2-37. Shows the managed bean
@ManagedBean

@RequestScoped

public class Bean2 {

   private String name;

   private Integer age;


   // getters and setters

}
This is a very simple registration form with Ajax-based validation. In other words, when we blur the field (tab out or click outside), an Ajax request is fired. We start going through JSF phases. If there is a validation error, after Process Validations, we go to Render Response. If there is no validation error, then we finish all the phases, going through Update Model and Invoke Application. To see this in action, let's create a phase listener that will print a message to the console as we pass each phase.
In case you need to review the JSF phases, they are shown in Figure 2-4.
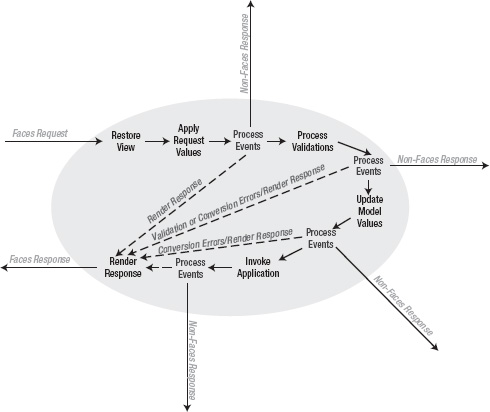
Figure 2-4. JSF life cycle diagram
JSF fires what are called phase events before and after each phase. We can write a listener to listen to these events and output a message to the log. The phase listener can be used for anything else, such as injecting a custom functionality between phases.
The phase listener is shown in Listing 2-38.
Listing 2-38. The phase listener
import javax.faces.event.PhaseEvent;

import javax.faces.event.PhaseId;

import javax.faces.event.PhaseListener;


public class PhaseTracker implements PhaseListener {


   public void afterPhase(PhaseEvent event) {

      event.getFacesContext().getExternalContext().log("AFTER

         "+event.getPhaseId());

   }

   public void beforePhase(PhaseEvent event) {

      event.getFacesContext().getExternalContext().log("BEFORE

         "+event.getPhaseId());

   }

   public PhaseId getPhaseId() {

      return PhaseId.ANY_PHASE;

   }

}
The methods beforePhase and afterPhase are very simple. All we do is print a message to the log. getPhaseId() returns the phase id for which to call this particular listener. We would like the listener to be invoked for each phase, so we return PhaseId.ANY_PHASE. It's possible to return a particular phase such as PhaseId.INVOKE_APPLICATION or it's also possible to return two or more phases.
The final step is to register this phase listener in a JSF configuration file (faces-config.xml), as shown in Listing 2-39.
Listing 2-39. Register the phase listener in a JSF configuration file
<lifecycle>

  <phase-listener>org.richfaces..book.PhaseTracker</phase-listener>

</lifecycle>
There is no annotation yet for phase listeners in JSF 2.
When you load the page, place the mouse cursor inside the name field, but then click somewhere else. You should see the console shown in Listing 2-40.
Listing 2-40. Displayed console
INFO: BEFORE RESTORE_VIEW 1

Feb 8, 2011 2:39:49 PM org.apache.catalina.core.ApplicationContext log

INFO: AFTER RESTORE_VIEW 1

Feb 8, 2011 2:39:49 PM org.apache.catalina.core.ApplicationContext log

INFO: BEFORE APPLY_REQUEST_VALUES 2

Feb 8, 2011 2:39:49 PM org.apache.catalina.core.ApplicationContext log

INFO: AFTER APPLY_REQUEST_VALUES 2

Feb 8, 2011 2:39:49 PM org.apache.catalina.core.ApplicationContext log
INFO: BEFORE PROCESS_VALIDATIONS 3
Feb 8, 2011 2:39:49 PM org.apache.catalina.core.ApplicationContext log
INFO: AFTER PROCESS_VALIDATIONS 3
Feb 8, 2011 2:39:49 PM org.apache.catalina.core.ApplicationContext log
INFO: BEFORE RENDER_RESPONSE 6
Feb 8, 2011 2:39:49 PM org.apache.catalina.core.ApplicationContext log
INFO: AFTER RENDER_RESPONSE 6
We arrived at Phase 3, validation failed and we jumped to Phase 6. So far it all makes sense. Now enter a valid value either for name or age. You should now see the console shown in Listing 2-41.
Listing 2-41. After entering a valid value, you will see the following console
INFO: BEFORE RESTORE_VIEW 1

Feb 8, 2011 2:41:23 PM org.apache.catalina.core.ApplicationContext log

INFO: AFTER RESTORE_VIEW 1

Feb 8, 2011 2:41:23 PM org.apache.catalina.core.ApplicationContext log

INFO: BEFORE APPLY_REQUEST_VALUES 2

Feb 8, 2011 2:41:23 PM org.apache.catalina.core.ApplicationContext log

INFO: AFTER APPLY_REQUEST_VALUES 2

Feb 8, 2011 2:41:23 PM org.apache.catalina.core.ApplicationContext log

INFO: BEFORE PROCESS_VALIDATIONS 3

Feb 8, 2011 2:41:23 PM org.apache.catalina.core.ApplicationContext log

INFO: AFTER PROCESS_VALIDATIONS 3

Feb 8, 2011 2:41:23 PM org.apache.catalina.core.ApplicationContext log

INFO: BEFORE UPDATE_MODEL_VALUES 4

Feb 8, 2011 2:41:23 PM org.apache.catalina.core.ApplicationContext log

INFO: AFTER UPDATE_MODEL_VALUES 4

Feb 8, 2011 2:41:23 PM org.apache.catalina.core.ApplicationContext log

INFO: BEFORE INVOKE_APPLICATION 5

Feb 8, 2011 2:41:23 PM org.apache.catalina.core.ApplicationContext log

INFO: AFTER INVOKE_APPLICATION 5

Feb 8, 2011 2:41:23 PM org.apache.catalina.core.ApplicationContext log

INFO: BEFORE RENDER_RESPONSE 6

Feb 8, 2011 2:41:23 PM org.apache.catalina.core.ApplicationContext log

INFO: AFTER RENDER_RESPONSE 6
As validation didn't fail, we competed all the phases. The next question is: do we need to go through all the phases when we are only validating? Probably not. When only validating, it's enough to reach Phase 3 (Process Validations), and even if the input is correct we can jump to the Render Response phase. Why invoke the Update Model and Invoke Application phases when we actually don't need to? Let's make our request quicker.
When the Register button is clicked, we don't want to go through all the phases, we want to skip Update Model and Invoke Application phases. How do we achieve that? That's where the bypassUpdates attribute is going to help us and described in Table 2-9.

Listing 2-42 shows updating the JSF page and setting bypassUpdates="true".
Listing 2-42. Updating the JSF page
<h:form>

   <h:panelGrid columns="3">

      <h:outputText value="Name:" />

      <h:inputText id="name" value="#{bean2.name}">

         <f:validateRequired/>

         <f:validateLength minimum="3"/>

         <a4j:ajax event="blur" render="errorName" bypassUpdates="true"/>

      </h:inputText>

      <h:message id="errorName" for="name"/>


      <h:outputText value="Age:" />

      <h:inputText id="age" value="#{bean2.age}">

         <f:validateRequired/>

         <f:validateLongRange minimum="0"/>

         <a4j:ajax event="blur" render="errorAge" bypassUpdates="true"/>

      </h:inputText>

      <h:message id="errorAge" for="age"/>

   </h:panelGrid>

   <h:commandButton value="Register" action="result"/>

</h:form>
Running the page again and entering invalid values causes validation to fail; and from the Process Validations phase we jump to Render Response, as before. But, when we enter a valid value, we get the same behavior because we set bypassUpdates="true". For example, entering ‘Joe' in the name field and then clicking outside the field should allow you to see it in the console shown in Listing 2-43.
Listing 2-43. Example of the console after entering the name field
INFO: AFTER RESTORE_VIEW 1

Feb 8, 2011 3:01:28 PM org.apache.catalina.core.ApplicationContext log

INFO: BEFORE APPLY_REQUEST_VALUES 2

Feb 8, 2011 3:01:28 PM org.apache.catalina.core.ApplicationContext log

INFO: AFTER APPLY_REQUEST_VALUES 2

Feb 8, 2011 3:01:28 PM org.apache.catalina.core.ApplicationContext log

INFO: BEFORE PROCESS_VALIDATIONS 3

Feb 8, 2011 3:01:28 PM org.apache.catalina.core.ApplicationContext log

INFO: AFTER PROCESS_VALIDATIONS 3

Feb 8, 2011 3:01:28 PM org.apache.catalina.core.ApplicationContext log

INFO: BEFORE RENDER_RESPONSE 6

Feb 8, 2011 3:01:28 PM org.apache.catalina.core.ApplicationContext log

INFO: AFTER RENDER_RESPONSE 6
Once we reach the Process Validation phase, the component is validated and we go directly to the Render Response phase. Again, there is no need to continue with the other phases because they will be invoked when the Register button is clicked. So to summarize, bypassUpdates is useful when doing Ajax-based validation.
JavaScript Interactions or Callback Events
Firing an Ajax request doesn't require writing any JavaScript code. Using <f:ajax> or the more advanced <a4j:ajax> makes it possible to fire an Ajax request from any component. However, there might be a situation where you might want to call or inject a custom JavaScript function before or after the Ajax request completes. JSF 2 provides two callback events, onevent and onerror, which allow you to invoke a custom JavaScript during the Ajax request. They are described in Table 2-10.

onevent consists of three sub-events, described in Table 2-11.

Let's start with a simple example. The application looks like Figure 2-5.
Figure 2-5. A simple form with different colors
Listing 2-44 shows the JSF page.
Listing 2-44. Shows the JSF page
<h:form>

   <h:panelGrid id="panel" style="background-color: #{bean3.color}">

      <h:selectOneRadio value="#{bean3.color}">

         <f:selectItem itemValue="red" itemLabel="Red" />

         <f:selectItem itemValue="yellow" itemLabel="Yellow" />

         <f:selectItem itemValue="blue" itemLabel="Blue" />

         <f:ajax event="click" render="panel" />

      </h:selectOneRadio>

   </h:panelGrid>

</h:form>
Listing 2-45 shows the managed bean.
Listing 2-45. Shows the managed bean
@ManagedBean

@RequestScoped

public class Bean3 {

   private String color;


   // getter and setter

}
Let's see how we can use the onevent callback to add custom JavaScript to be called during the Ajax request. Keep in mind these are client-side (browser) events. First, we need to create the JavaScript function. We can place Listing 2-46 right after the <body> tag in the JSF page.
Listing 2-46. Creating a JavaScript function
<script>

function ajaxRequestListener (event){

   if (event.status == 'begin'){

      if(!confirm('Are you sure you want change the color?' + '

         ('+event.status+')')) {

            form.reset();

            return false;

      }

   }

   else if (event.status == 'complete'){

      alert('Just before DOM update' + ' ('+event.status+')'),

   }

   else if (event.status == 'success'){

        alert('Color changed. We told you so.' + ' ('+event.status+')'),

   }

}


</script>
Because the ajaxRequestListener JavaScript function will be called three times, at begin, complete and success points, the function has three if-statements to handle each event separately. The only thing we are left to do is add the callback function to <f:ajax> behavior, as shown in Listing 2-47.
Listing 2-47. Adding a callback function to <f:ajax> behavior
<h:form>

   <h:panelGrid id="panel" style="background-color: #{bean3.color}">

      <h:selectOneRadio value="#{bean3.color}">

         <f:selectItem itemValue="red" itemLabel="Red" />

         <f:selectItem itemValue="yellow" itemLabel="Yellow" />

         <f:selectItem itemValue="blue" itemLabel="Blue" />

         <f:ajax event="click" render="panel" onevent="ajaxRequestListener"/>

      </h:selectOneRadio>

   </h:panelGrid>

</h:form>
Figure 2-6 shows running the application and selecting a new color.
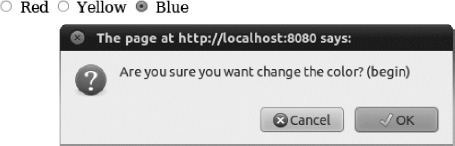
Figure 2-6. Selecting Blue color, begin sub-event
Figure 2-7 shows the complete sub-event alert dialog.
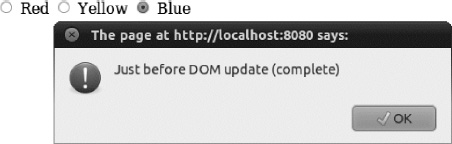
Figure 2-7. Selecting Blue color, complete sub-event
Figure 2-8 shows the success sub-event alert dialog.
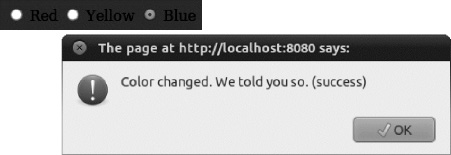
Figure 2-8. Selecting Blue color, success sub-event
Let's now add the onerror callback function. Listing 2-48 shows the JavaScript function.
Listing 2-48. Shows the JavaScript function
function ajaxErrorListener (event){

   alert ('Status: '+event.status + "
HTTP error: "+event.description );

}
We also need to set onerror attribute in <f:ajax> tag. Listing 2-49 shows the updated <f:ajax> tag.
Listing 2-49. Setting the onerror attribute in <f:ajax> behavior
<f:ajax event="click" render="panel" onevent="ajaxRequest"

   onerror="ajaxErrorListener"/>
To see how this works, load the page, stop the server, and then click to change the color. You will first see begin and complete messages. begin is shown because an Ajax request is fired. complete is shown because the response completed, but with an error. At this point, the onerror callback function is called and you will see the message shown in Figure 2-9.

Figure 2-9. onerror callback event
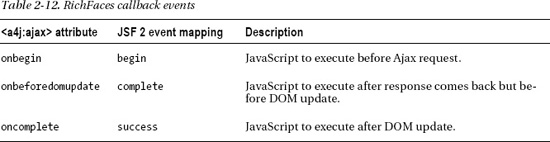
RichFaces makes working with callback functions simpler. onevent actually consists of three sub-events (begin, complete, success) and if you are interested in just one of them, you would need to check for that event, otherwise the same function will be called for all three. RichFaces makes it easier by making available three attributes on the <a4j:ajax> behavior: onbegin, onbeforedomupdate, and oncomplete. Each of these attributes is mapped to a different event, as described in Table 2-12.
Listing 2-50 shows updating the example to use <a4j:ajax> with these attributes.
Listing 2-50. Updating the example to use <a4j:ajax>
<h:form>

   <h:panelGrid id="panel" style="background-color: #{bean3.color}">

      <h:selectOneRadio value="#{bean3.color}">

         <f:selectItem itemValue="red" itemLabel="Red" />

         <f:selectItem itemValue="yellow" itemLabel="Yellow" />

         <f:selectItem itemValue="blue" itemLabel="Blue" />

            <a4j:ajax render="panel"
onbegin="if(!confirm('Are you sure you want change the
color'))
{form.reset(); return false;};"
oncomplete="alert('Color changed. We told you so.')"
onbeforedomupdate="alert('Just before DOM update')" />
</h:selectOneRadio>
</h:panelGrid>
</h:form>
Each event is exposed as a separate attribute, which makes it easier to use. You no longer need to define a function and check for each event. Do keep in mind that these attributes are only available on the RichFaces <a4j:ajax> behavior.
Summary
In this chapter we showed you how to set up a RichFaces project using Maven and covered how to use JSF 2 standard <f:ajax> behavior. We then showed you how RichFaces <a4j:ajax> behavior upgrades the standard <f:ajax> with extra features and attributes.
Chapter 3 will continue coverage of how RichFaces upgrades and extends standard Ajax functionality with tags such as <a4j:commandButton>, <a4j:commandLink>, <a4j:poll>, <a4j:jsFunction>, and <a4j:region> tags among the few. Keep in mind that all the features and attributes we covered in this chapter are also available on the tags we just listed. We will also cover advanced client queue customization and features that RichFaces provides on top of standard JSF 2 queue.