
Running Silverlight Applications Out of the Browser
Initially, Silverlight was designed to run inside a browser window, either as a widget on a web page or filling the whole browser window as an application. However, Silverlight 3 introduced a major new feature that enabled Silverlight applications to be installed locally on the user's machine. The process of installing a Silverlight application places the .xap file in a permanent location within the user's profile (that is, outside of the user's browser cache) and creates shortcuts on the user's desktop and/or start menu to enable them to run it locally. When the user clicks or double-clicks the shortcut, the application opens in its own window as if it were a standard, native application. This is known as out-of-browser (OOB) mode, and we'll be referring to it throughout this chapter as such.
![]() Note A key benefit of installing the application within the user's profile is that there is no need for the user installing it to have administrative privileges, which greatly simplifies the deployment of your application and allows updates to be easily installed.
Note A key benefit of installing the application within the user's profile is that there is no need for the user installing it to have administrative privileges, which greatly simplifies the deployment of your application and allows updates to be easily installed.
One of the biggest benefits of OOB mode is that it works cross platform—specifically working on both Windows and OSX, making Silverlight now a great way of building cross-platform applications.
Configuring OOB Mode
By default, your application is not configured to be installable and run in OOB mode. You need to explicitly turn on this feature via the project's properties. Start by selecting the “Enable running application out of the browser” check box as shown in Figure 16-1.
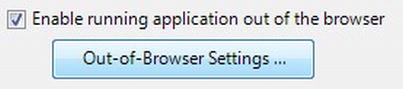
Figure 16-1. The “Enable running application out of the browser” option
You will now be able to click the Out-of-Browser Settings button below the check box, which will open the window shown in Figure 16-2.
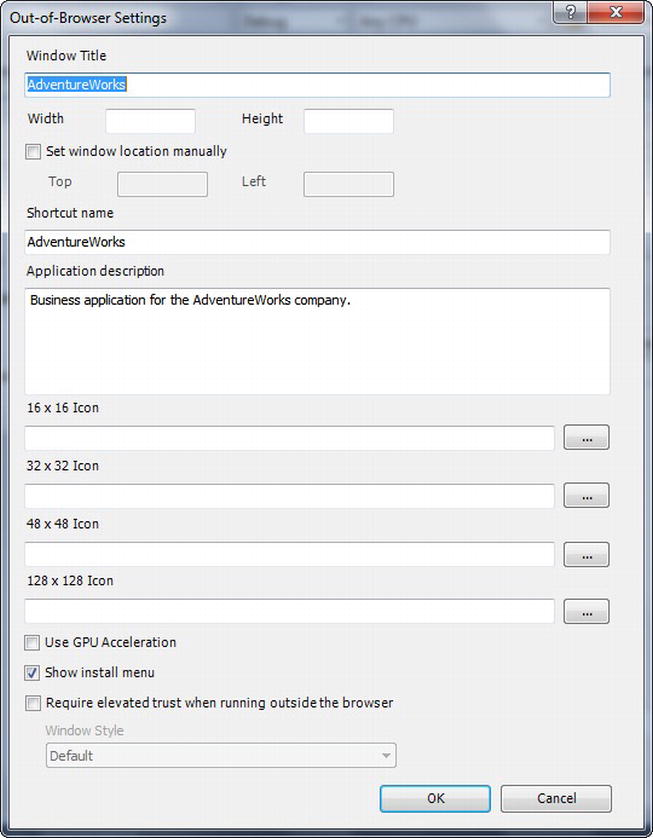
Figure 16-2. The Out-Of-Browser Settings window
This dialog provides you with a variety of options that apply when the application is running in OOB mode. These options can be broken up into three primary areas: window options, install options, and miscellaneous options.
Window Options
The window options enable you to specify the text that should appear in the title bar of the OOB window and the window's initial width and height. Without these options set, the window will default to a size of 800 × 600 and will be resizable unless you turn off the default window chrome by using custom chrome. By default, the application will center itself in the screen, but by selecting the “Set window location manually” check box, you can specify exactly where on the screen you want your application to appear.
Install Options
The install options enable you to specify the name of the shortcut that will be created on the user's desktop and/or start menu, a description that will appear in the tooltip on the application's shortcuts, and a number of icons of varying sizes. These icons will be used for the application's shortcuts and will be displayed in the install dialog, the title bar of the window, and as the taskbar icon. If no image files are assigned to these settings, default Silverlight icons will be used instead.
![]() Note These icon options should be assigned image files, not
Note These icon options should be assigned image files, not .ico files. (.ico is an image format specific to Windows). The Silverlight runtime will automatically create icons native to the host operating system from the image files as required.
Miscellaneous Options
The various miscellaneous options include the following:
- Enabling GPU acceleration for cached compositions via the “Use GPU Acceleration” check box
- Deciding whether an install option should appear in the context menu when the user right-clicks the application via the “Show install menu” check box
- Determining whether the application requires elevated trust when running outside the browser via the “Require elevated trust when running outside the browser” check box
- Specifying whether the application should use custom chrome via the “Window style” drop-down list, which is available only when “Require elevated trust when running outside the browser” is selected
![]() Note You can read the options that were set in the Out-of-Browser Settings dialog for the application at runtime in code using the
Note You can read the options that were set in the Out-of-Browser Settings dialog for the application at runtime in code using the Deployment.Current.OutOfBrowserSettings object. However, you cannot modify them at runtime.
Installing the Application to Run Out of the Browser
The user can install your application to run outside the browser in two ways. One is by simply right-clicking anywhere in the application and selecting the “Install XXX application on this computer…” option from the context menu, assuming this menu is enabled in the Out-of-Browser Settings dialog, which it is by default when the application is configured to be installed and run outside the browser. The context menu is shown in Figure 16-3.

Figure 16-3. The Silverlight context menu item to install the application locally
![]() Note This context menu will not be displayed when the user right-clicks a control that handles the
Note This context menu will not be displayed when the user right-clicks a control that handles the MouseRightButtonDown event and sets the event handler's e.Handled property to true. It will also not be shown on elements that use the ContextMenuService (from the Silverlight Toolkit) to display a custom context menu.
Alternatively, you can provide your own friendlier install option within your application. Installing the application via code is as easy as using the following line of code somewhere in your application: Application.Current.Install();
![]() Note You will need to add a using directive to the
Note You will need to add a using directive to the System.Windows namespace at the top of your file, because the Application class exists under that namespace.
As soon as the application is installed, it will automatically open and start running outside the browser.
![]() Note If the application is already installed and you attempt to call this method, an exception will be raised. Therefore, you should always check whether the application is installed first before calling this method. How you can do so will be covered in the next section.
Note If the application is already installed and you attempt to call this method, an exception will be raised. Therefore, you should always check whether the application is installed first before calling this method. How you can do so will be covered in the next section.
One thing you need to be aware of is that, for the purposes of security, a call to the Install method must be in response to a user-initiated event. In other words, you can call this method only in an event raised by some sort of user input, such as a button's Click event. Any attempt to call the Install method in an event handler not raised as a result of user input, such as in response to the Loaded event for a control, will be ignored.
![]() Note You can also create a desktop installer and install the application that way too. This method is discussed in Chapter 17.
Note You can also create a desktop installer and install the application that way too. This method is discussed in Chapter 17.
Once the user has initiated the install action, the install dialog shown in Figure 16-4 will appear, requiring the user to confirm the installation and specify what icons to create.
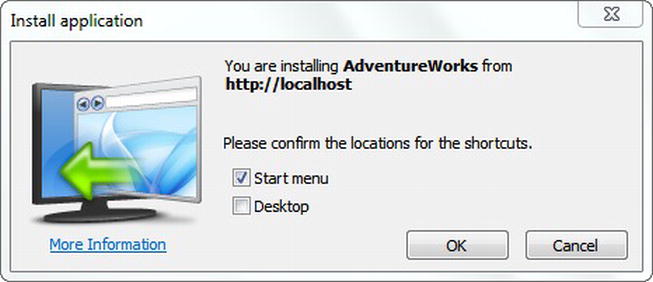
Figure 16-4. The “Install application” dialog
![]() Note If an icon was specified in the Out-of-Browser Settings dialog, it will be displayed in the dialog in place of the generic Silverlight application icon displayed in Figure 16-4.
Note If an icon was specified in the Out-of-Browser Settings dialog, it will be displayed in the dialog in place of the generic Silverlight application icon displayed in Figure 16-4.
A different dialog will be displayed when elevated trust permissions are being requested. This dialog will be discussed later in this chapter.
Determining Installation Status
You can determine whether or not the application is already installed by interrogating the InstallState property of the Application.Current object. This property returns an enumeration, with the following values:
NotInstalledInstalledInstallingInstallFailed
For example, the following code can be used to determine whether or not the application is installed:
bool isInstalled = (Application.Current.InstallState == InstallState.Installed);
You can determine when the installation status of the application changes by handling the InstallStateChanged event of the Application.Current object. Start by adding an event handler for the event:
Application.Current.InstallStateChanged += Application_InstallStateChanged;
Then, implement the event handler like so:
private void Application_InstallStateChanged(object sender, EventArgs e)

{

    // Handle the state change as required here

}
Within this event handler, you can interrogate the InstallState property of the Application.Current object to determine the new installation status of the application.
Determining Whether Running Inside or Outside the Browser
You can determine whether the application is running inside or outside the browser by interrogating the IsRunningOutOfBrowser property of the Application.Current object, for example:
bool isRunningOutOfBrowser = Application.Current.IsRunningOutOfBrowser;
If your application isn't designed to run inside the browser, you should use this property to detect whether the application is running inside the browser when it starts, and if so, display a view to the users from which they can install the application.
![]() Note Unfortunately, there is no way to launch the application in OOB mode from within the browser if it's already installed. Therefore, you will need to ask the user to do so manually if this is necessary.
Note Unfortunately, there is no way to launch the application in OOB mode from within the browser if it's already installed. Therefore, you will need to ask the user to do so manually if this is necessary.
Where/How Is the Application's .xap File Stored and Run?
When a Silverlight application is installed, a folder is created inside the user's profile folders to permanently store the application (outside of the browser's cache). This path will differ across operating systems, but on Windows Vista or 7 you can view the installed Silverlight applications by typing the following path into the Windows Explorer address bar: %userprofile%AppDataLocalLowMicrosoftSilverlightOutOfBrowser. Each installed application has its own folder under this, containing the .xap file for that application, along with a number of associated files—such as an HTML page to host it, an icon, and some metadata files.
The sllauncher.exe executable is used to host the Silverlight application when it is running in OOB mode. It is passed the ID of an application to launch like so:
sllauncher.exe appid
The application ID will match the name of the folder in the OOB store for that application. For example, the following command line demonstrates an example shortcut path to launch the application:
"C:Program FilesMicrosoft Silverlightsllauncher.exe" 1990526816.localhost
Interacting with the OOB Window
When your application is running in OOB mode, you can get a reference to the application's main window like so:
Window window = Application.Current.MainWindow;
This window object provides you with a number of properties, methods, and events that enable you to interact with and manipulate it.
![]() Note Many of these properties and methods are needed particularly when you have turned on custom chrome. Custom chrome is discussed in detail later in this chapter.
Note Many of these properties and methods are needed particularly when you have turned on custom chrome. Custom chrome is discussed in detail later in this chapter.
Closing the Window
Using the reference to the window, you can close it using its Close method:
Application.Current.MainWindow.Close();
You can detect when the window is being closed and prevent it from closing by handling its Closing event. Start by adding an event handler to the event:
Application.Current.MainWindow.Closing += MainWindow_Closing;
And then you can handle the event (and cancel the window being closed) like so:
private void MainWindow_Closing(object sender, ClosingEventArgs e)

{

    if (e.IsCancelable)

    {

        MessageBoxResult result = MessageBox.Show("Are you sure you wish to quit?",

                                    "AdventureWorks", MessageBoxButton.OKCancel);

        e.Cancel = (result != MessageBoxResult.OK);

    }

}
Window State, Position, and Dimensions
You can use the WindowState property of the window to maximize it, minimize it, or return it to its normal state. It accepts and returns an enumeration of type WindowState, which has the possible values Maximized, Minimized, and Normal. Here's an example:
Application.Current.MainWindow.WindowState = WindowState.Maximized;
You can set the size of the window using its Width and Height properties:
Application.Current.MainWindow.Width = 600;

Application.Current.MainWindow.Height = 800;
You can set the position of the window using its Top and Left properties. However, at runtime,
you can set these properties only if the “Set window location manually” check box was selected in the Out-Of-Browser Settings window shown in Figure 16-2, and the properties must be set before the end of the application's Startup event. After this, any changes to their values will be ignored.
Other Window Settings
You can set the window to be a topmost window, so it always appears on top of other windows whether or not it has the focus, by setting its TopMost property to true:
Application.Current.MainWindow.TopMost = true;
You can determine whether a window is active by interrogating its IsActive property, and you can activate it (i.e., bring it to the forefront of the various open windows and give it the focus) using its Activate method:
Application.Current.MainWindow.Activate();
![]() Note You do not have access to the HTML DOM using the
Note You do not have access to the HTML DOM using the HtmlPage object when running outside the browser as you do when running inside the browser.
Checking for Updates
One of the issues with running a Silverlight application outside the browser is that users are no longer requesting the application from the server. Normally, when browsing to a Silverlight application using a web browser, the browser will check if it has previously downloaded the .xap file by checking for it in its cache. If it doesn't find it, it will automatically download the .xap file from the server. If it does find it, it will check with the server as to whether the cached version matches the version on the server. That is, it will check to see whether it has the latest version already. If it does, it will just use the cached version, saving the need to download it again. Otherwise, it will download the new version, overwriting the now out-of-date cached version before running it.
![]() Note You can see this caching behavior by using the free Fiddler tool, which you can download from
Note You can see this caching behavior by using the free Fiddler tool, which you can download from www.fiddler2.com.
However, when running in OOB mode, the .xap file is simply loaded from its installation location on disk, meaning that it will not be updated as new versions become available on the server. Therefore, a strategy needs to be implemented to ensure that the installed application is kept up to date. Luckily, Silverlight has some functionality built-in to help you do that. You can determine whether an update is available by using the following line of code:
Application.Current.CheckAndDownloadUpdateAsync();
With this method call, the application will go back to the URL that it originated from and see whether a new version of the application is available. If an update is found, it will be automatically downloaded and installed just prior to when the application is next run. This action is performed asynchronously, and thus does not have a return value.
You can determine whether or not an update was found by handling the CheckAndDownloadUpdateCompleted event. Start by assigning an event handler to the event:
Application.Current.CheckAndDownloadUpdateCompleted +=

    Application_CheckAndDownloadUpdateCompleted;
You can then handle the event like so:
private void Application_CheckAndDownloadUpdateCompleted(object sender,

                                        CheckAndDownloadUpdateCompletedEventArgs e)

{

    if (e.UpdateAvailable)

    {

        // Logic can go here

    }

}
![]() Note You can determine whether an error occurred when checking for an update by interrogating the
Note You can determine whether an error occurred when checking for an update by interrogating the Error property of the CheckAndDownloadUpdateCompletedEventArgs object passed into the event handler as a parameter.
If an update is found, it won't be installed until the application is next restarted. It's your decision as to whether to force the user to restart the application, perhaps by preventing the users from using the application until it is restarted, or allow the users to continue working with the existing version.
You may choose to automatically perform a check for updates each time the application is started, or alternatively, you can simply provide a feature that enables the users to check for updates at their leisure.
![]() Note When running the application in OOB mode with elevated trust (described later in this chapter), the application will automatically update itself only if the application is signed. You won't see this behavior when the source of the update is
Note When running the application in OOB mode with elevated trust (described later in this chapter), the application will automatically update itself only if the application is signed. You won't see this behavior when the source of the update is localhost, because updates are permitted in this scenario for development purposes. However, once you deploy the application to production, it must be signed to be able to update itself. Application signing is covered in Chapter 17.
Debugging in OOB Mode
When you run your Silverlight project in debugging mode in Visual Studio, the application is run within a browser window. However, at times, you want to debug your application while it is running in OOB mode—especially when you want to debug features that aren't available when the application is running inside the browser.
To configure the application to launch in OOB mode from Visual Studio, you need to
- Enable OOB support for your Silverlight application, as previously detailed.
- Set the Silverlight project as the startup project for the solution (instead of the Web project).
The Silverlight application will start in OOB mode with the debugger attached, enabling you to debug the application as required.
 Note Without OOB support configured for the application, simply setting the Silverlight project as the startup project will run it within the browser instead, using a file path. If you find that this is the case, and that the application is still running within the browser, check to ensure that you've configured to application to support OOB mode.
You can also attach the Visual Studio debugger to an already running instance of the application running in OOB mode, and debug it in that manner, like so:
- In Visual Studio, start by going to Tools
 Attach To Process.
 - In the dialog window that appears, scroll down the list of available processes until you find the
sllauncher.exeprocess (the Silverlight launcher process discussed earlier in this chapter). If there is more than one listed, look for the one with the title that matches that of the Silverlight application that you want to debug. - Click the Attach button. The Visual Studio debugger will attach to the application and enable you to debug it as required.
Uninstalling the Application
When you no longer want a Silverlight application installed on your machine, you can remove it in one of two ways. The first is by simply right-clicking anywhere within the application's window and selecting “Remove this application” from the context menu. The other method is to use the operating system's uninstall application tool (such as Windows Vista or 7's Programs and Features tool). The application will appear as an entry in that tool, and you will be able to uninstall it as you would any other application.
![]() Note You cannot uninstall the application through code.
Note You cannot uninstall the application through code.
Toast Notifications
Silverlight 4 introduced the ability to display toast notifications; these are the little windows that pop up for a couple of seconds, usually in the bottom-right corner of your screen, to notify you of something that has happened in the application.
For example, Microsoft Outlook displays a toast notification when a new e-mail is received, and TweetDeck (a popular Twitter client) displays a toast notification when a new tweet appears in your Twitter feed. Toast notifications in Silverlight enable you to implement this same sort of notification in your Silverlight applications. For example, you might like to display a notification when an order is placed in the system or when a product is getting low in stock. An example of a simple notification window is shown in Figure 16-5.
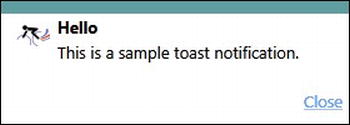
Figure 16-5. A simple toast notification window
![]() Note You can display toast notifications only when the application is running in OOB mode or when it's running with elevated trust permissions inside the browser. Attempting to do so otherwise will throw an exception, so you should always check to ensure that the application meets these criteria before attempting to show a toast notification, like so:
Note You can display toast notifications only when the application is running in OOB mode or when it's running with elevated trust permissions inside the browser. Attempting to do so otherwise will throw an exception, so you should always check to ensure that the application meets these criteria before attempting to show a toast notification, like so:
if (App.Current.IsRunningOutOfBrowser || App.Current.HasElevatedPermissions)

{

    // Show toast notification

}
To display a toast notification, you create an instance of the NotificationWindow class and assign it some content. Unfortunately, you cannot create a XAML file that inherits from the NotificationWindow class as it is sealed. You can, however, create a user control and assign an instance of that to the NotificationWindow class's Content property, which is the strategy that will be demonstrated here. Before we do, however, let's start by simply displaying an empty notification. To do so, you simply create a new instance of the NotificationWindow class, set the size of the toast notification window, and call its Show method, passing it the amount of time in milliseconds to display the notification, like so:
NotificationWindow toastWindow = new NotificationWindow();

toastWindow.Width = 280;

toastWindow.Height = 100;

toastWindow.Show(4000);
Running this code will result in a small window appearing in the bottom right-hand side of the screen and automatically disappearing after 4 seconds.
![]() Note Toast notifications can be displayed for a maximum of 30 seconds (30,000 milliseconds) and are limited to a maximum width of 400 pixels and a maximum height of 100 pixels.
Note Toast notifications can be displayed for a maximum of 30 seconds (30,000 milliseconds) and are limited to a maximum width of 400 pixels and a maximum height of 100 pixels.
An empty notification window is of little use, so let's display some content in it. You do so by assigning a control to its Content property. The easiest way to implement the content of a toast notification is to create a user control in your project, design the content in its XAML file, and then assign an instance of the user control to the NotificationWindow object's Content property, for example:
toastWindow.Content = new MessageArrivedNotification();
If your application is in the background and showing the notification window to get itself noticed, a good idea is to activate the main window when the notification window is clicked to bring your application to the front. You can implement this by handling the MouseLeftButtonDown event of the user control and activating the main window in the event handler:
private void UserControl_MouseLeftButtonDown(object sender, MouseButtonEventArgs e)

{

    Application.Current.MainWindow.Activate();

}
It can also be a good idea to provide a way to close the notification window so that the user can dismiss the notification and continue working. The NotificationWindow object has a Close method, but you need that object to call the method on, which you don't have in the user control unless you want to trawl through the visual tree hierarchy to get it. The simple solution to this is to accept a NotificationWindow object in the user control's constructor, which it can then stash away as a member variable for later use, and pass this through when the object is being created.
toastWindow.Content = new MessageArrivedNotification(toastWindow);
You can then call the Close method on this object from within the user control as required.
![]() Note You may also wish to pass the constructor an object containing data that the notification window can display if required.
Note You may also wish to pass the constructor an object containing data that the notification window can display if required.